Codacy vs Veracode: Code Quality vs Enterprise AppSec
Codacy screenshot

Quick Verdict

Codacy screenshot
Veracode screenshot

Codacy and Veracode are not in the same product category. Codacy is a developer-oriented code quality platform that includes security scanning as part of a broader code health offering. Veracode is an enterprise application security testing platform built for CISOs, security directors, and AppSec teams. Comparing them directly is like comparing a Swiss Army knife to a professional-grade power tool – one provides versatile coverage across many dimensions, the other provides deep capability in a specific domain.

The fundamental difference: Codacy answers the question “Is our code clean, well-tested, and reasonably secure?” Veracode answers the question “Does our application have exploitable vulnerabilities that could lead to a data breach?” These are related but distinct concerns, and the tools reflect that distinction in every design decision – from pricing ($15/user/month vs. $15,000+/year) to setup time (10 minutes vs. weeks) to target buyer (engineering leads vs. CISOs).

Choose Codacy if: you are a development team that needs a single affordable platform for code quality enforcement, coverage tracking, basic security scanning (SAST, SCA, secrets), and AI-powered code review. You want to ship cleaner code with fewer bugs and reasonable security coverage without enterprise procurement overhead. You value setup simplicity, predictable per-user pricing, and the ability to scan AI-generated code with the free AI Guardrails IDE extension.

Choose Veracode if: you are an enterprise security team that needs deep application security testing – binary SAST, DAST with AI-assisted authentication, SCA with behavioral supply chain analysis, compliance reporting aligned to PCI DSS, HIPAA, FedRAMP, and GDPR, developer security training at scale, and auditor-recognized certification. Your security program has budget, headcount, and compliance mandates that require enterprise-grade tooling.

If your organization needs both code quality and deep security: Use both. Codacy and Veracode have minimal feature overlap, and running them together provides comprehensive coverage. Or pair Codacy with a more affordable security tool like Snyk or Semgrep if Veracode’s pricing exceeds your budget.

At-a-Glance Feature Comparison

Category Codacy Veracode
Primary focus Code quality + basic security Enterprise application security
Target buyer Engineering leads, dev teams CISOs, AppSec teams, compliance officers
SAST approach Source code analysis (embedded engines) Binary-level + source code analysis
SAST languages 49 languages 30+ languages
DAST ZAP-powered (Business plan) AI-assisted auth DAST (dedicated product)
SCA Included in Pro plan Phylum behavioral analysis (dedicated product)
Secrets detection Yes Yes
Container scanning No Yes
IaC scanning Limited Yes
AI code review AI Reviewer (hybrid rule + AI) None (Veracode Fix is remediation only)
AI code governance AI Guardrails (free IDE extension) None
AI remediation AI Reviewer suggestions Veracode Fix (AI-powered)
Code quality analysis Yes – patterns, complexity, duplication No
Code coverage tracking Yes No
Quality gates Customizable thresholds on PRs No (security policy gates only)
Developer training No Security Labs (hands-on training)
Compliance certification No Verified by Veracode
Compliance reporting Basic (OWASP, SANS mapping) Deep (PCI DSS, HIPAA, SOC 2, FedRAMP, GDPR)
Free tier AI Guardrails IDE extension No
Starting paid price $15/user/month (Pro) ~$15,000/year (SAST only)
Setup time Under 10 minutes Weeks to months (enterprise deployment)
Git platforms GitHub, GitLab, Bitbucket GitHub, GitLab, Bitbucket, Azure DevOps
Self-hosted Business plan (premium pricing) Cloud-primary, on-premises available

What Is Codacy?

Codacy is an automated code quality and security platform trusted by over 15,000 organizations and 200,000 developers. Founded as a cloud-native code quality service, Codacy has evolved into a comprehensive developer platform that packages code quality analysis, SAST, SCA, DAST, secrets detection, code coverage tracking, duplication detection, and AI-powered code review into a single product with predictable per-user pricing.

Codacy’s design philosophy centers on developer accessibility. The platform connects to GitHub, GitLab, or Bitbucket and begins scanning pull requests automatically without any CI/CD pipeline configuration. Analysis runs on Codacy’s infrastructure, eliminating the need for build pipeline integration for basic scanning. This pipeline-less approach is the fastest setup experience in the code quality category – most teams go from signup to first analysis results in under 10 minutes.

The platform supports 49 programming languages through a strategy of embedding multiple third-party analysis engines – ESLint, Pylint, PMD, SpotBugs, Bandit, Gosec, and dozens of other language-specific analyzers – rather than building a single proprietary rule engine. This gives Codacy broad language coverage with the analysis depth of each embedded tool.

Codacy’s AI capabilities include three interconnected features. AI Guardrails is a free IDE extension for VS Code, Cursor, and Windsurf that scans code – including AI-generated code – in real time and auto-remediates issues before they are committed. AI Reviewer combines deterministic rule-based analysis with context-aware AI reasoning that draws on changed files, PR descriptions, and linked Jira tickets. AI Risk Hub (Business plan) provides organizational-level visibility into AI code risk.

Pricing is straightforward: the free Developer tier includes AI Guardrails. The Pro plan costs $15/user/month with unlimited scans, repos, and lines of code, and includes SAST, SCA, secrets detection, coverage tracking, duplication detection, and quality gates. The Business plan adds DAST, self-hosted deployment, SSO/SAML, and the AI Risk Hub at custom pricing.

Codacy is a G2 Leader for Static Code Analysis as of 2025, and is positioned as a modern, affordable alternative to heavier platforms like SonarQube for teams that want quality and basic security in a single tool.

What Is Veracode?

Veracode is an enterprise application security testing platform founded in 2006 in Burlington, Massachusetts. Veracode has been a Gartner Magic Quadrant Leader for Application Security Testing for 11 consecutive years – the longest streak of any vendor in the category. The company serves over 2,500 customers globally and has scanned over 37 trillion lines of code.

Veracode’s technical differentiator is binary-level SAST analysis – the ability to scan compiled artifacts (JARs, DLLs, WARs, executables) without requiring access to the original source code. This approach analyzes the actual compiled representation of the application, catching certain vulnerability classes that source-code-only tools may miss while enabling scanning of third-party components, acquired codebases, and legacy applications where source code may be unavailable or lost.

The Veracode platform covers multiple security testing dimensions. Veracode SAST performs binary and source code static analysis across 30+ languages, with Pipeline Scan providing a lightweight CLI for fast CI/CD integration. Veracode DAST tests running web applications with AI-assisted authentication handling that navigates complex login flows automatically. Veracode SCA scans open-source dependencies using Phylum behavioral analysis technology that sandbox-executes packages to detect malicious behavior beyond CVE database matching. Package Firewall blocks malicious packages at the repository level.

Veracode Fix is the AI-powered remediation engine that generates code fix suggestions for identified vulnerabilities, reportedly reducing fix time by up to 92%. Veracode Security Labs provides interactive, hands-on developer security training in containerized lab environments – a unique capability among AppSec platforms. The Verified by Veracode certification program provides third-party attestation that auditors in regulated industries recognize as evidence of a mature security program.

Veracode’s compliance reporting covers PCI DSS, HIPAA, SOC 2, NIST 800-53, FedRAMP, and GDPR. The platform generates audit-ready reports that align with regulatory framework requirements.

Pricing reflects Veracode’s enterprise positioning. SAST alone starts at approximately $15,000-$25,000/year for a single application. The full enterprise platform with SAST, DAST, SCA, Security Labs, and compliance features ranges from $50,000 to $250,000+ annually depending on application count and developer seats.

Feature-by-Feature Breakdown

SAST: Source Analysis vs. Binary Analysis

This is the most fundamental technical difference between the two platforms and reflects their entirely different design philosophies.

Codacy’s SAST performs source-code analysis using embedded third-party engines across 49 languages. When a developer opens a pull request, Codacy runs the relevant analyzers against the changed code and posts inline comments with severity ratings and remediation guidance. The analysis detects common vulnerability patterns – injection flaws, authentication issues, cryptographic weaknesses, insecure data handling – alongside code quality issues. The strength is breadth: 49 languages covered, combined quality and security findings in a single scan, and zero CI/CD configuration required for basic scanning.

The limitation is depth. Codacy’s security analysis depends on the capabilities of the embedded engines rather than a purpose-built security scanning engine. Complex multi-file vulnerability chains – where tainted input enters the application in one method and reaches a dangerous sink several layers deeper – are harder for Codacy to detect compared to dedicated SAST engines.

Veracode’s SAST performs both binary and source-level analysis using a proprietary scanning engine refined over nearly two decades. The binary analysis approach is unique: applications are compiled and the resulting artifacts (JARs, DLLs, WARs) are uploaded to the Veracode cloud for analysis. The scanner examines bytecode, MSIL, and native binaries to detect vulnerabilities in the compiled representation of the code. This catches certain vulnerability classes that source-only tools miss – compiler-introduced issues, runtime behavior patterns visible in bytecode, and vulnerabilities in the interaction between compiled modules.

The critical advantage of binary analysis is scanning without source code. Third-party vendor libraries, acquired codebases during M&A due diligence, legacy applications where build environments no longer exist – Veracode can analyze all of these. No other major SAST vendor provides this capability.

The tradeoffs are speed and source mapping. Binary analysis requires compilation and upload, making the scan cycle slower than source-level analysis. Full platform scans can take hours for large applications. Pipeline Scan mitigates this for CI/CD workflows by providing faster results, but the overall scanning experience is slower than Codacy’s automatic PR-level analysis. Additionally, mapping binary-level findings back to specific source code lines can be less precise than source-level analysis.

Bottom line on SAST: Veracode provides deeper, more mature security-focused SAST with the unique ability to scan compiled artifacts. Codacy provides broader language coverage with combined quality and security analysis at a fraction of the cost. Teams that need enterprise-grade vulnerability detection – especially for compiled or third-party code – need Veracode. Teams that need “good enough” security scanning alongside code quality enforcement will find Codacy sufficient.

SCA: Basic Coverage vs. Behavioral Analysis

Both tools include Software Composition Analysis, but the depth and approach differ substantially.

Codacy’s SCA is included in the Pro plan at $15/user/month. It scans dependency manifests (package.json, requirements.txt, pom.xml, and others) to identify known vulnerabilities in open-source packages, tracks CVEs across the dependency tree, and alerts teams to newly disclosed vulnerabilities. The SCA findings appear alongside code quality and SAST results in the same PR review, providing a unified view of all code health concerns.

Codacy’s SCA is effective for basic dependency vulnerability alerting but does not match the depth of dedicated SCA platforms. It does not include reachability analysis (determining whether vulnerable code paths in dependencies are actually called by your application), behavioral analysis for detecting malicious packages, or automated remediation PR generation.

Veracode’s SCA is a dedicated product with significantly deeper capabilities. The integration of Phylum behavioral analysis technology sets it apart from most SCA tools. Traditional SCA matches package versions against CVE databases. Veracode’s behavioral analysis sandbox-executes packages to detect malicious behavior – data exfiltration, reverse shell establishment, credential theft, and cryptocurrency mining – regardless of whether the package matches a known CVE. This addresses zero-day supply chain attacks that exploit novel techniques undetectable by database-only approaches.

Package Firewall extends this protection proactively by blocking malicious or vulnerable packages at the repository level before they enter your dependency tree. Veracode SCA also includes license compliance checking and SBOM generation in SPDX and CycloneDX formats.

The accessibility gap matters: Codacy includes SCA in a $15/user/month plan. Veracode SCA is a separate product that typically starts at approximately $12,000/year and is most commonly purchased as part of the enterprise platform bundle. For teams that need basic dependency vulnerability alerts, Codacy’s included SCA provides real value without additional cost. For teams that need supply chain protection against sophisticated attacks, Veracode’s behavioral analysis is in a different league – but at a different price point.

DAST: ZAP-Powered vs. AI-Assisted

Codacy’s DAST is powered by ZAP (Zed Attack Proxy) and is available on the Business plan at custom pricing. It tests running applications for runtime vulnerabilities – authentication bypasses, configuration errors, injection attacks, and other issues that static analysis cannot detect. The DAST capability is functional but positioned as a complementary feature within Codacy’s broader platform, not as a dedicated DAST product.

Veracode’s DAST is a standalone enterprise product with significant investment in reducing DAST deployment friction. The standout feature is AI-assisted authentication handling that automatically navigates complex login flows – multi-step authentication, OAuth redirects, CAPTCHA challenges, and custom login forms. Authentication is the number one barrier to effective DAST scanning because if the scanner cannot log in, it only tests the unauthenticated attack surface, missing the majority of application functionality where critical vulnerabilities typically reside.

Veracode DAST also integrates API security testing, scanning REST and SOAP APIs for common API vulnerability classes. The maturity of Veracode’s DAST reflects nearly two decades of development and a large enterprise customer base providing feedback on edge cases.

The practical difference: Codacy’s DAST is a “check the box” capability – it provides basic dynamic testing within a broader platform. Veracode’s DAST is a specialized security testing product that security teams rely on for compliance and thorough runtime vulnerability assessment. Teams with serious DAST requirements should choose Veracode or a dedicated DAST tool. Teams that want basic dynamic testing as an add-on to their code quality workflow may find Codacy’s Business plan sufficient.

Developer Experience

Codacy is built for developers. Veracode is built for security teams. This distinction shapes every aspect of the user experience.

Codacy’s developer experience prioritizes speed and simplicity. Setup requires connecting a Git platform and selecting repositories – no CI/CD configuration, no build pipeline changes, no infrastructure provisioning. Analysis begins automatically on the next pull request. Results appear as inline PR comments with severity ratings, descriptions, and suggested fixes. The AI Reviewer adds context-aware feedback that considers the full PR – changed files, descriptions, linked tickets. Quality gates enforce minimum standards without requiring developers to visit a separate dashboard.

The AI Guardrails IDE extension provides real-time scanning in VS Code, Cursor, and Windsurf, catching issues – including in AI-generated code – before they reach a commit. The extension is free for all developers, lowering the barrier to adoption.

Veracode’s developer experience has improved significantly but still reflects its enterprise security origins. Pipeline Scan provides a lightweight CLI that runs in CI/CD pipelines and returns results in minutes rather than hours. Veracode Fix generates AI-powered remediation suggestions that reduce the time from vulnerability discovery to fix. IDE plugins for VS Code and IntelliJ provide real-time feedback during development.

However, the core platform is designed for security analysts who triage hundreds of findings across dozens of applications, not for individual developers fixing issues in their PR. Full SAST scans are too slow for per-PR scanning in most pipelines. The initial onboarding process involves sales engagement, application registration, policy configuration, and build pipeline integration – a process measured in weeks, not minutes. Developers who have used Codacy, Snyk, or Semgrep will notice the friction difference immediately.

Veracode Security Labs partially compensates for the developer experience gap by training developers to avoid vulnerabilities in the first place. The interactive, hands-on training modules cover OWASP Top 10, language-specific security patterns, and real-world scenarios. This is a genuinely differentiated capability – no other AppSec platform provides the same depth of developer training. But training is not a substitute for a frictionless scanning experience.

Bottom line on developer experience: If developer adoption and inner-loop speed are priorities, Codacy wins decisively. If the goal is enterprise security program effectiveness with developer training as a strategic investment, Veracode’s approach – accepting developer friction in exchange for security depth and compliance – is the deliberate tradeoff.

Compliance and Certification

Codacy provides basic compliance coverage. Its SAST and SCA findings map to OWASP Top 10 and SANS Top 25 vulnerability categories. Quality dashboards show security trends over time. But Codacy does not generate audit-ready compliance reports aligned to specific regulatory frameworks, does not offer compliance certification programs, and does not provide the policy management depth that regulated industries require.

Veracode provides enterprise-grade compliance capabilities. Findings map to PCI DSS, HIPAA, SOC 2, NIST 800-53, FedRAMP, and GDPR. The platform generates reports formatted for auditor consumption, with evidence trails that demonstrate security testing cadence, remediation timelines, and policy adherence.

The Verified by Veracode certification program is unique in the AppSec market. It provides third-party attestation that an application meets defined security standards. Auditors in financial services, healthcare, and government recognize this certification as evidence of a mature application security program. For organizations undergoing regular security audits, presenting a Veracode certification simplifies the evidence-gathering process and accelerates audit completion.

Policy-based compliance management allows security teams to define requirements per application – mandatory scan types, minimum scan frequencies, maximum allowed vulnerability severities, and remediation SLAs. Different applications can have different policies based on their risk classification (critical customer-facing applications vs. internal tools), providing granular governance at enterprise scale.

The gap is substantial. Codacy’s compliance coverage is adequate for teams that need to demonstrate basic security hygiene. Veracode’s compliance capabilities are designed for organizations where regulatory compliance is a board-level concern, audit failure has material business consequences, and the security team needs to produce evidence that satisfies external auditors. For regulated industries – financial services, healthcare, government, defense – Veracode’s compliance depth is in a category that Codacy does not compete in.

CI/CD Integration

Codacy’s pipeline-less approach is its most distinctive operational advantage. Connect your repository, and Codacy begins scanning every commit and pull request automatically without any changes to your CI/CD configuration. There is no YAML to write, no scanner to install, and no build step to add. Analysis runs on Codacy’s infrastructure. For teams that want advanced features like code coverage tracking, CI/CD integration is needed to upload coverage reports, but the core scanning experience requires zero pipeline configuration.

Codacy supports GitHub Actions, GitLab CI, and Bitbucket Pipelines for advanced integrations and coverage uploads. The CLI tool provides flexibility for custom workflows.

Veracode requires explicit CI/CD integration. Applications must be compiled, packaged, and uploaded to the Veracode platform for analysis. Pipeline Scan provides a lightweight CLI that integrates into any CI/CD system – GitHub Actions, GitLab CI, Jenkins, Azure Pipelines, CircleCI, and others. The CLI runs policy-based scans and returns pass/fail results that can gate deployments.

Full platform scans are typically triggered from CI/CD but run asynchronously on Veracode’s cloud infrastructure. Results appear in the Veracode dashboard, and findings can be routed to issue trackers. The integration is well-documented but requires dedicated setup effort – configuring API credentials, defining scan profiles, setting up result routing, and establishing policy gates.

One significant platform difference: Veracode supports Azure DevOps natively. Codacy does not. For organizations standardized on Azure DevOps, this eliminates Codacy from consideration.

The tradeoff: Codacy’s automatic scanning is faster to deploy and requires less ongoing maintenance. Veracode’s explicit integration provides more control over scan timing, scope, and policy enforcement. For enterprise security programs that need precise control over when and how applications are scanned, Veracode’s approach is an advantage. For development teams that want scanning to happen transparently, Codacy’s approach is simpler.

Pricing Comparison

Codacy Pricing

Plan Price What You Get
Developer (Free) $0 AI Guardrails IDE extension for VS Code, Cursor, Windsurf
Pro $15/user/month Unlimited scans, repos, LOC. AI Guardrails + AI Reviewer. SAST, SCA, secrets detection. Coverage, duplication, quality gates. GitHub, GitLab, Bitbucket integration
Business Custom Everything in Pro + DAST (ZAP-powered), AI Risk Hub, self-hosted option, SSO/SAML, audit logs, dedicated support

Veracode Pricing

Product Estimated Annual Cost What You Get
SAST only ~$15,000-$25,000/year Binary + source SAST, 30+ languages, Pipeline Scan, Veracode Fix
SCA only ~$12,000/year Dependency scanning, Phylum behavioral analysis, Package Firewall, SBOM generation
DAST only ~$20,000/year Automated web app scanning, AI-assisted authentication, API testing
Enterprise Platform $50,000-$250,000+/year All SAST, DAST, SCA. Container + IaC scanning. Security Labs training. Compliance management. Consulting services

Side-by-Side Cost Analysis

Team Size / Scenario Codacy Cost (Annual) Veracode Cost (Annual) Notes
5-person startup $900 (Pro) Not practical Veracode’s minimum pricing exceeds most startup budgets
10 developers, 5 apps $1,800 (Pro) ~$30,000-$50,000 (SAST + SCA) 17-28x cost difference
20 developers, 10 apps $3,600 (Pro) ~$50,000-$100,000 (platform) 14-28x cost difference
50 developers, 25 apps $9,000 (Pro) ~$100,000-$175,000 (platform) 11-19x cost difference
100 developers, 50 apps $18,000 (Pro) ~$150,000-$250,000+ (platform) 8-14x cost difference

Key Pricing Observations

The cost difference is not about value – it is about category. Codacy and Veracode are priced for different markets. Codacy’s $15/user/month targets development teams that want code quality with security features included. Veracode’s enterprise pricing targets security programs with dedicated budgets, headcount, and compliance mandates. Comparing their prices directly is misleading because you are comparing a code quality tool with basic security to a full enterprise security platform.

Codacy’s per-user pricing is predictable. Your bill scales linearly with team size regardless of codebase size, application count, or scan frequency. There are no surprises as your codebase grows or as you add applications. For growing companies, this predictability simplifies budgeting.

Veracode’s pricing requires a sales conversation. There is no self-service signup, no published price list, and no way to evaluate the tool without engaging the sales team. This reflects Veracode’s enterprise positioning but creates a barrier for teams that want to evaluate before committing. Multi-year contracts (2-3 years) typically yield 15-30% discounts.

Factor in the total cost of ownership. Veracode’s license cost is only part of the investment. Enterprise deployment requires security analyst time for result triage and false positive management (2-4 weeks initially), application onboarding and policy configuration, CI/CD integration setup, ongoing training for development teams, and dedicated security team headcount to manage the platform. These operational costs can equal or exceed the license cost in the first year.

Codacy’s free tier provides real value. The AI Guardrails IDE extension is genuinely free – not a trial, not a feature-limited version, but a standalone tool that any developer can use indefinitely. Veracode has no free tier for scanning capabilities, though the Security Labs Community Edition provides free developer training.

Use Cases: When to Choose Each Tool

Choose Codacy When

Your primary concern is code quality, not enterprise security compliance. If your team needs to enforce coding standards, track test coverage, reduce duplication, manage complexity, and prevent technical debt accumulation – with security scanning as a useful bonus rather than the central requirement – Codacy provides all of this at $15/user/month. The quality gates, coverage tracking, and duplication detection that Codacy provides are capabilities Veracode does not offer at all.

You need a single affordable platform for a small to mid-size team. Instead of assembling separate tools for code quality, security scanning, coverage tracking, and AI review, Codacy covers all of these in one product. For teams of 5-50 developers without dedicated security staff, the operational simplicity of a single vendor and dashboard has real value.

Speed of setup and developer adoption matter. Codacy’s pipeline-less approach means scanning begins in under 10 minutes. Developers see results in their PRs without changing their workflow. AI Guardrails catches issues in the IDE before code is committed. This low-friction approach drives adoption rates that enterprise security tools struggle to match.

Your team generates significant AI code. If your developers use GitHub Copilot, Cursor, or Windsurf extensively, Codacy’s AI Guardrails is specifically designed to scan AI-generated code in real time. The free IDE extension catches security and quality issues before AI-generated code reaches a commit – a workflow that no other code quality platform matches at this price point.

Budget is constrained and Veracode-class tooling is out of reach. For teams that need security scanning but cannot justify $15,000+/year for a dedicated security platform, Codacy’s included SAST, SCA, and secrets detection provide meaningful security coverage. The coverage is not as deep as Veracode’s, but for applications that are not handling highly sensitive data or subject to regulatory compliance, it is often sufficient.

Codacy is not ideal if: you need enterprise-grade compliance reporting (PCI DSS, HIPAA, FedRAMP), binary SAST for scanning compiled code without source, developer security training at scale, auditor-recognized certification, or the depth of DAST and SCA that dedicated security platforms provide.

Choose Veracode When

Application security is a board-level concern with dedicated budget. If your organization has a CISO, an AppSec team, and security testing mandates from leadership or regulators, Veracode is designed for this operating model. The platform provides the depth, governance, compliance reporting, and audit trail that enterprise security programs require.

You operate in a regulated industry. Financial services, healthcare, government, and defense organizations subject to PCI DSS, HIPAA, SOC 2, FedRAMP, NIST, or GDPR need compliance reporting that maps security findings to specific regulatory requirements. Veracode’s compliance capabilities, audit-ready reports, and the Verified by Veracode certification program directly address these needs. Codacy cannot match this compliance depth.

Binary analysis is a requirement. If you need to scan third-party vendor code, acquired codebases during M&A due diligence, legacy applications without available source, or compiled artifacts for security assurance, Veracode’s binary SAST is the only enterprise option. Codacy requires source code access and cannot analyze compiled artifacts.

Developer security training at scale is part of your strategy. If your security program includes reducing vulnerability introduction rates through developer education, Veracode Security Labs provides the most comprehensive hands-on training platform in the AppSec market. The training covers OWASP Top 10, language-specific security, and real-world vulnerability scenarios. This addresses the root cause of vulnerabilities – developer knowledge gaps – rather than just finding issues after they are written.

You need DAST for complex web applications. If your applications use multi-step authentication, OAuth flows, or custom login mechanisms, Veracode’s AI-assisted DAST authentication navigates these flows automatically with less manual configuration than other DAST tools. This means more of your application surface gets scanned, including the authenticated portions where the most critical vulnerabilities typically reside.

Supply chain security against zero-day attacks matters. Veracode’s Phylum behavioral analysis detects malicious packages through sandbox execution – identifying data exfiltration, reverse shells, and credential theft regardless of whether the package matches a known CVE. If software supply chain security against novel attacks is a priority, Veracode’s approach goes beyond traditional CVE matching.

Veracode is not ideal if: you need code quality features (patterns, complexity, duplication, coverage), you have a small team with limited budget, you want the fastest possible setup, or you prioritize developer experience over security depth. Veracode does not provide any code quality capabilities, and its developer experience trails developer-first tools significantly.

Migration Considerations

Moving from Codacy to Veracode

This migration happens when organizations outgrow Codacy’s security capabilities – typically when they enter regulated markets, experience security incidents, or face audit requirements that demand enterprise-grade AppSec tooling.

Before migrating, understand what you will lose:

  1. Code quality features disappear entirely. Veracode does not provide code quality analysis, pattern detection, complexity tracking, duplication detection, coverage monitoring, or quality gates. You will need to keep Codacy (or add SonarQube or another quality tool) to maintain code quality enforcement.
  2. Setup simplicity disappears. Codacy’s pipeline-less approach requires no CI/CD configuration. Veracode requires build pipeline integration, application registration, policy configuration, and security team training. Plan for weeks of deployment effort.
  3. Cost increases substantially. Moving from $3,600/year (20 developers on Codacy Pro) to $50,000+/year (Veracode platform) is a significant budget shift that requires executive approval and security budget allocation.
  4. AI Guardrails has no Veracode equivalent. If your team relies on real-time IDE scanning of AI-generated code through Codacy Guardrails, there is no comparable feature in Veracode. SonarLint (from SonarQube) provides IDE-level analysis but does not specifically target AI-generated code.

The practical approach: Do not replace Codacy with Veracode – supplement it. Keep Codacy for code quality and add Veracode for deep security. The tools have minimal overlap, and running both provides comprehensive coverage that neither achieves alone.

Moving from Veracode to Codacy

This migration is rare and typically happens when organizations determine they were over-invested in security tooling relative to their actual risk profile – or when budget cuts force consolidation.

Before migrating, understand the risks:

  1. Security depth decreases dramatically. Codacy’s SAST, SCA, and DAST are functional but do not match the depth of Veracode’s scanning engines, binary analysis, behavioral SCA, or AI-assisted DAST authentication. If your organization processes sensitive data or operates in a regulated industry, this downgrade may create unacceptable risk.
  2. Compliance capabilities are lost. Veracode’s regulatory compliance reporting, audit-ready reports, and the Verified by Veracode certification cannot be replicated with Codacy. If your organization relies on these for audit compliance, the migration is not viable without an alternative compliance mechanism.
  3. Developer training is lost. Veracode Security Labs has no equivalent in Codacy. You would need a separate training solution to maintain developer security education.
  4. Binary analysis capability is lost. If you scan third-party or legacy code that lacks source, Codacy cannot replace this capability.

The practical recommendation: If budget is the driving factor, consider replacing Veracode with a more affordable dedicated security tool like Snyk or Semgrep rather than relying on Codacy’s built-in security features as a substitute for enterprise AppSec. Codacy plus Snyk at approximately $9,600/year for 20 developers provides stronger combined coverage than Codacy alone.

Starting Fresh – Building Your Toolchain

For organizations choosing tools for the first time, here is a practical decision framework based on your primary concern:

If code quality is your primary concern and security is secondary: Start with Codacy Pro ($15/user/month). You get code quality enforcement, basic SAST, SCA, secrets detection, coverage tracking, and AI review in a single tool. Add a dedicated security tool later if your risk profile or compliance requirements grow.

If security is your primary concern and you have enterprise budget: Start with Veracode and add a code quality tool like Codacy or SonarQube alongside it. Veracode handles deep security scanning, compliance, and training. The quality tool handles code health, coverage, and developer-facing quality enforcement.

If you need both and want to minimize cost: Use Codacy Pro for code quality with basic security, and add Snyk ($25/developer/month for Team) for deeper security scanning. The combined cost of approximately $480/developer/year provides strong coverage across both domains for a fraction of Veracode’s starting price. See our Codacy vs Snyk comparison for how these two tools complement each other.

If you have zero budget: Use Codacy’s free AI Guardrails IDE extension for real-time code scanning, plus Snyk Free tier (100 SAST tests/month plus SCA, container, and IaC scans). This combination provides meaningful security and quality coverage at zero cost.

Alternatives to Consider

If neither Codacy nor Veracode perfectly matches your requirements, several other tools address different segments of the code quality and security spectrum.

For Code Quality (Codacy Alternatives)

SonarQube is the most direct alternative to Codacy for code quality. It provides 6,500+ deterministic analysis rules, the most mature quality gate enforcement in the market, and self-hosted deployment through the free Community Build. SonarQube’s analysis depth per language significantly exceeds Codacy’s, but it lacks Codacy’s AI Guardrails, AI Reviewer, and included SCA. For teams that prioritize analysis depth over breadth and AI features, SonarQube is the stronger quality tool. See our Codacy vs SonarQube comparison for a detailed breakdown.

For Enterprise Security (Veracode Alternatives)

Checkmarx is Veracode’s most direct competitor. Like Veracode, Checkmarx is a Gartner Magic Quadrant Leader for AST, offering SAST, DAST, SCA, API security, and compliance reporting. Checkmarx’s differentiator is CxQL – a custom SAST query language that allows security teams to write organization-specific rules. Checkmarx also offers stronger self-hosted deployment options. Veracode’s differentiators are binary analysis and Security Labs. See our Checkmarx vs Veracode comparison for the full enterprise-to-enterprise breakdown.

For Developer-First Security

Snyk provides SAST (Snyk Code), SCA with reachability analysis (Snyk Open Source), container scanning, and IaC scanning in a developer-friendly package. Snyk’s DeepCode AI engine provides deeper SAST than Codacy with faster scan times than Veracode. The free tier includes real scanning capabilities. For teams that want better security than Codacy provides but cannot justify Veracode’s enterprise pricing, Snyk at $25/developer/month fills the middle ground. See our Snyk vs Veracode comparison.

Semgrep is an open-source SAST engine with over 10,000 community rules. Semgrep Pro adds cross-file data flow analysis, secrets scanning, and SCA. The open-source core is free, and the commercial platform starts at $35/contributor/month. Semgrep’s strength is custom rule authoring using a developer-friendly YAML syntax. For teams that want maximum control over their security rules without enterprise pricing, Semgrep is the most flexible option.

For Combined Quality and Security

CodeRabbit is the best dedicated AI code review tool available. It does not replace either Codacy or Veracode but complements both by providing deeper, more contextual AI-powered PR review than either tool’s AI features. At $12/user/month with a generous free tier, CodeRabbit is worth considering as an addition to any security or quality toolchain.

For more alternatives to each tool, see our Codacy alternatives and Veracode alternatives guides. For a broader look at the SAST landscape, see our best SAST tools roundup.

Head-to-Head on Specific Scenarios

Scenario Better Choice Why
Enforcing code quality standards on PRs Codacy Veracode has no code quality features
Tracking test coverage and duplication Codacy Veracode does not track quality metrics
Detecting complex multi-file injection vulnerabilities Veracode Binary SAST with deep data flow analysis
Scanning compiled code without source access Veracode Binary analysis is unique to Veracode
Basic dependency vulnerability scanning Codacy SCA included in Pro plan at $15/user/month
Supply chain protection against zero-day attacks Veracode Phylum behavioral analysis goes beyond CVE matching
DAST for complex authenticated web apps Veracode AI-assisted authentication handling
Scanning AI-generated code in the IDE Codacy AI Guardrails (free) has no Veracode equivalent
PCI DSS / HIPAA / FedRAMP compliance reporting Veracode Deep regulatory mapping and audit-ready reports
Auditor-recognized security certification Veracode Verified by Veracode program
Developer security training at scale Veracode Security Labs with hands-on training modules
Fastest setup for a new team Codacy Under 10 minutes, no CI/CD configuration needed
AI-powered PR review with context awareness Codacy AI Reviewer uses PR metadata and Jira tickets
Container and IaC security scanning Veracode Codacy does not scan containers
Budget under $10,000/year for 20 developers Codacy $3,600/year vs. $50,000+/year
Azure DevOps integration Veracode Codacy does not support Azure DevOps
M&A due diligence code scanning Veracode Binary analysis for acquired codebases

Final Recommendation

Codacy and Veracode are not competitors. They are tools from different categories that happen to share some surface-level feature overlap in SAST and SCA. Choosing between them is not about which is “better” – it is about which problem you are trying to solve.

If your problem is code quality and you want security as a bonus: Choose Codacy. At $15/user/month, you get code quality analysis, coverage tracking, duplication detection, quality gates, SAST, SCA, secrets detection, and AI-powered review. The setup takes minutes, the pricing is predictable, and the developer experience is smooth. Codacy will not satisfy enterprise security auditors or detect the deepest vulnerability chains, but it will keep your code clean, well-tested, and free of common security issues. For the vast majority of development teams that are not in heavily regulated industries, this level of coverage is sufficient.

If your problem is enterprise application security: Choose Veracode. The binary SAST, AI-assisted DAST, behavioral SCA, compliance reporting, developer training, and certification program are designed for organizations where security is a strategic investment, not an afterthought. The pricing reflects enterprise value, the setup requires enterprise commitment, and the capabilities address enterprise requirements. But remember that Veracode provides zero code quality features – you will still need a quality tool alongside it.

For the most comprehensive coverage: Use both. Codacy handles code quality – patterns, duplication, complexity, coverage, quality gates, AI review. Veracode handles deep security – binary SAST, DAST, behavioral SCA, compliance, training, certification. The overlap between the two tools is minimal, and the combined coverage is stronger than any single platform provides. The combined cost (Codacy Pro at $3,600/year for 20 developers plus Veracode platform starting at $50,000/year) is significant, but organizations with serious security mandates typically have the budget to justify it.

For budget-conscious teams that need more security than Codacy alone: Pair Codacy with Snyk or Semgrep. Codacy handles quality, and the dedicated security tool handles deep vulnerability detection. The combined cost is a fraction of Veracode’s, and the coverage is stronger than Codacy alone. See our Codacy vs Snyk comparison for details on how these tools complement each other.

The question is not “Codacy or Veracode?” It is “What problem am I solving, and what is my budget?” Answer those two questions, and the right choice becomes clear.

Further Reading

Frequently Asked Questions

Is Codacy better than Veracode?

Codacy and Veracode serve fundamentally different audiences. Codacy is better for development teams that want a single, affordable platform covering code quality, basic security scanning (SAST, SCA, secrets, DAST), coverage tracking, and AI-powered code review at $15/user/month. Veracode is better for enterprise security teams that need deep application security testing with binary SAST analysis, AI-assisted DAST, compliance certifications (PCI DSS, HIPAA, FedRAMP), developer training (Security Labs), and the Verified by Veracode certification program. If your priority is code quality with security as a bonus, choose Codacy. If your priority is enterprise-grade application security, choose Veracode.

How much does Codacy cost compared to Veracode?

Codacy Pro costs $15/user/month with unlimited scans, repos, and lines of code. For a 20-developer team, that is $3,600/year. The Business plan with DAST and self-hosted options uses custom pricing. Veracode SAST alone starts at approximately $15,000-$25,000/year for a single application. The full enterprise platform with SAST, DAST, SCA, and Security Labs can range from $50,000 to $250,000+ per year depending on application count and developer seats. Codacy is roughly 5-50x cheaper depending on team and application size, but the two tools are not direct substitutes – Veracode’s enterprise security depth is in a different category.

Can Codacy replace Veracode?

Codacy cannot fully replace Veracode for organizations that need enterprise application security. Codacy lacks binary SAST analysis, developer security training, the Verified by Veracode certification program, and the depth of compliance reporting that Veracode provides. However, for organizations where code quality is the primary concern and basic security scanning is sufficient, Codacy’s SAST, SCA, and secrets detection may cover enough of the security dimension to avoid the cost of an enterprise platform like Veracode. Teams in regulated industries or handling highly sensitive data should not consider Codacy a substitute for Veracode.

Can Veracode replace Codacy?

Veracode cannot replace Codacy because it does not provide code quality features. Veracode does not detect code smells, enforce coding standards, track code coverage, measure code duplication, monitor complexity, or enforce quality gates on pull requests. Veracode is a security platform exclusively. If you replace Codacy with Veracode, you lose all code quality enforcement, which leads to accumulating technical debt even if your security posture is strong. The two tools serve different purposes and are complementary rather than interchangeable.

Does Veracode have code quality features like Codacy?

No. Veracode is exclusively an application security testing platform. It does not provide code quality analysis, pattern detection, coding standards enforcement, complexity tracking, duplication detection, coverage monitoring, or quality gates. Veracode focuses on finding security vulnerabilities through SAST, DAST, and SCA. Organizations that need both code quality and security typically use Codacy (or a similar quality tool like SonarQube) alongside Veracode rather than relying on either tool alone.

Can I use Codacy and Veracode together?

Yes, and this combination is effective because the tools have minimal overlap. Codacy handles code quality enforcement – patterns, duplication, complexity, coverage, quality gates, and basic security scanning. Veracode handles deep application security – binary SAST, DAST with AI-assisted authentication, SCA with behavioral analysis, compliance reporting, and developer training. Both tools post PR checks, so you can require both to pass before merging. The combined cost (Codacy Pro at $3,600/year for 20 developers plus Veracode starting at $15,000+/year) is significant, but the coverage is comprehensive.

Which tool is better for startups?

Codacy is significantly better for startups. At $15/user/month, Codacy provides code quality analysis, SAST, SCA, secrets detection, coverage tracking, and AI-powered review in a single affordable platform. The free tier includes the AI Guardrails IDE extension. Setup takes under 10 minutes with no infrastructure to manage. Veracode’s pricing starts at $15,000/year for SAST alone, requires a sales process, and is designed for enterprise procurement workflows. Startups should start with Codacy and add a dedicated security tool like Snyk only when their security requirements outgrow Codacy’s built-in capabilities.

Which has better SAST – Codacy or Veracode?

Veracode’s SAST is significantly deeper for security vulnerability detection. Veracode’s binary analysis scans compiled artifacts and can detect vulnerability classes that source-only tools miss. Its scanning engine has been refined over nearly two decades and supports 30+ languages. Codacy’s SAST uses embedded third-party analysis engines across 49 languages, providing broader language coverage but shallower per-language security analysis. For detecting complex multi-file injection vulnerabilities and security issues in compiled code, Veracode is the stronger tool. For combined code quality and basic security scanning across more languages, Codacy provides broader coverage.

Does Codacy support binary analysis like Veracode?

No. Codacy performs source-code-level analysis only. It requires access to your source code through GitHub, GitLab, or Bitbucket integration to scan. Veracode’s unique capability is binary-level SAST – scanning compiled artifacts (JARs, DLLs, WARs, executables) without needing the original source code. If you need to scan third-party vendor code, acquired codebases, or legacy applications where source is unavailable, Veracode is the only option between these two tools.

Which tool has better compliance reporting?

Veracode has substantially stronger compliance reporting. It maps findings to PCI DSS, HIPAA, SOC 2, NIST 800-53, FedRAMP, and GDPR. The Verified by Veracode certification program provides third-party attestation that auditors recognize as evidence of a secure development lifecycle. Codacy provides basic compliance mapping to OWASP and SANS standards through its SAST findings, but it does not offer the depth of regulatory reporting, audit-ready reports, or auditor-recognized certifications that Veracode provides. For regulated industries, Veracode’s compliance capabilities are in a different league.

Which is easier to set up?

Codacy is dramatically easier to set up. Connect your GitHub, GitLab, or Bitbucket account, select repositories, and scanning begins automatically on the next pull request – no CI/CD configuration required. Total setup time is under 10 minutes. Veracode requires a sales process to obtain access, application onboarding with policy configuration, build pipeline integration for binary upload or Pipeline Scan setup, and security team training on the platform. Initial deployment typically takes weeks to months for enterprise-scale rollouts. The setup complexity reflects the different target markets – Codacy targets development teams, Veracode targets enterprise security programs.

Does Veracode have AI code review like Codacy?

Veracode offers Veracode Fix, an AI-powered remediation engine that generates code fix suggestions for identified security vulnerabilities. However, Veracode Fix is focused exclusively on security remediation, not general code review. Codacy’s AI Reviewer provides context-aware PR analysis that considers changed files, PR descriptions, and linked Jira tickets to provide feedback on logic, complexity, and missing tests – going beyond pure security analysis. Codacy’s AI Guardrails also provides free real-time IDE scanning of AI-generated code. For AI-powered code review breadth, Codacy is stronger. For AI-powered security fix suggestions, Veracode Fix is focused and effective.

Originally published at aicodereview.cc
The Shopify UCP Guide: What 3,200 Monitored Domains Taught Us About AI Agent Commerce

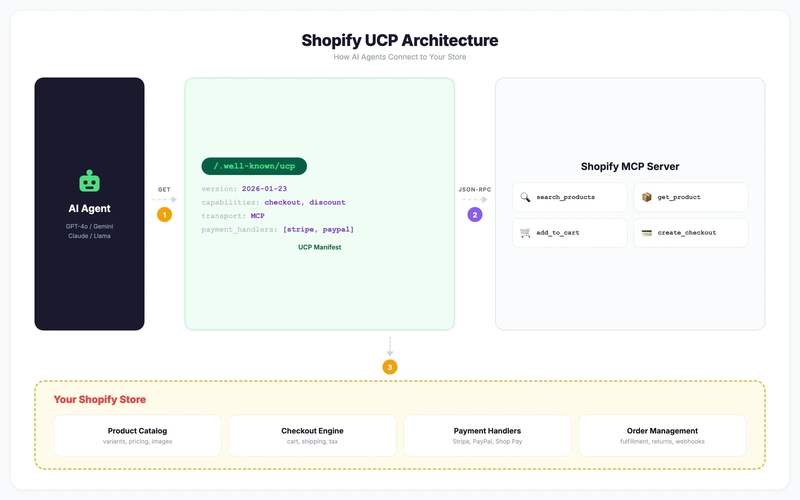
Shopify UCP Architecture — how AI agents connect to your store via manifest discovery, MCP server, and Shopify infrastructure

Shopify accounts for the overwhelming majority of UCP adoption. Of the 2,826 verified UCP merchants in our monitoring dataset, 2,812 — over 99.5% — are on Shopify.

That’s not a coincidence — Shopify co-developed the Universal Commerce Protocol with Google and shipped native UCP support before most platforms had even published a roadmap. But what surprised us as we grew our monitoring dataset past 3,200 domains was how significant the gap is between “technically passes” and “performs well for AI agents in production.”

This guide covers everything we’ve learned: what Shopify gives you out of the box, what you need to configure, what breaks under real agent traffic, and how to optimize your store for the agentic commerce era.

Shopify UCP Architecture — how AI agents connect to your store via manifest discovery, MCP server, and Shopify infrastructure

What Shopify Provides Natively

Shopify’s UCP implementation is the most complete we’ve seen across any platform. When you enable UCP through the Universal Commerce Agent app in the Shopify App Store, the platform automatically generates and serves your /.well-known/ucp manifest without any manual configuration required.

Out of the box, a properly activated Shopify store exposes two stable UCP capabilities to AI agents: Checkout (cart management and purchase completion) and Orders (order status and history). Every verified Shopify store in our dataset exposes both. Catalog browsing is part of the UCP spec but is currently in draft status and not yet widely deployed.

The platform also exposes your store catalog through the Agentic plan, which opens Shopify Catalog as a structured data source for agents that support it. This is separate from the MCP tool layer but increasingly relevant as agent frameworks develop richer product understanding capabilities.

What this means practically: if you install the Universal Commerce Agent app and your store is otherwise functional, you’ll likely pass a basic UCP check within minutes. The harder work is everything that comes after.

The Manifest: What We See Across 3,200 Domains

Your UCP manifest is a structured JSON document that tells AI agents what your store supports, how to communicate with it, and what constraints to respect. Shopify generates this automatically, but the contents vary significantly across stores — and the differences matter.

The first thing we look at is the protocol version. The current specification is 2026-01-23, and across our dataset, the vast majority of Shopify stores are already on this version. Shopify’s app update mechanism keeps active stores current — though stores that have not updated the Universal Commerce Agent app in many months may occasionally fall behind. Agents implementing strict version negotiation may refuse to interact with outdated manifests.

The second is the capabilities array. A well-configured Shopify manifest should declare at minimum dev.ucp.shopping.checkout and dev.ucp.shopping.order — the two capabilities present on every verified Shopify store in our dataset. Stores that have partially configured their UCP setup sometimes declare fewer capabilities than they actually support, which causes agents to skip features the store is perfectly capable of handling.

Third is the payment handlers section, which reflects your actual payment stack. Shopify populates this automatically based on your enabled payment providers, but it can become stale if you add or remove payment methods without a full UCP re-sync. We see this most often on stores that recently switched from Shopify Payments to a third-party provider, or vice versa.

Finally, the transports declaration. Shopify stores declare MCP as the primary transport, which is correct. Problems arise when stores have custom middleware or proxy configurations that intercept requests before they reach the MCP handler — the manifest says MCP is available but the actual endpoint doesn’t behave as expected.

Common Manifest Issues We Flag

Across our monitoring dataset, the most frequently flagged issues are: missing signing keys (stores that enabled UCP before key rotation was standard and haven’t re-synced), currency not declared on stores using Shopify Markets (agents trying to price-compare across sessions can get inconsistent results), and stale capabilities after payment provider changes (the manifest still lists a payment method that’s no longer active).

None of these will cause a hard failure on a basic UCP check — the manifest is technically valid. But they create subtle errors in production agent sessions that are difficult to diagnose without a monitor that tracks changes over time.

Runtime Performance: What Agents Actually Experience

A manifest check tells you whether your store is configured correctly. What it can’t tell you is how your store actually performs when an agent runs a real session — product discovery, cart building, variant resolution, checkout completion.

Across our benchmark dataset, Shopify stores show response times between 102ms and 1,316ms for MCP tool calls, with a median of 146ms and a p95 of 205ms — fast enough for virtually any agent workflow. The rare outliers above 500ms are almost always explained by one of three things: geographic distance from the nearest Shopify edge node, heavy app stack adding middleware latency, or Shopify Markets adding an additional 200–400ms for cross-region requests.

Shopify MCP Response Time Distribution — bar chart showing standard stores vs Markets proxy latency across 3,200 domains

Tool availability is generally excellent on Shopify. When we run tools/list against a properly configured store, we consistently see both core tools available. Compare that to custom UCP implementations on other platforms, where tool availability is frequently incomplete or inconsistently declared.

Checkout completion rates are the highest we see on any platform — but they drop meaningfully on stores that have mandatory custom fields on the checkout page. Agents can handle standard Shopify checkout flows natively, but custom fields that require JavaScript interaction or are injected by third-party apps often break the automated flow. If your store has a mandatory gift message field or a custom loyalty ID input, test it explicitly with agent sessions.

In our 180-session benchmark, we ran sessions against Shopify stores using multiple agent models. Variant resolution was the most variable capability — the Llama 3.3 70B variant had notably lower success rates on stores with complex product option configurations (more than 3 option dimensions, or options that affect availability rather than just presentation).

Configuration Checklist

Based on our monitoring data, here are the five steps that separate stores that perform well in agent sessions from stores that pass the basic check but struggle in production.

First, enable UCP properly. Install the Universal Commerce Agent app from the Shopify App Store and complete the full setup flow, including the key generation step. Partial installations are the single most common source of manifest issues we see.

Second, verify your manifest at ucpchecker.com/check. Run the check, review the capabilities and payment sections specifically, and confirm the protocol version matches the current specification. If you’re on an older version, an app update is usually all it takes to fix it.

Third, review your robots.txt and bot access configuration. Shopify’s default robots.txt allows UCP agent traffic, but custom modifications can block it. If you’ve used a third-party SEO app to customize your robots.txt, verify it isn’t inadvertently blocking the user agents that UCP-compliant AI clients use.

Fourth, test with multiple agent models. Don’t assume that passing validation means all agents can complete transactions. Run sessions with at least two different agent implementations and specifically test variant-heavy products. Variant resolution failure is the most common production issue we see on otherwise well-configured stores.

Fifth, set up UCP Alerts. Your manifest can change silently — app updates, payment provider changes, and Shopify platform changes can all alter what your manifest declares. Alerts notify you when we detect a change in your manifest so you can investigate before agents encounter the problem.

Shopify Markets and Multi-Region Considerations

Shopify Markets is the platform’s native multi-currency, multi-region selling feature. It’s excellent for human shoppers and increasingly common on the stores we monitor. It also introduces UCP-specific complexity that many merchants don’t account for.

The proxy layer that Markets uses to serve region-appropriate content adds 200–400ms of latency to MCP tool calls. For most agent workflows, this is acceptable. For agents running product discovery across dozens of stores in a single session, it compounds.

More importantly, your manifest can vary by geographic context when Markets is active. An agent accessing your store from a US IP may see a different payment handlers section than one accessing from the EU, because your available payment methods differ by region. This isn’t inherently wrong — it’s expected behavior — but it means agents can’t cache your manifest reliably across sessions from different origins.

If you’re using Markets, declare your primary currency explicitly in your UCP configuration even if Shopify auto-detects it. And ensure your store correctly handles the country parameter in product and checkout requests — agents that pass explicit country context should get deterministic pricing, not a redirect to a region-detection flow.

Common Failure Modes

Common Shopify UCP Failure Modes — app conflicts, variant resolution, draft product leaks, and redirect loops

Four failure patterns come up repeatedly in our monitoring data, and they’re all worth knowing before you go into production.

App conflicts causing cart total mismatches. Some Shopify apps modify cart calculations through hooks that don’t propagate correctly to the MCP checkout tool. The most common manifestation: an agent successfully adds items to a cart and receives a subtotal, but when it initiates checkout, the total has changed because a discount or surcharge app modified it after the initial cart response. Agents that validate cart totals before confirming checkout will abort the transaction.

Variant complexity exceeding agent resolution capability. Products with more than three option dimensions, or options that combine to affect availability (a size that’s only available in certain colors), frequently cause agents to fail at variant selection. The MCP tool returns the product correctly, but the agent can’t determine which variant ID to use without rendering the full option matrix. Simplifying your product option structure — or providing explicit variant recommendations for your most common configurations — significantly improves agent success rates.

Draft products appearing in MCP responses. Shopify’s catalog API and the MCP Discovery tool don’t always apply the same product visibility filters. We’ve seen stores where draft products (not published to the storefront) appear in MCP product listings. Agents attempting to add these to a cart receive an error. Audit your product visibility settings if you maintain a large draft catalog.

Redirect loops for agents without location headers. Some stores have geographic redirect logic that sends visitors without a detected location to a region-selection page. Agents that don’t send standard location headers get caught in this loop — they follow the redirect, hit the same logic again, and either fail or get stuck. If you use geographic redirects, configure them to pass through to the default storefront for requests that carry a UCP agent identifier.

Product feed best practices

When Shopify generates your UCP manifest and exposes your catalog through MCP tools, the quality of what agents see depends entirely on your product data. A clean manifest with dirty product data is worse than no UCP at all — agents will discover your store, attempt to shop, and fail.

Here’s what matters for agent-readable product feeds:

Titles must be variant-specific. An agent searching for “blue cotton t-shirt size L” needs to match against a title that contains those attributes. If your product title is just “Classic Tee” with variants buried in option fields, agents have to make extra calls to resolve what they’re looking at. Stores with descriptive, variant-aware titles see higher search-to-cart conversion in our agent sessions.

Set priceCurrency on every offer. This is the single most common data quality issue we flag. Without explicit currency declarations, agents may display wrong currency symbols or attempt incorrect conversions. On multi-market Shopify stores, the product price changes by region — but if the feed doesn’t declare which currency applies, the agent is guessing. Always set priceCurrency in your product structured data.

Images must have descriptive alt text. Agents that support multimodal input use alt text to understand product images. “IMG_4521.jpg” tells an agent nothing. “Navy blue merino wool crew neck sweater — front view” tells it everything. This is standard accessibility practice that doubles as agent optimization.

Keep variant data clean and consistent. If your store has products with multiple option axes (color × size × material), each variant needs a unique, resolvable ID. We’ve seen stores where variant IDs change after inventory syncs, breaking any agent that cached a previous variant reference. Stable variant IDs are essential for reliable add-to-cart flows.

Don’t expose draft or out-of-stock products. Your MCP-facing catalog should match your public storefront. If an agent finds a product through search, adds it to cart, and then gets an “unavailable” error at checkout, that’s a failed session. Check that your product visibility settings apply consistently to both the storefront and the MCP server. In our monitoring, we’ve flagged stores where the MCP endpoint returns 10-15% more products than the public catalog — those are ghost products that agents can discover but buyers can’t purchase.

Structured data matters beyond the manifest. Shopify merchants using Schema.org Product markup on their storefront pages help agents that discover products through web crawling (not just MCP). The markup should include: product name, description, price with currency, availability status, brand, SKU, and image URLs. This creates a second discovery path for agents that crawl the web before connecting via MCP.

Update frequency. Stale feeds cause stale agent experiences. If you run flash sales, seasonal pricing, or frequent inventory changes, your product feed needs to reflect those changes in near-real-time. Shopify’s native UCP integration handles most of this automatically, but custom feeds or third-party sync tools can introduce lag. Our daily monitoring catches when a manifest’s product data drifts from what’s actually available on the storefront.

What’s Coming

Two capabilities currently in draft status will be significant for Shopify merchants when they ship: Cart as a persistent, shareable construct (enabling agents to hand off a pre-filled cart to a human for completion), and Catalog as a richer product data access layer (giving agents structured access to inventory, pricing tiers, and product relationships without relying on search).

Shopify’s existing OAuth infrastructure puts it in a strong position for identity linking — the ability for agents to authenticate as a known customer and access loyalty points, saved addresses, and purchase history. This is the capability most likely to drive meaningful conversion improvements for returning customers.

We track adoption of emerging capabilities through our stats dashboard and publish deeper analysis in the State of Agentic Commerce reports. If you want to understand where the ecosystem is heading, those are the places to watch.

Check Your Store

If you’re running a Shopify store and haven’t run a UCP check yet, start there. The check takes about 30 seconds and will tell you whether your manifest is correctly configured and up to date.

If you’re already in our directory, set up UCP Alerts so you’re notified when your manifest changes. Silent regressions — the kind that only show up when an agent fails to complete a transaction — are the hardest to catch without monitoring.

And if you want to see how AI agents actually experience your store, UCP Playground lets you run real agent sessions against live stores. It’s the fastest way to find the variant resolution and checkout completion issues that don’t show up in manifest validation.

References & Official Resources

Further Reading

Related Platform Guides

Exploring UCP across other platforms? These guides cover what we’ve learned about each platform’s implementation:

Why One Extra Network Hop Silently Breaks Your Latency Budget in Production

Diagram 1 — Before

Your Latency Budget Is Lying: The Real Cost of a Single Extra Network Hop

That one “harmless” extra service call is quietly burning your p99. Here’s the math, the failure modes, and how to fix it.

You shipped a feature. Everything looked fine in staging. The integration tests passed. The average response time in production is 120ms — well within the 200ms target your team agreed on six months ago.

Then someone checks the p99.
It’s 780ms.
The dashboards look fine at a glance, users aren’t screaming yet, but something is clearly wrong. You start digging. You find that three weeks ago, someone added a call to a new internal service — a feature flag resolver, a permission check, a logging sidecar flush — and nobody thought much of it. “It only adds about 5ms,” they said.

And they were right, at the median. But at the tail? It quietly murdered your latency budget.

This is the story of how that happens, why it’s almost always invisible until it isn’t, and what you can actually do about it.

A single network hop looks trivial in isolation. In a distributed system, it’s never just one hop.

First, What Even Is a Latency Budget?

A latency budget is a constraint. It’s the total time you have available to fulfill a request end-to-end — from the client sending the first byte to the client receiving the last byte — before the experience degrades.

Your product team says “the page must load in under 200ms.” That 200ms is the budget. Now you have to allocate it across every layer of your stack.

A typical allocation for a server-rendered web request might look like this:

Layer Allocated Time
DNS resolution (cached) ~1ms
TCP + TLS handshake (cached) ~5ms
Network transit (round trip) ~20ms
Load balancer + reverse proxy ~3ms
Application logic ~80ms
Database query ~40ms
Response serialization ~10ms
Network return ~20ms
Total ~179ms

That gives you roughly 21ms of buffer. Sounds reasonable. But notice that this model assumes one path through your system. In reality, modern distributed systems don’t have one path. They have a graph of paths, and each path has its own tail behavior.

The moment you add one more synchronous network hop — another service call, a proxy that wasn’t there before, a new sidecar — you don’t just add the median latency of that hop. You add its entire latency distribution. Including its p99. Including its occasional 2-second timeout spike. And those distributions don’t add linearly.

The Math They Don’t Put in Your Architecture Diagram

Let’s be precise about this, because it’s the core of everything.

If you make a single call to a service with the following latency distribution:

  • p50: 5ms
  • p95: 20ms
  • p99: 80ms

…then at the 50th percentile, your caller sees 5ms. Fine.

But now suppose you’re calling five services in series. Even if every one of them has the same “5ms median” profile:

The compound tail problem:

If each service independently has a 1% chance of hitting 80ms, then the probability that at least one of them hits 80ms in a single request is:

P(at least one slow) = 1 - P(all fast)
                     = 1 - (0.99)^5
                     = 1 - 0.951
                     = 4.9%

So your compound p95 is now being shaped by the slowest of five services, not the average. What was a 1-in-100 event for each service individually becomes a nearly 1-in-20 event for the composite request.

Add ten services and the math gets grimmer:

P(at least one slow) = 1 - (0.99)^10 = 9.6%

Your p99 just became your p90. In production, at scale, that’s thousands of requests per minute hitting the tail.

This is the phenomenon described in the classic Google paper “The Tail at Scale” — and it’s been reproduced in real systems countless times since. research

What Actually Happens Inside a Single Extra Hop

When you add a synchronous call to another service, here’s what actually happens on the wire — most of which is invisible in your flame graphs if you’re not looking:

1. TCP Connection Overhead

If the connection isn’t kept alive (common in naive HTTP/1.1 setups or misconfigured HTTP/2), every call involves a TCP handshake: ~1 RTT. At a typical inter-datacenter latency of 1–5ms, that’s 1–5ms before you’ve sent a single byte of your request.

Connection pooling eliminates most of this, but only if you’ve set it up correctly and your pool isn’t exhausted under load.

2. TLS Negotiation

If the service-to-service call is over HTTPS (as it should be in a zero-trust setup), TLS adds latency. A full TLS 1.3 handshake with a session resumption costs roughly 0.5–2ms. Without session resumption, it’s a full 1–2 RTT.

In a service mesh like Istio with mutual TLS (mTLS), every single pod-to-pod call goes through TLS — it’s automatic and transparent, which is great for security and brutal for people who thought “service mesh is free.” foci.uw

Benchmarks of Istio with Envoy sidecars have shown consistent per-hop overhead of 1–5ms added latency at the median, with p99 overheads stretching into tens of milliseconds under load, depending on payload size and connection concurrency. oneuptime

3. Serialization and Deserialization

Your service sends a request body. JSON, Protobuf, MessagePack — doesn’t matter, it costs something. JSON serialization of a medium-complexity object (10–20 fields, some nested) in Node.js or Go costs roughly 0.05–0.5ms. Across many hops at high concurrency, this adds up. More importantly, large payloads increase memory allocation, which can trigger GC pauses — and GC pauses are essentially uncapped.

4. Queueing at the Receiving End

Even if the downstream service is fast on average, under real traffic it’s doing other things. Goroutines are scheduled. Thread pools have limits. Connection queues fill up. The incoming request waits.

This is the queueing component of latency — often the largest and most volatile contributor to tail latency — and it’s completely invisible to the caller. Your request could sit in a queue for 0ms at 10 RPS and 200ms at 1000 RPS, and your p50 will look fine the whole time while your p99 is on fire.

5. The Return Trip

All of the above applies symmetrically on the way back: serialization of the response, TCP acknowledgment, return network latency. A “fast” synchronous RPC call to an internal service that “only” takes 3ms median has already consumed 3ms of your budget before your code has done anything with the result.

Visualizing the Compounding Effect

Let’s walk through a concrete example.

The scenario: an e-commerce checkout endpoint

Your /checkout endpoint has a 200ms latency budget. Here’s the architecture three months ago vs. today.

Before:

Diagram 1 — Before

Measured latency breakdown:

  • Network + gateway: 5ms
  • Checkout service logic: 30ms
  • DB query (indexed): 25ms
  • Response serialization + return: 10ms
  • Total p50: ~70ms. p99: ~130ms. Budget remaining: ~70ms.

After (four new hops added over three months):

Diagram 2 — After

Now let’s reconstruct the budget:

Hop p50 p99
Network + gateway 5ms 10ms
Auth service call 8ms 60ms
Feature flag service 4ms 40ms
Checkout logic 30ms 55ms
DB query 25ms 70ms
Inventory service call 10ms 90ms
Pricing service call 12ms 85ms
Return + serialization 10ms 20ms
Total ~104ms ~430ms

The p50 looks fine. Still well under 200ms. But the p99 has blown past the budget more than twice over — and the team didn’t notice because their alerting was on average response time.

This is an extremely common pattern. It’s how systems that “feel fast” break under scrutiny. systemoverflow

Every hop through your data center carries overhead that compounds across the request chain.

Tail Latency: The Number That Actually Matters for Users

Most teams instrument p50. Some instrument p95. Very few actually act on p99. This is a mistake.

The p99 is the latency that 1 in 100 of your users experiences. At 100 requests per second, that’s 1 user every second hitting a degraded experience. At 10,000 requests per second, it’s 100 users per second.

More critically: the p99 of your composite service is almost always dominated by the worst single component in your call chain. If you have ten services and one of them has an occasionally misbehaving garbage collector, that GC pause becomes your p99 — even if the other nine services are perfectly tuned.

Here’s a simulation in Go that demonstrates the compound distribution:

package main

import (
    "fmt"
    "math/rand"
    "sort"
    "time"
)

// simulateHopLatency returns a latency in ms for a single service hop.
// Models a bimodal distribution: usually fast, occasionally slow.
func simulateHopLatency(rng *rand.Rand) float64 {
    if rng.Float64() < 0.99 {
        // Fast path: normally distributed around 5ms
        return 5.0 + rng.NormFloat64()*1.5
    }
    // Slow path: GC pause, queue buildup, etc.
    return 5.0 + 60.0 + rng.NormFloat64()*10.0
}

func percentile(sorted []float64, p float64) float64 {
    idx := int(p/100.0*float64(len(sorted)))
    if idx >= len(sorted) {
        idx = len(sorted) - 1
    }
    return sorted[idx]
}

func main() {
    rng := rand.New(rand.NewSource(time.Now().UnixNano()))
    samples := 100_000

    for numHops := 1; numHops <= 5; numHops++ {
        results := make([]float64, samples)
        for i := 0; i < samples; i++ {
            total := 0.0
            for h := 0; h < numHops; h++ {
                total += simulateHopLatency(rng)
            }
            results[i] = total
        }
        sort.Float64s(results)
        fmt.Printf("Hops: %d | p50: %.1fms | p95: %.1fms | p99: %.1fmsn",
            numHops,
            percentile(results, 50),
            percentile(results, 95),
            percentile(results, 99),
        )
    }
}

Running this produces roughly:

Hops: 1 | p50: 5.0ms  | p95: 8.1ms  | p99: 64.3ms
Hops: 2 | p50: 10.0ms | p95: 69.2ms | p99: 124.8ms
Hops: 3 | p50: 15.0ms | p95: 128.4ms| p99: 185.0ms
Hops: 4 | p50: 20.0ms | p95: 134.1ms| p99: 246.1ms
Hops: 5 | p50: 25.1ms | p95: 193.8ms| p99: 317.2ms

Notice what happened: from 1 hop to 2 hops, the p95 jumped from 8ms to 69ms. Not because the services got slower — because the probability of hitting at least one slow response nearly doubled. This is tail amplification, and it’s the reason p50 monitoring is effectively useless for latency budget tracking. aerospike

The Invisible Hops You Forget to Count

Here’s the thing: engineers are usually aware of the obvious hops — the service calls they wrote. What they miss are the silent ones:

Service mesh sidecars. In Istio or Linkerd, every outbound and inbound request passes through an Envoy/Linkerd proxy. That’s two extra network hops per RPC call. The proxy has its own CPU overhead, memory allocation, and queue. At high RPS, this isn’t free. Benchmarks show Istio adding 1–5ms to median latency, with meaningfully worse tail behavior under load. foci.uw

Feature flag SDKs calling home. Some feature flag systems are backed by an SDK that does a remote HTTP call to resolve flags per request. If your flag SDK is calling out to a remote service on every checkout request, that’s a hop you probably forgot to count. It’s especially painful because flag evaluation feels like it should be pure local logic.

Auth middleware calling an external service. JWT validation is local and fast. But if your auth middleware is calling a user service or an OAuth introspection endpoint to validate tokens per request, you’ve added a hop that’s invisible in your app code but very visible in your latency.

Centralized rate limiters. Redis-backed rate limiters are common and reasonable. But a call to Redis over the network on every request adds 0.5–3ms depending on co-location, even when it’s just a INCR. At high traffic, Redis also becomes a hot node, and its tail latency degrades.

Distributed tracing agents. Most tracing SDKs are async and non-blocking. Some aren’t, or have internal queues that fill up under load and start blocking.

Load balancers in front of load balancers. Cloud-managed load balancers in front of ingress controllers in front of service mesh proxies in front of your app. That’s three layers before your code runs.

None of these hops appear in your architecture diagram. All of them show up in your flame graphs.

Queueing Theory, Very Briefly

You don’t need a PhD in queueing theory to understand why adding hops is dangerous. You just need one intuition from Little’s Law:

L = λW

Where:

  • L = average number of requests in the system
  • λ = arrival rate
  • W = average time a request spends in the system

As W (the latency per request) increases due to extra hops, L (backlog) grows proportionally. When backlog grows, queueing delays increase, which makes W larger, which makes L larger. This feedback loop is what turns a “5ms extra hop” into “500ms occasional spikes” — the system tips past its natural equilibrium.

The practical implication: every hop you add reduces your headroom before the system becomes queue-bound under load.

How to Actually Measure Your Latency Budget

Knowing the theory is one thing. Measuring it in production is where most teams fail. Here’s how to do it properly.

1. Trace every request end-to-end with OpenTelemetry

Distributed tracing is the single most important tool for latency budget tracking. If you’re not already using OpenTelemetry, this is the baseline.

A basic setup in Node.js:

// tracing.js — initialize before anything else
const { NodeSDK } = require('@opentelemetry/sdk-node');
const { OTLPTraceExporter } = require('@opentelemetry/exporter-trace-otlp-http');
const { HttpInstrumentation } = require('@opentelemetry/instrumentation-http');
const { ExpressInstrumentation } = require('@opentelemetry/instrumentation-express');

const sdk = new NodeSDK({
  traceExporter: new OTLPTraceExporter({
    url: process.env.OTEL_EXPORTER_ENDPOINT || 'http://localhost:4318/v1/traces',
  }),
  instrumentations: [
    new HttpInstrumentation(),
    new ExpressInstrumentation(),
  ],
});

sdk.start();

Once you have traces flowing into Jaeger, Tempo, or Honeycomb, you can:

  • See the waterfall diagram for every request
  • Identify which span is consuming the most time
  • Filter by p99 requests specifically (filter by duration > 400ms) and see what’s different about them
  • Compare span durations across percentiles

The key metric to extract from your traces: span duration by percentile, per service. Not aggregate. Per service. That’s how you find the outlier.

2. Calculate your budget utilization per span

Most teams look at total response time. What you want is a budget utilization view — a percentage of the budget consumed at each hop.

This is trivially expressible as a Prometheus query if you’re using span metrics:

# Fraction of total budget consumed by each service
histogram_quantile(0.99,
  sum(rate(http_server_duration_bucket{service_name="inventory-service"}[5m])) by (le)
)
/ 0.200  # divided by your 200ms budget

If this query returns 0.45 for inventory-service, that single service is consuming 45% of your budget at p99. You now have a number to act on.

3. Measure, don’t estimate, the overhead of infrastructure layers

Before profiling your application code, measure the bare overhead of your infrastructure:

  • Add a /health endpoint to your service that does nothing except return 200
  • Measure its latency from another pod in the same cluster
  • That number is your infrastructure floor: it includes DNS, proxy overhead, TLS, and serialization
  • Anything under your application latency is “free”; anything above it needs a reason

In a well-tuned Kubernetes cluster without a service mesh, this baseline is typically 0.5–2ms. With Istio mTLS, it’s typically 2–8ms, sometimes higher. oneuptime

Mistakes Teams Make (That Kill Their Latency Budget)

These are the patterns I see repeatedly in real systems.

Alerting on p50 instead of p99

Average and median latency look good right up until your on-call engineer gets paged by an angry stakeholder. Alert on p95 and p99. The p50 is almost useless for user-facing latency SLOs.

Adding hops without counting them

Every architectural decision that adds a synchronous network call should be an explicit tradeoff discussion: “This adds approximately Xms to our median latency and introduces Y% tail risk.” That conversation almost never happens because teams think about correctness, not latency topology.

Treating timeouts as a safety net, not a budget item

A timeout of 500ms on a downstream call is not “safe.” If that downstream service is called on every request and occasionally hits its 500ms timeout, your caller will block for 500ms before getting an error and returning a degraded response. Timeouts are not a performance feature. They’re a correctness feature. Tune them aggressively.

The right mental model: your timeout is the maximum you’re willing to spend on that hop. It should be a fraction of your total budget, not a failsafe.

Ignoring retry amplification

Retries with no budget awareness are latency multipliers. If service A times out calling service B and retries twice, a single user request has now made three calls to service B. Under load, this turns transient slowness into a cascading failure. Always budget for retries:

effective_timeout = (retry_count + 1) * per_attempt_timeout + (retry_count * retry_delay)

If you have 3 retries, a 100ms per-attempt timeout, and 50ms retry delay, a single user request can block for up to 450ms on that one hop. That’s your entire budget, gone, on error handling.

Not accounting for fan-out in parallel calls

Parallel service calls look free on a timeline diagram. They’re not. The total latency of N parallel calls is max(L1, L2, ..., LN) — the slowest one. And as N grows, the probability that at least one of them hits its p99 grows exponentially. A “parallel” checkout that calls 8 services simultaneously will hit the worst p99 of those 8 services on nearly every request. systemoverflow

Trusting that the service mesh is zero-cost

Istio and Linkerd are excellent tools. They are not zero-cost. Benchmark them. Measure the overhead in your specific workload. The overhead depends heavily on payload size, connection concurrency, and CPU availability on the sidecar. At high RPS with large payloads, the overhead is significant. foci.uw

Latency compounds invisibly across layers. Observability is the only way to see the full picture.

How to Reduce Latency and Reclaim Your Budget

Once you’ve measured the problem, here’s how to actually fix it.

1. Eliminate unnecessary synchronous hops entirely

This is the most impactful change and the hardest to get approved. Ask for every synchronous service call in your hot path: “Does this need to happen before I return a response?”

Feature flag resolution: cache flags locally and refresh asynchronously. Don’t call a remote service on every request.

Auth token validation: validate JWTs locally with a public key. Don’t introspect them via HTTP.

Audit logging: write to a local queue and flush asynchronously. The audit log doesn’t need to be consistent before the user gets their response.

Each hop you remove doesn’t just save its own latency. It removes its entire tail distribution from your compound calculation.

2. Move from HTTP to faster transports where it matters

HTTP/1.1 → HTTP/2 for multiplexing. HTTP/2 → gRPC with connection reuse for internal service calls. gRPC with Protobuf serialization typically cuts serialization overhead by 3–10x compared to JSON, and connection multiplexing eliminates most connection-establishment overhead. This won’t save you from architectural problems, but in a path where every millisecond counts, it’s worth it.

3. Parallel what can be parallel, but with a real fan-out budget

If your request genuinely needs data from multiple services, call them in parallel. But bound the fan-out. If you’re calling 8 services in parallel, set a hedged timeout — not “wait for all of them,” but “wait until 95% respond and use degraded data for the rest.” This is called partial responses or timeout hedging, and it’s a powerful pattern for high-availability systems.

// Example: parallel fetch with timeout and partial result tolerance
func fetchWithTimeout(ctx context.Context, services []ServiceClient, budgetMs int) []Result {
    ctx, cancel := context.WithTimeout(ctx, time.Duration(budgetMs)*time.Millisecond)
    defer cancel()

    results := make([]Result, len(services))
    var wg sync.WaitGroup

    for i, svc := range services {
        wg.Add(1)
        go func(idx int, client ServiceClient) {
            defer wg.Done()
            res, err := client.Fetch(ctx)
            if err != nil {
                results[idx] = Result{Degraded: true} // Use fallback
                return
            }
            results[idx] = res
        }(i, svc)
    }

    wg.Wait()
    return results
}

4. Cache aggressively and correctly

Not “add Redis in front of everything,” but cache at the right layer:

  • In-process cache for data that rarely changes: feature flags, configuration, rate limit thresholds. This eliminates the hop entirely.
  • Distributed cache (Redis, Memcached) for data that changes moderately and is expensive to recompute. But remember: a Redis call is still a network hop. Measure it.
  • CDN or edge caching for responses that are fully cacheable. The fastest hop is the one that never reaches your origin.

5. Tune your connection pools aggressively

Connection pool exhaustion is one of the most common causes of sudden latency spikes in production. When a pool is exhausted, new requests queue waiting for a connection — and that queueing can spike your p99 into seconds even when the underlying service is healthy.

For every downstream HTTP client in your system, explicitly configure:

  • Maximum connections
  • Connection timeout (how long to wait for a connection from the pool)
  • Request timeout (how long to wait for a response)
  • Idle timeout (how long to keep an unused connection alive)

Most HTTP client libraries default to conservative settings that are badly mismatched for high-throughput internal service calls.

6. Profile your serialization

Particularly in JVM-based and Node.js services, JSON serialization of large objects is surprisingly expensive. If you’re serializing the same data structure on every request, consider:

  • Pre-computing and caching the serialized form
  • Switching to Protobuf or MessagePack for internal APIs
  • Trimming your response payloads — only send what the caller actually uses

The Architectural Checklist

Before you ship any change that adds a new service call to a latency-sensitive path, run this checklist:

  • [ ] Measured the baseline latency of the new dependency (p50, p95, p99) in production or under realistic load
  • [ ] Calculated the new compound p99 for the full request chain after adding this hop
  • [ ] Verified the new p99 is within the latency budget with margin for growth
  • [ ] Considered async alternatives: can this happen outside the request path?
  • [ ] Set an explicit timeout on the call — not a default, a deliberate number based on the budget allocation for this hop
  • [ ] Defined a fallback for when this call fails or times out — degraded response, cached result, default value
  • [ ] Added tracing instrumentation so this hop appears in distributed traces
  • [ ] Added latency alerting on this specific service-to-service call at p99
  • [ ] Reviewed retry policy — retries are multiplied against the timeout; have you budgeted for them?
  • [ ] Checked connection pool settings — are they tuned for the expected concurrency of this call?
  • [ ] Reviewed if TLS/mTLS overhead has been measured and accounted for in the budget

If any of these items can’t be answered confidently, the PR should not merge into a latency-sensitive path without an explicit team discussion.

A Real Latency Budget Calculation

Let’s close the loop with a worked example you can adapt.

System: A mobile app backend. The product requirement is 150ms end-to-end response at p95 for the home feed endpoint.

Budget allocation:

Component Budget (p95) Owner
DNS + TCP + TLS (mobile to CDN edge) 10ms Infrastructure
CDN to origin gateway 5ms Infrastructure
Gateway + auth (JWT local validation) 5ms Platform
Feature flag resolution (local cache) 1ms Platform
Feed service business logic 30ms App team
Primary DB query (indexed read) 25ms App team
Recommendations service call 35ms ML team
Response serialization + compression 8ms App team
Return path network 10ms Infrastructure
Total allocated 129ms
Remaining headroom 21ms

This leaves 21ms of headroom before hitting the 150ms SLO. Now someone proposes adding a “personalization boost” service call. Its measured p95 is 18ms.

If you add it synchronously to the hot path, your headroom drops to 3ms. Any slight increase in traffic, any GC event in any service, any network hiccup — and you’re over budget. The right conversation is: “Can this call happen asynchronously? Can we pre-compute and cache the result? Does it need to be in the hot path?” Often the answer is no, it doesn’t.

This is how you defend your latency budget: with numbers, not intuition.

More Engineering Reads

If this kind of production-depth engineering writing is useful to you, more of it lives at kallis.in — a growing collection of engineering content covering system design, architecture, observability, and real-world development patterns.

The Takeaway

The problem with latency budgets isn’t that engineers don’t care about them. It’s that the damage is cumulative, invisible at the median, and always attributed to “the system getting more complex” rather than the specific architectural decisions that caused it.

One extra hop is never just 5ms. It’s 5ms at p50, and it’s the entire tail distribution of that service — including its worst-day behavior — injected into every request that goes through it. Multiply that across five services added over six months, and you’ve turned a snappy product into something that users feel is “kinda slow sometimes.”

The tools to fight this aren’t exotic. Distributed tracing, explicit budget allocation, p99 alerting, aggressive timeout tuning, and a cultural habit of treating every new synchronous hop as a cost that needs justification. That’s it.

Your architecture diagram shows boxes and arrows. Your users experience latency distributions. Make sure someone on your team is closing the gap between those two views — before your p99 starts closing it for you.

#performance #distributedsystems #systemdesign #backend #architecture #microservices

From Zero to Crypto Hero (Week 4) – Week of Break from Coding and Big Regret

luftietheanonymous profile

Hello Dev.to Community

This time I’m writing the article one day later, as I usually kept to push the updates to appear regularly on sunday. Well today is monday, so I guess it’s not a big deal 😅 (Especially coz mostly my posts do not make big outreach). Anyways, promise is a promise, thus I upload this tiny update on my work.

Are you ready ? Let’s go !

Introduction

So if I said, that I took break from coding, it means I’ve been buggering around, doing nothing and I just post it to just keep the streak ? Well technically correct 😀

Thanks for reading, I hope you enjoyed this part, don’t forget to hit a like or some other cool emoji and till next time. See ya !

.
.
.
.
.
.
.
.
.
.
.
.
.
.
.
.
.
.
.
.
.
.
.
.
.
.
.
.
.
.
.
.
.
.
.
.
.
.
.
.
.
.
.
.
.
.
.
.
.
.
.
.
.
.
.
.
.
.
.
.
.
.
.
.
.
.
.
.
.
.
.
.
.
.
.
.
.
.
.
.
.
.
.
.
.
.
.
.
.
.
.
.
.
.
.
.
.
.
.
.
.
.
.
.
.
.
.
.
.
.
.
.
.
.
.
.
.
.
.
.
.
.
.
.
.
.
.
.
.
.
.
.
.
.
.
.
.
.
.
.
.
.
.
.
.
.
.
.
.
.
.
.
.
.
.
.
.
.
.
.
.
.
.
.
.
.
.
.
.
.
.
.
.
.
.
.
.
.
.
.
.
.
.
.
.
.
.
.
.
.
.
.
.
.
.
.
.
.
.
.
.
.
.
.
.
.
.
.
.
.
.
.
.
.
.
.
.
.
.
.
.
.
.
.
.
.
.
.
.
.
.
.
.
.
.
.
.
.
.
.
.
.
.
.
.
.
.
.
.
.
.
.
.
.
.
.
.
.
.
.
.
.
.
.
.
.
.
.
.
.
.
.
.
.
.
.
.
.

Ok, I was joking 🤣. If you’re still here to read further, congrats your curiosity is out of space 🚀.

This week perhaps was not filled a lot of with coding/programming whatsoever. But for sure it was not boring or completely wasted time.

So what have I been doing throughout this week ?

Let’s start with the fact, that I’ve been 3 days out and about in Warsaw on the conference Next Block Expo, specially devoted to cryptocurrencies but discussed from financial angle. I have shared more of my views on the event in that article (If you’re interested go on and read it)

As I reached my home-town and woke-up the next day, I honestly felt as though someone would have completely stolen my batteries🪫

In general, I liked the event from the point of view, that there were more projects that were genuinely interesting me than on the last edition, however here are yet couple of inferences that came into my mind. Not only about

Inferences

I’m not a fan of big cities

warsaw

I know in previous article I have written, that I do not like big cities, but that was very general statement. I’ve written in the article that I hate big cities, I forgot to add that at least in Poland, but more on that later.

Before I start let’s define what is a big city (at least for me) ? A big city at least for me is a agglomeration in which live 500k+ people (incld. commute-workers + students).

Although I personally do not live in some hicksville, I used to say so about place where I live. Warsaw felt for me like rotten, toxic and fake. I felt more endangered than even in Berlin tbh, whereas Berlin got the most unliked city in my hierarchy.

And additionally the air-conditions in Warsaw seemed awful to me (However I’m kind of over-sensitive in this case, so I might be biased). I mean indeed, the centre, accompanied by skyscrapers is looking nice and the most popular places are impressive, but for me it was enough to see how the city looks like 2/4/6 km away from the highlight-spots, to realise that Warsaw’s beauty is only marketing (as always lol).

It’s actually quite common in Poland, but I guess every city has it’s issues, regardless of the country. I remember back 2023, as I gone for my first ever solo-trip to Manchester, England. I’ve been there for about 4 days, back then I really didn’t experience something that would be hideous in some way, except a hobo, who pissed on a wall while I’ve been walking through the city, seeking a place to purchase a ticket for public-transport.

I admire always England for their infrastructure and architecture, when it comes to metropolis like Greater Manchester. I always laughed that Manchester is smaller than my city, but then I realised that the cities fade between each other and I remember that I could not realise if I’m in Salford/Trafford or Manchester. So were my experiences at least.

The World is centralized, not by government, by technology:

Sorry, I had no clue how to name this inference lol. I want to tell about my experience in Warsaw that indeed, was very mixed because I had kind of emergency situation. I haven’t taken the phone-charger to my phone, although before leaving the house I had been plugging in the power-bank to pack it into backpack.

Unfortunately both power-bank and charger have been left at home by the time of my departure. Unluckily, my phone’s battery’s level was decreasing rapidly, like never before.

And I was looking for place where to purchase a charger and I had impression that almost everything is against me. Suddenly some arab-guy and afterwards a hobo wanted to scrounge money from me and as I gone to the mall by bus, there was some shady-guy following me weirdly as though he wanted to pick-pocket me or something, he resigned after I have shown him a pepper-spray in my hand, not having even made an eye-contact with that guy.

I gone to a first mall and the charger cheapest charger was 100 PLN, it was Media-Markt shop. I asked the assistant, if can help me choose some cheap charger, and shockingly he advised me to go to the mall on the other side of the street to buy a charger in a supermarket.

The price there ? 18.50 PLN (for cable and the charger-cube) ! Whereas the cable at Media-Markt its-self was 79 PLN ! Can you comprehend it ? There is more 500% spread between price in special IT-RTV-AGD Shop and Super-market. It just blew my mind, honestly speaking and would never say it was reality.

I almost burst in tears when I have experienced the vibration of my phone going out of battery and me being not even with knowledge, where to purchase a charger.

What I meant by centralisation is that everything nowadays is heavily based on electronics and current/electricity. Perhaps that’s another problem to be solved, huh ? I know it’s my fault in the end of the days, that I hadn’t taken the charger 😅. I do not seek for excuses.

Small events > Big events: I reckon smaller events that are highly technical or devoted specifically for specific topic, are better than big events, where there are a lot of people. Big events tend to be more general and kind of discombobulating, as there are so many people talking to each other one has an impression to be a weirdo, not having talked to anyone.

Ferrari

Cybertruck

Big events have also a flaw, that there is very intrusive and pressure-full marketing done and on one day you can buy the same ticket for 65$ and the next day you can have 2 tickets in the same price, which is annoying. Smaller events often have stable price of the event-ticket, which I find a great solution, even if for someone it out of budget.

However for sure good things about big-events is bigger amount of projects and companies to be approached and talked to, to know what services are nowadays offered on the market.

And therefore, the amount of stickers is also greater 😀 Here’s the new layout/design of my laptop. Hope you like it 😁

sticker-filled

front-case

Whereas smaller events like for sure Monero Konferenco could be such event……

Unfortunately, I guess I will not be able to get to the event, due to the financial circumstances on my own. Now, I’ve an impression as though I wasted my money on NBX to be honest, although there are visible benefits from that event.

I really would love to visit Monero Konferenco this year’s edition (even though it’s in Warsaw). This event is going to be technical and specific, something I had dreamt about and could not find so specifically. It sounds it’s not going to be sort of scattered gibberish about financial matters.

Don’t get me wrong, finances are super-important field of human-life, but when it comes to such events, it ends up on artificially looking for me severe talks about the future, another 101 sessions instead of bringing some more medium-advanced/advanced knowledge so people can develop.

And unfortunately a lot of speakers in my eyes are just dreams-sellers and are excluded from reality, pushing from the stage some truisms about hard-work, persistence, everything everyone knows about. But in the end of the days, everyone has to deal with their own issues and do everything what they can in their scale to solve them, not in the speaker’s scale.

politics

Furthermore, I do not preach that big-events, are bad and you should not attend them. No I just present the trade-offs of both types of events. Both have pros and cons, that should be basically taken into a count and should be treated separately and not as a comparing-pair.

I have to confess, even though there were projects that interested me like Gen6, Relocatify or Sealed. Most of the projects were already about combining Tradfi with Defi. Speaking outspoken, that hurts. Cryptocurrencies were the hope, which were about to turn the way we understand finances and the way we pay. Unfortunately, it seems that cryptocurrencies become only an asset instead of what their real purpose was. It seems crypto became alternative and is not going to become a payment-system. At least not in next 5/10 years, I suppose.

tradfi

tradfi2

tradfi3

That doesn’t mean however that I stopped being engaged in cryptocurrencies and blockchain. No, I just know that I’m just likely to build a very niche product if I were to build a private-blockchain and it will not be something that institutions would put money into (Which I actually would not like them to do).

We saw how big pump was on ZTrash (ZCash) and even bigger dump occured, only to pump the narrative and take the money from naive people, who blindly believed in privacy-turn. Unless markets are controlled by big whales, that operate in fiat, psychotically indulge theirself in seeing wars and blood of other innocent people, and understand only money-language, no change in financial-system is about to occur, and people will exist, so long will the markets be manipulated.

Resign from my privacy standard was a failure – On NBX, I came to a conclusion, not to cover my face as I usually do in public and not only. I did it for common convenience and not to trigger controversies among people there (usually a covered face is associated mostly with criminals, than carrying about privacy). Also as I got to the venue, it turned out light was shit and the air was slightly humid for me, so I could suffocate in the mask and could basically fall on someone or cause damage while walking, if I had my glasses on.

Also I gone there with an attitude that, if I don’t show my face in social media anywhere, so I will not be recognisable by anyone (Previously I used to post my images in a mask online).

Big events have their flaw also that there are basically cameras everywhere, everyone is recording something and I genuinely felt, when I was just resting after networking as though someone would basically put the camera right into my face. Whereas MoneroKonferenco seems to be a really private arrangement. They have even their Photo Policy, which sound like:

Ask before snapping, all persons in a photo/video must have explicitly given consent to be photographed/recorded. As such, please avoid taking photos/video of large crowds, audience, or workshop participants.

Don’t get me wrong, I’m not saying those all fluffy stuff about that conference, trying to scrounge money from you guys or something, no.

Rather just express my genuine willingness to appear, there though given my financial situation I know it will be tough. I will not create a fund-raising for a trip to Warsaw specifically for Monero-Konferenco, if I cannot even give you anything in exchange.

One option would be to go and work there as an volunteer, as they get the ticket for free. Which sounds as an interesting experience in my opinion, we will see if the event will fit my schedule or not.

People on the big-events: I was surprised, when I saw people who have less knowledge about cryptocurrencies than I have, are younger than me, and make money in this industry, whereas I, not being fake-modest have a quite big knowledge on cryptocurrencies both from financial and technical point of view and haven’t made a single penny.

I do not complain or say I’m worse, just assert the facts that some people make money faster.

Candidly, I’m more looking on events for connecting with devs and people who build and also people who worked on projects already, than financial or businessman connection.

I decided to resign from hackathon participation

Given the fact that my financial struggle nowadays and my experience from trips, I decided not to participate in ETHSilesia hackathon, that I intended to.

Apparently everything seemed to fit in time perfectly, but the budget doesn’t lie and I cannot pump it somehow out of nowhere. My investments currently are 60% down, and I will not resolve the loss.

Hence, I decided to devote this time to implement solid gameplay feature with reward system based on ZKP (likely to be implemented with Noir).

Was there something technical, that I’ve done ?

Obviously ! Week without going is lost week though 😀 (Don’t take it literally). On Sunday/Monday I started implementing the gameplay functionality with socket.io and was fixing the bugs with the actual frontend code in my Pokestake project, that I work on.

You can see above the mechanism, that the connection between two players, has been successfully estabilished.

If you have some suggestions, feel free to visit my repos and create an issue with your suggestion 😀 If you see some bug or see a way to make code more efficient, also feel free to post an issue

Frontend

GitHub logo

LuftieTheAnonymous
/
PokeStake-Dapp

A Pokemon themed staking protocol with usage of Chainlink VRF

PokeStake 🎴⛓️

PokeStake Banner

A decentralized staking protocol where you can lock Pokemon cards and draw random rewards daily. Built on-chain with verifiable randomness and IPFS storage.

Overview

PokeStake is a Web3 staking protocol that lets users stake Pokemon cards and participate in daily random draws. Each day, stakers can claim a random card from the pool—powered by Chainlink VRF for cryptographically secure randomness and Pinata for decentralized card metadata storage.

Tech Stack

Technology Purpose Version
Next.js Frontend framework & API routes Latest
TypeScript Type-safe development Latest
Solidity Smart contract logic ^0.8.0
Foundry Smart contract development & testing Latest
RainbowKit Wallet connection & UI Latest
Wagmi Ethereum hooks & contract interaction Latest
TanStack Query Server state management Latest
Chainlink VRF Verifiable randomness v2
Pinata SDK IPFS pinning & card metadata Latest

Features

  • 🎴 Stake Pokemon Cards – Lock your cards into the protocol
  • 🎰 Daily Random Draws – Once per day, draw…

Smart-Contracts

GitHub logo

LuftieTheAnonymous
/
PokeStake_Protocol

A Staking protocol with usage of Chainlink VRF for drawing a random pokemon Card

Foundry

Foundry is a blazing fast, portable and modular toolkit for Ethereum application development written in Rust.

Foundry consists of:

  • Forge: Ethereum testing framework (like Truffle, Hardhat and DappTools).
  • Cast: Swiss army knife for interacting with EVM smart contracts, sending transactions and getting chain data.
  • Anvil: Local Ethereum node, akin to Ganache, Hardhat Network.
  • Chisel: Fast, utilitarian, and verbose solidity REPL.

Documentation

https://book.getfoundry.sh/

Usage

Build

$ forge build

Test

$ forge test

Format

$ forge fmt

Gas Snapshots

$ forge snapshot

Anvil

$ anvil

Deploy

$ forge script script/Counter.s.sol:CounterScript --rpc-url <your_rpc_url> --private-key <your_private_key>

Cast

$ cast <subcommand>

Help

$ forge --help
$ anvil --help
$ cast --help

Backend Code

How have you been doing ?

What were you up to in recent week ? Some event attended ? Some side-project done ? Some wins ? Some failures ? Let me know down in the comments, hope you reading enjoyed the article (I have edited and written it about 7 hours).

Cheers for reaching until the end, Luftie

ABAP Unit Testing in SAP S/4HANA: A Senior Architect’s Guide to Writing Tests That Actually Matter

Let me be honest with you: for most of my early career, ABAP unit testing felt like a box-ticking exercise. Write a test, make it green, move on. It wasn’t until I inherited a legacy codebase that kept breaking in production—in ways nobody could predict—that I truly understood what good unit tests are worth. If you’re serious about building ABAP unit testing practices that create real safety nets, this guide is for you.
We’re going to go well beyond the basics. We’ll look at test doubles, dependency injection in ABAP OOP, how to structure test classes for maintainability, and how to integrate testing into your development workflow in a way that actually sticks—without slowing your team to a crawl.

Why ABAP Unit Testing Is More Critical Than Ever in S/4HANA

S/4HANA migration projects are exposing years of technical debt. I’ve seen it repeatedly: a business-critical program that “works fine” on ECC gets migrated, and suddenly edge cases that were hidden for a decade start surfacing. Without a solid test suite, every change becomes a leap of faith.

Beyond migrations, the modern ABAP landscape has shifted dramatically. Clean ABAP principles (which we explored in ABAP Clean Code: 10 Golden Rules for Readable and Maintainable SAP Code) demand testability as a first-class concern. You can’t write clean code without writing testable code—they’re the same discipline.

Here’s the business case in plain terms:

  • Reduced regression risk: Catch breaking changes before they reach production

  • Faster onboarding: Tests document intent better than comments ever will

  • Refactoring confidence: Modify code without fear when your test suite has your back

  • Technical debt visibility: Hard-to-test code is a direct indicator of poor design

The Anatomy of a Good ABAP Unit Test

Before we write a single line, let’s align on what makes a unit test valuable. I use the FIRST principles as my mental checklist:

  • Fast — Runs in milliseconds, no database round-trips

  • Independent — Each test stands alone, no shared state

  • Repeatable — Same result every time, regardless of environment

  • Self-validating — Pass or fail, no manual inspection needed

  • Timely — Written close to (or before) the production code

Most ABAP unit tests I’ve audited fail on “Fast” and “Independent” because they hit the database or depend on system configuration. We’ll fix that.

Setting Up Your Test Class: The Local Test Class Pattern

ABAP unit tests live in local test classes defined in the test include of a global class, or directly in a program’s test include. Here’s the standard scaffold I use:


&quot;! @testing ZCL_ORDER_VALIDATOR
CLASS ltc_order_validator DEFINITION
  FOR TESTING
  RISK LEVEL HARMLESS
  DURATION SHORT.

  PRIVATE SECTION.
    DATA: mo_cut TYPE REF TO zcl_order_validator.  &quot; CUT = Class Under Test

    METHODS:
      setup,          &quot; Runs before each test method
      teardown,       &quot; Runs after each test method
      should_reject_empty_order         FOR TESTING,
      should_accept_valid_order         FOR TESTING,
      should_reject_order_over_limit    FOR TESTING.

ENDCLASS.

CLASS ltc_order_validator IMPLEMENTATION.

  METHOD setup.
    mo_cut = NEW zcl_order_validator( ).
  ENDMETHOD.

  METHOD teardown.
    CLEAR mo_cut.
  ENDMETHOD.

  METHOD should_reject_empty_order.
    &quot; Arrange
    DATA(ls_order) = VALUE zs_order( ).

    &quot; Act
    DATA(lv_result) = mo_cut->validate( ls_order ).

    &quot; Assert
    cl_abap_unit_assert=>assert_equals(
      act  = lv_result
      exp  = abap_false
      msg  = &#039;Empty order should be rejected&#039;
    ).
  ENDMETHOD.

  METHOD should_accept_valid_order.
    &quot; Arrange
    DATA(ls_order) = VALUE zs_order(
      order_id   = &#039;4500001234&#039;
      material   = &#039;MAT-001&#039;
      quantity   = 10
      unit       = &#039;PC&#039;
    ).

    &quot; Act
    DATA(lv_result) = mo_cut->validate( ls_order ).

    &quot; Assert
    cl_abap_unit_assert=>assert_equals(
      act  = lv_result
      exp  = abap_true
      msg  = &#039;Valid order should be accepted&#039;
    ).
  ENDMETHOD.

  METHOD should_reject_order_over_limit.
    &quot; Arrange
    DATA(ls_order) = VALUE zs_order(
      order_id   = &#039;4500001235&#039;
      material   = &#039;MAT-001&#039;
      quantity   = 99999  &quot; Exceeds business limit
      unit       = &#039;PC&#039;
    ).

    &quot; Act
    DATA(lv_result) = mo_cut->validate( ls_order ).

    &quot; Assert
    cl_abap_unit_assert=>assert_equals(
      act  = lv_result
      exp  = abap_false
      msg  = &#039;Order exceeding quantity limit should be rejected&#039;
    ).
  ENDMETHOD.

ENDCLASS.

Notice the naming convention: should_[expected_behavior]_[when_condition]. This reads like a specification. When a test fails at 2am, you want the name to tell you exactly what broke—not force you to dig through code.

Dependency Injection: The Key to Testable ABAP OOP Code

Here’s where most ABAP developers hit a wall. Your class calls a database-reading helper, an RFC, or a BAdI. How do you test the logic without actually hitting those external dependencies?

The answer is dependency injection—and it pairs perfectly with the OOP design patterns covered in ABAP OOP and Strategy Pattern: Real-World Applications.

Here’s the pattern in practice. First, define an interface for your dependency:


INTERFACE zif_material_repository.
  METHODS get_by_id
    IMPORTING iv_material_id TYPE matnr
    RETURNING VALUE(rs_material) TYPE mara
    RAISING   zcx_material_not_found.
ENDINTERFACE.

Then implement the real version that hits the database:


CLASS zcl_material_repository DEFINITION
  PUBLIC FINAL
  CREATE PUBLIC.

  PUBLIC SECTION.
    INTERFACES zif_material_repository.

ENDCLASS.

CLASS zcl_material_repository IMPLEMENTATION.
  METHOD zif_material_repository~get_by_id.
    SELECT SINGLE * FROM mara
      WHERE matnr = @iv_material_id
      INTO @rs_material.
    IF sy-subrc <> 0.
      RAISE EXCEPTION TYPE zcx_material_not_found.
    ENDIF.
  ENDMETHOD.
ENDCLASS.

Now inject the dependency through the constructor:


CLASS zcl_order_processor DEFINITION
  PUBLIC FINAL
  CREATE PUBLIC.

  PUBLIC SECTION.
    METHODS constructor
      IMPORTING io_material_repo TYPE REF TO zif_material_repository.

    METHODS process_order
      IMPORTING is_order        TYPE zs_order
      RETURNING VALUE(rv_success) TYPE abap_bool.

  PRIVATE SECTION.
    DATA mo_material_repo TYPE REF TO zif_material_repository.

ENDCLASS.

CLASS zcl_order_processor IMPLEMENTATION.
  METHOD constructor.
    mo_material_repo = io_material_repo.
  ENDMETHOD.

  METHOD process_order.
    TRY.
      DATA(ls_material) = mo_material_repo->get_by_id( is_order-material ).
      &quot; ... business logic here ...
      rv_success = abap_true.
    CATCH zcx_material_not_found.
      rv_success = abap_false.
    ENDTRY.
  ENDMETHOD.
ENDCLASS.

Writing Test Doubles: Mocks, Stubs, and Fakes in ABAP

With dependency injection in place, you can now inject a fake implementation during testing. Let’s create a test double for our material repository:


&quot; Define inside the test class include
CLASS ltc_material_repo_stub DEFINITION FOR TESTING.
  PUBLIC SECTION.
    INTERFACES zif_material_repository.
    DATA ms_return_material TYPE mara.
    DATA mv_should_raise     TYPE abap_bool.
ENDCLASS.

CLASS ltc_material_repo_stub IMPLEMENTATION.
  METHOD zif_material_repository~get_by_id.
    IF mv_should_raise = abap_true.
      RAISE EXCEPTION TYPE zcx_material_not_found.
    ENDIF.
    rs_material = ms_return_material.
  ENDMETHOD.
ENDCLASS.

&quot;! @testing ZCL_ORDER_PROCESSOR
CLASS ltc_order_processor DEFINITION FOR TESTING
  RISK LEVEL HARMLESS
  DURATION SHORT.

  PRIVATE SECTION.
    DATA: mo_cut       TYPE REF TO zcl_order_processor,
          mo_repo_stub TYPE REF TO ltc_material_repo_stub.

    METHODS:
      setup,
      should_succeed_when_material_found    FOR TESTING,
      should_fail_when_material_not_found   FOR TESTING.

ENDCLASS.

CLASS ltc_order_processor IMPLEMENTATION.

  METHOD setup.
    mo_repo_stub = NEW ltc_material_repo_stub( ).
    mo_cut = NEW zcl_order_processor( mo_repo_stub ).
  ENDMETHOD.

  METHOD should_succeed_when_material_found.
    &quot; Arrange: Configure stub to return a valid material
    mo_repo_stub->ms_return_material = VALUE mara( matnr = &#039;MAT-001&#039; ).
    mo_repo_stub->mv_should_raise = abap_false.

    &quot; Act
    DATA(ls_order)   = VALUE zs_order( material = &#039;MAT-001&#039; quantity = 5 ).
    DATA(lv_success) = mo_cut->process_order( ls_order ).

    &quot; Assert
    cl_abap_unit_assert=>assert_true(
      act = lv_success
      msg = &#039;Order processing should succeed when material exists&#039;
    ).
  ENDMETHOD.

  METHOD should_fail_when_material_not_found.
    &quot; Arrange: Configure stub to simulate missing material
    mo_repo_stub->mv_should_raise = abap_true.

    &quot; Act
    DATA(ls_order)   = VALUE zs_order( material = &#039;GHOST-MAT&#039; quantity = 5 ).
    DATA(lv_success) = mo_cut->process_order( ls_order ).

    &quot; Assert
    cl_abap_unit_assert=>assert_false(
      act = lv_success
      msg = &#039;Order processing should fail when material does not exist&#039;
    ).
  ENDMETHOD.

ENDCLASS.

No database. No RFC calls. These tests run in under 10 milliseconds, and they prove exactly what you need them to prove.

Testing Exception Handling: Don’t Skip This

One of the most overlooked aspects of unit testing is verifying that your exception handling logic—which we explored deeply in ABAP Exception Handling: Clean, Reliable Error Management—actually works as designed. Here’s how to assert that an exception is raised:


METHOD should_raise_exception_on_null_input.
  DATA lx_exception TYPE REF TO zcx_invalid_input.

  TRY.
    mo_cut->process_order( VALUE #( ) ).
    &quot; If we reach here, the test should fail
    cl_abap_unit_assert=>fail(
      msg = &#039;Expected ZCX_INVALID_INPUT to be raised but it was not&#039;
    ).
  CATCH zcx_invalid_input INTO lx_exception.
    &quot; Assert the exception carries the right message
    cl_abap_unit_assert=>assert_not_initial(
      act = lx_exception->get_text( )
      msg = &#039;Exception should carry a meaningful message&#039;
    ).
  ENDTRY.
ENDMETHOD.

Common Pitfalls to Avoid

I’ve reviewed hundreds of ABAP test suites. Here are the mistakes I see most often:

1. Testing Implementation, Not Behavior

Your test should answer “does this method do what I expect?” not “does this method call these internal methods in this order?” If your tests break every time you refactor internals, they’re testing the wrong thing.

2. One Giant Setup Method

When your setup method tries to configure everything for every possible test scenario, tests become impossible to understand. Instead, create helper methods that each test can call to set up only what it needs.

3. Magic Numbers Without Explanation

Why is the quantity limit 99999? Document it. A test is documentation first, verification second.

4. Ignoring the Risk Level Annotation

Use RISK LEVEL HARMLESS for pure unit tests. If a test really does need database access (for integration-style tests), set it to CRITICAL and separate it from your unit test suite. Mixing them destroys your fast feedback loop.

Integrating Unit Tests Into Your Development Workflow

Writing tests is only half the battle. The other half is making sure they actually get run. Here’s the workflow I recommend for teams:

  • Run unit tests before every transport release — Use transaction SE80 or ABAP Development Tools (ADT) in Eclipse to run tests for all affected objects

  • Set a code coverage target — I recommend starting at 60% and moving toward 80% over time. Perfect coverage is a myth; meaningful coverage is the goal

  • Use ATC (ABAP Test Cockpit) rules — Configure ATC to flag objects that have zero test coverage as a code quality warning

  • Review test code in code reviews — Test code is production code. It deserves the same scrutiny

  • Never skip tests to meet a deadline — This is the most expensive shortcut in software development

Quick Reference: Key cl_abap_unit_assert Methods

Method
Use When

assert_equals
Exact value match expected

assert_not_equals
Value must differ from unexpected

assert_true
Boolean condition must be true

assert_false
Boolean condition must be false

assert_initial
Variable must be initial/empty

assert_not_initial
Variable must have a value

assert_bound
Reference must not be null

assert_not_bound
Reference must be null

fail
Force a test failure unconditionally

Final Thoughts: Tests Are a Design Activity

The best insight I can offer after years of working on SAP systems is this: if your code is hard to test, your design has a problem. Testability is a forcing function for good architecture. The moment you try to write a unit test and realize you need to spin up half the SAP system to do it, that’s feedback—feedback that your class is doing too much or knows too much about its surroundings.

Start small. Pick one class, write three meaningful tests for it. See how it feels. Then expand. The habit, once formed, is genuinely one of the most valuable professional skills you can build as an ABAP developer.

And if you’re working on the performance side of things—making your ABAP code not just correct but fast—make sure to check out SAP ABAP Performance Optimization: Identifying and Fixing Bottlenecks in Real-World Systems. Tests and performance go hand in hand: you can’t safely optimize code you haven’t tested.

What’s your current testing setup look like? Are you starting from zero, or trying to add tests to an existing codebase? Drop a comment below—I read every one, and real-world questions often turn into future articles. If this was useful, share it with a colleague who’s still shipping code without tests. 🙂

Cosine Similarity vs Dot Product in Attention Mechanisms

Installerpedia Screenshot

For comparing the hidden states between the encoder and decoder, we need a similarity score.

Two common approaches to calculate this are:

  • Cosine similarity
  • Dot product

Cosine Similarity

It performs a dot product on the vectors and then normalizes the result.

Example

Encoder output:

[-0.76, 0.75]

Decoder output:

[0.91, 0.38]

Cosine similarity ≈ -0.39

  • Close to 1 → very similar → strong attention
  • Close to 0 → not related
  • Negative → opposite → low attention

This is useful when:

  • Values can vary a lot in size
  • You want a consistent scale (-1 to 1)

The problem is that it’s a bit expensive. It requires extra calculations (division, square roots), and in attention we don’t always need that.

Dot Product

Dot product is much simpler. It does the following:

  • Multiply corresponding values
  • Add them up

Example

(-0.76 × 0.91) + (0.75 × 0.38) = -0.41

Dot product is preferred in attention because:

  • It’s fast
  • It’s simple
  • It gives good relative scores

Even if the numbers are not normalized, the model can still figure out:

  • Which words are more important
  • Which words to ignore

Looking for an easier way to install tools, libraries, or entire repositories?
Try Installerpedia: a community-driven, structured installation platform that lets you install almost anything with minimal hassle and clear, reliable guidance.

Just run:

ipm install repo-name

… and you’re done! 🚀

Installerpedia Screenshot

🔗 Explore Installerpedia here

SAP MES Integration with PP/QM: Building a Real-Time Production Monitoring Architecture That Actually Works

If you’ve spent any time in a manufacturing environment, you know the dirty secret nobody talks about in conference rooms: the gap between what the ERP system thinks is happening on the shop floor and what’s actually happening is often enormous. Orders that are “in process” for three days. Quality defects discovered at final inspection that could have been caught at operation two. Machine downtime that gets logged retroactively—if it gets logged at all.

This is the problem that SAP MES integration with PP/QM is designed to solve. And after years of designing and delivering these architectures, I can tell you: when it works well, it genuinely transforms manufacturing operations. When it’s done poorly, you end up with a system nobody trusts and a shop floor that goes back to paper.

In this article, I’ll walk you through the architectural decisions, integration patterns, and real-time monitoring strategies that make the difference between a successful MES-SAP integration and an expensive failure.

What We’re Actually Trying to Solve: The Shop Floor Data Problem

Before we talk architecture, let’s be honest about the problem. Most manufacturing companies have SAP S/4HANA (or ECC) handling their production orders, quality inspection lots, and material movements. What they typically lack is real-time feedback from the shop floor. The MES system—whether that’s a third-party product like Siemens Opcenter, Rockwell Plex, or a custom-built solution—sits in the middle, capturing machine signals, operator inputs, and process data that the ERP was never designed to collect.

The integration challenge is bidirectional:

  • Downward (SAP → MES): Production orders, routing operations, BOM components, quality inspection plans, and scheduling data need to flow to the shop floor system so operators know what to build and how.

  • Upward (MES → SAP): Confirmations, actual quantities, quality results, scrap declarations, and material consumption need to flow back so the ERP reflects reality.

The real-time requirement is what makes this hard. A batch upload once an hour might have been acceptable in 2005. Today, with lean manufacturing targets and customer commitments that require hour-by-hour production visibility, you need confirmations flowing back within seconds or minutes of an event occurring on the floor.

Core SAP Objects You Need to Understand

Before designing any integration, make sure you’re fluent in the SAP side of this equation. Here are the objects that matter most:

Production Orders (PP)

  • AUFK: Order header data (status, plant, MRP controller)

  • AFKO: Order header for PP orders (scheduling dates, quantities)

  • AFPO: Order items

  • AFVC: Operations within the order

  • AFVV: Quantities and times for operations

  • RESB: Reservation/component requirements

Quality Management (QM)

  • QMEL: Quality notifications

  • QALS: Inspection lots

  • QASE: Inspection characteristics

  • QAMR: Inspection results (mean values)

  • QAMV: Inspection results (single values)

Understanding these tables isn’t optional. When your MES team tells you “the confirmation isn’t working,” you need to know exactly which BAPI is being called, which fields are required, and which database tables to check for debugging. Ignorance of the underlying data model is where most integrations go wrong.

Architecture Patterns: Choosing the Right Approach

I’ve seen three main architectural patterns used for MES-SAP integration. Each has its place, and choosing the wrong one for your context is a mistake you’ll be living with for years.

Pattern 1: Direct BAPI/RFC Integration

The oldest and most common approach. The MES calls SAP BAPIs directly via RFC connection. For production confirmations, the primary BAPI is BAPI_PRODORDCONF_CREATE_TT. For goods movements, it’s BAPI_GOODSMVT_CREATE.

When it works well: Simple, low-volume scenarios with a single MES system and a stable SAP landscape.

When it fails: Network latency kills you in real-time scenarios. If the MES has to wait for a synchronous RFC response before allowing an operator to proceed, and SAP is having a slow moment, you’ve just created a bottleneck on the production line. I’ve seen this exact scenario halt a production line during a critical period. Not a good day.

Pattern 2: Message-Based Integration via Middleware

The MES publishes events to a message broker (Apache Kafka, RabbitMQ, or SAP Integration Suite), and an integration layer consumes those messages and pushes them to SAP asynchronously. For the reverse direction, SAP IDocs or change pointers trigger outbound messages.

This is the pattern I recommend for most modern implementations. The decoupling is essential. The shop floor system doesn’t need to wait for SAP. If SAP is temporarily unavailable, messages queue up and process when connectivity is restored. You get retry logic, dead-letter queues for failed messages, and monitoring out of the box.

If you’re building event-driven architectures in your SAP landscape, the patterns I discussed in SAP BTP Event Mesh: Building Resilient Integrations That Actually Scale apply directly here—especially the guidance around guaranteed delivery and consumer group management.

Pattern 3: IoT-First with Edge Processing

The most modern approach: machine signals are collected at the edge (using OPC-UA, MQTT, or similar protocols), processed locally to generate business events (“operation completed,” “quality threshold exceeded”), and then those business events are forwarded to both the MES and SAP. The MES becomes a consumer of events rather than the sole source of truth.

This is the direction the industry is moving, particularly in Industrie 4.0 contexts. It enables real-time anomaly detection without requiring SAP to be in the critical path of machine operation.

Practical Implementation: Production Order Confirmation Flow

Let me walk through the most common use case: confirming a production order operation from the MES back to SAP. Here’s the ABAP side of that equation—a wrapper function that handles the BAPI call with proper error handling.

&quot;&quot;&quot;
Wrapper for MES Production Order Confirmation
Calls BAPI_PRODORDCONF_CREATE_TT with proper error handling
Prerequisite: Valid production order exists in AUFK with operations in AFVC
&quot;&quot;&quot;
CLASS zcl_mes_prod_confirmation DEFINITION PUBLIC FINAL CREATE PUBLIC.

  PUBLIC SECTION.
    TYPES:
      BEGIN OF ty_conf_result,
        success     TYPE abap_bool,
        message     TYPE string,
        conf_number TYPE rueck,
      END OF ty_conf_result.

    METHODS confirm_operation
      IMPORTING
        iv_order_number TYPE aufnr
        iv_operation    TYPE vornr
        iv_conf_qty     TYPE menge_d
        iv_scrap_qty    TYPE menge_d
        iv_actual_work  TYPE ae_arbmng  &quot;Actual labor hours&quot;
        iv_posting_date TYPE budat
      RETURNING
        VALUE(rs_result) TYPE ty_conf_result.

  PRIVATE SECTION.
    METHODS build_conf_header
      IMPORTING
        iv_posting_date TYPE budat
      RETURNING
        VALUE(rs_header) TYPE bapi_bus2105_conf_head_create.

    METHODS handle_return_messages
      IMPORTING
        it_return TYPE bapiret2_tab
      RETURNING
        VALUE(rv_success) TYPE abap_bool
      CHANGING
        cv_message TYPE string.

ENDCLASS.

CLASS zcl_mes_prod_confirmation IMPLEMENTATION.

  METHOD confirm_operation.
    DATA:
      ls_header     TYPE bapi_bus2105_conf_head_create,
      lt_timetickets TYPE TABLE OF bapi_bus2105_conf_tt_create,
      ls_timeticket  TYPE bapi_bus2105_conf_tt_create,
      lt_return     TYPE TABLE OF bapiret2,
      lv_conf_num   TYPE rueck.

    &quot;Build the confirmation header&quot;
    ls_header = build_conf_header( iv_posting_date ).

    &quot;Populate the time ticket (operation details)&quot;
    ls_timeticket-orderid    = iv_order_number.
    ls_timeticket-operation  = iv_operation.
    ls_timeticket-yield      = iv_conf_qty.
    ls_timeticket-scrap      = iv_scrap_qty.
    ls_timeticket-work_actual = iv_actual_work.
    ls_timeticket-work_unit  = &#039;H&#039;.  &quot;Hours&quot;
    ls_timeticket-fin_conf   = abap_false.  &quot;Not final confirmation&quot;
    ls_timeticket-postg_date = iv_posting_date.

    APPEND ls_timeticket TO lt_timetickets.

    &quot;Call the BAPI&quot;
    CALL FUNCTION &#039;BAPI_PRODORDCONF_CREATE_TT&#039;
      EXPORTING
        headdata           = ls_header
      TABLES
        timetickets        = lt_timetickets
        return             = lt_return.

    &quot;Handle results&quot;
    rs_result-success = handle_return_messages(
      EXPORTING it_return  = lt_return
      CHANGING  cv_message = rs_result-message
    ).

    IF rs_result-success = abap_true.
      &quot;Commit the work - critical step often missed!&quot;
      CALL FUNCTION &#039;BAPI_TRANSACTION_COMMIT&#039;
        EXPORTING
          wait = abap_true.  &quot;Wait for async update tasks&quot;
    ELSE.
      &quot;Roll back on any error&quot;
      CALL FUNCTION &#039;BAPI_TRANSACTION_ROLLBACK&#039;.
    ENDIF.

  ENDMETHOD.

  METHOD build_conf_header.
    rs_header-postg_date = iv_posting_date.
    rs_header-conf_text  = &#039;MES Automatic Confirmation&#039;.  &quot; Audit trail&quot;
  ENDMETHOD.

  METHOD handle_return_messages.
    rv_success = abap_true.
    DATA(lv_errors) = VALUE string_table( ).

    LOOP AT it_return INTO DATA(ls_return).
      CASE ls_return-type.
        WHEN &#039;E&#039; OR &#039;A&#039;.
          rv_success = abap_false.
          APPEND |{ ls_return-id }-{ ls_return-number }: { ls_return-message }|
            TO lv_errors.
        WHEN &#039;W&#039;.
          &quot;Log warnings but don&#039;t fail&quot;
          MESSAGE s001(zmesint) WITH ls_return-message.
      ENDCASE.
    ENDLOOP.

    IF lv_errors IS NOT INITIAL.
      cv_message = concat_lines_of( table = lv_errors sep = | | ).
    ENDIF.
  ENDMETHOD.

ENDCLASS.

A few things worth highlighting in this code:

  • The BAPI_TRANSACTION_COMMIT with wait = abap_true is critical. Without it, the update runs asynchronously and you can’t be certain the data is committed before you respond to the MES. I’ve debugged production issues that boiled down to this missing parameter.

  • Always distinguish between Error/Abort messages and Warnings. Warnings shouldn’t block processing—log them for monitoring but let the transaction proceed.

  • The rollback on error is non-negotiable. Partial confirmations create data integrity nightmares that are very hard to clean up.

Quality Inspection Results: Closing the Loop

The QM side of MES integration is often underestimated. Most teams focus on production confirmations and treat quality as an afterthought. This is a mistake.

When an operator performs an in-process quality check at a workstation, those results need to flow back to SAP’s inspection lot (QALS) and update the inspection characteristics (QASE). The BAPI for recording inspection results is BAPI_INSPOPER_RECORDRESULTS.

The architectural consideration here is about usage decision triggering. In SAP QM, the usage decision is the formal acceptance or rejection of an inspection lot. In an MES-integrated scenario, you have a choice:

  • Let the MES trigger the usage decision automatically based on measurement results vs. tolerances

  • Record results in SAP and let the QM team make the usage decision manually in QA11

  • Use a hybrid: auto-approve lots where all results are within tolerance, flag exceptions for manual review

Option 3 is almost always the right answer. Full automation sounds appealing but removes human judgment from critical quality decisions. Pure manual processes defeat the purpose of integration. The hybrid approach gives you efficiency where it’s safe and human oversight where it matters.

Real-Time Monitoring: What Good Looks Like

The goal of MES-SAP integration isn’t just data synchronization—it’s operational visibility. Here’s what a mature implementation should provide:

Key Performance Indicators to Track

  • Confirmation lag: Time between operation completion (MES timestamp) and SAP confirmation posting. Target: under 2 minutes for real-time scenarios.

  • Integration error rate: Percentage of MES messages that fail to process in SAP. Target: below 0.5%.

  • Quality result turnaround: Time from inspection completion to usage decision in SAP.

  • Schedule adherence: Comparing planned vs. actual operation times using AFVV data.

Building a Custom Monitoring Dashboard

Don’t rely solely on standard SAP transactions for monitoring your integration. Build a custom ABAP CDS view that joins your integration log table with production order data. If you want to go deep on how CDS views can power real-time reporting scenarios like this, the techniques covered in ABAP CDS Views ile Performanslı Veri Modelleme — İleri Seviye Mimari Rehberi (advanced CDS modeling) apply directly—particularly parameterized CDS views for time-range filtering.

Your monitoring view should expose at minimum:

  • All orders with confirmations pending beyond your threshold (e.g., operations completed in MES but not yet confirmed in SAP)

  • Failed messages with their error details and retry count

  • Quality lots awaiting usage decision past SLA

Common Failure Modes and How to Avoid Them

Let me share the failure modes I’ve seen most often, so you don’t have to learn them the hard way:

1. Order Status Not Checked Before Confirmation

Your MES will sometimes try to confirm an operation on an order that’s been technically completed, locked, or deleted in SAP. Always check order status (via STATUS_CHECK function module or JEST/TJ02T tables) before attempting a confirmation. A status check that takes 50ms saves you a failed transaction and a manual correction job.

2. Timezone Mismatches

MES systems often store timestamps in UTC. SAP production confirmations care about plant-local time for scheduling calculations. A timezone offset error can make your confirmation appear to occur before the order was released—which SAP will reject. Always align on timezone handling during design, not during go-live.

3. Missing Backflushing Logic

If your routing operations use backflushing for component consumption, SAP will automatically post goods issues when the operation is confirmed. Your integration needs to account for this—don’t double-post goods movements that backflushing will handle automatically. Check the backflushing indicator on the operation (AFVC-MGVRG) before posting separate goods movements.

4. No Idempotency Handling

Networks fail. Message brokers retry. Your confirmation BAPI call might get executed twice for the same MES event. Design your integration to handle duplicate messages gracefully—log the MES transaction ID and check for duplicates before calling the BAPI. This is basic, but surprisingly often missed.

The principles around clean error handling that I’ve referenced in SAP ABAP Performance Optimization apply to integration code as much as to any other ABAP program—maybe more so, because the error paths are more complex and the consequences of getting them wrong are immediate and visible on the production floor.

IoT Layer: Adding Machine Signals to the Picture

The frontier of MES-SAP integration is incorporating machine signal data directly. With OPC-UA becoming the standard industrial communication protocol, you can capture cycle times, temperatures, pressures, and machine states without operator input.

The architectural principle here is edge intelligence: don’t send every raw machine signal to SAP. Process signals at the edge or in the MES to generate business-relevant events. SAP should receive “Cycle completed—30.2 seconds, within tolerance” not a stream of raw sensor readings.

When a process parameter exceeds its tolerance, the event triggers three things simultaneously:

  • A quality notification in SAP QM (BAPI_QUALNOT_CREATE)

  • An alert in the MES for the operator

  • An entry in your integration monitoring log

This closed-loop quality approach—where the machine itself triggers a quality response in the ERP—is what Industrie 4.0 looks like in practice. Not just connected machines, but machines that drive business processes.

Key Takeaways

  • Choose your integration pattern deliberately: direct RFC for simple scenarios, message-based for resilience at scale, IoT-first for maximum real-time capability.

  • The BAPI layer works well, but you must handle commits, rollbacks, and status pre-checks explicitly—SAP won’t protect you from a badly formed request.

  • Quality integration is as important as production confirmation—design the usage decision workflow early.

  • Build monitoring into your architecture from day one, not as an afterthought.

  • Idempotency, timezone alignment, and backflushing awareness are the details that separate implementations that work from implementations that work in theory.

What’s Your Biggest MES Integration Challenge?

Every manufacturing environment has its own quirks—custom machine protocols, legacy MES systems that predate modern APIs, organizational dynamics between IT and operations teams. The architecture patterns here give you a foundation, but the real work is always in the details of your specific context.

I’d genuinely like to hear what you’re working through. Drop a comment below describing your integration scenario—whether you’re evaluating architectures for a new project or debugging an existing one—and let’s work through it together. And if this article gave you a useful framework, share it with a colleague who’s dealing with the same challenges. The shop floor deserves better than manual reconciliation and end-of-shift batch uploads.

Technical Leadership in SAP Projects: How Senior Architects Make Better Decisions Under Pressure

Technical Leadership in SAP Projects: How Senior Architects Make Better Decisions Under Pressure
Every seasoned SAP architect has been there. It’s 11 PM, production is down, the business is losing thousands of dollars per hour, and three junior developers are staring at you waiting for a clear direction. In that moment, your technical depth matters—but it’s your technical leadership that determines the outcome. After years of navigating these high-stakes moments in SAP environments, I want to share what actually works when the pressure is on, and more importantly, how to build the decision-making muscle before you ever need it.

This article is for architects and senior developers who are either stepping into leadership roles or looking to sharpen their judgment in complex SAP project environments. We’ll cover structured decision frameworks, trade-off analysis, how to communicate architectural decisions effectively, and how to grow the next generation of SAP engineers around you.

Why Technical Leadership in SAP Is Uniquely Challenging

SAP landscapes are not typical software environments. You’re dealing with decades of business logic baked into customizations, strict upgrade cycles, deep integration dependencies, and organizations that are often risk-averse by nature. When you layer modern technologies—SAP BTP, ABAP RESTful Application Programming Model (RAP), CDS Views, event-driven architecture—on top of a legacy core, the architectural decisions become exponentially more complex.

Here’s what makes technical leadership in SAP particularly demanding:

  • Legacy debt is invisible until it bites you. Years of undocumented enhancements, Z-programs, and BADI implementations create a minefield that only becomes visible mid-project.

  • Business stakeholders speak a different language. Translating “we need to refactor the IDoc processing layer” into business risk and timeline impact is genuinely hard.

  • The SAP ecosystem evolves faster than most teams can absorb. Clean Core, BTP extensions, S/4HANA migration—the rate of change demands continuous architectural re-evaluation.

  • Decisions have long tails. A poor integration design choice made today might surface as a performance crisis two years into production. The architect who made the call may no longer even be on the project.

Understanding these constraints isn’t pessimism—it’s the foundation of good leadership. You make better decisions when you honestly acknowledge the environment you’re operating in.

The Architecture Decision Record (ADR): Your Most Underused Tool

One of the most impactful habits I’ve developed over the years is consistently writing Architecture Decision Records. An ADR is a short, structured document that captures why a significant technical decision was made, not just what was decided.

In SAP projects, this is particularly valuable. When a team three years from now is wondering why the system uses IDocs for vendor invoice integration instead of REST services, the ADR tells the story—including the constraints, the alternatives considered, and the trade-offs accepted.

ADR Template for SAP Projects


## ADR-0042: Use SAP Event Mesh for Order-to-Cash Integration

**Date:** 2025-01-15  
**Status:** Accepted  
**Deciders:** [Lead Architect, Integration Team Lead, BTP Platform Owner]

### Context
The Order-to-Cash process requires near-real-time event propagation 
between S/4HANA and three downstream systems (CRM, WMS, external 3PL).
Current IDoc-based approach introduces 15-30 minute delays and brittle 
point-to-point coupling.

### Decision
We will adopt SAP BTP Event Mesh as the central event broker for all 
Order-to-Cash domain events, replacing current IDoc RFC calls.

### Alternatives Considered
1. **Direct REST APIs** – Synchronous; creates tight coupling, 
   cascading failure risk under load.
2. **Enhanced IDocs with immediate delivery** – Reduces delay but 
   doesn&#039;t solve the coupling problem; limits future extensibility.
3. **SAP Integration Suite with polling** – Introduces unnecessary 
   complexity; polling defeats event-driven purpose.

### Consequences
- Positive: Loose coupling, independent scalability, audit trail via 
  event log, supports future consumer onboarding without sender changes.
- Negative: Team upskilling required on event-driven patterns; 
  added BTP licensing cost; eventual consistency model requires 
  business process alignment.

### Review Date: 2026-01-15

Notice the “Review Date” field. Good architectural decisions have expiry dates. What’s correct today may be wrong tomorrow, and building in a review cycle signals intellectual honesty to your team.

If you’re exploring event-driven architectures in SAP, our article on SAP BTP Event Mesh and building resilient integrations provides deep technical context that pairs well with the ADR approach described here.

Decision-Making Under Pressure: A Framework That Actually Works

When you’re in a production crisis or a contentious architecture review, structured thinking is your best ally. I use a lightweight framework I call SCOPE for time-pressured decisions:

  • S – Situation clarity: What exactly is the problem? Don’t skip this. In SAP incidents, it’s common to spend 40 minutes solving the wrong problem.

  • C – Constraints visible: What can’t we change? Business hours, system availability windows, release cycles, compliance requirements.

  • O – Options on the table: Generate at least three options. The worst decisions come from false binary choices.

  • P – Probability and impact: Quick mental model—what’s the likelihood each option creates new problems, and how severe?

  • E – Execute and document: Make the call, own it, and write down why. Even a Slack message to the team counts.

The SCOPE framework won’t eliminate bad calls—nothing will. But it dramatically reduces the type of bad call where you react emotionally, skip analysis, or let the loudest voice in the room drive the decision.

Practical Example: Handling an ABAP Performance Crisis

Imagine a critical batch job in SD is timing out after the S/4HANA migration. Business is escalating. Here’s SCOPE in action:

  • S: Batch job SELECT on VBAP and VBAK with joins runs 40+ minutes in S/4HANA vs. 8 minutes in ECC. Migration was two weeks ago.

  • C: Can’t modify table structures; can’t postpone month-end close; only four-hour maintenance window available tomorrow morning.

  • O: Option 1—rewrite SELECT to use CDS View with proper indexing. Option 2—introduce background parallelization using CALL FUNCTION IN BACKGROUND TASK. Option 3—apply SAP Note for known HANA optimizer issue with this query pattern.

  • P: Option 3 is lowest risk if a relevant SAP Note exists (check first). Option 1 is medium risk—requires testing. Option 2 is highest risk—architecture change under time pressure.

  • E: Check SAP Notes immediately. If no note, proceed with Option 1 in the maintenance window with a clear rollback plan.

For deeper context on ABAP performance investigation techniques, I recommend reading our ABAP performance optimization guide covering real-world bottleneck identification—the query analysis patterns there apply directly to scenarios like this.

Communicating Architecture to Non-Technical Stakeholders

One of the skills that separates good technical leads from great ones is the ability to make complex architectural concepts legible to business stakeholders—without dumbing them down or being condescending.

Here’s a technique I’ve refined over many project steering committees: the Three-Layer Communication Model.

Layer 1: Business Impact (30 seconds)

Lead with what changes for the business. “This change means your finance team will see vendor payment statuses update in near-real time instead of with a 30-minute delay.”

Layer 2: Why It Works (60 seconds)

Explain the mechanism without jargon. “Currently, our systems use a messaging format called IDoc that requires a scheduler to run every 30 minutes. We’re replacing it with an event-driven approach—think of it like switching from scheduled email digests to instant push notifications.”

Layer 3: Risk and Cost (as long as needed)

Be honest about trade-offs. This is where architects lose credibility by overselling. Acknowledge the upskilling cost, the testing effort, and the rollback complexity. Stakeholders respect honesty far more than false confidence.

The moment you start using acronyms in a business meeting without explaining them first, you’ve lost the room. Every IDoc, BAPI, RFC, and CDS acronym needs to earn its place in the conversation.

Growing the Next Generation: Mentorship as a Leadership Responsibility

Technical leadership isn’t just about making the right calls yourself—it’s about building a team that makes good calls when you’re not in the room. This is the hardest part of the job, and the most rewarding.

The Guided Discovery Method

When a junior developer brings you a problem, resist the urge to immediately give the answer. Instead, use what I call Guided Discovery:

  • Ask what they’ve already tried. This surfaces their reasoning process, not just their conclusion.

  • Ask what they think the root cause is. Often they’re closer to the answer than they realize.

  • Offer a directional hint, not the solution. “Have you looked at how the selection conditions interact with the buffering strategy here?”

  • Let them implement and debrief together. The learning sticks when they own the fix.

Yes, this takes longer than just fixing the bug yourself. But you’re not optimizing for today’s ticket—you’re building tomorrow’s senior developer.

Code Reviews as Teaching Moments

Your code reviews are one of your highest-leverage teaching tools. A few principles that have served me well:

  • Comment on the code, never the person. “This approach may cause a performance issue under high load” vs. “You wrote this wrong.”

  • Explain the why behind every critique. If you can’t explain why something should change, question whether it actually needs to.

  • Acknowledge good work explicitly. Positive reinforcement in code reviews is criminally underused. If someone wrote a clean ABAP OOP implementation, say so.

  • Use questions, not directives. “What happens if this internal table is empty when we reach this loop?” teaches better than “Add a CHECK statement here.”

Clean code practices in ABAP are a great foundation for these review conversations. Our guide on ABAP Clean Code and writing maintainable SAP code provides concrete standards that you can reference during reviews.

Trade-Off Analysis: The Core Skill That Separates Architects from Developers

Anyone can learn ABAP syntax. Anyone can configure a BTP service. The skill that genuinely differentiates a senior architect is the ability to reason clearly about trade-offs—and to make that reasoning transparent to the team.

A simple but powerful exercise: for every major technical decision, explicitly map it against four dimensions:

  • Maintainability: How hard will this be to change in 2 years?

  • Performance: What’s the behavior under peak load?

  • Extensibility: Can we add new requirements without structural changes?

  • Team capability: Does the team have the skills to build and operate this? If not, what’s the upskilling cost?

When you make these four axes explicit, decisions that seemed purely technical become organizational conversations. A microservices approach on BTP might score high on extensibility but low on team capability right now—and that’s a legitimate reason to choose a simpler architecture today with a clear migration path for later.

This kind of trade-off thinking is exactly what informs good decisions around process automation in SAP. The architectural considerations around RPA and AI integration—covered in our SAP BTP intelligent process automation article—are a practical application of this four-dimension framework.

Building Your Personal Decision-Making Track Record

Here’s a practice almost no one does but everyone should: keep a personal architecture journal. Not a formal document—a running log of decisions you made, why you made them, and what happened.

Every six months, review it. You’ll start to see patterns in where your instincts are strong and where they consistently lead you astray. This self-awareness is the foundation of genuine technical wisdom—the kind that can’t be taught in a course or read in a book.

Some questions worth journaling after major decisions:

  • What information did I have, and what was I missing?

  • Which constraints did I underestimate?

  • Whose input did I not seek that I should have?

  • If I made this call again tomorrow, would I change anything?

The architects I respect most are not the ones who never make mistakes. They’re the ones who learn from each decision at a structural level—and who actively look for their own blind spots.

Key Takeaways

  • Use Architecture Decision Records to capture the why behind technical choices—not just the what.

  • Apply a structured framework (like SCOPE) when making high-pressure decisions to avoid reactive, emotional choices.

  • Communicate architecture in three layers: business impact first, mechanism second, risks and costs third.

  • Invest in mentorship through Guided Discovery and high-quality code reviews—this is how you multiply your architectural impact.

  • Make trade-off reasoning explicit across maintainability, performance, extensibility, and team capability.

  • Keep a personal decision journal and review it regularly to identify and address your own blind spots.

What’s Your Experience?

Technical leadership in SAP is a craft that takes years to develop—and it’s still evolving. I’d genuinely like to hear from you: what’s the hardest architectural decision you’ve had to make under pressure in an SAP project, and what did you learn from it? Drop your thoughts in the comments below, or reach out directly. The conversations that happen in the comments section are often as valuable as the article itself.

If this resonated with you, share it with a colleague who’s stepping into an architect role—it might save them from a few painful lessons I had to learn the hard way.

Part 1: Why I Chose Amazon Bedrock AgentCore (And What Lambda Gets Wrong for AI Agents)

I built a production AI agent on AWS. Not a demo, not a proof of concept — a real system with persistent memory, guardrails, CI/CD pipelines, and users who depend on it not going down at 2am.

The thing nobody tells you: the hard part isn’t the AI. The hard part is the infrastructure around it.

This series is my attempt to document everything I had to figure out the hard way — from architecture decisions in Part 1 all the way to cost optimisation in Part 6. The companion demo repo is at github.com/rajmurugan01/bedrock-agentcore-starter.

Let’s start at the beginning: why Amazon Bedrock AgentCore, and why not the “obvious” serverless approach.

The obvious approach: Lambda + Bedrock

If you’ve shipped anything serverless on AWS, your first instinct is Lambda. You know it, it has great tooling, CDK support is mature, and it scales to zero.

For a simple Bedrock wrapper — get a message, call InvokeModel, return a response — Lambda is fine. But the moment you add conversational state, it starts to crack.

Here’s what a real conversational AI agent needs:

  1. Session state — the agent needs to remember what happened earlier in the conversation
  2. Long-running processing — LLMs can take 30-90 seconds for complex multi-tool chains
  3. Memory across sessions — the agent should know who the user is from previous conversations
  4. Streaming responses — users expect tokens to appear progressively, not wait 60 seconds for a blob

Let’s look at how Lambda handles each of these.

Problem 1: Lambda’s 15-minute timeout

Lambda has a hard maximum execution timeout of 15 minutes. For a simple Q&A, that’s fine. But for an agentic loop — where the model calls tools, processes results, calls more tools, and reasons over everything — you can easily hit 5-10 minutes per complex interaction.

And I haven’t even mentioned the user’s session. If a user comes back after 20 minutes and continues the conversation, that’s a new Lambda invocation with zero context.

Problem 2: Session state storage

Lambda is stateless by design. Every invocation is independent. For conversational state, you need to:

  1. Store session state somewhere (DynamoDB, ElastiCache, S3)
  2. Load it at the start of every Lambda invocation
  3. Save it at the end of every invocation
  4. Handle the edge case where the Lambda times out mid-session
  5. Build a session expiry and cleanup mechanism

That’s a lot of undifferentiated infrastructure for a problem that isn’t your core business.

Problem 3: Cross-session memory

Beyond session state, real assistants need memory — the ability to remember that a user’s preferred contact method is email, that they’re a premium customer, that they had a billing dispute last month.

With Lambda, you’d need to build this yourself: a vector database for semantic recall, a summarisation pipeline to consolidate old sessions, a retrieval step before each invocation. Entirely custom, entirely your problem to maintain.

What AgentCore actually does

Amazon Bedrock AgentCore is AWS’s managed infrastructure for running AI agents. It’s designed specifically for the workload pattern that Lambda handles poorly.

Here’s the mental model: AgentCore is a managed container orchestrator for long-running, stateful AI agent sessions. You ship a Docker container with your agent code. AgentCore handles:

  • Container lifecycle — starts, stops, scales, and restarts containers
  • Session routing — routes each user session to the right container instance
  • Memory persistence — built-in Semantic, Summary, and UserPreference memory strategies
  • JWT validation — validates Cognito (or custom) JWTs before your code even runs
  • VPC networking — runs your containers inside your VPC without cold start penalties
  • SSE streaming — handles the HTTP connection and SSE protocol for you

The architectural difference:

Lambda approach:
  User message → API Gateway → Lambda (cold start?) → load session from DynamoDB →
  call Bedrock → save session to DynamoDB → return response → Lambda exits

AgentCore approach:
  User message → AgentCore Runtime (JWT validated) → your container (already warm) →
  call Bedrock → response streams back → container stays warm for next message

The architecture we’re building

┌────────────────────────────────────────────────────────────────┐
│  GitHub Actions (OIDC)                                         │
│  ├── Build Docker (linux/amd64)                                │
│  ├── Push to ECR (:latest + :<sha>)                           │
│  └── update-agent-runtime CLI                                  │
└──────────────────────────────┬─────────────────────────────────┘
                               │
                    CDK v2 TypeScript deploys:
                               │
┌──────────────────────────────▼─────────────────────────────────┐
│  AWS Infrastructure (us-east-1)                                │
│                                                                │
│  AgentCore Runtime                                             │
│  ├── Cognito JWT authoriser                                    │
│  ├── AG-UI HTTP protocol (SSE streaming)                      │
│  └── Container: Python agent on port 8080                     │
│                                                                │
│  AgentCore Memory (3 strategies)                               │
│  Bedrock Guardrail (prompt injection + PII)                   │
│  CloudWatch alarms (token count + latency)                    │
└────────────────────────────────────────────────────────────────┘

Primary model: Claude Sonnet 4.6 with prompt caching
Background model: Amazon Nova Pro (cheap classification/summarisation)
CI/CD: GitHub Actions OIDC — no stored AWS credentials

Series roadmap

Part Topic
Part 1 (this post) Architecture & why AgentCore
Part 2 Full CDK stack + 9 deployment gotchas
Part 3 Python agent with Strands SDK + prompt caching
Part 4 Docker local dev loop
Part 5 GitHub Actions OIDC + ECR + Runtime updates
Part 6 Cost breakdown + alarms

Full demo repo: github.com/rajmurugan01/bedrock-agentcore-starter

Originally published at rajmurugan.com. This is Part 1 of the Ultimate Guide to Building AI Agents on AWS with Bedrock AgentCore series.