HackMD vs AnySlate: Which Markdown Tool Is Right for Dev Teams?

Your dev team writes in Markdown. That much is settled. The question is which tool actually fits the way you work, not just for writing a doc, but for the full picture: where the files live, whether your AI tools can touch them, how pricing scales as the team grows, and whether you are locked into a browser tab or can actually work natively on your machine.

HackMD and AnySlate are both serious Markdown tools. They are not the same tool. This comparison lays out the real differences so you can make the right call for your team, not the default one.

What Each Tool Actually Is
HackMD is a browser-based, real-time collaborative Markdown editor. It has been around since 2014 and has built a strong following among developer teams, open-source communities, and academic groups. Its standout features are real-time co-editing, GitHub synchronisation, GitHub Flavoured Markdown support, UML diagrams, math equations via MathJax and KaTeX, presentation mode via reveal.js, and a Book Mode for organising multiple notes into a structured document. It is entirely web-based; there is no official native desktop app. Team plans start at $5 per user per month.

AnySlate is a professional Markdown writing workspace built for serious long-form writing and technical documentation. It runs natively on Mac, Windows, Linux, and in any browser, all under one subscription. Every document is saved as a portable plain .md file. The Professional plan at $60 per year includes real-time collaboration, an AI writing assistant, native MCP integration so AI tools like Claude and Cursor can read and write your documents directly, web publishing with custom CSS, version history, and 100GB of storage.

Head to Head: The Features That Matter for the Dev Team
Feature

HackMD

AnySlate

Platform

Browser only, no official native desktop app

Mac, Windows, Linux, and browser, all in one plan

Real-time collaboration

Yes, core feature, live cursors, colour-coded contributors

Yes, on Professional plan, live cursors

File format

Markdown stored on HackMD servers

Plain .md files, portable, yours to keep

GitHub integration

Yes, push and pull docs directly from repositories

Not natively, files are portable and Git-compatible

AI integration (MCP)

No MCP support

Native MCP, Claude and Cursor read and write docs directly

AI writing assistant

No built-in AI assistant

Yes, built into the Professional plan

Diagrams

Yes, UML, Mermaid, Graphviz, music notation

Yes, code and diagrams supported

Math equations

Yes, MathJax and KaTeX

Yes, LaTeX math rendering

Version history

Yes, available on paid plans

Yes, on Professional plan

Web publishing

Yes, publish notes publicly, Book Mode for structured docs

Yes, with custom CSS control

Pricing

$5 per user per month for team plans

$60 per year flat, all features, all platforms

Free plan

Yes, unlimited notes, up to 3 teammates

Yes, core editor, all 4 platforms, 50MB storage

Desktop app

No official native app

Yes, native Mac, Windows, Linux apps

Mobile app

No native mobile app

No mobile app currently

Where HackMD Has the Edge
HackMD’s GitHub integration is genuinely strong. If your team’s documentation lives in a repository and you want to push and pull docs directly from GitHub without any extra setup, HackMD handles that natively. For open-source projects and teams already deep in a GitHub workflow, that integration removes real friction.

The presentation mode is also a legitimate differentiator. Turning a Markdown document into a reveal.js slide deck directly in HackMD, without exporting or using a separate tool, is a workflow that technical teams who present specs or architecture reviews will find genuinely useful.

And the free plan is generous for small teams. Up to three teammates, unlimited notes, and a solid editing experience at no cost makes HackMD worth trying before committing to a paid plan.

HackMD is best understood as Google Docs for Markdown, fast, browser-based, and built for real-time collaboration on technical content. If your team lives in GitHub and the browser, it fits well with that workflow.

Where AnySlate Has the Edge
The biggest structural difference is the file format. HackMD stores your documents on its servers. AnySlate saves every document as a plain .md file that lives wherever you choose: your machine, a shared folder, or a repository. You can open it in any editor on any device, pass it to any AI tool, commit it to Git, or simply keep it forever without worrying about what happens to the service. There is no export step. There is no lock-in.

The native desktop app matters more than it sounds. A browser tab and a native app behave differently in terms of startup time, keyboard shortcuts, offline reliability, and system integration. For developers who are already context-switching between terminal, editor, and browser all day, having the writing tool as a proper desktop application rather than another browser tab reduces friction in a way that is hard to quantify but easy to feel.

The MCP integration is the most forward-looking differentiator. HackMD has no MCP support. AnySlate connects natively to AI tools like Claude and Cursor via MCP, meaning your agent can read your documentation, write to it, and keep it current as part of your normal workflow, without copy-paste, without switching apps. For teams already using AI coding assistants, this is not a nice-to-have. It is the feature that changes how documentation fits into the development process.

The question is not just which tool is better today. It is about which tool best fits how teams will work in two years, where AI agents are part of every workflow, and the format in which your docs live determines whether those agents can help.

The Pricing Reality for Growing Teams
This is where the comparison gets concrete. HackMD charges $5 per user per month for team plans. AnySlate charges $60 per year flat, regardless of how many people on your team use it.

For five people, HackMD costs $300 per year. AnySlate costs $60. For ten people, HackMD costs $600 per year. AnySlate still costs $60. The gap widens with every team member added. For a small dev team of five to fifteen people, this is not a marginal difference; it is a significant budget decision.

HackMD’s free plan is generous enough for very small teams or individual use. But as soon as you need team features at scale, the per-user pricing compounds quickly.

The One Thing to Take Away
HackMD is a well-built tool with a clear strength: browser-based real-time collaboration with GitHub integration. If that is your primary need and your team is small enough that the per-user pricing works, it is worth using.

AnySlate is built for teams where the writing environment needs to be more than a browser tab, where files need to be portable and AI-readable, where the tool needs to work natively on every platform the team uses, and where pricing should not penalise growth. The $60 flat annual price, native MCP support, native desktop apps, and the plain .md file format are not bolt-on features; they are the product’s founding design decisions.

Both tools are free to start. Try HackMD at hackmd.io and AnySlate at anyslate.io; no account needed for the AnySlate desktop app.

Is Windows Copilot Spyware? Everything You Need to Know

Artificial Intelligence is no longer optional in modern operating systems. From AI-generated text to automated screenshots and contextual memory features, companies are rapidly integrating AI directly into the devices people use every day.

Microsoft has aggressively entered this race through its AI ecosystem called Copilot. What started as an AI assistant inside Microsoft applications has now evolved into something deeply integrated within Windows itself.

But the rollout of Microsoft Copilot and the controversial “Recall” feature triggered intense backlash from cybersecurity researchers, privacy advocates, developers, enterprise administrators, and regular users.

Across forums, Reddit discussions, GitHub issues, cybersecurity blogs, and news platforms, users started asking the same question:

Is Microsoft secretly installing AI features without proper user consent?

Some users even started referring to Recall as “built-in spyware.”

That statement is controversial.

Microsoft strongly denies that Recall or Copilot acts as spyware. The company states that Recall is an optional feature, processes information locally, and gives users control over snapshots and stored data.

However, cybersecurity experts argue that the risks are still significant because of how much sensitive information the system can potentially collect..

What Is Microsoft Copilot?

Microsoft Copilot is an expansive AI assistant ecosystem designed to serve as a productivity-enhancing companion across a wide range of platforms, including Windows, Microsoft 365, the Edge browser, and specialized tools like Visual Studio Code and GitHub. By leveraging advanced large language model technology, it enables users to generate content, summarize complex documents, analyze screenshots, and automate workflows with ease. Integrated directly into Bing, Teams, and standard Office applications, Copilot can answer questions and retrieve activity history to streamline daily tasks. To further solidify this AI-first approach, Microsoft introduced “Copilot+ PCs,” a new generation of hardware optimized for these experiences. However, this evolution has not been without its hurdles, as evidenced by the introduction of Recall—a controversial feature designed to track and search a user’s past activity on their device

*What Is Microsoft Recall?
*

Microsoft Recall is an AI-powered Windows feature designed to continuously capture snapshots of user activity.

According to Microsoft, Recall helps users “retrace their steps” by allowing them to search previous activity using natural language.

For example, users can ask:

  • Show me the document I was editing last week.
  • Find the website where I saw that product.
  • Open the presentation I was working on yesterday.

To make this possible, Recall periodically captures snapshots of what appears on your screen.

Microsoft says these snapshots are:

  • Stored locally on the device
  • Protected using encryption
  • Accessible through Windows Hello authentication
  • Optional and user-controlled

However, the concept immediately triggered alarm bells in the cybersecurity community.

Mozilla and Privacy Experts Warned About Full Screen Snapshot Collection

One of the strongest public criticisms came from privacy-focused organizations and browser developers, including Mozilla.

Mozilla raised concerns that Microsoft Recall could effectively create a searchable photographic memory of nearly everything visible on a user’s screen.

According to Mozilla’s analysis and public commentary around Recall:

  • The feature periodically captures screenshots of user activity
  • Those screenshots may include sensitive personal information
  • Financial details, passwords, medical data, chats, and confidential work could potentially appear in snapshots
  • Users may not fully understand the amount of information being stored
  • If attackers gain access to Recall databases, the stored history could become extremely valuable

Mozilla described Recall as a feature capable of “snapshotting” user activity across the operating system and warned users to carefully evaluate the privacy implications before enabling it.

The concern was not only about Microsoft itself collecting data, but also about the broader cybersecurity risk created by maintaining an AI-searchable archive of screen history.

This criticism became widely discussed across:

  • Reddit privacy communities
  • Cybersecurity blogs
  • Linux communities
  • Enterprise IT forums
  • Digital rights discussions

Many privacy advocates argued that storing continuous screenshots fundamentally changes the trust relationship between users and operating systems.

Why People Started Calling Recall “Spyware”

The term “spyware” is emotionally charged.

Traditionally, spyware refers to malicious software that secretly collects user information without consent.

Microsoft argues Recall does not meet that definition because:

  • It is designed as a productivity feature
  • Data is stored locally
  • Users can disable it
  • Microsoft claims it does not upload data to the cloud

Despite that, many users and researchers still compare it to spyware due to the nature of the data collection.

The controversy exploded because Recall was described as a feature capable of recording almost everything visible on the user’s screen.

That potentially includes:

  • Passwords
  • Credit card details
  • Private chats
  • Emails
  • Confidential work documents
  • Banking information
  • Client data
  • Internal dashboards
  • Authentication tokens
  • Medical information

Cybersecurity experts argued that even if Microsoft itself is not abusing the feature, malware authors or attackers could potentially target Recall databases.

The biggest fear was simple:

If malware compromises the system, Recall becomes a goldmine of user history.

The Major Privacy Backlash

The announcement of Recall in 2024 triggered an immediate and widespread privacy backlash, drawing sharp criticism from security professionals, journalists, and researchers alike. At the heart of the controversy was the feature’s continuous screenshot collection, which experts feared would capture highly sensitive data despite Microsoft’s promised filtering mechanisms. This created a centralized activity history that many viewed as a surveillance risk; critics argued that a searchable AI memory of a user’s life could be disastrous if compromised by malware, shared-device access, or enterprise mismanagement.

Beyond individual privacy, the feature posed a significant risk to enterprise security, with companies worrying that proprietary source code, trade secrets, and confidential customer information might be inadvertently recorded. These anxieties were compounded by trust issues regarding default enablement, as many users feared Microsoft would silently activate the feature via Windows updates. Ultimately, Recall became a flashpoint for broader societal distrust toward big tech, intensifying concerns that AI integration is being used to justify excessive data collection.

Reports of Copilot Appearing Without User Consent

Multiple users across forums and communities reported that Copilot appeared on their systems after updates.

Some users claimed:

  • Copilot appeared after Windows updates
  • AI features were enabled automatically
  • Copilot returned after being disabled
  • Microsoft products integrated AI without clear opt-in consent

A Microsoft community post from 2024 included users complaining that Copilot was added without permission and describing the inclusion as intrusive.

Reddit discussions also showed users claiming Copilot was installed automatically without prompts.

Some developers additionally reported GitHub Copilot settings enabling themselves unexpectedly in certain environments.

These reports fueled broader online claims that Microsoft was pushing AI into systems whether users wanted it or not.

What Microsoft Says

Microsoft strongly rejects the idea that Recall is spyware.

The company states that:

  • Recall is optional
  • Users must opt in
  • Data is processed locally
  • Snapshots are encrypted
  • Windows Hello authentication is required
  • Users can pause, delete, or filter snapshots
  • Recall can be removed entirely

Microsoft also delayed Recall after initial backlash and redesigned parts of its security architecture.

According to Microsoft:

  • Sensitive data is encrypted
  • Keys are protected
  • Recall requires secure authentication
  • Users remain in control

Microsoft later clarified that Recall was not secretly enabled on all systems.

Still, the debate continues.

Why Cybersecurity Experts Are Still Concerned

Even after Microsoft added more protections, many security researchers remain skeptical.

The core issue is not whether Microsoft intends harm.

The concern is whether storing detailed user activity creates a new attack surface.

Cybersecurity experts frequently emphasize an important principle:

The safest sensitive data is the data you never collect.
Even encrypted systems can become targets.

Researchers worry about:

  • Malware extracting Recall data
  • Privilege escalation attacks
  • AI-related vulnerabilities
  • Insider threats
  • Authentication bypasses
  • Misconfigured enterprise deployments

Several reports and security discussions in 2025 and 2026 continued questioning whether Recall fully solved its privacy risks.

Why This Matters for Developers and Businesses

For developers, startups, agencies, and enterprises, this controversy is particularly important.

If AI systems continuously monitor screens, they may unintentionally capture:

  • API keys
  • SSH credentials
  • Database passwords
  • Proprietary code
  • Client dashboards
  • Financial records
  • Internal strategy documents

For agencies and freelancers handling client work, this raises major confidentiality concerns.

If sensitive screens are captured into searchable history systems, organizations must carefully review compliance requirements.

This is especially important for industries involving:

  • Healthcare
  • Finance
  • Government contracts
  • Cybersecurity
  • Legal services
  • SaaS platforms
  • The Evolution of AI and the Privacy Paradox

The controversy surrounding Microsoft Recall is symptomatic of a broader shift within the technology industry toward pervasive, context-aware AI systems. Modern artificial intelligence is increasingly dependent on deep activity tracking, behavioral analysis, and persistent memory systems to deliver the personalized, predictive assistance that users now expect. This trajectory has created an inherent tension between the pursuit of productivity and the fundamental pillars of privacy, security, and informed user consent. As operating systems evolve from passive tools into “intelligent observers,” we are entering an era that fundamentally redefines the traditional concept of digital privacy.

Assessing the Cybersecurity Risks of Recall

Determining whether a feature like Recall is “dangerous” requires a nuanced understanding of the balance between utility and vulnerability. While Recall is a legitimate productivity feature rather than malware, its architectural reliance on comprehensive behavioral history introduces significant cybersecurity risks. From a defense perspective, any centralized repository of user activity becomes a high-value target for malware exploitation and insider threats. Furthermore, the accidental capture of sensitive data in snapshots—ranging from login credentials to proprietary corporate information—raises serious concerns regarding credential exposure and regulatory compliance. Ultimately, the challenge lies in ensuring that users fully comprehend the scope of this data collection and that organizations implement the rigorous safeguards necessary to prevent systemic privacy violations.

Deployment and Configuration of Microsoft Recall

A common misconception is that Recall is active on all Windows devices; however, it is strictly limited to Copilot+ PCs equipped with specialized AI hardware. While Microsoft has clarified that the feature is opt-in, initial confusion arose due to the appearance of Recall components in standard Windows builds. Despite its optional nature, many privacy-conscious users and security professionals choose to disable these features to adhere to the principle of least privilege, minimizing the potential attack surface created by background AI analysis and automated screenshot histories.

Technical Procedures for Disabling AI Features

For users seeking to manage or remove these integrations, several administrative methods are available:

  • Deactivating Microsoft Recall If your hardware supports Recall, you can manage it via the system settings:
  • Toggle Off: Navigate to Settings → Privacy & Security → Recall & Snapshots and disable “Save Snapshots.”
  • Data Purge: Select the option to delete existing snapshots to ensure no historical data remains on the disk.
  • Feature Removal: For a more permanent solution, Recall can be uninstalled via Settings → Apps → Optional Features.

Disabling Microsoft Copilot To remove the AI assistant interface from your environment, use one of the following approaches:

Standard Users: Right-click the Taskbar, select Taskbar Settings, and toggle Copilot to Off.

Windows Pro/Enterprise (Group Policy): Open gpedit.msc and navigate to User Configuration → Administrative Templates → Windows Components → Windows Copilot Set “Turn off Windows Copilot” to Enabled.

Advanced (Registry Editor): Navigate to HKEY_CURRENT_USERSoftwarePoliciesMicrosoftWindows. Create a key named WindowsCopilot and a DWORD value TurnOffWindowsCopilot set to 1.

Strengthening System Privacy and Security

To complement the removal of AI tracking, users should implement broader privacy hardening measures:

  • Permission Audits: Disable unnecessary microphone, camera, and location access.
  • Account Management: Utilize local accounts to limit cloud-based data synchronization.
  • Data Hygiene: Avoid displaying sensitive information—such as API keys or banking credentials—in plain sight, and utilize encrypted password managers.

The Ethical and Enterprise Landscape

The Recall controversy has sparked a critical ethical debate regarding the transparency of AI systems and the ownership of behavioral data. Enterprise security teams are now tasked with developing rigorous AI governance policies to address risks associated with involuntary screen capture and data retention compliance.

While online discourse often oscillates between legitimate cybersecurity analysis and speculative misinformation, the core issue remains informed consent. Microsoft’s pivot toward “intelligent” operating systems necessitates a higher standard of user awareness. Whether one chooses to embrace these productivity tools or disable them to protect confidential workflows, understanding the underlying data architecture is essential in this new era of AI-integrated computing.

Final Thoughts

Microsoft Recall and Copilot represent one of the biggest shifts in modern operating system design.

For some users, these tools are exciting productivity enhancements.

For others, they represent a dangerous expansion of AI-driven monitoring.

The truth lies somewhere in between.

Recall is not officially classified as spyware.

Microsoft says the feature is optional, encrypted, locally processed, and removable.

However, the cybersecurity concerns surrounding continuous activity capture are real and should not be ignored.

The most important takeaway is this:

Users deserve transparency, control, and informed consent when AI systems interact with their data.

Whether you choose to keep Recall enabled or disable it completely, understanding how these systems work is essential for protecting your privacy and security.

Sources & Reference


Mozilla Privacy Commentary on Microsoft Recall Concerns https://blog.mozilla.org/en/mozilla/ai/microsoft-recall-ai-feature-privacy-concerns/


The Verge – Microsoft Faces Fresh Recall Security Concerns https://www.theverge.com/report/912101/microsoft-windows-recall-new-security-concerns-response


Reddit Discussion – Copilot Automatically Installed https://www.reddit.com/r/Windows11/comments/1i7n6dx/copilot_automatically_installed_without_any_prompt/


Mozilla Community Privacy Discussions https://connect.mozilla.org/


Boundary Value Analysis (BVA) in Software Testing.

#A Complete Guide on Boundary Value Analysis (BVA) in Software Testing.

In software testing, many critical bugs appear at the edges of input ranges rather than in the middle. Applications may work perfectly for normal values but fail when users enter minimum, maximum, or out-of-range values. This is where Boundary Value Analysis (BVA) becomes one of the most effective testing techniques.

Boundary Value Analysis is a black-box testing technique used to test values at the boundaries of valid and invalid input ranges.

Why Boundary Value Analysis:

Developers often test applications using normal inputs like:

Age = 25
Quantity = 10
Password length = 12

However, real-world users frequently enter edge-case values like:

Age = 17
Quantity = 0
Password length = 256

These situations commonly expose defects such as:

Off-by-one errors
Incorrect validations
Overflow or underflow issues
Data truncation problems

For example:

If age > 18

The developer intended to allow users who are 18 years or older, but the condition accidentally rejects users aged exactly 18.

Boundary testing helps catch these defects early in the development cycle.

Understanding Boundary Value Analysis

Suppose an application accepts an age range between 18 and 60.

Using BVA, the following values are tested:

Test Value Purpose
17 Below minimum
18 Exact minimum
19 Just above minimum
59 Just below maximum
60 Exact maximum
61 Above maximum

This small set of test cases provides excellent coverage for boundary-related defects.

Types of Boundary Value Analysis:

1. Normal Boundary Value Analysis:-

This approach tests only valid boundary values.

For a range of 18–60:

18
19
59
60

It does not test invalid values like 17 or 61.

2. Robust Boundary Value Analysis:

Robust BVA includes invalid values outside the range.

For 18–60:

17
18
19
59
60
61

This is the most commonly used form because it validates both acceptance and rejection logic.

3. Worst-Case Boundary Value Analysis:-

This technique is used when multiple input variables exist.

Example:

Age: 18–60
Salary: 20,000–100,000

Worst-case BVA tests combinations of boundary values across all inputs.

Although powerful, it may increase the number of test cases significantly.

Real-World Applications of BVA

Boundary Value Analysis is widely used across different domains.

Real-World Applications of BVA

Boundary Value Analysis is widely used across different domains.

  1. Banking Applications

Examples include:

ATM withdrawal limits
Daily transaction limits
Loan amount validation

  1. E-Commerce Platforms

Examples:

Product quantity limits
Discount percentage validation
Cart item restrictions

Boundary testing ensures systems do not allow negative quantities or invalid discounts.

  1. File Upload Systems

Suppose the maximum upload size is 5 MB.

Boundary test cases:

4.99 MB
5 MB
5.01 MB

This helps detect validation inconsistencies between frontend and backend systems.

  1. API Testing

Modern applications heavily depend on APIs.

Example payload:
{
“quantity”: 1-100 } // Json Format.

Boundary tests:

0
1
2
99
100
101

API boundary testing is essential because backend systems may behave unpredictably for invalid inputs.

Advantages of Boundary Value Analysis

  1. High Defect Detection

Most software defects occur near boundaries, making BVA highly effective.

  1. Reduced Number of Test Cases

Instead of testing every possible value, testers focus only on critical boundary inputs.

  1. Easy to Understand

BVA is simple to learn and implement, even for beginner QA engineers.

  1. Excellent for Automation

Boundary test cases work well in:

API automation
Regression testing
CI/CD pipelines
Data-driven testing

  1. Improves Software Reliability

Testing edge conditions ensures systems behave correctly under extreme situations.

Limitations of BVA

Despite its benefits, BVA has some limitations.

  1. Works Best for Range Inputs

BVA is ideal for numeric or measurable ranges but less useful for complex workflows.

  1. May Miss Internal Logic Defects

Boundary testing focuses on inputs, not internal business logic.

  1. Combination Testing Can Grow Quickly

Worst-case BVA may create too many test combinations for large systems.

Conclusion

Boundary Value Analysis is one of the most important software testing techniques because it targets the areas where defects are most likely to occur — the edges.

Rather than testing every possible input, BVA allows testers to focus on high-risk values efficiently. It helps detect validation issues, off-by-one errors, and system failures early in the software development lifecycle.

Whether you are testing web applications, APIs, banking systems, or mobile apps, mastering Boundary Value Analysis can significantly improve software quality and testing efficiency.

For QA engineers and SDETs, BVA remains a fundamental skill that is widely used in real-world testing environments.

Send error event of an Lambda function to SNS Topic

Lambda Async failure

Lambda Async failure

1. Bài toán

Giả sử chúng ta có một Lambda function tên là ProcessMessages.

SNS InputTopic -> Lambda ProcessMessages

Lambda được invoke async khi có messege publish vào trong SNS topic InputTopic.

Bài toán đặt ra là:

Khi function Lambda “ProcessMessages” xử lý message fail thì hệ thống phải gửi sang một notifi tới SNS Topic “ErroTopic”

Lambda Failure Destination

Với Lambda asynchronous invocation, Lambda không trả lỗi trực tiếp về caller theo kiểu đồng bộ. Thay vào đó, Lambda đưa event vào hàng đợi nội bộ rồi xử lý sau. AWS Lambda có cơ chế retry cho async invocation; mặc định nếu function lỗi, Lambda retry thêm 2 lần. Nếu vẫn lỗi sau các lần retry, Lambda có thể gửi record lỗi đến destination như SNS topic hoặc SQS queue.

SNS InputTopic
↓
Lambda ProcessMessages
↓ nếu xử lý thất bại
SNS ErrorTopic
↓
Email notification

Kiến trúc lab

Ta sẽ thực hiên các task chính:

  1. Tạo SNS topic InputTopic
  2. Tạo SNS topic ErrorTopic
  3. Tạo Lambda function ProcessMessages
  4. Subscribe Lambda vào InputTopic
  5. Subscribe email vào ErrorTopic
  6. Cấu hình Lambda async failure destination trỏ về ErrorTopic
  7. Publish message vào InputTopic
  8. Lambda cố tình throw error
  9. Nhận email alert từ ErrorTopic

Hands on Lab bằng AWS Console

*Bước 1: Tạo SNS topic InputTopic
*

Vào AWS Console:

Amazon SNS → Topics → Create topic

Chọn:

Type: Standard
Name: InputTopic

Bấm:

Create topic. Lưu lại ARN của topic này, ví dụ:
arn:aws:sns:ap-southeast-1:123456789012:InputTopic

Create Topic

Created the Topic

Bước 2: Tạo SNS topic ErrorTopic

Tạo topic thứ hai:

Amazon SNS → Topics → Create topic

Chọn:

Type: Standard
Name: ErrorTopic

Bấm:

Create topic

Topic này sẽ nhận failure notification từ Lambda.

Bước 3: Subscribe email vào ErrorTopic

Vào topic ErrorTopic:

Subscriptions → Create subscription

Chọn:

Protocol: Email
Endpoint: email của bạn

Ví dụ:

[email protected]

Bấm:

Create subscription

Subcription

Sau đó mở email và bấm Confirm subscription. (Có thể vẫn bị nằm trong thư mục Spam)

Nếu chưa confirm email subscription, SNS sẽ không gửi notification đến email của bạn.

  1. Tạo Lambda function ProcessMessages

Vào:

AWS Lambda → Functions → Create function

Chọn:

Author from scratch
Function name: ProcessMessages
Runtime: Python 3.12 hoặc Node.js 20.x
Architecture: x86_64

Bấm:

Create function

  1. Code Lambda cố tình fail

Dùng Python cho dễ test.

Trong Lambda code editor, thay code bằng:

import json

def lambda_handler(event, context):
print(“Received event:”)
print(json.dumps(event))

# Giả lập xử lý message thất bại
raise Exception("Simulated processing failure from ProcessMessages")

Bấm:

Deploy

Ý nghĩa code này:

Mỗi khi Lambda nhận message từ InputTopic, nó sẽ cố tình throw exception.
Sau retry async thất bại, Lambda sẽ gửi failure record sang ErrorTopic.

  1. Gắn InputTopic làm trigger cho Lambda

Trong Lambda ProcessMessages, vào tab:

Configuration → Triggers → Add trigger

Chọn:

Source: SNS
SNS topic: InputTopic

Bấm:

Add

Lúc này flow đã có:

InputTopic → ProcessMessages

Theo AWS, Lambda có thể được invoke bởi SNS notification và Lambda xử lý SNS message theo cơ chế asynchronous.

  1. Cấu hình Failure Destination cho Lambda

Đây là phần quan trọng nhất.

Trong Lambda ProcessMessages, vào:

Configuration → Asynchronous invocation

Bấm:

Edit

Tìm phần:

Destination on failure

Chọn:

SNS topic

Sau đó chọn topic:

ErrorTopic

Hoặc nhập ARN của ErrorTopic.

Bấm:

Save

AWS Console cũng hướng dẫn cấu hình async invocation tại Lambda function bằng đường dẫn Configuration → Asynchronous invocation → Edit.

  1. Kiểm tra IAM permission

Thông thường khi bạn cấu hình qua Console, AWS có thể tự thêm permission cần thiết hoặc yêu cầu bạn cấp quyền.

Lambda execution role cần quyền publish message vào SNS ErrorTopic.

Policy tối thiểu có dạng:

{
“Effect”: “Allow”,
“Action”: “sns:Publish”,
“Resource”: “arn:aws:sns:REGION:ACCOUNT_ID:ErrorTopic”
}

Ví dụ:

{
“Effect”: “Allow”,
“Action”: “sns:Publish”,
“Resource”: “arn:aws:sns:ap-southeast-1:123456789012:ErrorTopic”
}

Nếu thiếu quyền, Lambda có thể fail khi gửi record sang destination. AWS có metric DestinationDeliveryFailures để theo dõi trường hợp Lambda không gửi được event đến destination do lỗi permission, cấu hình sai hoặc giới hạn kích thước.

  1. Test bằng cách publish message vào InputTopic

Vào:

Amazon SNS → Topics → InputTopic → Publish message

Nhập:

Subject: Test Lambda Failure
Message body:
{
“orderId”: “12345”,
“action”: “process”
}

Bấm:

Publish message

Sau đó flow sẽ chạy:

InputTopic nhận message
→ SNS invoke Lambda ProcessMessages
→ Lambda throw exception
→ Lambda retry async
→ Sau khi fail hết retry
→ Lambda gửi failure record sang ErrorTopic
→ ErrorTopic gửi email cho bạn

  1. Kiểm tra CloudWatch Logs

Vào:

CloudWatch → Log groups

Tìm log group:

/aws/lambda/ProcessMessages

Bạn sẽ thấy log kiểu:

Received event:
…
Exception: Simulated processing failure from ProcessMessages

Điều này chứng minh Lambda đã nhận event từ SNS nhưng xử lý thất bại.

13. Kiểm tra email từ ErrorTopic
Sau một lúc, bạn sẽ nhận được email từ SNS ErrorTopic.

Nội dung email thường không chỉ có message gốc, mà còn có thông tin failure record từ Lambda, bao gồm các thông tin như:

  • requestContext
  • responseContext
  • functionError
  • approximateInvokeCount
  • requestPayload
  • responsePayload

Đây là lý do Lambda destination hữu ích hơn việc chỉ gửi message lỗi thủ công. Nó cho ta context về invocation thất bại.

*Dọn dẹp tài nguyên sau lab
*

Để tránh phát sinh chi phí hoặc rác tài nguyên, xóa các resource sau:

Lambda function: ProcessMessages
SNS topic: InputTopic
SNS topic: ErrorTopic
CloudWatch log group: /aws/lambda/ProcessMessages

Vào CloudWatch xóa log group nếu không cần giữ log.

X, ücretsiz kullanıcıların kullanım limitlerini güncelledi

X, ücretsiz kullanıcıların kullanım limitlerini güncelledi

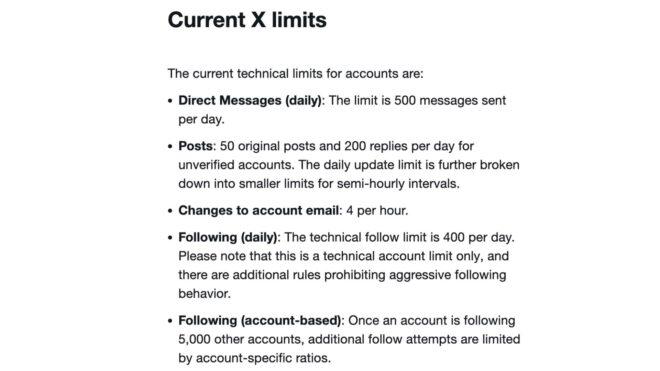
X, ücretsiz kullanıcıların kullanım limitlerini güncellediX artık “doğrulanmamış” hesaba sahip kullanıcıların günde en fazla 50 adet yeni gönderi paylaşmasına ve 200 paylaşıma yanıt vermesine izin verecek. Günlük direkt mesaj limitini 500’de tutmaya devam eden platform, normal gönderi özelinde daha fazlasına ihtiyaç duyan kişileri ücretli aboneliklere yönlendiriyor. Bu hamlesiyle bot hesapları/spam mesajları azaltmayı da hedefleyen şirket, daha önce günlük 2.400 adet “post/repost” paylaşımına izin veriyordu.

X, ücretsiz kullanıcıların kullanım limitlerini güncelledi yazısı ilk olarak Teknoloji haberleri – LOG üzerinde yayınlandı.

Healthy Pods, Broken Transactions: What Kubernetes Doesn’t Catch in Banking Systems

A production scenario walkthrough with Spring Boot, Resilience4j, and Kafka

Your pods are running. Your readiness probes are green. Your HPA hasn’t moved. And your payment authorizations are silently failing.

This is not a hypothetical. It’s the failure class that cloud-native financial systems encounter repeatedly — and the one that standard Kubernetes observability is structurally unable to catch.

Let’s walk through exactly how this happens and what the engineering response looks like in code.

The Scenario

Standard card authorization pipeline:

API Gateway → Payment Service → Kafka → Fraud Service → Ledger Service → Notification Service

The Fraud Service slows from 50ms to 4 seconds. Nothing crashes. Everything looks healthy. But over the next 40 minutes:

• Kafka consumer lag on the fraud topic grows to 50,000+ messages
• Payment Service thread pool exhausts
• HikariCP connections on the Ledger Service saturate
• Card authorizations fail system-wide
• ACH settlement files are incomplete

Here’s why, and here’s the code that prevents it.

Problem 1: Your Readiness Probe Doesn’t Know Your Threads Are Exhausted

The default Spring Boot readiness probe checks /actuator/health. That endpoint checks database connectivity and disk space — not whether your service can actually process work.

Add a custom health indicator that reflects real processing capacity:

@Component
public class ThreadPoolHealthIndicator implements HealthIndicator {

private final ThreadPoolTaskExecutor executor;

public ThreadPoolHealthIndicator(ThreadPoolTaskExecutor executor) {
    this.executor = executor;
}

@Override
public Health health() {
    int active = executor.getActiveCount();
    int max = executor.getMaxPoolSize();
    double utilization = (double) active / max;

    if (utilization > 0.90) {
        return Health.down()
            .withDetail("activeThreads", active)
            .withDetail("maxThreads", max)
            .withDetail("utilization", utilization)
            .withDetail("reason", "Thread pool near exhaustion")
            .build();
    }
    return Health.up()
            .withDetail("activeThreads", active)
            .withDetail("utilization", utilization)
            .build();
}

}

Now your readiness probe will actually pull the pod from rotation when the service can’t process requests — giving Kubernetes real signal to act on.

Problem 2: Your Resilience4j Timeout Is Set for Tolerance, Not Behavior

A 6-second timeout on a service that normally responds in 50ms is not a safety net. It means degradation runs for 6 full seconds before any protective mechanism fires.

Configure timeouts relative to your operating envelope:

resilience4j:
timelimiter:
instances:
fraudService:
timeoutDuration: 500ms
circuitbreaker:
instances:
fraudService:
slidingWindowSize: 20
failureRateThreshold: 50
slowCallRateThreshold: 80
slowCallDurationThreshold: 500ms
waitDurationInOpenState: 30s
permittedNumberOfCallsInHalfOpenState: 5

The critical detail: slowCallDurationThreshold must match your timeoutDuration. If your circuit breaker considers anything under 6 seconds a fast call but your timeout fires at 500ms, you get retries without circuit breaking — which is retry amplification.

Problem 3: No Bulkhead Means One Slow Dependency Owns Your Entire Thread Pool

Without bulkhead isolation, the Fraud Service slowdown consumes threads from the same pool handling Ledger Service calls and API responses. Everything degrades together.

resilience4j:
thread-pool-bulkhead:
instances:
fraudService:
maxThreadPoolSize: 10
coreThreadPoolSize: 5
queueCapacity: 20
ledgerService:
maxThreadPoolSize: 15
coreThreadPoolSize: 8
queueCapacity: 30

@Service
public class FraudScoringClient {

private final WebClient webClient;

@Bulkhead(name = "fraudService", type = Bulkhead.Type.THREADPOOL)
@CircuitBreaker(name = "fraudService", fallbackMethod = "fraudScoringFallback")
@TimeLimiter(name = "fraudService")
public CompletableFuture<FraudScore> scoreFraudRisk(PaymentRequest request) {
    return webClient.post()
        .uri("/fraud/score")
        .bodyValue(request)
        .retrieve()
        .bodyToMono(FraudScore.class)
        .toFuture();
}

public CompletableFuture<FraudScore> fraudScoringFallback(
        PaymentRequest request, Exception ex) {
    return CompletableFuture.completedFuture(
        FraudScore.pendingManualReview(request.getTransactionId())
    );
}

}

Fraud Service degradation now saturates only its allocated bulkhead. Ledger Service calls keep their own pool.

Problem 4: No Idempotency Means Recovery Creates Duplicate Ledger Entries

When the Fraud Service recovers and the Payment Service replays its Kafka backlog, the Ledger Service receives duplicate authorization events. Without idempotency, it posts duplicate records — creating phantom transactions in the settlement batch.

@KafkaListener(topics = “payment.authorized”, groupId = “ledger-service”)
public void processAuthorization(AuthorizationEvent event) {
String idempotencyKey = “ledger:” + event.getTransactionId();

Boolean isNew = redisTemplate.opsForValue()
    .setIfAbsent(idempotencyKey, "processed", Duration.ofHours(24));

if (Boolean.FALSE.equals(isNew)) {
    log.info("Duplicate authorization event skipped: {}", 
        event.getTransactionId());
    return;
}

try {
    ledgerRepository.postTransaction(event);
} catch (Exception e) {
    redisTemplate.delete(idempotencyKey);
    throw e;
}

}

The delete-on-failure matters. Block duplicates, not retries. They are different things.

Problem 5: Consumer Lag Isn’t in Your SLO

Lag grew for 15 minutes before the first authorization failed. If it had been a primary alert, the incident window shrinks dramatically.

@Scheduled(fixedDelay = 30000)
public void recordConsumerLag() {
adminClient.listConsumerGroupOffsets(“payment-service-group”)
.partitionsToOffsetAndMetadata().get()
.forEach((partition, offsetMeta) -> {
long lag = calculateLag(partition, offsetMeta.offset());
meterRegistry.gauge(
“kafka.consumer.lag”,
Tags.of(
“topic”, partition.topic(),
“partition”, String.valueOf(partition.partition())
),
lag
);
});
}

Alert on lag before CPU, before error rate, before your dashboards turn red.

The Pattern

Every problem here has the same shape:

1.  A localized degradation Kubernetes cannot see
2.  A missing isolation boundary that lets it spread
3.  A recovery path that produces incorrect state without idempotency

Green pods do not mean reliable transactions. In financial systems, that distinction is the difference between a recoverable incident and a two-day reconciliation problem.

DEVOPS_ECR

Deploying with AWS ECR + GitHub Actions
A complete CI/CD pipeline: Build → Push to ECR → Deploy to EC2

  1. What is ECR?
    ECR (Elastic Container Registry) is AWS’s private Docker image registry — think of it as a private Docker Hub that lives inside AWS. Instead of pushing your images to Docker Hub, you push them to ECR.

Why ECR over Docker Hub?
• Lives inside AWS — pulling from EC2 is fast and free (no egress costs)
• Private by default — no public exposure
• Integrates natively with IAM — no separate login credentials
• Automatically scans images for security vulnerabilities on push

  1. The Big Picture
    Here is how all the pieces connect together:

GitHub (your code)
|
| push to main branch
v
GitHub Actions Runner
|
|– 1. Checkout code
|– 2. Configure AWS credentials
|– 3. Login to ECR
|– 4. Build frontend image
|– 5. Push frontend to ECR
|– 6. Build backend image
|– 7. Push backend to ECR
|– 8. SSH into EC2
|
|– pulls frontend from ECR
|– pulls backend from ECR
|– pulls mariadb from Docker Hub
|– pulls adminer from Docker Hub
|– runs docker compose up

  1. ECR Repositories
    How many repos do you need?
    You only create ECR repos for YOUR custom images. Public official images (MariaDB, Adminer) come directly from Docker Hub — no ECR needed for them.

Service Image Source ECR Repo Needed?
Frontend Your custom code YES
Backend Your custom code YES
MariaDB Docker Hub (mariadb:11) NO
Adminer Docker Hub (adminer:latest) NO

ECR Repository URL Structure
After creating a repo, AWS gives you a URI like this:

123456789012.dkr.ecr.ap-south-1.amazonaws.com/myapp-frontend

123456789012 = your AWS account ID
dkr.ecr = ECR service
ap-south-1 = your region
amazonaws.com = AWS domain
/myapp-frontend = your repository name

How to Create ECR Repos
AWS Console → ECR → Create Repository → do this twice:

Settings that matter:
• Visibility: Private (always)
• Tag Immutability: Enabled — prevents overwriting existing tags
• Scan on Push: Enabled — auto scans for CVEs on every push
• Everything else: leave as default

Create two repos named:
myapp-frontend
myapp-backend

  1. IAM — Users and Roles
    IAM User vs IAM Role
    IAM User IAM Role
    What it is Permanent identity with fixed keys Temporary identity, auto-assumed
    Has permanent keys? Yes No
    Who uses it External things (GitHub Actions) AWS services (EC2 → ECR)
    Credentials Access Key + Secret Key Temporary token (auto-rotated)

IAM User — for GitHub Actions
GitHub Actions runs on a machine outside AWS. It needs real credentials to prove its identity to AWS.

Steps to create:

  1. AWS Console → IAM → Users → Create User
  2. Name it: github-actions-ecr
  3. Attach policy: AmazonEC2ContainerRegistryFullAccess
  4. Security Credentials tab → Create Access Key → choose CLI
  5. IMPORTANT: Copy both keys immediately — secret shown only once

IAM Role — for EC2
EC2 lives inside AWS. Attach a role to the instance instead of putting keys on the server (keys on server = security risk).

Steps to create:

  1. AWS Console → IAM → Roles → Create Role
  2. Trusted entity type: AWS Service → EC2
  3. Attach policy: AmazonEC2ContainerRegistryReadOnly
  4. Name it: ec2-ecr-readonly
  5. EC2 → Instances → your instance → Actions → Security → Modify IAM Role → attach it

Verify it worked by SSHing into EC2 and running:
aws sts get-caller-identity
If it returns your account ID and role name, the role is working.

  1. GitHub Secrets
    Go to: GitHub repo → Settings → Secrets and Variables → Actions → New Repository Secret

Secret Name Value
AWS_ACCESS_KEY_ID Your IAM user access key
AWS_SECRET_ACCESS_KEY Your IAM user secret key
AWS_REGION e.g. ap-south-1
EC2_HOST Your EC2 public IP address
EC2_SSH_KEY Full contents of your .pem file (including header/footer)

For EC2_SSH_KEY — open your .pem file, copy everything including the —–BEGIN RSA PRIVATE KEY—– header and —–END RSA PRIVATE KEY—– footer, paste as the secret value.

  1. ECR Authentication Explained
    ECR does not use username/password like Docker Hub. It uses temporary tokens that expire every 12 hours. The command to get and apply the token is:

aws ecr get-login-password –region ap-south-1
| docker login
–username AWS
–password-stdin
123456789012.dkr.ecr.ap-south-1.amazonaws.com

• aws ecr get-login-password — asks AWS for a temporary password (valid 12 hours)
• | — pipes that password into the next command
• docker login –username AWS — logs Docker into ECR using the temp password
• –username AWS — ECR always uses the literal string AWS as username, not your IAM username

In GitHub Actions, the aws-actions/amazon-ecr-login@v1 action runs this automatically. You never write it manually in the workflow.

  1. The GitHub Actions Workflow
    steps.login-ecr.outputs.registry Explained
    This is GitHub Actions syntax for referencing the output of a previous step:

${{ steps.login-ecr.outputs.registry }}

steps = look in previous steps
login-ecr = the id you gave the step (id: login-ecr)
outputs = this step exposes output values
registry = the specific output: your ECR base URL

Resolves to: 123456789012.dkr.ecr.ap-south-1.amazonaws.com

The amazon-ecr-login action automatically figures out your account ID and region from your credentials and exposes it as the registry output. Use it instead of hardcoding your account ID.

Complete Workflow File
Save this as .github/workflows/deploy.yml in your repo:

name: Build, Push to ECR, Deploy to EC2

on:
push:
branches:
– main

jobs:
deploy:
runs-on: ubuntu-latest

steps:
  - name: Checkout Code
    uses: actions/checkout@v3

  - name: Configure AWS Credentials
    uses: aws-actions/configure-aws-credentials@v2
    with:
      aws-access-key-id: ${{ secrets.AWS_ACCESS_KEY_ID }}
      aws-secret-access-key: ${{ secrets.AWS_SECRET_ACCESS_KEY }}
      aws-region: ${{ secrets.AWS_REGION }}

  - name: Login to Amazon ECR
    id: login-ecr
    uses: aws-actions/amazon-ecr-login@v1

  - name: Build and Push Frontend
    env:
      ECR_REGISTRY: ${{ steps.login-ecr.outputs.registry }}
      IMAGE_TAG: ${{ github.sha }}
    run: |
      docker build -t $ECR_REGISTRY/myapp-frontend:$IMAGE_TAG ./frontend
      docker tag $ECR_REGISTRY/myapp-frontend:$IMAGE_TAG $ECR_REGISTRY/myapp-frontend:latest
      docker push $ECR_REGISTRY/myapp-frontend:$IMAGE_TAG
      docker push $ECR_REGISTRY/myapp-frontend:latest

  - name: Build and Push Backend
    env:
      ECR_REGISTRY: ${{ steps.login-ecr.outputs.registry }}
      IMAGE_TAG: ${{ github.sha }}
    run: |
      docker build -t $ECR_REGISTRY/myapp-backend:$IMAGE_TAG ./backend
      docker tag $ECR_REGISTRY/myapp-backend:$IMAGE_TAG $ECR_REGISTRY/myapp-backend:latest
      docker push $ECR_REGISTRY/myapp-backend:$IMAGE_TAG
      docker push $ECR_REGISTRY/myapp-backend:latest

  - name: Deploy to EC2
    uses: appleboy/[email protected]
    with:
      host: ${{ secrets.EC2_HOST }}
      username: ubuntu
      key: ${{ secrets.EC2_SSH_KEY }}
      envs: AWS_ACCESS_KEY_ID,AWS_SECRET_ACCESS_KEY,AWS_REGION
      script: |
        aws ecr get-login-password --region $AWS_REGION 
          | docker login 
            --username AWS 
            --password-stdin 
            123456789012.dkr.ecr.ap-south-1.amazonaws.com
        cd /home/ubuntu/myapp
        docker compose pull frontend backend
        docker compose up -d --no-build
        docker image prune -f
  1. Docker Compose File
    This file lives both in your GitHub repo and on your EC2 instance at /home/ubuntu/myapp/docker-compose.yml

services:
frontend:
image: 123456789012.dkr.ecr.ap-south-1.amazonaws.com/myapp-frontend:latest
ports:
– “3000:3000”
depends_on:
– backend
restart: always

backend:
image: 123456789012.dkr.ecr.ap-south-1.amazonaws.com/myapp-backend:latest
ports:
– “8000:8000”
depends_on:
– db
environment:
DB_HOST: db
DB_PORT: 3306
DB_NAME: myapp
DB_USER: myuser
DB_PASS: mypassword
restart: always

db:
image: mariadb:11
environment:
MYSQL_ROOT_PASSWORD: rootpassword
MYSQL_DATABASE: myapp
MYSQL_USER: myuser
MYSQL_PASSWORD: mypassword
volumes:
– db_data:/var/lib/mysql
restart: always

adminer:
image: adminer:latest
ports:
– “8080:8080”
restart: always

volumes:
db_data:

  1. Things to Change for Your Project
    File What to Change Change To
    docker-compose.yml ECR URI in image: fields (x2) Your actual ECR repo URIs from AWS console
    deploy.yml ./frontend in docker build Actual path to your frontend folder in repo
    deploy.yml ./backend in docker build Actual path to your backend folder in repo
    deploy.yml ECR URL in docker login script Your actual ECR registry base URL
    deploy.yml username: ubuntu ec2-user if using Amazon Linux, ubuntu if Ubuntu
    deploy.yml /home/ubuntu/myapp Path where docker-compose.yml lives on EC2
    deploy.yml myapp-frontend / myapp-backend Your actual ECR repo names if different

  2. EC2 Instance Setup
    SSH into your EC2 and make sure these are installed:

Check Docker

docker –version

Check Docker Compose

docker compose version

Install AWS CLI if missing

sudo apt update
sudo apt install awscli -y

Verify AWS CLI

aws –version

Create app directory

mkdir -p /home/ubuntu/myapp

Copy your docker-compose.yml to EC2 (run this from your local machine):

scp -i your-key.pem docker-compose.yml ubuntu@your-ec2-ip:/home/ubuntu/myapp/

  1. Complete Setup Checklist
    Do these in order before your first deploy:

• Create ECR repo: myapp-frontend
• Create ECR repo: myapp-backend
• Create IAM User (github-actions-ecr) with ECR full access
• Generate access keys for IAM user
• Add AWS_ACCESS_KEY_ID to GitHub Secrets
• Add AWS_SECRET_ACCESS_KEY to GitHub Secrets
• Add AWS_REGION to GitHub Secrets
• Add EC2_HOST to GitHub Secrets
• Add EC2_SSH_KEY to GitHub Secrets
• Create IAM Role (ec2-ecr-readonly) with ECR read-only access
• Attach IAM Role to EC2 instance
• Install AWS CLI on EC2
• Create /home/ubuntu/myapp directory on EC2
• Copy docker-compose.yml to EC2
• Create .github/workflows/deploy.yml in your repo
• Push to main branch and watch GitHub Actions tab

Why Neleto Exists

every time. And yet, the tools we rely on to manage websites often feel like they’re stuck in the previous decade.

That tension is exactly why Neleto exists.

The friction we kept running into

As a digitalization partner working with mid-sized companies, we saw the same patterns again and again. Traditional CMS platforms were slow, bloated, and increasingly painful to maintain. Page speed suffered, security required constant vigilance, and every new feature seemed to demand another plugin. Clients loved the end result of a custom site but hated the editing experience — or worse, they accidentally broke things.

Headless and “modern” alternatives solved some problems but created others. They were powerful for developers, yet they often pushed complexity onto clients or required expensive frontend frameworks and ongoing specialist work. Pricing frequently scaled with seats or traffic in ways that punished growing businesses. And data residency? For European companies, that was rarely a first-class concern.

Then AI changed everything.

Tools like Cursor, Claude, and Windsurf started letting developers move dramatically faster. But the content layer — the actual website content that real businesses live and die by — remained disconnected from these new workflows. AI could help write code or generate text, but it couldn’t safely and natively update the live site without fragile custom integrations.

We didn’t want to keep patching around these limitations. We wanted to remove them.

What we decided to build

Neleto was born from a simple conviction: the best CMS should feel invisible to clients and empowering to developers — while being ready for the AI-native future that’s already here.

That conviction led to several non-negotiable decisions:

  • Performance as a foundation, not a feature. We built the backend in Rust. The result is websites that are dramatically faster than traditional PHP or Node.js solutions — often 10-50× quicker in real-world scenarios. Faster sites rank better, convert better, and cost less to run. For agencies and freelancers delivering client work, that speed advantage compounds every single day.

  • Two worlds, one system. Developers get full control: direct HTML access, a clean plugin API, and complete freedom to build exactly what they need. Non-technical editors and clients get a genuinely pleasant admin interface where they can manage pages, blog posts, events, translations, and files without training or fear of breaking the site. Role-based permissions keep everything safe and organized.

  • AI that actually belongs in a CMS. Neleto includes a native MCP (Model Context Protocol) server — the only one we’re aware of built into a CMS from the ground up. This means AI agents can securely read and write content directly, following the same permissions and workflows humans use. It’s not a bolted-on chatbot or a future roadmap item. It’s there today, ready for the way developers and teams are already working.

  • European pragmatism. We host in regions you choose, with strong GDPR compliance when you select EU/Germany servers. Your data stays where you want it. Pricing is transparent and predictable. There’s no vendor lock-in — export your content whenever you like. And migration from WordPress is built in, because we know many great sites still live there.

Built by people who ship websites every day

Neleto isn’t a theoretical product designed in a vacuum. It grew out of real client work at Triple-A Soft. We kept feeling the same friction points and eventually decided the best way to solve them for our clients (and ourselves) was to build the tool we actually wanted to use.

We made it affordable enough for freelancers and small agencies while powerful enough for teams. We included the content types and features most sites need out of the box so you spend less time configuring and more time delivering value. And we designed it to get better as AI capabilities advance, rather than having to be retrofitted later.

The future we’re building toward

Neleto exists because we believe the next era of the web belongs to teams that can move fast without sacrificing control, performance, or simplicity. Developers should leverage AI as a true collaborator. Editors should feel confident managing their own content. Businesses should own their data and their speed.

That’s the CMS we wanted. So we built it.

If you’ve ever felt the gap between how fast you can develop and how painful it is to hand a site over to a client…

If you’ve ever wished your content tools kept pace with your AI-assisted workflow…

If you care about performance, compliance, and not getting locked into expensive or bloated platforms…

…then Neleto was built for you.

We’re just getting started. Try it for free, explore the documentation, or reach out if you’d like to talk about how it fits your workflow. We’re building Neleto in public with real users, and we’d love to have you along for the ride.

Fast websites. Easy content. AI native.

That’s not just our tagline. It’s why we exist.
visit neleto.io

Türk Telekom, “ASELSAN” ile iş birliği gerçekleştirdi

Türk Telekom,

Türk Telekom, "ASELSAN" ile iş birliği gerçekleştirdiTürk Telekom, yerli akıllı telefonlar, kullanıcı cihazları ile yerli haberleşme ekipmanlarının donanım ve yazılımlarını geliştirmek üzere ASELSAN ile güçlerini birleştirdiğini duyurdu. Kurulan iş birliği, resmi açıklamaya göre haberleşme teknolojilerinde yerli ve milli üretimin payını en üst seviyeye taşımayı amaçlıyor. Türk Telekom CEO’su Ebubekir Şahin, iş birliği hakkında şunları kaydetti: “Dijital dönüşümde liderliği üstleniyor, yenilikçi yerli ve milli ürünler, projeler geliştirmeyi milli sorumluluk olarak ana odak noktamızda tutuyoruz. Ülkemizin küresel teknoloji alanındaki rekabet gücünü artıracak, yerli ve milli haberleşme cihazı üretimi de bu anlamda kırmızı çizgimizdir. Sayın Cumhurbaşkanımızın dijitalleşme ve yerlileşme vizyonu doğrultusunda çok kıymetli bir iş birliğine imza attık. Bu güçlü birliktelik sayesinde yerli ve milli cihaz projemizin yol haritası belirlendi ve hayata geçmesi için ilk somut adımları atıldı. Türkiye’nin teknolojide dışa bağımlılığını azaltacak ve teknolojiye dayalı geleceğini şekillendirecek çalışmalarımız aralıksız devam edecek.” Türk Telekom’un yerli ürünlerinin dünyanın çeşitli ülkelerinde kullandığına dikkat çeken Şahin; “Türk Telekom olarak yalnızca bir telekomünikasyon […]

Türk Telekom, “ASELSAN” ile iş birliği gerçekleştirdi yazısı ilk olarak Teknoloji haberleri – LOG üzerinde yayınlandı.

Vite Version 8: Unified Rust-Based Bundler and Up to 30x Faster Builds

Vite 8.0 introduces a significant architectural change, migrating from a dual-bundler setup to a single Rust-based bundler called Rolldown. This update enhances build speeds, reporting reductions from 46 seconds to 6 seconds in some projects. The release includes developer experience improvements and maintains compatibility with the existing plugin ecosystem.

By Daniel Curtis