Why Platform Governance and Transparency Matter for Developers and Freelancers

In this post, I’m sharing my personal experience with Reddit’s moderation and shadow bans, not as a personal grudge but as an example why Developers and Freelancers should pay attention to each platform’s governance, moderation and transparency policies because when your visibility and reputation are tied to third party platforms, you want to assess the risks associated with those platforms to your professional presence and your ability to reach your audience.

I left Reddit for many years and rarely engaged with it as a platform since it forced users to disable their VPN or sign up and share their data.

One day, I wanted to give it another shot after seeing some interesting content. I signed up again and began participating in technical discussions.

I kept posting from time to time absolutely and purely technical comments.

I began to notice over time that my posts or comments were not getting views or replies at all. While this doesn’t bother me that much, I found after a couple of weeks that all my posts had 1 view. This situation raised my suspicion, so I began doing research on the matter.

Lo and behold, I realized that I was actually shadow banned and there was no warning, no violations, nothing… I was not using bots or VPN or anything out of the ordinary.

I learned later after doing further research that moderators can easily trigger Reddit’s auto ban system by reporting someone even if there is no reason.

Now, the question is, why would someone go out of their way to report my account specifically. Yep, you guessed it! In practice, there’s no way to know; Reddit provides no transparency about who reported you or why, which leaves users guessing whether they did something wrong or not.

Imagine that every time you want to post something, you need to go through each subreddit’s “Rules” and also Reddit’s own policies and terms which are enforced inconsistently; this often feels like a legal exercise.

On Reddit,in some cases, you can post inflammatory content and get little to no moderation but my neutral technical posts were hidden.

Despite the fact that Reddit has an “Appeal” system, the time it takes Reddit to review your appeal can take anywhere from 1 week to several months; at the same time, if you create a new account, you risk getting banned again for having an alternative account.

Reddit’s ban system is a perfect example of failed distributed moderation system where a moderator can ban your whole account because they dislike your presence or disagree with your opinion.

Reddit relies heavily on volunteers to moderate posts or comments, and they are often overworked and burnt out.

At the same time, Reddit laid off around 5% of their workforce in recent years.

Reddit’s system is unique and bizarre in a bad way because on one end, moderators can flag your entire account for bans, not just their own subreddit, on the other hand, Reddit claim that the system is fair, distributed and decentralized.

While Reddit’s moderation and ban policies can be broken, this is not unique to Reddit as other large tech platforms like LinkedIn, Facebook (Meta), Twitter (X) and others also have poor user experience when it comes to moderation; this made me more cautious about relying on a single platform for visibility or professional networking.

Lessons learned:

  1. Don’t treat big platforms as neutral parties; they are private companies with opaque policies and guidelines.
  2. Don’t put all your eggs in one basket. Diversify your presence to multiple platforms and don’t be scared to try new ones.
  3. As a rule of thumb, if your content can be hidden or removed by someone other than you, treat the platform as an amplifier rather than your primary go-to place to gain visibility.
  4. Obtain your own domain, learn how to build your own site (easy with AI for people who don’t like frontend).

As a cloud and security consultant, I now treat every hosted platform as a temporary amplifier, not a permanent foundation for my professional presence.

Disclaimer:
This is based on my personal experience on Reddit and reflects my subjective view of its moderation and appeal processes, not a legal or technical audit of the platform.

Using an LLM to automate a task that used to take hours by hand

I want to share a concrete example of using an LLM to automate a manual process in my workflow. Not chatbot stuff. An actual pipeline step that used to require a human sitting with two audio tracks for hours.

The problem

I build live speech-to-speech translation. To measure latency, I need to know which phrase in the source audio corresponds to which phrase in the translated audio, so I can measure the time gap between them. This alignment used to be done by hand. A person listens to both tracks, matches up the phrases, and logs timestamps. For a 6-minute session that’s easily an afternoon of work.

The hard part isn’t the math. It’s the alignment. Languages reorder things. German puts verbs at the end. Arabic restructures sentences. A Spanish phrase at position 3 might map to an English phrase at position 7.

Where the LLM fits in

This is exactly the kind of thing LLMs are good at. They understand semantic equivalence across languages and handle reordering naturally. So I replaced the manual step with an LLM call:

  1. Force-align both audio tracks to get per-word timestamps (automated, no LLM needed)
  2. Number every word in both transcripts and send them to the LLM
  3. LLM returns matched phrase pairs with word indices
  4. Compute the time gap for each pair using the timestamps from step 1

What used to take hours now takes a couple of minutes. No human in the loop.

The general pattern

The reason I’m sharing this is that the pattern generalizes. If you have a workflow step where a human reads two things and figures out how they correspond, an LLM can probably do it. The key is that I’m not asking it for a judgment call or creative output. I’m asking it to do structured alignment, a well-constrained task where it’s reliable.

The LLM only handles the one step that actually needs language understanding. Everything else (force alignment, timestamp extraction, aggregation) is regular code.

Full methodology: Automating ear-voice span

Code: VoiceFrom/live-s2st-eval

CyberArena – Interactive Cyber Security Simulation & Threat Analysis Platform

Excited to share my latest project — CyberArena, an interactive Cyber Security Simulation & Threat Analysis Platform built using Python, Flask, SQLite, Docker, HTML/CSS, and JavaScript.

🔐 Features include:
• AI-based Threat Analyzer
• Phishing Simulation
• Base64 Payload Analysis
• RSA Encryption Demo
• Steganography Detection
• Leaderboard & Gamification System
• Responsive Cyberpunk Dashboard UI

This project helped me strengthen my understanding of:
✔ Cybersecurity concepts
✔ Threat analysis workflows
✔ Authentication systems
✔ Python backend development
✔ Docker deployment
✔ Responsive UI design

The platform is inspired by real-world SOC Analyst and Cyber Security Analyst workflows, including phishing detection, suspicious activity analysis, and security reporting.

🚀 Live Demo:
https://cyberarena-interactive-cyber-attack.onrender.com/

💻 GitHub:
https://github.com/omu47/CyberArena-Interactive-Cyber-Attack-Simulation-Threat-Analysis-Platform

Currently continuing to scale the project with plans for SIEM-style monitoring, PostgreSQL, Kafka, Kubernetes, and advanced AI-powered threat intelligence features.

Will really love to connect and if you want to contribute please do dm , don’t waste time in thinking

Mathematical Functions in CSS: clamp, min, max and How They Simplify Responsiveness

The Math Cure for Your Layout Headaches

Grab a cup of coffee and let’s have a real talk about responsive design. We have all been there: you build a gorgeous layout, and it looks absolutely crisp on your 27-inch 5K monitor. But the moment you test it on an iPhone SE or a giant ultra-wide screen, the design completely falls apart. Headlines either stretch into monstrous proportions or shrink down to microscopic text. Margins blow up, and components start overlapping in the worst ways possible.

Making layouts look perfect on every device used to mean writing endless media queries. But today, we have smarter tools in our CSS arsenal that do the heavy lifting for us: the mathematical functions clamp(), min(), and max(). Let’s look at how they can save your sanity and clean up your stylesheets.

How We Suffered Before

Remember the dark ages of responsive web design? To make a font scale dynamically with the viewport, we relied on viewport units like vw. It sounded great on paper: just set font-size: 5vw and watch it scale! But in reality, on tiny screens, your 5vw text shrunk to an unreadable 4px, and on massive screens, it became a giant 120px headline.

To stop this madness, we had to resort to two painful workarounds:

  • Writing a dozen @media rules at different breakpoints to manually override the font sizes and paddings.
  • Using mind-boggling, unreadable CSS formulas like calc(16px + (24 - 16) * ((100vw - 320px) / (1200 - 320))).

If looking at that formula gives you PTSD, you are not alone. It was unmaintainable, prone to typos, and felt like a hack. Just like we used to struggle with nested layouts before CSS Subgrid solved our grid alignment nightmares, managing responsive typography and spacing was an absolute chore.

The Modern Way in 2026

Today, the mathematical trinity of CSS—min(), max(), and clamp()—is fully supported, incredibly robust, and ready to replace hundreds of lines of media queries. Here is how they work in simple terms:

1. max(value1, value2, …)

The max() function compares the values you give it and chooses the largest one. Think of it as setting a minimum floor for a property. For example, width: max(50%, 300px) means: “Take up half the screen, but never shrink below 300px.”

2. min(value1, value2, …)

The min() function does the exact opposite: it compares the values and selects the smallest one. This acts as a maximum ceiling. For instance, width: min(80%, 1200px) means: “Take up 80% of the screen, but freeze once you hit 1200px.”

3. clamp(minimum, preferred, maximum)

This is the absolute holy grail of modern responsive design. clamp() takes three arguments: a lower bound, a fluid/preferred value, and an upper bound. It keeps the preferred value strictly within the minimum and maximum range. It is the ultimate way to handle fluid typography and dynamic spacing without ever writing a media query.

When you combine these math functions with cutting-edge layout systems like CSS Container Queries, you get components that are fully fluid, modular, and context-aware.

Ready-to-Use Code Snippet

Let’s look at a practical, real-world example. Here is a clean, modern card component that uses CSS math functions to fluidly scale its typography, inner padding, and overall width without a single breakpoint rule.

/* A fully responsive, modern card layout */
.responsive-card {
  /* Dynamic width: takes up 90% of screen but caps at 600px */
  width: min(90%, 600px);
  
  /* Fluid padding: scales between 1rem and 2.5rem based on screen width */
  padding: clamp(1rem, 4vw, 2.5rem);
  
  background-color: #1e1e24;
  color: #f5f5f7;
  border-radius: 12px;
  box-shadow: 0 10px 30px rgba(0, 0, 0, 0.15);
  margin: 2rem auto;
}

.card-title {
  /* Fluid typography: scales between 1.5rem and 3rem based on viewport */
  font-size: clamp(1.5rem, 5vw, 3rem);
  line-height: 1.2;
  margin-bottom: 1rem;
}

.card-text {
  /* Smart text sizing that scales but stays readable */
  font-size: clamp(1rem, 1rem + 1vw, 1.25rem);
  line-height: 1.6;
  opacity: 0.9;
}

Common Beginner Mistakes

While CSS math functions look like magic, there are two classic traps that developers often fall into:

The “Static Value” Trap: Writing something like clamp(1rem, 2rem, 3rem). If your middle (preferred) value is static, the function has nothing to calculate dynamically! The browser will look at 2rem, see that it never changes, and simply lock the element at 2rem. Your middle value must always contain a dynamic unit (like vw, vh, or percentages).

The Accessibility Trap: Using pure viewport units (like 5vw) as the preferred value in clamp() for text. If a user zooms in using their browser settings, viewport units do not scale with the zoom. To keep your website accessible and compliant with WCAG guidelines, always mix viewport units with relative units (like rem or em) inside your math functions. Writing clamp(1.2rem, 1rem + 2vw, 2.5rem) ensures that the font scales beautifully with the screen size while still honoring user zoom preferences.

🔥 We publish more advanced CSS tricks, ready-to-use snippets, and tutorials in our Telegram channel. Subscribe so you don’t miss out!

Polyglot Persistence in Microservices: Let the Domain Choose the Database

Introduction

One of the most consequential decisions in microservices architecture is data storage. Monolithic systems traditionally rely on a single relational database to service all needs — a model that worked well for decades but creates tight coupling, limits scalability, and forces every domain to conform to the same persistence paradigm regardless of whether it is the right fit.

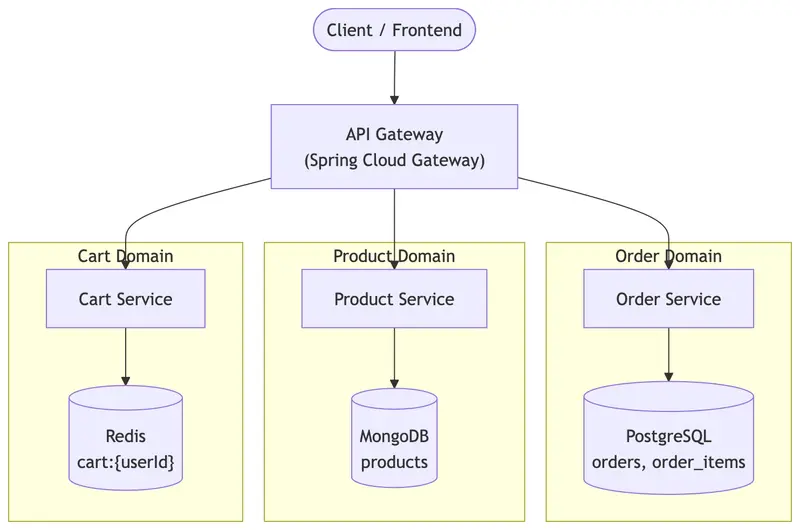
Modern distributed systems have embraced a concept known as polyglot persistence — the practice of using different data storage technologies within the same system, each chosen to match the access patterns and characteristics of the domain it serves. A MVP e-commerce project examined in this document demonstrates this pattern in a concrete way: three different databases, each serving a distinct microservice, each chosen deliberately.

The Three-Database Architecture

The platform studied here organizes data across three specialized stores:

Service Database Type Rationale
Order Service PostgreSQL Relational (ACID) Transactional consistency, financial data
Product Service MongoDB Document (NoSQL) Flexible schemas, rich catalog data
Cart Service Redis In-memory K/V Sub-millisecond speed, ephemeral state

This is the Database per Service pattern [1]. Each service owns its database exclusively — no service reads directly from another’s store. This boundary enforces loose coupling and allows each team to evolve the schema independently without risk of cross-service breakage.

PostgreSQL for the Order Service: ACID as a Requirement

A relational database organizes data into tables — structured grids where every row is a record and every column is a typed, constrained attribute. Relationships between tables are expressed through foreign keys: a column in one table that references the primary key of another, letting the engine enforce referential integrity automatically. This rigid schema is not a limitation but a deliberate guarantee: every row must conform to the same structure, and the engine validates constraints at write time. The payoff is ACID — the ability to group multiple writes into a single all-or-nothing transaction that either commits fully or rolls back completely, leaving the database in a consistent state regardless of failures.

The Order Service persists financial records. An order is not just data — it is a legal artifact, a commitment. This makes ACID guarantees non-negotiable.

The service uses Spring Data JPA with Flyway for schema migrations. The schema reflects classical relational design: parent orders table with a child order_items table linked by a foreign key with ON DELETE CASCADE.

CREATE TABLE orders (
    id BIGSERIAL PRIMARY KEY,
    user_id VARCHAR(255) NOT NULL,
    total DECIMAL(19, 2) NOT NULL,
    status VARCHAR(50) NOT NULL,
    order_date TIMESTAMP NOT NULL
);

CREATE TABLE order_items (
    id BIGSERIAL PRIMARY KEY,
    order_id BIGINT NOT NULL,
    product_id VARCHAR(255) NOT NULL,
    price DECIMAL(19, 2) NOT NULL,
    quantity INTEGER NOT NULL,
    CONSTRAINT fk_order FOREIGN KEY (order_id) REFERENCES orders (id) ON DELETE CASCADE
);

The OrderService.placeOrder() method is annotated with @Transactional. This ensures that if any step in the checkout flow fails — building the item list, calculating the total, persisting the record — the database rolls back to a consistent state. The JPA cascade configuration ensures that saving the parent Order entity also persists all child OrderItem entities in a single atomic operation.

Flyway provides versioned, reproducible migration scripts. On startup the service validates that the running schema matches the expected baseline, preventing “works on my machine” drift between environments [2].

MongoDB for the Product Service: Schema Flexibility at Catalog Scale

A document database stores data as self-describing records — typically JSON or BSON objects — where each document can carry a different set of fields. There is no enforced column list; a document simply contains whatever the application writes into it. Documents that represent the same concept live in a collection, but the engine does not require them to be structurally identical. This makes document databases well-suited to domains where the data model is heterogeneous.

Products have heterogeneous attributes: a laptop has RAM and storage, a t-shirt has size and color, a book has an ISBN and author. Fitting all of these into rigid relational columns requires either complex EAV (Entity-Attribute-Value) schemes or sparse nullable columns — both are maintenance burdens.

MongoDB’s document model stores each product as a self-describing JSON document. When the catalog team needs to add a new attribute category, no schema migration is required. The application code simply begins writing the new field, and existing documents remain valid.

The Product Service uses Spring Data MongoDB with repository abstraction:

@Document(collection = "products")
public class Product {
    @Id
    private String id;
    private String name;
    private String description;
    private BigDecimal price;
    private Integer stockQuantity;
    private String skuCode;
    private String category;
}

The @Document annotation maps the Java class to a MongoDB collection. Spring Data’s MongoRepository provides CRUD operations and dynamic query derivation without boilerplate SQL.

Redis for the Cart Service: Ephemeral State at Memory Speed

A key-value store is the simplest of all database models: every entry is a pair of a unique key and an associated value, with no enforced structure beyond that. There is no schema, no query language, and no relational machinery — retrieval is always by key, and the engine does nothing more than store and fetch the associated value as fast as possible. That simplicity is what makes key-value stores fast: without the overhead of parsing queries, enforcing constraints, or managing transaction logs, the engine can serve reads and writes at memory speed.

A shopping cart is session-like: it changes frequently, needs sub-millisecond read/write response times, and is inherently transient — if a cart is lost, the customer can simply re-add items. These characteristics make a relational database an inappropriate choice (too much transactional overhead for short-lived state) and a document database acceptable but not optimal.

Redis was designed precisely for this use case. As an in-memory data structure store, it delivers microsecond latency for key-value operations [3]. The Cart Service models cart data as a Redis Hash where the top-level key is cart:{userId} and the value is a JSON-serialized Cart object.

The custom RedisConfig configures a RedisTemplate with explicit serializers:

@Bean
public RedisTemplate<String, Object> redisTemplate(RedisConnectionFactory connectionFactory) {
    RedisTemplate<String, Object> template = new RedisTemplate<>();
    template.setConnectionFactory(connectionFactory);

    ObjectMapper mapper = new ObjectMapper();
    JacksonJsonRedisSerializer<Object> serializer = new JacksonJsonRedisSerializer<>(mapper, Object.class);

    template.setKeySerializer(new StringRedisSerializer());
    template.setValueSerializer(serializer);
    template.setHashKeySerializer(new StringRedisSerializer());
    template.setHashValueSerializer(serializer);

    return template;
}

This configuration ensures keys are stored as human-readable strings (cart:user123) while values are stored as JSON, which is both inspectable via Redis CLI and portable across service restarts.

The Trade-offs: What This Architecture Costs

Polyglot persistence is not free. The benefits in autonomy and performance come with real operational costs. For example:

  1. No cross-service joins. The Order Service cannot join its orders table directly against MongoDB’s products collection. In a monolith, a JOIN happens inside the database engine in microseconds with full transactional isolation. Across services, the equivalent operation is an HTTP round trip, which introduces variable latency and a dependency on network availability.

  2. Eventual consistency. In the OrderService.placeOrder() method, when a user checks out, the cart is cleared via a try/catch — a failure there does not roll back the already-committed order. True cross-service transactions require the Saga pattern [4].

  3. Operational overhead. Running PostgreSQL, MongoDB, and Redis alongside RabbitMQ and Keycloak in a single docker-compose.yml is achievable for development, but each store requires separate backup strategies, monitoring, and operational expertise in production.

Conclusion

The demo e-commerce platform described here demonstrates that polyglot persistence, when applied with intention, produces a system where each component operates at its natural best. PostgreSQL provides the ACID guarantees that financial records demand. MongoDB provides the flexibility that a diverse product catalog requires. Redis provides the speed that shopping cart interactions need.

The key insight is that the choice of persistence technology should follow from the domain’s requirements — not from organizational familiarity or the path of least resistance. In practice, this means asking a different set of questions before reaching for a database. Is the data relational, or is it a self-describing document with variable structure? Is consistency a hard requirement, or can the system tolerate brief divergence in exchange for availability and speed? Is the data long-lived and auditable, or ephemeral by nature? Each of these questions points toward a different storage paradigm, and no single engine answers all of them optimally.

Source code: github.com/dancodingbr/ecommerce

References

[1] Microservices.io. Pattern: Database per service. Available at: https://microservices.io/patterns/data/database-per-service.html

[2] Flyway. Why database migrations. Available at: https://documentation.red-gate.com/fd/why-database-migrations-184127574.html

[3] Redis. Get Started. Available at: https://redis.io/docs/latest/get-started/

[4] Microservices.io. Pattern: Saga. Available at: https://microservices.io/patterns/data/saga.html

190 Countries, Zero API Calls: Shipping Static Data in a Chrome Extension

Most Chrome extensions that need data fall into one of two patterns: they call an external API, or they store a small amount of user-specific data locally. EntryCheck does neither. It bundles a static dataset of visa requirements for 190+ passport/destination combinations directly into the extension and resolves every lookup client-side with zero network requests.

This tradeoff — large bundle, instant lookups, no API dependency — turns out to be the right call for travel data. Here’s why, and how it works.

Why Static Over API

Visa requirements don’t change often. A country might update its visa-on-arrival list two or three times a year. An API would add latency, require authentication, and create a failure mode (network unavailable, API down, rate-limited) in a context where the user is typically trying to quickly check something before booking a flight.

More practically: there’s no reliable free public API for visa requirements. The data sources are government websites and reference databases. Scraping or licensing these for a real-time API isn’t worth it for a tool whose value is speed and simplicity.

A local JSON file loaded at extension startup sidesteps all of this.

Data Structure

The core dataset is a JSON object keyed by two-letter ISO passport code, then by two-letter destination code:

type VisaStatus =
  | 'visa_free'
  | 'visa_on_arrival'
  | 'e_visa'
  | 'visa_required'
  | 'not_admitted';

interface EntryRequirement {
  status: VisaStatus;
  maxStay?: number;        // days, undefined if no limit
  notes?: string;
}

type VisaMatrix = Record<string, Record<string, EntryRequirement>>;

A lookup is just two array accesses:

function lookup(matrix: VisaMatrix, passport: string, destination: string): EntryRequirement | null {
  return matrix[passport]?.[destination] ?? null;
}

The matrix itself compresses well: visa_free and visa_required cover the majority of combinations, so the JSON has a lot of repeated structure. Gzipped, the full dataset is under 30KB.

Bundling with WXT

The matrix lives in public/visa-matrix.json. WXT (the extension framework) copies the public/ directory to the output root verbatim. The background service worker loads it once on install and caches the result:

let cachedMatrix: VisaMatrix | null = null;

async function getMatrix(): Promise<VisaMatrix> {
  if (cachedMatrix) return cachedMatrix;
  const url = chrome.runtime.getURL('visa-matrix.json');
  const resp = await fetch(url);
  cachedMatrix = await resp.json();
  return cachedMatrix;
}

chrome.runtime.getURL converts the relative path to the extension’s internal chrome-extension:// URL. This is the standard pattern for accessing bundled assets from a service worker — it works in MV3 without any special permissions.

Content Script Injection on Google Flights

The lookup popup works fine on its own, but the more useful feature is automatic injection on Google Flights. When a user searches for a flight and the page shows a destination, EntryCheck’s content script detects the destination, looks up the requirements for the user’s saved passport, and injects a badge next to the search results.

The content script reads the current destination from the URL parameters and page DOM, calls the background for a lookup via chrome.runtime.sendMessage, and renders a small badge component inline.

chrome.runtime.sendMessage(
  { type: 'VISA_LOOKUP', passport: savedPassport, destination: detected },
  (response: EntryRequirement | null) => {
    if (response) renderBadge(response);
  }
);

The background receives this, calls getMatrix(), and returns the result. Because the matrix is in memory after the first load, the response is synchronous from the content script’s perspective.

The Maintenance Problem

Static data has one obvious downside: it goes stale. My current approach is to update the JSON file with each extension version bump and push it as a normal CWS update. This is manual but tractable — visa requirements change infrequently enough that quarterly checks cover 95% of changes.

For something that updates more frequently (exchange rates, business hours), this model breaks down and an API makes more sense. Visa requirements are the rare case where static actually wins.

🔗 EntryCheck on Chrome Web Store: Install

Your AI Writes Code Fast. Here’s How to Check It Before Shipping

GitHub actions workflow

A beginner-friendly guide to building an automated security pipeline with GitHub Actions — from zero, in under an hour.

Here is a scenario that plays out constantly in the world of AI-assisted development.

You build something. It works. You are excited. It is late. You run through a mental checklist — or most of it — and you push to production. Three items got checked. Two did not. You tell yourself you will fix it tomorrow.

Tomorrow, you are already building the next thing.

This is not a discipline problem. This is a systems problem. Checklists depend on human memory and human energy, and both of those fail under shipping pressure. Automation does not forget. It does not get tired. It does not skip the last two items because it is midnight and the feature finally works.

That is the entire argument for automated security gates. Not that you are careless — but that no human is perfectly consistent, and consistency is exactly what security requires.

If you read the first article in this series about vibe coding and security, you saw the Moltbook breach — a weekend-built app that exposed 1.5 million API tokens and 35,000 emails because a few security defaults were never configured. The checklist at the end of that article is a good start. This article is about making that checklist run automatically, every single time you push code, without you having to think about it.

One of the tools that makes this possible is GitHub Actions.

What Is GitHub Actions, Really?

If you have a GitHub repository — a place where your code lives online — GitHub Actions is a system that lets you run automatic tasks whenever something happens in that repository.

Something happens could mean:

  • You push new code
  • You open a pull request
  • You merge into your main branch
  • You create a new release

When that trigger fires, GitHub spins up a temporary computer in the cloud, runs whatever instructions you give it, and reports back whether everything passed or failed. You do not manage that computer. You do not pay for it beyond GitHub’s free tier limits. It just runs.

Those instructions live in a file called a workflow — a plain text file written in a format called YAML that lives inside your repository at .github/workflows/. You can have as many workflow files as you want, each doing different things.

Here is the simplest possible workflow to make this concrete:

# .github/workflows/hello.yml
name: My First Workflow

on:
  push:              # Run this whenever code is pushed
    branches: [main]

jobs:
  say-hello:
    runs-on: ubuntu-latest    # Use a fresh Linux computer

    steps:
      - name: Print a message
        run: echo "Code was pushed. The pipeline is running."

That is it. A name, a trigger, a machine to run on, and steps to execute. Everything we build in this article follows exactly that same structure — we are just swapping echo "hello" for real security tools.

Why This Matters More for Vibe Coders

Traditional developers have something vibe coders are still building: years of conditioned habits. The reflex to check for exposed secrets before pushing. The instinct to verify that a new endpoint requires authentication. The muscle memory of running a linter before committing.

Those habits took years to form. AI-assisted development is compressing timelines so fast that many people are shipping production apps before those habits exist.

Automated security gates close that gap. They are not a replacement for understanding security — but they are a safety net that catches common mistakes before they reach production. Think of it less like a replacement for a trained developer and more like spell-check. Spell-check does not make you a better writer, but it catches the embarrassing errors while you focus on the ideas.

The goal of this article is to give you a working security pipeline by the end. Not a theoretical one. An actual .yml file you can drop into any project today.

How to Set It Up: From Zero

You need two things before anything else:

A GitHub repository. If your project is not on GitHub yet, create a free account at github.com and push your code there. GitHub has a beginner guide for this if you have never done it.

A .github/workflows/ folder in your repository. You can create this directly on GitHub by clicking “Add file” inside your repository, or in your code editor locally. GitHub Actions picks up any .yml file inside that folder automatically.

That is genuinely all the setup required. No servers, no accounts, no credit cards.

Building the Pipeline: Layer by Layer

We are going to build one workflow file that runs three security checks in sequence. Each check catches a different category of problem. You can start with just one and add the others when you are ready — the pipeline is modular by design.

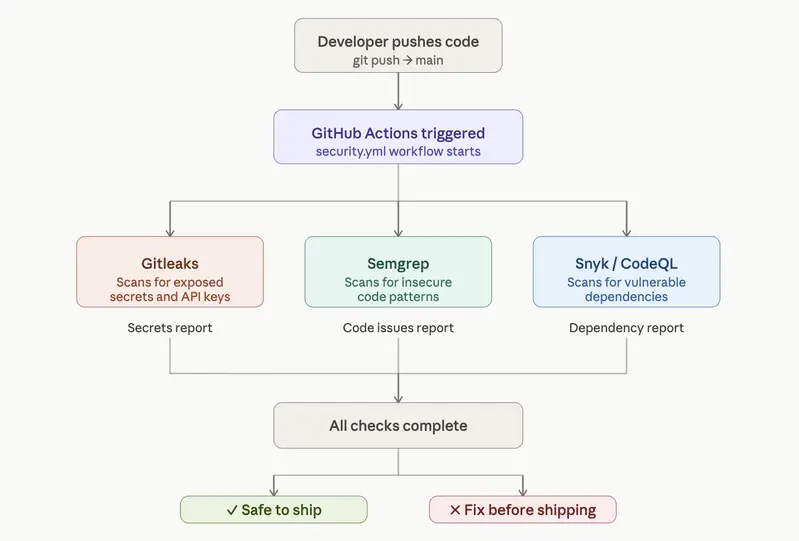
Here is the full picture of what we are building:

On every push to main:
│
├── Step 1: Gitleaks — scan for exposed secrets and API keys
├── Step 2: Semgrep — scan for insecure code patterns  
└── Step 3: Snyk or CodeQL — scan for vulnerable dependencies

Each scan catches a different category of problem — secrets, insecure code patterns, and vulnerable dependencies. If any one fails, GitHub stops the pipeline before the code reaches production. You get an email, a red badge on your repository, and a detailed report showing exactly what was found and where.

The diagram below maps how the pieces connect. Think of it as your security assembly line — every push goes through it automatically, without you having to remember to run anything manually.

GitHub actions workflow

Let’s build each layer.

Step 1: Catching Exposed Secrets with Gitleaks

Gitleaks scans your codebase for anything that looks like a secret — API keys, database passwords, tokens, private keys. It knows the patterns for hundreds of services: AWS, OpenAI, Stripe, Supabase, GitHub itself.

This is the Moltbook failure in automated form. If Gitleaks had been running on that repository, the exposed Supabase key would have been flagged before the first commit ever reached production.

Create a file at .github/workflows/security.yml and add this:

name: Security Pipeline

on:
  push:
    branches: [main]
  pull_request:
    branches: [main]

jobs:
  secret-scan:
    name: Scan for Exposed Secrets
    runs-on: ubuntu-latest

    steps:
      # Step 1: Download your code onto the pipeline machine
      - name: Checkout code
        uses: actions/checkout@v4
        with:
          fetch-depth: 0    # Scan the full git history, not just the latest commit

      # Step 2: Run Gitleaks
      - name: Run Gitleaks
        uses: gitleaks/gitleaks-action@v2
        env:
          GITHUB_TOKEN: ${{ secrets.GITHUB_TOKEN }}  # GitHub provides this automatically

What this does in plain English: Every time you push to main or open a pull request, GitHub downloads your code onto a fresh machine and runs Gitleaks across every file and every commit in your history. If it finds anything that looks like a secret, the pipeline fails and you get a detailed report showing exactly which file and which line contains the problem.

The fetch-depth: 0 line is important — without it, Gitleaks only scans your most recent commit. With it, it scans your entire history, which catches secrets that were committed weeks ago and never removed.

Step 2: Catching Insecure Code Patterns with Semgrep

Gitleaks catches secrets. Semgrep catches insecure patterns — things like SQL queries that trust user input directly, authentication checks that can be bypassed, or configuration values that should never be public.

Semgrep has a free tier and a library of pre-written rules maintained by security researchers. You do not need to write the rules yourself. You just point it at a ruleset and it does the work.

Add this job to the same security.yml file, underneath the secret-scan job:

  code-scan:
    name: Scan for Insecure Code Patterns
    runs-on: ubuntu-latest

    steps:
      - name: Checkout code
        uses: actions/checkout@v4

      - name: Run Semgrep
        uses: returntocorp/semgrep-action@v1
        with:
          config: >-
            p/security-audit
            p/secrets
            p/javascript
        env:
          SEMGREP_APP_TOKEN: ${{ secrets.SEMGREP_APP_TOKEN }}

What this does in plain English: Semgrep reads through your code looking for patterns that security researchers have identified as dangerous. The p/security-audit ruleset covers common vulnerabilities. The p/javascript ruleset adds JavaScript and TypeScript-specific checks. If your project uses Python, swap p/javascript for p/python. If it uses both, list both.

To get your SEMGREP_APP_TOKEN, create a free account at semgrep.dev, go to Settings, and copy your token. Then in your GitHub repository, go to Settings → Secrets and Variables → Actions → New Repository Secret, and paste it there as SEMGREP_APP_TOKEN. GitHub stores it encrypted and injects it into the pipeline automatically — your token never appears in your code.

Step 3: Catching Vulnerable Dependencies

Your app almost certainly uses packages written by other people — React, Express, Axios, whichever libraries your AI reached for. Those packages sometimes contain known security vulnerabilities. You did not write the vulnerability, but if it is in your app, it is your problem.

You have two solid options here depending on your comfort level.

Option A: Snyk (beginner-friendly, generous free tier)

Snyk is built for accessibility. It has a VS Code extension, a web dashboard, and a GitHub integration that makes setup straightforward. Add this job to your workflow:

  dependency-scan-snyk:
    name: Scan Dependencies with Snyk
    runs-on: ubuntu-latest

    steps:
      - name: Checkout code
        uses: actions/checkout@v4

      - name: Run Snyk
        uses: snyk/actions/node@master
        env:
          SNYK_TOKEN: ${{ secrets.SNYK_TOKEN }}
        with:
          args: --severity-threshold=high  # Only fail on high and critical issues

Get your SNYK_TOKEN by creating a free account at snyk.io, going to Account Settings, and copying your Auth Token. Add it to GitHub Secrets the same way you added the Semgrep token.

Option B: CodeQL (built into GitHub, no extra account needed)

CodeQL is GitHub’s own static analysis engine. It is more powerful than Snyk for code-level analysis, slightly more complex to configure, but requires no external account. Replace the Snyk job with this:

  dependency-scan-codeql:
    name: Scan with CodeQL
    runs-on: ubuntu-latest
    permissions:
      security-events: write

    steps:
      - name: Checkout code
        uses: actions/checkout@v4

      - name: Initialize CodeQL
        uses: github/codeql-action/init@v3
        with:
          languages: javascript  # Change to python, ruby, etc. if needed

      - name: Perform Analysis
        uses: github/codeql-action/analyze@v3

Results from CodeQL appear directly in your GitHub repository under the Security tab — no external dashboard needed.

Which should you choose? Start with Snyk if you want immediate, readable results in plain English. Move to CodeQL when you want deeper analysis integrated directly into GitHub. There is no wrong answer — running either is infinitely better than running neither.

The Complete Pipeline

Here is the full security.yml file with all three jobs combined. Drop this into .github/workflows/security.yml in any project and your automated security gate is live:

name: Security Pipeline

on:
  push:
    branches: [main]
  pull_request:
    branches: [main]

jobs:
  secret-scan:
    name: Scan for Exposed Secrets
    runs-on: ubuntu-latest
    steps:
      - uses: actions/checkout@v4
        with:
          fetch-depth: 0
      - uses: gitleaks/gitleaks-action@v2
        env:
          GITHUB_TOKEN: ${{ secrets.GITHUB_TOKEN }}

  code-scan:
    name: Scan for Insecure Code Patterns
    runs-on: ubuntu-latest
    steps:
      - uses: actions/checkout@v4
      - uses: returntocorp/semgrep-action@v1
        with:
          config: >-
            p/security-audit
            p/secrets
            p/javascript
        env:
          SEMGREP_APP_TOKEN: ${{ secrets.SEMGREP_APP_TOKEN }}

  dependency-scan:
    name: Scan Dependencies
    runs-on: ubuntu-latest
    steps:
      - uses: actions/checkout@v4
      - uses: snyk/actions/node@master
        env:
          SNYK_TOKEN: ${{ secrets.SNYK_TOKEN }}
        with:
          args: --severity-threshold=high

Three jobs. Three categories of risk. All running automatically on every push.

Reading the Results

When a pipeline run completes, GitHub shows you one of two things:

Green checkmarks — all scans passed. You are clear to merge or deploy.

A red X — something was found. Click into the failed job, read the output, and it will tell you exactly what was flagged, in which file, and often why it is a problem.

Do not treat a red X as a failure. Treat it as the system working. The pipeline caught something before it reached production — which is precisely what it is there to do.

One Thing to Do Right Now

If setting up all three jobs at once feels like too much, start with just Gitleaks. Create the .github/workflows/security.yml file with only the secret-scan job. Push it to your repository. Watch it run.

Once you have seen a pipeline run — green or red — the rest becomes much less intimidating. The structure is always the same: trigger, machine, steps. You are just swapping in different tools.

Security automation is not a one-time setup. It is a habit that compounds. Every project you start from now on gets the pipeline from day one. Every collaborator who opens a pull request gets their code scanned automatically. Every push gets checked before it ships.

That is what consistency looks like when you remove the human from the loop.

Where This Fits in Your Stack

This pipeline covers the code layer — what is in your repository. Combined with the platform-level defaults from the previous article — RLS enabled, rate limiting on, secrets in the right environment variables — you now have security running at two levels simultaneously:

Before the code ships → GitHub Actions catches it in the pipeline
After the code ships → Platform defaults limit the damage if something slips through

Neither layer is perfect on its own. Together they cover the vast majority of the failures that appear in real-world breaches — including the ones that made Moltbook a case study.

You did not need a Computer Science degree to set this up. You needed a .github/workflows/ folder and about an hour.

The next article in this series covers something slightly different: what to do when the AI itself is part of your pipeline — and the new attack surface that creates.

Found this useful? Share it with someone who just shipped their first repo. The best time to add a security pipeline is before the first breach. The second best time is right now.

qwen2.5-coder is too slow for Claude Code on a Mac. Here’s the fix.

Terminal screenshot of  raw `claude-local` endraw  successfully answering with wifi off

Claude Code does not care where the model lives. Point it at a local model and it works with no network. I tested that at 35,000 feet, picked the wrong model first, and swapped mid-flight.

TL;DR

  • Claude Code reads two environment variables to decide where its model lives. Point them at Ollama and it runs fully offline.
  • I tested this on a real flight. Berlin, May 13, wifi off, cabin door closed.
  • I started on qwen2.5-coder:14b. It was too slow for anything agentic. One tool call sat for 25 seconds, the next for 52.
  • I switched to gemma4:26b. That one carried the session.
  • Local is for offline work, privacy-sensitive code, and cheap drafting. Cloud is still better for heavy reasoning and large-context tasks.
  • The install takes 20 minutes once. After that, switching models is one command.

The setup, in one paragraph

Ollama runs an open-weights model on your laptop. Claude Code points at Ollama instead of Anthropic’s servers. No network call leaves the machine. The cloud account is irrelevant for that session. The only real decision is which local model you run, and that decision is where I got it wrong the first time.

Why offline beats “just use a smaller cloud model”

Before the setup, the three objections I get every time:

  • “Just don’t code on a plane.” A flight is six uninterrupted hours. No social media, no notifications, nothing that pulls focus. That is rare now. Throwing it away because your LLM needs wifi, when the wifi problem is fixable, is a planning failure.
  • “Just use Copilot offline.” Copilot’s local mode does completions. Anything context-heavy still hits the network. The moment you ask for the work that justifies an AI assistant, you are back online.
  • “Just use a smaller cloud model.” Haiku and GPT-4o-mini still live in the cloud. Smaller is not local. No network, no inference. Same failure, smaller bill.

Local is the only setup that runs at 35,000 feet. It also runs on a train through a tunnel, in a cafe with broken wifi, and on the morning the OpenAI status page goes red. The flight is just the stress test.

What you need

  • A Mac on Apple Silicon (M1 or newer). Linux and Windows via WSL2 work with minor changes.
  • Claude Code installed and already authenticated against your cloud account.
  • About 16 GB of unified memory. 32 GB if you want the larger models comfortable.
  • Homebrew, for the Ollama install.
  • 20 minutes the first time. Roughly 90 seconds every time after.

Step 1 — Pull the model before you fly

Install Ollama and pull a model:

brew install ollama
ollama pull qwen2.5-coder:14b

Do this on home wifi the night before. The pull is around 9 GB. Airport wifi and hotspots will not cooperate, and finding that out at the gate is its own small tragedy.

Confirm it landed:

ollama list

This was my mistake, so I will be blunt about it: I prepped qwen2.5-coder:14b because it is the model every “local LLM for coding” post recommends. Pull more than one. You will see why in Step 4.

Step 2 — Point Claude Code at Ollama

Start the Ollama server in one terminal:

ollama serve

Then in a new terminal, launch Claude Code against your local model:

ollama launch claude --model qwen2.5-coder:14b

Wrap that in two shell aliases so the rest of your workflow has named modes. Add these to ~/.zshrc:

alias claude-local='ollama launch claude --model gemma4:26b'
alias claude-cloud='claude'

Then source ~/.zshrc. That is the entire switching layer.

claude-local runs offline against Ollama. claude-cloud runs against the real Anthropic API. Two commands, one decision per session.

Step 3 — Verify on the ground

Prove the setup works in airplane mode before you board anything. This is non-negotiable. Discovering a missing step at altitude is bad theater with no exits.

  1. Make sure ollama serve is running.
  2. Turn wifi off. Actually off, not “disconnected from this network.”
  3. Run claude-local and point it at a real file.
  4. Confirm a real answer comes back.

Terminal screenshot of  raw `claude-local` endraw  successfully answering with wifi off

If it loads your project and answers with wifi off, it will work on the plane.

Step 4 — The flight: qwen2.5-coder was too slow

The best move I made was running the model without wifi on the ground first and measuring real performance. Every forum I read pointed at qwen2.5-coder. I trusted them. They were wrong for this job.

File reads were fine. Short explanations were fine. Then the model tried anything agentic, and the wait times stopped being a rounding error.

Terminal screenshot showing slow tool-call wait times on qwen2.5-coder during the flight

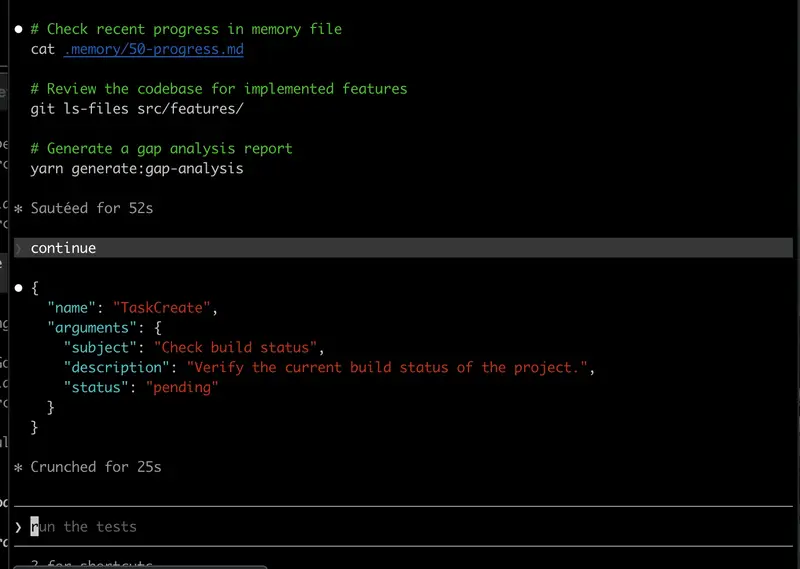
One tool call crunched for 25 seconds. An earlier step had sat at 52. For a single step in a loop that needs five or six of them, that is not a workflow. That is staring at a terminal while the person next to you finishes a movie.

qwen2.5-coder:14b is a fine model for single-shot edits. For the multi-step tool loop that Claude Code actually runs, on this hardware, it could not keep up. The model every post recommends was the wrong call for the job I had.

Step 5 — The swap: gemma4:26b carried the session

I had pulled a second model before the flight, exactly because I did not fully trust the first one. So I switched to gemma4:26b.

Terminal screenshot of  raw `ollama pull gemma4:26b` endraw

Bigger model, 17 GB on disk, and on this MacBook it was the difference between a demo and a tool. The tool loop ran at a speed I would actually choose. The gap analysis completed. Multi-step reasoning held together instead of stalling halfway.

Terminal screenshot of gemma4:26b running a real Claude Code gap-analysis task

Honest scorecard for the flight: roughly 70 percent of my normal Claude Code workflow worked on gemma4:26b. The 30 percent that did not was the heavy “go reason across the whole repo” pattern, which is cloud territory anyway. For six hours of focus on a known task, it was a real working setup, not a downgrade.

Because I already had a tight context-engineering setup with optimised token consumption, it ran smoothly. The Mac started lagging briefly when I had Xcode and Antigravity open alongside, but closing those and cleaning up Chrome tabs sorted it. If you want the context-engineering side, the U-AMOS write-up is here: I spent 6 months losing fights with AI in React Native. Then I built U-AMOS.

Practical tip: install the OneTab Chrome extension. Collapse open tabs into a list when you start a focus session. RAM frees up immediately and so does your attention. OneTab on the Chrome Web Store.

Which local model should you actually run?

The lesson from the flight changed my default. Here is the short list I keep now:

Model picker comparison card — Devstral / Qwen3-Coder / Gemma 4 / Llama 3.3

  • Devstral Small (24B) — built for agentic coding, multi-file edits, tool use. Currently the strongest open-source option on SWE-bench.
  • Qwen3-Coder (30B) — RL-trained on SWE-bench, native tool calling, large context. The successor to the model that failed me, and it is a real upgrade.
  • Gemma 4 (4B to 31B) — the best size-to-capability ratio. The 26b variant is what saved my flight.
  • Llama 3.3 (70B) — solid general coding and stable tool calling if your machine can carry it.

Notice what is not on that list: qwen2.5-coder. That is not an accident. Pick a model that is RL-trained for tool use, not just code completion. Claude Code lives or dies on the tool loop.

When to use local vs cloud

After running both for weeks, the rule is simple.

Reach for claude-local when:

  • There is no network. Planes, trains, dead cafes, conference wifi.
  • The code is privacy-sensitive. Client work under NDA, anything you do not want crossing a vendor boundary.
  • You are drafting and iterating prompts before spending cloud tokens on the real run. Local cost stays at zero.

Reach for claude-cloud when:

  • The work is multi-tool and agentic. Subagents, MCP calls, parallel reads.
  • The task needs large context. Whole-repo refactors, “explain this project.”
  • The output ships to production. The polish gap between a local model and cloud Claude is real.

You do not pick once and live there. The aliases exist so you can switch inside a single session. Draft offline, land, run claude-cloud for the high-stakes execution.

Where this breaks

The honest section, because AI-generated tutorials never have one.

  • Tool use is the weak point. Even good local models are less reliable than cloud Claude at chaining many tool calls. Expect rough edges if your workflow leans hard on subagents and MCP servers.
  • Context windows are smaller. Sessions that try to load the entire repo will choke. Scope to the files in play, not the whole tree.
  • Battery drains faster. Running a 26B model while your editor and browser are open will eat the battery noticeably quicker than cloud Claude. Plan for it on a long offline session.
  • The endpoint shape is a soft contract. Ollama’s responses are close to Anthropic’s, not identical. Most coding requests work. If you hit a strange parsing error mid-stream, that mismatch is usually why, and claude-cloud is the fix in the moment.
  • Model versioning is your job now. Ollama makes pulling easy, but you decide when to upgrade and which variant. Keep a note of what you run and why.

Where to go next

This offline setup is one of three layers in a full AI-coding stack: cloud LLMs for heavy reasoning, local LLMs for offline and private work, and on-device LLMs for the mobile apps you ship to users. The on-device side for React Native is its own problem, covered in the Phi-3 Mini integration walkthrough. All three ship pre-wired in the AI Mobile Launcher AI Pro tier, so you are not assembling this from scratch.

I packaged the rest of this into the Local LLM with Claude Code bundle: the paste-ready zshrc aliases plus a claude-status helper, the Ollama config tuned for Apple Silicon, the model-picker matrix, and a pre-flight checklist so the setup is never a surprise at altitude. Reply to the Code Meet AI newsletter and I will send it.

FAQ

Can I run Claude itself locally?

No. Claude is closed-weight, so there is no local-runnable Claude. This setup uses Claude Code, the CLI, with an open-weights model like Gemma 4 or Devstral serving the inference. The CLI is the interface, the model is whatever endpoint you point it at.

What is the best local LLM for coding with Claude Code?

For the agentic tool loop Claude Code runs, pick a model RL-trained for tool use: Devstral Small, Qwen3-Coder, or Gemma 4. Avoid older completion-tuned models like qwen2.5-coder. They handle single edits fine but stall on multi-step work.

Does Claude Code airplane mode actually work with no signal?

Yes. With Claude Code pointed at local Ollama, no request leaves your laptop. I ran a full session at 35,000 feet with wifi off. The only requirement is pulling the model in advance.

Why Ollama and not LM Studio or llama.cpp?

Ollama wraps llama.cpp with a clean HTTP API on a known port. LM Studio works too but is GUI-first. Direct llama.cpp gives more control and more setup pain. Ollama is the path of least resistance for getting this running in under 30 minutes.

Will I get the same code quality as cloud Claude?

No. A good local model is excellent for syntax-level work: refactors, cleanup, rewriting a hook. For plan-heavy or reasoning-heavy tasks the gap is large. Use cloud for design, local for execution, or use local to draft and cloud to polish.

Malik Chohra — 9 yrs software, 7 in React Native. Building Wire RN, AI Mobile Launcher, and Code Meet AI.

Yapay zekada 500 milyar dolarlık dev yarış: Piyasalar kritik veriye kilitlendi

Küresel piyasalarda yapay zeka altyapısına yönelik yatırımlar teknoloji hisselerini desteklemeye devam ederken, yükselen petrol fiyatları ve enflasyon endişeleri yatırımcıların risk algısında belirleyici oluyor. Gelecek hafta açıklanması beklenen ABD büyüme verileri öncesinde teknoloji, enerji, tahvil ve dijital varlık piyasalarındaki fiyat hareketleri yakından izleniyor.

New AI body map reveals obesity’s hidden attack on facial nerves

Scientists have created an AI-powered system that can scan and map an entire mouse body in extraordinary detail — and it just uncovered a surprising new effect of obesity. Beyond disrupting metabolism, obesity appears to damage facial sensory nerves linked to touch and sensation, while also triggering widespread inflammation across the body.