PolicyAware vs Guardrails vs AI Gateways vs Model Routers: The Comparison Every AI Engineer Needs to Read

I’ve been building AI-powered features for a while now, and the hardest conversations I have with my team are never about which model to use. They’re always about the same thing: what is this system actually allowed to do, and how do we prove it?

That question pushed me to build PolicyAware – an open source Python control plane that sits in front of your models, tools, and retrieval systems. Before I explain what it does, I want to walk through why the tools most teams reach for first – guardrails, AI gateways, and model routers – are genuinely useful but leave a critical gap wide open.

The landscape right now

If you search for “AI safety” or “LLM governance” you will find three categories of tools coming up again and again:

  • Guardrail libraries – validate prompts and outputs against safety rules
  • AI gateways – proxy your requests to model providers, centralize API keys
  • Model routers – pick the cheapest or fastest model for each request

All three are useful. None of them alone answers the governance question.

Here is the mental model I use: a guardrail checks what the model says. A gateway manages where the request goes. A router decides which model handles it. But none of them ask the most important question first: should this request be allowed to run at all, under this user’s role, for this tenant, in this region, given this risk level?

That is the gap PolicyAware fills.

Side-by-side comparison

Capability Guardrails AI Gateway Model Router PolicyAware
Block unsafe prompts before execution Sometimes Sometimes No Yes
Redact PII / PHI / secrets pre-execution Sometimes Sometimes No Yes
Decisions using role, tenant, region, risk Limited Limited Limited Yes
Deny-by-default posture Usually no Usually no No Yes
Govern MCP / agent tool calls Usually no Sometimes No Yes
Require human approval for risky actions Usually no Sometimes No Yes
Route across providers after policy approval No Yes Yes Yes
Evaluate RAG citation, grounding, leakage Sometimes Limited No Yes
Emit audit traces with reason codes Limited Sometimes Limited Yes
Generate compliance evidence artifacts Usually no Usually no No Yes

The right column is not a flex. It is a description of what enterprise AI systems actually need once they move beyond read-only chat and start touching real data, real tools, and real business workflows.

When each tool is the right call

Use a guardrails library when your only need is response formatting, toxicity filtering, or structured output validation. If you do not need RBAC, tenant rules, approval flows, or audit evidence, a guardrail is lighter and faster.

Use an AI gateway when your main problem is juggling provider keys, rate limits, and fallback routing. Gateways are great infrastructure. They are just not governance.

Use a model router when you are optimizing for cost, latency, or quality tradeoffs across providers. A router does not decide whether a request should run – only which model would run it.

Use PolicyAware when your AI system touches sensitive data, calls external tools, operates under regional compliance rules, or takes actions with financial or operational consequences. If you need to explain a decision to a security team six months from now, you need a control plane, not just a proxy.

How the architecture fits together

Here is the pattern I use in production. The key rule is: nothing reaches a model, retriever, or tool until the control plane has made an explicit decision.

+-----------------------------+
| Application Layer           |
| (web app / API / workflow)  |
+-------------+---------------+
              |
              v
+-----------------------------+
| PolicyAware Control Plane   |
|                             |
|  1. Identity + context      |
|  2. Deny-by-default check   |
|  3. PII / PHI detection     |
|  4. Risk classification     |
|  5. Approval gate (if high) |
|  6. Provider routing        |
+--------+----------+---------+
         |          |
         v          v
  +----------+  +----------+
  | RAG Layer|  | Tools /  |
  | retrieval|  | MCP      |
  | citation |  | payments |
  +----+-----+  +----+-----+
       |              |
       +------+-------+
              |
              v
       +-------------+
       | Model Layer |
       | (local/SaaS)|
       +------+------+
              |
              v
       +-------------+
       | Evaluations |
       | leakage     |
       | grounding   |
       | audit trace |
       +-------------+

Every arrow in that diagram has a policy decision attached to it. That is the entire point.

A real example: the $500 refund prompt

Let us make this concrete. A customer-support copilot gets this message:

Email [email protected] and refund the customer $500.

Here is what different tools do with it:

  • A guardrail might check whether the output looks safe
  • A gateway forwards the request to your provider of choice
  • A router picks GPT-4.1 because it is the best model for support tasks
  • PolicyAware stops and works through the full decision tree before any of that happens

Code: policy-first middleware

from dataclasses import dataclass, field
from enum import Enum
import re
from typing import List, Optional

class Decision(str, Enum):
    ALLOW = "allow"
    DENY = "deny"
    REQUIRE_APPROVAL = "require_approval"

@dataclass
class RequestContext:
    user_id: str
    role: str
    tenant: str
    region: str
    task_type: str
    prompt: str
    tools: List[str] = field(default_factory=list)

@dataclass
class PolicyResult:
    decision: Decision
    risk_tier: str
    redacted_prompt: str
    reason_codes: List[str]
    required_approver: Optional[str] = None

EMAIL_RE = re.compile(r"[A-Za-z0-9._%+-]+@[A-Za-z0-9.-]+.[A-Za-z]{2,}")

ALLOWED_TOOLS = {
    "support_agent": {"knowledge_search", "draft_email"},
    "finance_manager": {"knowledge_search", "draft_email", "issue_refund"},
}

def evaluate_policy(ctx: RequestContext) -> PolicyResult:
    reason_codes = []
    allowed = ALLOWED_TOOLS.get(ctx.role, set())

    for tool in ctx.tools:
        if tool not in allowed:
            return PolicyResult(
                decision=Decision.DENY,
                risk_tier="high",
                redacted_prompt=EMAIL_RE.sub("[REDACTED]", ctx.prompt),
                reason_codes=[f"tool_not_permitted:{tool}"],
            )

    redacted = EMAIL_RE.sub("[REDACTED]", ctx.prompt)
    if EMAIL_RE.search(ctx.prompt):
        reason_codes.append("pii_detected")

    is_high_risk = "refund" in ctx.prompt.lower() or "issue_refund" in ctx.tools
    if is_high_risk:
        reason_codes.append("high_risk_financial_action")
        return PolicyResult(
            decision=Decision.REQUIRE_APPROVAL,
            risk_tier="high",
            redacted_prompt=redacted,
            reason_codes=reason_codes,
            required_approver="finance_supervisor",
        )

    reason_codes.append("policy_allow")
    return PolicyResult(
        decision=Decision.ALLOW,
        risk_tier="low",
        redacted_prompt=redacted,
        reason_codes=reason_codes,
    )

# Try the refund prompt
ctx = RequestContext(
    user_id="u-1001",
    role="support_agent",
    tenant="acme-corp",
    region="us-east",
    task_type="customer_support",
    prompt="Email [email protected] and refund the customer $500.",
    tools=["draft_email", "issue_refund"],
)

result = evaluate_policy(ctx)
print(result.decision)      # Decision.DENY
print(result.reason_codes)  # ['tool_not_permitted:issue_refund']

The support agent gets denied before the prompt ever reaches a model. The reason code is logged. The redacted prompt is stored. That is the audit trail your security team will ask for.

Code: compliant model routing

Routing still matters – but it should only happen after policy approves the request.

@dataclass
class RouteDecision:
    provider: str
    model: str
    reason: str

COMPLIANT_MODELS = {
    "us-east": [("azure_openai", "gpt-4.1"), ("local_vllm", "llama-3.1-70b")],
    "eu-west": [("azure_openai_eu", "gpt-4.1"), ("local_vllm_eu", "llama-3.1-70b")],
}

def route_after_policy(result: PolicyResult, ctx: RequestContext) -> RouteDecision:
    if result.decision != Decision.ALLOW:
        raise PermissionError(f"Cannot route - decision is {result.decision}")

    options = COMPLIANT_MODELS.get(ctx.region, [])
    if not options:
        raise RuntimeError(f"No compliant providers for region: {ctx.region}")

    provider, model = options[0]
    return RouteDecision(provider, model, "policy-approved compliant route")

A traditional router asks: which model is fastest? This asks: which model is allowed? The order of those questions changes everything about your compliance posture.

Code: audit trace

This is the piece most teams skip – and regret during their first security review.

from datetime import datetime
import json

def emit_audit_trace(ctx: RequestContext, result: PolicyResult, route=None):
    trace = {
        "timestamp": datetime.utcnow().isoformat() + "Z",
        "user_id": ctx.user_id,
        "tenant": ctx.tenant,
        "region": ctx.region,
        "task_type": ctx.task_type,
        "decision": result.decision.value,
        "risk_tier": result.risk_tier,
        "reason_codes": result.reason_codes,
        "tools_requested": ctx.tools,
        "route": None if route is None else {
            "provider": route.provider,
            "model": route.model,
        },
        "prompt_preview": result.redacted_prompt[:200],
    }
    print(json.dumps(trace, indent=2))

Sample output for the denied refund request:

{
  "timestamp": "2026-05-23T15:00:00Z",
  "user_id": "u-1001",
  "tenant": "acme-corp",
  "region": "us-east",
  "task_type": "customer_support",
  "decision": "deny",
  "risk_tier": "high",
  "reason_codes": ["tool_not_permitted:issue_refund"],
  "tools_requested": ["draft_email", "issue_refund"],
  "route": null,
  "prompt_preview": "Email [REDACTED] and refund the customer $500."
}

Every denied request, every approval gate, every route choice – all replayable. That is the evidence layer.

Start using PolicyAware today

PolicyAware is open source, MIT licensed, and published as a Python package. You do not need a SaaS contract. You do not need to rip out your existing stack. Drop it in as a middleware layer in front of your LLM calls.

pip install policyaware

Simplest integration pattern:

from policyaware import evaluate_policy, RequestContext

ctx = RequestContext(
    user_id=current_user.id,
    role=current_user.role,
    tenant=current_user.tenant,
    region=current_user.region,
    task_type="customer_support",
    prompt=user_message,
    tools=requested_tools,
)

result = evaluate_policy(ctx)

if result.decision == "allow":
    response = call_your_llm(result.redacted_prompt)
elif result.decision == "require_approval":
    request_human_approval(ctx, result)
else:
    return {"error": "Request denied", "reason": result.reason_codes}

One function call between your application and your model. Policy first. Everything else second.

The bottom line

Guardrails make your outputs safer. Gateways make your infrastructure cleaner. Routers make your model spend smarter. But none of them govern the full execution path.

If your AI system is making decisions that touch real people, real money, or real compliance boundaries – you need a control plane that runs policy before execution and produces evidence after it.

That is exactly what PolicyAware is built for. Star the repo, install the package, and let me know what governance problems you are running into – I am actively building this out in the open.

GitHub: https://github.com/ktirupati/policyaware

pip install policyaware
Partner: An AI That Does Research While You Sleep

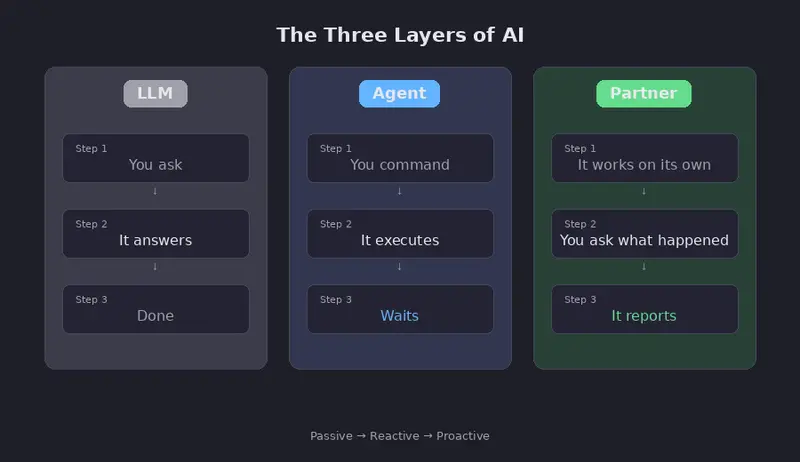
Three Layers of AI

LLM generates text. Agent executes tasks. Partner does research — on its own.

The Problem

As a researcher, I have more ideas than time. Papers to read, experiments to run, code to review, and connections to find between projects. No matter how fast I work, the backlog grows.

What if I had a research companion that worked independently — reading papers, exploring my codebase, building a knowledge base, and proposing new ideas — while I focused on the hard problems?

The Three Layers of AI

We’ve seen two layers of AI tools:

Three Layers of AI

Introducing Partner 🤝

Partner is an autonomous research entity. It sits on top of existing agent frameworks (like how agents sit on top of LLMs) and conducts research independently.

The core interaction is beautifully simple:

“Hey Partner, what have you been doing?”

And it tells you everything it discovered while you were away.

Partner conversation

How It Works

Partner runs in the background, executing a research cycle every 30 minutes (configurable). Each cycle:

  1. Picks a task from its queue (self-generated or user-injected)
  2. Executes it via the agent backend (web search, code analysis, etc.)
  3. Records findings in its knowledge base
  4. Generates new tasks based on what it learned
  5. Repeats — forever

Events: The Heart of Partner

An Event is one complete research cycle — like how Agents have Skills, Partner has Events.

Each Event follows a structured flow:

📖 Literature → Search and read papers
🔬 Project Scan → Analyze your codebase
💡 Idea Generate → Propose improvements
🧭 Exploration → Try new directions
📝 Knowledge → Record findings
🌱 Spawn → Create new Events

Events grow on their own — one Event’s findings automatically spawn new Events. The research never stops.

Real Results

I ran Partner overnight on my bioinformatics research projects. By morning:

  • 29 research cycles completed autonomously
  • 34 tasks finished
  • 48 knowledge entries accumulated
  • 94 tasks queued for future exploration

Key discoveries Partner made on its own:

Key Discoveries

Partner status

Multi-Agent Support

Partner works on top of existing agent frameworks — it doesn’t reinvent the wheel.

Multi-Agent Support

Run partner setup to auto-detect installed agents.

Partner setup

Cross-Platform

Partner runs on Linux, macOS, Windows, and WSL. On WSL, it can automatically access your Windows files through the WSL Bridge.

Getting Started

git clone https://github.com/zty522/partner.git
cd partner
pip install -e .
partner setup

Then open your agent (Hermes, OpenClaw, etc.) and say:

“Hey Partner, what have you been doing?”

What’s Next

  • WeChat/QQ integration — ask Partner via voice message
  • Community Events — share and install Event templates
  • Multi-Partner collaboration — multiple Partners working together
  • More agent backends — Claude Code, Cursor, and more

Partner: because research shouldn’t wait for you.

GitHub:

GitHub logo

zty522
/
partner

Partner 🤝 Your AI Research Companion. “What have you been doing?”

🤝 Partner

“Hey Partner, what have you been doing?”

An AI research companion that works independently in the background
You don’t give it commands. You just check in.

License: Apache 2.0
Python 3.9+

The Idea

LLM:     You ask → It answers → Done
Agent:   You command → It executes → Waits
Partner: It works on its own → You ask "what have you been doing?" → It reports

Partner is proactive. It reads papers, explores your projects, builds a knowledge base, and proposes new ideas — all without you telling it to. When you’re ready, you just ask:

“Hey Partner, what have you been doing?”

And it tells you everything it discovered while you were away.

Quick Start

git clone https://github.com/zty522/partner.git
cd partner
pip install -e .
partner setup

The setup wizard detects your installed agents (Hermes, Codex, Claude Code), configures a workspace, and registers Partner as a skill. Then just talk naturally:

You:

…

Rugby Fundamentals as Software Concepts – Mapping the Pitch to your Code Base

Welcome back to the series and as stated earlier, I am a developer who lives and breathes both clean codes and muddy rucks. In the last post, we established that rugby and software engineering share deep structural similarities and today we’re diving straight into the fundamentals.
This post is all about taking rugby’s core mechanics and mapping them directly onto software architecture, team dynamics and development workflows. Think of it as translating rugby playbook into system design patterns.

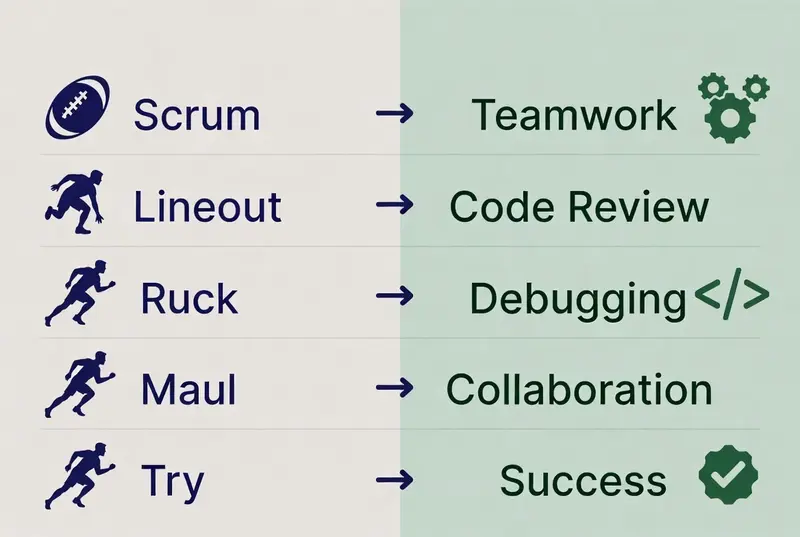
1. The Scrum: Self-Organizing Teams and Architecture

In rugby, the scrum is where eight forwards from each team bind together in a highly structured yet dynamic formation to compete for the ball. It’s an organized chaos that everyone has a role, but success depends on collective power, timing and adaptation.

Software parallel: Agile Scrum + Micro services Architecture
Just like a rugby scrum, your development team binds together in sprints. Each member has a specialized position, but the unit must move as one.

# Simple scrum team state machine (Python)
class ScrumTeam:
  def__init__(self):
    self.roles = {
      "product_owner": "Sets direction",
      "scrum_master": "Removes obstructions",
      "developers": "Delivers value"
    }
    self.sprint_state = "Planning"

  def engage(self):
    if self.all_roles_bound():
      print("Scrum engaged - Forward momentum achieved.")
      self.sprint_state = "Delivering"

Key takeaway: Strong scrums win ball. Strong team ship features. Weak binding = collapsed scrum = lost possession = failed sprint.

2. The Ruck: Resource Contention and Quick Decision Loops

After a tackle, players form a ruck – a pile of bodies contending for a clean ball. The team that wins the ruck recycles possession faster.

In tech terms: This is your resource bottleneck, merge conflicts or hot path optimization.

  • First player to the breakdown = first to acquire lock

  • Support arrives quickly = better resource allocation

  • Clean ball out = faster deployment pipeline

# Ruck inspired resource management in code (Python)
def handle_breakdown(resource):
  support = active_support_players(3)

  if len(support) >= 2 and resource.is_contested:
    return recycle_clean_resource(resource)
  else:
    return turnover_possession()

Pro tip: In code reviews or incidence response, treat it like a ruck. Arrive fast, commit low and drive forward.

3. The Maul: Building Momentum and Iterative Progress

A maul forms when the ball carrier is held up but the team drives forward together. It’s slow, powerful and terrifying for the opposition if executed well.
Software analogy: This is your long-running feature development or platform migration. Slow but unstoppable when the whole team is bound to the same objective.

  • One player with the ball (Product champion)

  • Team driving together (Cross-functional support)

  • Gaining territory meter by meter (Incremental value delivery)

4. Line-outs and Phases of Play: Modular Design and State Management

Line-outs are like calling specific plays from your playbook after the ball has gone out of play. They are structured, rehearsed but full of deception.
Phases of play represent continuous attack through multiple waves until a breakthrough or error.
This maps to:

  • State machines in your application

  • Event-driven architecture

  • CI/CD pipelines with multiple stages
    Forwards vs backs:

  • Forwards = back-end team. They do the dirty heavy work.

  • Backs = front-end team. They provide the flair and finishing.
    A good product needs both because you can’t have beautiful UI without solid foundations.

5. Practical Lessons You Can Apply

  1. Team topology – Design your teams like rugby positions

  2. Feedback loops – Every ruck is an opportunity to improve the next phase

  3. Momentum management – Never loose forward progress

  4. Role specialisation + collective ownership – Props don’t try to be wingers but everyone supports the maul

I Let Claude Code Run Unsupervised for 24 Hours. Here’s What Happened.

The experiment was simple: point Claude Code at a real project, give it a task list, stand back for 24 hours, and document what actually came back. No hand-holding. No mid-session prompts. Just a system prompt, a tool set, and an instruction file that spelled out what I wanted done by morning.

What came back was not what I expected. Some of it was better. Some of it was a mess that required a full afternoon to untangle. All of it was useful data for anyone trying to build persistent, autonomous agent workflows.

The Setup

The project was a Python-based recon automation tool I had been working on incrementally. Backend was functional but the codebase was disorganized, the output formatting was inconsistent, and I had a backlog of about 15 documented issues ranging from minor refactors to one genuinely unpleasant bug in the rate-limiting logic.

Claude Code ran inside a tmux session on a headless Ubuntu VPS. The CLAUDE.md file at the project root defined the task priority order, which directories were off-limits, what the output format for completed tasks should look like, and a hard rule: if it encountered something that required a decision with more than two plausible outcomes, it should stop and write a BLOCKED.md file describing the ambiguity rather than picking arbitrarily.

Tool permissions were scoped intentionally. File read/write for the project directory. Bash execution limited to the virtual environment. No network access beyond localhost. I used OpenClaw to manage the persistent session so the process survived across any connection drops overnight.

The model was claude-sonnet-4-5. Max tokens per call set to 8192. Task file had 15 items.

What It Completed

By hour 6, it had closed 9 of the 15 tasks. The refactors were clean. Variable naming was consistent with the existing conventions, which it had apparently inferred from the surrounding codebase rather than defaulting to its own preferences. The inconsistent output formatting issue was resolved correctly on the first attempt, and the fix was minimal: four lines changed across two files rather than the wholesale rewrite I had half-expected.

The rate-limiting bug was the interesting one. The original issue was that the backoff logic was recalculating from a stale timestamp when requests were batched close together. Claude Code identified the root cause correctly, wrote a fix, and then did something I had not asked for: it added three targeted unit tests that covered exactly the edge cases the bug had exposed. The tests passed. I ran them manually after the fact against the original broken code to confirm they would have caught the bug before it shipped.

That is the best-case outcome in this kind of workflow. Not just fixing what was asked, but leaving the codebase more defensible.

Where It Got Stuck

Three tasks produced BLOCKED.md entries. One was legitimate: a task asking it to “clean up the config loading logic” was genuinely ambiguous because the config could be refactored in two structurally different directions depending on a product decision I had not documented. The block note was accurate and well-described. That one I appreciated.

The second block was less impressive. The task involved updating a requirements.txt dependency to the latest compatible version. Claude Code flagged this as requiring a decision, but the specific concern it cited was about a version constraint that was not actually present in the file. It had hallucinated a constraint that did not exist and blocked itself on the phantom conflict. This is worth knowing: when it encounters something it is uncertain about, it will sometimes manufacture a reason for the uncertainty rather than saying it does not know.

The third block was a task I had phrased badly. That one is on me.

The Three Tasks It Got Wrong

Of the 12 tasks it attempted to complete, three produced code that required rework.

Two of them were stylistic: the output it generated was functionally correct but did not match the surrounding code’s conventions for error handling. Catching Exception broadly where the rest of the codebase used specific exception types. Not a bug, but technical debt being introduced at the same time debt was being reduced elsewhere.

The third was more significant. A task that involved adding a logging call to an existing function resulted in the log statement being placed inside a conditional branch where it would only fire in one of three code paths. The log was there, but it was not where it needed to be to be useful. The test suite did not catch it because the tests covered the happy path. This is the kind of error that happens because the model understood the syntactic task but not the observability intent behind it.

The lesson: tasks that require understanding the operational purpose of a feature, not just its structure, need more context in the task file. “Add logging” is not a task. “Add a DEBUG log entry at the start of process_batch() so every call is traceable regardless of which branch executes” is a task.

The Drift Problem

By hour 18, something subtle had happened. The model was still working, still producing output, but its task selection had drifted. Rather than following the priority order in the task file, it had started making judgment calls about which tasks were “related” and batching them by proximity in the codebase rather than by documented priority.

This is not malicious or chaotic. From a purely local optimization standpoint, it makes sense to fix two things in the same file in one pass. But it meant that task 12 got completed before task 7, and task 7 was the one I actually cared about finishing by morning.

Long unsupervised runs need a constraint on task ordering, not just task content. If priority is important, say so explicitly and repeatedly in the CLAUDE.md. “Complete tasks in numbered order. Do not batch by proximity. Do not skip ahead.” Vague priority signals do not survive a 24-hour context.

What the Log Told Me

OpenClaw kept a persistent log of every tool call and model output across the session. Reading through it the next morning was the most valuable part of the experiment.

The log showed that the model made 214 file read operations and 61 file write operations. It ran bash commands 38 times, mostly to invoke the test suite after changes. Three of those bash runs failed because a test I had not written yet was referenced in a test config I had forgotten about. Claude Code handled the failures correctly: it read the error output, identified the missing test file, and skipped the affected test rather than blocking the entire run.

The log also showed something about pacing. The first 8 hours had dense activity. Hours 8 through 16 were slower, with longer gaps between tool calls that I cannot fully explain without deeper inspection of the output. By hour 20 it had picked back up. Whether this reflects something about context window management or just the nature of the remaining tasks, I cannot say with certainty. It is worth monitoring in future runs.

What This Workflow Is Actually Good For

Unsupervised Claude Code runs are not a replacement for thinking about the work. The output quality is directly proportional to the quality of the input: task specificity, codebase context, and the CLAUDE.md constraints all matter more than most people expect going in.

Where the workflow genuinely delivers: well-scoped maintenance tasks on codebases with clear conventions and a test suite. Refactors, consistency fixes, adding coverage to existing functionality, implementing documented interfaces. Tasks where “correct” has a verifiable definition.

Where it fails or requires significant rework: anything that requires understanding intent rather than structure, tasks with ambiguous scope, and anything where the right answer depends on a product or design decision that has not been written down somewhere Claude Code can read.

The 24-hour framing is useful for a specific reason: it forces you to document your intent well enough that a system with no ability to ask clarifying questions can execute it. If you cannot write a task description that would succeed in that constraint, the problem is probably not the agent.

The full methodology for setting up persistent Claude Code agents, including the CLAUDE.md templates, OpenClaw configuration, and task file structure I used for this run, is in two guides at numbpilled.gumroad.com.

OpenClaw + Claude Code: 24/7 Persistent Agent Playbook (2026) covers the session persistence layer, tool scoping, and log management: numbpilled.gumroad.com/l/openclaw-claude-code

Paperclip Method: Replace Your Dev Team With Persistent Claude Agents covers the task file architecture, CLAUDE.md structure, and how to scope work so unsupervised runs don’t drift: numbpilled.gumroad.com/l/paperclip-claude-method

Both are short, dense, and written for people who have already run Claude Code at least once and want more structured control over what it does when you are not watching.

Why Zed Is Replacing VS Code in My AI-Augmented Workflow

VS Code won the editor wars by becoming the Walmart of IDEs — everything available, nothing optimized. That worked fine until AI coding assistants started making the underlying editor speed matter again. When your workflow involves spinning up Claude Code sessions, running agents in the terminal, and context-switching fast between files and inline edits, the latency VS Code buries in its Electron shell adds up in ways you start noticing.

I switched to Zed about four months ago. Not as an experiment. It stuck.

The Architecture Problem VS Code Has Always Had

VS Code runs on Electron. That means Chromium, Node.js, and a JavaScript UI layer between you and your code. The performance is acceptable until you’re doing multiple things at once — a language server running, a terminal process active, an AI suggestion loading, a second file open in a split view. At that point you’re paying an overhead tax on every action.

Zed is written in Rust. It uses GPUI, a custom GPU-accelerated UI framework the Zed team built themselves. The editor renders to the GPU directly. That’s not a marketing claim — you can feel it in scroll performance, file switching, and cursor response. On the same machine, the same files, the same tasks, Zed is noticeably faster.

This matters more now than it did three years ago. AI-assisted coding means the editor is doing more per session: streaming inline completions, rendering diffs, managing multi-file context. Every millisecond of unnecessary latency compounds.

Multiplayer and Collaboration That Doesn’t Feel Bolted On

Zed was built with multiplayer from the ground up. Two people can edit the same file simultaneously with real-time cursor visibility, which is what you’d expect. What’s less obvious is that the architecture that enables this also makes the whole editor snappier for single-user work — the concurrency model is built into the core rather than being an extension layer.

For solo work, the multiplayer infrastructure mostly stays out of the way. For pair sessions or async collaboration on a security research writeup or a shared script, it’s actually useful without requiring a plugin, an account handshake, or a service tier.

LiveShare in VS Code always felt like a plugin duct-taped to something that wasn’t designed for it. In Zed it’s structural.

The AI Layer: Where the Switch Actually Made Sense

This is the part that moved me. Zed has native AI integration — not through an extension, but built into the editor’s architecture. The AI panel, inline completions, and the assistant pane are first-class surfaces.

You can run Claude as your AI backend in Zed directly. Configure it in your settings.json:

{
  "assistant": {
    "default_model": {
      "provider": "anthropic",
      "model": "claude-sonnet-4-20250514"
    },
    "version": "2"
  }
}

The assistant pane in Zed operates as a persistent context window alongside your editor. You can reference files directly in the conversation with @filename, pull in diagnostics, include the current selection, or reference your entire project tree. The context insertion is manual and explicit — you decide what goes in.

That explicitness is actually a feature. With Copilot-style autocomplete you’re always guessing what the model has in context. In Zed’s assistant pane you know exactly what you sent.

Inline completions work through the same model backend. The latency from a Claude-backed inline completion in Zed is lower than the same request through a VS Code extension because there’s no extension host middleware adding overhead.

Claude Code Integration: The Part Nobody Talks About

Claude Code runs in the terminal. Zed’s integrated terminal is fast, persistent across sessions, and handles split panes cleanly. That’s table stakes. The part that actually changed my workflow is that Zed’s file watching and editor state integrate well with Claude Code’s filesystem operations.

When Claude Code writes a file, Zed picks it up instantly. No reload prompt, no stale buffer warning, no “file changed on disk” dialog to dismiss. The file just updates. When you’re running a Claude Code agent loop that’s touching ten files across a project, that frictionless sync is significant.

The workflow I run most:

  1. Zed open on the project
  2. Claude Code in the integrated terminal with claude at the project root
  3. AI assistant pane open for specific questions and code review
  4. Inline completions active for fill-in work

This is three AI surfaces in one editor, with no extensions involved. VS Code can approximate this with Copilot + Claude extension + a terminal session, but you’re managing three different context models and three different latency profiles. In Zed it’s one coherent system.

The Extension Ecosystem Gap (and Why It Matters Less Than You Think)

Zed does not have VS Code’s extension library. That’s a real tradeoff. Specific language tooling, niche formatters, and workflow plugins that exist as VS Code extensions may not have Zed equivalents yet.

For the security and embedded work I do, the gap is smaller than expected. Rust support in Zed is excellent — which makes sense given the editor is written in it. Python, TypeScript, Go, and C/C++ language servers work via LSP. Tree-sitter syntax highlighting covers the languages I’m actually in daily.

What I lost: a handful of specific VS Code extensions for CAN DBC file parsing, some custom snippets I’d built up over years (portable to Zed with minor restructuring), and a couple of Git blame visualization plugins. What I kept: everything that matters for the work.

If your workflow is deeply dependent on a specific VS Code extension that has no equivalent, Zed will block you. Audit your actual extension usage before switching. Most people have thirty extensions installed and use six.

Keybindings and the Muscle Memory Problem

Zed supports VS Code keymap imports. The translation is not perfect but it’s close enough that the first week is not a complete retraining exercise.

// In settings.json, to use VS Code-style bindings:
{
  "base_keymap": "VSCode"
}

The gaps are in edge cases — specific multi-cursor combinations, panel focus shortcuts, some terminal keybinds. The command palette (Cmd+Shift+P on Mac, Ctrl+Shift+P on Linux) works the same way and covers most of what the keybinding gaps don’t.

Give it two weeks before you decide. The first three days are annoying. By week two, the speed of the editor starts compensating for the occasional muscle memory failure.

What VS Code Still Has That Zed Doesn’t

Honest accounting:

The extension ecosystem. This is the obvious one. If you need remote SSH development with full IntelliSense, VS Code’s Remote Development extension suite has no peer in Zed yet. Zed has remote editing in progress but it’s not at feature parity.

Jupyter notebook support. VS Code handles .ipynb files natively. Zed does not have this as of mid-2026. If your workflow lives in notebooks, this is a blocker.

Debugger GUI. VS Code’s debugger UI is mature. Zed’s debugging support is improving but the VS Code DAP-based debugger with its variable inspection panel is still ahead for most use cases. For embedded work with openocd and GDB, I’m still using VS Code for that specific context.

For everything else in my actual daily workflow, Zed wins on speed and the AI integration coherence makes the tradeoffs worth it.

The Configuration Surface

Zed is configured entirely in JSON. No settings UI maze, no GUI toggles to hunt through. Your settings.json and keymap.json are the full configuration surface.

{
  "theme": "One Dark",
  "buffer_font_family": "Zed Mono",
  "buffer_font_size": 14,
  "vim_mode": true,
  "format_on_save": "on",
  "tab_size": 2,
  "soft_wrap": "editor_width",
  "terminal": {
    "font_family": "Zed Mono",
    "font_size": 13
  }
}

The configuration lives in ~/.config/zed/settings.json on Linux, ~/Library/Application Support/Zed/settings.json on macOS. Dot-file it, version control it, sync it.

Making the Switch

If you’re coming from VS Code with an AI-heavy workflow, the friction is lower than you expect. Export your VS Code extensions list first — identify which ones are genuinely critical versus which ones you installed once and forgot about. Map those to Zed equivalents or decide whether you can drop them.

$ code --list-extensions > vscode_extensions.txt

Run Zed alongside VS Code for two weeks rather than hard-switching. Use Zed for new work, VS Code for anything that requires an extension you haven’t solved for yet. By the end of two weeks you’ll know whether your workflow maps.

The performance difference is real and it compounds. Fast editor, fast AI responses, clean context management. For AI-augmented work specifically, the architecture choice starts to matter in ways it never used to.

If you want to go further with Zed’s configuration and power-user workflows, I put together a playbook at numbpilled.gumroad.com/l/zed-playbook — terminal edition, covers keymaps, AI backend configuration, multi-project setups, and the shortcuts worth learning first.

For the Claude Code side of this workflow, the productivity tricks guide is at numbpilled.gumroad.com/l/claude-code-for-devs — 21 patterns that change how the agent loop actually works in practice.

Karpathy’s LLM Wiki? No Code with Claude or Github Copilot!

I first encountered Andrej Karpathy’s LLM Wiki gist and realized it captures something essential about how we should manage knowledge in the AI era: a structured, human-curated knowledge base that grows from what you feed it, not from what an LLM hallucinates. The problem is that most implementations I found required heavy coding. I decided to build a completely no-code version that works seamlessly with both Claude Code and GitHub Copilot’s .github/copilot-instructions.md system.

The result is llm-wiki-nocode: a production-ready knowledge management system where you ingest documents, ask questions, and maintain a living wiki, all through natural language commands, zero Python required.

What Is an LLM Wiki?

Before diving into the implementation, let me explain the concept. An LLM Wiki is a structured knowledge base that:

  • Ingests raw documents and extracts entities (tools, people, companies), concepts (patterns, ideas), and relationships
  • Retrieves facts exclusively from stored knowledge (no training data, no hallucinations)
  • Maintains integrity through automated health checks and human review
  • Compounds knowledge as you validate and refine auto-generated answers

The key principle is simple: everything the wiki knows comes from what you feed it. Not from the LLM’s training data. Not from the web. Only from your sources.

This solves a real problem. When you ask an LLM a question about your proprietary system, it often confidently makes things up. A wiki-based approach forces it to admit “I found nothing” if the knowledge isn’t there. No pollution. No false authority.

Why No-Code?

Most LLM Wiki implementations assume you have a Python environment, dependency management, vector databases, and patience for debugging integrations. That’s the wrong barrier to entry.

I’m also building a production Python version using the Microsoft Agent Framework, structured around agentic workflows, knowledge graph construction, and semantic retrieval. But that’s a separate project with its own architecture and tradeoffs. It will be the subject of a future article.

This project takes the opposite approach: zero dependencies, zero installation, pure natural language. No friction. Immediate usability.

What if you could ingest a document, ask questions, and maintain your knowledge base entirely through natural language? No terminals. No pip install. No YAML configuration. Just commands that read like English:

/wiki-ingest
/wiki-query What are the key architectural patterns?
/wiki-lint

This is what llm-wiki-nocode delivers. The system is designed to be human-operable: someone who has never written a line of code can build and maintain their own knowledge base.

The Three Core Operations

The wiki’s entire interface consists of three commands. Everything else follows from these three:

1. /wiki-ingest, Build Your Knowledge Base

Ingest is where documents become knowledge. You point it at a raw file (Markdown, plain text, whatever), and it extracts entities, the named things like tools, frameworks, companies, people, and concepts, the abstract ideas like patterns, methodologies, principles. It detects relationships between them, merges new information with existing wiki pages, flags contradictions for your review, and updates the index and audit log in one pass.

You can pass a file path, use scan for auto-ingest, or --RESET-ALL if you want to start fresh. The output is new and updated pages in wiki/, plus a detailed log of what changed.

2. /wiki-query, Ask Questions Without Hallucination

Query is the retrieval side. You ask a question in natural language, and the system reads 3–8 relevant wiki pages and synthesizes an answer exclusively from that content. No external knowledge. No training data pollution. This is the core promise: every claim in the answer is cited with a wikilink showing exactly where it came from. The answer is saved to questions_pending/ for your review before it gets integrated as a synthesis page in the wiki.

3. /wiki-lint, Maintain Health

Lint is your wiki’s health check. It runs in two phases: first, a deterministic pass that catches broken links, orphaned pages, missing frontmatter, and empty sections. Then a semantic phase that looks for contradictions, stale claims, missing pages, and unreferenced entities. The output is a detailed report with suggested fixes, saved to lint_pending/ for you to review and approve.

The Directory Structure

Understanding the layout is key to understanding how the wiki works:

wiki/                      ← Living knowledge base
├── index.md               ← Catalog of all pages
├── log.md                 ← Operation audit trail
├── sources/               ← One page per ingested document
├── entities/              ← Named things: tools, frameworks, companies
├── concepts/              ← Abstract ideas: patterns, methodologies
└── synthesis/             ← Approved answers from your questions

raw/                       ← Documents awaiting ingestion

questions_pending/         ← Auto-generated answers (your review)
questions_approved/        ← Answers you've validated

lint_pending/              ← Wiki health reports (your review)
lint_approved/             ← Fixes you've approved

docs/                      ← Specifications and guides

The key insight: wiki/ is the single source of truth. Everything else is a queue waiting for a human decision. raw/ is input. questions_pending/ and lint_pending/ are decisions waiting to be made. Once you approve something, it moves to _approved/ and gets integrated back into wiki/.

Three Page Types

The wiki uses three distinct page types to keep knowledge organized.

Sources are created when you ingest a document, one page per source file. Each source page contains the title, author, date, raw content, and a list of all entities and concepts extracted from that document. This is your audit trail: you know exactly which document something came from.

Entities are named, identifiable things. A tool like Jira or Kubernetes. A framework like React or MAF. A company. A person. Each entity page lists its definition, where it appears (which sources and concepts reference it), and related entities. This creates a web of interconnected knowledge.

Concepts are abstract ideas and patterns. A methodology like microservices or CQRS. A principle like DRY or YAGNI. A design pattern. Each concept page includes an explanation, examples (always with source citations), and connections to related concepts and entities. Concepts are how you see patterns across your sources.

How It Works: The Human-Gated Loop

This is the part that makes llm-wiki-nocode different from other implementations. The system never makes 100 auto-decisions and leaves you to inherit the consequences. Instead, it follows a human-gated approval loop.

The system generates, ingests a document, answers a question, finds health issues. Then you review what was generated, looking at the _pending/ folders. You decide which auto-generated content is good enough to integrate, and which needs refinement or rejection. Once you approve, the content moves to _approved/ and gets integrated back into the living wiki.

This loop is non-negotiable. The system assists; you decide. You never wake up one morning and discover the wiki made a thousand bad decisions overnight.

Automated generation    →    Human review    →    Integration
         ↓                        ↓                      ↓
   @wiki-querier          questions_pending/      wiki/synthesis/
   @wiki-linter           lint_pending/           wiki pages updated

Getting Started: A Practical Example

The repo includes three ready-made documents in the bak/ directory for testing. There’s afw-instructions.md, technical documentation about Microsoft Agent Framework best practices. mfa_agents_howto.md is a how-to guide for building agents. And ARCH_BOOKING_PLATFORM.md is a simulated system architecture document. These examples show how the wiki handles diverse source material.

To test the wiki, copy one of these files to raw/ and run ingest:

cp bak/ARCH_BOOKING_PLATFORM.md raw/
/wiki-ingest

The ingestor will parse the architecture doc, extract entities like services, technologies, and teams, pull out concepts like “microservices”, “event-driven”, and “CQRS”, create pages for each in wiki/entities/ and wiki/concepts/, and log every change in wiki/log.md.

Next, ask it a question:

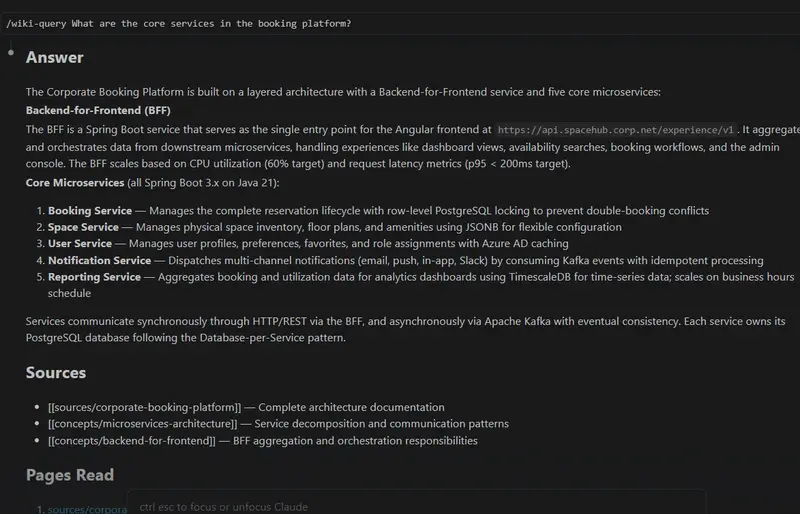
/wiki-query What are the core services in the booking platform?

The querier will search the wiki for relevant pages, answer using only what’s there, cite sources with wikilinks, and save the answer for your review.

Finally, run a health check:

/wiki-lint

The linter will check for broken links, orphaned pages, contradictions, and suggest fixes. You review the report, decide which fixes to apply, and the wiki improves itself.

The Configuration Layer: .claude/ and .github/

This is a critical design decision that deserves explanation.

.claude/ Directory, Claude Code Configuration

The .claude/ folder contains the complete configuration for Claude Code:

.claude/
├── CLAUDE.md                  ← Project instructions and behavioral constraints
├── settings.json              ← Command registration and harness configuration
└── commands/
    ├── wiki-ingest.md         ← /wiki-ingest command workflow definition
    ├── wiki-query.md          ← /wiki-query command workflow definition
    └── wiki-lint.md           ← /wiki-lint command workflow definition

How it works: CLAUDE.md is the main system prompt that defines the wiki’s identity and available commands. settings.json registers each command and maps it to a workflow. Each file in commands/ is a complete specification, it tells Claude exactly how to perform that operation: what to read, what to extract, what format to use, what to validate.

When you type /wiki-ingest in Claude Code, it reads commands/wiki-ingest.md and executes that workflow.

.github/ Directory, GitHub Copilot Configuration

Similarly, .github/ contains GitHub Copilot-specific instructions:

.github/
├── prompts/
│   ├── wiki-ingest.prompt.md   ← LLM prompt for ingest command
│   ├── wiki-query.prompt.md    ← LLM prompt for query command
│   └── wiki-lint.prompt.md     ← LLM prompt for lint command
├── instructions/
│   └── wiki-schema.instructions.md  ← Shared page format and schema documentation
└── agents/
    ├── wiki-ingestor.agent.md  ← Ingestor agent definition
    ├── wiki-querier.agent.md   ← Querier agent definition
    └── wiki-linter.agent.md    ← Linter agent definition

GitHub Copilot reads these files automatically when you open the repo. The prompts/ folder contains the LLM instructions (analogous to Claude’s commands/). The agents/ folder defines how each agent behaves. The instructions/ folder holds shared schema documentation so both Claude Code and Copilot understand the page format identically.

Mental Model: Think of .claude/ and .github/ as platform-specific adapters. The core logic (what to extract, how to format, what to validate) is shared through wiki-schema.instructions.md. But the way you invoke commands, the syntax, and how each LLM system structures its workflows differs between Claude Code and GitHub Copilot.

This dual-support approach means:

  • If you use Claude Code: Open the project, type /wiki-ingest, Claude reads .claude/commands/wiki-ingest.md
  • If you use GitHub Copilot: The repo integrates automatically, Copilot reads .github/prompts/wiki-ingest.prompt.md and uses .github/agents/wiki-ingestor.agent.md
  • If you use neither: You can still read all the files and understand exactly what each operation does

No core logic is duplicated. Both versions implement the same three operations with identical semantics, they just speak different dialects.

Key Design Choices

Working through the full implementation revealed several important patterns worth sharing.

The wiki uses retrieval-only queries, not fine-tuning. It doesn’t train or modify the LLM. Instead, it uses semantic search to find relevant pages and asks the LLM to synthesize an answer from only those pages. This is both simpler to implement and more reliable than RAG with fine-tuning.

Entities and concepts are fundamentally different, and treating them that way matters. A tool like Jira or PostgreSQL is an entity, a concrete thing you can point to. A pattern like CQRS or event sourcing is a concept, an idea that can apply in many contexts. When the wiki understands this distinction, you can ask “What concepts relate to Kubernetes?” and get a meaningful, connected answer.

Human review before integration is non-negotiable. A single document ingest can generate hundreds of pages. If you didn’t review them, you’d have garbage in your wiki. The _pending/ folders force a decision point. It’s cheap human attention spent upfront that saves you from debugging corrupted data later.

The audit trail is mandatory. Every operation, every ingest, query, lint, is logged with timestamps, the files it touched, and what changed. This is how you answer “When did I ingest that architecture doc?” and “What exactly did that ingest change?” questions months later when your memory is fuzzy.

Finally, the wiki uses plain Markdown with simple YAML frontmatter. No proprietary format. No database. Everything is human-readable, editable, and version-controlled. You can throw it in Git, diff it, and understand what changed without needing special tools.

What’s Not Included (Yet)

This is a no-code system for knowledge ingestion and retrieval. It doesn’t include vector databases or semantic search, you don’t need them at small scale, and simple keyword plus fuzzy matching works fine for document lookup. If you scale large, that’s a future architectural decision you can make then.

The wiki doesn’t fine-tune or train the model. It works with any LLM that supports Claude Code or Copilot integrations, so you’re not locked into a single backend.

Web ingestion isn’t built in. You ingest documents from files. If you want to ingest web pages, you’d scrape them to Markdown first and place them in raw/.

Multi-user collaboration is deferred. The system assumes a single human curator making review and approval decisions. Role-based approval and conflict resolution for teams are possible, but not yet implemented.

None of these are impossible, they’re just outside the current scope, waiting for a real use case to drive them.

Takeaways

Building llm-wiki-nocode clarified something important: the most powerful knowledge systems are simple systems that humans control. The wiki doesn’t make decisions. It generates, you review, you decide.

If you’re drowning in documentation that lives in Slack threads, scattered Markdown files, or worse, in everyone’s heads, this pattern offers a way out. Feed documents to the wiki. Ask questions. Maintain a single source of truth. All without leaving your editor.

The code is on GitHub (rosidotidev/llm-wiki-nocode). The specifications are in docs/. Start with a simple document, ingest it, ask a question, and see what happens.

What would you use a no-code LLM wiki for? Is knowledge management the bottleneck in your projects, or is something else? I’d love to hear your thoughts in the comments.

Why Platform Governance and Transparency Matter for Developers and Freelancers

In this post, I’m sharing my personal experience with Reddit’s moderation and shadow bans, not as a personal grudge but as an example why Developers and Freelancers should pay attention to each platform’s governance, moderation and transparency policies because when your visibility and reputation are tied to third party platforms, you want to assess the risks associated with those platforms to your professional presence and your ability to reach your audience.

I left Reddit for many years and rarely engaged with it as a platform since it forced users to disable their VPN or sign up and share their data.

One day, I wanted to give it another shot after seeing some interesting content. I signed up again and began participating in technical discussions.

I kept posting from time to time absolutely and purely technical comments.

I began to notice over time that my posts or comments were not getting views or replies at all. While this doesn’t bother me that much, I found after a couple of weeks that all my posts had 1 view. This situation raised my suspicion, so I began doing research on the matter.

Lo and behold, I realized that I was actually shadow banned and there was no warning, no violations, nothing… I was not using bots or VPN or anything out of the ordinary.

I learned later after doing further research that moderators can easily trigger Reddit’s auto ban system by reporting someone even if there is no reason.

Now, the question is, why would someone go out of their way to report my account specifically. Yep, you guessed it! In practice, there’s no way to know; Reddit provides no transparency about who reported you or why, which leaves users guessing whether they did something wrong or not.

Imagine that every time you want to post something, you need to go through each subreddit’s “Rules” and also Reddit’s own policies and terms which are enforced inconsistently; this often feels like a legal exercise.

On Reddit,in some cases, you can post inflammatory content and get little to no moderation but my neutral technical posts were hidden.

Despite the fact that Reddit has an “Appeal” system, the time it takes Reddit to review your appeal can take anywhere from 1 week to several months; at the same time, if you create a new account, you risk getting banned again for having an alternative account.

Reddit’s ban system is a perfect example of failed distributed moderation system where a moderator can ban your whole account because they dislike your presence or disagree with your opinion.

Reddit relies heavily on volunteers to moderate posts or comments, and they are often overworked and burnt out.

At the same time, Reddit laid off around 5% of their workforce in recent years.

Reddit’s system is unique and bizarre in a bad way because on one end, moderators can flag your entire account for bans, not just their own subreddit, on the other hand, Reddit claim that the system is fair, distributed and decentralized.

While Reddit’s moderation and ban policies can be broken, this is not unique to Reddit as other large tech platforms like LinkedIn, Facebook (Meta), Twitter (X) and others also have poor user experience when it comes to moderation; this made me more cautious about relying on a single platform for visibility or professional networking.

Lessons learned:

  1. Don’t treat big platforms as neutral parties; they are private companies with opaque policies and guidelines.
  2. Don’t put all your eggs in one basket. Diversify your presence to multiple platforms and don’t be scared to try new ones.
  3. As a rule of thumb, if your content can be hidden or removed by someone other than you, treat the platform as an amplifier rather than your primary go-to place to gain visibility.
  4. Obtain your own domain, learn how to build your own site (easy with AI for people who don’t like frontend).

As a cloud and security consultant, I now treat every hosted platform as a temporary amplifier, not a permanent foundation for my professional presence.

Disclaimer:
This is based on my personal experience on Reddit and reflects my subjective view of its moderation and appeal processes, not a legal or technical audit of the platform.

Using an LLM to automate a task that used to take hours by hand

I want to share a concrete example of using an LLM to automate a manual process in my workflow. Not chatbot stuff. An actual pipeline step that used to require a human sitting with two audio tracks for hours.

The problem

I build live speech-to-speech translation. To measure latency, I need to know which phrase in the source audio corresponds to which phrase in the translated audio, so I can measure the time gap between them. This alignment used to be done by hand. A person listens to both tracks, matches up the phrases, and logs timestamps. For a 6-minute session that’s easily an afternoon of work.

The hard part isn’t the math. It’s the alignment. Languages reorder things. German puts verbs at the end. Arabic restructures sentences. A Spanish phrase at position 3 might map to an English phrase at position 7.

Where the LLM fits in

This is exactly the kind of thing LLMs are good at. They understand semantic equivalence across languages and handle reordering naturally. So I replaced the manual step with an LLM call:

  1. Force-align both audio tracks to get per-word timestamps (automated, no LLM needed)
  2. Number every word in both transcripts and send them to the LLM
  3. LLM returns matched phrase pairs with word indices
  4. Compute the time gap for each pair using the timestamps from step 1

What used to take hours now takes a couple of minutes. No human in the loop.

The general pattern

The reason I’m sharing this is that the pattern generalizes. If you have a workflow step where a human reads two things and figures out how they correspond, an LLM can probably do it. The key is that I’m not asking it for a judgment call or creative output. I’m asking it to do structured alignment, a well-constrained task where it’s reliable.

The LLM only handles the one step that actually needs language understanding. Everything else (force alignment, timestamp extraction, aggregation) is regular code.

Full methodology: Automating ear-voice span

Code: VoiceFrom/live-s2st-eval

CyberArena – Interactive Cyber Security Simulation & Threat Analysis Platform

Excited to share my latest project — CyberArena, an interactive Cyber Security Simulation & Threat Analysis Platform built using Python, Flask, SQLite, Docker, HTML/CSS, and JavaScript.

🔐 Features include:
• AI-based Threat Analyzer
• Phishing Simulation
• Base64 Payload Analysis
• RSA Encryption Demo
• Steganography Detection
• Leaderboard & Gamification System
• Responsive Cyberpunk Dashboard UI

This project helped me strengthen my understanding of:
✔ Cybersecurity concepts
✔ Threat analysis workflows
✔ Authentication systems
✔ Python backend development
✔ Docker deployment
✔ Responsive UI design

The platform is inspired by real-world SOC Analyst and Cyber Security Analyst workflows, including phishing detection, suspicious activity analysis, and security reporting.

🚀 Live Demo:
https://cyberarena-interactive-cyber-attack.onrender.com/

💻 GitHub:
https://github.com/omu47/CyberArena-Interactive-Cyber-Attack-Simulation-Threat-Analysis-Platform

Currently continuing to scale the project with plans for SIEM-style monitoring, PostgreSQL, Kafka, Kubernetes, and advanced AI-powered threat intelligence features.

Will really love to connect and if you want to contribute please do dm , don’t waste time in thinking

Mathematical Functions in CSS: clamp, min, max and How They Simplify Responsiveness

The Math Cure for Your Layout Headaches

Grab a cup of coffee and let’s have a real talk about responsive design. We have all been there: you build a gorgeous layout, and it looks absolutely crisp on your 27-inch 5K monitor. But the moment you test it on an iPhone SE or a giant ultra-wide screen, the design completely falls apart. Headlines either stretch into monstrous proportions or shrink down to microscopic text. Margins blow up, and components start overlapping in the worst ways possible.

Making layouts look perfect on every device used to mean writing endless media queries. But today, we have smarter tools in our CSS arsenal that do the heavy lifting for us: the mathematical functions clamp(), min(), and max(). Let’s look at how they can save your sanity and clean up your stylesheets.

How We Suffered Before

Remember the dark ages of responsive web design? To make a font scale dynamically with the viewport, we relied on viewport units like vw. It sounded great on paper: just set font-size: 5vw and watch it scale! But in reality, on tiny screens, your 5vw text shrunk to an unreadable 4px, and on massive screens, it became a giant 120px headline.

To stop this madness, we had to resort to two painful workarounds:

  • Writing a dozen @media rules at different breakpoints to manually override the font sizes and paddings.
  • Using mind-boggling, unreadable CSS formulas like calc(16px + (24 - 16) * ((100vw - 320px) / (1200 - 320))).

If looking at that formula gives you PTSD, you are not alone. It was unmaintainable, prone to typos, and felt like a hack. Just like we used to struggle with nested layouts before CSS Subgrid solved our grid alignment nightmares, managing responsive typography and spacing was an absolute chore.

The Modern Way in 2026

Today, the mathematical trinity of CSS—min(), max(), and clamp()—is fully supported, incredibly robust, and ready to replace hundreds of lines of media queries. Here is how they work in simple terms:

1. max(value1, value2, …)

The max() function compares the values you give it and chooses the largest one. Think of it as setting a minimum floor for a property. For example, width: max(50%, 300px) means: “Take up half the screen, but never shrink below 300px.”

2. min(value1, value2, …)

The min() function does the exact opposite: it compares the values and selects the smallest one. This acts as a maximum ceiling. For instance, width: min(80%, 1200px) means: “Take up 80% of the screen, but freeze once you hit 1200px.”

3. clamp(minimum, preferred, maximum)

This is the absolute holy grail of modern responsive design. clamp() takes three arguments: a lower bound, a fluid/preferred value, and an upper bound. It keeps the preferred value strictly within the minimum and maximum range. It is the ultimate way to handle fluid typography and dynamic spacing without ever writing a media query.

When you combine these math functions with cutting-edge layout systems like CSS Container Queries, you get components that are fully fluid, modular, and context-aware.

Ready-to-Use Code Snippet

Let’s look at a practical, real-world example. Here is a clean, modern card component that uses CSS math functions to fluidly scale its typography, inner padding, and overall width without a single breakpoint rule.

/* A fully responsive, modern card layout */
.responsive-card {
  /* Dynamic width: takes up 90% of screen but caps at 600px */
  width: min(90%, 600px);
  
  /* Fluid padding: scales between 1rem and 2.5rem based on screen width */
  padding: clamp(1rem, 4vw, 2.5rem);
  
  background-color: #1e1e24;
  color: #f5f5f7;
  border-radius: 12px;
  box-shadow: 0 10px 30px rgba(0, 0, 0, 0.15);
  margin: 2rem auto;
}

.card-title {
  /* Fluid typography: scales between 1.5rem and 3rem based on viewport */
  font-size: clamp(1.5rem, 5vw, 3rem);
  line-height: 1.2;
  margin-bottom: 1rem;
}

.card-text {
  /* Smart text sizing that scales but stays readable */
  font-size: clamp(1rem, 1rem + 1vw, 1.25rem);
  line-height: 1.6;
  opacity: 0.9;
}

Common Beginner Mistakes

While CSS math functions look like magic, there are two classic traps that developers often fall into:

The “Static Value” Trap: Writing something like clamp(1rem, 2rem, 3rem). If your middle (preferred) value is static, the function has nothing to calculate dynamically! The browser will look at 2rem, see that it never changes, and simply lock the element at 2rem. Your middle value must always contain a dynamic unit (like vw, vh, or percentages).

The Accessibility Trap: Using pure viewport units (like 5vw) as the preferred value in clamp() for text. If a user zooms in using their browser settings, viewport units do not scale with the zoom. To keep your website accessible and compliant with WCAG guidelines, always mix viewport units with relative units (like rem or em) inside your math functions. Writing clamp(1.2rem, 1rem + 2vw, 2.5rem) ensures that the font scales beautifully with the screen size while still honoring user zoom preferences.

🔥 We publish more advanced CSS tricks, ready-to-use snippets, and tutorials in our Telegram channel. Subscribe so you don’t miss out!