Build AI Voice Agent with Gemini 3.1 Flash Live and VideoSDK

Google just launched Gemini 3.1 Flash Live Preview its most capable real-time voice and audio model yet. If you’re building AI voice agents, conversational apps, or anything that needs low-latency audio intelligence, this model is a big deal. And with VideoSDK’s Python SDK, plugging it into your app takes just a few minutes.

In this blog, we’ll walk through what the new model can do, and then build a working voice agent step by step using VideoSDK.

What’s New in Gemini 3.1 Flash Live Preview

Google describes this as its “highest-quality audio and voice model yet,” and there are a few things that actually back that up.

It’s built for real-time, audio-first experiences. Unlike models that convert speech to text and then process it, Gemini 3.1 Flash Live works audio-to-audio meaning it hears you and responds as audio, keeping the conversation feeling natural and fast.

Here’s what stands out:

  • Lower latency than before. Compared to 2.5 Flash Native Audio, this model is noticeably faster. Fewer awkward pauses, snappier responses. That matters a lot when you’re building voice agents where delays break the experience.
  • It actually understands how you say things. The model picks up on acoustic nuances, pitch, pace, tone. So it can tell when you’re asking a casual question vs. when you sound urgent or confused.
  • Better background noise handling. It filters out noise more effectively, which means it works in real environments, not just quiet studios.
  • Multilingual out of the box. Over 90 languages supported for real-time conversations.
  • Longer conversation memory. It can follow the thread of a conversation for twice as long as the previous generation. So your agent won’t “forget” what was said earlier in a long session.
  • Tool use during live conversations. This one is huge for agent builders. The model can now trigger external tools (APIs, functions, searches) while a live conversation is happening not just at the end of a turn.
  • Multimodal awareness. It handles audio and video inputs together, so you can build agents that respond to what they see and hear at the same time.
  • The model ID is: gemini-3.1-flash-live-preview

Building a Voice Agent with VideoSDK

VideoSDK gives you everything you need to wire Gemini 3.1 Flash Live into a real voice application. Here’s how to get set up from scratch.

Step 1 : Create and Activate a Python Virtual Environment

First, create a clean Python environment so your project dependencies stay isolated.

python3 -m venv venv

Activate it:

macOS/Linux

source venv/bin/activate

Windows

venvScriptsactivate

You should see (venv) in your terminal, which means you’re good to go.

Step 2 : Set Up Your Environment Variables

Create a .env file in your project root and add your API keys:

VIDEOSDK_AUTH_TOKEN=your_videosdk_token_here
GOOGLE_API_KEY=your_google_api_key_here

You can get your VideoSDK auth token from the VideoSDK dashboard and your Google API key from Google AI Studio.

Important: when GOOGLE_API_KEY is set in your .env file, do not pass api_key as a parameter in your code the SDK picks it up automatically.

Step 3 : Install the Required Packages

Install VideoSDK’s agents SDK along with the Google plugin:

pip install "videosdk-agents[google]"

Step 4 : Create Your Agent (main.py)

Create a file called main.py in your project folder and paste in the following code:

from videosdk.agents import Agent, AgentSession, Pipeline, JobContext, RoomOptions, WorkerJob
from videosdk.plugins.google import GeminiRealtime, GeminiLiveConfig
import logging
logging.basicConfig(level=logging.INFO, format="%(asctime)s - %(name)s - %(levelname)s - %(message)s", handlers=[logging.StreamHandler()])

class MyVoiceAgent(Agent):
    def __init__(self):
        super().__init__(
            instructions="You Are VideoSDK's Voice Agent.You are a helpful voice assistant that can answer questions and help with tasks.",
        )

    async def on_enter(self) -> None:
        await self.session.say("Hello, how can I help you today?")

    async def on_exit(self) -> None:
        await self.session.say("Goodbye!")

async def start_session(context: JobContext):
    agent = MyVoiceAgent()
    model = GeminiRealtime(
        model="gemini-3.1-flash-live-preview",
        # When GOOGLE_API_KEY is set in .env - DON'T pass api_key parameter
        # api_key="AIXXXXXXXXXXXXXXXXXXXX", 
        config=GeminiLiveConfig(
            voice="Leda", # Puck, Charon, Kore, Fenrir, Aoede, Leda, Orus, and Zephyr.
            response_modalities=["AUDIO"]
        )
    )

    pipeline = Pipeline(llm=model)
    session = AgentSession(
        agent=agent,
        pipeline=pipeline
    )

    await session.start(wait_for_participant=True, run_until_shutdown=True)

def make_context() -> JobContext:
    room_options = RoomOptions(
        # room_id="<room_id>", # Replace it with your actual room_id
        name="Gemini Realtime Agent",
        playground=True,
    )

    return JobContext(room_options=room_options)

if __name__ == "__main__":
    job = WorkerJob(entrypoint=start_session, jobctx=make_context)
    job.start()

To run the agent:

python main.py

Once you run this command, a playground URL will appear in your terminal. You can use this URL to interact with your AI agent.

What Can You Build With This?

Gemini 3.1 Flash Live + VideoSDK opens up a pretty wide range of real-world use cases:

  • Customer support voice bots. Replace or supplement your call center with agents that actually understand tone and can handle multilingual customers in real time.
  • AI meeting assistants. Agents that join calls, take notes, answer questions from participants, and trigger follow-up actions mid-conversation.
  • Healthcare intake agents. Voice-based triage agents that collect patient information, ask follow-up questions, and route to the right department all in a natural spoken conversation.
  • Language tutors. Real-time conversation partners that catch pronunciation issues, adjust their pace based on the learner, and respond naturally.
  • Voice-controlled IoT and home automation. Agents that listen continuously, understand context, and trigger device actions through tool use all in sub-second response times.
  • Live interview prep tools. Candidates practice answering questions aloud and get spoken feedback instantly.

Conclusion

Gemini 3.1 Flash Live Preview is a meaningful step forward for real-time voice AI. The improvements in latency, noise handling, multilingual support, and especially live tool use make it a strong foundation for production voice agents.

VideoSDK wraps all of that into a clean Python SDK that gets you from zero to a running agent in a handful of lines. Whether you’re prototyping or building something you intend to ship, the setup here gives you a solid starting point.

Next Steps and Resources

Airwave — a self-hosted radio where everyone listens in sync

I built a “shared radio” you can self-host.

Paste a YouTube / Spotify / SoundCloud link →
Airwave turns it into a live stream →
Everyone listens in sync.

No accounts. No premium APIs. No “press play now”.

Runs in Docker:
docker run -p 8000:8000 ghcr.io/76696265636f646572/airwave
Open → http://localhost:8000

Paste a link → music starts → share the URL 🎉

Perfect for:
• parties
• remote teams
• Sonos setups

Github: https://github.com/76696265636f646572/Airwave

How to Protect JavaScript Projects Against Supply Chain Attacks

The Axios incident is a useful reminder that npm risk is not abstract.

A practical defense model for JavaScript projects starts with a few boring but effective controls.

The baseline

Use these defaults:

  • pin versions and keep lockfiles committed
  • run npm ci --ignore-scripts in CI
  • review dependency changes like code changes
  • use short-lived credentials where possible
  • rotate secrets after suspicious installs
  • separate build credentials from runtime credentials

That will not eliminate supply chain risk, but it removes a lot of avoidable exposure.

Why this matters

The main mistake teams make is assuming supply-chain risk is just a vulnerability scanning problem.

It is broader than that.

It is a process problem:

  • install policy
  • dependency review
  • secret scope
  • CI isolation
  • incident response

If those pieces do not work together, a malicious package has a much easier time moving through your system.

What to put in CI

At minimum, I would recommend:

npm ci --ignore-scripts

Then add policy around:

  • lockfile diffs
  • minimum release age rules for critical packages
  • package allowlists for sensitive environments
  • alerts for unexpected dependency ownership changes

Tools like Renovate and Dependabot help, but only if you configure them with policy instead of treating them as passive update bots.

Why the Axios case is useful

The Axios incident is not interesting because it was unique.
It is interesting because it was plausible.

The attack worked because it used the same trust paths teams already rely on every day: a popular package, a maintainer account, and an install-time hook.

That is why the best defenses are often boring, repeatable controls.

A practical checklist

Before you ship, check that you can answer these questions:

  • Who reviews dependency changes?
  • Which builds can execute install scripts?
  • Which secrets are present in CI?
  • What happens if a package becomes compromised tomorrow?
  • How fast can you rotate credentials if that happens?

If those answers are fuzzy, that is where to start.

Originally published on my blog.

DevTrails 2026

Scaling Gig Worker Protection with AI: Our Journey at Guidewire DevTrails 2026

Image

Introduction

Excited to step into the Scale Phase of the Guidewire DevTrails 2026 Hackathon!
After successfully completing the Seed Phase with a 4/5 rating and achieving the *Diamond Tier *, our team is now focused on scaling our solution and bringing it closer to real-world impact.

The Problem We’re Solving

Gig economy workers—especially delivery partners—face unpredictable challenges daily:

  • Extreme weather conditions
  • Air pollution and poor visibility
  • Traffic disruptions and unexpected events

These factors directly impact their earnings, safety, and job stability.

Our Solution: GigCover AI

We built GigCover AI, an AI-powered parametric insurance platform designed specifically for gig workers.

Key Idea:

Instead of traditional insurance claims, payouts are triggered automatically based on real-time risk conditions.

How It Works

  • Collects user location (GPS)
  • Fetches real-time weather data
  • Calculates risk level dynamically
  • Enables instant claim eligibility when risk is high

This ensures faster, fair, and transparent protection.

What We’re Building in the Scale Phase

In this phase, we are focusing on:

  • Enhancing AI models with better predictive analytics
  • Integrating real-time environmental data (weather, pollution, traffic)
  • Designing a scalable system architecture
  • Improving user experience for gig workers
  • Building faster and more transparent parametric triggers

Tackling the “Market Crash” Challenge

One of the most exciting challenges we faced was the Market Crash scenario

A coordinated fraud attack using:

  • Fake GPS locations
  • Multiple accounts
  • Artificial claim triggers

Our Defense Strategy

We designed a multi-layered anti-fraud system:

  • GPS + IP + movement validation
  • Behavioral pattern tracking
  • Device fingerprinting
  • Fraud network detection
  • Risk-based claim control

This ensures:
✔ Fraud detection
✔ Genuine worker protection
✔ System reliability

Tech Stack

  • Frontend (Web): React + Vite + Tailwind CSS
  • Mobile App: Flutter
  • Backend: Flask (Python)
  • Database: SQLite
  • APIs: OpenWeatherMap + REST APIs

Impact

Our platform aims to:

  • Protect gig workers financially
  • Provide instant payouts during risk events
  • Build trust between workers and platforms
  • Deliver real-world social impact

Team – The Core Four

  • Sujitha Rajan
  • Shona B
  • Sharmishthaa R
  • Tarika Paramasivam

Final Thoughts

By combining AI, real-time data, and parametric insurance, we are building a system that is:

  • Innovative
  • Secure
  • Socially impactful

AI #Hackathon #Guidewire #DevTrails2026 #GigEconomy #InsuranceTech

ParametricInsurance #MachineLearning #Flutter #ReactJS #Flask

StartupIdeas #WomenInTech #Innovation #TechForGood #FullStackDevelopment

WeatherAPI #FraudDetection #CyberSecurity #SystemDesign

Building Popverse: What I Learned Designing a Bubble Shooter with 500+ Levels

Bubble shooters are one of those genres that looks solved. Match three, clear the board, repeat. The core mechanic is so well-established that most developers treat it as a template rather than a design problem.

I didn’t want to build a template. I wanted to build something that stayed interesting past level 50.

Why bubble shooters are harder to design than they look
The fundamental challenge with bubble shooters is entropy. Every level starts with a cluttered board and ends with an empty one. That’s the whole game. Once players internalize the basic color-matching mechanic, the only way to maintain engagement is variety — and variety in a bubble shooter is surprisingly difficult to achieve without breaking the feel of the game.

The standard approach is to add obstacles. Frozen bubbles that need multiple hits. Stone bubbles that can’t be destroyed by color matching. Walls that change the bounce angles. These work, but they’re additive complexity — more things to remember, more exceptions to the core rule.

What I found more interesting was multiplicative complexity: elements that interact with each other to produce emergent outcomes the player didn’t fully predict.

Designing 20 special bubble types

Popverse ships with 20 unique special bubble types. Getting to 20 required drawing a hard line between bubbles that added genuine strategic depth and bubbles that just added visual noise.

The ones that made the cut share a property: they change what the optimal move is, not just how hard the move is to execute.

Bomb bubbles are the clearest example. When a Bomb is on the board, the best move is rarely the most obvious color match — it’s often to deliberately set up a chain that detonates the Bomb at the right moment. The presence of a single Bomb bubble reframes the entire board.

Rainbow bubbles work differently. They match any color, which sounds like a pure advantage, but they introduce a decision cost. When you have a Rainbow in your queue, every shot becomes a question: is this the right moment to use it, or should I save it? That friction is the design doing its job.

Lightning bubbles create chain reactions across rows. Portal bubbles teleport shots to unexpected positions. Healer bubbles restore frozen neighbors. Each type introduces a different kind of thinking rather than a different intensity of the same thinking.

The 500+ level problem

500 levels is a lot of content for a solo developer to produce. The practical solution is a level generation philosophy rather than designing each level individually from scratch.

I organized levels into clusters of roughly 15-20, each cluster built around a specific mechanic combination. One cluster focuses on portal bubble navigation. Another introduces Bomb timing under shot pressure. A third combines Frost and Lightning bubbles in ways that force the player to choose between clearing fast and clearing efficiently.

Within each cluster, the first few levels introduce the mechanic cleanly. The middle levels add secondary complications. The final levels remove the scaffolding and let the mechanic run at full difficulty.

This structure means designing 30 clusters rather than 500 individual levels — a much more manageable problem.

What the random puzzle mode taught me

Popverse includes a random puzzle generator alongside the main level progression. I added it as a secondary feature, expecting it to be used occasionally.

Players used it constantly.

The insight this gave me: a significant portion of bubble shooter players aren’t trying to progress through a story. They want an infinite supply of fresh boards to solve. The level progression serves one type of player. The random mode serves another. Both are legitimate, and a game that only ships one of them is leaving half its potential audience underserved.

Technical decisions worth mentioning

Popverse is built with Cocos Creator targeting both browser and mobile from a single codebase. The physics of bubble shooting — arc trajectories, wall bounces, cluster detection — are all handled in TypeScript. Cluster detection in particular is worth getting right early: the algorithm that determines which bubbles to pop after a match affects how satisfying every single shot feels.

The browser version is live at phyfun.com. The iOS version is on the App Store.

If you’re building a puzzle game with a large level count, the most useful thing I can tell you is this: design the system before you design the levels. The system generates the levels. The levels don’t generate themselves.

5G, Türkiye’de Kullanıma Sunuldu

5G, kademeli olarak tüm Türkiye’de kullanıma sunulmaya başladı. Operatörler, 81 ilde aynı anda kullanıma sunmuş olsa da bazı bölgelerde bağlantı kesintileri vb. durumlar görülebilir.

CloudHub 2.0 (Mulesoft)

CloudHub 2.0 – Explained Simply

CloudHub 2.0 is the newer version of MuleSoft’s managed platform for running APIs and integrations. It improves on CloudHub 1.0 by giving you more control, better security, and stronger scalability.

In CloudHub 1.0, applications ran on shared workers within a single AWS region. CloudHub 2.0 moves away from that model and provides isolated environments with dedicated infrastructure. This means better performance, more control over networking, and improved security.

This guide focuses on how networking works in CloudHub 2.0 and how it helps you build scalable and secure integrations.

Updated Terminology

Before diving into features, it helps to understand that some terms have changed in CloudHub 2.0. These updates reflect the new architecture and make it easier to work with advanced capabilities.
Key Features of CloudHub 2.0

CloudHub 2.0 introduces several improvements to make managing applications easier and more flexible.

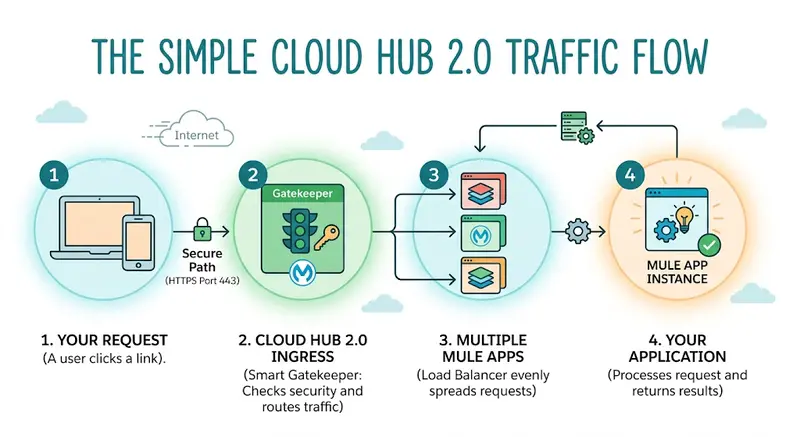
1. Ingress Controller (Previously HTTP Load Balancer)

The ingress controller is the entry point for all external traffic coming into your application.

Smart traffic routing
Incoming requests are distributed across application instances using an NGINX-based controller. This helps balance load and avoids downtime during deployments.
Connection handling
Each request creates two connections – one from the client to the ingress and another from ingress to the Mule app. Idle connections are automatically closed after a set time (default is 300 seconds), which you can adjust.
Supported ports and protocols
Port 443 (HTTPS) is used for secure communication
Port 80 (HTTP) is allowed only inside private environments
TLS configuration
You can manage certificates, define trusted authorities, and even enable mutual TLS for stronger security.
Custom domains
You can map your own domain (like api.example.com) to your application using DNS and simple configuration.

2. DNS Management

CloudHub 2.0 automatically creates and manages DNS records for your applications.

Public endpoint
Used to access your app from outside:
…cloudhub.io
Internal endpoint
Used within private environments for secure communication between apps.
How it works
Public traffic is routed through ingress, while internal traffic stays within the private network.
TTL settings
DNS updates are quick (default 60 seconds), but you can customize this if needed.


### 3. Shared Spaces vs Private Spaces

CloudHub 2.0 provides two types of environments:

Shared Spaces
Applications share infrastructure
Incoming requests go through a shared ingress
Outbound traffic is open by default (no restrictions)
Private Spaces
Fully isolated environments
Dedicated ingress and stricter security controls
You can define firewall and traffic rules
Inbound Traffic
Shared Spaces
Requests go through a shared ingress and are routed to the app.
Private Spaces
Requests go through a dedicated ingress, and security rules (like IP restrictions) are applied before reaching the app.
Outbound Traffic

  • Shared Spaces
    Apps can call external services freely.

  • Private Spaces
    Outbound traffic is controlled using rules such as:

  • Allowed protocols (HTTP, HTTPS, TCP)

  • Destination IPs or domains

  • Ports

Traffic can also be routed through NAT, VPN, or other secure network setups.

For internal communication, using internal DNS is recommended to keep traffic private.

4. High Availability and Scaling

CloudHub 2.0 is designed to keep your applications running smoothly.

Multi-zone deployment
Applications run across multiple availability zones, so if one fails, another takes over.
Self-healing
If an application instance fails, it is automatically restarted.
Auto-scaling
Applications scale up or down based on usage (CPU, memory, etc.)
Infrastructure also scales automatically if more capacity is needed

5. Advanced Capabilities

For more complex setups, CloudHub 2.0 offers:

Service mesh (Istio)
Helps manage traffic between services and adds security with mTLS.
Network policies
Fine control over how applications communicate internally.
Egress control
Route all outgoing traffic through a central system for monitoring or compliance.
Why This Matters

CloudHub 2.0 gives you much better control over how your applications connect, communicate, and scale. By understanding how traffic flows (both in and out), DNS works, and how environments differ, you can design more secure and reliable integrations.

Final Thoughts

CloudHub 2.0 is not just an upgrade – it’s a move toward a more modern, cloud-native way of building integrations.

With stronger networking controls and better scalability, teams can build systems that are both flexible and secure.

If you’re planning to move from CloudHub 1.0 or starting fresh, pay close attention to your networking design. It plays a big role in how well your system performs and how secure it is.