Dynamic typing, mutable defaults, framework-specific conventions in Django and Flask, GIL behavior in concurrent code — Python has enough quirks that you want to know exactly what an AI reviewer will and will not catch before you commit to a tool. CodeRabbit has reviewed millions of Python pull requests across Django monoliths, FastAPI microservices, and data science notebooks, and the coverage is strong for most teams. But the nuances matter, and this guide breaks down exactly where CodeRabbit excels with Python and where you might need to supplement it.
This guide covers how CodeRabbit specifically handles Python code: what it looks for, how it integrates with Django, Flask, and FastAPI, what type hint and PEP 8 enforcement looks like in practice, and how it compares to Python-specific alternatives like Sourcery and Pylint.

How CodeRabbit reviews Python code

When a pull request is opened on a Python repository, CodeRabbit does several things in parallel. It reads the diff to understand what changed, pulls in the context of surrounding files, builds a semantic understanding of the change’s intent, and then runs its configured linters against the modified files. The entire pipeline completes in roughly 2 to 4 minutes, faster than most developers context-switch away from a PR.
For Python specifically, CodeRabbit’s review covers several distinct layers:
Syntax and style – The most mechanical layer. CodeRabbit runs Pylint (on the Pro plan) and flags PEP 8 violations, unused imports, undefined variables, and formatting inconsistencies. On free tier, the AI itself catches obvious style issues even without dedicated linter execution.
Logic and correctness – This is where the AI analysis adds real value beyond what a linter provides. CodeRabbit reads the code’s intent and flags logic issues like off-by-one errors in slice operations, missing break statements in loops, incorrect use of is vs == for value comparison, and functions that silently swallow exceptions.
Python-specific patterns – CodeRabbit understands Python idioms and catches anti-patterns that are unique to the language. Mutable default arguments (def func(items=[])) are a classic example – they create shared state across function calls in a way that surprises developers coming from other languages. Late-binding closures in loops that capture loop variables by reference rather than value are another. CodeRabbit flags both.
Security vulnerabilities – SQL injection through string formatting, hardcoded secrets, insecure subprocess calls, and unsafe deserialization with pickle. More on this in the security section below.
Documentation quality – CodeRabbit notices when public functions lack docstrings and can be configured to require them. It also reviews existing docstrings for accuracy – flagging cases where a documented parameter does not match the actual function signature.
PEP 8 enforcement with CodeRabbit
PEP 8 is Python’s official style guide, and enforcing it consistently across a team is one of the most common reasons developers reach for automated code review. CodeRabbit handles PEP 8 enforcement through its Pylint integration on the Pro plan, with additional style checks from the AI model itself on both free and paid tiers.
The Pylint integration catches the full range of PEP 8 violations: line length, whitespace around operators and keywords, naming conventions for variables, functions, and classes, blank line rules between functions and classes, and import ordering. If your team already uses Ruff or flake8 in pre-commit hooks, CodeRabbit’s linting is somewhat redundant for pure style checking – but the AI layer adds value because it explains why a style convention matters in context rather than just flagging a violation code.
Where CodeRabbit’s style review gets genuinely useful is in the gray areas that linters miss. A linter will tell you a line is 89 characters. CodeRabbit will tell you that a particular function is doing too much – three levels of nested logic that should be refactored into named helper functions – which is an architectural style concern that no rule-based linter catches.
You can also write custom style instructions in plain English in your .coderabbit.yaml configuration. For example:
reviews:
  instructions: |
    - Always check that all public functions have docstrings
    - Flag any function exceeding 40 lines as a refactoring candidate
    - Require type annotations on all function parameters and return values
    - Flag f-strings that use concatenation instead of format expressions
These instructions run on every pull request. They are not as precise as a deterministic linter rule, but they give the AI reviewer guidance that reflects your team’s specific conventions – conventions that would be impractical to encode as lint rules.
Type hint suggestions
Python type hints have gone from optional to expected in most professional Python codebases over the past few years. Typed code is easier to refactor, better understood by IDEs, and catchable by static analysis tools like mypy and pyright. CodeRabbit supports type hint review in a few ways.
When you add a new function or modify an existing one in a pull request, CodeRabbit checks whether type annotations are present. If they are missing, it comments with a suggestion to add them, often including the correct syntax based on inferred types from the function body. For example, if a function clearly returns a list of strings based on its implementation, CodeRabbit will suggest -> list[str] as the return type annotation.
For existing type annotations, CodeRabbit reviews them for correctness. It flags Optional[str] used without a None check, Union types that are never narrowed before use, and Pydantic models with fields that lack proper validation constraints in FastAPI schemas.
CodeRabbit does not run mypy or pyright directly as part of its review pipeline by default. However, you can configure your CI pipeline to run mypy first and include its output as a comment on the PR before CodeRabbit runs – CodeRabbit will then incorporate those findings into its contextual analysis. Alternatively, you can instruct CodeRabbit to treat missing type annotations as a blocker in your .coderabbit.yaml configuration.
For Python projects where type coverage is a priority, the recommended setup is mypy in CI (so annotations are enforced at merge) plus CodeRabbit for contextual suggestions (so developers get guidance on how to annotate correctly, not just that they need to).
Django, Flask, and FastAPI support
Framework-specific review is one of the areas where CodeRabbit distinguishes itself from generic AI tools. It does not treat Django or Flask code as plain Python – it understands the conventions and security model of each framework.
Django
For Django projects, CodeRabbit catches several categories of issues that general-purpose linters miss entirely:
ORM misuse – Raw SQL queries that bypass the ORM and introduce injection risk. N+1 query patterns where a queryset is evaluated inside a loop rather than using select_related or prefetch_related. Missing .only() or .defer() calls on querysets that fetch more columns than needed.
Security settings – DEBUG = True left in settings files that are committed to the repository. Missing SECURE_SSL_REDIRECT, SESSION_COOKIE_SECURE, or CSRF_COOKIE_SECURE settings in production configuration files. Hardcoded SECRET_KEY values.
Template safety – Improper use of mark_safe() with user-supplied data. Missing |escape filters on template variables in custom template tags. XSS patterns in template rendering logic.
URL and view patterns – Views that do not check authentication before accessing protected resources. Missing @login_required decorators. CSRF exemptions applied without a corresponding security justification.
Flask
For Flask applications, CodeRabbit focuses on:
Debug mode – app.run(debug=True) committed to files that will run in production. Flask’s debug mode enables the interactive debugger, which is a critical remote code execution vulnerability in production.
Secret key management – Hardcoded app.secret_key values. Secret keys loaded from environment variables but without a fallback check that fails loudly when the variable is missing.
Input validation – Route handlers that access request.args or request.form data without validation or sanitization. SQLAlchemy queries constructed with string formatting rather than parameterized queries.
Extension configuration – Flask-Login configurations that are missing or incorrectly set up. Flask-SQLAlchemy usage patterns that create sessions outside of application context.
FastAPI
FastAPI has become the dominant choice for new Python API projects in 2026, and CodeRabbit’s support reflects that. It reviews:
Response models – Endpoint functions missing response_model declarations, which affects both API documentation and response validation. Pydantic models used as response types that expose internal fields that should be excluded.
Async correctness – Synchronous database calls inside async def route functions – a common mistake that blocks the event loop and eliminates the performance benefits of async FastAPI.
Dependency injection – Security dependencies defined with Depends() but applied inconsistently across related endpoints. Missing authentication dependencies on protected routes.
Pydantic validation – Request body models that lack field validators for critical inputs. Missing Field(...) constraints on required fields that should have length or format validation.
Security vulnerability detection in Python
Security review is one of CodeRabbit’s stronger areas for Python projects. It catches several vulnerability classes that are common in Python applications:
SQL injection – String formatting or concatenation used to build SQL queries instead of parameterized queries or ORM methods. This applies to direct database access with psycopg2 or sqlite3 as well as raw queries in Django’s extra() and RawSQL() methods.
Command injection – subprocess.call(), subprocess.run(), or os.system() called with shell=True and user-supplied input. This is one of the most common high-severity vulnerabilities in Python applications that process file system paths or user-provided commands.
Insecure deserialization – pickle.loads() called on data from untrusted sources. Pickle deserialization is an arbitrary code execution vulnerability when the source data is attacker-controlled. CodeRabbit flags this consistently and suggests safer alternatives like JSON or MessagePack for data exchange.
Hardcoded credentials – API keys, passwords, database connection strings, and JWT secret keys committed directly in source code. CodeRabbit catches these in configuration files, Python source, and environment setup scripts.
Weak cryptography – MD5 and SHA1 used for password hashing, which are fast hash functions fundamentally unsuitable for credential storage. CodeRabbit suggests switching to bcrypt, Argon2, or Python’s hashlib.scrypt for any password-related hashing.
Path traversal – File path construction using user-supplied input without sanitization, which allows attackers to read or write files outside the intended directory.
For production Python projects with serious security requirements, pairing CodeRabbit with a dedicated SAST tool like Semgrep (which has dedicated Django and Flask security rulesets) or Bandit provides more comprehensive coverage. CodeRabbit excels at catching security issues in context as part of code review – Semgrep and Bandit excel at systematic full-repository security audits.
Comparing CodeRabbit to Python-specific tools

CodeRabbit vs Sourcery
Sourcery is the tool most directly comparable to CodeRabbit for Python. Sourcery was built specifically for Python from the ground up – its refactoring suggestions, Pythonic idiom recommendations, and cognitive complexity analysis are deeply tuned to how Python code works.
Where Sourcery wins: Python-specific refactoring suggestions are more granular and more accurate than CodeRabbit’s. Sourcery recognizes list comprehension opportunities, merges nested if statements, simplifies boolean expressions, and suggests more Pythonic patterns with a precision that reflects its Python-first architecture. Its VS Code and JetBrains extensions provide real-time suggestions in the editor rather than waiting for a pull request.
Where CodeRabbit wins: Broader language support (CodeRabbit covers 30+ languages vs Sourcery’s Python focus), stronger security vulnerability detection, better PR summary and walkthrough features, support for four Git platforms vs Sourcery’s GitHub/GitLab, and a more generous free tier. CodeRabbit’s custom review instructions system is also more flexible for teams with specific conventions.
Pricing – Sourcery costs $10/user/month for the Pro plan. CodeRabbit Pro costs $24/user/month. For Python-only teams on a budget, Sourcery delivers more Python-specific value per dollar. For polyglot teams or teams that want stronger security analysis, CodeRabbit justifies the higher price.
The CodeRabbit vs Sourcery comparison goes into more depth on this if you want a side-by-side breakdown.
CodeRabbit vs Pylint
Pylint is not an AI tool – it is a deep, rule-based static analyzer for Python. The comparison is not really about competition. Pylint runs in milliseconds in your editor or pre-commit hook. CodeRabbit runs on pull requests and provides contextual, natural-language feedback.
What Pylint does better: Deterministic rule enforcement, deep type inference analysis, custom plugin support for project-specific rules, and zero latency when running locally.
What CodeRabbit does better: Understanding intent and context, generating human-readable explanations rather than error codes, and providing suggestions that reflect architectural concerns rather than syntactic rules.
The recommended setup for Python teams is to use both: Pylint (or the faster Ruff, which covers most Pylint use cases) in pre-commit hooks and CI, and CodeRabbit on pull requests for contextual AI analysis. They operate at different levels of the development workflow and are complementary rather than redundant.
CodeRabbit vs DeepSource
DeepSource is a static analysis platform with a strong Python analyzer that covers 150+ rules across bug detection, security, performance, and style. It also includes Autofix – the ability to generate ready-to-apply code changes for detected issues.
DeepSource’s advantage for Python is its Autofix capability combined with its dashboard for tracking issue trends across the full repository over time. It does not just review new changes – it gives you visibility into the overall health of your codebase.
CodeRabbit’s advantage is its AI-powered contextual analysis that understands the broader intent of a change, not just whether individual lines violate rules. CodeRabbit also has a more capable free tier for smaller teams.
For large Python teams that want both PR-level review and repository-wide quality tracking, using DeepSource alongside CodeRabbit is a legitimate strategy. They solve different problems despite some surface-level overlap.
Configuring CodeRabbit for Python repos
Getting CodeRabbit set up for a Python project takes about five minutes. Here is a complete .coderabbit.yaml configuration that works well for most Python projects:
language: "en-US"
tone_instructions: "Be direct and concise. Explain the why behind suggestions, not just the what."

reviews:
  profile: "chill"
  request_changes_workflow: false
  high_level_summary: true
  poem: false
  review_status: true
  collapse_walkthrough: false

  tools:
    pylint:
      enabled: true
    ruff:
      enabled: true

  path_filters:
    - "!migrations/**"
    - "!**/migrations/*.py"
    - "!setup.py"
    - "!conftest.py"

  path_instructions:
    - path: "tests/**"
      instructions: |
        Review test code with relaxed style rules.
        Flag tests that do not assert anything meaningful.
        Flag overly broad exception catching that hides test failures.
        Suggest using pytest fixtures over setUp/tearDown patterns.
    - path: "**/*.py"
      instructions: |
        Enforce type annotations on all public function parameters and return values.
        Flag any use of mutable default arguments (list, dict, set as defaults).
        Flag SQL queries constructed via string formatting or concatenation.
        Flag subprocess calls with shell=True when user input is involved.
        Flag hardcoded credentials, API keys, or secret values.
        Suggest list comprehensions where equivalent for loops exist.
        Flag functions exceeding 50 lines as refactoring candidates.
        Check that all Django ORM querysets use select_related or prefetch_related where appropriate.
A few configuration choices worth explaining:
The path_filters section excludes Django migrations from review. Migration files are auto-generated and reviewing them produces noise without value. The same applies to most setup.py and conftest.py patterns.
The path_instructions section applies different review standards to test code vs application code. Test files need different conventions – some style rules are less important, while test-specific quality rules (assertion quality, fixture hygiene) become more important.
Setting profile: "chill" reduces the volume of comments on style issues and keeps the review focused on substantive findings. For teams that want exhaustive style enforcement, "assertive" is the alternative.
A modern alternative worth knowing
If you are evaluating AI code review tools for Python projects and want something that goes beyond pure review, CodeAnt AI (priced at $24-40/user/month) is worth considering. It bundles AI code review with SAST, secret detection, IaC security scanning, and DORA metrics in a single platform.
For Python teams that currently pay separately for code review (CodeRabbit), security scanning (Semgrep or Snyk), and secret detection, CodeAnt AI can consolidate those tools into one subscription at a comparable or lower total cost. The trade-off is that CodeAnt AI’s AI review engine is less mature than CodeRabbit’s, and there is no free tier to evaluate it before committing.
CodeRabbit remains the better choice for teams that prioritize review quality and want the flexibility of a generous free tier. CodeAnt AI makes sense for teams that need unified security compliance tooling alongside code review.
Getting started
If you want to try CodeRabbit on a Python project today:
- Go to coderabbit.ai and sign in with your GitHub, GitLab, Azure DevOps, or Bitbucket account
- Install the CodeRabbit app and select the Python repositories you want reviewed
- Open a pull request – CodeRabbit will post its first review automatically within 2 to 4 minutes
- Add a
.coderabbit.yaml file (like the one above) to customize the review for Python conventions
- Upgrade to Pro ($24/user/month) when you want Pylint integration, auto-fix suggestions, and custom linter configuration
The free tier gives you a real sense of what CodeRabbit’s Python analysis looks like on your actual codebase – not a curated demo. That is the best way to evaluate whether the tool fits your team’s workflow before committing to the Pro plan.
For more on what CodeRabbit looks like in day-to-day use, the CodeRabbit review covers its full feature set, pricing, and real-world performance benchmarks in detail. And if you are still deciding between several tools, the best code review tools for Python breakdown compares CodeRabbit against Sourcery, DeepSource, Semgrep, and more with Python-specific context.
Further Reading
Frequently Asked Questions
Does CodeRabbit support Python?
Yes. CodeRabbit has full Python support including Pylint integration for linting, type hint analysis, PEP 8 enforcement, security vulnerability detection, and framework-specific review for Django, Flask, and FastAPI. It works with all Python versions and integrates with any Git repository on GitHub, GitLab, Azure DevOps, or Bitbucket.
Can CodeRabbit enforce PEP 8 for Python projects?
Yes. CodeRabbit runs Pylint as one of its 40+ built-in linters on the Pro plan, which covers PEP 8 style rules. You can also configure it to use Ruff or flake8 via your .coderabbit.yaml file and write custom review instructions in plain English to flag specific style violations that matter to your team.
Does CodeRabbit review Django and Flask code?
Yes. CodeRabbit understands Django and Flask patterns and flags issues like raw SQL queries that bypass the ORM, missing CSRF protection, insecure settings such as DEBUG=True in production, N+1 query patterns, and improper use of mark_safe in templates. For Flask, it catches debug mode in production, hardcoded secret keys, and missing input validation.
How does CodeRabbit handle Python type hints?
CodeRabbit reviews type hints in pull request diffs and suggests adding annotations where they are missing. It flags type mismatches, identifies functions that lack return type annotations, and comments when Optional types are used without proper None handling. It does not run mypy directly but can be configured to treat mypy output as part of your review pipeline.
Can CodeRabbit detect Python security vulnerabilities?
Yes. CodeRabbit detects common Python security issues including SQL injection through string formatting in queries, hardcoded credentials and secret keys, use of pickle.loads on untrusted data, subprocess calls with shell=True, insecure use of MD5 or SHA1 for password hashing, and SSRF patterns. For deeper security scanning, pairing CodeRabbit with Semgrep or Bandit provides broader coverage.
How do I configure CodeRabbit for a Python project?
Add a .coderabbit.yaml file to your repository root. Set the language to python, enable relevant linters like pylint or ruff under the tools section, and write custom review instructions in plain English under the instructions key. You can tell CodeRabbit to always check type annotations, flag functions over 40 lines, or enforce specific Django ORM patterns. The configuration is version-controlled alongside your code.
How does CodeRabbit compare to Sourcery for Python?
Sourcery is purpose-built for Python with deep language-specific suggestions including refactoring patterns, Pythonic idiom recommendations, and list comprehension improvements. CodeRabbit is a broader AI review tool with strong Python support via built-in linters and contextual AI analysis. Sourcery ($10/user/month) costs less and offers a VS Code extension with real-time suggestions. CodeRabbit Pro ($24/user/month) covers more languages and platforms with a more generous free tier.
Does CodeRabbit replace Pylint or Ruff for Python?
No – CodeRabbit complements rather than replaces Pylint and Ruff. Ruff and Pylint run instantly in your editor and pre-commit hooks for immediate feedback. CodeRabbit runs at the pull request level to provide contextual, AI-powered comments that consider the broader intent and design of each change. The recommended setup is Ruff locally, Pylint in CI, and CodeRabbit on pull requests.
Is CodeRabbit free for Python projects?
CodeRabbit offers a free tier that covers unlimited public and private repositories with AI-powered PR summaries and review comments. Rate limits apply at 200 files per hour and 4 PR reviews per hour. The Pro plan at $24/user/month removes limits and adds built-in linters including Pylint, auto-fix suggestions, and custom review instructions. Open-source public repositories get Pro features for free.
Does CodeRabbit support FastAPI projects?
Yes. CodeRabbit reviews FastAPI endpoint definitions, flags missing response model declarations, identifies improper error handling in route functions, and comments on async patterns. It understands Pydantic model usage in FastAPI schemas and can be configured to enforce specific API design conventions for your project.
How does CodeRabbit handle Python test code?
CodeRabbit reviews test files in pull requests the same way it reviews application code. It flags overly broad exception catching in tests, missing assertions, poorly scoped fixtures, and test functions that test multiple unrelated behaviors. You can configure it to apply different review standards to test code, for example relaxing line length rules while enforcing assertion quality.
What is CodeAnt AI and how does it compare to CodeRabbit for Python?
CodeAnt AI is a code quality platform priced at $24-40/user/month that bundles AI code review with SAST, secret detection, IaC security scanning, and DORA metrics. For Python teams that need a single tool covering code quality and security compliance, CodeAnt AI offers broader coverage at a similar price to CodeRabbit Pro. CodeRabbit has a more mature AI review engine and a free tier, while CodeAnt AI has no free plan but provides more built-in security tooling.
Originally published at aicodereview.cc





 Razer, bugün “Pro Type Ergo” adını verdiği, ayrık yapıyı benimseyen ilk ergonomik klavye modelini tanıttı. Tam boyutlu olarak tasarlanan ve hem eğik hem de ayrık yapısıyla bilek dostu bir seçenek olan model, RGB aydınlatmayı eksik etmiyor ve gövde yapısına uygun bir bilek desteğiyle geliyor. Yurt dışı fiyatı 190 dolar olarak açıklanan model, birden fazla programlanabilir tuşa ve farklı amaçlar için özelleştirilebilen döndürülebilir yapıda iki adet butona sahip. Düşük profilli bir seçenek olan kablosuz klavye, yapısı gereği doğrudan oyuna odaklanmıyor. Yazma kolaylığı olması için iki adet “B” tuşu bulunan ve boşluk tuşu üçe bölünen Pro Type Ergo, şirketin yapay zeka servislerine hızlı erişim sunan bir buton da taşıyor.
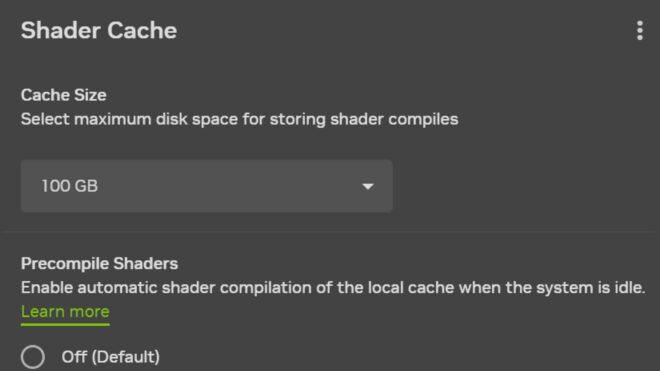
 Bugün gönderilen son güncellemeyle birlikte Nvidia uygulamasına çok sayıda oyuncuyu memnun edecek “Shader Cache” özelliği geldi. “Hepimiz yaşamışızdır: Bilgisayarı açarsınız, oyunun başına oturursunuz ve o sinir bozucu ‘Shader derleniyor’ çubuğuyla karşılaşırsınız. Bazen de doğrudan oyuna girersiniz, ancak shader’lar arka planda derlendiği için rahatsız edici takılmalar meydana gelir.” diyen şirket, yerleşik olarak kapalı gelen “Shader Cache” özelliğiyle derleme sürecini çok daha zahmetsiz hale getiriyor. Şu anda beta aşamasında olan Auto Shader Compilation (ASC) isimli özellik, derleme işlemini sistem boştayken gerçekleştiriyor ve bu sayede sürücü güncellemelerinden sonra sık sık karşılaşılan derleme ekranlarını büyük oranda ortadan kaldırabiliyor.

 Sony ve TCL, geçtiğimiz aylarda Sony’nin ev eğlence birimini devralacak özel bir ortak girişim kurmak adına masaya oturmuştu. Bugün bu doğrultuda “Bravia Inc.” isimli yeni bir şirketin kurulacağı duyuruldu. Bu şirkette Sony’nin yüzde 51, sürece yaklaşık 473 milyon dolar yatırım yapan TCL’nin ise yüzde 49 hissesi bulunacak. Sony’nin gelişmiş görüntüleme ve ses teknolojilerini kullanarak Bravia markalı yeni nesil televizyonlar, ses sistemleri ve projektörler hazırlayacak TCL, merkezi Tokyo’da yer alan Bravia Inc.’in faaliyetlerine 2027’nin nisan ayında başlayacağını aktardı.

 Google, bugün video odaklı yeni Veo 3.1 Lite modelini duyurdu. Yeni model için yaptığı açıklamada, “Şimdiye kadarki en ekonomik video modelimiz olan Veo 3.1 Lite ile tanışın. Bu model, geliştiricilerin Veo 3.1 Fast ile aynı hızda, ancak yarı fiyatından bile daha ucuza yüksek hacimli video uygulamaları geliştirmesini sağlıyor. Veo 3.1 model ailesini tamamlayan bu seçenek, geliştiricilere ihtiyaçlarına göre esneklik sunuyor.” ifadelerini kullanan Google, yeni modelin Gemini API’ı üzerinden kullanıma sunulmaya başlandığını duyurdu. Şirket ayrıca 7 Nisan itibarıyla Veo 3.1 Fast modelinin fiyatlarını düşüreceklerini; böylece çok daha fazla geliştiricinin kendi ürünlerine video oluşturma özelliği ekleyebileceğini aktardı. Video’s here to stay – introducing Veo 3.1 Lite, our most cost efficient video generation model to date, and on April 7th we are also reducing the price for Veo 3.1 Fast : ) pic.twitter.com/s7OMZaMPho — Logan Kilpatrick (@OfficialLoganK) March 31, 2026

 Bugün bir açıklama paylaşan Çinli otomobil devi Chery, Türkiye’de üç yılda 150 bin kullanıcıya ulaştığını duyurdu. Şirketten yapılan paylaşımda, “2023 yılının mart ayında Türkiye pazarına resmi giriş yapan Chery Türkiye, üçüncü yıl dönümüne ulaştı. Bu süreçte yerelleşme stratejisini kesintisiz şekilde hayata geçiren marka, pazara giriş aşamasından ölçekli büyüme dönemine geçiş yaptı. 3 yıl gibi bir süreçte 150 bine yakın kullanıcıya ulaşan marka, bu sayede Türkiye’de SUV segmentinde en hızlı büyüyen markalardan biri haline geldi. Aynı zamanda Chery, “CHERY FAMILY CARE” yaklaşımıyla şekillenen hizmet yapısını güçlendirerek satış sonrası süreçleri araç sahipliğinin tüm yaşam döngüsüne entegre etti. Bu kapsamda satın alma anından uzun dönem kullanıma kadar uzanan bütüncül bir deneyim sunan marka, kullanıcı memnuniyetini ve marka güvenini önemli ölçüde artırmayı başardı.” ifadelerine yer verildi. Şirket ek olarak şunlara değindi: “Aralık 2022’de Türkiye pazarına girişini resmi olarak duyuran ve bugün Türkiye’deki üçüncü yıl dönümünü #Chery3Yaşında hashtag’i ile kutlamaya başlayan marka, Türkiye’yi Asya ile […]