InsightAgent — Turn Any CSV Into AI-Powered Stories

The Problem

Every day, individuals and businesses collect data in spreadsheets and CSV files but lack the technical expertise to extract meaningful insights. Hiring data analysts is expensive, and most visualization tools require coding knowledge.

The Solution

InsightAgent is an agentic AI system built with JavaScript that transforms any CSV dataset into actionable insights instantly. Simply upload your file and three specialized AI agents go to work:

  • Agent 1 — Data Analyst: Reads your dataset and surfaces 3 specific insights
  • Agent 2 — Business Advisor: Delivers one clear actionable recommendation
  • Agent 3 — Chat Agent: Lets you have a real conversation about your data

How It Works

  1. User uploads a CSV file through the web interface
  2. The backend parses the file and sends data to Agent 1
  3. Agent 1 analyzes and returns structured insights
  4. Agent 2 generates a business recommendation
  5. Chart.js renders the visualization automatically
  6. Agent 3 stays ready to answer follow-up questions

How I Built It

Tech Stack

  • Frontend: HTML, CSS, Vanilla JavaScript
  • Backend: Node.js + Express
  • AI: Groq API (LLaMA 3.3 70B)
  • Visualizations: Chart.js
  • File handling: Multer

Architecture
CSV Upload → Parse → Agent 1 → Agent 2 → UI Render → Agent 3 on standby

Responsible AI Design

  • No user data stored — files deleted immediately after analysis
  • All AI outputs clearly labeled as AI-generated
  • Agents only reference actual data values

What I Learned

Building InsightAgent taught me how to design multi-agent pipelines where each agent has a clear bounded responsibility. Chaining agents sequentially creates emergent intelligence greater than any single prompt could achieve.

Try It Yourself

Satellite Tailscale — Ep. 9

🛰️ Episode 9: The Smart Home Ground Station (Tailscale in Home Assistant)

“Get away from her, you witch!”
— Ellen Ripley, Aliens (a Schwarzenegger contemporary production).
“Get away from it, you open port!”
— You, discovering your Home Assistant instance has been exposed to the public internet.

🏠 The Problem with Smart Home Remote Access

You have spent weeks setting up Home Assistant. Your lights respond to voice commands. Your thermostat knows when you leave the house. Your security cameras upload snapshots when motion is detected at 02:00. The fish feeder fires at 08:00 and 18:00, reliably, every day, without human intervention.

And then you leave for a long weekend and realise: you cannot check any of it from outside your home network.

The conventional solutions to this problem range from mildly inconvenient to actively dangerous:

  • Open a port on your router and expose Home Assistant to the internet — technically works; also technically invites every port-scanner on the planet to your front door.
  • Use a dynamic DNS service + Let’s Encrypt + a reverse proxy — works well, but requires maintenance, certificate renewal, and a patience for YAML that not everyone possesses.
  • Subscribe to Home Assistant Cloud (Nabu Casa) — excellent service, worth supporting, costs money monthly, and routes your traffic through a third-party server.
  • Install the Tailscale add-on — takes seven minutes, costs nothing extra, routes traffic directly between your devices, and works through any NAT.

We are going with the last option. Obviously.

📋 SIPOC — The Smart Home Satellite

Suppliers Inputs Process Outputs Customers
Home Assistant Add-on Store Home Assistant OS or Supervised installation Install Tailscale add-on → Start → Authenticate Home Assistant joins your tailnet as a named node You, checking the thermostat from a coffeeshop
Tailscale Inc. (unofficial add-on by Frenck) Your existing tailnet (Episodes 2–8) Enable userspace networking → Optional: proxy + Funnel homeassistant.your-tailnet.ts.net reachable from all tailnet devices Your iPad Mini, anywhere in the world
Home Assistant Community Tailscale account (free tier sufficient) Update ACL policy → Tag Home Assistant as tag:home-base HTTPS access to HA dashboard via MagicDNS Family members you invite to your tailnet
Your home hardware (Pi, NUC, etc.) Tailscale installed on iPad Mini, Mac Mini Optional: HTTPS via Tailscale Funnel for non-tailnet access Smart home fully remotely operable Your peace of mind, on the road

🤖 Two Ways to Connect Home Assistant to Tailscale

Before we start, a small clarification that has caused confusion in many a forum post:

There are two different Tailscale things in the Home Assistant ecosystem:

  1. The Tailscale Add-on — installs Tailscale inside Home Assistant OS, making the HA instance itself a node in your tailnet. This is what we want.
  2. The Tailscale Integration — connects to the Tailscale API to monitor your tailnet from within Home Assistant (tracking which devices are online). This is useful but separate — it does not provide VPN access.

We will install the add-on first (network access), and then optionally configure the integration afterwards (monitoring). Think of the add-on as the satellite dish, and the integration as the telemetry readout.

“There are two kinds of people.”
— Arnold Schwarzenegger, probably, in some film at some point.
“There are two kinds of Tailscale things in Home Assistant. Know which one you need.”
— This episode.

🛠️ Step 1 — Install the Tailscale Add-on

The Tailscale add-on for Home Assistant is maintained by Frenck (Franck Nijhof), a core Home Assistant developer. It lives in the Home Assistant Community Add-ons repository.

Add the Community Add-ons Repository

If you have not already added the Community Add-ons repository to your HA instance:

  1. In Home Assistant, navigate to Settings → Add-ons → Add-on Store.
  2. Click the three-dot menu (⋮) in the top right.
  3. Select Repositories.
  4. Add the following URL:
   https://github.com/hassio-addons/repository
  1. Click Add → Close.

Refresh the add-on store page. The Community Add-ons section will appear.

Find and Install Tailscale

  1. In the Add-on Store, search for Tailscale.
  2. Click on the Tailscale add-on (the one by Frenck / Home Assistant Community Add-ons).
  3. Click Install.

The installation takes a minute or two. Go make a coffee. You have earned it.

⚙️ Step 2 — Configure the Add-on

Before starting the add-on, configure it. Click the Configuration tab on the Tailscale add-on page.

The minimal configuration for joining your tailnet (no Funnel, no custom domain) looks like this:

userspace_networking: false

Setting userspace_networking: false tells Tailscale to use the kernel-level WireGuard® interface rather than a userspace implementation. This gives better performance and, crucially, allows Home Assistant to act as a subnet router — making your home network accessible to your tailnet, just as we configured the Mac Mini in Episode 8.

If you want to also enable the Tailscale proxy (which gives your HA instance an HTTPS URL on your tailnet without any certificate configuration):

userspace_networking: false
proxy: true

And if you want Tailscale Funnel (which makes your HA instance accessible from the public internet via a Tailscale-managed URL — useful for family members who do not have Tailscale installed):

userspace_networking: false
proxy: true
funnel: true

🛰️ For our use case — iPad Mini in a coffeeshop, accessing HA on your tailnet — userspace_networking: false is sufficient. Enable proxy: true if you want the convenience of https://homeassistant.your-tailnet.ts.net. Enable funnel: true only if you need non-tailnet access.

Click Save.

🚀 Step 3 — Start the Add-on and Authenticate

On the Info tab of the Tailscale add-on:

  1. Enable Start on boot — critical for reliability.
  2. Enable Watchdog — restarts the add-on automatically if it crashes.
  3. Enable Auto update — keeps Tailscale current with security patches.
  4. Click Start.

Once running, click Open Web UI. This opens the Tailscale authentication page.

You may see a message about the device’s key needing renewal. Click Reauthenticate and follow the prompts to sign in with the same identity provider you used for your other tailnet devices.

Once authenticated, you will see a confirmation that the device has been added to your tailnet. Home Assistant is now a satellite.

“I’ll be back.”
— T-800.
“Start on boot: enabled. I will indeed be back.”
— The Tailscale add-on, silently, on every reboot.

🔍 Step 4 — Verify Home Assistant Is in Your Tailnet

From your Mac Mini or iPad Mini, run:

tailscale status

You should see your Home Assistant instance listed:

100.x.x.x  homeassistant        youremail@  linux   -

With MagicDNS enabled (which it is, from Episode 5), you can now access Home Assistant from any tailnet device at:

http://homeassistant:8123

Or, with the proxy option enabled:

https://homeassistant.your-tailnet.ts.net

Open that URL from your iPad Mini in a coffeeshop. Home Assistant loads. Your living room lights are in the palm of your hand.

🔒 Step 5 — Update Your ACL Policy

Back in the Tailscale admin console, let us tag Home Assistant and update the access policy.

Tag Your Home Assistant Device

  1. Navigate to Machines in the admin console.
  2. Find your Home Assistant node.
  3. Click ... → Edit ACL tags.
  4. Add tag:home-base (same tag as your Mac Mini — both are home base nodes).

Update the ACL

Add Home Assistant’s specific port to your existing ACL:

{
  "acls": [
    // Owner can access everything
    {
      "action": "accept",
      "src":    ["group:owner"],
      "dst":    ["*:*"]
    },
    // Mobile devices can reach home-base nodes on specific ports
    {
      "action": "accept",
      "src":    ["tag:mobile"],
      "dst":    [
        "tag:home-base:22,5900,8123,21115,21116,21117,21118,21119"
      ]
    }
  ]
}

Port 8123 is Home Assistant’s default HTTP port. If you enabled the proxy option and are using HTTPS via MagicDNS, traffic goes on port 443 — but for direct tailnet access, 8123 is the one to open.

📱 Step 6 — Configure the Home Assistant Companion App

The Home Assistant mobile app (the Companion App) is the primary way to interact with HA from your iPad Mini. Let us configure it to use your Tailscale connection.

  1. Install the Home Assistant app from the App Store on your iPad Mini.
  2. Open the app and tap Manual entry (if auto-discovery does not find your instance).
  3. Enter the Home Assistant URL:
  4. Without proxy: http://homeassistant:8123
  5. With proxy (HTTPS): https://homeassistant.your-tailnet.ts.net
  6. Tap Connect.
  7. Log in with your Home Assistant credentials.

The Companion App supports multiple server URLs — you can configure a local URL (for when you are at home on your home network) and an external URL (your Tailscale MagicDNS address for when you are away). The app switches between them automatically based on which network you are connected to.

To configure this:

  1. In the Companion App: Settings → Companion App → [your server name].
  2. Under Connection, add:
  3. Internal URL: http://homeassistant.local:8123 (for home network)
  4. External URL: http://homeassistant:8123 (for tailnet access away from home)

When you are at home, the app talks directly to HA over your local network. When you are in a coffeeshop, it connects via Tailscale. You do not have to think about which one — the app figures it out.

🛰️ The satellite network is now smart enough to know when you are in its orbit and when you are not. It adjusts accordingly. Like a well-trained ground station crew.

🌐 Bonus: Tailscale Funnel — Access for the Non-Tailscale Household

You have parents. They do not have Tailscale installed. They want to check whether you fed the cat. (You have. Twice. You are responsible.)

Tailscale Funnel allows you to expose your Home Assistant instance to the public internet via a Tailscale-managed subdomain (homeassistant.your-tailnet.ts.net), without port-forwarding, without a public IP, and with Tailscale handling TLS termination.

To enable it, update your add-on configuration to:

userspace_networking: false
proxy: true
funnel: true

Restart the add-on. Check the Logs tab — you will see a line like:

INFO: Tailscale Funnel is enabled:
INFO: Your Home Assistant instance is publicly available at:
INFO: https://homeassistant.your-tailnet.ts.net

Share that URL with your parents. They open it in any browser, no Tailscale required, TLS certificate included, courtesy of Tailscale.

⚠️ Security note: Enabling Funnel exposes your HA instance to the public internet. Ensure your Home Assistant is on a current version, use strong passwords, enable two-factor authentication, and consider enabling the Home Assistant IP ban (login_attempts_threshold) as a brute-force deterrent. The Terminator checks all these boxes. So should you.

🏠 Bonus: Home Assistant as a Subnet Router

In Episode 8, we configured the Mac Mini M4 Pro as a subnet router, making your entire home network accessible via Tailscale. Your Home Assistant instance can do the same job — and for some setups (where HA is the always-on device, not the Mac Mini), it makes more sense for HA to carry this responsibility.

In the add-on configuration:

userspace_networking: false
proxy: true
tags:
  - tag:home-base

Then, in the Tailscale admin console, approve the subnet route for your home network (e.g., 192.168.1.0/24) on the Home Assistant node.

Now your iPad Mini can reach every device on your home network — smart plugs, cameras, the NAS, the Pi-hole — via the Home Assistant node acting as the gateway. One satellite to rule them all.

📊 Bonus: The Tailscale Integration (Monitoring Your Tailnet from HA)

Once the add-on is running and HA is on your tailnet, you can optionally install the Tailscale Integration to bring tailnet monitoring into Home Assistant.

  1. Navigate to Settings → Devices & Services → Add Integration.
  2. Search for Tailscale.
  3. Follow the prompts — you will need an API access token from the Tailscale admin console (Admin → Settings → API keys).
  4. Enter your tailnet name (your email or organisation name).

The integration creates sensors for:

  • Total devices in your tailnet
  • Number of currently connected devices
  • Number of disconnected devices
  • Individual binary sensors per device (online/offline)

This unlocks automations like:

automation:
  - alias: "Alert when Mac Mini goes offline"
    triggers:
      - trigger: state
        entity_id: binary_sensor.mac_mini_m4_tailscale
        from: "on"
        to: "off"
    actions:
      - action: notify.mobile_app_ipad_mini
        data:
          message: "⚠️ Mac Mini went offline. Did the cat unplug it?"

Your satellite network is now self-monitoring. If a ground station goes dark, you get an alert on your iPad Mini. The Terminator would call this situational awareness. We call it good engineering.

🤖 The Constellation — Updated Status

Device Role Tailscale Status
Mac Mini M4 Pro Home Base / Subnet Router ✅ Always-on node Full desktop, SSH, subnet gateway
iPad Mini Mobile Ground Station ✅ Roaming node Connects from anywhere
Home Assistant Smart Home Ground Station ✅ Add-on installed All automations, remotely accessible

Three satellites. One tailnet. One flat white.

☕ The Complete Coffeeshop Scenario

You are in the coffeeshop. The oat milk flat white is exceptional today. Your Tailscale connection is up. You open the Home Assistant Companion App on your iPad Mini.

From there, you can:

  • Check live camera feeds from every room
  • Adjust the thermostat before you head home
  • Turn off a light you are now certain you left on
  • Trigger automations manually (goodbye, morning routine — I am running it from here)
  • Check the fish feeder log — yes, it fired at 08:00, the fish are fine
  • Arm or disarm the alarm
  • See who is at the front door if you have a video doorbell

All of this, secured by WireGuard®, authenticated by your Tailscale identity, governed by your ACL policy, from a coffeeshop with perfectly acceptable wi-fi.

“Come with me if you want to live.”
— T-800, Terminator 2.
“Come into my tailnet if you want your smart home to remain accessible.”
— Tailscale, Home Assistant episode.

🔭 Further Reading

📡 Satellite Tailscale is a series about building your personal mesh network using Tailscale — from a coffeeshop iPad Mini to a home Mac Mini M4 Pro, and everything in between.

Beyond Guilt: Democratizing Financial Literacy Through a Jumping Cow

This is a submission for the 2026 WeCoded Challenge.

  1. The Concept: Democratization of Information
    Investment and finance have long been the privilege of those with capital or advanced education. I wanted to use technology as a “tool to break these privileges.” Whether you are a developer in a high-rise office or a young cattle herder in a remote area, as long as you have a smartphone, you should be able to feel the pulse of the global economy. I believe this is the truest purpose of technology.

  2. Breaking Barriers: Language and Education
    Reading thick economics textbooks and memorizing jargon is a high hurdle for many. However, the intuitive feedback of “If the stock price goes up, the cow flies” can be understood by children and people who don’t speak the same language.

Intuitive Understanding: By converting complex concepts into “movement,” I encourage understanding without the need for explanations. No difficult financial terms are needed. Even a child can intuitively understand the market “vibe” by looking at how high the cow is jumping.

Preventing Dropouts: By turning “study” into “play,” I prevent people from giving up due to boredom and maintain their continuous interest in the market.

  1. The Method: Low-cost, High-impact
    You don’t need expensive materials or high-spec PCs. Using lightweight tools like Streamlit, I created the “world’s most accessible classroom” that anyone can access for free through a browser.

In the development process, I delegated complex JavaScript logic to AI (as my assistant). This allowed me to focus on the creative design that only a human can do: unique game mechanics and Python-based system integration.

  1. My Vision: The Most Accessible Classroom
    My goal is to bridge the “education gap” caused by birthplace or environment. Interactive games are not just entertainment; they can be the most friendly “guidebook” for navigating the giant, complex maze of the global economy. I will continue to explore new forms of education where anyone can learn how the “real world” works through play.

Building an Authentication System With Express JWT: A Step-by-Step Guide

Change Express type to module

If you are currently building mini API projects with Express.js, you will have noticed this: anyone can send requests to your API endpoints.

However, real-world APIs don’t work that way. You have to log in, create an account, and get an API key, which you’ll use to authenticate every request you send.

And that’s exactly what this tutorial is all about. I will show you how to build a secure authentication system using Express, JSON Web Tokens (JWT), Bcrypt, and salt. So users can log in, get a token, and use it to authenticate requests before they can access your API routes.

What is in This Guide:

  • Prerequisites
  • Basic Setup for Express Project
  • Basic Database Setup in MongoDB.
  • What is JWT?
  • How to Implement JWT in Express
  • How to Hash a Password with Bcrypt and Salt in Express

Prerequisites

You should have:

  • VS Code installed on your device
  • A basic understanding of Express.js

Basic Setup for Express Project

PS: You can skip this section if you already know how to set up a basic Express project.

Step 1: Create a new package.json file in a new folder.
npm init -y

Step 2: Install all necessary packages, including Express, Mongoose, dotenv, and nodemon.

npm install express mongoose dotenv nodemon

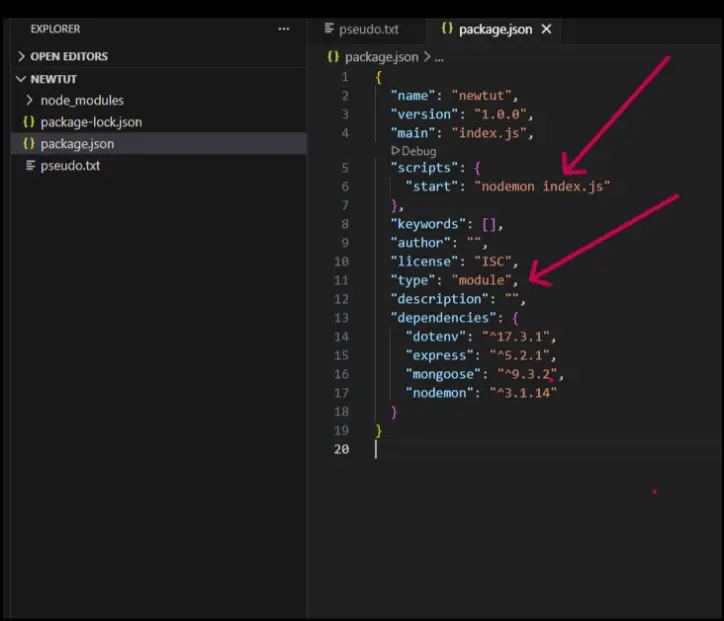
Step 3: Change the “type” value in package.json to “module” so we can use ESM and set up the nodemon package to enable auto-restart whenever you make changes to a file.

Change Express type to module

Step 4: Create an index.js file and set up the basic Express app configurations.

import express from 'express'

const app = express();

const Port = process.env.PORT || 5000

const start = ()=>{
    app.listen(Port, ()=>{
        console.log('The server is running ....');

    })
}
start();

Your terminal should display “The server is running…” when you enter npm start.

Basic Database Setup in MongoDB.

PS: You can skip this section if you already know how to set up a database in MongoDB

Step 1: Create a .env file and paste your Cluster connection string.
You should have something like this:

MONGO_URI = mongodb+srv://name:[email protected]/LoginApp?appName=NodeExpressTutorial

javascript

PS: You can check out this tutorial in case you don’t know how to get your Cluster connection string in MongoDB Atlas.

Step 2: Create a new folder with a new file. This is where we will connect our code application to MongoDB Atlas.

E.g Database > connectdb.js


import mongoose from "mongoose"
export const connectdb = (url)=>{
    return mongoose.connect(url)
}

In this code, we used the mongoose.connect() method to connect our app to MongoDB.

Step 3: Establish the MongoDB connection in your index.js file.

import express from 'express'
import 'dotenv/config'
import { connectdb } from './DB/connectDb.js';

const app = new express();

const Port = process.env.PORT || 5000

const start = async(req, res)=>{
    try {
        await connectdb(process.env.MONGO_URI)

        app.listen(Port, ()=>{
            console.log('Server is running ....');

         })

    } catch (error) {
        console.log(error);

    }
}
start();

In this code, we imported both “dotenv/config” and “connectdb” files. I.e., the previous file we used to connect our code in step 2.

Then we invoked the connectdb() file by passing our MONGO_URI value in step 1.
However, before we proceed, we must set up our database schema.

Step 4: Create a new folder and file inside. This is where we will set up our database schema.
E.g., UserSchema > User.js

Step 5: Set up the database’s basic fields in the file.

import mongoose from 'mongoose'

import validator from 'validator'

const {Schema} = mongoose
const userSchema = new Schema({

    name:{
        type: String,
        required: [true, "Name must not be empty!"],
        trim: true
    },
    email:{
        type: String,
        required: [true, "Email cannot be empty!"],
        validate:{
            validator:function(value) {
                return validator.isEmail(value)
            },
            message: (props)=>`${props.value} is not a valid email address.`
        },
        unique: true
    },
    password:{
        type: String,
        required: [true, "Password cannot be empty!"]
    }
})

In this code, we imported the Mongoose and the Validator packages.
The validator package ensures that the data users enter meets a specific rule before it is saved to the MongoDB database. In this case, we want to use it to ensure the user enters a valid email address.

Note: To use “validator,” you must first install it in your package.json file.

npm install validator

Then, we created a userSchema variable that holds the necessary fields, including name, email, and password.

Step 6: Compile a model from the Schema definitions.

export const user = mongoose.model('User', userSchema)

Note that this code is still in the same schema file.

Once we have set up our database connection, the next step is to test it to confirm that the connection has been established and a new database has been created.

Step 7: Create a temporary user in the index.js file to verify that the database has been created.

const start = async(req, res)=>{
    try {
        await connectdb(process.env.MONGO_URI)
        await user.create(
            {
                name: "Glory",
                email:"[email protected]",
                password: '123s'
            }
        )
        console.log("User created");

        app.listen(Port, ()=>{
            console.log('Server is running ....');

         })

    } catch (error) {
        console.log(error);

    }
}
start();

Step 8: Check your collections in Atlas; you should see your new database and a “user created” message in your terminal.

A img showing database in MongoDB

Step 9: Remove the “user.create()” line of code once you have confirmed that the database has been created. Otherwise, you will automatically create a new user every time you restart the server.

Once we have set up our database, the next step is to issue a token when a user logs in using a JSON Web Token (JWT).

What is a JSON Web Token (JWT)?

JWT is a token that contains all the information a server needs to verify if you can access an endpoint.

It has 3 major components:

1. Header: This contains the metadata information about the token, which includes the algorithm used to sign the JWT and its type.
E.g.,

{
“alg”: “HS256”,
“type”: “jwt”
}

2. Payload: This contains the actual information the server needs to know what you can access.

E.g.,

{
“username”: “glory”,
“id”: “_id1”,
“role”: “admin”
}

Note: A payload must not contain sensitive information such as passwords because it’s only encoded, not encrypted. This means it can be decoded, i.e., people can decode and read the content.

3. Signature: This combines the header, payload, and secret key and then hashes them together to create a token.

   const token = jwt.sign( Payload, SECRET, { algorithm: "HS256" } ) 
//    Output
eyJhbGciOiJIUzI1NiIsInR5cCI6IkpXVCJ9.eyJ1c2VySWQiOiI2OWI4OGExMjk1YjE3ZDNkZjc2M2U1ZTIiLCJuYW1lIjoiR2xvcmlhIFRlanVvcvIiwicm9sZSI6InNlbGxlciIsImlhdCI6MTc3NDQ3NzAwMiwiZXhwIjoxNzc0NDc3OTAyfQ.caJ79KkHN9lsFM4nnjkw8kLyzo2UUYraG4a1o_tGalE

Once the token has been issued, the next step is to verify it to ensure it’s valid and has not been compromised.

The Verification Process

To verify that the generated token is valid, it splits it into 3 parts: header, payload, and signature. Then it takes the same secret key used to generate the token.

After that, it combines the header, payload, and the same secret key to create a new hash. Let’s call it token B, and the first token we generated is token A.

Then it compares both tokens. If they match, the token generated is valid. If it doesn’t, then it’s not a valid token.

How to Implement JSON Web Tokens (JWT) in Express

Step 1: Set up your login controller.


import { user } from "../UserModel/User.js";

const Login = async (req, res)=>{

    const {email, password} = req.body;

    if (!email || !password){
        res.status(400).json({"msg":"Email or password cannot be empty"})
    }

    const findUser = await user.findOne({email}).select('+password')
    if(!findEmail){
        res.status(400).json({"msg":"Email doesn't exist!"})
    }

    res.status(200).json({msg:”success “ })
}


export {
    Login
}

This first if statement checks whether the name and password are empty. If true, it throws an error message.
The findUser variable checks if the provided email exists and selects the password. If it doesn’t exist, it throws an error message.

Step 2: Set up your login route.


import { Login } from "../controllers/auth.js";

import express from 'express'
const route = express.Router();

route.post('/login', Login)

export default route

Step 3: Install JWT into your project.

npm install jsonwebtoken

Step 4: Create a new JWT secret in your .env file.

E.g.,

JWT_SECRET =  anystrongsecretvalue

Note: Use any secure secret value

Step 5: Set up your payload and secret key and sign it in your login controller.

import jwt from "jsonwebtoken";

import { user } from "../UserModel/User.js";

const Login = async (req, res)=>{

    const {email, password} = req.body;

    if (!email || !password){
        res.status(400).json({"msg":"Email or password cannot be empty"})
    }

    const findUser = await user.findOne({email}).select('+password')
    if(!findUser){
        res.status(400).json({"msg":"Email doesn't exist!"})
    }

    const Payload ={
        "name": findUser.name,
        "id": findUser._id
    }
    const token = jwt.sign(Payload, process.env.JWT_SECRET, {'expiresIn':'3d'})
   res.status(200).json({success:"true", token:token})

}


export {
    Login
}

We imported the JWT package at the top of the file. Then we set up the payload using the value in the findUser variable. I.e., name and ID.

Then we signed the token using the jwt.sign() method and passed the payload, secret key, and expiration time.

The process.env.JWT_SECRET represents your secret value in your .env file.
The expiresIn represents the token validity; in this case, it’s set to 3 days.

JWT Verification in Express

Just like I explained earlier, after generating a token, we must verify it to ensure it’s valid before users can access a route.

Step 1: Create a “middleware” folder and an “authentication.js” file inside it.

import jwt from "jsonwebtoken"
const authentication = (req, res, next)=>{
    const tokenValue = req.headers.authorization;

    if(!tokenValue || !tokenValue.startsWith('Bearer ')){
        res.status(400).json({msg:"Missing or incorrect token header!"})
    }
    const token = tokenValue.split(' ')[1]
    try {
        const decoded = jwt.verify(token, process.env.JWT_SECRET)
        req.user = {id:decoded._id, name: decoded.name}
        next();
    } catch (error) {
        res.status(403).json({success:"False", msg:error})
    }
}

export default authentication;

The tokenValue variable retrieves the token generated from the header. (Note: Every time a user wants to access a route, they will pass the token in the header.)

The if statement checks whether the token is missing or the user added “Bearer “ at the beginning of the token value. (You’ll see this in action later.)

In the token variable, we used the split() method to get only the token value. (I.e., excluding the word bearer)

Inside the try-catch block, we used the jwt.verify() method and passed the token value with the secret JWT key. This is used to verify the token.

If it is valid, we retrieve the user ID and name.
Otherwise, if the token is invalid or has expired, it will throw an error.

Step 2: Test it on Postman to confirm it is working.

An img showing a new token generated from a login request in Postman

We can now use this “authentication” file on any route we want to protect.

For instance, if you have a “getProduct” route and you only want users with a valid token to send a request, here is how you would do it.

Step 3: Import the authentication file (i.e., the name of the file that contains the JWT verification) in the route file.

import authentication from "../middleware/authentication.js";
import { Login, getProduct
 } from "../controllers/auth.js";
import express from 'express'
const route = express.Router();

route.post('/login', Login)
route.get('/products', authentication, getProduct)
export default route


We imported the authentication file and added it right before the getProduct route.
If you try to access this route without providing a token value, you’ll get this error:

An image showing an unauthorized error message

However, if you add the token to the header property before you send the request, you will get a successful response.

An image showing a success message

How to Hash a Password with Bcrypt and Salt in Express

We have successfully implemented an authentication system that allows users to log in, receive a token, and use it to access a route. However, it doesn’t end there.

Right now, users’ passwords are stored as plaintext in the database. If the database gets compromised, bad actors can access all our users’ passwords, which can lead to severe data breaches, especially for users who use the same password for various accounts.

This is where password hashing comes in, using Bcrypt.

Bcrypt is a hashing algorithm that is used to hash passwords before they are stored in the database.

Here is how it works: it takes the plain password and uses a hashing function to convert it into hash codes. These hashcodes are simply strings of random characters. They cannot be reversed, i.e., no one can decode them to get the actual password, making it a more secure option.

However, hashing passwords with only Bcrypt also makes it susceptible to a Rainbow table attack. This is a password-cracking mechanism that uses a rainbow table to search for the corresponding text of a hash. This rainbow table contains billions of data entries (strings) and their corresponding hashes based on different hashing algorithms. So if a user creates an account with a weak password, they can look up the hashed password in the table to get the equivalent text.

To prevent this, we use Salt.

Salt adds a layer of security to the hashed password by adding a random string of characters before it is stored in the database. So, even if there is a data breach, it’ll be extremely difficult to decrypt the hash.

Here is how to hash a password with Bcrypt and Salt in Express

Step 1: Install the Bcrypt package.

 npm install bcrypt

Step 2: Import the Bcrypt package at the top of the user model file and hash the password before saving it in the database.

import mongoose from 'mongoose'
import validator from 'validator'
import bcrypt from "bcrypt"
const SALT_WORK_FACTOR = 10
const {Schema} = mongoose
const userSchema = new Schema({

    name:{
        type: String,
        required: [true, "Name must not be empty!"],
        trim: true
    },
    email:{
        type: String,
        required: [true, "Email cannot be empty!"],
        validate:{
            validator:function(value) {
                return validator.isEmail(value)
            },
            message: (props)=>`${props.value} is not a valid email address.`
        },
        unique: true
    },
    password:{
        type: String,
        required: [true, "Password cannot be empty!"]
    }
})

userSchema.pre('save', async function(){
    const user = this;

    if(!user.isModified('password')){
        return;
    }
    const salt = await bcrypt.genSalt(SALT_WORK_FACTOR);
    const hashpassword = await bcrypt.hash(user.password, salt);
    user.password = hashpassword;
})

export const user = mongoose.model('User', userSchema)

The SALT_WORK_FACTOR variable represents the number of times the hashing algorithm is applied.
Then we used the schema.pre() hook to hash the password before it’s saved.
The if statement checks if the password has been modified; if true, it exits the code.
The salt variable uses the bcrypt.genSalt() to generate a unique salt.
The hashpassword variable uses the bcrypt.hash() function to hash the user’s password with the generated salt.
Then we updated the user password with the generated hash.

Step 3: Compare the provided password with the hashed password in the database before a user can log in using the bcrypt.compare() function.

userSchema.methods.comparePassword = async function(candidatePassword) {
    const isMatch = await bcrypt.compare(candidatePassword, this.password)
    return isMatch;
}

In the userSchema.methods.comparePassword() function, we used the bcrypt.compare() method to compare the plaintext password (provided by the user) with the hashed password in the database. Then it returns true if they match.

Step 4: Use the comparePassword() method in the login controller to ensure only users with a valid password can log in.

   const isMatch = await findUser.comparePassword(String(password))
    if(!isMatch){
        res.status(400).json({success:true, msg:"Incorrect password."})
    }

The variable isMatch uses the comparePassword method to compare the provided password with the hashed password. Then, if the password doesn’t match, it throws an error message.
Here is the complete code for the login controller.

import { user } from "../UserModel/User.js";

import jwt from "jsonwebtoken";
const Login = async (req, res)=>{

    const {email, password} = req.body;

    if (!email || !password){
        res.status(400).json({"msg":"Email or password cannot be empty"})
    }

    const findUser = await user.findOne({email}).select('+password')
    if(!findUser){
        res.status(400).json({"msg":"Email doesn't exist!"})
    }

    const isMatch = await findUser.comparePassword(String(password))
    if(!isMatch){
        res.status(400).json({success:true, msg:"Incorrect password."})
    }
    const Payload ={
        "name": findUser.name,
        "id": findUser._id
    }
    const token = jwt.sign(Payload, process.env.JWT_SECRET, {'expiresIn':'3d'})
    res.status(200).json({success:"true", token:token})
}
export {
    Login
}

New users’ passwords should be stored like this in your database.

An image showing hashed password in MongoDB

Conclusion

You have successfully implemented a secure authentication system in your Express project using JWT. Now, users have to log in and provide a valid token before they can send requests to API endpoints.

You also learned how to secure user passwords in your database by using Bcrypt and Salt to hash passwords.

Congratulations on making it this far!

Object-Oriented Ruby for AI Developers

Ruby’s object-oriented design makes it exceptionally well-suited for building structured AI systems. In this installment of the Ruby for AI series, we will explore how to leverage classes, inheritance, modules, and mixins to create clean, reusable AI components.

Building Your First AI Class

Every Ruby object starts with a class. The initialize method acts as a constructor, and instance variables store object state.

class PromptTemplate
  def initialize(template_string, variables = {})
    @template_string = template_string
    @variables = variables
    @compiled = nil
  end

  def compile
    @compiled = @template_string.gsub(/{{(w+)}}/) do |match|
      key = match[2..-3]
      @variables[key] || match
    end
  end

  def to_s
    @compiled || compile
  end
end

greeting = PromptTemplate.new("Hello, {{name}}! Your task is {{task}}.", {
  "name" => "Ruby Developer",
  "task" => "build AI agents"
})

puts greeting.compile
# => Hello, Ruby Developer! Your task is to build AI agents.

Controlling Access with attr_reader and attr_accessor

Ruby provides convenient macros for defining getters and setters. Use attr_reader for read-only attributes and attr_accessor when you need both read and write access.

class ChatMessage
  attr_reader :role, :content, :timestamp
  attr_accessor :metadata

  def initialize(role:, content:, metadata: {})
    @role = role
    @content = content
    @timestamp = Time.now
    @metadata = metadata
  end

  def to_h
    { role: @role, content: @content, timestamp: @timestamp }
  end
end

message = ChatMessage.new(role: "user", content: "Explain Ruby modules")
puts message.role        # => user
message.metadata = { tokens: 15, model: "gpt-4" }

Inheritance for Specialized AI Components

Inheritance lets you create specialized versions of base classes. A ChatAgent hierarchy demonstrates this well.

class BaseAgent
  attr_reader :name, :system_prompt

  def initialize(name:, system_prompt: "You are a helpful assistant.")
    @name = name
    @system_prompt = system_prompt
    @conversation_history = []
  end

  def add_message(role, content)
    @conversation_history << ChatMessage.new(role: role, content: content)
  end

  def conversation_context
    @conversation_history.map(&:to_h)
  end
end

class CodeReviewAgent < BaseAgent
  def initialize(name: "CodeReviewer")
    super(
      name: name,
      system_prompt: "You are an expert code reviewer. Focus on security, performance, and readability."
    )
    @review_count = 0
  end

  def review_code(code_snippet)
    @review_count += 1
    add_message("user", "Please review this code:n```

rubyn#{code_snippet}n

```")
    # Simulate LLM call
    "Review ##{@review_count}: Code analyzed for #{code_snippet.lines.count} lines."
  end
end

reviewer = CodeReviewAgent.new
puts reviewer.review_code("def foo; bar; end")

Modules and Mixins: Shared Behavior

Modules in Ruby serve two purposes: namespaces and mixins. For AI development, mixins let you share capabilities across unrelated classes.

module TokenCountable
  def estimate_tokens(text)
    # Rough approximation: 1 token ~= 4 characters
    (text.length / 4.0).ceil
  end

  def token_budget_remaining(budget)
    budget - estimate_tokens(to_s)
  end
end

module RateLimitable
  def self.included(base)
    base.extend(ClassMethods)
  end

  module ClassMethods
    def rate_limit(calls:, per: 60)
      @max_calls = calls
      @window_seconds = per
      @call_timestamps = []
    end

    def can_call?
      now = Time.now
      @call_timestamps.reject! { |t| now - t > @window_seconds }
      @call_timestamps.length < @max_calls
    end
  end

  def record_call
    self.class.instance_variable_get(:@call_timestamps) << Time.now
  end
end

Include vs Extend: Choosing Your Approach

Understanding the distinction between include and extend is crucial for proper module design.

class LLMClient
  include TokenCountable    # Instance methods
  extend RateLimitable      # Class methods

  rate_limit calls: 100, per: 60

  attr_reader :last_prompt

  def initialize(api_key)
    @api_key = api_key
    @last_prompt = ""
  end

  def complete(prompt)
    raise "Rate limit exceeded" unless self.class.can_call?

    @last_prompt = prompt
    record_call

    puts "Tokens estimated: #{estimate_tokens(prompt)}"
    "Generated response for: #{prompt[0..50]}..."
  end

  def to_s
    @last_prompt
  end
end

client = LLMClient.new("sk-...")
puts client.complete("Write a Ruby method to parse JSON")
puts "Remaining budget: #{client.token_budget_remaining(4000)} tokens"

A Complete AI Agent Example

Here is a practical implementation combining all concepts: a configurable agent system using modules for capabilities and inheritance for specialization.

module ToolUsing
  def register_tool(name, &block)
    @tools ||= {}
    @tools[name] = block
  end

  def execute_tool(name, *args)
    @tools&.[](name)&.call(*args) || "Tool #{name} not found"
  end

  def available_tools
    @tools&.keys || []
  end
end

class ReActAgent < BaseAgent
  include ToolUsing
  attr_reader :thoughts

  def initialize(name:, system_prompt: nil)
    super(
      name: name,
      system_prompt: system_prompt || "You are a ReAct agent. Think step by step."
    )
    @thoughts = []
    setup_default_tools
  end

  def think(observation)
    @thoughts << observation
    "Thought #{@thoughts.length}: #{observation}"
  end

  def act
    "Acting based on #{@thoughts.length} thoughts..."
  end

  private

  def setup_default_tools
    register_tool(:search) { |query| "Searching for: #{query}" }
    register_tool(:calculate) { |expr| eval(expr).to_s rescue "Error" }
  end
end

agent = ReActAgent.new(name: "ResearchAssistant")
agent.think("I need to find Ruby documentation")
puts agent.execute_tool(:search, "Ruby modules")
puts agent.available_tools.inspect
puts agent.act

Conclusion

Object-oriented Ruby provides powerful abstractions for AI development. Classes encapsulate state and behavior, inheritance enables specialization, and modules offer flexible code sharing through mixins. These patterns form the foundation for larger systems explored later in this Ruby for AI series, including LLM client libraries and multi-agent orchestration frameworks.

The Axios Attack Proved Vibe Coding’s Biggest Blind Spot

Yesterday, for roughly two hours, every npm install of the world’s most popular HTTP client installed a Remote Access Trojan on your machine.

The axios package — over 100 million weekly downloads, present in approximately 80% of cloud environments — was compromised on March 30, 2026. A threat actor hijacked maintainer “jasonsaayman”‘s npm account, published malicious versions [email protected] and [email protected], and within 2 seconds of npm install, before npm even finished resolving other dependencies, a cross-platform RAT was running on your machine. Windows, macOS, Linux. All of them.

If your AI coding assistant ran that install for you — and thousands of developers let AI auto-run npm install every day — you never even saw it happen.

This is the second major npm supply chain attack in March 2026. The first was the Trivy/CanisterWorm compromise on March 19, where 75 of 76 trivy-action GitHub Action tags were force-pushed to deploy self-spreading malware using blockchain-based command and control. Two attacks on critical infrastructure in eleven days. The trend line is not ambiguous.

Why Vibe Coders Are the Softest Target

Here is how a typical vibe coding session works:

  1. You prompt your AI: “Build me an HTTP client that fetches user data from the API”
  2. The AI generates code with import axios from 'axios'
  3. The AI (or you) runs npm install axios
  4. You test it. It works. You ship it.

At no point in this workflow does anyone:

  • Check when the package version was published. [email protected] was published hours before the install. A human reviewing the npm page would have noticed the suspicious timing. An AI assistant does not check.
  • Verify that the maintainer account has not changed hands. The attacker took over a real maintainer’s account. The package name was legitimate. The version number looked normal.
  • Audit postinstall scripts. The malicious payload ran via a hidden dependency ([email protected]) that executed on install. AI assistants do not read postinstall scripts before running them.
  • Pin exact versions. If your package.json says "axios": "^1.14.0", npm happily installs 1.14.1 — the compromised version. AI tools default to caret ranges.
  • Review lockfile diffs. The lockfile change would have shown a brand-new transitive dependency appearing out of nowhere. Nobody looks at lockfile diffs. AI certainly does not.

The AI assistant optimizes for one thing: does the code work? It does not optimize for is the dependency safe? And that gap — between “it works” and “it is safe” — is the blind spot this attack drove straight through.

We Already Had the Data

Two days before the axios attack, I published the results of auditing 5 vibe-coded web components against the OWASP Top 10. The findings:

49 vulnerabilities. 19 critical. Zero components would pass a security audit.

Every component worked as a demo. Every component was exploitable in production. The failure categories were consistent across all five:

Category Instances
Broken Access Control 15
Cryptographic Failures 10
Injection 7
Security Misconfiguration 9
Other (SSRF, path traversal, etc.) 8

That audit focused on application-level vulnerabilities — the code the AI generates. The axios attack reveals the other half of the problem: supply chain vulnerabilities in the dependencies the AI chooses.

When I cross-referenced the audit findings with the axios attack vector, the overlap was uncomfortable. Multiple items in the Vibe Coding Safety Checklist would have caught this specific attack:

  • Pin exact dependency versions (no ^ or ~)
  • Audit postinstall scripts before running them
  • Review dependency diffs in lockfile changes
  • Use npm ci instead of npm install (fails on lockfile mismatch instead of silently updating)
  • Never let AI auto-run install commands without human review

The axios attack is the supply chain version of what we found in individual components. The pattern is the same: the AI optimizes for functionality and ignores security. The only difference is the attack surface — your code versus your dependencies.

5 Things to Do Right Now

If you are vibe coding (and statistically, you probably are — 84% of developers now use or plan to use AI coding tools), here are 5 changes to make today. Each one takes under 5 minutes.

1. Pin Your Dependency Versions

Stop using caret ranges. Right now, open your package.json and remove every ^ and ~.

// BEFORE: axios attack would auto-install
"axios": "^1.14.0"

// AFTER: only installs the exact version you vetted
"axios": "1.14.0"

Then run:

npm config set save-exact true

This makes all future npm install --save commands pin exact versions by default. Five seconds of setup, permanent protection against malicious patch releases.

2. Use npm ci Instead of npm install

npm install will happily resolve new versions that match your semver range. npm ci installs exactly what is in your lockfile and fails if there is any mismatch.

# In your CI/CD pipeline, replace:
npm install

# With:
npm ci

If the lockfile says [email protected] and someone pushes a change to [email protected], npm ci will fail loudly instead of silently installing the compromised version.

3. Disable Lifecycle Scripts in CI

The axios payload executed via a postinstall script. You can block this entirely:

# Run installs without executing any lifecycle scripts
npm ci --ignore-scripts

# Then explicitly run only the scripts you trust
npm run build

Add this to your .npmrc for permanent protection:

ignore-scripts=true

Yes, some legitimate packages use postinstall scripts (like sharp for image processing). You can allowlist those explicitly. But the default should be “do not run arbitrary code during install.”

4. Implement a Version Cooldown

Do not install any package version published less than 72 hours ago. The axios malicious versions were live for approximately 2-3 hours before being yanked. A 72-hour cooldown catches most smash-and-grab supply chain attacks.

You can enforce this with Socket.dev (free for open source) or a simple CI check:

# Check publish date of a package version
npm view [email protected] time --json

If the publish timestamp is less than 72 hours old, block the install and flag for human review.

5. Stop Letting AI Auto-Run Install Commands

This is the most important one. When your AI coding assistant generates a dependency and runs npm install, insert yourself into the loop:

  • Review what is being installed before it runs
  • Check the dependency on npm — when was it last published? By whom? Does it have new transitive dependencies?
  • Diff the lockfile after install to see exactly what changed

The AI is your code generator, not your security reviewer. Treat every AI-suggested dependency the same way you would treat a dependency recommended by a stranger on the internet — because that is effectively what it is.

The Pattern Is Accelerating

Two major npm supply chain attacks in eleven days. The Trivy/CanisterWorm attack on March 19 compromised a security scanner — the very tool developers rely on to catch vulnerabilities. The axios attack on March 30 compromised an HTTP client that exists in the vast majority of JavaScript projects.

The attack surface is expanding at the same rate as AI-assisted development adoption. More developers are shipping faster with less review. Attackers have noticed.

This is not a call to stop using AI for coding. The productivity gains are real, and I use AI coding tools daily. But there is a difference between using AI as a tool and trusting it as a security reviewer. It is not one. It has never claimed to be one. And the axios attack is the clearest proof yet that treating npm install as a safe operation — especially when an AI is the one running it — is a gamble with escalating odds.

Get the Full Checklist

The 5 steps above are a starting point. They are extracted from the Vibe Coding Safety Cheat Sheet — a free 10-point quick reference covering the most critical security checks for AI-generated code.

If you want the complete system — all 32 checklist items, 10 security-enhanced prompt templates, before/after exploit examples, and CI/CD configs that automate these checks — the full Vibe Coding Safety Checklist is available on Gumroad.

The axios attack will not be the last supply chain compromise. The question is whether the next one hits your project before or after you add these checks to your workflow.

Previously in this series: I Bought a $100 Product for One Cent Using Vibe-Coded Checkout — Plus 4 More Exploits — a step-by-step audit of 5 vibe-coded components revealing 49 security vulnerabilities.

Ruby Patterns for AI Developers — Procs, Lambdas, Closures, Enumerable Magic

By now you can read basic Ruby and understand classes. Good. But to read real Ruby comfortably, you also need the patterns Ruby developers lean on all the time.

This means understanding a few core ideas:

  • procs
  • lambdas
  • closures
  • Enumerable

These are not academic features. They show up everywhere in Ruby, Rails, and AI-adjacent code that transforms data, filters records, builds pipelines, and wraps behavior.

Let’s make them practical.

A proc is a chunk of callable behavior

A proc lets you store behavior in a variable and call it later.

upcase_text = Proc.new { |text| text.upcase }

puts upcase_text.call("ruby for ai")

Output:

RUBY FOR AI

That may look small, but it matters. You can pass behavior around just like data.

For example, maybe you want a reusable text post-processor:

clean_output = Proc.new do |text|
  text.strip.gsub(/s+/, " ")
end

raw = "   hello     from    model   "
puts clean_output.call(raw)

Output:

hello from model

Lambdas are stricter procs

Ruby has both Proc and lambda. They are similar, but lambdas behave more like regular methods.

formatter = lambda { |name| "Hello, #{name}" }
puts formatter.call("Advait")

You can also write it with stabby lambda syntax:

formatter = ->(name) { "Hello, #{name}" }
puts formatter.call("Ruby")

The important practical difference is argument handling.

loose_proc = Proc.new { |a, b| "#{a} #{b}" }
strict_lambda = ->(a, b) { "#{a} #{b}" }

puts loose_proc.call("hello")
# puts strict_lambda.call("hello")

The proc call works and silently sets b to nil.
The lambda version would raise an error because it expects exactly two arguments.

In real code, prefer lambdas when you want something method-like and predictable.

Closures remember their surrounding state

A closure is callable code that captures variables from the scope where it was created.

That sounds abstract. Here is the practical version.

def build_prompt_wrapper(prefix)
  ->(question) { "#{prefix}: #{question}" }
end

support_prompt = build_prompt_wrapper("Support assistant")
teaching_prompt = build_prompt_wrapper("Teaching assistant")

puts support_prompt.call("Reset my password")
puts teaching_prompt.call("Explain Ruby blocks")

Output:

Support assistant: Reset my password
Teaching assistant: Explain Ruby blocks

The lambda “remembers” prefix even after build_prompt_wrapper has finished.

That is a closure.

This is useful for AI code because you often want configurable behavior without creating a whole new class every time.

Blocks: Ruby’s built-in callback style

You already saw blocks in iterators. They are central to Ruby.

A method can yield to a block:

def with_timing
  start = Time.now
  result = yield
  finish = Time.now

  puts "Took #{(finish - start).round(3)}s"
  result
end

response = with_timing do
  sleep 0.2
  "model response"
end

puts response

Output:

Took 0.2s
model response

This pattern is everywhere in Ruby libraries: open a file, wrap a database transaction, benchmark a call, retry a request.

If a method uses yield, it expects a block.

Turn a block into a proc with &

Sometimes you want to accept a block and store or forward it.

def run_pipeline(input, &step)
  step.call(input)
end

result = run_pipeline(" hello ") { |text| text.strip.upcase }
puts result

The &step turns the block into a proc object.

You do not need this every day, but when you see &block in method definitions, now you know what is happening.

Enumerable is where Ruby gets fun

Enumerable gives collection classes a pile of useful methods like:

  • map
  • select
  • reject
  • find
  • reduce
  • group_by
  • each_with_object

You will use these constantly.

Let’s work with a realistic AI-flavored data set.

chunks = [
  { id: 1, text: "Ruby is elegant", score: 0.91 },
  { id: 2, text: "Rails ships fast", score: 0.87 },
  { id: 3, text: "Bananas are yellow", score: 0.21 }
]

map: transform each item

texts = chunks.map { |chunk| chunk[:text] }
p texts

select: keep matching items

relevant = chunks.select { |chunk| chunk[:score] > 0.8 }
p relevant

find: get the first match

best_match = chunks.find { |chunk| chunk[:id] == 2 }
p best_match

reduce: combine values

total_score = chunks.reduce(0) { |sum, chunk| sum + chunk[:score] }
puts total_score

These methods let you write concise code that still reads clearly.

each_with_object is cleaner than manual mutation

Beginners often do this:

lookup = {}
chunks.each do |chunk|
  lookup[chunk[:id]] = chunk[:text]
end

p lookup

That works. But Ruby has a neater pattern:

lookup = chunks.each_with_object({}) do |chunk, hash|
  hash[chunk[:id]] = chunk[:text]
end

p lookup

This shows up a lot in Ruby codebases.

Chain enumerable methods to build data pipelines

This is where Ruby becomes really pleasant for AI data work.

results = chunks
  .select { |chunk| chunk[:score] > 0.5 }
  .map { |chunk| chunk[:text].upcase }
  .sort

p results

You can think of this as a small transformation pipeline.

That style is perfect for:

  • preparing prompt context
  • cleaning API responses
  • ranking search hits
  • formatting model output
  • generating summaries from collections

Group data with group_by

Suppose you classify chunks by source type.

documents = [
  { source: "faq", text: "Reset password", score: 0.8 },
  { source: "faq", text: "Update email", score: 0.7 },
  { source: "docs", text: "Install Ruby", score: 0.95 }
]

grouped = documents.group_by { |doc| doc[:source] }
p grouped

This is handy when building retrieval pipelines or dashboards.

Use symbols for lightweight keys

You have already seen hashes with symbol keys:

{ score: 0.91, source: "docs" }

This is idiomatic Ruby. Most enumerable examples in real code will use symbol keys like :score and :source.

A practical example: rerank and format context

Let’s put the patterns together.

chunks = [
  { text: "Ruby blocks are closures", score: 0.82 },
  { text: "Rails uses MVC", score: 0.76 },
  { text: "Cats are animals", score: 0.12 }
]

format_chunk = ->(chunk) { "- #{chunk[:text]} (#{chunk[:score]})" }

context = chunks
  .select { |chunk| chunk[:score] >= 0.75 }
  .sort_by { |chunk| -chunk[:score] }
  .map(&format_chunk)
  .join("n")

puts context

Output:

- Ruby blocks are closures (0.82)
- Rails uses MVC (0.76)

That is the kind of data shaping you do constantly in AI applications.

Proc or class?

A good rule of thumb:

Use a proc or lambda when:

  • behavior is small
  • it is local to one flow
  • it does one simple transformation

Use a class when:

  • behavior has multiple steps
  • it needs configuration or dependencies
  • it has state
  • it deserves tests of its own

Do not turn every three-line transformation into a class. Do not turn every meaningful subsystem into a lambda either. Use judgment.

What to remember

Here is the short version:

  • a proc is callable behavior stored in an object
  • a lambda is a stricter, more method-like proc
  • closures remember variables from surrounding scope
  • blocks are Ruby’s built-in callback mechanism
  • Enumerable gives you powerful collection methods
  • chaining select, map, find, reduce, and friends is normal Ruby

If you get comfortable with these, a lot of Ruby code stops looking magical and starts looking obvious.

Try this next

Save this as ruby_patterns.rb and run:

ruby ruby_patterns.rb

Then extend it:

  • add reject to remove bad results
  • use group_by on a larger document list
  • create a lambda that truncates long model outputs
  • build a tiny prompt-cleaning pipeline with chained enumerable calls

Next, we’ll move into Rails and build your first app so all this Ruby stops living in toy scripts and starts powering a real web application.

Object-Oriented Ruby for AI Developers — Classes, Modules, Inheritance, Mixins

When you start reading Rails code, plain Ruby scripts, or Ruby AI libraries, you hit object-oriented code almost immediately.

You see classes. Modules. Inheritance. include. extend. Maybe a service object or two.

If you come from Python or JavaScript, Ruby’s object model feels familiar in places and weird in others. The good news: you do not need every edge case to be productive. You need enough to read code, structure code, and avoid writing a mess.

Let’s build exactly that.

Start with a class

A class is a blueprint for objects. Objects hold state and behavior.

class PromptTemplate
  def initialize(name, template)
    @name = name
    @template = template
  end

  def render(input)
    @template.gsub("{{input}}", input)
  end
end

summarizer = PromptTemplate.new(
  "summary",
  "Summarize this text in 3 bullets: {{input}}"
)

puts summarizer.render("Ruby is elegant and productive.")

Output:

Summarize this text in 3 bullets: Ruby is elegant and productive.

A few Ruby basics are doing work here:

  • initialize runs when you call .new
  • instance variables start with @
  • methods are defined with def
  • the last expression is returned automatically

That implicit return is a very Ruby thing. Don’t fight it.

Add readers and writers with attr_*

You often want controlled access to object state.

class ModelConfig
  attr_reader :provider, :model
  attr_accessor :temperature

  def initialize(provider, model, temperature = 0.2)
    @provider = provider
    @model = model
    @temperature = temperature
  end
end

config = ModelConfig.new("openai", "gpt-4.1-mini")
puts config.provider
puts config.model
puts config.temperature

config.temperature = 0.7
puts config.temperature

attr_reader creates getter methods.
attr_accessor creates both getter and setter methods.

There is also attr_writer, which only creates a setter.

In Rails code, this pattern is everywhere.

Use classes to model real application concepts

Suppose you are building a tiny AI feature that scores whether a support ticket needs escalation.

class Ticket
  attr_reader :title, :body, :priority

  def initialize(title:, body:, priority: "normal")
    @title = title
    @body = body
    @priority = priority
  end

  def urgent?
    priority == "high"
  end
end

class EscalationClassifier
  def initialize(ticket)
    @ticket = ticket
  end

  def classify
    return "urgent" if @ticket.urgent?
    return "urgent" if @ticket.body.downcase.include?("production down")

    "normal"
  end
end

ticket = Ticket.new(
  title: "Login issue",
  body: "Customer says production down in Europe",
  priority: "normal"
)

classifier = EscalationClassifier.new(ticket)
puts classifier.classify

This is already cleaner than passing hashes around forever.

The Ticket class owns ticket-related behavior.
The EscalationClassifier class owns classification behavior.

That separation matters once your codebase grows.

Inheritance: one class builds on another

Inheritance lets a subclass reuse behavior from a parent class.

class LLMClient
  def initialize(api_key)
    @api_key = api_key
  end

  def headers
    {
      "Authorization" => "Bearer #{@api_key}",
      "Content-Type" => "application/json"
    }
  end
end

class OpenAIClient < LLMClient
  def endpoint
    "https://api.openai.com/v1/chat/completions"
  end
end

client = OpenAIClient.new("secret-key")
p client.headers
puts client.endpoint

OpenAIClient inherits from LLMClient, so it gets the headers method automatically.

This is useful when several classes share a stable core.

But don’t get carried away. Deep inheritance trees become annoying fast. In modern Ruby and Rails code, composition and mixins are often preferred over “class hierarchy soup.”

Override methods and call super

A subclass can replace a parent method and still reuse part of the original with super.

class BaseMessageFormatter
  def format(message)
    "[base] #{message.strip}"
  end
end

class ChatMessageFormatter < BaseMessageFormatter
  def format(message)
    "[chat] #{super}"
  end
end

formatter = ChatMessageFormatter.new
puts formatter.format("  Hello from the model  ")

Output:

[chat] [base] Hello from the model

You will see super in Rails controllers, models, and framework internals.

Modules group shared behavior

A module is not instantiable. You use it to organize methods, constants, or shared behavior.

module JsonRenderable
  def as_json
    instance_variables.each_with_object({}) do |ivar, hash|
      key = ivar.to_s.delete("@")
      hash[key] = instance_variable_get(ivar)
    end
  end
end

class EmbeddingResult
  include JsonRenderable

  def initialize(id, score)
    @id = id
    @score = score
  end
end

result = EmbeddingResult.new("doc_42", 0.91)
p result.as_json

Output:

{"id"=>"doc_42", "score"=>0.91}

Here the module gives reusable behavior to any class that includes it.

Mixins: Ruby’s practical superpower

When you include a module, its instance methods become available in the class.

module Retryable
  def with_retries(max_attempts: 3)
    attempts = 0

    begin
      attempts += 1
      yield
    rescue => e
      retry if attempts < max_attempts
      raise e
    end
  end
end

class EmbeddingFetcher
  include Retryable

  def fetch
    with_retries(max_attempts: 2) do
      puts "Fetching embeddings..."
      # pretend network request happens here
      "ok"
    end
  end
end

puts EmbeddingFetcher.new.fetch

This is a mixin. It’s a way to share behavior without forcing everything into inheritance.

Rails uses this style heavily.

If you understand include SomeModule, a lot of Rails code suddenly becomes much less mysterious.

include vs extend

This trips people up once, then it’s easy.

  • include adds module methods as instance methods
  • extend adds module methods as class methods to a specific object or class
module Slugifiable
  def slugify(text)
    text.downcase.gsub(/s+/, "-")
  end
end

class Article
  extend Slugifiable
end

puts Article.slugify("Ruby For AI")

If you used include Slugifiable, you would call slugify on an instance instead.

Composition beats cleverness

A good Ruby codebase usually has small classes with one clear job.

For AI work, that often means classes like:

  • PromptBuilder
  • ChatClient
  • EmbeddingIndexer
  • DocumentChunker
  • ResponseValidator

That is better than one giant AIService class doing everything.

Here is a simple composed example:

class PromptBuilder
  def build(question)
    "Answer this clearly for a beginner: #{question}"
  end
end

class FakeLLM
  def call(prompt)
    "MODEL RESPONSE: #{prompt}"
  end
end

class ChatService
  def initialize(prompt_builder:, llm:)
    @prompt_builder = prompt_builder
    @llm = llm
  end

  def answer(question)
    prompt = @prompt_builder.build(question)
    @llm.call(prompt)
  end
end

service = ChatService.new(
  prompt_builder: PromptBuilder.new,
  llm: FakeLLM.new
)

puts service.answer("What is a mixin?")

That is easy to test, easy to swap, and easy to grow.

What to remember

If you remember nothing else, remember this:

  • classes create objects
  • initialize sets up state
  • instance variables use @
  • attr_reader and friends generate getters/setters
  • inheritance reuses parent behavior
  • modules group shared behavior
  • mixins with include are common and important
  • composition is usually cleaner than deep inheritance

That’s enough to read a lot of real Ruby and Rails code without panicking.

Try this next

Save this as oop_ruby.rb and run it:

ruby oop_ruby.rb

Then experiment:

  • add a SystemPromptBuilder subclass
  • create a Loggable module and mix it into multiple classes
  • add a second LLM client and inject it into ChatService

That kind of small practice is how this stuff becomes natural.

Next up, we’ll cover Ruby patterns you’ll keep seeing in serious code: procs, lambdas, closures, and the enumerable tricks that make Ruby feel like Ruby.

Cipher: My AI That’s Actually Building Unreal Blueprints For Me

I’m tired of staring at the same Blueprint nodes for the third hour straight. So I built Cipher — an AI agent that plans gameplay systems in Unreal Engine and spits out commands to make them real.

Cipher isn’t some fancy wrapper. It’s an agent that thinks through what needs to happen, then fires structured JSON commands over a Python bridge straight into Unreal. It duplicates Blueprints, adds cameras, spring arms, components, you name it. And it’s already doing more than I expected.

Why the hell am I doing this?

Unreal is powerful but the workflow can be soul-crushing. Want a new camera rig? Duplicate, tweak variables, hook up events, pray nothing breaks. Same crap every time you prototype. I got fed up repeating myself and decided to teach an AI to handle the boring bits so I could focus on the fun ones.

How Cipher actually works

I give it a high-level goal. Cipher’s planner figures out the steps, then outputs clean command JSON. A Python listener running inside Unreal picks it up and executes — creating actors, modifying Blueprints, adding components, setting properties. No vague “generate code” nonsense. It’s deliberate, structured, and reversible when it screws up.

Right now it’s solid at duplication and component surgery. Tell it “add a spring arm and camera to this pawn,” it does it without drama. Small wins, but they stack fast.

What’s already shipping

  • Blueprint duplication with targeted modifications 
  • Adding and configuring components (cameras, springs, collision) 
  • Basic property tweaks and hierarchy changes 

It’s not perfect, but watching it build a functional camera system in seconds still makes me grin like an idiot.

The annoying bits I’m still fighting

Duplication bugs keep popping up when references get messy. Stability isn’t there yet — sometimes Unreal gets cranky with rapid commands. And making the whole thing deterministic so I don’t get different results on the same prompt is harder than it sounds. I’m deep in the trenches fixing this stuff daily.

Where this is headed

Full gameplay systems. Inventory, combat loops, procedural level hooks — all planned and assembled by Cipher. Long term? Maybe entire small games from rough specs. I’m not there yet, but the path is clear.

I built this because I want to make games faster and weirder without getting buried in editor busywork. Cipher’s my co-pilot in the trenches, not some magic bullet. It still needs me to steer hard, and that’s exactly how I like it.

If you’re an Unreal dev drowning in repetitive Blueprint work, this kind of setup might save your sanity too. I’ll keep posting updates as it levels up.

Hit me up if you’re doing similar crazy shit. Always down to compare scars.