What Happens When You Press a Key

What Happens When You Press a Key
One Letter, Eight Processors, Three OS Layers

Reading time: ~15 minutes

You pressed the letter a.

It showed up in your terminal. That felt instantaneous. Sorry to tell you, but it wasn’t. Between the tip of your finger leaving that key and the character appearing on screen, at least eight separate processors handled your input, three operating system layers made decisions about it, and — if you’re working over SSH, and let’s be honest, how else are we talking to Claude at midnight — it crossed the internet encrypted and packetized inside a protocol designed by a Finnish researcher in the 1990s.

The eight processors: keyboard microcontroller, USB host controller, interrupt controller (APIC), your CPU — and on the SSH path, the story repeats on the remote side with its own interrupt controller, CPU, and the NVMe or storage controller that may have been woken to log the session.

This is what “pressing a key” actually is.

The Hardware You Never Think About

Your keyboard is a computer.

That’s not marketing fluff. Inside every modern keyboard is a microcontroller — a small chip running firmware — whose entire job is to watch a matrix of switches and tell the host machine when something changes. The cheap $15 keyboard on your desk has a processor dedicated to this task. It runs all day. You’ve never once thought about it. I didn’t think about it till I was penning this.

The microcontroller doesn’t monitor individual wires for each key. That would require 104 wires for a full keyboard. Instead, it uses an electrical matrix. Each key sits at a row/column intersection. The controller scans the matrix continuously — it sends a signal down one row at a time and checks which columns complete the circuit. If column 3 responds when row 7 is active, the a key is down.

Keyboard scan matrix

Scan rate varies by firmware quality, a closed source binary, maybe I’ll crack one open and see what’s inside in a future blog. A mediocre keyboard scans at 1kHz — once per millisecond. A gaming keyboard might scan at 8kHz. Your mechanical keyboard probably does something in between both.

The Debounce Problem

Here’s the thing about physical switches: they bounce.

When a metal contact closes, it doesn’t close cleanly. It bounces — makes contact, breaks, makes contact, breaks — for somewhere between 1ms and 20ms before settling. Without software handling this, every keypress would register as between two and fifty keypresses, randomly. Anyone who’s seen my sad graveyard of keyboards — casualties of the Rust borrow checker — knows that’s a lot of bouncing. My current Keychron Q6 Pro is doing the Lord’s work so far.

The firmware debounces the signal. The most common approach is to require the key to be in the same state for N consecutive scans before reporting a state change. Some keyboards debounce in hardware with a small capacitor. Either way, this is why every keystroke we’ve ever made has an invisible 5–20ms delay baked in before the keyboard reports anything at all.

That’s why gaming keyboards advertise 1000Hz polling — lower polling rate means higher USB latency, and debounce delay is already baked into every keystroke. 8ms vs 1ms is 7ms of guaranteed additional input lag. Whether you can feel 7ms is a different argument.

[Narrator: You cannot]

USB: The Polling Station

Once the keyboard microcontroller decides you’ve pressed a real key, it needs to tell the host machine. On a modern keyboard, that means USB — or Bluetooth, which uses the same HID report format over a wireless link. I’m covering USB here because it’s what most developers are plugged into, and the wired path is where the interesting kernel machinery lives.

USB is a polled protocol. The host — your computer’s USB host controller — periodically asks each device “anything to report?” Like that daily standup that should be weekly, except USB never learns. Keyboards advertise themselves as HID (Human Interface Device) class devices and request a polling interval, typically 1ms (1000Hz) for gaming keyboards, 8ms (125Hz) for cheap ones.

When your keyboard has a keypress to report, it packages it as a HID report — a small binary structure, typically 8 bytes, containing a modifier byte (Shift, Ctrl, Alt, etc.) and up to 6 simultaneous key codes. Not character codes. Key codes — numbers that identify physical key positions independent of what those positions mean. Six slots. Modifiers don’t count — they have their own byte. That’s why Ctrl+Shift+A works fine (one key slot plus two modifier bits), but mashing A+S+D+F+G+H+J simultaneously starts dropping keys.

HID Report (8 bytes):
[ modifier ] [ reserved ] [ key1 ] [ key2 ] [ key3 ] [ key4 ] [ key5 ] [ key6 ]
  0x00           0x00       0x04    0x00     0x00     0x00     0x00     0x00
                             ↑
                    "key at position 4" — this is the 'a' key location

The 0x04 there is not the ASCII code for a. It’s the HID usage code for “the key at position 4 on a standard keyboard.” The keyboard doesn’t know what a means. It only knows where the key is.

That’s why keyboard layouts don’t require firmware updates. The physical scan code never changes. The meaning lives in a data file in /usr/share/X11/xkb/ or the kernel’s keymaps. Switching layouts is changing a lookup table, not rewriting firmware. That’s why Dvorak works, why you can type Cyrillic without a Russian keyboard, why your compose key sequences function.

The USB host controller receives the HID report. The hardware interrupt fires. A kernel driver wakes up.

USB HID polling — the host asks, repeatedly

The Kernel Input Subsystem: Three Translations for the Price of One

The Linux kernel’s input subsystem is where things get genuinely interesting. It handles a series of translations, and each one exists for a good reason.

HID scan codes → Linux key codes

The kernel HID driver receives the 8-byte report and maps the scan code (0x04) to a Linux key code (KEY_A, which is 30 in the kernel’s input event numbering). This mapping lives in a translation table in the kernel.

This distinction matters because keyboards from different manufacturers use different scan codes for the same physical key. The kernel normalizes them all into a single, consistent numbering space. After this step, all keyboards look the same to the rest of the stack. Abstraction and encapsulation — turns out it’s not just a user-space design pattern. The kernel does it too, and it does it first.

The kernel emits an input_event struct — a 24-byte structure that gets written to the event device:

struct input_event {
    struct timeval time;  // when it happened (16 bytes on 64-bit; simplified here)
    __u16 type;           // EV_KEY = keyboard event
    __u16 code;           // KEY_A = 30
    __s32 value;          // 1=press, 0=release, 2=repeat
};

(The timeval representation has changed since kernel 5.1 to avoid y2038 issues; I’m simplifying the size here.)

This event appears on a file like /dev/input/event7. Each input device on your system — keyboard, mouse, touchpad, power button, webcam button — gets its own numbered event file. Run ls /dev/input/ and you’ll see a dozen or more. Which one is your keyboard? cat /proc/bus/input/devices tells you, or try evtest and start pressing keys. Everything from here up — your terminal, your GUI, your shell — is reading from this device file.1

Key codes → key symbols (where your keyboard layout lives)

This is where the letter a actually becomes the letter a — or A, or à, or α.

For a terminal, this translation happens in the kernel’s tty layer or in userspace depending on configuration. For X11 and Wayland, it happens in XKB — the X Keyboard extension, or its Wayland equivalent. Either way, a keyboard layout (a data file, not compiled code) maps KEY_A to the symbol a, and KEY_A + Shift to A, and KEY_A + various modifiers to accented variants.

This is why switching keyboard layouts works without rebooting. The physical scan codes don’t change. The firmware doesn’t change. Only the mapping table changes, in software, at this layer.

Three Paths from Kernel to Program

At this point the path splits. Where the key event goes next depends on what you were running.

Where the keypress goes — terminal, GUI, or SSH

Path 1: Your Terminal

If you were typing in a terminal, the key symbol goes into the PTY line discipline.

The terminal emulator holds the PTY master. It takes the resolved key symbol, encodes it as bytes (UTF-8 for most modern terminals), and writes those bytes to the master fd. The kernel line discipline processes them — in cooked mode, that means buffering them until Enter, handling backspace, echoing them back to the terminal for display. The bytes emerge at the PTY slave, where your shell reads them from stdin.

The echo is worth pausing on.

When you see the letter appear on screen as you type — that’s not your program. Your shell hasn’t seen that character yet. The kernel’s line discipline echoes it back through the PTY master, your terminal emulator reads the echoed byte, and renders it. In cooked mode, the shell doesn’t get anything until you press Enter.

Read that again. Every character you see while typing a command is the kernel drawing it, not the shell. The shell is sitting there, waiting for Enter, completely unaware of what you’ve typed so far.

This is why stty -echo works — you type and nothing appears, but the input is still going through. The kernel just stopped echoing. Useful for passwords. Extremely confusing when you accidentally set it wrong and can’t figure out why your terminal is “broken.” (You’ve run reset at least once in your career for exactly this reason. Now you know why it fixed things.)

That’s why stty -echo exists — and why password prompts use it. That’s why stty raw breaks readline — raw mode bypasses the line discipline entirely. No buffering, no backspace processing, no echo. Programs that implement their own line editing (vim, fzf, any TUI app) need this. Programs that relied on the kernel to handle it are now on their own.

And if you’ve ever hit Backspace and seen ^?, or pressed an arrow key and gotten ^[[A spat back at you — that’s the terminal and the program disagreeing about which mode they’re in. Those are the raw escape sequences for those keys. In cooked mode the line discipline interprets them. In raw mode it passes them through verbatim, and the program is supposed to handle them. When nothing handles them, you see the bytes as printed characters. reset fixes it because it forces the terminal back to sane defaults — cooked mode, echo on, line discipline doing its job.

Path 2: X11 / Wayland (GUI)

In a graphical environment, the input stack is different. The kernel’s input event device (/dev/input/eventN) is read by a userspace program — libinput or the legacy evdev driver — which passes events to the display server.

For X11, that’s the X server. It applies XKB key mappings and dispatches key events to whichever window has keyboard focus, via the X11 protocol. Client applications receive KeyPress and KeyRelease events through their Xlib or XCB connection.

For Wayland, the compositor is the display server. It reads directly from the input device through libinput, applies keyboard mappings, and sends key events to the focused client through the Wayland protocol’s wl_keyboard interface.

The compositor also handles the part where Super+L locks your screen before any application sees it. That’s a global key binding, caught at the compositor layer, never forwarded. Your application has no idea it was pressed.

Path 3: SSH (The Internet Leg)

This is the path that gets genuinely wild. If you’re in an SSH session — sitting at your laptop, typing into a shell running on a server three time zones away — the journey looks nothing like what you’d expect.

Your local terminal emulator receives the key event, encodes it as bytes, and passes it to the PTY master running locally. Those bytes emerge at the PTY slave — but on the other side of that slave is not a shell. It’s the SSH client (ssh process), which is sitting there reading bytes from its PTY like any other program would.

The SSH client takes those bytes and:

  1. Feeds them into the SSH transport layer (RFC 4253), which encrypts them with AES or ChaCha20 and wraps them in an SSH_MSG_CHANNEL_DATA packet
  2. Sends that packet over a TCP connection to the SSH server
  3. The TCP stack on your machine fragments it, adds headers, computes checksums
  4. Your NIC transmits it as Ethernet frames (or Wi-Fi frames, with their own layer of encryption)
  5. It routes across however many hops it takes to reach the server

SSH key journey — two PTY pairs, one encrypted tunnel

The server receives the TCP segment, the SSH server decrypts it, extracts the byte, and writes it to the PTY master of the remote shell’s PTY pair. The byte enters the remote line discipline. The remote shell reads it from its stdin … and breathe …

The character appearing on your screen follows the reverse path: the shell writes it, through the PTY, through SSH encrypted back, across the internet, decrypted by your SSH client, written to your local PTY master, read by your local terminal emulator, rendered on screen.

For a keystroke to a remote server in the same city, that round trip is typically 1–5ms. For a server across the continent, 30–80ms. For a server across an ocean, 150–300ms.

Every. Single. Character.

That’s why high-latency SSH sessions feel sluggish when you type — your terminal is waiting for the echo from the server before showing you the character, and the character is crossing the world to get there.

(Some SSH clients and terminal emulators implement local echo to hide this latency. They’re lying to you about what the server received. It’s a benevolent lie.)

The Numbers

Let’s put this together in time. You press a:

Step What happens Approximate time
Key bounces and debounces Firmware waits for stable signal 5–20ms
Microcontroller scan + HID report Next USB poll cycle 0–8ms
USB interrupt + HID driver Kernel wakes up, maps scan code <1ms
Input event to PTY / display server Kernel routes to consumer <1ms
Line discipline processing + echo Echo, cooked mode, echoed byte render <1ms
Terminal render Alacritty/kitty draws the glyph 1–5ms

Local round trip: roughly 10–30ms from finger-lift to pixel. Dominated entirely by keyboard firmware debounce and USB poll rate.

The CPU doing the actual computation — running your shell, processing the character — is involved for microseconds of that. The waiting is physics and polling intervals.

One Letter, Summarized

Physical key
    └── keyboard microcontroller (scan + debounce)
           └── HID report over USB (scan code)
                  └── Linux kernel HID driver (scan code → key code)
                         └── kernel input subsystem (key code → input_event)
                                └── [branch]
                                     ├── PTY line discipline → shell stdin
                                     ├── X11/Wayland compositor → GUI app
                                     └── SSH client → TCP → internet
                                                            → SSH server
                                                            → remote PTY
                                                            → remote shell

From a piece of metal making contact to a byte arriving in your program: eight processors touched it, the kernel translated it three times, and if you’re on SSH, the internet carried it and brought the echo back.

The key you press is the simple part. Everything after is the iceberg.

What’s Next

That 0x04 scan code became the letter a somewhere in the stack. But what is the letter a? It’s not a byte. It’s not a character. It’s an agreement — one that took sixty years and several spectacular failures to reach.

Next up in Your String is Not What You Think It Is, I’m going to break your mental model of strings. The letter é might be one character or two. The flag emoji 🇬🇧 is four bytes pretending to be one glyph. And MySQL’s utf8 encoding can’t store an octopus emoji because someone in 2002 made a decision that seemed reasonable at the time.

Further Reading

  • man 4 input — Linux input subsystem documentation. Describes input_event and the event device interface.
  • USB HID Usage Tables — The official USB HID spec. Table 10 has the keyboard usage codes. It’s exactly as dry as you’d expect.
  • XKB Configuration Guide — If you’ve ever wanted to understand why keyboard layouts live where they do.
  • RFC 4253 — The SSH Transport Layer Protocol. Sections 6 and 7 cover the encryption and packet format. Readable as RFCs go.
  • The TTY Demystified — Linus Akesson’s classic. Start here for a deeper look at the line discipline and TTY subsystem.

I’m writing a book about what makes developers irreplaceable in the age of AI. Join the early access list →

Naz Quadri has spent an uncomfortable amount of time reading kernel source to understand why a character takes 30ms to cross 2 centimeters. He blogs at nazquadri.dev. Rabbit holes all the way down 🐇🕳️.

  1. Find your keyboard’s handlers with: grep -A5 "Keyboard" /proc/bus/input/devices | grep -oP '(?<=Handlers=).*'. On my machine that returns sysrq kbd event7 leds — sysrq means it can trigger magic SysRq sequences, kbd means the kernel sees it as a keyboard, event7 is the device file you’d read for raw keypresses, and leds means it can toggle your Caps Lock light. ↩
Anthropic accidentally leaked Claude Code’s source code. Here’s what that means.

Last week, someone noticed that version 2.1.88 of the Claude Code npm package was 60MB heavier than it should have been.
Inside: reconstructable source code for Claude Code’s CLI. Around 512,000 lines of TypeScript across nearly 2,000 files. Significant portions of the agent codebase that Anthropic had kept private, exposed by a single build mistake.

How does a mistake like this even happen?

When developers ship software, they often minify the code first. That means compressing it into an unreadable blob of abbreviated variable names and stripped formatting. The goal is smaller files, faster downloads, and some protection from competitors reading your work.
To debug that minified code, teams use source maps: files that translate the ugly compressed version back into the original readable code.
These are internal tools.
They should never ship to users.
This one did.

What was actually inside?

Reported findings include:

  • How Claude Code’s agent loop works
  • Multi-agent coordination logic
  • Around 44 feature flags for unshipped functionality
  • System prompts Claude Code uses internally
  • How persistent memory is implemented

What was confirmed not inside: model weights, training data, backend infrastructure, or safety pipelines.
The AI is fine.
This was the client-side scaffolding around it.

Wasn’t Claude Code already open source?

Anthropic has a public GitHub repo for Claude Code and a Claude Agent SDK that developers can use to build their own tools. So there’s always been some public surface area.
But the actual application has always shipped as an obfuscated bundle.
You could install it and run it.
You could not read how it worked.

So what should you actually pay attention to?

The feature flags are the most interesting part. Hidden functionality sitting behind conditionals tells you a lot about what Anthropic is building next. People are already mapping those out.
Anthropic confirmed this was human error, not a security breach, and no customer data was exposed. If you’re building on Claude Code or evaluating agentic AI tools, this is a rare look at how a production-grade AI agent is actually architected. The code is already mirrored across GitHub.
It’s not going anywhere.

I built a zero-account, local-first notepad — and why I think most note apps are solving the wrong problem

The itch

Every time I needed to jot something down quickly — a snippet, a URL, a half-formed idea at 1am — I’d open a new browser tab and start searching for a notepad tool.

The results were always the same: sign up to save your notes. Connect your Google account. Install our desktop app. Enable cloud sync.

For a notepad.

I just wanted to type. So I built one.

What DarkNotepad actually is

DarkNotepad is a minimal online notepad with three hard constraints I set for myself:

  1. No account required — ever. Not even optional.
  2. Nothing leaves your browser — notes live in localStorage, full stop.
  3. Dark mode by default — because most people who need a quick scratchpad are developers, and developers live in dark mode.

That’s it. No backend, no user table, no analytics that track what you type.

The stack (it’s boring, intentionally)

I kept it simple on purpose:

  • React + react-router-dom for SPA routing
  • react-helmet-async for per-route meta tags (SEO without SSR)
  • vercel.json rewrites to avoid 404s on page refresh for internal routes like /about and /blog
  • JSON-LD (SoftwareApplication schema) in index.html for rich snippets
  • Deployed on Vercel — free tier, zero config

No database. No auth library. No backend whatsoever.

The most interesting technical decision was actually the vercel.json config. SPAs break hard on direct URL access because the server doesn’t know about client-side routes. This one-liner fixes it:

{
  "rewrites": [{ "source": "/(.*)", "destination": "/index.html" }]
}

Why local-first for a notepad?

I think most tools default to server-side storage because that’s what we’re trained to build. But for ephemeral, personal notes — the kind you write and delete the same day — there’s no good reason your data needs to leave your machine.

localStorage gives you:

  • Instant persistence with zero latency
  • Works offline by default
  • No GDPR surface — you literally don’t have the data
  • Zero infrastructure cost

The tradeoff: notes don’t sync across devices. For my use case (quick scratchpad, not a PKM system), that’s fine. If you need cross-device sync, use Notion. DarkNotepad is for the 30-second use case.

What I learned shipping this

SEO for tools is different from SEO for content. The homepage competes on transactional keywords (“online notepad dark mode”) where established players dominate. The real opportunity is long-tail informational content — articles about eye strain, privacy, local-first architecture. That’s where a new domain can actually rank.

Ship the privacy policy before anything else. Not just for legal reasons — it’s a trust signal that affects Google AdSense approval, user perception, and how seriously people take your tool.

Product Hunt and communities matter more than organic SEO at launch. Google takes months. Humans take seconds.

What’s next

  • More blog content targeting long-tail keywords
  • Keyboard shortcuts
  • Export to .txt / .md
  • Maybe a word count — people keep asking

If you want to take a look: darknotepad.com

And if you’re building something similar or have opinions on the local-first approach, I’d genuinely love to hear them in the comments.

Building Secure Session Management in NestJS – Refresh Tokens, Device Tracking & Session Revocation(PART 2)

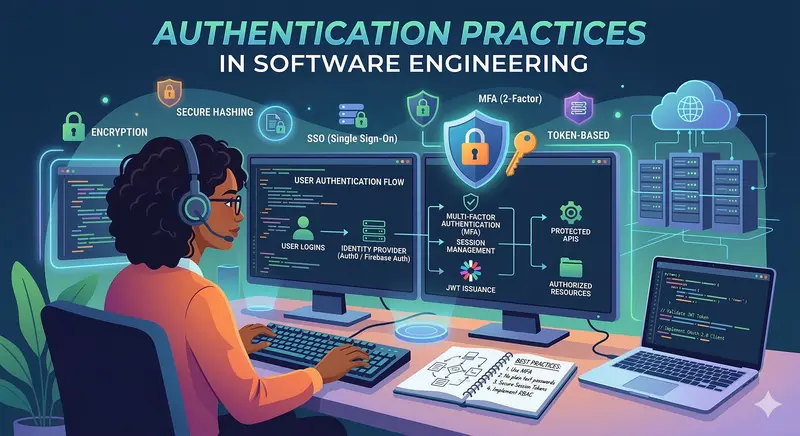
Authentication practices, session revocation, token validation, session management

Authentication practices, session revocation, token validation, session management

1. The Refresh Token Flow — Validating Against the DB

This is where the real security upgrade happens. Instead of just verifying the JWT signature, we now check the database to confirm the session still exists and hasn’t been revoked.

// auth.service.ts — updated refreshToken method
async refreshToken(rawRefreshToken: string) {

// Step 1: Verify the JWT signature and check expiry.
// jwtService.verify() throws an error if the token is expired or the signature is invalid.


let payload: any;
try {

payload = this.jwtService.verify(rawRefreshToken, {
secret: this.configService.get<string>('JWT_REFRESH_SECRET'),
});
} catch {
// The token is either expired or was tampered with
throw new UnauthorizedException('Refresh token is invalid or expired');
}


// Step 2: Load all active sessions for this user from the database.
// We need to find the specific session that matches this refresh token.

// Note: we explicitly request 'refreshTokenHash' since it has select: false on the entity.

const sessions = await this.sessionRepository.find({
where: { userId: payload.sub, isActive: true },
select: ['id', 'refreshTokenHash', 'expiresAt', 'isActive'],
});

// Step 3: Compare the incoming token against each session's stored hash.
// bcrypt.compare() handles this — it hashes the raw token and checks if it matches.

let matchingSession: Session | null = null;

for (const session of sessions) {
const isMatch = await bcrypt.compare(
rawRefreshToken,
session.refreshTokenHash,
);

if (isMatch) {
matchingSession = session;
break; // Found it — no need to check further
}
}

// Step 4: If no matching session exists, it was revoked (user logged out)

if (!matchingSession) {
throw new UnauthorizedException('Session not found or has been revoked');
}

// Step 5: Double-check the session's own expiry timestamp

if (new Date() > matchingSession.expiresAt) {
await this.sessionRepository.update(matchingSession.id, {
isActive: false,
});

throw new UnauthorizedException('Session has expired. Please log in again.',);
}

// Step 6: Record that this session was just used (for "last active" display)

await this.sessionRepository.update(matchingSession.id, {
lastUsedAt: new Date(),
});

// Step 7: Issue a fresh access token

const user = await this.usersService.findOne(payload.sub);
if (!user) throw new UnauthorizedException('User not found');

const newPayload = { email: user.email, sub: user.id, role: user.role };
const accessToken = this.jwtService.sign(newPayload, { expiresIn: '15m' });
return {
access_token: accessToken,
expires_in: 900,
};
}

Why this matters: A stolen refresh token is now useless the moment the legitimate user logs out. The database is the source of truth — not just the JWT signature.

Performance note: If a user has many sessions (lots of devices), iterating through all of them to bcrypt-compare can be slow. A common optimization is to include the session ID in the refresh token’s JWT payload, so you can look up the exact session directly and only do one bcrypt comparison.

2. Session Revocation — Logout (Single) and Logout-All

Single Device Logout
When a user logs out from one device, we mark that specific session as inactive. The refresh token is now dead — even if it hasn’t reached its JWT expiry date.

// auth.service.ts
async logout(userId: string, sessionId: string) {
// Find the session — and confirm it actually belongs to this user.
// Never skip this check! Otherwise, user A could log out user B.

const session = await this.sessionRepository.findOne({
where: { id: sessionId, userId, isActive: true },
});

if (!session) {
throw new BadRequestException('Session not found');
}

// Mark as inactive (soft delete — we keep the row for audit purposes)

await this.sessionRepository.update(session.id, { isActive: false });
return { message: 'Logged out successfully' };
}
// auth.controller.ts
@Post('logout')
@UseGuards(JwtAuthGuard) // Must be authenticated to logout
@ApiBearerAuth()
async logout(@Req() req, @Body() body: { session_id: string }) {
// req.user.userId is populated by JwtStrategy.validate()
return this.authService.logout(req.user.userId, body.session_id);
}

Logout From All Devices
This is the “I think my account was compromised” button. One call, every session gone.

// auth.service.ts
async logoutAll(userId: string) {
// Deactivate every active session for this user in one query

await this.sessionRepository.update(
{ userId, isActive: true },
{ isActive: false },
);

return { message: 'Logged out from all devices successfully' };
}
// auth.controller.ts
@Post('logout-all')
@UseGuards(JwtAuthGuard)
@ApiBearerAuth()
@ApiOperation({ summary: 'Revoke all active sessions for the current user' })
async logoutAll(@Req() req) {
return this.authService.logoutAll(req.user.userId);
}

3. Password Change = Revoke All Sessions

This one is critical and often missed. When a user changes their password, you should immediately invalidate all their existing sessions.

Here’s why this matters: imagine a user named Kofi suspects his account has been compromised. He changes his password. But without session revocation, any attacker who already has a valid refresh token can keep getting new access tokens for up to 7 more days -completely unaffected by the password change.

// auth.service.ts
async changePassword(
userId: string,
currentPassword: string,
newPassword: string
) {
// Get user including the password field (it has select: false on the entity)

const user = await this.usersService.findOneWithPassword(userId);

if (!user || !user.password) {
throw new BadRequestException('User not found');
}

// Verify the current password is correct before allowing the change

const isCurrentPasswordValid =  bcrypt.compare(currentPassword,user.password);

if (!isCurrentPasswordValid) {
throw new UnauthorizedException('Current password is incorrect');
}

// Hash and save the new password

const hashedNewPassword = await bcrypt.hash(newPassword, 10);
await this.usersService.updatePassword(userId, hashedNewPassword);

// ✅ CRITICAL STEP: Revoke ALL sessions.
// Any stolen refresh tokens are now completely useless.

await this.sessionRepository.update(
{ userId, isActive: true },
{ isActive: false },
);

return {
message:'Password changed successfully. You have been logged out from all devices. Please log in again.',
};
}

The user will need to log in again on all their devices — which is expected and correct. Security over convenience, always.

4. Listing Active Sessions – Letting Users See Where They’re Logged In

This is the feature users love. You’ve seen it in Google Account settings: “Your account is currently active on these devices.” Here’s how to build it:

// auth.service.ts
async getActiveSessions(userId: string) {
const sessions = await this.sessionRepository.find({
where: { userId, isActive: true },
order: { createdAt: 'DESC' }, // most recent login first
});

// Map to a clean format for the client.
// We never expose the refreshTokenHash.

return sessions.map((session) => ({
id: session.id, // client uses this to revoke a specific session
device: ${session.browser} on ${session.os}, // "Chrome on macOS"
deviceType: session.deviceType,
ipAddress: session.ipAddress,
lastUsed: session.lastUsedAt || session.createdAt,
loggedInAt: session.createdAt,
expiresAt: session.expiresAt,
}));
}
// auth.controller.ts
@Get('sessions')
@UseGuards(JwtAuthGuard)
@ApiBearerAuth()
@ApiOperation({ summary: 'List all active sessions for the current user' })
async getSessions(@Req() req) {
return this.authService.getActiveSessions(req.user.userId);
}

A sample response:

[
{
"id": "550e8400-e29b-41d4-a716-446655440000",
"device": "Chrome on macOS",
"deviceType": "desktop",
"ipAddress": "41.66.12.34",
"lastUsed": "2026-03-02T09:45:00.000Z",
"loggedInAt": "2026-03-01T08:00:00.000Z",
"expiresAt": "2026-03-08T08:00:00.000Z"
},
{
"id": "660e8400-e29b-41d4-a716-446655440001",
"device": "Mobile Safari on iOS",
"deviceType": "mobile",
"ipAddress": "41.66.12.35",
"lastUsed": "2026-03-01T22:10:00.000Z",
"loggedInAt": "2026-02-28T14:22:00.000Z",
"expiresAt": "2026-03-07T14:22:00.000Z"
}
]

Users can pass the session id to POST /auth/logout to revoke any specific session they don’t recognize.

5. Tradeoffs & Considerations

Nothing is free. Here’s what you’re taking on with this approach:

What you gain

  • Real logout — revocation actually works
  • Per-device visibility for users
  • Protection against token theft
  • Password change security (all sessions wiped)
  • Audit trail of login activity

What you’re taking on
Database hit on every token refresh. Every time a client needs a new access token (up to every 15 minutes per active user), you query the database. For large-scale apps, this adds up.

Mitigation: cache session lookups in Redis with a short TTL, or embed the session ID in the JWT payload to enable a direct lookup instead of scanning all user sessions.
You need to clean up old sessions. Sessions pile up over time. Set up a scheduled cleanup job using @nestjs/schedule:

// sessions-cleanup.service.ts
import { Injectable } from '@nestjs/common';
import { Cron, CronExpression } from '@nestjs/schedule';
import { InjectRepository } from '@nestjs/typeorm';
import { Repository, LessThan } from 'typeorm';
import { Session } from './session.entity';

@Injectable()
export class SessionsCleanupService {

constructor(
@InjectRepository(Session)
private sessionRepository: Repository<Session>,
) {}

// Runs every night at midnight

@Cron(CronExpression.EVERY_DAY_AT_MIDNIGHT)
async cleanupExpiredSessions() {
// Delete sessions that have passed their expiresAt date

const result = await this.sessionRepository.delete({
expiresAt: LessThan(new Date()),
});
console.log(Cleaned up ${result.affected} expired sessions);
}
}

Refresh token rotation (optional but recommended). For maximum security, issue a new refresh token on every /auth/refresh call and invalidate the old one. This means if a refresh token is stolen and used before the legitimate user uses it, the legitimate user’s next refresh will fail — an early signal that something is wrong. This is more complex but closes a subtle replay attack window. User-Agent parsing is heuristic. The ua-parser-js library is good, but not perfect. Some browsers misreport themselves, and bots can spoof any user-agent string. Treat device info as helpful metadata for display purposes, not as a hard security boundary.

6. ** Conclusion + Key Takeaways**

Here’s a quick recap of what we built:

Feature Implementation
Revocable sessions Session entity in DB; logout marks isActive = false
Device tracking DeviceInfoMiddleware parses User-Agent header on login
Secure token storage bcrypt hash stored in DB; raw token never persisted
Single-device logout POST /auth/logout with session_id
Logout all devices POST /auth/logout-all bulk-deactivates all sessions
Password change security changePassword revokes all sessions automatically
Active sessions screen GET /auth/sessions returns clean session list

The core mental model to remember: JWTs are your fast lane; database sessions are your checkpoint. Short-lived access tokens (15 min) keep performance high because you only check the DB occasionally. Database-backed sessions give you the control to say “no” to a refresh token that was supposed to be dead.

If you’re starting out: the most impactful things to implement first are the session entity, the DB lookup on refresh, and the revoke-all-on-password-change. Everything else — device tracking, cleanup jobs, session listing — is valuable but additive.
Your users are trusting you with their accounts.
Follow for more backend engineering deep dives.

Notion Cortex: A Multi-Agent AI Research System Where Notion Is the Operating System

This is a submission for the Notion MCP Challenge

What I Built

Notion Cortex is a multi-agent AI research system that uses Notion as its operating system — not just an output destination, but the shared coordination layer where agents think, communicate, and await human approval.

Give it any topic, and five specialized AI agents fan out in parallel:

  1. Scout agents (x5) research different angles simultaneously, extracting structured entities into a Knowledge Graph
  2. Analyst cross-references all findings, identifies patterns and gaps
  3. Synthesizer streams a structured synthesis directly into Notion as it thinks
  4. Approval Gate pauses execution and waits for you to review in Notion — set Status to “Approved” to continue
  5. Writer produces a publication-ready intelligence brief with headings, entity tables, and conclusions

Every agent’s reasoning streams into its own Working Memory page in real time. You can literally watch them think in Notion.

$ notion-cortex "The rise of autonomous AI agents in software engineering"

🧠 Notion Cortex — starting run for: "The rise of autonomous AI agents..."

📋 Bootstrapping Notion workspace...
✅ Workspace ready (1.6s)

🧩 Decomposing topic into research angles...
   5 angles identified

🚀 Running 5 Scout agents (concurrency: 3)...
  ✅ Scout 1 done
  ✅ Scout 2 done
  ...

📊 All Scouts complete (103s). Running Analyst...
✅ Analyst done (31s)

🕸️  Computing knowledge graph relations...
✅ Relations linked (8s)

🔗 Running Synthesizer...
✅ Synthesis written (23s)

✍️  Running Writer...
✅ Writer done (43s)

🎉 Done in 229s! Intelligence brief: https://notion.so/...

Video Demo

The demo shows a complete run from notion-cortex "topic" through all 5 agent phases to the final intelligence brief in Notion.

Show us the code

GitHub: github.com/tyy130/notion-cortex

Architecture

src/
  index.ts              CLI entry point + setup wizard
  cleanup.ts            Archives all cortex-* databases for a fresh start
  orchestrator.ts       Pipeline coordinator
  llm.ts                Dual-provider streaming (OpenAI + Anthropic)
  streaming.ts          Token buffer → timed Notion block flush
  concurrency.ts        Write queue (p-limit) + exponential backoff retry
  types.ts              Zod schemas for all database entry types
  agents/
    scout.ts            Research + entity extraction via MCP
    analyst.ts          Cross-scout analysis + KG enrichment
    synthesizer.ts      Structured synthesis streamed to Working Memory
    writer.ts           Final brief written to Outputs database
  notion/
    bootstrap.ts        Idempotent 5-database workspace creation
    client.ts           Notion SDK singleton
    mcp-client.ts       Notion MCP server (stdio transport)
    task-bus.ts         Agent task queue CRUD
    working-memory.ts   Streaming page writer + content reader
    knowledge-graph.ts  Entity store with serialized upsert
    approval-gates.ts   Human-in-the-loop polling
    outputs.ts          Final page publisher
    markdown-blocks.ts  Markdown → Notion block converter
    utils.ts            Shared helpers

Key Technical Decisions

Serialized KG upsert: Parallel scouts can discover the same entity simultaneously. A pLimit(1) queue wraps the check-then-create operation, making the upsert atomic without a database lock.

Two-queue concurrency design: writeQueue (pLimit(3)) handles Notion API rate limiting. kgUpsertQueue (pLimit(1)) handles logical atomicity. Different concerns, different queues.

Idempotent bootstrap with archived filtering: bootstrapWorkspace searches for existing cortex-* databases and reuses them. It filters out archived databases (Notion’s search API returns them by default) and uses databases.update to ensure schema migrations apply to pre-existing databases.

Dual-provider LLM abstraction: Supports OpenAI (default) and Anthropic with streaming and multi-turn tool-use loops. Switch with one env var.

55 tests across 13 files: Full coverage of the orchestrator pipeline, all agents, concurrency utilities, markdown converter, and Notion data layer.

Quick Start

git clone https://github.com/tyy130/notion-cortex.git
cd notion-cortex
npm install
notion-cortex setup    # interactive wizard
notion-cortex "your research topic"

How I Used Notion MCP

Notion isn’t just where output ends up — it’s the runtime substrate. The Notion MCP server (@notionhq/notion-mcp-server) runs as a stdio subprocess, giving Scout agents access to notion_search — they check what knowledge already exists in the workspace before extracting new entities, avoiding redundant work across runs.

Beyond MCP search, each database works as infrastructure through the Notion SDK:

1. Task Bus (agent coordination)

The orchestrator creates tasks, scouts claim them via assigned_agent, and status transitions (pending → active → done → blocked) drive the pipeline forward. This is a distributed task queue implemented entirely in Notion.

2. Working Memory (streaming scratchpad)

Each agent gets a dedicated Notion page. As tokens stream from the LLM, a timed buffer flushes them as paragraph blocks to the page every second. You can open a scout’s Working Memory page and watch it think in real time.

3. Knowledge Graph (structured entity store)

Scouts extract entities (companies, products, trends, concepts) with claims, confidence levels, and source URLs. A serialized upsert queue (pLimit(1)) prevents duplicate entities when parallel scouts find the same thing. After the Analyst pass, computeAndStoreRelations scans all entities and auto-links them using Notion’s relation property — if “GitHub Copilot” appears in another entity’s claim, they get linked.

4. Approval Gates (human-in-the-loop)

Before the Writer runs, an approval gate creates a Notion database entry with status “Pending” and a link to the synthesis. The system polls with exponential backoff until you change the status to “Approved” or “Rejected” in Notion. This is genuine human-in-the-loop control — not a dialog box, but a Notion workflow.

5. Outputs (final deliverables)

The Writer converts its markdown output into native Notion blocks — headings, bullet lists, numbered lists, tables, code blocks, bold/italic, and links — using a custom markdownToNotionBlocks converter. The result is a proper Notion page, not a pasted text blob.

Final Thoughts

The most surprising thing about this project was how naturally Notion works as an agent coordination layer. Databases become task queues. Pages become working memory. Relations become a knowledge graph. Status properties become approval gates. It’s not a hack — it’s genuinely the right tool for this.

The human-in-the-loop approval gate is my favorite feature. Most agent systems are either fully autonomous or require you to babysit a terminal. With Cortex, you get a Notion notification, review the synthesis at your own pace, and approve when ready. The agents wait patiently.

MIT licensed. PRs welcome.

The State of AI in 2026: From Chatbots to the Chorus

If 2024 was the year of the conversational chatbot and 2025 was the year of the standalone agent, 2026 is rapidly becoming the year of the Chorus—persistent, volitional AI systems operating not in isolation, but in coordinated concert.

As we look at the current state of artificial intelligence, three massive shifts are redefining how developers build, deploy, and interact with AI. Let’s break down what’s actually happening on the ground in 2026.

1. The Death of Rigid Function Calling (and the Rebirth of CLI)

For the past two years, the industry obsessed over JSON-based function calling. We built complex schemas and catalogs of independent tools for our agents to select from. But as action spaces grew, context limits shattered and agent reliability plummeted.

In 2026, the paradigm has shifted back to a 50-year-old concept: The Unix Philosophy.

Instead of bloated tool catalogs, modern orchestration frameworks are exposing capabilities as standard CLI commands. Projects like open-multi-agent and AWS’s new CLI Agent Orchestrator are proving that giving an LLM a terminal (via run(command="..." )) with pipe operators (|, &&, ||) is fundamentally superior. The AI doesn’t need to learn a new structured JSON schema; its training data is already saturated with billions of lines of shell scripts. We are moving from function selection to string composition, natively reducing cognitive load and token overhead.

2. Local AI Achieves “Datacenter-Class” Hardware Parity

We’re no longer restricted to cloud APIs for serious reasoning. The democratization of local AI has hit a critical inflection point thanks to algorithmic breakthroughs and consumer silicon.

Take Google’s recent TurboQuant architecture as a prime example. By randomly rotating n-dimensional state vectors before quantization, models bypass the “attention sink” precision loss that plagued early quants. Combine this software magic with Apple’s M5 Max architecture (which integrated native Neural Accelerators directly into the GPU cores), and the results are staggering.

Developers are currently benchmarking massive 120B+ parameter models (like Qwen3.5-122B-A10B-4bit and gpt-oss-120b) at over 65 tokens per second entirely locally on laptops. The gap between an enterprise server rack and a developer’s backpack has officially closed.

3. Small Models Get “Agentic”

While the 100B+ models dominate local hardware, the most fascinating trend of 2026 is at the absolute bottom of the parameter scale.

We’ve realized that “intelligence” and “agency” aren’t strictly tied to model size. Liquid AI’s recent release of LFM2.5-350M proved that you can run reliable agentic loops on a 350-million parameter model. Mistral’s Voxtral TTS is doing state-of-the-art voice synthesis with just 3GB of RAM and sub-100ms latency. These micro-models are being embedded directly into application pipelines, acting as specialized nodes that feed into larger orchestrators.

The Takeaway

The “State of AI” in 2026 is no longer about human-to-machine chatting. It is about Machine-to-Machine Orchestration.

We are building the Chorus—a system where a 350M parameter model handles immediate parsing, delegates a shell command to an isolated sandbox, and pipes the output to a 122B local model for deep reasoning. The tools of the past were APIs. The tools of the future are just agents talking to agents through standard streams.

Welcome to the terminal age of AI.

How to Give Claude Long-Term Memory

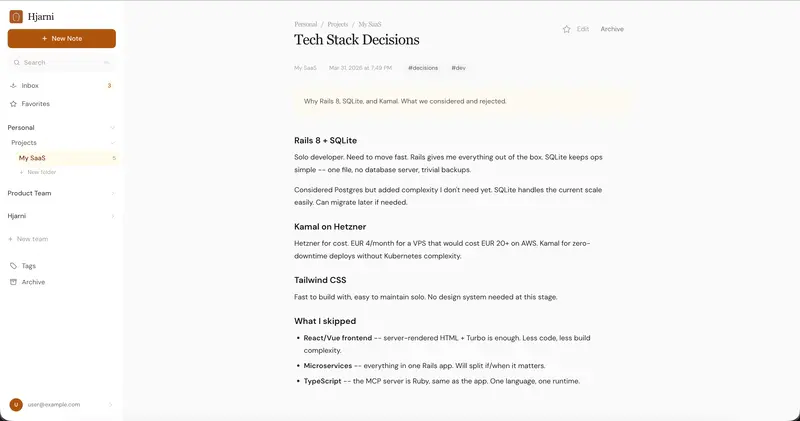
A note in Hjarni

Every time you open your AI, you start over. You explain your project, your stack, the decision you made last Tuesday. Again.

You can stop doing this. In five minutes.

How it works

Hjarni is a note app your AI can read. You write notes. Your AI searches and reads them. One URL to connect.

Step 1: Create your first note

Sign up at hjarni.com. Create a note about something you’re tired of re-explaining.

Title: Tech Stack

Rails 8 + SQLite.
Deployed on Hetzner via Kamal.
MCP server built into the app.
Tailwind + Turbo, no React.
Solid Queue for background jobs.

A note in Hjarni

Step 2: Connect to Claude

Go to Settings. Find Connectors. Add a custom connector.

Name it “Hjarni” and paste https://hjarni.com/mcp as the URL. Done.

Claude MCP settings with Hjarni connected

Step 3: Ask Claude something

Start a new conversation. Don’t paste any context. Just ask something only your notes would know.

“Write me a pitch based on what you know about my product.”

Claude searches your notes. Finds the answer. No copy-pasting.

What to save next

If you’ve typed it twice, save it. Project context. Decisions and their reasons. Research conclusions.

Every note you add makes the next conversation better. Ten notes in, you just talk to your AI like it’s been on your team all along.

The free tier gives you 25 notes with full MCP access. No credit card.

👉 Start writing free

Works with Claude and ChatGPT today.

20 Niche CSS Libraries for 2026 🚀

If you’re tired of every website looking like a carbon-copy of the big frameworks, this list is for you. These 20 niche libraries are lightweight, unique, and packed with “Wow” factors to give your next project a distinct soul.

🏛️ The “Classless” Minimalists
Just drop these in your

and your plain HTML becomes beautiful.

MVP.css: Perfect for “v1” prototypes. It styles standard tags so you can focus on building. 📄

Water.css: A favorite for documentation. It’s clean, light, and very easy on the eyes. 💧

Sakura: A tiny framework that focuses on perfect typography and white space. 🌸

Simple.css: Great for personal blogs. It’s readable, fast, and stays out of your way. ✍️

Tacit: Designed for developers who “don’t do design.” It makes everything look professional by default. 🤫

🎨 The High-Concept & Artistic
For when you want your website to tell a story through its style.

Nes.css: For that nostalgic 8-bit, retro-gaming aesthetic. 🎮

Paper CSS: Gives your UI elements a physical, paper-like texture and subtle shadows. 📝

Wired Elements: Features sketchy, hand-drawn components that look like a digital wireframe. ✏️

98.css: A total throwback that recreates the Windows 98 interface perfectly. 💻

Bonsai CSS: A super-lightweight utility system that focuses on “organic” spacing. 🎋

⚡ The Modern “Attribute-Based” & Utility Tools
These libraries change how you write code, using attributes or tiny utility blocks.

Butterfly CSS v4: A 2026 standout that moves away from classes. It uses Attribute-Based Styling (like [responsive] or [flex-row]) to keep your HTML clean while adding stunning animations and “floating” visual effects effortlessly. 🦋

Chota: A tiny (3kb!) framework that packs a punch with a full grid system. 🐣

Milligram: One of the fastest ways to get a clean, modern layout without the bloat. ☕

Picnic CSS: Native-feeling components that use minimal classes for a lightweight experience. 🧺

Hiccup CSS: A new favorite for “Atomic” styling that avoids the complexity of larger tools. ⚡

🧪 The Experimental & Technical
Using the latest 2026 web standards for maximum performance.

Open Props: A massive collection of CSS variables to help you build your own custom system. 🎨

Tufte CSS: Inspired by Edward Tufte’s work; perfect for academic or data-heavy articles. 🧪

Glass.css: A niche library dedicated entirely to the “Glassmorphism” (frosted glass) aesthetic. 💎

Shadow UI: Focuses on advanced depth, layering, and realistic Neumorphic shadows. 🌑

Pico.css: A sophisticated classless library that includes a great dark mode and accessible components. 🏔️

🔥 Which one is for you?
Need it fast? Use a Classless library (1-5).

Need it unique? Go Artistic (6-10).

Need it modern and clean? Go Attribute-Based or Utility (11-15).

The Vulnerability Scanner That Became the Vulnerability

The Story

A vulnerability scanner got hacked.

Then the hackers used it to poison one of the most popular AI libraries on the planet.

That happened last week.

Here’s what went down:

March 19 — TeamPCP compromised Aqua Security’s Trivy, one of the most trusted open-source vulnerability scanners in DevSecOps.

March 23 — Using stolen credentials, they compromised Checkmarx’s KICS GitHub Actions and VS Code extensions.

March 24 — Those same credentials gave them access to LiteLLM’s CI/CD pipeline.

What Is LiteLLM?

LiteLLM is the universal AI gateway used across 36% of all cloud environments. It averages 95 million downloads per month. It sits between applications and 100+ AI providers—holding API keys for OpenAI, Anthropic, AWS, and Azure in one place.

The attackers published two backdoored versions to PyPI.

What the Malware Did

In just three hours, the malware:

  • Harvested SSH keys, cloud credentials, and Kubernetes secrets
  • Deployed privileged pods to every node in Kubernetes clusters
  • Installed a persistent backdoor polling for additional payloads
  • Swept cryptocurrency wallets and .env files

TeamPCP posted this on Telegram:

“These companies were built to protect your supply chains yet they can’t even protect their own.”

They also announced a partnership with LAPSUS$.

Let that land.

The Irony That Kills

Victim Their Job What Happened
Aqua Trivy Vulnerability scanner Got hacked
Checkmarx KICS Infrastructure as Code security Got hacked
LiteLLM AI gateway with 95M downloads Got backdoored

The companies selling supply chain security became the supply chain risk.

What This Means for Developers

If Trivy, KICS, and LiteLLM—with all their resources and visibility—can be compromised this way, what does that mean for the rest of us?

More importantly: What should we be asking our security tool providers right now?

I’m a cybersecurity student at UNIJOS, and I’ve been sitting with this question all week.

The Question I Keep Coming Back To

If you’re using security tools in your workflow—scanners, CI/CD integrations, AI libraries—what’s one thing you wish you knew about their security before you started using them?

Not asking for product pitches. Genuinely trying to understand how developers and security professionals are thinking about this.

Drop your thoughts in the comments. I’ll read every single one.

A Quick Reflection

This attack reinforced something for me:

Firewalls aren’t enough. Tools aren’t enough. Even the tools built to protect us need to be secured.

If we’re building on top of AI infrastructure, we have to start asking harder questions about the tools we trust—because right now, the attackers are asking the right questions.

Let’s learn together.

If you found this helpful, consider sharing it with someone who’s building on AI infrastructure. We need to have this conversation.