Quick Verdict

This comparison has an unusual answer: DeepSource and ESLint are not competitors – they are complementary tools designed for different stages of the development workflow. Comparing them head-to-head is like comparing a code review platform to an IDE plugin. Both improve code quality, but they operate at entirely different layers.
ESLint is a free, open-source JavaScript and TypeScript linter. It runs inside your editor as you type, provides real-time underlines for code issues, and enforces team conventions through the largest JavaScript plugin ecosystem in existence – over 2,900 npm packages covering React, Vue, TypeScript, accessibility, testing libraries, and much more.
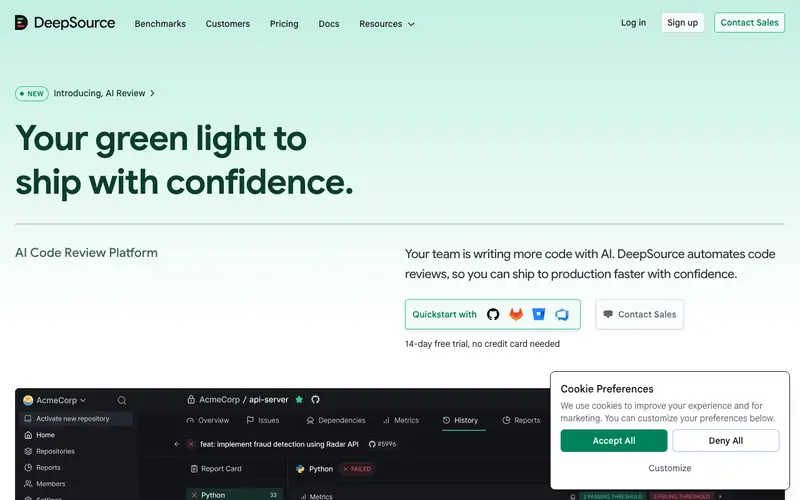
DeepSource is a cloud-hosted AI code review platform. It connects to your GitHub, GitLab, or Bitbucket repository and analyzes every pull request using 5,000+ static analysis rules, AI-powered code review across five quality dimensions, and Autofix AI that generates working fixes for nearly all detected issues. It supports 16 languages at GA level – including Python, Go, Java, Rust, and infrastructure-as-code formats – giving multi-language teams unified analysis in a single dashboard.
The short answer for JavaScript teams: ESLint in your editor, DeepSource on your PRs. ESLint catches bugs and style violations in real time as you write code. DeepSource catches deeper quality issues and security vulnerabilities before code is merged. If you are evaluating DeepSource as a replacement for ESLint, the answer is almost certainly “add DeepSource to your workflow, do not remove ESLint.”
Choose ESLint alone if you are a solo developer or very small team, you work exclusively in JavaScript/TypeScript, and you need zero cost with instant editor feedback. ESLint is the non-negotiable foundation for any JavaScript project.
Add DeepSource when you have a team of three or more developers, you need multi-language analysis beyond JavaScript, you want AI-powered code review with structured feedback on every PR, or you need automated fix generation that goes beyond ESLint’s deterministic auto-fix.
At-a-Glance Comparison
| Category |
DeepSource |
ESLint |
| Type |
Cloud code quality and AI review platform |
JavaScript/TypeScript linter |
| Languages |
16 GA (Python, JS, TS, Go, Java, Ruby, Rust, C#, PHP, Scala, Dart, Shell, SQL, Docker, Terraform, Ansible) |
JavaScript, TypeScript (plugins add JSX, Vue, Svelte) |
| Total rules |
5,000+ across all supported languages |
~300 core + thousands via community plugins |
| Runs in |
Cloud (PR analysis via webhooks, async) |
Editor (real-time), CLI, pre-commit hooks, CI |
| Real-time editor feedback |
IDE plugins for VS Code, IntelliJ, PyCharm |
Native – runs as you type with zero delay |
| Quality gates |
Yes – configurable PR status checks |
No built-in quality gates |
| SAST (security scanning) |
Yes – OWASP Top 10, SANS Top 25 |
Limited – basic patterns via eslint-plugin-security |
| Taint / cross-file analysis |
Yes (AI review and security rules) |
No – single-file AST analysis only |
| SCA (dependency scanning) |
No |
No |
| Secrets detection |
Yes – 30+ services |
No |
| AI code review |
Yes – five-dimension PR report cards |
No |
| Auto-fix |
Autofix AI – LLM-powered, context-aware |
Deterministic rule-based auto-fix |
| Code health dashboards |
Yes – longitudinal trend tracking |
No |
| PR comments |
Yes – inline findings on pull requests |
No (CI integration posts comments manually) |
| Custom rules |
Supported |
Fully programmable in JavaScript |
| Plugin ecosystem |
DeepSource-curated rules |
Massive open-source npm ecosystem |
| Self-hosted |
Enterprise plan only |
N/A – runs locally by design |
| Free tier |
Free for individuals; Open Source plan for public repos |
Completely free and open source |
| Paid starting price |
$24/user/month (Team) |
$0 – no paid tier exists |
| Pricing model |
Per active contributor |
Free |
| Setup time |
Under 10 minutes (cloud, no server) |
Minutes (npm install + config) |
| Git platform integration |
GitHub, GitLab, Bitbucket |
Any CI/CD system |
Understanding the Core Difference: Platform vs Tool
Before diving into feature details, the most important thing to understand is the architectural difference between DeepSource and ESLint. This shapes everything from how you configure them to when they run to what they can and cannot detect.
ESLint is a local tool that runs where you are. ESLint is installed as an npm package in your project or globally on your machine. The VS Code extension runs ESLint in the editor, analyzing the current file on every keystroke and displaying findings as inline underlines with hover explanations. The CLI runs ESLint from the terminal or from a CI pipeline step. In all cases, ESLint runs in your environment – your machine, your editor, your CI runner. It has no external services, no dashboard, and no account.
DeepSource is a cloud platform that runs on your code. You connect your repository to DeepSource via OAuth. DeepSource’s cloud analysis engine runs on every commit and PR via webhooks. Findings are posted as PR comments and visible in the DeepSource dashboard. Analysis happens asynchronously – it does not block your CI pipeline. You access insights through a web interface that tracks quality trends across all your repositories over time.
The practical implication is significant. ESLint’s feedback arrives in milliseconds as you type – before you have even saved the file. DeepSource’s feedback arrives in minutes after you push code – after the PR is open. These are fundamentally different moments in the developer workflow, and they catch fundamentally different types of issues.
ESLint is optimized for fast, frequent, granular feedback at the code level. It tells you a variable is unused, a function lacks a return statement, or an import is ordered incorrectly – and it tells you the instant you make those mistakes. This tight feedback loop is what makes ESLint effective for enforcing code style and catching obvious bugs.
DeepSource is optimized for deep, structured analysis at the PR level. It looks at the full context of changes across the codebase, applies AI reasoning to evaluate code quality across five dimensions, generates intelligent fixes, and maintains a running picture of your code health over time. These capabilities require cloud-level processing that no local CLI tool can match.
What Is DeepSource?
DeepSource is an AI-native code analysis platform that has evolved from its origins as a precise static analysis tool into a full code review platform. Founded in 2019, it built its reputation on a single differentiator that matters most to developers: when DeepSource flags an issue, it is almost certainly real.
How DeepSource works
DeepSource connects to your repository via GitHub, GitLab, or Bitbucket. After adding a .deepsource.toml configuration file that specifies which analyzers to enable, DeepSource automatically analyzes every commit and pull request. Results appear as inline PR comments with explanations and, where possible, Autofix AI corrections that developers can apply with a single click.
The analysis engine runs two parallel passes on every PR. The first pass applies relevant rules from the 5,000+ rule database against changed code, then runs a post-processing framework that filters findings through explicit and implicit signals before surfacing them to developers. This filtering step is what delivers the sub-5% false positive rate – the engine detects more potential issues internally, but only surfaces the ones it has high confidence are genuine problems.
The second pass is the AI code review engine, which examines each PR through a different lens than static rules. The AI review detects novel issues, provides architectural feedback, and evaluates code against higher-level quality criteria. Each PR receives a structured report card with feedback across five dimensions: Security, Reliability, Complexity, Hygiene, and Coverage.
Key strengths of DeepSource
Sub-5% false positive rate. This is DeepSource’s signature differentiator and the most consistently cited advantage in user reviews on G2 and Capterra, where DeepSource holds a 4.8/5 overall rating. When developers trust that 95%+ of findings are real issues worth fixing, they engage with the tool rather than learning to ignore it. This behavioral change is what separates effective static analysis from expensive noise generators.
Multi-language support in a single platform. While ESLint is limited to JavaScript and TypeScript, DeepSource covers 16 languages at GA level. Teams running Python backends, Go microservices, Java APIs, or Rust services alongside JavaScript frontends get unified quality analysis in a single dashboard. Infrastructure-as-code languages – Terraform, Docker, and Ansible – are supported at GA, meaning cloud infrastructure gets the same analysis quality as application code.
Autofix AI. DeepSource’s Autofix AI uses large language models to generate context-aware fixes that analyze imports, related functions, and project-specific coding patterns. The fix looks like it was written by a team member, not generated from a template. DeepSource reports that Autofix AI can generate fixes for nearly all detected issues – a dramatic improvement over the earlier rule-based system that covered roughly 30% of issues. The Iterative Fix Refinement feature lets developers provide diff-level feedback to regenerate improved fixes.
Five-dimension PR report cards. Rather than presenting a flat list of findings, DeepSource organizes AI review feedback into five structured dimensions: Security, Reliability, Complexity, Hygiene, and Coverage. Each PR gets a report card that communicates overall quality at a glance. This is particularly valuable for code reviewers who need to quickly assess whether a PR is ready for merge without reading through dozens of individual findings.
Code health dashboards. The platform maintains longitudinal tracking of quality metrics across all repositories, showing issue trends, coverage changes, and maintainability scores over time. Engineering managers and leads can use these dashboards for sprint retrospectives, technical debt prioritization, and compliance reporting.
Security scanning. DeepSource provides vulnerability detection aligned with OWASP Top 10 and SANS Top 25, plus secrets detection for over 30 services. This is qualitatively more comprehensive than what ESLint’s security plugins can provide – DeepSource can trace data flows across files and understand security implications that single-file AST analysis cannot detect.
DeepSource Agents. Launched in 2025, DeepSource Agents observe every line written in the codebase, reason about changes with full context, and take autonomous action to secure code. Agents can create pull requests, manage CVEs, and identify cross-file security issues. This moves DeepSource from passive analysis toward proactive code security.
What Is ESLint?
ESLint is the de facto standard linter for JavaScript and TypeScript, created by Nicholas Zakas in 2013 and now maintained by the OpenJS Foundation. It analyzes source code to find problematic patterns, enforce coding conventions, and catch potential bugs before runtime. ESLint is installed on over 30 million VS Code instances and used by virtually every professional JavaScript project in existence.
How ESLint works
ESLint runs locally. In the editor, the VS Code extension runs rules in real time as you type, highlighting issues with red and yellow underlines, and providing fix suggestions through the quick-fix menu. As a CLI tool, it can be run from the terminal, in pre-commit hooks via Husky and lint-staged, and in CI/CD pipelines for enforcing code quality gates.
ESLint analyzes JavaScript and TypeScript by parsing each file into an Abstract Syntax Tree (AST) and then running visitor functions from each enabled rule against the AST nodes. This approach is fast – analyzing a single file takes milliseconds – and highly customizable through the rule API. In 2024, ESLint completed migration to the flat config system (eslint.config.js), replacing the legacy .eslintrc format.
Key strengths of ESLint
Real-time editor feedback with zero delay. This is ESLint’s defining advantage. The instant a developer writes a bug – a wrong comparison operator, an unused variable, a missing dependency in a React hook – ESLint highlights it with a red underline. No context switch, no CI wait, no PR comment. The problem is caught and fixed before the code is even saved. This tight feedback loop is what makes ESLint effective for code style and convention enforcement.
Massive plugin ecosystem. Over 2,900 npm packages extend ESLint for every framework, library, and use case imaginable. Core plugins include @typescript-eslint for TypeScript-specific rules, eslint-plugin-react and eslint-plugin-react-hooks for React best practices, eslint-plugin-import for module conventions, eslint-plugin-jsx-a11y for accessibility, eslint-plugin-jest for test coverage rules, and eslint-plugin-security for basic security patterns. Shared configurations like eslint-config-airbnb and @antfu/eslint-config give teams a comprehensive rule set with a single install.
Completely free with no limitations. ESLint has zero cost, forever, for any team size or codebase size. There is no premium tier, no usage limit, and no per-seat pricing. Every feature – the flat config system, all official plugins, the VS Code extension, the entire rule ecosystem – is MIT licensed and free. For individual developers, small teams, and open-source projects, this accessibility is unmatched.
Custom rule authoring in JavaScript. Teams can write custom ESLint rules in JavaScript to encode organization-specific conventions, detect team-specific anti-patterns, or enforce project-specific APIs. The rule API is well-documented and accessible to any JavaScript developer. Custom rules integrate seamlessly into the editor, the CLI, and CI – giving teams enforcement everywhere ESLint runs.
Pre-commit hooks integration. Running ESLint in pre-commit hooks via lint-staged provides a blocking gate before code is committed. Developers cannot push code with linting errors (unless they override the hook). This is a shift-left enforcement mechanism that catches issues before they ever reach a PR, reducing the volume of findings that DeepSource and other PR-level tools need to process.
Feature-by-Feature Deep Dive
Analysis scope and depth
This is the most fundamental difference between the two tools.
ESLint is optimized for breadth within JavaScript. With thousands of rules across the ecosystem – code style, best practices, framework conventions, accessibility, testing patterns, and basic security – ESLint provides the most comprehensive JavaScript-specific rule coverage available. No tool matches ESLint’s depth within the JavaScript/TypeScript ecosystem, particularly when you add framework-specific plugins.
The limitation is scope. ESLint analyzes one file at a time. It cannot trace data flow across files, understand how a function in auth.js is called from routes.js, or detect security vulnerabilities that span multiple modules. It has no understanding of runtime behavior, no awareness of dependency relationships, and no model of the full codebase. For catching multi-file issues – injection vulnerabilities, cross-component state management bugs, module interface mismatches – ESLint’s per-file analysis is insufficient.
DeepSource is optimized for depth across the codebase. The 5,000+ rule database applies analysis that considers full-file context, related code patterns, and cross-file relationships. The AI review engine goes further, evaluating PRs against higher-level quality criteria that no rule-based system can encode. Security scanning follows data flows across files to detect injection vulnerabilities that span multiple functions and modules.
The key insight is that ESLint and DeepSource catch different categories of issues. ESLint catches issues that are visible in a single file: unused variables, missing return statements, incorrect API usage, convention violations, and single-file security patterns like eval() usage. DeepSource catches issues that require codebase context: data flow vulnerabilities, architectural problems, quality trends across sprints, and security issues that span multiple files.
For JavaScript teams, the combined picture looks like this:
| Issue category |
ESLint |
DeepSource |
| Code style and conventions |
Primary strength |
Covered through JS/TS rules |
| Single-file bugs |
Immediate, in-editor |
At PR stage |
| Cross-file data flow issues |
Not possible |
Yes (AI review and security rules) |
| Security patterns (single-file) |
Basic via eslint-plugin-security |
Yes, OWASP-aligned |
| Injection vulnerabilities (cross-file) |
No |
Yes |
| Secrets detection |
No |
Yes (30+ services) |
| Code complexity metrics |
Limited (no-complexity rule) |
Five-dimension reporting |
| Trend analysis over time |
No |
Yes (code health dashboards) |
| Framework-specific best practices |
Exceptional (React, Vue, Angular, etc.) |
Good (framework-aware rules) |
| Infrastructure-as-code |
No |
Yes (Terraform, Docker, Ansible at GA) |
| Non-JS languages |
No |
Python, Go, Java, Ruby, Rust, and more |
Auto-fix capabilities
Both tools can automatically fix issues, but the sophistication of their fix systems is very different.
ESLint’s auto-fix is deterministic and reliable. Each rule that supports auto-fix applies a predefined, deterministic transformation. Adding a missing semicolon, removing a trailing comma, fixing import ordering, changing var to const – these fixes are simple, correct, and applied in milliseconds. ESLint’s auto-fix is the right tool for mechanical corrections that have one obvious, unambiguous answer.
The limitation of ESLint’s auto-fix is its simplicity. For issues that require understanding the surrounding context – what type a variable should be, what a better algorithm looks like, how to refactor a complex function – ESLint’s rule-based system cannot generate the fix. The rule flags the issue; the developer writes the fix manually.
DeepSource’s Autofix AI uses large language models to generate fixes that go far beyond mechanical transformations. When Autofix AI encounters a complex issue, it analyzes the surrounding code, imports, related functions, and project-specific patterns to generate a fix that looks like it belongs in the codebase. The difference is dramatic: ESLint auto-fix adds a semicolon; Autofix AI rewrites a vulnerable database query to use parameterized inputs, matching the patterns used throughout the rest of the project.
The Iterative Fix Refinement feature takes this further – developers can review a generated fix, provide feedback at the diff level, and ask DeepSource to regenerate an improved version. This creates a collaborative loop between the developer and the AI that produces fixes of genuinely production-ready quality.
In practice, both fix systems belong in your workflow. ESLint’s auto-fix handles the high-frequency, low-complexity corrections in milliseconds in the editor. DeepSource’s Autofix AI handles the complex, context-dependent fixes at the PR stage. Running both means the maximum number of issues get automatically remediated, leaving only the genuinely difficult problems for human attention.
Security capabilities
ESLint’s security coverage through eslint-plugin-security is surface-level. The plugin detects approximately 15 patterns: eval() usage, child_process.exec() with potentially unsanitized input, non-literal RegExp patterns, innerHTML and outerHTML assignments, and similar single-file patterns. These catches are useful as a baseline, but they catch only the most obvious, deliberate misuse of dangerous APIs within a single file.
The fundamental limitation is that ESLint analyzes each file independently. If user input arrives in req.body, passes through a validation middleware in middleware/validate.js, reaches a service function in services/user.js, and eventually lands in a SQL query in db/queries.js, ESLint cannot trace that path. It sees each file in isolation. The injection vulnerability exists across four files, and ESLint is architecturally incapable of detecting it.
DeepSource’s security analysis crosses file boundaries. The platform detects vulnerabilities aligned with OWASP Top 10 and SANS Top 25 – SQL injection, XSS, authentication bypasses, insecure cryptographic practices, and others – by analyzing data flows across the codebase, not just within individual files. The AI review engine adds another layer, detecting novel security patterns that rule-based analysis might miss.
DeepSource also provides secrets detection for over 30 services – API keys, database credentials, authentication tokens, and private certificates accidentally committed to the repository. This is a category of security issue that ESLint has no mechanism to address.
The security gap between the two tools is significant for production applications. If your JavaScript application handles user input, makes database queries, or stores sensitive data, ESLint’s security coverage is insufficient as a standalone security layer. DeepSource – or a dedicated SAST tool like Semgrep – is needed to catch the cross-file vulnerabilities that represent the most common and most dangerous web application security issues.
For teams interested in a pure security scanner comparison, see our DeepSource vs Semgrep analysis and the Semgrep vs ESLint comparison, which covers the SAST vs linter dynamic in detail.
Language and framework support
ESLint is the definitive JavaScript and TypeScript tool. No tool matches its depth for those two languages. Through plugins, ESLint extends to JSX, TSX, Vue single-file components, Svelte components, and Astro files. The rule ecosystem provides framework-specific coverage that no general-purpose static analysis platform can replicate in depth – React hook rules, Vue option API rules, Angular-specific patterns, Next.js conventions, and thousands more.
The limitation is exclusivity. ESLint does not analyze Python, Java, Go, Rust, or any other language. It does not scan Terraform files, Dockerfiles, or Ansible playbooks. For full-stack teams with polyglot codebases, ESLint covers only the JavaScript layer.
DeepSource covers the full stack. Sixteen languages at GA – including Python, Go, Java, Ruby, Rust, and C# – plus infrastructure-as-code formats (Terraform, Docker, Ansible) give multi-language teams a single quality platform across their entire codebase. A Python FastAPI backend, a Go microservice, a TypeScript React frontend, and a Terraform infrastructure layer can all be analyzed in the same DeepSource dashboard with the same sub-5% false positive rate.
For pure JavaScript teams, the language gap does not matter. If your entire technology stack is JavaScript and TypeScript, ESLint’s ecosystem depth is a genuine advantage that DeepSource cannot match. DeepSource’s JS/TS analysis is strong and covers frameworks like React and Node.js, but ESLint’s plugin ecosystem with over 2,900 packages is unrivaled for JavaScript-specific convention enforcement.
For full-stack teams, DeepSource’s multi-language support is a key differentiator. Having Python, Go, and JavaScript analysis in a single dashboard – with unified severity ratings, code health trends, and Autofix AI across all languages – reduces the toolchain complexity of managing separate linters for each language.
Pricing comparison
| Tier |
DeepSource |
ESLint |
| Free |
Individual developers – public and private repos |
$0 – entire tool is free |
| Open Source |
$0 – public repos only, 1,000 analysis runs/month |
N/A |
| Team / Paid |
$24/user/month – all features including AI review, Autofix AI, security scanning |
N/A – no paid tier |
| Enterprise |
Custom – self-hosted, SSO/SCIM, dedicated support |
N/A |
The cost comparison is straightforward: ESLint is free at any scale. DeepSource’s Team plan at $24/user/month includes AI code review, Autofix AI, security scanning, code health dashboards, and IDE integrations. For teams of five, that is $120/month. For teams of twenty-five, it is $600/month.
The relevant question is not ESLint vs DeepSource on cost – ESLint is free and most teams will continue using it regardless. The question is whether DeepSource’s value justifies its cost for your team. Teams that consistently cite DeepSource as worth the price point to three benefits: time saved through Autofix AI fixing issues that would otherwise require manual refactoring, security issues caught at the PR stage before they reach production, and the signal quality improvement from sub-5% false positives creating genuine developer engagement with findings rather than learned helplessness.
Cost comparison by team size (DeepSource Team plan):
| Team size |
Monthly cost |
Annual cost |
| 5 developers |
$120/month |
$1,440/year |
| 10 developers |
$240/month |
$2,880/year |
| 25 developers |
$600/month |
$7,200/year |
| 50 developers |
$1,200/month |
$14,400/year |
DeepSource uses committer-based billing, which means you pay only for developers who actively push code to analyzed repositories in a given month, not for every seat in your organization. For teams with a mix of active committers and occasional contributors, this billing model can reduce the effective per-seat cost significantly.
For a detailed DeepSource pricing breakdown, see our DeepSource pricing guide. For comparison with another platform that occupies similar pricing territory, see the DeepSource vs Codacy comparison.
IDE integration
ESLint’s IDE integration is the gold standard for JavaScript development. The VS Code extension runs rules in real time as you type – not on save, not on build, but on every keystroke. Issues appear as red underlines with hover explanations and quick-fix suggestions accessible through the lightbulb menu or Ctrl+. shortcut. The experience is instantaneous. Extensions are available for JetBrains IDEs, Vim/Neovim, Sublime Text, Atom, and virtually every other editor. For JavaScript developers, ESLint’s editor integration is the primary interaction model.
DeepSource’s IDE integration is supplementary. Plugins for VS Code, IntelliJ IDEA, and PyCharm provide real-time feedback as developers write code. The IDE integration surfaces DeepSource’s high-confidence, low-noise findings directly in the editor, catching issues before they reach the PR stage. This is a useful shift-left feature, but the editor experience is not as seamless as ESLint’s native integration. Findings appear on save rather than on every keystroke, and the plugin is more resource-intensive.
The recommended workflow is clear: ESLint in the editor for real-time JavaScript/TypeScript feedback, DeepSource at the PR stage for deep analysis across all languages. DeepSource’s IDE plugin is a valuable supplement for developers who want to catch DeepSource findings earlier in the workflow, but it does not replace ESLint’s editor experience.
CI/CD integration
ESLint in CI is a standard practice. Running eslint . (or a targeted path) in your CI pipeline enforces code quality at the push level. Failing the ESLint step blocks PRs from merging with linting errors. This is typically configured in GitHub Actions, GitLab CI, CircleCI, Jenkins, or any CI system through a simple command-line step. ESLint’s CI integration is completely free and requires no external services.
DeepSource’s CI integration works differently. Rather than running as a CI pipeline step, DeepSource connects via webhooks – when code is pushed to a connected repository, DeepSource’s cloud engine analyzes it asynchronously and posts results as PR comments and status checks. This “pipeline-less” architecture means DeepSource does not add time to your build pipeline. The trade-off is that results arrive asynchronously rather than blocking the pipeline directly.
DeepSource does provide a CLI for teams that want to integrate it explicitly into CI pipelines. This allows teams to configure DeepSource as a required status check that blocks PR merging when new issues are introduced.
Quality gates in DeepSource can be configured to block PRs that introduce new issues or fail to meet quality thresholds. While ESLint enforces coding conventions at the file level, DeepSource’s quality gates enforce overall code health standards at the PR level – including security findings, complexity thresholds, and coverage requirements that go beyond what ESLint’s per-file analysis can enforce.
When to Use Each Tool
Use ESLint when
Any JavaScript or TypeScript development. ESLint is the non-negotiable foundation for JavaScript development. There is no scenario where a JavaScript team should not have ESLint configured. It is free, takes minutes to set up, provides instant editor feedback, and catches the vast majority of code style and convention issues at the earliest possible point.
You need framework-specific convention enforcement. ESLint’s plugin ecosystem – particularly eslint-plugin-react, eslint-plugin-react-hooks, eslint-plugin-vue, @typescript-eslint, and eslint-plugin-import – provides convention enforcement depth that no platform tool can replicate. If your team has specific React patterns to enforce, Next.js conventions to follow, or TypeScript strictness requirements to maintain, ESLint plugins handle this better than any other tool.
You work with JavaScript-only tooling and zero budget. Solo developers, open-source projects, and teams with no tools budget can get exceptional JavaScript code quality enforcement at zero cost with ESLint, Prettier, and a good shared configuration.
You need pre-commit enforcement. ESLint’s integration with Husky and lint-staged provides blocking pre-commit hooks that prevent code with linting errors from being committed. This enforcement mechanism operates before code ever reaches a PR, which is earlier in the workflow than any cloud platform can intercept it.
Use DeepSource when
You have a team and want PR-level quality gates. Once you have multiple developers contributing to a shared codebase, you need quality enforcement at the PR stage that catches issues before they are merged. ESLint in CI can enforce linting, but DeepSource adds deeper analysis, security scanning, AI review, and Autofix AI that goes far beyond what a linting step provides.
Your stack includes languages beyond JavaScript. Any team with Python, Go, Java, Ruby, Rust, or infrastructure-as-code in their stack benefits from DeepSource’s multi-language analysis. ESLint cannot analyze these languages. DeepSource can analyze the entire stack in a single dashboard with the same quality standards across all languages.
Security scanning is a requirement. If your application handles sensitive data, processes authentication, or makes database queries – and especially if your organization has compliance requirements – ESLint’s eslint-plugin-security is insufficient for serious security coverage. DeepSource’s OWASP-aligned security scanning, cross-file vulnerability detection, and secrets detection for 30+ services provides the security coverage that production applications require.
You want automated remediation at scale. Autofix AI’s ability to generate context-aware fixes for nearly all detected issues transforms DeepSource from a problem identifier into a problem solver. Teams managing large codebases with technical debt find automated remediation particularly valuable – DeepSource can generate hundreds of fixes across a codebase that would take weeks to address manually.
You need code health visibility over time. Engineering managers and tech leads benefit from DeepSource’s longitudinal trend tracking – seeing whether code quality is improving or degrading across sprints, identifying repositories with growing technical debt, and tracking security posture over time. ESLint has no concept of historical trends; it only knows the current state of the code.
Combining DeepSource and ESLint
Most professional teams run both tools, and the integration is seamless. They do not conflict because they operate at different stages with different scopes.
The recommended workflow:
-
Developer writes code. ESLint highlights style issues, potential bugs, and convention violations in real time in the editor. Issues are fixed before code is saved.
-
Developer commits code. Pre-commit hook runs ESLint via lint-staged and blocks commits with linting errors. Only clean code reaches the repository.
-
Developer pushes code. DeepSource’s cloud engine analyzes the changes against the full codebase. AI code review runs in parallel with static analysis.
-
DeepSource posts results. PR comments appear with inline findings, Autofix AI fix suggestions, and a five-dimension report card. Security issues are flagged with OWASP references.
-
Developer reviews and applies fixes. Autofix AI suggestions can be applied with a single click. ESLint auto-fix handles remaining cosmetic issues.
-
PR is merged. Code health dashboards update with new metrics.
Configuration is independent. ESLint is configured through eslint.config.js (flat config) or .eslintrc (legacy). DeepSource is configured through .deepsource.toml. The two configurations do not interact – you maintain both separately. There is some overlap in what both tools detect for JavaScript and TypeScript, but the overlap produces reinforcing coverage rather than redundant noise. DeepSource’s post-processing framework ensures its JavaScript findings remain within the sub-5% false positive threshold even when covering territory also covered by ESLint.
ESLint findings do not appear in DeepSource. Unlike Codacy, which embeds ESLint as an analysis engine and shows ESLint findings in its dashboard, DeepSource runs its own JavaScript and TypeScript analyzers independently. If a finding is caught by ESLint in the editor and fixed before commit, it simply will not appear in DeepSource because the code is clean when analyzed. If a finding is only in DeepSource’s rule set (a cross-file security issue, for example), ESLint will never catch it. The tools cover different ground.
Alternatives to Consider
If you are evaluating the broader landscape beyond just DeepSource and ESLint, several tools are worth knowing about.
SonarQube is the enterprise-grade alternative to DeepSource as a platform tool. It provides 6,500+ rules across 35+ languages, the most mature quality gate system available, free self-hosted deployment through the Community Build, and battle-tested enterprise tooling. SonarQube’s Community Build is free and can be self-hosted with no contributor limits – making it compelling for teams with strict data residency requirements or limited budgets for cloud tools. The trade-offs are operational complexity (requires server infrastructure), a dated user interface, and slower scan times. SonarQube also runs its own JavaScript analyzer that covers similar ground to ESLint – so teams using SonarQube may find less need for ESLint in CI (though ESLint in the editor remains valuable). For a detailed breakdown, see our SonarQube vs ESLint comparison.
Codacy is a closer alternative to DeepSource in the cloud-hosted code quality space. At $15/user/month – half of DeepSource’s Team plan price – Codacy covers 49 languages with SAST, SCA, and secrets detection. Notably, Codacy actually embeds ESLint as one of its analysis engines for JavaScript, meaning your ESLint findings appear in Codacy’s dashboard. If you want ESLint analysis combined with platform-level features at the lowest price, Codacy is worth evaluating. The trade-offs are a higher false positive rate (requiring configuration tuning) and less sophisticated Autofix AI compared to DeepSource. See our Codacy vs ESLint comparison and DeepSource vs Codacy comparison for detailed breakdowns.
Semgrep is the strongest alternative if your primary concern is security scanning rather than code quality. Semgrep’s YAML-based rule authoring is the most developer-friendly in the SAST industry, its Pro engine performs cross-file taint tracking that catches injection vulnerabilities spanning multiple modules, and the open-source CLI is free for commercial use. Semgrep pairs excellently with ESLint – ESLint for code quality, Semgrep for security – in teams where security scanning is a primary requirement. The full platform is free for up to 10 contributors. See our Semgrep vs ESLint comparison and DeepSource vs Semgrep comparison for details.
Snyk Code provides developer-first security scanning with exceptional IDE integration, SCA with reachability analysis, and container security. At $25/developer/month, it focuses exclusively on security rather than general code quality. If your team needs the most comprehensive security coverage – SAST, SCA, container, and IaC scanning in a single developer-centric platform – Snyk Code is worth evaluating alongside DeepSource.
Biome is an emerging ESLint alternative (not replacement for DeepSource) that combines linting and formatting in a single Rust-based tool. Biome is significantly faster than ESLint, achieves much of ESLint’s core coverage without the plugin ecosystem complexity, and handles TypeScript natively. Biome does not replace DeepSource – it is a linter that operates at the same level as ESLint. For teams frustrated with ESLint’s configuration complexity, Biome is worth evaluating as an editor-level tool.
For a broader view of the code quality platform landscape, see our DeepSource alternatives guide, our best code review tools for JavaScript roundup, and our best SAST tools 2026 comparison.
Verdict
The DeepSource vs ESLint comparison has a clear answer: these are not competing tools, and the right choice for most professional teams is to use both.
ESLint is the non-negotiable foundation for any JavaScript or TypeScript project. It is free, universal, and provides instant editor feedback that no cloud platform can replicate. No JavaScript team should ship code without ESLint configured with a solid set of rules and plugins. The ecosystem depth – particularly for framework-specific rules in React, Vue, TypeScript, and testing libraries – is unmatched.
DeepSource is the recommended platform addition for teams of three or more developers. Its sub-5% false positive rate means every PR finding is worth acting on. Autofix AI reduces manual refactoring time by generating context-aware fixes that go far beyond what ESLint’s deterministic auto-fix can produce. Multi-language support brings Python, Go, Java, and other stack components into the same quality analysis workflow. Security scanning aligned with OWASP Top 10 catches cross-file vulnerabilities that ESLint cannot detect.
If you are choosing where to invest first: configure ESLint immediately – it costs nothing and takes minutes. Add DeepSource when you have a team and want structured PR-level quality enforcement, automated remediation, and security scanning. The incremental investment in DeepSource at $24/user/month delivers compounding returns as the team grows and the codebase matures.
The one scenario where you might genuinely choose between them is if you are a solo developer evaluating whether to pay for DeepSource. In that case, ESLint plus a good shared configuration plus the free Semgrep Community Edition for security scanning gives you excellent coverage at zero cost. DeepSource’s individual free plan also provides basic analysis for solo developers. The paid Team plan’s value – AI review, Autofix AI, and code health dashboards – scales with team size.
For team environments, the verdict is unambiguous: ESLint in the editor, DeepSource on your PRs. They cover different stages of the development workflow, catch different categories of issues, and together provide the most comprehensive JavaScript code quality coverage available.
Further Reading
Frequently Asked Questions
Does DeepSource replace ESLint?
No. DeepSource does not replace ESLint for JavaScript and TypeScript teams. DeepSource is a cloud-hosted code quality platform that runs analysis via webhooks on every pull request, delivering findings in a centralized dashboard with AI-powered remediation. ESLint is a local linter that runs in your editor in real time as you type, catches style violations and potential bugs instantly, and enforces team conventions through a plugin ecosystem of over 2,900 npm packages. ESLint provides instant feedback at the moment of writing. DeepSource provides deeper analysis at the PR stage. Both serve different stages of the development workflow. Most professional JavaScript teams should use both.
Does DeepSource use ESLint internally?
DeepSource runs its own proprietary JavaScript and TypeScript analyzers with 5,000+ rules, not ESLint under the hood. Unlike platforms such as Codacy, which embed ESLint as one of their analysis engines, DeepSource built its own analysis engine. The upside is that DeepSource’s rules are tuned specifically for its sub-5% false positive rate goal. The trade-off is that you do not automatically get ESLint’s plugin ecosystem within DeepSource – your ESLint configuration and DeepSource configuration are separate and independent.
Is ESLint free?
Yes, ESLint is completely free and open source under the MIT license. There is no paid edition, no premium tier, and no usage limits. The entire ecosystem – ESLint core, the flat config system, community plugins like eslint-plugin-react and @typescript-eslint, and shared configurations like eslint-config-airbnb – is free to use in any project, commercial or otherwise. ESLint is maintained by the OpenJS Foundation. This is one of ESLint’s strongest advantages – there is zero cost regardless of team size, codebase size, or usage volume.
Is DeepSource free for JavaScript projects?
DeepSource offers a free plan for individual developers that covers both public and private repositories with basic static analysis. The Open Source plan is free for organizations working on public repositories, with 1,000 analysis runs per month included. The Team plan at $24/user/month includes all features – JavaScript and TypeScript analysis, AI code review with five-dimension PR report cards, Autofix AI, security scanning aligned with OWASP Top 10 and SANS Top 25, and code health dashboards. Teams that need self-hosted deployment or SSO require the Enterprise plan with custom pricing.
Can ESLint detect security vulnerabilities?
ESLint can detect some security issues through plugins like eslint-plugin-security and eslint-plugin-no-unsanitized. These plugins catch obvious patterns – eval() usage, innerHTML assignments, child_process.exec() with unsanitized input, and SQL string concatenation. However, ESLint cannot perform taint analysis, which means it cannot trace the flow of user-controlled input across multiple files to detect injection vulnerabilities that span function calls and module boundaries. For serious application security scanning, teams pair ESLint with a dedicated SAST tool like DeepSource, Semgrep, or Snyk Code.
Which tool has fewer false positives – DeepSource or ESLint?
DeepSource is specifically engineered for a sub-5% false positive rate across all its rules, including JavaScript and TypeScript analysis. This means that nearly every finding DeepSource surfaces is a genuine issue worth fixing. ESLint’s false positive rate varies significantly depending on which rules and plugins you enable. Well-tuned ESLint configurations with only deterministic rules have extremely low false positive rates. But enabling aggressive plugins or rules that rely on heuristics can introduce noise. Both tools can achieve low false positive rates, but DeepSource does it systematically and by default, while ESLint requires deliberate rule selection and configuration to achieve the same outcome.
Do I need both DeepSource and ESLint?
For most professional JavaScript and TypeScript teams, yes – running both provides the best coverage. ESLint runs in the editor in real time, catching bugs, style violations, and convention deviations as you write code. DeepSource runs at the PR stage, applying its 5,000+ rules, AI code review, and Autofix AI to provide structured five-dimension feedback and automated fix generation. ESLint catches issues before code is committed. DeepSource catches issues before code is merged. The tools operate at different stages and are complementary, not redundant.
What languages does DeepSource support beyond JavaScript?
DeepSource supports 16 languages at GA level: Python, JavaScript, TypeScript, Go, Java, Ruby, Rust, C#, PHP, Scala, Dart, Shell, SQL, Docker, Terraform, and Ansible. Beta support exists for C/C++, Swift, and Kotlin. This multi-language support is a significant advantage over ESLint, which only covers JavaScript and TypeScript. For full-stack teams working in Python backends, Go services, or infrastructure-as-code alongside JavaScript frontends, DeepSource provides unified analysis across the entire stack while ESLint covers only the JavaScript portion.
Can DeepSource analyze ESLint configuration files?
DeepSource does not analyze or import ESLint configuration files (.eslintrc or eslint.config.js). DeepSource uses its own .deepsource.toml configuration file to specify which analyzers to enable. The two tools have separate configurations and run independently. If you want both ESLint and DeepSource findings in your workflow, you configure them independently – ESLint through its config file and DeepSource through .deepsource.toml. DeepSource’s JavaScript and TypeScript rules cover similar ground to many ESLint rules but are implemented separately with its own tuning for false positive reduction.
How does DeepSource’s Autofix AI compare to ESLint’s auto-fix?
ESLint’s auto-fix is deterministic and rule-based – each rule that supports auto-fix applies a predefined transformation to the code. For example, adding missing semicolons, removing unused variables, or fixing import ordering. These fixes are reliable but simple. DeepSource’s Autofix AI uses large language models to generate context-aware fixes that analyze imports, related functions, and project-specific coding patterns. Where ESLint’s auto-fix handles cosmetic corrections, DeepSource’s Autofix AI can generate fixes for complex logical issues, security vulnerabilities, and multi-line refactoring challenges. The two fix systems complement rather than duplicate each other.
Should I use DeepSource or SonarQube alongside ESLint?
It depends on your priorities. If you want a modern cloud-hosted platform with low false positives, AI-powered code review, and automated remediation, choose DeepSource. If you want the broadest possible rule coverage, enterprise-grade quality gates, and free self-hosted deployment, choose SonarQube. Both pair well with ESLint in the development workflow. DeepSource is faster to set up (under 10 minutes, no server required), while SonarQube has a larger community, broader language support, and a free Community Build. See our SonarQube vs ESLint comparison for a detailed SonarQube breakdown.
What is the best JavaScript code quality stack in 2026?
For most professional JavaScript and TypeScript teams, the recommended stack is: ESLint with @typescript-eslint, eslint-plugin-react, and a shared config like @antfu/eslint-config for real-time editor linting; Prettier for code formatting via eslint-config-prettier; DeepSource for PR-level analysis with AI code review, Autofix AI, and security scanning; and optionally Semgrep for deeper custom security rules or SCA with reachability analysis. This stack gives you instant feedback during development (ESLint), consistent formatting (Prettier), deep PR analysis with automated remediation (DeepSource), and coverage for application security patterns (Semgrep). Total cost for a team of 10: $240/month for DeepSource plus $0 for ESLint, Prettier, and Semgrep (free for under 10 contributors).
Does DeepSource work with GitHub, GitLab, and Bitbucket?
Yes. DeepSource integrates with GitHub, GitLab, and Bitbucket for automatic pull request analysis. Setup requires connecting your Git platform account, selecting repositories, and adding a .deepsource.toml configuration file. Analysis runs automatically on every commit and PR via webhooks, with findings posted as inline PR comments. ESLint, by contrast, is not tied to any Git platform – it runs locally in the editor, in pre-commit hooks, or in any CI/CD system. Neither tool supports Azure DevOps, so teams on that platform should consider SonarQube or running ESLint directly in Azure Pipelines.
Originally published at aicodereview.cc


 YouTube’ın çocuklara yönelik hazırlanan yapay zeka videolarına izin vermesi tepki çekiyor. Uzmanlar, çocuklara zarar verebileceği gerekçesiyle bu tür videoların yasaklanmasını istiyor.

 Otomotiv Distribütörleri ve Mobilite Derneği (ODMD), bugün 2026’nın merak edilen mart ayı verilerini paylaştı. Türkiye otomobil ve hafif ticari araç toplam pazarı, 2026 yılı Ocak-Mart döneminde bir önceki yılın aynı dönemine göre %3,94 oranında daralarak 265.398 adet olarak gerçekleşti. Otomobil satışları, 2026 yılı Ocak-Mart döneminde geçen yıla göre %5,86 oranında daralarak 210.688 adet, hafif ticari araç pazarı ise %4,23 artarak 54.710 adet oldu. 2026 yılı Mart ayı binek araç ve hafif ticari araç pazarı 2025 yılı mart ayına göre %12,75 oranında daralarak 101.997 adet oldu. 2026 Mart ayında otomobil satışları bir önceki yılın aynı ayına göre %13,04 daralarak 79.857 adet, hafif ticari araç pazarı %11,69 daralarak 22.140 adet oldu. Otomobil ve hafif ticari araç pazarı 10 yıllık mart ayı ortalama satışlara göre %23,8 arttı. Binek araç pazarı, 10 yıllık mart ayı ortalama satışlara göre %24,3 artış gösterdi. Hafif ticari araç pazarı, 10 yıllık mart ayı ortalama satışlara göre %22,2 arttı. […]

 Tesla, şirket CEO’su Elon Musk’ın doğrulamasına göre Model S ve Model X üretimini sonlandırdı. Türkiye’de hiçbir zaman resmi olarak satılmayan araçlar temelde insansı robot Optimus’a yer açmak için rafa kaldırılıyor. Fremont fabrikasında Model S ve Model X’ten sonra açılacak boşluğu Optimus üretimiyle dolduracak olan Tesla, robotun üretime yakın versiyonunu ilk çeyrek bitmeden görücüye çıkarmaya hazırlanıyor. 2027’nin sonunda halka insansı robot satabilecek kapasiteye geleceklerini iddia eden Musk, Model S ve Model X hakkında yaptığı açıklamada, “Model S ve Model X programlarını artık sonlandırmanın vakti geldi; çünkü asıl geleceğimiz otonom sürüş üzerine kurulu. Bu yüzden, eğer bir Model S veya Model X almayı düşünüyorsanız sipariş vermenin tam zamanı.” ifadelerini kullanmıştı.
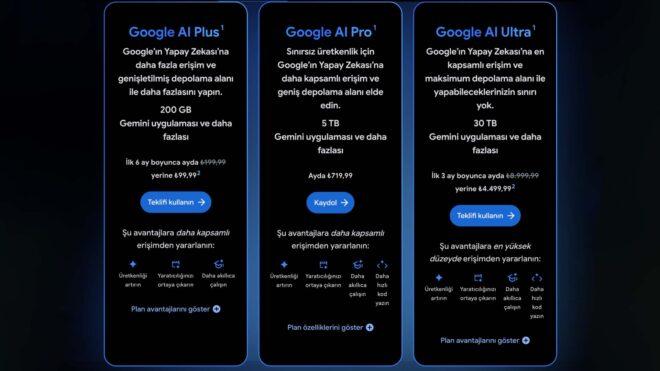
 Bugün önemli bir duyuru yapan Google, “AI Pro” aboneliğinin daha önce 2 TB olan depolama alanını herhangi bir fiyat artışına gitmeden 5 TB’a çıkardığını duyurdu. 2 Nisan 2025 itibarıyla Google, yapay zeka özelinde AI Plus, AI Pro ve AI Ultra olmak üzere üç farklı abonelik sunuyor. AI Plus için aylık 199 TL, AI Pro için aylık 719 TL, AI Ultra içinse aylık tam 8.999 TL abonelik ücreti açıklanıyor.

 Apple, geçtiğimiz saatlerde “DarkSword” güvenlik açığına karşı iOS 18.7.7 ve iPadOS 18.7.7 güncellemelerini yayımladı. iOS 26’ya geçemeyen ya da geçmek istemeyen kullanıcıları korumak isteyen şirket, cihazların bu yeni sürümlere vakit kaybetmeden güncellemesini öneriyor. DarkSword, iOS 18.4 ile 18.7 sürümleri arasındaki Apple cihazlarını hedef alan bir siber saldırı aracı ve kullanıcıların kötü amaçlı kod barındıran veya ele geçirilen web sitelerini ziyaret etmesiyle cihazlara sızılmasına olanak tanır. Bu sayede cihazlardan mesajlar, tarayıcı geçmişi, konum bilgileri ve kripto paralar dahil olmak üzere çok sayıda özel bilgi çalınabiliyor.