Integrating Mapbox with Angular (Part 1: Setup with TypeScript Support)

Integrating maps and adding interactivity to them can be a bit tricky at first. In this post, I’ll show you how to easily add a basic map using Mapbox in your Angular project.

Mapbox offers several ways to use their maps, but the most straightforward approach is through their official npm package: mapbox-gl.

Step 1: Install the Mapbox GL JS package

npm i --save mapbox-gl

Step 2: Include the Mapbox CSS in index.html
In your index.html file, inside the

tag, add the following:

<link href='https://api.mapbox.com/mapbox-gl-js/v3.13.0/mapbox-gl.css' rel='stylesheet' />

Don’t just copy-paste, always check Mapbox’s official docs for the latest version.

Step 3: Get Your Mapbox Access Token
Log into your Mapbox account and generate a public access token (pk.).
If you’re using Mapbox on a frontend-only app, a public token is enough.
For backend services, use a secret token (sk.), but never expose it in frontend code.

Step 4: Create Map Component
map.ts

import { AfterViewInit, Component } from '@angular/core';
import mapboxgl, { Map } from 'mapbox-gl';

@Component({
  selector: 'app-map',
  templateUrl: 'map.html',
  styleUrls: ['map.css']
})
export class MapComponent implements AfterViewInit {
map!: Map;
accessToken = ''; // Add your public token here
mapStyle = 'mapbox://styles/mapbox/streets-v12'

ngAfterViewInit(): void {
    mapboxgl.accessToken = this.accessToken;
    this.map = new mapboxgl.Map({
      container: 'map', // matches the div ID
      style: this.mapStyle,
      center: [20, 50], // [lng, lat]
      zoom: 3,
    });
  }
}

map.html

<div id="map"></div>

map.css

#map {
  width: 100%;
  height: 100%;
}

Important:
Make sure that the parent element of your map (and the map container itself) has a defined width and height.
If either of them is missing, Mapbox won’t know how big the map should be, and you might just see a blank box.

Example fix:
map.css

.map-section {
  width: 100vw;
  height: 100vh;
}

#map {
  width: 100%;
  height: 100%;
}

map.html

<section class="map-section">
  <div id="map"></div>
</section>

If your map still overflows or causes scrollbars, make sure you reset global margins and paddings:

styles.css

html,
body {
  margin: 0;
  padding: 0;
}

This is the most basic way to include Mapbox in your project.
In upcoming posts, I’ll show you how to make your map more interactive using real-world data.

Give Your AI Agent a Mock Server: mockd as an MCP Tool

Here’s a scene that plays out a dozen times a day if you use an AI coding agent: you ask it to build something that calls an external API — a payment service, a notification system, an OAuth flow — and it writes beautiful code. Clean types, proper error handling, good structure. Then it stops. It can’t actually run any of it, because the API it’s calling doesn’t exist locally and the agent has no way to spin one up.

So you get code that looks right but hasn’t been tested against anything. The agent wrote a Stripe integration without ever seeing a Stripe response. It built a webhook handler without ever receiving a webhook. You’re the one who has to close that gap, manually, every time.

I kept hitting this wall, and it’s the reason mockd ships with 18 MCP tools built in.

What MCP gives your agent

MCP — Model Context Protocol — is the standard that lets AI agents call external tools programmatically. Instead of just reading and writing files, your agent can interact with services, APIs, and infrastructure through a structured interface.

mockd implements an MCP server that exposes everything an agent needs to create mock endpoints, send test traffic, inspect request logs, verify call counts, and inject failure conditions. All over stdio, no API keys required for local use.

The agent doesn’t just develop against a mock server. It provisions and manages the mock server itself.

Setup: two minutes, zero config

Claude Code

Add this to your Claude Code MCP configuration:

{
  "mcpServers": {
    "mockd": {
      "command": "mockd",
      "args": ["mcp"],
      "env": {}
    }
  }
}

Cursor

In Cursor’s MCP settings (Settings → MCP Servers), add the same configuration:

{
  "mcpServers": {
    "mockd": {
      "command": "mockd",
      "args": ["mcp"],
      "env": {}
    }
  }
}

This works with any MCP-compatible agent — Claude Code, Cursor, GitHub Copilot, Windsurf, JetBrains AI. The mockd mcp command speaks standard MCP over stdio, so anything that implements the protocol can use it.

One detail worth calling out: mockd mcp automatically starts a background daemon if one isn’t already running. You don’t need to manually run mockd start first. The agent connects, mockd boots up on port 4280 (mock server) and 4290 (admin API), and everything just works. Pass --data-dir if you want project-level isolation between different codebases.

A real workflow: “Build me a payment service”

Here’s what actually happens when you ask an agent to build something against an external API, with mockd connected as an MCP tool.

You: “Build a payment service that integrates with Stripe. It should create charges, handle webhooks, and refund failed payments.”

The agent’s first move isn’t writing application code. It calls manage_mock to create the Stripe endpoints it knows it’ll need:

  • POST /v1/charges → returns a charge object with status: "succeeded"
  • POST /v1/refunds → returns a refund object
  • GET /v1/charges/:id → returns charge details
  • POST /webhook → a local endpoint for receiving Stripe events

Each mock returns realistic response structures — the agent knows what Stripe responses look like and configures the mocks accordingly.

Then it writes the application code. The payment service, the webhook handler, the refund logic. But here’s the key difference: it can test every function as it writes it. The code hits http://localhost:4280/v1/charges, gets back a real HTTP response with a real JSON body, and the agent can verify the code actually works.

After writing the code, the agent calls verify_mock to check that the right endpoints were called the expected number of times. It calls get_mock_invocations to inspect the exact request bodies its code sent. It finds a bug — the refund handler is sending charge_id instead of charge in the request body — fixes it, and tests again.

Then it pushes further. It calls set_chaos_config to inject intermittent 500 errors on the charge endpoint, reruns the payment flow, and discovers the retry logic doesn’t handle idempotency keys correctly. It fixes that too.

The agent just completed a development loop that would normally require you to set up a Stripe test account, manage API keys, deal with rate limits, and manually inspect webhook payloads. Instead, it did the whole thing itself in a few minutes.

The tools that matter most

mockd exposes 18 MCP tools total. You don’t need to memorize them — the agent discovers them automatically through the MCP protocol. But these are the ones that get used constantly:

manage_mock — The workhorse. Create, list, get, update, delete, and toggle mock endpoints. This is how the agent builds out the API surface it needs.

verify_mock — Assert that a mock was called a specific number of times. The agent uses this to confirm its code is actually making the requests it should be.

get_mock_invocations — Retrieve the full request details for every call that hit a specific mock — headers, body, query parameters, timestamps. This is how the agent debugs what its code is actually sending.

get_request_logs — View all traffic that hit the mock server, not just matched requests. Useful when the agent’s code is calling an endpoint that doesn’t have a mock yet.

set_chaos_config — Inject latency, errors, and connection failures. The agent uses this to test its own error handling and retry logic.

manage_state — Create, read, update, and delete stateful resources. When the agent needs a mock that remembers data between requests — like a user record that persists after creation — this is how.

import_mocks — Import mock endpoints from an OpenAPI spec, Postman collection, or other formats. If the API the agent is integrating with has a spec, this bootstraps the entire mock surface in one call.

Resources: read-only context for the agent

Beyond tools, mockd also exposes MCP resources — read-only data the agent can access for context. There are 5 static resource URIs (mock://config, mock://mocks, mock://logs, mock://state, mock://chaos) and 8 dynamic resource patterns for drilling into specific mocks, invocations, and state entries.

In practice, the agent uses resources to understand the current state of the mock server before making changes. It reads mock://mocks to see what’s already configured, checks mock://logs to see recent traffic, and uses that context to make informed decisions about what to create or modify next.

Why this changes the development loop

The fundamental shift is that your AI agent can now iterate on code and its test environment simultaneously. It’s not writing code in a vacuum and hoping it works when it hits a real service. It’s running a full development loop — write, test, inspect, fix, test again — with a real HTTP server returning real responses.

No rate limits. No API keys. No cost per request. No dependency on staging environments that might be down. No “works on my machine but I can’t test the integration” gaps.

The agent gets real HTTP responses, not simulated ones. The code it writes has been tested against actual network calls. When you review the PR, the integration code has already been through dozens of iteration cycles against a mock that behaves like the real thing.

That’s the gap I kept running into, and it’s the gap that disappears when your agent has a mock server it controls.

What to know

The MCP transport is stdio only right now — local use. There’s no remote or SSE transport, so this is a “your machine, your agent” setup. If you’re hoping to share a mock server across a team via MCP, that’s not how it works yet. The agent also can’t change server configuration through MCP. It can create and manage mocks all day, but things like port numbers, TLS settings, and server-level config still require CLI flags or a config file. That’s a deliberate boundary, not an oversight.

MCP tool responses can get chatty. If your agent has a small context window and you’ve got fifty mocks configured, calling manage_mock with action: "list" is going to eat a chunk of that context. Something to keep in mind if you’re working with a constrained model. Trim your mocks or use targeted get calls instead of listing everything.

One more thing: mockd mcp auto-starts a background daemon, which is convenient right up until you forget it’s running. The daemon doesn’t shut down when the MCP session ends. You’ll want to run mockd stop when you’re done, or you’ll find port 4280 still occupied next time you try to start something else there. Ask me how I know.

Get started

Install mockd, add the MCP config to your agent, and point it at a project that talks to external APIs. The agent will figure out the rest.

# Install mockd
curl -fsSL https://get.mockd.io | sh

# Start mockd — the MCP server auto-connects to this
mockd start

For detailed setup instructions, tool reference, and advanced configuration:

Trace AI: I Pointed a Camera at a Whiteboard. Notion Built the Entire System Design Doc.

This is a submission for the Notion MCP Challenge

What I Built

Every engineering team has the same graveyard: folders full of blurry whiteboard photos that were supposed to become

documentation. They never do. The meeting ends, the momentum dies, and that brilliant architecture sketch slowly rots in

someone’s camera roll.

Trace AI kills that problem dead.

Trace is an autonomous pipeline that watches your Notion Design Inbox, your Slack workspace, and your Discord server

simultaneously. The moment you drop in a whiteboard photo, Trace wakes up, reasons through the sketch using Claude vision,

and uses the official Notion MCP server to build a complete, structured system design document — entirely on its own.

Not a summary. Not a description. A full engineering document:

  • Mermaid.js architecture diagrams — flowchart and sequence, auto-generated from your ink
  • Component breakdown — every service, database, and load balancer identified and described
  • Security analysis — potential vulnerabilities flagged with recommendations
  • Bottleneck detection — performance risks spotted before they hit production
  • Actionable task cards — your handwritten To-Dos extracted and created as real entries in your Notion engineering board,
    with Priority, Category, and Status pre-filled
  • AWS cost estimates — rough monthly infrastructure projections for every component
  • Complexity scoring — team size and build timeline estimates

The entire process takes under 2 minutes from photo to polished doc.

In a large company, information decays. A project manager marks a project as “completed”, but the task database still has 5 open items. A budget page says ‘$10k’, but the invoice page says ‘$12k’. Usually, these contradictions stay hidden until something breaks.

Sentinel fixes this. Using the new Model Context Protocol (MCP), Sentinel acts as a “shared brain” across your entire workspace. It observes every edit and cross-references it against a set of global truths you define. If a contradiction occurs, Sentinel doesn’t just watch—it acts.

Video Demo

Show us the code

https://github.com/Boweii22/Arch-Vision
Deployed live on Render using Docker (nikolaik/python-nodejs for Python + Node.js in one container — required to run the MCP
server subprocess).

How I Used Notion MCP

This is where Trace AI goes beyond a simple API wrapper.

Trace spawns the official @notionhq/notion-mcp-server as a live subprocess using the MCP Python SDK. Claude then enters an

agentic tool-use loop — it doesn’t receive a rigid set of instructions and execute them blindly. It reasons about what

blocks to append, how to structure the content, and how to handle edge cases like long Mermaid diagrams that exceed Notion’s
2000-character rich text limit.

Whiteboard photo
↓
Claude Vision → Architecture Analysis (structured JSON)
↓
npx @notionhq/notion-mcp-server ←→ Claude agentic loop
↓ ↓
Notion Page created MCP tool calls:
(direct API, correct parent) – append_block_children
– create_database_page
– (up to 25 iterations)
↓
Tasks Database ← action items extracted
Projects DB ← relational mapping

MCP unlocks something that raw API calls can’t: judgment. Claude decides when to split a code block, how to format a

callout, when to skip a section because the data isn’t there. The document isn’t templated — it’s reasoned.

On top of that, Trace runs a bi-directional sync loop: if you manually edit the Mermaid diagram in Notion, Trace detects the change, re-analyzes the modified architecture, and updates the analysis sections to stay consistent with your edits. Your

Notion workspace stays alive, not static.

Three ways to trigger it — Notion Inbox, Slack, Discord — because great tools meet teams where they already live.

FOSDEM 2026: Intro to WebTransport – the Next WebSocket?!

Max Inden recently explored in a talk at FOSDEM 2026 how the upcoming WebTransport protocol and Web API enhance WebSocket capabilities. WebTransport seeks to provide, among other things, lower latency and transparent network switching for key use cases such as high-frequency financial data streaming, cloud gaming, live streaming, and collaborative editing.

By Bruno Couriol

Çin'den robot üretiminde dev adım: Yıllık kapasite 10 bine çıkarıldı

Çin’in Guangdong eyaletine bağlı Foshan kentinde faaliyete geçen tam otomatik insansı robot üretim hattı, teknoloji dünyasında büyük yankı uyandırdı. Yıllık 10 bin robota kadar üretim kapasitesine sahip olan hat, yüksek teknolojiyle donatıldı ve üretim sürecini büyük ölçüde hızlandırdı. Tek bir insansı robotun üretimi yaklaşık 30 dakika gibi kısa bir sürede tamamlanıyor.

NoteRunway: Because Your Notion Workspace Deserves an Elite Crew

Main Page

This is a submission for the Notion MCP Challenge

Table of Contents

  • What I Built

    • Explanatory Video
    • Introduction
    • The Backstory
    • The 7 Tools
  • Show us the code
  • How I Used Notion MCP

    • The Architecture
    • Why MCP and Not Just the API?
    • Destructive Tool Safety
  • The Tech Behind It

    • Multi-Provider AI (BYOK)
    • The Archive System
  • Wrapping Up

What I Built

Explanatory Video

Introduction

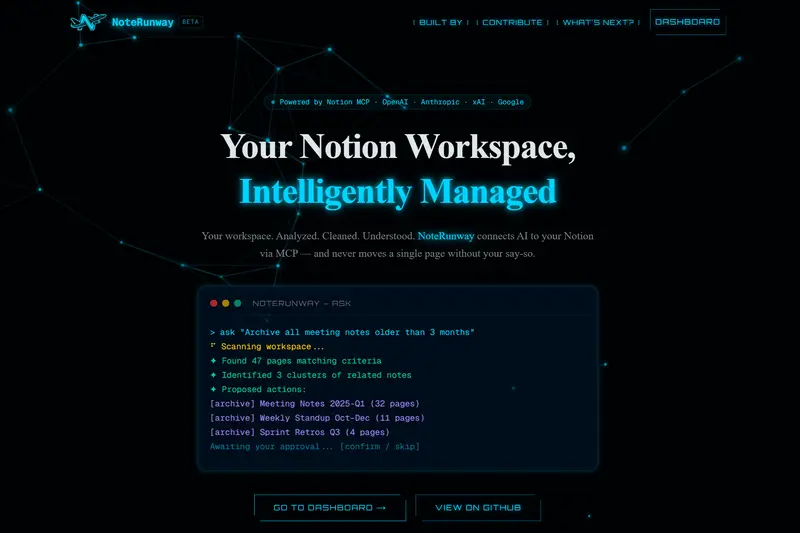
NoteRunway: an AI-powered workspace management tool that helps Notion power users clean up, audit, and command their workspace through a single interface.

Think of it as a flight control tower for your Notion workspace. It scans for problems you didn’t know you had, visualizes connections you couldn’t see, and lets you talk to your workspace in plain English.

🔗 Live Demo → noterunway.pilotronica.com

Main Page

The Backstory

I’m a Notion addict. Not the “I use it for grocery lists” kind, rather the “I have 400+ pages, nested databases inside databases, and a set of half-written ideas from 2 AM” kind.

It all started in 2020, when I decided it was time to bring more order into my life. My notes were scattered everywhere, there was some structure, but not nearly enough. I needed something more powerful… something more organized.

Then I discovered Notion and instantly knew it was exactly what I’d been looking for all along and didn’t know existed.

You know how it goes, at first, you’re fully motivated. Everything’s clean, structured, flawless. You’re convinced this time you’ll manage your notes perfectly.

But sooner or later, every power user ends up in the same place: orphaned pages from long-forgotten projects, duplicate notes written three times because the first two vanished into the void, and dead links leading to pages you archived months ago.

And somewhere in that chaos, there’s probably a note with an API key you definitely didn’t mean to paste and leave it forever. Have you ever pasted an API key or secret thinking “I’m gonna move it somewhere more secure later”? And that “later” doesn’t really come, does it?

I needed a tool that could see the bigger picture, something that could scan everything, something that’d surface what’s broken, and help me fix it without blindly deleting content or forcing me to manually comb through bajillion pages.

When the Notion MCP Challenge dropped, it clicked right away. I could build that tool, and give something back to the Notion community while I’m at it.

The 7 Tools

NoteRunway packs 7 workspace management tools, split between pure scanners and AI-powered analyzers.

Think of it as a crew of seven tools at your disposal, everything you need to keep your Notion workspace in top shape. Each one has a specific role: some scan your workspace to surface hidden issues, others go deeper to analyze patterns and give you smarter insights.

Together, they cut through the clutter, highlight what actually needs attention, and help you clean things up without the risk of losing something important. No guesswork, no endless manual checks, just a clear view of your workspace and the tools to keep it running smoothly.

📊 Workspace Health Dashboard

Dashboard

Your workspace at a glance. Total pages, top-level pages, recently edited, empty pages, and link density (how well-connected your workspace actually is).

It’s the “oh wow, I have how many empty pages?” moment.

🔍 Duplicate Detection

Duplicate Detection

This is where the AI earns its keep. NoteRunway fetches up to 100 pages with their content snippets, sends them to the LLM with a specialized system prompt, and gets back semantic duplicate groups with similarity scores.

Not just “same title” duplicates, it catches pages with different names but overlapping content. The AI picks a recommended “keep” version (⭐), and you choose which ones to archive.

🗑️ Garbage Collector

Garbage Collector

Rule-based detection across three categories:

  • Orphaned — parent page was deleted, child is floating in limbo
  • Empty — zero content blocks (you created it and… forgot)
  • Stale — untouched for 90+ days (configurable)

Dry-run mode is on by default. You review everything before anything moves.

🔗 Dead Link Detector

Dead Link Detector

Finds @mentions pointing to pages that no longer exist. Every broken mention is tracked back to its source page, so you know exactly where to fix it.

🔐 Sensitive Data Finder

Sensitive Data Finder

Two-phase security scanner:

Phase 1 (Regex): Scans all pages against 13 patterns: API keys (OpenAI, Anthropic, Stripe, AWS, GitHub), PEM keys, JWTs, database URLs, passwords, credit cards. Findings are always partially redacted, never exposing full values.

Phase 2 (AI Deep Scan): Optionally sends page text to the LLM to catch natural-language secrets that regex misses. Things like “the password is hunter2” or “login: admin/secret123”.

🕸️ Dependency Graph

Dependency Graph

An interactive force-directed graph of your entire workspace. Pages are nodes (colored by depth), connections are edges (solid for parent-child, dashed for @mentions). Orphaned pages glow red.

You can hover, click, collapse branches, and zoom around. It’s surprisingly therapeutic to see your workspace as a living network.

💬 Semantic Ask (Agentic Chat)

Semantic Ask

A natural language interface to your workspace, powered by an agentic AI loop.

Type something like “Find all pages about authentication and summarize them” or “Archive everything in the old-project folder.” The AI breaks it into tool calls (search, read, analyze), feeds results back into its context, and proposes structured actions for your approval.

It supports 5 action types: archive, create, rename, append, and update, all with a human-in-the-loop confirmation step. No action executes without your explicit “yes.”

Just a heads-up: be cautious with destructive actions. Avoid updating or archiving critical data.

This project is still in beta, and I don’t want you to risk losing important information. As you know, AI isn’t deterministic, and unexpected outcomes can happen.

Show us the code

Here’s the repository:

NoteRunway

AI-Powered Notion Workspace Management

Clean, organize, and command your Notion workspace with AI. Powered by the Notion MCP.

NoteRunway

🔗 Live Demo → noterunway.pilotronica.com

Next.js
TypeScript
Tailwind CSS
Notion MCP
Vercel AI SDK
License

Table of Contents

Overview

NoteRunway is a browser-based tool that helps Notion power users clean up, audit, and manage their workspace using a combination of deterministic scans and AI-powered intelligence via the Notion MCP.

It connects to your Notion workspace through OAuth, runs server-side analysis via Next.js API routes, and provides a cyberpunk-themed UI for reviewing findings and approving actions.

Core Principles

Principle Description
Zero Lock-in Your data stays in Notion. NoteRunway never stores workspace content.
Human-in-the-Loop No destructive action runs without explicit user approval.
Privacy First AI keys stored only in your browser (BYOK). Sent per-request to NoteRunway APIs and never persisted server-side.

…

How I Used Notion MCP

This is the core of the whole project. NoteRunway uses the Notion MCP Server as the execution layer for all workspace interactions in the Semantic Ask feature.

The Architecture

Browser → Next.js API (SSE) → Vercel AI SDK → MCP Client → notion-mcp-server (stdio) → Notion API

Here’s the flow:

  1. User sends a message in the Ask interface
  2. Vercel AI SDK processes it with streamText() and the selected LLM
  3. When the AI decides it needs workspace data, it calls tools: search_pages, get_page, get_page_content, run_analysis
  4. These tools route through MCPClient, which communicates with the Notion MCP server over stdio (JSON-RPC 2.0)
  5. The MCP server translates tool calls into Notion API requests and returns structured results
  6. Results feed back into the AI’s context for the next reasoning step (up to 10 steps)
  7. When the AI wants to make changes, it calls propose_actions, which streams proposed actions to the UI for human approval
  8. Only after the user confirms does the action execute via MCP

Why MCP and Not Just the API?

I use both. Here’s the split:

  • NotionClient (direct SDK) for bulk reads, workspace scans, pagination-heavy operations. It’s faster for fetching 400 pages than routing through MCP.
  • MCPClient (MCP server) for all writes like creating, archiving, renaming, updating pages. MCP provides a sandboxed execution layer with tool-level safety.

This hybrid approach gives me the speed of direct API access with the safety of MCP’s tool calling protocol.

Destructive Tool Safety

Any tool that modifies workspace data (patch, post-page, delete, move) requires an approved: true flag. The AI can propose actions, but nothing destructive runs without the user clicking “Execute.”

The Tech Behind It

Layer Technology Why
Framework Next.js 16 (App Router) Full-stack React with API routes
AI SDK Vercel AI SDK 6 Unified streaming + tool calling across 4 providers
MCP @notionhq/notion-mcp-server Notion workspace access via Model Context Protocol
Visualization React Flow 11 Force-directed graph for the dependency viewer
Validation Zod 4 Runtime schema validation for all API inputs/outputs
Styling Tailwind CSS 4 + shadcn/ui Cyberpunk aesthetic with accessible components

Multi-Provider AI (BYOK)

NoteRunway supports 4 AI providers with 13 models: OpenAI (GPT-5.4, GPT-5 Mini), Anthropic (Claude Opus 4.6, Haiku 4.5), xAI (Grok 4, Grok 3), and Google (Gemini 2.5 Pro/Flash).

Your API key stays in your browser’s localStorage. It’s sent per-request in an HTTP header, used once to create a provider instance, and discarded. NoteRunway’s server never stores, logs, or persists your key.

The Archive System

Every destructive action creates an audit trail:

NoteRunway Archive/
├── Duplicates/
│   └── [Audit Stub] Original Title
├── Garbage Collection/
│   └── [Audit Stub] Stale Page Name
└── Semantic Ask/
    └── [Audit Stub] Archived via Chat

Each audit stub contains a callout with the archive date, reason, and a faithful copy of the original content. The original page is soft-archived to Notion’s trash (recoverable for 30 days).

Nothing is ever truly deleted without a paper trail.

Wrapping Up

NoteRunway started as a personal itch, a messy workspace and a dev challenge deadline. It turned into something I’m going to use every week.

Building with the Notion MCP was a revelation. The ability to give an AI structured access to a workspace, with tool-level control over what it can read and write, opens up workflows that feel like magic. Ask a question, get an answer sourced from your actual pages. Propose a cleanup, review it, execute it. All in one flow.

If you’re a Notion power user drowning in pages, give it a spin: noterunway.pilotronica.com

And if you find an API key you forgot about in a meeting note… you’re welcome. 😄

Built with ☕ and too many late nights by Giorgi Kobaidze

I built a payment processing platform in Mexico with FastAPI — here’s what I learned after 10+ production deployments

I’ve been running FastAPI in production for a payment processing platform in Mexico for the past couple of years. We handle SPEI transfers (Mexico’s interbank transfer system), OXXO Pay (cash payments at convenience stores), and crypto on-ramps through multiple PSP integrations.
I wanted to share some real lessons from production that I don’t see discussed much.
The stack

FastAPI + async SQLAlchemy 2.0 + asyncpg
PostgreSQL + Redis (rate limiting + caching)
Docker → AWS ECS Fargate
GitHub Actions CI/CD
Alembic for migrations

Lesson 1: Webhook state machines save your life
When you process payments, you receive webhooks from payment providers. The naive approach is to just update the payment status directly. Don’t do this.
We built a webhook state machine where each payment goes through defined states: pending → processing → completed/failed. Every state transition is logged with timestamps. When a payment provider sends duplicate webhooks (and they will), the state machine just ignores transitions that don’t make sense.
This saved us during a reconciliation where we found timezone boundary issues between UTC and CST that were causing mismatches at midnight.
Lesson 2: Alembic migrations + ECS = restart loops
This one hurt. We had an Alembic migration that was taking too long, and ECS health checks were killing the container before the migration finished. Container restarts, migration starts over, health check fails again. Infinite loop.
Fix: Run migrations as a separate ECS task before deploying the new container. Never run migrations on startup in production.
Lesson 3: psycopg2 + LIKE queries will bite you
If you use % in LIKE queries with psycopg2 and parameterized queries, you need %% for literal percent signs when mixed with %s placeholders. We had a bug where a search endpoint was silently returning empty results.

Wrong

cursor.execute(“SELECT * FROM users WHERE name LIKE ‘%s%'”, (search,))

Right

cursor.execute(“SELECT * FROM users WHERE name LIKE %s”, (f”%{search}%”,))
Lesson 4: VARCHAR timestamps are a trap
One of our PSP integrations stores created_at as VARCHAR instead of TIMESTAMP. Every time we need to do date comparisons, we have to CAST(created_at AS TIMESTAMP). If you’re designing your schema, always use proper TIMESTAMP columns.
Lesson 5: Rate limiting is not optional
We got hit with a brute force attack on our auth endpoints within the first month. Redis-backed rate limiting with SlowAPI saved us. 5 attempts per minute on login, 20 requests per minute on general endpoints.
Lesson 6: Connection pooling matters more than you think
Our KYC service was falling over under load. The fix? Increasing the connection pool from 10 to 50 connections. That’s it. Went from random 500 errors to zero issues.
The architecture pattern that works
After iterating through multiple services, this is the pattern I settled on:
Repository (data access)
→ Service (business logic)
→ Endpoint (HTTP layer)
Each layer only talks to the one below it. Dependencies are injected via FastAPI’s Depends(). Testing becomes trivial — just mock the repository layer.

After refining this over 10+ deployments, I packaged the boilerplate into a starter kit with the full auth system, async DB, Docker, CI/CD, and tests. It’s on my Gumroad if anyone wants it. But the lessons above are the real value — the code is just the implementation.
I also deploy production AWS infrastructure for teams that don’t want to deal with Terraform/ECS — details here if that’s useful.
Happy to answer questions about running FastAPI in production, dealing with Mexican payment providers, or anything else.

Demystifying REST APIs: A Comprehensive Guide from Beginner to Architect

If you’ve spent more than a week in web development, you’ve encountered REST APIs. They are the glue of the modern internet, connecting front-end frameworks to back-end databases and enabling third-party integrations that we take for granted.

But there is a massive difference between “making an API call” and “understanding RESTful architecture.” Today, we’re going deep. We’ll start with the basics and move into the advanced patterns that separate junior developers from senior architects.

Want to dive deeper into full-stack patterns? Check out more resources at NeedleCode.

What Exactly is REST?

REST (Representational State Transfer) isn’t a protocol like HTTP; it’s an architectural style. Introduced by Roy Fielding in his 2000 dissertation, it was designed to make the web more scalable and flexible.

When an API is “RESTful,” it means it follows a specific set of rules that allow different systems to communicate seamlessly, regardless of the language they are written in.

The 5 Pillars of RESTful Design

To build a truly RESTful system, you must adhere to these constraints:

  1. Client-Server Separation: The UI (Client) and the Data (Server) are independent. You can swap your React frontend for a mobile app without changing a single line of your backend logic.
  2. Statelessness: This is the most critical constraint. The server does not store any “session” data about the client. Every single request must contain all the information (including credentials) needed to process it.
  3. Cacheability: Responses must define themselves as cacheable to prevent clients from requesting the same data repeatedly, reducing latency.
  4. Uniform Interface: This simplifies the architecture. Whether you are fetching a user or a product, the method of interaction (URLs, HTTP verbs) should feel consistent.
  5. Layered System: A client shouldn’t know if it’s connected directly to the database server or an intermediate proxy/load balancer.

The Developer’s Toolbox: HTTP Methods

In REST, we treat everything as a Resource. We manipulate these resources using standard HTTP verbs.

Method Action Idempotent?
GET Retrieve a resource Yes
POST Create a new resource No
PUT Update/Replace an entire resource Yes
PATCH Partially update a resource No
DELETE Remove a resource Yes

Pro-Tip: A common interview question is the difference between PUT and PATCH. Remember: PUT replaces the entire object, while PATCH only modifies the specific fields you send.

Deciphering the Server: Status Codes

As a dev, you need to speak “Status Code.” They tell you exactly what happened without parsing a huge JSON body.

  • 2xx (Success): 200 OK (Standard success), 201 Created (Success after POST).
  • 4xx (Client Error): 400 Bad Request (Your JSON is malformed), 401 Unauthorized (You forgot the token), 404 Not Found (Endpoint doesn’t exist).
  • 5xx (Server Error): 500 Internal Server Error (Your backend code crashed).

Moving to Advanced Territory

Once you’ve mastered the basics, you’ll face real-world challenges like performance and scale.

1. Pagination and Filtering

Never return SELECT * FROM users. If you have 100,000 users, your API will crash. Use query parameters:
GET /api/v1/orders?page=2&limit=50&status=shipped

2. Stateless Auth with JWT

Since REST is stateless, we don’t use server-side sessions. Instead, we use JSON Web Tokens (JWT). The client sends the token in the Authorization header with every request.

3. API Versioning

Change is inevitable. To avoid breaking your users’ apps, version your URL:
https://api.needlecode.com/v1/products
https://api.needlecode.com/v2/products

4. The “Final Boss”: HATEOAS

HATEOAS (Hypermedia as the Engine of Application State) means your API provides links to guide the client.

{
  "user_id": 123,
  "name": "Dev",
  "links": [
    { "rel": "self", "href": "/users/123" },
    { "rel": "delete", "href": "/users/123", "method": "DELETE" }
  ]
}

This makes your API self-discoverable, though it is often skipped in simpler internal projects.

Summary

REST APIs are popular because they are predictable and scalable. By mastering these constraints and methods, you aren’t just “coding an endpoint”—you’re designing a system.

What’s your biggest struggle with API design? Let’s chat in the comments!

For more deep dives into system architecture and backend development, visit us at NeedleCode.