8 API Design Mistakes That Will Haunt You in Production

APIs are permanent. That sounds dramatic until you’ve spent three weeks coordinating a breaking change across fourteen client teams while keeping the old endpoint alive in a compatibility shim nobody wants to maintain. Bad code can be refactored quietly. A bad API contract is a public debt that compounds interest every quarter.

Here are eight patterns drawn from designs that looked reasonable at the time, shipped to production, and then caused real pain.

Mistake 1: Not Versioning From Day One

The argument against early versioning sounds rational — you don’t know what will change yet. The problem is that “later” arrives the moment a single external client goes to production. At that point, adding versioning requires a migration, not just a decision.

URL path versioning (/v1/users, /v2/users) is the most explicit approach and the right default for most teams. It’s easy to route at the infrastructure level and visible in any log file. Stripe uses it for good reason: its clarity is a significant part of why Stripe’s API is considered one of the best-designed in the industry.

Mistake 2: Inconsistent Naming Conventions

Mixing camelCase and snake_case in the same API is documentation debt. It forces consumers to resolve the ambiguity by trial and error. The choice of convention matters less than the consistency — pick one and enforce it at the serialization layer, not through convention and hope.

Mistake 3: Returning Too Much Data by Default

An endpoint that returns everything it knows about a resource seems generous. In practice, it’s a performance liability. When your /users/{id} returns the profile, preferences, billing history, and activity log, every mobile client pays the serialization cost for data it immediately discards.

The N+1 problem is the related trap: an /orders endpoint that fetches a full customer object per order will issue one query for the order list and one per order for the customer. Pagination should be the default, not an option — and for time-series data, cursor-based pagination is more reliable than offset-based.

Mistake 4: Poor Error Responses

A generic 500 with no body is an absence of information dressed as a response. Stripe’s error format is the standard worth emulating: HTTP status code, machine-readable code field, human-readable message, and enough context to reproduce the problem. Validation errors should identify which fields failed and why, not just “validation failed.”

Mistake 5: No Rate Limiting

An API without rate limits is an invitation to unintentional denial-of-service. A client with a buggy retry loop can bring down your service for everyone. The sliding window counter algorithm is the right default: approximates the accuracy of a full sliding log with the memory efficiency of fixed windows. Expose limits in response headers (X-RateLimit-Remaining, Retry-After) so well-behaved clients can adapt.

Mistake 6: Ignoring Idempotency

Network requests fail in ways that are indistinguishable from success. A timeout — did the server process it before responding failed? For write operations, a blind retry can create duplicate charges or inconsistent state. Stripe requires idempotency keys for all POST requests that modify financial data. Implement them before you have external clients, not after your first support ticket about a duplicate charge.

Mistake 7: Authentication as an Afterthought

API keys are appropriate for server-to-server communication. OAuth 2.0 is appropriate when acting on behalf of users. JWT is a token format, not an authentication scheme — and treating it as automatically secure is how you end up with the none algorithm vulnerability. Make the authentication decision before your first external consumer, because retrofitting it is painful.

Mistake 8: Coupling Internal Models to API Responses

Serializing database rows directly into API responses is efficient until your next refactoring. Rename a column and you’ve shipped a breaking change. Add an internal field like password_hash and you risk accidental exposure. Data Transfer Objects — explicit serializer classes that define the shape of each response — create a deliberate boundary between internal implementation and external contract.

Three Key Takeaways

  1. The structural decisions that can’t wait are versioning, error format, authentication model, and the boundary between internal model and external contract. Retrofitting these is expensive. Everything else can be improved iteratively.
  2. API design failures are externalized. The pain of poor design is paid by consumers on a timeline you don’t control. That asymmetry justifies more upfront care than most internal engineering decisions.
  3. Study Stripe, GitHub, and Twilio. Not because they’re famous, but because their design choices are deliberate and documented. The patterns they use for consistency, pagination, error handling, and versioning exist for good reasons.

Read the full article at novvista.com for a detailed breakdown of each mistake, real implementation examples, and analysis of how Stripe, GitHub, and Twilio set the standard.

Originally published at NovVista

Zero-Downtime Deployments: Blue-Green, Canary, and Rolling Updates Explained

Every minute of downtime has a price tag. Gartner’s oft-cited figure of $5,600 per minute is from 2014 — adjusted for today’s always-on expectations, the real number for mid-market SaaS sits between $8,000 and $15,000. But the cost that never makes a spreadsheet is user trust. A customer who hits a 502 during checkout doesn’t file a support ticket. They leave.

The good news is that zero-downtime deployments are no longer the exclusive domain of teams with dedicated platform engineering. The tooling has matured. The bad news is that “zero-downtime” has become marketing language — the trade-offs, failure modes, and edge cases rarely get covered alongside the pretty diagrams.

The Three Strategies at a Glance

Blue-Green is the oldest and most intuitive. Two identical production environments: one (blue) serves live traffic while the other (green) runs the new version. Flip the load balancer. Instant switchover, instant rollback.

The trade-off is infrastructure cost — you need double the compute sitting idle. And if your app stores sessions in memory (it shouldn’t, but many do), the switchover drops every active session. Redis-backed sessions or JWT authentication eliminate this problem before it bites you.

Canary Releases take a more cautious path. Route a small percentage of traffic — say 5% — to the new version and watch error rates, p95 latency, and business metrics. Only if those hold steady do you proceed to 100%. This is the strategy that Google and Netflix champion, and for good reason: canary deployments catch problems that staging environments never surface, like subtle performance regressions under real load or edge cases hiding in user data your fixtures don’t cover.

Nginx handles weight-based splitting natively:

upstream app_backend {
    server 10.0.1.10:8080 weight=95;  # Stable
    server 10.0.1.20:8080 weight=5;   # Canary
}

Rolling Updates replace instances one-at-a-time — this is Kubernetes’ default strategy. The maxUnavailable and maxSurge parameters control how aggressive the rollout is. The key requirement is that both the old and new version can run simultaneously against the same database schema. That constraint surfaces the hardest part of zero-downtime deployments: database migrations.

The Problem Nobody Leads With

All three strategies share the same underlying challenge: during any deployment, old and new application code run concurrently against the same database. Add a NOT NULL column, rename a field, or drop a table — and you’ve just broken every instance still running the old code.

The expand-contract pattern is the answer. Instead of one breaking change, you make three non-breaking ones: add the new structure alongside the old (expand), deploy code that writes to both, then drop the old after the migration is complete (contract). It takes more deployments. It is the only reliable approach.

Three Key Takeaways

  1. Choose the strategy that matches your infrastructure reality. Blue-green requires double compute. Canary requires robust observability. Rolling updates require schema backward compatibility. Pick the trade-off you can actually sustain.

  2. Observability is a prerequisite, not a nice-to-have. Canary deployments are only valuable if you’re watching the right metrics: not just error rates, but p99 latency, business conversion, and resource consumption on new instances.

  3. The database is the hard part. Any zero-downtime deployment strategy is undermined by schema changes that break the running application. Treat migrations as a separate, careful process — never as an afterthought bundled into the same deployment.

Read the full article at novvista.com for complete Nginx, HAProxy, and Kubernetes configuration examples, plus a detailed breakdown of when each strategy makes sense for your team size and infrastructure.

Originally published at NovVista

Federal Judge Blocks Pentagon’s Attempt to Label Anthropic a National Security Threat

Federal Judge Blocks Pentagon’s Attempt to Label Anthropic a National Security Threat

In a significant ruling, a federal judge in San Francisco has blocked the Pentagon and the Trump administration from enforcing a national security designation against Anthropic, an artificial intelligence (AI) company that refused to remove safety restrictions from its Claude models. This decision has far-reaching implications for the development and deployment of AI technology, and we’ll dive into the details of what this means for the industry and its stakeholders.

The Background: Anthropic’s Refusal to Comply with Safety Restrictions

Anthropic, a leading AI company, has been at the forefront of developing advanced language models, including its popular Claude model. However, the company has been under pressure from the Trump administration to remove certain safety restrictions from its models, which would allow them to be used by federal agencies without any limitations. The restrictions in question were designed to prevent the misuse of AI technology, particularly in sensitive areas such as national security and defense.

The Court’s Ruling: A Victory for Anthropic and the AI Community

U.S. District Judge Rita Yungkurth issued a preliminary injunction, blocking the Pentagon and the Trump administration from enforcing the national security designation against Anthropic. The ruling is a significant victory for the AI company, which had been facing intense pressure to comply with the administration’s demands. The court’s decision is also a major win for the AI community, which has been advocating for the responsible development and deployment of AI technology.

What This Means for the AI Industry

The court’s ruling has significant implications for the AI industry, particularly in the areas of national security and defense. The decision sends a strong message that AI companies will not be forced to compromise on their values and principles in order to comply with government demands. This is a major victory for the AI community, which has been pushing for greater transparency and accountability in the development and deployment of AI technology.

Key Takeaways

  • The court’s ruling is a significant victory for Anthropic and the AI community, which has been advocating for the responsible development and deployment of AI technology.
  • The decision sends a strong message that AI companies will not be forced to compromise on their values and principles in order to comply with government demands.
  • The ruling has significant implications for the AI industry, particularly in the areas of national security and defense.
  • The decision highlights the importance of transparency and accountability in the development and deployment of AI technology.

Conclusion

The court’s ruling is a major victory for the AI industry, which has been facing intense pressure to comply with government demands. The decision sends a strong message that AI companies will not be forced to compromise on their values and principles in order to comply with government demands. As the AI industry continues to evolve and grow, it’s essential that we prioritize transparency and accountability in the development and deployment of AI technology. The court’s ruling is a significant step in the right direction, and we can expect to see more developments in this area in the coming months and years.

Source: news.bitcoin.com

contextzip gain –graph: Watch Your Daily Savings Grow

After a week of using ContextZip, run:

$ contextzip gain --graph

ContextZip Savings Report
═══════════════════════════

Daily:
Mon ████████████░░░░░░░░  31,204 chars (87 commands)
Tue ██████████████████░░  52,891 chars (142 commands)
Wed ████████████████░░░░  44,123 chars (118 commands)
Thu █████████████░░░░░░░  38,902 chars (104 commands)
Fri ██████████████████████ 61,203 chars (167 commands)
Sat ████░░░░░░░░░░░░░░░░  12,891 chars (34 commands)
Sun ██░░░░░░░░░░░░░░░░░░   8,204 chars (21 commands)

Week total: 249,418 chars saved (673 commands)
Avg per command: 370 chars saved
Top category: npm (42% of savings)

Concrete numbers. Daily breakdown. Which category of commands saves the most.

What the Graph Tells You

Spike days are build-heavy days. Friday at 61K saved means lots of builds and test runs. Saturday at 12K means light coding.

Top category shows where your noise comes from. If npm is 42% of your savings, your JavaScript projects are the noisiest. If Docker is the top, you’re doing lots of container work.

Average per command helps you understand the baseline. 370 chars per command means most commands have moderate noise. If it’s 1,000+, you’re running very noisy commands regularly.

Monthly Rollup

$ contextzip gain --month

March 2026: 1,247,891 chars saved
             3,421 commands filtered
             Avg: 365 chars/command
             Peak day: Mar 14 (89,204 chars)

Over a month, the savings add up to millions of characters — hundreds of thousands of tokens. At current AI pricing, that’s measurable cost savings.

Try It

cargo install contextzip
eval "$(contextzip init)"

Use it for a week. Then run contextzip gain --graph and see your own numbers.

GitHub: github.com/contextzip/contextzip

Part of the ContextZip Daily series. Follow for daily tips on optimizing your AI coding workflow.

Install: npx contextzip | GitHub: jee599/contextzip

Simulate Before You Execute: Dry-Run API for Trading Bots

Your trading bot spotted a 3% arbitrage opportunity between Jupiter and a centralized exchange. By the time you’ve simulated the trade, calculated slippage, and confirmed gas costs, the opportunity vanished. Your bot needs to make split-second decisions, but one wrong transaction can drain your entire balance.

Why Simulation Matters for Trading Bots

In algorithmic trading, execution speed determines profitability. But speed without safety is bankruptcy waiting to happen. A misconfigured bot can approve unlimited tokens to malicious contracts, execute trades at terrible prices due to sandwich attacks, or drain funds through reentrancy exploits.

Traditional approaches force you to choose: either simulate transactions using fork testing (slow, complex setup) or execute blindly and hope for the best (fast, but dangerous). Neither works for production trading bots that need millisecond decision-making with ironclad risk controls.

Dry-Run API: Test Every Trade Before Execution

WAIaaS provides a dry-run API that simulates any transaction without spending gas or moving funds. Your trading bot can validate trades, check slippage limits, and verify gas costs before committing real capital.

Here’s how your Jupiter arbitrage bot validates a swap before execution:

curl -X POST http://127.0.0.1:3100/v1/actions/jupiter-swap/swap 
  -H "Content-Type: application/json" 
  -H "Authorization: Bearer wai_sess_<token>" 
  -d '{
    "inputMint": "So11111111111111111111111111111111111111112",
    "outputMint": "EPjFWdd5AufqSSqeM2qN1xzybapC8G4wEGGkZwyTDt1v",
    "amount": "1000000000",
    "dryRun": true,
    "slippageBps": 50
  }'

The simulation returns the exact output amount, effective price, and fee breakdown without executing the trade. If the numbers look good, remove "dryRun": true and execute the same request for real.

This works across all 14 DeFi protocols integrated into WAIaaS: Jupiter swaps, Drift perpetuals, Hyperliquid futures, Polymarket predictions, cross-chain bridges via LI.FI, and liquid staking through Lido and Jito.

Advanced Simulation: Batch Transactions and Gas Conditions

Your MEV bot needs to execute complex multi-step strategies atomically. WAIaaS supports batch transaction simulation, letting you test entire trade sequences before committing:

curl -X POST http://127.0.0.1:3100/v1/transactions/send 
  -H "Content-Type: application/json" 
  -H "Authorization: Bearer wai_sess_<token>" 
  -d '{
    "type": "Batch",
    "transactions": [
      {
        "type": "APPROVE",
        "spender": "JUP6LkbZbjS1jKKwapdHNy74zcZ3tLUZoi5QNyVTaV4",
        "amount": "1000000"
      },
      {
        "type": "ContractCall",
        "to": "JUP6LkbZbjS1jKKwapdHNy74zcZ3tLUZoi5QNyVTaV4",
        "data": "0x..."
      }
    ],
    "dryRun": true
  }'

Gas conditional execution takes this further. Your bot can queue transactions that only execute when gas prices meet your threshold:

curl -X POST http://127.0.0.1:3100/v1/transactions/send 
  -H "Content-Type: application/json" 
  -H "Authorization: Bearer wai_sess_<token>" 
  -d '{
    "type": "TRANSFER",
    "to": "recipient-address",
    "amount": "0.1",
    "gasCondition": {
      "maxGasPrice": "20000000000",
      "timeoutSeconds": 1800
    }
  }'

This queues the transaction until gas drops below 20 gwei or the 30-minute timeout expires.

Real-Time Transaction Pipeline

WAIaaS processes transactions through a 7-stage pipeline that validates, simulates, checks policies, waits for gas conditions, executes, and confirms each trade. Your bot gets real-time status updates through the REST API:

# Check transaction status
curl http://127.0.0.1:3100/v1/transactions/<tx-id> 
  -H "Authorization: Bearer wai_sess_<token>"

Response shows current pipeline stage:

{
  "id": "019c47d6-51ef-7f43-a76b-d50e875d95f4",
  "status": "PENDING",
  "stage": "stage4-wait",
  "gasCondition": {
    "maxGasPrice": "20000000000",
    "currentGasPrice": "25000000000",
    "waitingFor": "gas_price_drop"
  }
}

Built-in Risk Controls for Trading Bots

Simulation prevents obvious failures, but trading bots need defense in depth. WAIaaS includes 21 policy types that act as circuit breakers for automated trading:

  • SPENDING_LIMIT: Kill switch when daily losses exceed threshold
  • RATE_LIMIT: Prevent runaway bot loops (max 100 trades/hour)
  • ALLOWED_TOKENS: Whitelist only tokens your bot should trade
  • CONTRACT_WHITELIST: Block calls to unknown contracts (prevents rug pulls)
  • TIME_RESTRICTION: Disable trading outside market hours
  • PERP_MAX_LEVERAGE: Cap leverage on perpetual futures

These policies follow a 4-tier security model. Small trades execute instantly, larger amounts trigger notifications or delays, and huge positions require human approval via WalletConnect.

Multi-Chain Trading with One API

Your arbitrage opportunities span chains. WAIaaS supports 2 chain types across 15 networks, with cross-chain bridging through LI.FI and Across protocols. Your bot can:

  • Swap SOL for USDC on Jupiter (Solana)
  • Bridge USDC to Ethereum via LI.FI
  • Provide liquidity on Aave (Ethereum)
  • Trade perpetuals on Hyperliquid

All through the same session token and consistent API interface.

Get Started: Deploy a Trading Bot in 5 Steps

  1. Install via Docker (30 seconds):
git clone https://github.com/minhoyoo-iotrust/WAIaaS.git
cd WAIaaS
docker compose up -d
  1. Create trading wallets (funded with your strategy capital):
# Create Solana wallet for DeFi
curl -X POST http://127.0.0.1:3100/v1/wallets 
  -H "Content-Type: application/json" 
  -H "X-Master-Password: your-password" 
  -d '{"name": "solana-trading", "chain": "solana", "environment": "mainnet"}'

# Create Ethereum wallet for perps
curl -X POST http://127.0.0.1:3100/v1/wallets 
  -H "Content-Type: application/json" 
  -H "X-Master-Password: your-password" 
  -d '{"name": "ethereum-trading", "chain": "evm", "environment": "mainnet"}'
  1. Create bot session (API key for your trading bot):
curl -X POST http://127.0.0.1:3100/v1/sessions 
  -H "Content-Type: application/json" 
  -H "X-Master-Password: your-password" 
  -d '{"walletId": "<solana-wallet-uuid>"}'
  1. Set risk policies (prevent bot from draining funds):
curl -X POST http://127.0.0.1:3100/v1/policies 
  -H "Content-Type: application/json" 
  -H "X-Master-Password: your-password" 
  -d '{
    "walletId": "<wallet-uuid>",
    "type": "SPENDING_LIMIT",
    "rules": {
      "instant_max_usd": 1000,
      "daily_limit_usd": 10000
    }
  }'
  1. Start trading (simulate first, execute if profitable):
import { WAIaaSClient } from '@waiaas/sdk';

const client = new WAIaaSClient({
  baseUrl: 'http://127.0.0.1:3100',
  sessionToken: process.env.WAIAAS_SESSION_TOKEN,
});

// Simulate Jupiter swap
const simulation = await client.executeAction('jupiter-swap', 'swap', {
  inputMint: 'So11111111111111111111111111111111111111112',
  outputMint: 'EPjFWdd5AufqSSqeM2qN1xzybapC8G4wEGGkZwyTDt1v',
  amount: '1000000000',
  dryRun: true
});

// Check if profitable after fees
if (simulation.outputAmount > profitabilityThreshold) {
  // Execute for real
  const trade = await client.executeAction('jupiter-swap', 'swap', {
    inputMint: 'So11111111111111111111111111111111111111112',
    outputMint: 'EPjFWdd5AufqSSqeM2qN1xzybapC8G4wEGGkZwyTDt1v',
    amount: '1000000000'
  });
}

What’s Next

Your trading bot needs millisecond execution with bulletproof risk controls. WAIaaS gives you both through simulation APIs, gas conditional execution, and built-in policy enforcement across 14 DeFi protocols.

Explore the full capabilities at https://github.com/minhoyoo-iotrust/WAIaaS or dive into the interactive API docs at https://waiaas.ai.

Never Miss an AI Hackathon Again: Building an Autonomous Discovery Agent with Notion & Brave MCP

GitHub logo

This is a submission for the Notion MCP Challenge

What I Built

HackathonSniper is an autonomous AI agent designed to eliminate “hackathon fatigue.” If you’re like me, you spend hours every month checking Devpost, DoraHacks, and Dev.to just to find one hackathon that fits your niche.

HackathonSniper turns this manual hunt into an automated pipeline. It doesn’t just “search”—it thinks. It uses the Model Context Protocol (MCP) to bridge the gap between AI reasoning and the real web.

Video Demo

Show us the code

GitHub logo

klee1611
/
HackathonSniper

AI-powered hackathon discovery agent using Brave Search + Notion MCP

🎯 Hackathon Sniper

A sophisticated TypeScript agent that automatically discovers, evaluates, and tracks hackathons using AI-powered analysis. Built with clean architecture patterns, real MCP server integration, and complete environment separation.

✨ Features

  • 🔍 Intelligent Search – Real Brave Search MCP server integration
  • 🤖 AI Evaluation – Groq-powered hackathon qualification analysis
  • 📊 Notion Integration – Real Notion MCP server for storage and tracking
  • 🎭 Test Isolation – Complete environment isolation for testing (zero external dependencies)
  • ⚡ Fast Development – Hot reload, comprehensive Makefile, pnpm package management
  • 🛡️ Type Safety – End-to-end TypeScript with Zod schema validation
  • 🧪 Robust Testing – Unit, integration, and smoke tests

🚀 Quick Start

Prerequisites

  • Node.js 18+
  • pnpm (recommended) or npm

Installation & Setup

# Clone and setup in one command
git clone <repository-url>
cd HackathonSniper
make setup

Development Workflow

# Copy and fill in your API keys
cp .env.example .env
# Run development

…

The Technical Architecture

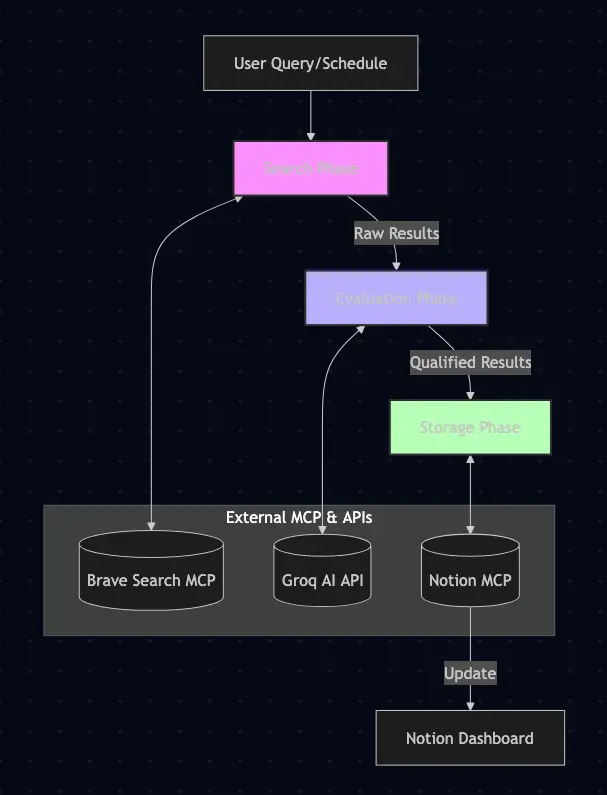
The agent follows a rigorous 3-phase lifecycle:

  1. 🔍 The Hunt (Brave Search MCP): It performs targeted searches across the web to find new hackathon announcements, even those buried in blog posts or obscure landing pages.
  2. 🤖 The Vetting (Groq LLM): Every discovery is analyzed by a Llama-3 model. It evaluates the prize pool, solo-friendliness, AI relevance, and proximity to the deadline.
  3. 📊 The Storage (Notion MCP): Qualified opportunities are instantly synced to a beautifully structured Notion database, complete with metadata, deadlines, and AI-generated summaries.

tech_architecture

How I Used Notion MCP

The Notion MCP Server (@notionhq/notion-mcp-server) is the “nervous system” of this project. It transforms a simple script into a powerful productivity tool by allowing the AI to interact with my Notion workspace as if it were a native application.

Instead of writing complex, boilerplate-heavy API calls to the Notion REST API, the Notion MCP is integrated. This allowed the agent to:

  • Dynamic Schema Mapping: The agent automatically maps structured AI evaluation objects to Notion database properties (Dates, Checkboxes, URLs, and Rich Text).
  • Process Isolation: By using the MCP StdioClientTransport, the Notion integration runs in its own isolated process, managed entirely by the Model Context Protocol.
  • Automated Workflows: The agent uses the create_notion_page tool provided by the MCP server to dynamically populate my “Hackathon Scout” dashboard.

Wrapping Up

This integration unlocks a “set and forget” workflow. I can run HackathonSniper as a background task, and my Notion workspace stays updated with a high-signal, low-noise list of opportunities. It’s not just data entry; it’s an autonomous data clerk powered by Notion MCP.

8 Agentic Coding Patterns That Ship 10x Faster (Cursor, Windsurf, Claude Code)

8 Agentic Coding Patterns That Ship 10x Faster (Cursor, Windsurf, Claude Code)

AI coding tools evolved.

In 2024, we got autocomplete. In 2025, we got inline chat. In 2026, we have autonomous agents that read your codebase, plan multi-file changes, run tests, and iterate until things work.

But here’s the thing — most developers are still using these tools like fancy autocomplete. They type a prompt, get a suggestion, accept or reject, repeat.

That’s like buying a Formula 1 car and driving it in first gear.

Agentic coding means giving the AI enough context, constraints, and autonomy to handle entire tasks end-to-end. The difference isn’t the tool — it’s the patterns you use.

In this article, I’ll share 8 battle-tested agentic coding patterns with real configurations, prompt templates, and workflows that work across Cursor, Windsurf, Claude Code, and Copilot Workspace.

The Agentic Coding Spectrum

Not all AI coding is equal. Here’s where the tools sit in March 2026:

Manual                                          Autonomous
  |                                                  |
  |  Copilot    Cursor     Windsurf    Claude Code   |
  |  (suggest)  (compose)  (cascade)   (agent mode)  |
  |                                                  |
  └──────────────────────────────────────────────────┘
       Tab-complete  →  Multi-file  →  Full autonomy

The patterns in this article work across the spectrum, but they shine brightest in compose/cascade/agent modes where the tool can autonomously execute multi-step plans.

Pattern 1: The AGENTS.md Convention

The single most impactful pattern in agentic coding: give your AI agent a mission briefing file at the root of your project.

# AGENTS.md

## Project Context
This is a Next.js 14 SaaS application for invoice management.
- Framework: Next.js 14 (App Router)
- Database: PostgreSQL via Prisma
- Auth: NextAuth.js v5
- Styling: Tailwind CSS + shadcn/ui
- State: Zustand for client, React Query for server
- Testing: Vitest + Playwright

## Architecture Rules
- All API routes go in `app/api/` — NO pages router
- Database queries ONLY through Prisma — no raw SQL
- All forms use react-hook-form + zod validation
- Server components by default, "use client" only when needed
- Error boundaries on every route segment

## Coding Standards
- TypeScript strict mode — no `any` types
- All functions must have JSDoc comments
- Max file length: 300 lines — split if longer
- Imports: external first, then internal, then relative
- No barrel exports (index.ts re-exports)

## Common Patterns
### Creating a new feature
1. Schema first: `prisma/schema.prisma`
2. Migration: `npx prisma migrate dev`
3. Server action: `app/actions/feature.ts`
4. UI component: `components/feature/`
5. Page: `app/(dashboard)/feature/page.tsx`
6. Tests: `tests/feature.test.ts`

### API Error Handling

typescript
// Always use this pattern for API routes
export async function POST(req: Request) {
try {
const body = await req.json();
const validated = schema.parse(body);
// … logic
return Response.json({ data: result });
} catch (error) {
if (error instanceof z.ZodError) {
return Response.json(
{ error: “Validation failed”, details: error.issues },
{ status: 400 }
);
}
console.error(“[API_ERROR]”, error);
return Response.json(
{ error: “Internal server error” },
{ status: 500 }
);
}
}


## What NOT to Do
- Don't add new dependencies without checking existing ones first
- Don't modify the auth flow without explicit approval
- Don't use `console.log` — use the structured logger
- Don't skip TypeScript types — ever

markdown

Why it works: Every AI coding tool reads project files for context. AGENTS.md gives the agent your team’s knowledge upfront — architecture decisions, conventions, patterns, anti-patterns. Without it, the agent makes reasonable but wrong guesses.

Pro tip: Put AGENTS.md in your .cursorrules or .windsurfrules file for automatic inclusion, or keep it as a standalone file that Claude Code and other tools will discover.

Pattern 2: Task Decomposition Prompts

Don’t ask the AI to “build a feature.” Ask it to decompose first, then execute each step:

# Task Decomposition Template

## Phase 1: Plan (don't write code yet)
Analyze this requirement and create a step-by-step implementation plan:

**Requirement:** [paste requirement]

For each step, specify:
1. Files to create or modify
2. Dependencies on other steps
3. Test criteria (how do we know this step works?)

Output the plan as a numbered checklist. Do NOT write any code yet.

## Phase 2: Execute (one step at a time)
Now implement step [N] from the plan above.

Before writing code:
- Re-read the plan
- Check if previous steps are complete
- List any assumptions

After writing code:
- Verify it compiles (run the appropriate check)
- Run related tests
- Note any issues for the next step

## Phase 3: Verify
All steps are implemented. Now:
1. Run the full test suite
2. Check for TypeScript errors
3. Review all changed files for consistency
4. List any remaining TODOs or known issues

Here’s a real-world example using this pattern in Cursor Composer:

@plan Create a Stripe webhook handler that:
- Validates the webhook signature
- Handles checkout.session.completed
- Updates the user's subscription in our DB
- Sends a welcome email for new subscribers
- Handles subscription.deleted for cancellations
- Has idempotency protection (don't process same event twice)

Output a numbered plan with files and test criteria. Don't code yet.

The agent produces a plan. You review it. Then:

@execute Implement step 1 from the plan: webhook signature validation.
Run the test after implementing.

Why this matters: Agents that try to build everything at once produce worse code than agents that plan first. The plan creates a checkpoint you can review before expensive code generation.

Pattern 3: Context Window Management

The biggest performance killer in agentic coding isn’t the model — it’s what’s in the context window. Here’s a .cursorrules file optimized for context management:

# .cursorrules — Context Window Optimization

# Include only what's relevant per task
context_rules:
  # Always include for every task
  always:
    - AGENTS.md
    - tsconfig.json
    - package.json (dependencies section only)
    - prisma/schema.prisma (model definitions only)

  # Include based on task type
  patterns:
    api_route:
      - app/api/**/*.ts
      - lib/auth.ts
      - lib/db.ts
      - types/api.ts

    ui_component:
      - components/**/*.tsx
      - lib/hooks/*.ts
      - styles/globals.css
      - tailwind.config.ts

    database:
      - prisma/schema.prisma
      - prisma/migrations/
      - lib/db.ts
      - app/actions/*.ts

  # Never include (saves tokens, avoids confusion)
  exclude:
    - node_modules/
    - .next/
    - "*.test.ts"  # unless task is about testing
    - "*.stories.tsx"
    - coverage/
    - dist/

And here’s a prompt pattern that explicitly manages context:

## Context-Aware Task Prompt

**Task:** [description]

**Relevant files (read these):**
- `src/lib/auth.ts` — current auth implementation
- `src/types/user.ts` — User type definition
- `prisma/schema.prisma` — lines 45-80 (User model)

**Reference files (for patterns, don't modify):**
- `src/app/api/invoices/route.ts` — follow this API pattern

**Out of scope (don't touch):**
- Anything in `src/components/`
- The auth flow
- Database schema changes

**Expected output:**
- Modified: `src/app/api/users/route.ts`
- New: `src/app/api/users/[id]/route.ts`
- Modified: `src/lib/validators/user.ts`

Pattern 4: Test-Driven Agent Development (TDAD)

Write the tests first. Then let the agent implement until tests pass. This is the highest-confidence agentic coding pattern:

// tests/invoice-service.test.ts
// Write these FIRST, then let the agent implement

import { describe, it, expect, beforeEach } from "vitest";
import { InvoiceService } from "../src/services/invoice";
import { mockDb } from "./helpers/mock-db";

describe("InvoiceService", () => {
  let service: InvoiceService;

  beforeEach(() => {
    service = new InvoiceService(mockDb());
  });

  describe("createInvoice", () => {
    it("should create an invoice with line items", async () => {
      const invoice = await service.createInvoice({
        customerId: "cust_123",
        lineItems: [
          { description: "Consulting", quantity: 10, unitPrice: 150 },
          { description: "Development", quantity: 20, unitPrice: 200 },
        ],
        dueDate: new Date("2026-04-30"),
      });

      expect(invoice.id).toBeDefined();
      expect(invoice.subtotal).toBe(5500); // 10*150 + 20*200
      expect(invoice.status).toBe("draft");
      expect(invoice.lineItems).toHaveLength(2);
    });

    it("should calculate tax correctly", async () => {
      const invoice = await service.createInvoice({
        customerId: "cust_123",
        lineItems: [
          { description: "Service", quantity: 1, unitPrice: 1000 },
        ],
        taxRate: 0.19,
        dueDate: new Date("2026-04-30"),
      });

      expect(invoice.subtotal).toBe(1000);
      expect(invoice.tax).toBe(190);
      expect(invoice.total).toBe(1190);
    });

    it("should reject invoices with no line items", async () => {
      await expect(
        service.createInvoice({
          customerId: "cust_123",
          lineItems: [],
          dueDate: new Date("2026-04-30"),
        })
      ).rejects.toThrow("Invoice must have at least one line item");
    });

    it("should reject negative quantities", async () => {
      await expect(
        service.createInvoice({
          customerId: "cust_123",
          lineItems: [
            { description: "Bad", quantity: -1, unitPrice: 100 },
          ],
          dueDate: new Date("2026-04-30"),
        })
      ).rejects.toThrow("Quantity must be positive");
    });
  });

  describe("sendInvoice", () => {
    it("should change status from draft to sent", async () => {
      const invoice = await service.createInvoice({
        customerId: "cust_123",
        lineItems: [
          { description: "Work", quantity: 1, unitPrice: 500 },
        ],
        dueDate: new Date("2026-04-30"),
      });

      const sent = await service.sendInvoice(invoice.id);
      expect(sent.status).toBe("sent");
      expect(sent.sentAt).toBeDefined();
    });

    it("should not send an already-sent invoice", async () => {
      const invoice = await service.createInvoice({
        customerId: "cust_123",
        lineItems: [
          { description: "Work", quantity: 1, unitPrice: 500 },
        ],
        dueDate: new Date("2026-04-30"),
      });

      await service.sendInvoice(invoice.id);

      await expect(
        service.sendInvoice(invoice.id)
      ).rejects.toThrow("Invoice already sent");
    });
  });
});

Now the prompt to the agent:

## TDAD Prompt

I've written failing tests in `tests/invoice-service.test.ts`.

Your task:
1. Read the tests carefully
2. Implement `src/services/invoice.ts` to make ALL tests pass
3. Create any necessary types in `src/types/invoice.ts`
4. Run `npx vitest tests/invoice-service.test.ts` after each change
5. Iterate until all tests are green
6. Do NOT modify the test file

Constraints from AGENTS.md:
- Use Prisma for DB operations
- Zod for input validation
- Follow the service pattern in `src/services/customer.ts`

Why TDAD is powerful: The tests are an unambiguous specification. The agent can’t “hallucinate” its way past a failing assertion. It either works or it doesn’t.

Pattern 5: Incremental Migration Agent

Large refactors are where agentic coding shines. This pattern migrates code file-by-file with verification at each step:

# Migration Agent Prompt Template

## Objective
Migrate from [OLD_PATTERN] to [NEW_PATTERN] across the codebase.

## Rules
1. Migrate ONE file at a time
2. After each file:
   - Run type checker: `npx tsc --noEmit`
   - Run related tests: `npx vitest [file]`
   - If either fails, fix before moving on
3. Commit after each successful file migration
4. Keep a migration log in `docs/migration-log.md`

## Migration Spec

### Before (Old Pattern)

typescript
// Old: class-based services with manual DI
class UserService {
private db: Database;
constructor(db: Database) {
this.db = db;
}
async getUser(id: string): Promise {
return this.db.users.findUnique({ where: { id } });
}
}


### After (New Pattern)

typescript
// New: functional with dependency injection via closure
import { type Database } from “@/lib/db”;

export function createUserService(db: Database) {
return {
getUser: async (id: string): Promise => {
return db.users.findUnique({ where: { id } });
},
} as const;
}

// Type helper
export type UserService = ReturnType;


## File Order (migrate in this sequence)
1. `src/services/base.ts` — foundation
2. `src/services/user.ts` — simple, good test case
3. `src/services/invoice.ts` — medium complexity
4. `src/services/payment.ts` — complex, has events
5. `src/services/notification.ts` — has side effects
6. Update all imports in `src/app/` routes
7. Remove old `ServiceBase` class

## Migration Log Format

markdown
| # | File | Status | Tests | Notes |
|—|——|——–|——-|——-|
| 1 | base.ts | ✅ Done | 3/3 | Removed class, exported types |
| 2 | user.ts | ✅ Done | 8/8 | Added return type |
| 3 | invoice.ts | 🔄 In Progress | – | – |

markdown

Key insight: The agent can handle the mechanical work of refactoring, but it needs explicit rules about verification, order, and how to handle failures. Without these constraints, it’ll try to change everything at once and break the build.

Pattern 6: Error Recovery Loops

When the agent hits an error, most developers intervene manually. Instead, teach the agent to self-recover:

# Error Recovery Protocol

When you encounter an error, follow this protocol:

## Level 1: Self-Fix (try 3 times)
1. Read the full error message and stack trace
2. Identify the root cause (not the symptom)
3. Apply the fix
4. Run the check again
5. If still failing after 3 attempts → escalate to Level 2

## Level 2: Context Expansion
1. Read related files that might contain the answer
2. Check if this is a known pattern in AGENTS.md
3. Search for similar patterns in the codebase: `grep -r "pattern" src/`
4. Try the fix with expanded context
5. If still failing → escalate to Level 3

## Level 3: Simplify
1. Revert to the last working state
2. Break the task into smaller sub-tasks
3. Implement the simplest version that could work
4. Add a TODO comment for the full implementation
5. Report what you couldn't complete and why

## NEVER do:
- Suppress errors with try/catch without logging
- Skip tests to "make it work"
- Add `@ts-ignore` or `any` types to bypass type errors
- Delete tests that are failing
- Change the requirement to match your implementation

Here’s how this looks in a Claude Code workflow:

# claude-code-config.yaml
agent:
  name: "feature-builder"
  error_recovery:
    max_self_fix_attempts: 3
    escalation_strategy: "simplify"

  verification:
    after_each_change:
      - "npx tsc --noEmit"
      - "npx vitest --reporter=verbose"

  guardrails:
    forbidden_patterns:
      - "@ts-ignore"
      - "as any"
      - "eslint-disable"
      - "console.log"
    max_files_changed: 10
    require_test_for_new_files: true

Pattern 7: Multi-Agent Code Review

Use one agent to write code and another to review it. This catches issues that a single agent misses:

# multi_agent_review.py
# A simple multi-agent code review pipeline

import subprocess
import json
from pathlib import Path


def get_diff() -> str:
    """Get the current git diff of staged changes."""
    result = subprocess.run(
        ["git", "diff", "--staged"],
        capture_output=True, text=True
    )
    return result.stdout


def agent_review_prompt(diff: str, role: str) -> str:
    """Generate a review prompt for a specific reviewer role."""

    roles = {
        "security": """You are a security reviewer. Examine this diff for:
- SQL injection, XSS, CSRF vulnerabilities
- Hardcoded secrets or credentials
- Insecure deserialization
- Missing input validation
- Auth/authz bypasses
- Information leakage in error messages

For each issue found, specify:
- Severity (critical/high/medium/low)
- File and line number
- Description of the vulnerability
- Suggested fix

If no issues found, say "LGTM — no security issues detected."
""",
        "performance": """You are a performance reviewer. Examine this diff for:
- N+1 query patterns
- Missing database indexes (infer from query patterns)
- Unnecessary re-renders in React components
- Large bundle imports (could be tree-shaken)
- Missing pagination on list endpoints
- Synchronous operations that should be async
- Memory leaks (unclosed connections, missing cleanup)

For each issue, estimate the impact and suggest a fix.
""",
        "architecture": """You are an architecture reviewer. Examine this diff for:
- Violations of the patterns in AGENTS.md
- Tight coupling between modules
- Missing abstractions or leaky abstractions
- Inconsistency with existing codebase patterns
- Business logic in the wrong layer
- Missing error handling
- Proper separation of concerns

Reference existing code patterns when suggesting improvements.
""",
    }

    return f"""{roles[role]}

## Diff to Review

diff
{diff}


## Project Context
{Path("AGENTS.md").read_text() if Path("AGENTS.md").exists() else "No AGENTS.md found."}
"""


def run_review_pipeline():
    """Run all reviewers and aggregate results."""
    diff = get_diff()

    if not diff.strip():
        print("No staged changes to review.")
        return

    results = {}
    for role in ["security", "performance", "architecture"]:
        prompt = agent_review_prompt(diff, role)
        # Send to your preferred LLM API
        # response = llm.complete(prompt, model="claude-sonnet")
        # results[role] = response.text
        print(f"--- {role.upper()} REVIEW ---")
        print(f"Prompt ready ({len(prompt)} chars)")
        print()

    # Aggregate
    blocking_issues = [
        issue for role_results in results.values()
        for issue in role_results
        if issue.get("severity") in ("critical", "high")
    ]

    if blocking_issues:
        print(f"❌ {len(blocking_issues)} blocking issues found!")
        print("Fix these before merging.")
    else:
        print("✅ All reviews passed. Ready to merge.")


if __name__ == "__main__":
    run_review_pipeline()

shell

The power of multi-agent review: A single agent reviewing its own code has blind spots. Using different “reviewer personas” catches security issues that a performance reviewer misses, and vice versa.

Pattern 8: Autonomous Feature Branches

The ultimate agentic coding pattern: the agent creates a branch, implements the feature, writes tests, and opens a PR — all autonomously:

#!/bin/bash
# autonomous-feature.sh
# Fully autonomous feature implementation pipeline

set -euo pipefail

FEATURE_DESC="$1"
BRANCH_NAME="$2"

echo "🚀 Starting autonomous feature implementation"
echo "Feature: $FEATURE_DESC"
echo "Branch: $BRANCH_NAME"

# Step 1: Create branch
git checkout main
git pull origin main
git checkout -b "$BRANCH_NAME"

# Step 2: Plan (using your CLI agent tool)
echo "📋 Phase 1: Planning..."
PLAN=$(cat <<EOF
Read AGENTS.md for project context.
Create a detailed implementation plan for this feature:
$FEATURE_DESC

Output a JSON array of steps, each with:
- "description": what to do
- "files": array of files to create/modify
- "tests": how to verify this step

Do NOT write code yet. Planning only.
EOF
)

# Step 3: Execute each step
echo "⚡ Phase 2: Implementation..."
# The agent executes each planned step

# Step 4: Verify
echo "✅ Phase 3: Verification..."

# Run type checker
if ! npx tsc --noEmit; then
    echo "❌ TypeScript errors found. Attempting auto-fix..."
    # Agent fixes type errors
fi

# Run tests
if ! npx vitest --run; then
    echo "❌ Tests failing. Attempting auto-fix..."
    # Agent fixes failing tests (max 3 attempts)
fi

# Run linter
if ! npx eslint src/ --fix; then
    echo "⚠️ Linting issues found."
fi

# Step 5: Commit and push
echo "📦 Phase 4: Commit..."
git add -A
git commit -m "feat: $FEATURE_DESC

Implemented by autonomous agent pipeline.
- Plan: [N] steps executed
- Tests: all passing
- Types: clean
- Lint: clean"

git push origin "$BRANCH_NAME"

# Step 6: Create PR
echo "🔀 Phase 5: Creating PR..."
# Use GitHub CLI or API to create PR
gh pr create 
    --title "feat: $FEATURE_DESC" 
    --body "## Summary
Autonomous implementation of: $FEATURE_DESC

## Changes
$(git diff main..HEAD --stat)

## Verification
- ✅ TypeScript: clean
- ✅ Tests: all passing
- ✅ Lint: clean

## Review Notes
This PR was autonomously generated. Please review carefully:
- [ ] Business logic correctness
- [ ] Edge cases covered
- [ ] No hardcoded values
- [ ] Error handling appropriate" 
    --base main 
    --head "$BRANCH_NAME"

echo "🎉 Done! PR created for review."

Important: Always require human review before merging autonomous PRs. The agent does the implementation work; a human validates the decisions.

The Configuration Files That Make It Work

Here’s a complete setup for the major tools:

Cursor (.cursorrules)

# .cursorrules

You are an expert TypeScript/Next.js developer.

## Rules
1. Read AGENTS.md before every task
2. Plan before coding — decompose complex tasks
3. Run tests after every change
4. One file at a time for complex changes
5. Never skip types or error handling

## On Error
- Read the full error
- Check if AGENTS.md has guidance
- Fix root cause, not symptoms
- Max 3 self-fix attempts before asking

## Code Style
- Functional over class-based
- Composition over inheritance
- Explicit over implicit
- Small functions (<30 lines)

Windsurf (.windsurfrules)

# .windsurfrules

## Cascade Mode Configuration

### Context Loading
Always read these files first:
- AGENTS.md (project rules)
- relevant test files for the feature

### Execution Mode
- Use "Write" mode for new features
- Use "Edit" mode for refactors
- Always run verification after changes

### Iteration Protocol
When tests fail:
1. Read the test carefully
2. Read the error message
3. Fix the implementation (not the test)
4. Run again
5. After 3 failures, explain the issue

Claude Code (CLAUDE.md)

# CLAUDE.md

## Project
Next.js 14 SaaS — see AGENTS.md for full context.

## Commands
- Type check: `npx tsc --noEmit`
- Test: `npx vitest`
- Test single: `npx vitest path/to/test`
- Lint: `npx eslint src/`
- Dev server: `npm run dev`
- Build: `npm run build`

## Rules
- Follow AGENTS.md strictly
- Run type check + tests after every change
- Commit atomic changes with conventional commit messages
- Ask before adding new dependencies

Real-World Results

Here’s what these patterns look like in practice:

Metric Without Patterns With Patterns Improvement
Feature implementation time 4-8 hours 30-90 min 5-10x faster
First-attempt test pass rate ~40% ~85% 2x better
Code review rounds 3-5 1-2 60% fewer
Agent token waste ~50% of budget ~15% of budget 70% savings
Post-merge hotfixes 1 per 3 PRs 1 per 10 PRs 3x fewer

The key insight: the patterns, not the models, determine your productivity. A well-configured Cursor with good AGENTS.md will outperform raw GPT-5 without structure.

Getting Started Checklist

If you want to adopt agentic coding patterns today:

  • [ ] Create AGENTS.md in your project root (Pattern 1) — 30 minutes
  • [ ] Set up .cursorrules or equivalent for your tool — 15 minutes
  • [ ] Write tests before prompting for your next feature (Pattern 4) — already part of your workflow
  • [ ] Use task decomposition prompts instead of “build X” (Pattern 2) — immediate
  • [ ] Add error recovery rules to your agent config (Pattern 6) — 10 minutes
  • [ ] Try multi-agent review on your next PR (Pattern 7) — 30 minutes

Start with Patterns 1 and 4. They have the highest impact-to-effort ratio.

Key Takeaways

  1. AGENTS.md is the highest-ROI file in your codebase. It turns a generic AI into your team’s expert. Every coding agent reads it.

  2. Plan first, code second. Task decomposition prompts prevent the agent from going down rabbit holes.

  3. Context management is a skill. What you exclude from the context window matters as much as what you include.

  4. TDAD (Test-Driven Agent Development) is the gold standard. Tests are an unambiguous spec. Agents can’t hallucinate past a failing assertion.

  5. Teach your agent to recover from errors. Most developers intervene too early. A good error recovery protocol lets the agent fix itself.

  6. Multi-agent review catches blind spots. One agent writes, multiple agents review from different angles.

  7. Autonomous pipelines need human checkpoints. Full autonomy for implementation, human review before merge.

  8. Patterns beat models. A well-structured workflow with a good model beats a frontier model with no structure.

The era of “type prompt, accept suggestion” is over. Agentic coding is about designing workflows where AI handles execution and humans handle judgment.

These 8 patterns are your starting kit. Adapt them to your stack, refine them with your team, and watch your shipping velocity transform.

Which pattern are you most excited to try? Share your AGENTS.md setup in the comments — I’d love to see how different teams structure their AI coding workflows.

🍕 I Built FoodMine – A Modern Angular 18 Food Ordering App (Help Me Make It Better!)

Hey dev community! 👋

I just launched FoodMine – a dynamic food ordering web app built with Angular 18!

GitHub Repo -> FoodMine

🚀 Key Features

🔍 Search Functionality

Quickly find your desired food items with our intuitive search feature.

🛒 Shopping Cart

Add and manage items effortlessly for a streamlined ordering experience.

📸 Food Images

Browse through vibrant images to get a taste of what you’re ordering.

💻 Tech Stack
Angular 18 – TypeScript – HTML – CSS

🎯 I Need YOUR Help!

Submit an issue for:

  • 🐛 Bugs you find
  • 🚀 New features (payment, auth, order history)
  • ♿ Accessibility improvements
  • 📱 Mobile optimizations
  • 🎨 UI/UX suggestions

Submit a PR for:
✅ Restaurant filtering
✅ User authentication
✅ Payment integration
✅ Order history
✅ Dark mode toggle
✅ Unit tests
✅ Performance optimizations

🤝 Let’s Build Together!

Open Issues
Submit PR

Even a single emoji reaction helps! 🔥

⭐ Star the repo if you find it useful!

👉 Follow me Shubham Pawar for more projects!

The $1,800 Hostile Takeover: How Governance Attacks Are the Cheapest Exploit in DeFi — And 7 Defense Patterns That Actually Work

An attacker spent $1,800 on governance tokens and nearly walked away with $1.08 million in user funds. No flash loan. No smart contract bug. No zero-day. Just buying tokens on the open market and submitting a proposal.

This was Moonwell on Moonriver, March 2026. The attacker acquired 40 million MFAM tokens — enough to meet quorum — and proposed transferring admin control of seven lending markets, the comptroller, and the price oracle to their own address. The entire attack setup took 11 minutes.

Moonwell survived because they had a “Break Glass Guardian” — a 2-of-3 emergency multisig that could veto the proposal. Most protocols don’t have this. And the ones that do often implement it wrong.

Meanwhile, GreenField DAO wasn’t as lucky. In April 2025, an attacker flash-borrowed 9 million GOV tokens, passed a malicious proposal, and drained $31 million from the treasury — all within a single block. Beanstalk’s $182 million governance exploit in 2022 used the same pattern with over $1 billion in flash-loaned tokens.

Governance attacks are now the highest-ROI exploit class in DeFi. They’re cheap, they’re repeatable, and most protocols are still vulnerable. Here’s why, and how to fix it.

Why Governance Is DeFi’s Softest Target

Three structural problems make governance exploits uniquely dangerous:

1. Voting power is purchasable. Unlike exploiting a reentrancy bug (which requires technical skill) or compromising a private key (which requires access), governance attacks just require capital — sometimes very little capital.

2. Low participation is the norm. Most DAOs see 5-15% voter turnout. When quorum is set at 10% of circulating supply and 85% of tokens are dormant, an attacker needs to outbid… nobody.

3. Timelocks provide false security. A 48-hour timelock sounds protective until you realize most governance token holders don’t monitor proposals. The timelock expires, the malicious proposal executes, and nobody noticed.

The Attack Economics

Let’s quantify how cheap governance attacks actually are:

Moonwell (March 2026):
  Attack cost:     $1,800 (bought tokens on open market)
  Potential profit: $1,080,000
  ROI:             600x

GreenField DAO (April 2025):
  Attack cost:     ~$0 (flash loan, repaid in same tx)
  Actual profit:   $31,000,000
  ROI:             Infinite

Beanstalk (April 2022):
  Attack cost:     ~$0 (flash loan)
  Actual profit:   $182,000,000
  ROI:             Infinite

For context, the average smart contract exploit requires weeks of reverse engineering and a deep understanding of the protocol’s internals. A governance attack requires reading the proposal threshold from a public contract and checking token prices on a DEX.

The 5 Governance Attack Vectors

Vector 1: Flash Loan Vote Manipulation

The classic. Borrow governance tokens, vote, return them — all in one transaction.

// VULNERABLE: Governance that reads balanceOf() at vote time
function castVote(uint256 proposalId, bool support) external {
    uint256 votingPower = governanceToken.balanceOf(msg.sender); // ← Flash-loanable
    _recordVote(proposalId, msg.sender, votingPower, support);
}

Why it works: Any governance system that reads token balance at vote time instead of using historical snapshots is exploitable with flash loans.

Vector 2: Low-Quorum Treasury Drain

Moonwell’s pattern. Buy tokens below quorum threshold, submit proposal, wait for timelock to expire while nobody notices.

Required voting power: 40M MFAM (quorum)
Cost of 40M MFAM:     $1,800
Treasury value:        $1,080,000

Why it works: Token liquidity on secondary chains (Moonriver, Fantom, etc.) is often so thin that quorum-level quantities cost less than a used car.

Vector 3: Proposal Payload Obfuscation

The malicious proposal doesn’t say “drain the treasury.” It says “Upgrade proxy to new implementation” with a bytecode payload that nobody reads.

// Looks innocent in the proposal description:
// "MIP-42: Upgrade lending pool to v2.1 for gas optimization"
// Actual calldata:
function execute() external {
    // Step 1: Transfer admin of all markets to attacker
    comptroller._setPendingAdmin(0xAttacker);

    // Step 2: Accept admin (in a follow-up tx after timelock)
    // Step 3: Set price oracle to attacker-controlled contract
    // Step 4: Manipulate prices and drain all collateral
}

Why it works: Most governance participants vote based on the proposal title and forum discussion, not the on-chain calldata. Auditing proposal payloads requires Solidity expertise that most token holders don’t have.

Vector 4: Delegation Accumulation

Instead of buying tokens, slowly accumulate delegation from inactive holders who delegate to “trusted” community members.

// Attacker builds reputation as an active governance participant
// Gets delegated voting power from passive holders over months
// Eventually accumulates enough delegation to pass proposals solo

Why it works: Delegation is designed for efficiency but creates power concentration. A delegatee with 30% of voting power from passive holders is a single point of failure.

Vector 5: Cross-Chain Governance Desync

For protocols with governance on one chain and execution on another, the finality gap creates a voting power fabrication window.

Chain A (governance): Attacker votes with 10M tokens
Bridge message delay: 15 minutes
Chain B (execution):  Attacker has already moved tokens

Result: Voting power counted on Chain A, tokens already 
        transferred on Chain B — double counting

Why it works: Cross-chain message passing has inherent latency. If governance snapshots aren’t synchronized across chains, tokens can be “in two places at once.”

7 Defense Patterns That Actually Work

Pattern 1: Snapshot-Based Voting (Mandatory)

Never read token balance at vote time. Always use historical snapshots.

// SAFE: OpenZeppelin Governor with ERC20Votes snapshots
function _getVotes(
    address account,
    uint256 timepoint,
    bytes memory /*params*/
) internal view override returns (uint256) {
    // Reads balance at proposal creation block, NOT current block
    // Flash loans at vote time are worthless — balance is historical
    return token.getPastVotes(account, timepoint);
}

Implementation: Use OpenZeppelin’s ERC20Votes extension, which tracks voting power at every block via checkpoints. The Governor contract automatically reads from the snapshot at proposal creation time.

// ERC20Votes automatically checkpoints on every transfer
contract GovernanceToken is ERC20, ERC20Votes {
    function _update(address from, address to, uint256 amount) 
        internal override(ERC20, ERC20Votes) 
    {
        super._update(from, to, amount);
        // ERC20Votes._update() writes a checkpoint here
        // Future getPastVotes() calls read from this checkpoint
    }
}

What this prevents: Flash loan voting (Vector 1) — since the attacker didn’t hold tokens at the snapshot block, their voting power is zero.

What this doesn’t prevent: Market purchase attacks (Vector 2) if the attacker buys tokens before the snapshot block.

Pattern 2: Vote Escrow with Lock Period

Require tokens to be locked for a minimum period before they carry voting weight.

contract VoteEscrow {
    uint256 public constant MIN_LOCK_PERIOD = 7 days;

    struct Lock {
        uint256 amount;
        uint256 lockedAt;
        uint256 unlockTime;
    }

    mapping(address => Lock) public locks;

    function lock(uint256 amount, uint256 duration) external {
        require(duration >= MIN_LOCK_PERIOD, "Lock too short");

        token.transferFrom(msg.sender, address(this), amount);
        locks[msg.sender] = Lock({
            amount: amount,
            lockedAt: block.timestamp,
            unlockTime: block.timestamp + duration
        });
    }

    function getVotingPower(address account) external view returns (uint256) {
        Lock memory userLock = locks[account];

        // No voting power if locked less than MIN_LOCK_PERIOD ago
        if (block.timestamp < userLock.lockedAt + MIN_LOCK_PERIOD) {
            return 0;
        }

        // Voting power proportional to remaining lock time (ve-model)
        uint256 remaining = userLock.unlockTime > block.timestamp 
            ? userLock.unlockTime - block.timestamp : 0;
        return (userLock.amount * remaining) / MAX_LOCK_TIME;
    }
}

What this prevents: Both flash loan (Vector 1) and quick market purchase attacks (Vector 2). An attacker must lock capital for 7+ days with no guarantee of success, creating real economic risk.

Trade-off: Reduces participation from casual holders who don’t want to lock tokens. Mitigate with a liquid wrapper (veToken staking derivative) that still requires lock commitment.

Pattern 3: Break Glass Guardian (Emergency Veto)

Moonwell’s saving grace. A multisig with the power to veto malicious proposals outside normal governance flow.

contract BreakGlassGuardian {
    address public immutable GOVERNANCE_TIMELOCK;
    uint256 public constant GUARDIAN_THRESHOLD = 2; // 2-of-3

    address[3] public guardians;
    mapping(bytes32 => uint256) public vetoApprovals;

    function vetoProposal(uint256 proposalId) external {
        require(isGuardian(msg.sender), "Not a guardian");

        bytes32 vetoHash = keccak256(abi.encode(proposalId, "VETO"));
        vetoApprovals[vetoHash]++;

        if (vetoApprovals[vetoHash] >= GUARDIAN_THRESHOLD) {
            // Cancel the proposal in the timelock
            IGovernor(GOVERNANCE_TIMELOCK).cancel(proposalId);
            emit ProposalVetoed(proposalId);
        }
    }

    // Guardian rotation must go through full governance
    // (prevents guardian capture)
    function rotateGuardian(uint256 index, address newGuardian) 
        external 
        onlyGovernance 
    {
        guardians[index] = newGuardian;
    }
}

Critical design decisions:

  • Guardians can only veto, never propose or execute — this preserves decentralization
  • Guardian rotation goes through normal governance — prevents guardian capture
  • Use a 2-of-3 or 3-of-5 threshold — single guardians are a centralization risk
  • Guardians should be geographically and organizationally diverse

What this prevents: Any governance attack that relies on timelock expiration (Vectors 2, 3, 4). Even if the proposal passes, guardians can cancel it.

What this doesn’t prevent: Attacks that bypass governance entirely (key compromise, contract vulnerabilities).

Pattern 4: Proposal Validation Hooks

Automatically verify that proposal calldata doesn’t target critical functions without explicit safeguards.

contract GovernorWithValidation is Governor {
    // Functions that require super-majority (>80%) instead of simple majority
    mapping(bytes4 => bool) public criticalSelectors;

    constructor() {
        // Admin transfers always require super-majority
        criticalSelectors[bytes4(keccak256("_setPendingAdmin(address)"))] = true;
        criticalSelectors[bytes4(keccak256("_setImplementation(address)"))] = true;
        criticalSelectors[bytes4(keccak256("_setPriceOracle(address)"))] = true;
        criticalSelectors[bytes4(keccak256("transferOwnership(address)"))] = true;
        criticalSelectors[bytes4(keccak256("upgradeTo(address)"))] = true;
    }

    function _quorumReached(uint256 proposalId) 
        internal view override returns (bool) 
    {
        if (_containsCriticalAction(proposalId)) {
            // Critical actions need 80% approval, not 50%
            uint256 forVotes = proposalForVotes(proposalId);
            uint256 totalVotes = forVotes + proposalAgainstVotes(proposalId);
            return totalVotes >= quorum() && 
                   forVotes * 100 / totalVotes >= 80;
        }
        return super._quorumReached(proposalId);
    }

    function _containsCriticalAction(uint256 proposalId) 
        internal view returns (bool) 
    {
        (address[] memory targets, , bytes[] memory calldatas, ) = 
            proposals[proposalId].getActions();

        for (uint256 i = 0; i < calldatas.length; i++) {
            if (calldatas[i].length >= 4) {
                bytes4 selector = bytes4(calldatas[i][:4]);
                if (criticalSelectors[selector]) return true;
            }
        }
        return false;
    }
}

What this prevents: Payload obfuscation attacks (Vector 3). Even if token holders don’t read the calldata, the contract itself enforces higher thresholds for dangerous operations.

Pattern 5: Adaptive Quorum with Participation Weighting

Dynamic quorum that increases when voter participation is abnormally low.

contract AdaptiveQuorumGovernor is Governor {
    uint256 public constant BASE_QUORUM_BPS = 1000; // 10%
    uint256 public constant MAX_QUORUM_BPS = 4000;  // 40%

    uint256 public avgParticipationBps;

    function quorum(uint256 timepoint) public view override returns (uint256) {
        uint256 totalSupply = token.getPastTotalSupply(timepoint);

        uint256 adjustedQuorum = BASE_QUORUM_BPS;

        if (avgParticipationBps > 0) {
            adjustedQuorum = BASE_QUORUM_BPS * avgParticipationBps / 
                             _currentParticipationBps();

            if (adjustedQuorum > MAX_QUORUM_BPS) {
                adjustedQuorum = MAX_QUORUM_BPS;
            }
        }

        return (totalSupply * adjustedQuorum) / 10000;
    }
}

What this prevents: Low-quorum treasury drains (Vector 2). When participation drops, quorum rises automatically.

Pattern 6: Time-Weighted Voting Power

Weight voting power by holding duration. Recent purchasers get reduced influence.

function getVotingPower(address account, uint256 proposalBlock) 
    public view returns (uint256) 
{
    uint256 balance = token.getPastVotes(account, proposalBlock);
    uint256 holdingDuration = _getHoldingDuration(account, proposalBlock);

    // Linear ramp: 0% power at 0 days, 100% at 30 days
    uint256 multiplier;
    if (holdingDuration >= 30 days) {
        multiplier = 10000; // 100%
    } else {
        multiplier = (holdingDuration * 10000) / 30 days;
    }

    return (balance * multiplier) / 10000;
}

What this prevents: Market purchase attacks where tokens are bought shortly before a proposal snapshot.

Pattern 7: Optimistic Governance with Challenge Period

Proposals are assumed to pass unless challenged. Challenges trigger full voting.

contract OptimisticGovernor {
    uint256 public constant CHALLENGE_PERIOD = 5 days;
    uint256 public constant CHALLENGE_BOND = 10000e18;

    enum ProposalState { Proposed, Challenged, Executed, Cancelled }

    function challenge(uint256 proposalId) external {
        require(proposals[proposalId].state == ProposalState.Proposed);
        require(block.timestamp < proposals[proposalId].deadline);

        token.transferFrom(msg.sender, address(this), CHALLENGE_BOND);
        proposals[proposalId].state = ProposalState.Challenged;
        _startFullVote(proposalId);
    }
}

What this prevents: Reduces attack surface by requiring active monitoring. Routine proposals execute faster, suspicious ones get escalated.

Implementation Checklist: Defense-in-Depth

Minimum viable defense (all protocols):

  1. ✅ Snapshot-based voting (Pattern 1) — prevents flash loans
  2. ✅ Break Glass Guardian (Pattern 3) — emergency backstop
  3. ✅ Proposal validation hooks (Pattern 4) — auto-detect critical actions

Enhanced defense (>$10M TVL):

  1. ✅ Vote escrow with lock period (Pattern 2)
  2. ✅ Adaptive quorum (Pattern 5)

Maximum security (>$100M TVL):

  1. ✅ Time-weighted voting (Pattern 6)
  2. ✅ Optimistic governance (Pattern 7)

Monitoring (all protocols):

  • Alert on large token transfers to new addresses
  • Monitor proposal creation from recent token acquirers
  • Track delegation concentration changes
  • Alert on proposals targeting admin/upgrade/oracle functions

The Solana Parallel: SPL Governance Risks

Solana’s governance tooling (SPL Governance, Realms) faces the same attack classes with Solana-specific twists:

// Solana SPL Governance: Ensure voting weight uses token lock, not balance
pub fn get_voter_weight(
    governing_token_deposit: &GoverningTokenDeposit,
) -> Result<u64> {
    let deposit_time = governing_token_deposit.deposit_timestamp;
    let current_time = Clock::get()?.unix_timestamp;
    let holding_duration = current_time - deposit_time;

    // Require minimum 3-day deposit before voting weight activates
    if holding_duration < 3 * 86400 {
        return Ok(0);
    }

    Ok(governing_token_deposit.amount)
}

Key differences on Solana:

  • No flash loans in the EVM sense, but atomic CPI chains can achieve similar effects
  • SPL Governance uses explicit deposit/withdrawal of tokens into governance accounts
  • Realms voter weight plugins allow custom weight calculations — use them for time-weighting
  • Account close attacks can disrupt governance records if not properly handled

The Cost of Doing Nothing

The governance attack surface is expanding because:

  1. More DAOs are being created — Aragon, Tally, and Realms make DAO deployment trivial, but don’t enforce security best practices
  2. Token concentration is increasing — Low-float tokens on secondary chains make quorum-level purchases affordable
  3. Cross-chain governance is emerging — Multi-chain voting adds bridge delays, finality gaps, and synchronization vulnerabilities
  4. AI-assisted attacks are coming — LLMs can scan proposal thresholds, model attack economics, and identify vulnerable DAOs automatically

The Moonwell attack cost $1,800. The next one might cost $18. If your protocol uses on-chain governance without at minimum snapshot voting, vote escrow, and an emergency guardian, you’re not “decentralized” — you’re just undefended.

This analysis is part of the DeFi Security Research series. All code examples are for educational and defensive purposes. Previous entries covered the Aave V3 fork epidemic, the zero-cost Solana security pipeline, and custom detector development.

Replacing SCCM with FOG Project

Replacing SCCM with FOG Project

When I moved our infrastructure from Hyper-V to Proxmox, I also took the chance to rip out one of the heaviest pieces of the old stack: SCCM.

For an enterprise with thousands of endpoints and a full Microsoft licensing budget, SCCM can make sense. For four instructional labs with 72 workstations, it was too much. It wanted Windows Server, SQL Server, licensing baggage, and constant babysitting just to do the thing I actually needed: boot a machine over the network, lay down a clean image, put it back in the domain, and get out of the way.

FOG Project was the answer.

This post is the technical deep-dive for the imaging side of the migration. For the full Hyper-V to Proxmox migration story, see the migration deep-dive.

The environment I was replacing

The target was straightforward on paper:

  • 4 classrooms
  • 72 total workstations
  • 3 hardware-specific Windows 11 images
  • 47 machines with known MAC addresses at import time
  • 25 machines that would need to self-register on first PXE boot
  • Active Directory domain join after imaging
  • Room-specific OU placement

The architecture ended up looking like this:

  • FOG server: Debian Trixie 13 LXC on Proxmox, 10.0.1.20
  • Domain controllers / DHCP: Windows Server, 10.0.1.10 and 10.0.1.11
  • Domain: LAB.LOCAL
  • Join account: [email protected]
  • Rooms: Room-A, Room-B, Room-C, Room-D
  • Images: Win11-Lab-G4, Win11-Lab-Ultrawide, Win11-Lab-G9

I did not build images in Proxmox VMs. I built them on reference machines that matched the real lab hardware. The rooms were not identical. One had HP G4s, one had HP G9s, and two rooms had Dell FCT2250s paired with Dell UltraSharp 49″ curved monitors (U4924DW/U4919DW), which needed their own driver set.

Three golden images, three hardware profiles:

Room Image
Room-A Win11-Lab-G4
Room-B Win11-Lab-Ultrawide
Room-C Win11-Lab-Ultrawide
Room-D Win11-Lab-G9

Active Directory prep

The Linux box gets the attention in a FOG write-up, but the boring Windows prep is what made the deployment clean.

I created a least-privilege service account called svc-domainjoin and delegated only what FOG needed on the classroom OUs: create computer objects, delete computer objects, and full control on descendant computer objects.

The OU layout was one OU per room. Then I delegated permissions with dsacls:

dsacls "OU=Room-A,DC=LAB,DC=LOCAL" /I:T /G "LABsvc-domainjoin:CC;computer"
dsacls "OU=Room-A,DC=LAB,DC=LOCAL" /I:T /G "LABsvc-domainjoin:DC;computer"
dsacls "OU=Room-A,DC=LAB,DC=LOCAL" /I:S /G "LABsvc-domainjoin:GA;;computer"

Same pattern on all four classroom OUs.

Before touching imaging at all, I cleaned house in AD: moved 38 misplaced computer objects into the right OUs, deleted 60 stale ones from old naming schemes, unlinked the SCCM GPO from the room OUs, and exported a CSV of all 72 lab machines.

Then I set DHCP options 66 and 67 on the classroom scopes to point to FOG:

  • Option 66: 10.0.1.20
  • Option 67: initially ipxe.efi

Should have been enough. It was not.

The SCCM ghost in DHCP

PXE still misbehaved on some scopes even with the scope-level options pointing to FOG.

The culprit was stale SCCM and WDS policies still attached to several scopes. DHCP policies take priority over scope options. Clients matching the PXE vendor class were quietly getting sent to the retired SCCM server at 10.0.1.14 instead of FOG at 10.0.1.20. The old policies referenced smsbootx64wdsmgfw.efi and smsbootx64wdsnbp.com with the old boot server IP.

Eleven of those policies, spread across five scopes. Once I removed them all, PXE stopped getting hijacked by dead infrastructure.

Note: If PXE settings look right but clients keep booting somewhere else, check DHCP policies before you blame FOG.

FOG on Debian Trixie: three bugs in a trenchcoat

The FOG server was a Debian 13 LXC container on Proxmox. When I first looked at it, the web UI was running, which made it look installed.

It was not. The backend was missing entirely. No TFTP boot files. No NFS exports. No FOG services. The web UI was a shell with nothing behind it.

Re-ran the installer:

cd /tmp/fogproject/bin
bash installfog.sh -y

Trixie had other plans.

Bug 1: wrong osid

FOG had the wrong OS ID in .fogsettings. It detected the machine as Arch Linux instead of Debian. Fix in /opt/fog/.fogsettings:

osid='3'

to:

osid='2'

Without that, every package operation targeted the wrong distro.

Bug 2: libcurl4 renamed on Debian 13

Debian 13’s t64 transition renamed libcurl4 to libcurl4t64. FOG’s installer still asked for the old name. I patched the package check in functions.sh to handle Debian >= 13.

Bug 3: lastlog became lastlog2

FOG’s installer checks lastlog to verify user creation. Trixie dropped it for lastlog2. Quick fix:

apt-get install -y lastlog2
ln -sf /usr/bin/lastlog2 /usr/local/bin/lastlog

Once I patched all three, the installer completed and the backend finally matched the web UI.

NFS inside LXC: the container wall

With the installer patched, the next wall was image storage. FOG uses NFS for capture and deployment. Inside a Proxmox LXC container, kernel NFS does not cooperate:

mount: /proc/fs/nfsd: permission denied

I tried the usual Proxmox container feature flags:

pct set <CTID> -features nesting=1,nfs=1
pct reboot <CTID>

Better, but still not a reliable kernel NFS server. I stopped fighting it and went userspace: nfs-ganesha.

apt install nfs-ganesha nfs-ganesha-vfs

One annoying gotcha: Ganesha’s pseudo paths cannot nest. Having /images and /images/dev as pseudo paths breaks child lookup. I had to flatten the namespace.

The working /etc/ganesha/ganesha.conf:

NFS_CORE_PARAM {
    Protocols = 3,4;
    mount_path_pseudo = true;
    allow_set_io_flusher_fail = true;
}

EXPORT {
    Export_Id = 1;
    Path = /images;
    Pseudo = /images;
    Protocols = 3,4;
    Access_Type = RO;
    Squash = no_root_squash;
    FSAL { Name = VFS; }
    CLIENT { Clients = *; Access_Type = RO; }
}

EXPORT {
    Export_Id = 2;
    Path = /images/dev;
    Pseudo = /imagesDev;
    Protocols = 3,4;
    Access_Type = RW;
    Squash = no_root_squash;
    FSAL { Name = VFS; }
    CLIENT { Clients = *; Access_Type = RW; }
}

The critical line for LXC: allow_set_io_flusher_fail = true;. Without it, Ganesha dies with EPERM on PR_SET_IO_FLUSHER. That flag lets it skip the kernel call and keep running.

Verify with showmount -e localhost and rpcinfo -p localhost. If both look right, NFS is serving.

Note: Kernel NFS in LXC was a dead end. Userspace NFS was the practical way through it.

The golden image pipeline

With the server side stable, the real work was image prep. Same process every time:

  1. clean install Windows 11 on the reference machine
  2. install drivers, software, updates, and room-specific settings
  3. keep it off the domain
  4. install the FOG client if needed for post-deploy tasks
  5. clean it aggressively
  6. sysprep and shut down
  7. PXE boot and capture in FOG

Step 5 became its own thing. The cleanup one-liner I kept copy-pasting between machines. Ugly, but it works:

Stop-Service wuauserv -Force; Remove-Item C:WindowsSoftwareDistribution* -Recurse -Force -EA SilentlyContinue; Start-Service wuauserv; Dism /online /Cleanup-Image /StartComponentCleanup /ResetBase; Remove-Item C:WindowsPanther* -Recurse -Force -EA SilentlyContinue; Remove-Item C:WindowsTemp* -Recurse -Force -EA SilentlyContinue; Remove-Item C:WindowsPrefetch* -Recurse -Force -EA SilentlyContinue; Remove-Item "$env:TEMP*" -Recurse -Force -EA SilentlyContinue; Clear-RecycleBin -Force -EA SilentlyContinue; cleanmgr /sagerun:1; C:WindowsSystem32Sysprepsysprep.exe /oobe /generalize /shutdown

I started calling it the Frankenstein command. It’s stitched together from half a dozen different guides and does way too much in one line. But for repeatable image prep, it earned its place.

Broken down:

  • Stop-Service wuauserv -Force / Remove-Item SoftwareDistribution / Start-Service wuauserv: kill Windows Update, nuke the cache, bring it back.
  • Dism /online /Cleanup-Image /StartComponentCleanup /ResetBase: collapse superseded component versions. Frees real space.
  • The four Remove-Item lines: purge Panther logs, system temp, Prefetch, and user temp.
  • Clear-RecycleBin: self-explanatory.
  • cleanmgr /sagerun:1: Disk Cleanup with preconfigured settings.
  • sysprep.exe /oobe /generalize /shutdown: strip machine identity, stage OOBE, power off.

Note: After sysprep shuts the machine down, do not let it boot back into Windows before capture. If it does, you just spent your sysprep state and get to do it again.

Sysprep on Windows 11: Appx package hell

The worst part of this project was not FOG. It was Sysprep.

If you’ve fought Windows 11 Sysprep before, you know the error. If you haven’t, it looks like this in the Panther logs:

Sysprep was not able to validate your Windows installation.

More specifically:

Package <app> was installed for a user, but not provisioned for all users. This package will not function properly in the sysprep image.
Failed to remove apps for the current user: 0x80073cf2.

On Windows 11 23H2 and 24H2, the Microsoft Store silently updates Appx packages per-user. That creates a version mismatch between the installed state and the provisioned state. Sysprep sees it, panics, refuses to generalize.

What I tried that did not work:

  • Remove-AppxPackage -AllUsers
  • Remove-AppxProvisionedPackage
  • the mythical SkipAppxValidation registry setting
  • editing Generalize.xml
  • renaming AppxSysprep.dll

Some fail outright. Some appear to work, then the packages come back after a reboot. Some just swap one error for a different one.

What actually worked: changing the source image entirely.

I used Chris Titus Tech’s WinUtil to build a MicroWin ISO. Instead of installing stock Windows and spending hours ripping Store junk back out, I started from a clean ISO that never had the Appx baggage in the first place.

Prevention over cleanup:

  1. build MicroWin ISO
  2. install on the reference machine
  3. configure drivers and software
  4. disconnect from the network before sysprep if needed
  5. run the cleanup command
  6. sysprep, shut down, capture immediately

That was the difference between fighting Sysprep every time and having it just work.

PXE on newer hardware: snponly.efi

One more issue that looked like FOG but wasn’t. A newer motherboard would download ipxe.efi, start up, and freeze at:

iPXE initializing devices...

No ok. Just stuck.

iPXE’s built-in NIC driver couldn’t handle the newer chipset. The fix: switch DHCP option 67 from ipxe.efi to snponly.efi.

The difference is simple. ipxe.efi ships its own NIC drivers. snponly.efi delegates to the UEFI firmware’s native SNP driver. On newer boards, the firmware driver works where iPXE’s doesn’t.

One DHCP change, ipxe.efi to snponly.efi, and the machine booted straight to the FOG menu. It became the default for all our UEFI clients.

72 systems, deployed by room

With images captured and PXE stable, FOG could finally do its job.

Bulk imported the workstation list from CSV:

  • 47 had MAC addresses ready for direct import
  • 25 had no active lease at the time, so they were left to auto-register when first PXE booted

Each host got the right image and room group. Deploying a room was: select the group, schedule a deploy task, PXE boot the room. That’s it.

FOG uses Partclone under the hood, so it only transfers used blocks. A 500 GB drive with 30 GB used doesn’t push 500 GB over the wire. It pushes roughly 30 GB, compressed. Room-wide imaging is faster than people expect.

After deployment, the FOG client sets the hostname, joins the domain via svc-domainjoin, and drops the computer object in the correct OU. Multicast is also available for imaging an entire room simultaneously.

What I learned

Setting up FOG is not just “install FOG.” It’s DHCP policy archaeology, AD delegation, Windows image hygiene, boot loader compatibility, and the reality of running services inside Linux containers.

The short list:

  • DHCP policies override scope options. Check for leftover WDS/SCCM policies before blaming FOG.
  • A running web UI does not mean FOG is installed. Verify TFTP, services, and NFS.
  • FOG on Debian Trixie needs manual patches. osid, libcurl4t64, lastlog2.
  • Kernel NFS in Proxmox LXC is a dead end. Use nfs-ganesha.
  • Build images on reference machines. VM images don’t carry driver quirks correctly.
  • Debloat before install, not after. MicroWin saves hours of Appx cleanup.
  • Test Sysprep on something disposable first. Appx breakage on your finished image is a bad time.
  • snponly.efi for newer hardware. If iPXE hangs at device init, switch boot files.
  • Never boot a sysprepped machine before capture. Generalize is one-shot.
  • FOG’s hostName is VARCHAR(16). Plan your naming accordingly.

Once the rough edges were filed down, the day-to-day got simple. Pick the room. PXE boot. Image. Domain join. Done. Way less overhead than SCCM ever was.

That’s the kind of boring I want from lab infrastructure.

This post is part of a larger infrastructure migration series. For the full Hyper-V to Proxmox migration story, see the project page on solomonneas.dev.

Originally published at solomonneas.dev.