Keep_AS — The System That Refuses to Let You Miss Opportunities

This is a submission for the Notion MCP Challenge

🧠 Keep_AS — The system that refuses to let you fail

What I Built

There is a moment we all know.

You find an opportunity.
A job. A scholarship. A hackathon.

You tell yourself:
“I’ll do it later.”

Later becomes tomorrow.
Tomorrow becomes never.

And nothing crashes.
No error message.
No alarm.

Just… silence.

And another opportunity dies.

Keep_AS was born from that frustration.

Not because we lack talent.
But because we lack execution systems.

💡 The Idea

Keep_AS is not a productivity app.

It’s an AI-powered execution system that:

  • Takes an opportunity (job, project, goal)
  • Breaks it into structured, actionable tasks
  • Tracks your behavior
  • Pushes you to act
  • And refuses to let you ignore what matters

🎥 Video Demo

💻 Show us the code

⚙️ How It Works

1. Input: Raw Opportunity

User pastes something like:

“Software Engineer Internship — Deadline March 30 — Requires CV, cover letter, portfolio”

2. AI Parsing

We use an AI parser to extract:

  • Deadline
  • Required documents
  • Skills
  • Priority

3. Task Generation

The system transforms it into a task graph:

  • Prepare CV
  • Write Cover Letter
  • Build Portfolio
  • Submit Application
  • Track Deadline

4. Notion MCP Integration (Core of this project)

This is where the magic happens.

Using Notion MCP, Keep_AS becomes a real system:

🔹 A Notion Database is created automatically

Each task becomes a structured entry:

Task Status Priority Due Date
Prepare CV Todo High March 28

🔹 Real-time updates

  • Tasks are updated as you progress
  • Status changes trigger behavior tracking

🔹 Human-in-the-loop system

Notion acts as:

  • The interface
  • The memory
  • The control system

🧩 System Architecture

 User Input (Opportunity)
            │
            ▼
┌─────────────────────┐
│   AI Parser         │
└─────────────────────┘
            │
            ▼
┌─────────────────────┐
│ Task Graph Generator│
└─────────────────────┘
            │
            ▼
┌─────────────────────┐
│ Notion MCP          │
│ (Database + Pages)  │
└─────────────────────┘
            │
            ▼
┌─────────────────────┐
│ Momentum Engine     │
│ (Behavior Tracking) │
└─────────────────────┘
            │
            ▼
┌─────────────────────┐
│ User Feedback Loop  │
└─────────────────────┘

This creates:

  • Accountability
  • Urgency
  • Psychological pressure (the good kind)

🔥 What Makes This Special

Most tools:
→ Store tasks

Keep_AS:
→ Forces execution

🚫 No more:

  • “I forgot”
  • “I’ll do it later”
  • “I didn’t have time”

✅ Instead:

  • Structured action
  • Clear path
  • Constant pressure
  • Visible progress

🧠 Why Notion MCP Was Critical

Without Notion:
→ This is just another AI demo

With Notion MCP:
→ This becomes a living system

Notion provides:

  • Persistent structured data
  • Real-time updates
  • Human interaction layer
  • Visual clarity

It turns AI output into actionable reality

❤️ The Real Problem We’re Solving

This isn’t about productivity.

It’s about missed opportunities.

People don’t fail because they are not smart.

They fail because:

  • They don’t start
  • They don’t continue
  • They don’t finish

🚀 What’s Next

  • Real-time reminders
  • Calendar integration
  • Mobile notifications
  • Multi-opportunity tracking
  • AI coaching layer

🏁 Final Thought

Keep_AS is not here to organize your tasks.

It’s here to make sure:
you don’t abandon your future silently.

Gleam Has a Free Type-Safe Language That Runs on the BEAM — Erlang’s Power, Modern Syntax

The BEAM Problem

Erlang powers WhatsApp (2 billion users, 50 engineers). Elixir made it beautiful. But both have a secret weakness: no static types.

Your Elixir app works great — until production reveals a type mismatch that the compiler never caught.

Gleam fixes this. Full static types. Runs on the BEAM. Zero runtime overhead.

What Gleam Gives You

Type-Safe Erlang/Elixir Interop

import gleam/io
import gleam/int

pub fn main() {
  let answer = add(20, 22)
  io.println("The answer is: " <> int.to_string(answer))
}

fn add(a: Int, b: Int) -> Int {
  a + b
}

Every function has types. The compiler catches mistakes before runtime.

Pattern Matching

pub type Shape {
  Circle(radius: Float)
  Rectangle(width: Float, height: Float)
}

pub fn area(shape: Shape) -> Float {
  case shape {
    Circle(r) -> 3.14159 *. r *. r
    Rectangle(w, h) -> w *. h
  }
}

Forget a case? Compiler error. Not a runtime crash at 3 AM.

Use All of Erlang’s Libraries

// Call Erlang's crypto module directly
@external(erlang, "crypto", "strong_rand_bytes")
fn random_bytes(size: Int) -> BitArray

Gleam compiles to Erlang. Every OTP library works. GenServers, supervisors, ETS tables — all available.

Also Compiles to JavaScript

gleam build --target javascript

Same code, runs in Node.js or the browser. One language, two runtimes.

Quick Start

curl -sSf https://gleam.run/install | sh
gleam new my_project
cd my_project
gleam run

Why This Matters

The BEAM VM is the best runtime for concurrent, fault-tolerant systems. Gleam adds the one thing it was missing: a modern type system that catches bugs at compile time.

If you’re building APIs, real-time systems, or anything that needs 99.999% uptime — Gleam deserves a look.

Need to collect data for your BEAM applications? Check out my web scraping actors on Apify Store — structured data, ready to process. For custom solutions, email [email protected].

Building a Firecracker VM Orchestrator in Go — Part 1: Provider Interfaces

Spec-Driven Development Workflow

Building a Firecracker VM Orchestrator in Go — Part 1: Provider Interfaces

Introduction

I’m building Flames, an open-source control plane for managing microVMs powered by Firecracker and Jailer. The goal is a straightforward API to spin up, orchestrate, and tear down lightweight VMs — the kind of ephemeral, hardware-isolated environments that are becoming critical infrastructure. Especially in the AI ecosystem, where you’re running untrusted code, agent workflows, or sandboxed execution, container-level isolation isn’t enough. You need real VM boundaries with Jailer-enforced security, and you need it to be fast and programmable. That’s what Flames is for.

I’ve been coding with AI agents for a while now, but what’s different this time is that I’m using ContextPin as my main AI coding workspace — organizing specs, context, and decisions in one place so the AI always has what it needs. Spec-Driven Development, essentially.

Spec-Driven Development Workflow

I’m documenting the whole journey here.

The idea is simple: I write the specs, I bring my Go experience to the table, and I let AI handle the bulk of the implementation. This frees me up to spend more time on architecture, code review, and making sure the design decisions are sound — thinking about interfaces, data flow, concurrency trade-offs — while moving through the implementation phase much faster than I could solo.

This first spec tackles the most foundational piece: the provider interfaces. Five abstractions that decouple the entire control plane from any specific infrastructure backend.

The Problem

Flames needs to store VM state, cache data, queue background jobs, store blobs, and expose VMs via ingress. But I’ve been burned before by coupling to a specific database or queue system too early. A developer running go run locally shouldn’t need a database cluster. A production deployment should plug in real backends without changing application code.

If you’ve written Go for any amount of time, you know the answer: narrow interfaces with in-memory defaults. The interesting part is getting the contracts right on the first pass — and that’s where the spec-driven approach really pays off.

The green nodes are the five provider interfaces — the abstraction boundary. The dark nodes are the domain models each interface operates on. The control-plane components at the top consume only interfaces, never concrete implementations.

The Spec

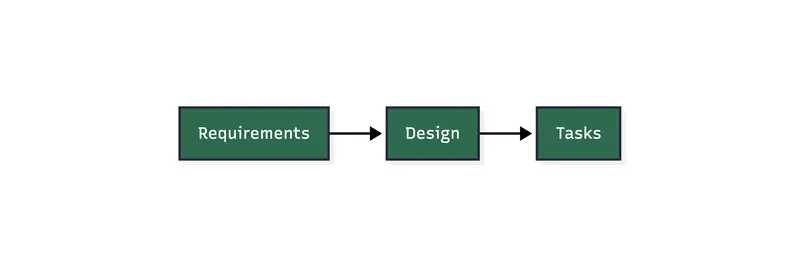
Before writing a single line of Go, I wrote three structured notes in ContextPin:

  • Requirements — 7 user stories, 30+ functional requirements, acceptance criteria, and non-functional constraints. This is the contract.
  • Design — Package layout, dependency graph, data models, interface signatures, implementation notes, and risk analysis. This is the blueprint.
  • Tasks — The ordered implementation checklist derived from the design.

Having these written down before implementation meant I could hand them to Claude Code and say “build this” — and then spend my time reviewing the output against my own spec rather than dictating every line. The spec becomes the shared language between me and the AI.

The Five Interfaces

  • StateStore (provider/state) — VM, controller, and event records. Default: memstate (maps + mutex)
  • BlobStore (provider/blob) — Opaque artifact storage. Default: memblob (byte slices)
  • CacheStore (provider/cache) — Ephemeral key-value caching. Default: memcache (map + TTL)
  • WorkQueue (provider/queue) — Background job processing. Default: memqueue (slices + leases)
  • IngressProvider (provider/ingress) — VM service exposure. Default: noop (no network ops)

Each interface lives in its own package, imports only from model/ and provider/providererr/, and has zero external dependencies in its default implementation. This is the kind of structure I’d set up in any Go project — clean import graphs, no circular dependencies, everything testable in isolation.

Key Design Decisions

These are the calls I made during the spec phase — the kind of decisions that are hard to delegate to AI because they require judgment about where the project is heading.

Interface-per-package over monolithic provider

One interface per package rather than a single Provider mega-interface. I’ve seen the mega-interface approach in other projects and it always ends the same way: a component that only needs blob storage ends up importing the entire provider dependency tree. Keeping them separate also maps cleanly to future adapter packages — provider/state/postgres imports provider/state and nothing else.

Non-blocking Dequeue

WorkQueue.Dequeue returns ErrNoJobs instead of blocking. I went back and forth on this one, but non-blocking is simpler to implement correctly across all backends. The callers (reconciler, scheduler) will already run on tick-based loops anyway. If we ever need a push model, that’s a separate optional interface — not a change to the core contract.

Conformance test suites

This is the one I’m most excited about. Every interface has a shared test suite in providertest/ that any adapter can import and run. The in-memory default passes it today. A future Postgres adapter runs the exact same tests. This is what turns interfaces from “type signatures that might work” into actual enforceable contracts. During review, I spent most of my time here — making sure the test cases cover the edge cases that matter.

Structured errors with errors.Is support

Provider errors carry metadata (resource type, ID) and support errors.Is matching against sentinels like ErrNotFound, ErrConflict, ErrCacheMiss. No string matching, ever. This is a pattern I’ve used in every serious Go project — the upfront cost is minimal and it saves hours of debugging later.

Reflections on the Workflow

I didn’t write these specs by hand, line by line. I brought my Go and infra expertise — I’d already done a Firecracker + Jailer proof of concept internally — and explained exactly how I wanted the architecture to work. The AI helped me turn that into structured requirements, design docs, and task breakdowns. It’s a conversation, not dictation.

But once the specs were done and living in ContextPin, everything moved fast. The AI produced code that matched my design because the design was explicit, not in my head. My review cycles were focused: does this match the spec? Does it handle the edge cases? Are the error types right?

I spent almost no time on implementation details and almost all my time on the things that matter for long-term quality: interface design, concurrency safety, test coverage.

What’s Next

With the provider interfaces in place, the next spec will build on top of them — likely the API server or scheduler, which consume these interfaces via constructor injection. The in-memory defaults mean I can develop and test the next layer without standing up any infrastructure. That’s the whole point.

This post is part of the Flames Spec-Driven Development series.

This entire project is being built using ContextPin + Claude Code. ContextPin is an ADE (Agentic Development Environment) — a GPU-accelerated desktop app designed for AI-assisted development that integrates directly with Claude Code, Codex, Gemini and OpenCode. ContextPin is going open-source soon. If you want to get early access, you can join here.

SafeBrowse: A Trust Layer for AI Browser Agents (Prevent Prompt Injection & Data Exfiltration)

If your agent can browse the web, download files, connect tools, and write memory, a stronger model is helpful, but it is not enough.

I built SafeBrowse to sit on the action path between an agent and risky browser-adjacent surfaces. It does not replace the planner or the model. Instead, it evaluates what the agent is trying to do and returns typed verdicts like ALLOW, BLOCK, QUARANTINE_ARTIFACT, or USER_CONFIRM.

The short version:

Your model decides what it wants to do.

SafeBrowse decides what it is allowed to do.

Today, the Python client is live on PyPI as safebrowse-client, and the full project is here:

Why I built this

A lot of agent safety discussion still sounds like “just use a better model” or “add more prompt instructions.”

That helps, but it does not solve the actual runtime problem.

A browsing agent can still get into trouble through:

  • prompt injection hidden in normal web pages
  • poisoned PDFs or downloaded artifacts
  • connector or tool onboarding abuse
  • OAuth callback abuse
  • durable memory poisoning
  • long-context social engineering that looks operationally plausible

Those are not just model-quality problems. They are control-boundary problems.

So SafeBrowse keeps the product boundary narrow:

  • adapters observe and propose actions
  • SafeBrowse evaluates and constrains
  • the planner or model stays external

What SafeBrowse does

SafeBrowse currently includes:

  • a TypeScript core runtime
  • a localhost daemon
  • a thin Python client
  • a Playwright reference adapter
  • policy and knowledge-base tooling
  • a live threat lab and comparison dashboard

The runtime evaluates:

  • page observations
  • actions like navigation or sink transitions
  • downloaded artifacts
  • tool / connector onboarding
  • OAuth callback flows
  • durable memory writes
  • replay and forensic logging

The most important hardening in the current branch is around connector and OAuth abuse:

  • verified registry-backed connector preparation
  • exact redirect and callback-origin verification
  • approval-bound onboarding
  • callback verification with state binding
  • artifact-to-tool taint propagation
  • replay bundles with policy provenance

Why this still matters with OpenAI or Claude

Hosted model platforms already have useful safety features. I am not claiming otherwise.

But SafeBrowse is useful for a different reason: it is app-side enforcement.

Model-native safety helps with:

  • stronger refusal behavior
  • better resistance to obvious jailbreaks
  • moderation / guardrail layers
  • tool approval primitives

SafeBrowse adds:

  • deterministic allow/block decisions
  • verified connector registry checks
  • OAuth callback and origin validation
  • artifact lineage and quarantine behavior
  • memory-write policy
  • replayable forensic logs

Better models reduce how often the agent wants to do the wrong thing.

SafeBrowse reduces what the agent is allowed to do when it still wants the wrong thing.

What I tested

I built a live threat lab that runs:

  • a raw agent
  • an SDK-protected agent

against the same model backend

For the frozen model-backed snapshot in the repo, both agents used the same local Qwen backend. The point was to measure the middleware difference, not hide behind a model swap.

Frozen batch summary:

  • completed comparisons: 22
  • raw-agent compromises: 21
  • SDK bypasses: 0

Here are a few representative rows:

Threat Raw Agent Agent + SDK Verdict
Visible direct override Compromised Contained BLOCK
Hidden instruction layer Compromised Stayed read-only ALLOW
Poisoned PDF handoff Compromised Quarantined QUARANTINE_ARTIFACT
Schema-poisoned trusted connector Compromised Contained BLOCK
Appendix-to-connector chain Compromised Contained BLOCK
Benign research page Stayed read-only Stayed read-only ALLOW

The connector cases were the most interesting. In early versions, euphemistic onboarding text and schema-poisoned manifests could still push the agent toward unsafe callback flows. The hardened v2 path closes those by treating registry trust, approval binding, callback origin, and state as runtime-enforced constraints instead of model-accepted hints.

How people use it

The Python package is intentionally thin.

It is not the full policy engine in Python. It is a client for the SafeBrowse daemon.

A typical flow looks like this:

  1. your browser agent reads a page
  2. your app sends the observation to SafeBrowse
  3. your model proposes a next step
  4. your app asks SafeBrowse to evaluate that action
  5. your browser only executes if SafeBrowse allows it

Quick start

Install the Python client:


bash
pip install safebrowse-client

How to Build a Bank Ledger in Golang with PostgreSQL using the Double-Entry Accounting Principle

Frontend view

I wrote a detailed tutorial on FreeCodeCamp about building a secure bank ledger backend in Golang with PostgreSQL, using double-entry accounting principles.
check it out here.
freecodecamp tutorial ink: https://www.freecodecamp.org/news/build-a-bank-ledger-in-go-with-postgresql-using-the-double-entry-accounting-principle/
Backend GitHub repo :
https://github.com/PaulBabatuyi/double-entry-bank-Go
Live demo: https://golangbank.app
Frontend Nextjs Typescript : https://github.com/PaulBabatuyi/double-entry-bank
And incase you want to check out my portfolio: https://paulbabatuyi.app

Frontend view

Backend API endpoint; Swagger

Day 24: Agentic AI in DevOps & MLOps ⚙️🚀

Executive Summary

DevOps and MLOps are where agentic AI becomes real infrastructure.

Unlike research or product agents, DevOps/MLOps agents:

  • touch production systems 🧨
  • trigger deployments
  • modify infrastructure
  • influence reliability, cost, and security

This makes them:

  • extremely powerful
  • extremely dangerous if designed poorly

This chapter goes deep into:

  • where agentic AI fits in DevOps & MLOps
  • safe architectural patterns
  • concrete implementations
  • observability, analytics, and cost controls
  • real-world use cases and failure modes

Think of these agents as junior SREs that never sleep — and must never panic.

Why DevOps & MLOps Are Agent-Native Domains 🧠

DevOps/MLOps work is:

  • procedural
  • reactive
  • signal-driven
  • repetitive under pressure

Classic loop:

Observe → Diagnose → Decide → Act → Verify

This maps perfectly to agentic systems.

But mistakes here cause:

  • outages
  • data corruption
  • massive cloud bills 💸

So autonomy must be earned, not assumed.

What DevOps Agents SHOULD and SHOULD NOT Do 🚦

SHOULD

  • detect anomalies early 📈
  • correlate logs, metrics, traces
  • propose remediation actions
  • automate low-risk responses

SHOULD NOT

  • deploy to prod unreviewed ❌
  • change infra topology autonomously
  • bypass incident processes

Default stance: read-only, then graduate.

Canonical Architecture: DevOps Agent System 🏗️

Signals (Metrics, Logs, Traces)
            ↓
     Observation Agent
            ↓
     Diagnosis Agent
            ↓
     Decision Agent
            ↓
   Action Validator & Policy Engine
            ↓
     Execution Agent
            ↓
     Verification & Rollback

Autonomy increases layer by layer.

Core Signals Ingested 📥

Signal Systems
Metrics Prometheus, Datadog
Logs ELK, OpenSearch
Traces Jaeger, Tempo
Deployments ArgoCD, Spinnaker
ML Metrics Evidently, WhyLabs

Agents reason across signals humans rarely correlate manually.

Use Case 1: Incident Triage Agent 🚨🧑‍🚒

Problem

  • alerts fire without context
  • engineers wake up blind

Agent Flow

Alert → Log correlation → Change detection → Hypothesis → Suggested action

Outcome

  • faster MTTR
  • fewer false escalations

Use Case 2: Deployment Risk Assessment 🧪📦

Before deployment, an agent evaluates:

  • recent incidents
  • test coverage changes
  • traffic patterns

Produces:

  • risk score
  • deploy / delay recommendation

Humans still approve.

Use Case 3: MLOps Drift Detection & Response 📉🧠

Agents monitor:

  • data drift
  • prediction drift
  • performance decay

Agent actions:

  • retraining proposal
  • rollback suggestion
  • alert routing

Example: Incident Diagnosis Agent (Pseudo-Code) 💻

def diagnose_incident(metrics, logs, traces):
    anomalies = detect_anomalies(metrics)
    correlated_logs = correlate_logs(logs, anomalies)
    recent_changes = find_recent_deployments()

    hypothesis = generate_hypothesis(
        anomalies,
        correlated_logs,
        recent_changes
    )
    return hypothesis

Diagnosis > reaction.

Policy-Gated Execution (Critical) 🔐

No agent action should skip policy checks.

IF action == "restart"
AND service_tier == "critical"
THEN require human approval

Policies protect uptime and engineers.

Tool Wrapping Pattern 🧩

Agent → Safe Wrapper → kubectl / API

Wrappers enforce:

  • environment checks
  • blast radius limits
  • rollback readiness

Never expose raw infrastructure tools.

Observability for DevOps Agents 👀📊

Track:

  • agent suggestions vs approvals
  • automated actions taken
  • rollback frequency
  • false positive rate

These metrics define trust.

Cost & Performance Analytics 💸📉

Agents can:

  • detect over-provisioning
  • recommend scale-downs
  • flag runaway jobs

But scaling actions must be staged and reversible.

Failure Modes Seen in Production 🚨

Failure Cause
Alert storms Poor signal filtering
Wrong remediation Shallow diagnosis
Automation fear No explainability

Agents must explain why before acting.

Case Study: SRE Assist Agent at Scale 🧑‍💻📊

Context

  • Multi-region SaaS platform

Agent Role

  • incident correlation
  • remediation suggestions

Results

  • 35% MTTR reduction
  • fewer night-time escalations

Key choice

Suggestions first. Automation later.

Tooling Ecosystem 🧰

Category Tools
Infra Kubernetes, Terraform
CI/CD GitHub Actions, ArgoCD
Observability Prometheus, Datadog
MLOps MLflow, Kubeflow

Agents integrate — they don’t replace.

Gradual Autonomy Model 📈

Observe → Suggest → Execute (Low Risk) → Execute (High Risk)

Most systems should never reach full autonomy.

Final Takeaway

Agentic AI in DevOps & MLOps is about resilience, not heroics.

The best teams:

  • automate safely
  • explain every action
  • design for rollback

An agent that can deploy must also know how to stop 🛑.

Test Your Skills

🚀 Continue Learning: Full Agentic AI Course

👉 Start the Full Course: https://quizmaker.co.in/study/agentic-ai

Teach Claude Code how to use your CLI with SKILLS.md

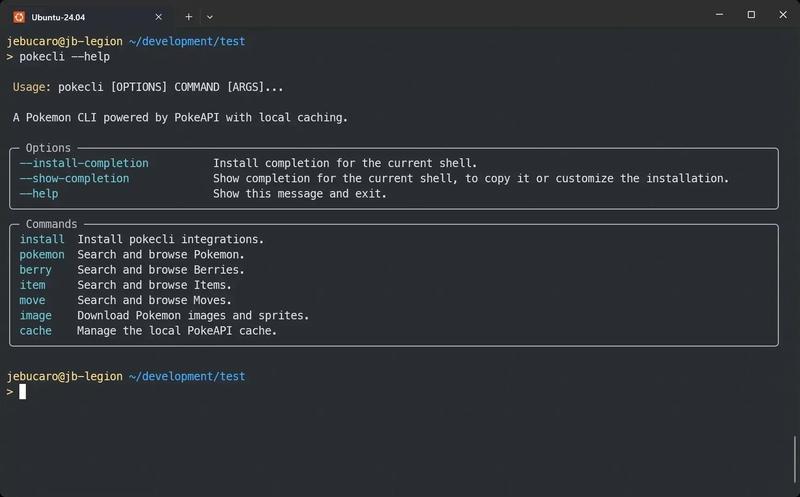
pokecli command tool running the help command

You have built a new CLI. You watch Claude Code call --help a few times, and something becomes obvious: the agent is not confused by the tool. It is re-learning the same command surface on every task because there is no compact guide telling it where to start.

That is the problem a SKILL.md solves. It does not change the CLI. It gives the agent a shorter path into the same commands it would eventually figure out on its own.

What a skill is

A skill is a folder of Markdown instructions that Claude Code loads when a request matches a set of trigger phrases. For a CLI, a well-built skill has three layers:

  1. Frontmatter – the name, a description with trigger phrases, and an allowed-tools list
  2. Body – a focused command guide the agent reads once the skill fires
  3. References – extra docs the agent can consult when the main file is not enough

Each layer has a job. The frontmatter decides when the skill loads. The body decides what the agent does first. The references keep the main file short without losing detail.

Meet pokecli

pokecli command tool running the help command

pokecli is a Python CLI I built specifically so this article had a real, inspectable example: an actual tool with actual commands that you can install, run, and then study the skill alongside. The goal was not to build the most impressive CLI. The goal was to have something concrete enough to show the pattern end to end.

It queries Pokemon, berries, items, and moves, downloads sprites, and manages a local cache. Six top-level command groups, predictable output, and a clean structure that maps well into a skill body.

Install it with uv:

uv tool install git+https://github.com/jebucaro/pokecli

pokecli installation with uv

Then install the bundled skill into ~/.claude/skills/pokecli:

pokecli install --skills

installing pokecli skills

What install --skills does

The skill files ship inside the installed package as package data. The command does not reach out to GitHub or generate anything. It reads the files bundled in the wheel and writes them to the right place on your machine.

In Python, that flow looks like this:

import shutil
from importlib import resources
from pathlib import Path

def install_skills():
    skills_dest = Path.home() / ".claude" / "skills" / "pokecli"
    skills_dest.mkdir(parents=True, exist_ok=True)

    ref_dest = skills_dest / "references"
    ref_dest.mkdir(exist_ok=True)

    # Read files bundled as package data and write them to the destination
    pkg = resources.files("pokecli.skills")
    (skills_dest / "SKILL.md").write_text(
        (pkg / "SKILL.md").read_text(encoding="utf-8")
    )
    (ref_dest / "api-fields.md").write_text(
        (pkg / "references" / "api-fields.md").read_text(encoding="utf-8")
    )

To make the skill files available as package data, declare them in pyproject.toml:

[tool.hatch.build.targets.wheel]
include = ["src/pokecli/skills/**"]

The key point is that the user does not need the repo checked out. The installed tool already carries the skill files. install --skills is just the command that puts them where Claude Code can find them.

Layer 1: The frontmatter trigger

The frontmatter is the part Claude reads all the time. It answers two questions fast: what does this skill do, and when should it load?

---
name: pokecli
description: Queries Pokémon, Berries, Items, and Moves data via the pokecli CLI. Use when the user needs to look up Pokémon stats, berries, items, or moves, download sprites, or manage the local cache. Also use when the user mentions "pokecli", "pokedex", or "PokeAPI"
allowed-tools: Bash(pokecli:*)
---

The description includes both the tool purpose and the phrases a user might actually say: pokedex, Pokemon stats, PokeAPI, download sprites. These are the real trigger words. A description that only describes the tool category without listing those phrases will miss requests.

The name should match the folder name so Claude can find the skill consistently.

Layer 2: The command guide

The body should read like a cheat sheet, not a tutorial. Short sections, command groups that mirror the CLI, examples you can copy and run.

pokecli has six top-level command groups: pokemon, berry, item, move, image, and cache. The skill body mirrors that structure:

pokecli pokemon get pikachu
pokecli berry get oran
pokecli item get master-ball
pokecli move get thunderbolt
## Core workflow

1. Query: Use `pokecli <resource> get <name_or_id>` to fetch details
2. Browse: Use `pokecli <resource> list` to paginate through all entries
3. Download: Use `pokecli image download pokemon <name> -o <path>` for sprites
4. Cache: Use `pokecli cache stats` and `pokecli cache clear` to manage local data

The agent does not need to know every flag before it starts. A quick start block and a workflow summary are enough for most requests. The rest of the command groups follow the same pattern: a few representative examples per group.

Layer 3: Reference files

Some questions do not belong in the main SKILL.md. What does base_experience mean for a Pokemon? Which sprite variants are usually available? Which fields are most useful when comparing moves?

That kind of detail goes in a separate file:

.claude/
└── skills/
    └── pokecli/
        ├── SKILL.md
        └── references/
            └── api-fields.md

The main skill stays short and loads fast. The reference file is there when Claude needs the deeper detail. This keeps the skill easier to trigger and easier to maintain over time.

The allowed-tools line

This line matters more than it looks:

allowed-tools: Bash(pokecli:*)

It tells Claude Code that this skill is allowed to run pokecli commands, but not arbitrary shell commands. That is a useful boundary. The skill is not just a convenience layer; it also scopes what the agent can do when it fires.

Does it trigger correctly?

Before shipping a skill, test both sides of the trigger. These prompts should fire it:

  • “Look up Pikachu’s stats”
  • “Show me berry data from PokeAPI”
  • “Download a sprite for Charizard”
  • “Compare Thunderbolt and Flamethrower”

These should not:

  • “Help me write a Python class”
  • “What is the weather today?”
  • “Create a spreadsheet”

If a prompt that should trigger the skill does not, the description is missing the right phrase. Add it. If a prompt that should not trigger the skill does fire, the description is too broad. Narrow it.

This is a session where I asked Claude Code three different prompts. In none of them did I explicitly mention pokecli. Claude discovered the tool and how to use it entirely from the installed skill.

  • “Look up Pikachu’s stats”
  • “Compare Thunderbolt and Flamethrower”
  • “Download a sprite for Charizard”


Using pokecli with Claude Code

You

Look up Pikachu’s stats

Agent

▸
Skill
{“skill”:”pokecli”,”args”:”Pikachu stats”}

{
  "skill": "pokecli",
  "args": "Pikachu stats"
}

Launching skill: pokecli

You

Base directory for this skill: [REDACTED]/.claude/skills/pokecli

Pokémon Data Lookup with pokecli

Quick start

pokecli pokemon get pikachu
pokecli berry get oran
pokecli item get master-ball
pokecli move get thunderbolt

Core workflow

  1. Query: Use pokecli <resource> get <name_or_id> to fetch details
  2. Browse: Use pokecli <resource> list to paginate through all entries
  3. Download: Use pokecli image download pokemon <name> -o <path> for sprites
  4. Cache: Use pokecli cache stats and pokecli cache clear to manage local data

Responses are cached locally after the first request. Use --no-cache to force a fresh fetch.

Commands

Pokemon

pokecli pokemon get pikachu
pokecli pokemon get 25
pokecli pokemon get charizard --format json
pokecli pokemon get bulbasaur --no-cache
pokecli pokemon list
pokecli pokemon list --limit 50
pokecli pokemon list --limit 20 --offset 40
pokecli pokemon moves charmander
pokecli pokemon moves 4 --format json

Berry

pokecli berry get cheri
pokecli berry get 1
pokecli berry get oran --format json
pokecli berry list
pokecli berry list --limit 10
pokecli berry list --limit 10 --offset 20

Item

pokecli item get potion
pokecli item get 1
pokecli item get master-ball --format json
pokecli item list
pokecli item list --limit 30
pokecli item list --limit 30 --offset 60

Move

pokecli move get thunderbolt
pokecli move get 24
pokecli move get surf --format json
pokecli move get flamethrower --no-cache
pokecli move list
pokecli move list --limit 40
pokecli move list --limit 20 --offset 100

Image Download

pokecli image download pokemon pikachu -o pikachu.png
pokecli image download pokemon pikachu -o pikachu_shiny.png --variant front_shiny
pokecli image download pokemon 6 -o charizard_back.png --variant back_default
pokecli image download pokemon 133 -o /tmp/eevee.png

Sprite variants: front_default, front_shiny, back_default, back_shiny, front_female, front_shiny_female

Cache Management

pokecli cache stats
pokecli cache clear
pokecli cache clear --resource pokemon
pokecli cache clear --resource item

Global options

Option Description
--no-cache Bypass local cache, fetch fresh from PokeAPI
--format table Rich formatted table output (default)
--format json Raw JSON with syntax highlighting

Example: Compare two Pokémon

pokecli pokemon get charizard
pokecli pokemon get blastoise

Example: Browse and then inspect

pokecli move list --limit 10
pokecli move get pound

Example: Download all starters

pokecli image download pokemon bulbasaur -o bulbasaur.png
pokecli image download pokemon charmander -o charmander.png
pokecli image download pokemon squirtle -o squirtle.png

Example: Look up moves a Pokémon can learn

pokecli pokemon moves pikachu
pokecli pokemon moves charizard --format json

Troubleshooting

For detailed command reference and data field descriptions, consult references/api-fields.md.

ARGUMENTS: Pikachu stats

Show more

Agent

▸
Bash
pokecli pokemon get pikachu

$ pokecli pokemon get pikachu

╭────────────────────────────────────────────────────────────╮
│ #25  Pikachu   Height: 0.4m   Weight: 6.0kg   Base XP: 112 │
╰────────────────────────────────────────────────────────────╯
 ELECTRIC 

Abilities: static  ·  lightning-rod (hidden)

Sprite: 
https://raw.githubusercontent.com/PokeAPI/sprites/master/sprites/pokemon/25.png


 Stat            Base  Bar                    
 hp                35  ███░░░░░░░░░░░░░░░░░   
 attack            55  ████░░░░░░░░░░░░░░░░   
 defense           40  ███░░░░░░░░░░░░░░░░░   
 special-attack    50  ████░░░░░░░░░░░░░░░░   
 special-defen…    50  ████░░░░░░░░░░░░░░░░   
 speed             90  ███████░░░░░░░░░░░░░

Agent

Here are Pikachu’s base stats:

Stat Value
HP 35
Attack 55
Defense 40
Sp. Attack 50
Sp. Defense 50
Speed 90

Pikachu is a pure Electric type with decent Speed being its standout stat. Its abilities are Static (may paralyze on contact) and the hidden ability Lightning Rod (draws Electric moves, raises Sp. Atk).

You

Compare Thunderbolt and Flamethrower

Agent

▸
Bash
pokecli move get thunderbolt

$ pokecli move get thunderbolt

╭──────────────────╮
│ #85  Thunderbolt │
╰──────────────────╯
  Type             Electric  
  Category         Special   
  Power            90        
  Accuracy         100%      
  PP               15        
  Effect Chance    10%       

Effect: Has a 10% chance to paralyze the target.

Agent

▸
Bash
pokecli move get flamethrower

$ pokecli move get flamethrower

╭───────────────────╮
│ #53  Flamethrower │
╰───────────────────╯
  Type             Fire     
  Category         Special  
  Power            90       
  Accuracy         100%     
  PP               15       
  Effect Chance    10%      

Effect: Has a 10% chance to burn the target.

Agent

They’re nearly identical moves — just different types and status effects:

Thunderbolt Flamethrower
Type Electric Fire
Category Special Special
Power 90 90
Accuracy 100% 100%
PP 15 15
Effect 10% Paralyze 10% Burn

The only meaningful differences:
– Paralysis (Thunderbolt) halves the target’s Speed and has a chance to skip turns — generally considered the stronger status
– Burn (Flamethrower) deals chip damage each turn and halves the target’s Attack (less useful against special attackers)

Both are among the most reliable moves in the game. Choice between them comes down to type coverage needed on your team.

Show more

You

Download a sprite for Charizard

Agent

▸
Bash
pokecli image download pokemon charizard -o charizard.png

$ pokecli image download pokemon charizard -o charizard.png

Downloading front_default sprite for charizard...
Saved to: /home/jebucaro/development/pokecli/charizard.png

Agent

Charizard’s sprite has been saved to charizard.png in your current directory ([REDACTED]/development/pokecli/charizard.png).

If you want other variants, options include: front_shiny, back_default, back_shiny, front_female, front_shiny_female.

The full version of this article goes deeper into the install flow, a side-by-side comparison with the Playwright CLI skill, a build-it-yourself challenge, and a walkthrough of the pokecli repo structure. You can find it at jonathanbucaro.com.

The key idea stays the same either way. You do not need to redesign a CLI to make it work well with an AI agent. In most cases, the missing piece is a compact guide that tells the agent when to reach for the tool and which commands to use first.

Photo by Jay on Unsplash

Pokémon and Pokémon character names are trademarks of Nintendo.

Organizing a Legacy React Project Without Blocking Delivery

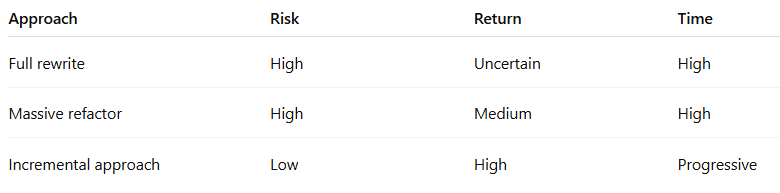
Rewriting everything from scratch often looks like the cleanest solution. In reality, it is usually the most expensive, slowest, and riskiest option. What consistently works in production environments is incremental refactoring driven by impact.

1. Diagnose before changing anything

Before reorganizing folders or introducing patterns, identify where the real cost is.

Common signals:

  • Components with 200–500+ lines
  • Business logic mixed with rendering
  • useEffect handling multiple responsibilities
  • Duplicated logic across the codebase
  • Implicit dependencies (scattered global state)

Without this mapping, refactoring becomes superficial.

2. Define a minimum standard and stop the bleed

Before fixing legacy code, prevent it from growing.

A simple baseline already improves consistency:

Components → UI only
Hooks → logic and state
Services → API communication

Rule: new code must follow the standard, even if old code does not.

3. Structure by feature, not by type

Legacy projects often use a “by type” structure (components/, utils/, etc.), which increases coupling.

A feature-based structure scales better:

src/
  features/
    users/
      components/
      hooks/
      services/
    dashboard/
  shared/
    components/
    hooks/
    utils/
  app/
    routes/
    providers/

This reduces cross-dependencies and improves ownership by domain.

4. Incremental refactoring (the only viable strategy)

Avoid large, batch refactors. The risk rarely justifies the cost.

Effective approach:

If you touch code → improve that part
If you see duplication → extract it
If logic is mixed → move it into a hook

Small, continuous improvements compound over time.

5. Separate responsibilities clearly

One of the main issues in legacy code is mixed responsibilities.

Typical example:

function Dashboard() {
  const [data, setData] = useState([])

  useEffect(() => {
    fetch('/api/data')
      .then(res => res.json())
      .then(setData)
  }, [])

  function processData() {
    // complex logic
  }

  return <div>{/* UI + logic */}</div>
}

Refactored:

// hook
export function useDashboardData() {
  const [data, setData] = useState([])

  useEffect(() => {
    fetch('/api/data')
      .then(res => res.json())
      .then(setData)
  }, [])

  return { data }
}
// component
function Dashboard() {
  const { data } = useDashboardData()
  return <DashboardView data={data} />
}

The gain is not aesthetic—it is lower coupling and higher predictability.

6. Centralize side effects

Legacy projects often suffer from duplicated requests and inconsistent state.

Standardizing with tools like React Query (TanStack) or SWR provides:

  • Automatic caching
  • Data synchronization
  • Less manual useEffect logic

Result: fewer bugs and less boilerplate.

7. Test where it matters

Full coverage in legacy systems is rarely efficient.

Prioritize:

  • Hooks (business logic)
  • Services (rules and integrations)

Lower priority:

  • Pure UI components

8. Strategy comparison

Conclusion

Organizing a legacy React project is not about achieving perfect architecture. It is about continuously reducing complexity without stopping delivery.

Clear separation of responsibilities, feature-based structure, and incremental refactoring consistently deliver the best results with the lowest risk.

Over time, this transforms unpredictable code into a system that is easier to maintain, test, and scale.

Rate Limiting Your API: Algorithms, Implementation, and the Strategic Thinking Behind It

Every API you expose to the internet will eventually be abused. Automated scrapers, credential stuffing bots, misbehaving integrations, and sometimes just a well-meaning client with a loop that runs too fast. Without rate limiting, a single bad actor can consume all your server resources and degrade the experience for every other user.

Rate limiting is one of those mechanisms that seems simple on the surface but reveals surprising depth when you implement it.

What Rate Limiting Actually Protects

Before discussing algorithms, it’s worth being explicit about the threats:

  • Resource protection: Preventing any single client from consuming a disproportionate share of CPU, memory, database connections, or bandwidth.
  • Cost control: If your API calls AI inference APIs, SMS providers, or payment processors, an unconstrained client can rack up significant charges in minutes.
  • Abuse prevention: Credential stuffing and enumeration attacks rely on volume. Rate limiting raises the cost for attackers significantly.
  • Fair access: In multi-tenant systems, rate limiting ensures one tenant’s spike doesn’t degrade everyone else’s experience.

The Four Algorithms That Matter

Fixed Window is the simplest: count requests per client in a fixed time interval, reject when the count exceeds the limit. Implementation in Redis is a single INCR with EXPIRE. The weakness is the boundary problem — a client can send the max at the end of one window and the max at the start of the next, effectively doubling their rate for a brief period.

Sliding Window Log eliminates the boundary problem by tracking timestamps of every request in the window. Accurate but memory-intensive: 1000 requests/minute × 10,000 clients = 10 million stored timestamps. Best suited for low-volume, high-value endpoints like login or password reset.

Sliding Window Counter is the recommended default. It maintains counters for the current and previous fixed windows, then computes a weighted count based on how far into the current window you are. Good balance of accuracy, memory efficiency, and implementation simplicity.

Token Bucket models rate limiting as a bucket that fills at a steady rate. Two parameters — refill rate and bucket capacity — independently control sustained throughput and burst tolerance. This is the algorithm used by most cloud providers and maps naturally to tiered pricing models.

Where to Rate Limit

Rate limiting should be layered:

  1. At the edge or load balancer (Nginx, Cloudflare, AWS API Gateway): protects application servers from receiving excessive traffic at all. Your first line of defense against volumetric abuse.
  2. At the API gateway or middleware: where you implement business-level limits by authenticated user, API key, subscription tier, or endpoint.
  3. At individual services: in microservice architectures, prevents a misbehaving upstream service from overwhelming a downstream dependency.

Each layer protects against different failure modes. Don’t rely on just one.

Communicating Limits to Clients

Good rate limiting is transparent. Every response should carry headers like X-RateLimit-Limit, X-RateLimit-Remaining, and X-RateLimit-Reset. A 429 Too Many Requests response should include a Retry-After header that tells well-behaved clients exactly when to try again. This converts rate limiting from a blunt instrument into a collaboration between your API and your consumers.

Three Key Takeaways

  1. The sliding window counter is the right default for most APIs. It provides close-to-accurate rate limiting with minimal memory overhead, without the complexity of tracking individual request timestamps.
  2. Identify clients by API key, not IP address. IP-based limiting is increasingly unreliable — users behind corporate proxies share addresses, and attackers with botnets distribute requests across thousands of IPs.
  3. Rate limits are a product decision as much as a technical one. What you allow per tier, what gets a 429 versus a graceful degradation, and how generously you size burst capacity all affect your users’ experience directly.

Read the full article at novvista.com for complete algorithm implementations, Redis code examples, and a guide to designing rate limit tiers for subscription-based APIs.

Originally published at NovVista

SQLite in Production: When the Simplest Database Is the Right One

For years the advice was automatic: SQLite is for prototypes, mobile apps, and test suites. If you’re building anything “real,” you need PostgreSQL. That advice was reasonable in 2015. It’s increasingly wrong in 2026.

SQLite powers every iPhone, every Android device, every Firefox and Chrome installation. The engine processes more queries per day than every other database engine combined. What changed isn’t SQLite’s reliability — it’s the ecosystem around it.

What Actually Changed

Litestream solved SQLite’s most critical production gap. Ben Johnson’s tool continuously replicates SQLite databases to S3-compatible storage by streaming WAL changes in near-real-time. Recovery point objectives drop to seconds. There’s no cron job, no pg_dump window, no backup interval to worry about — just a single sidecar binary and a bucket policy.

LiteFS from Fly.io uses a FUSE-based filesystem to replicate SQLite across multiple nodes. A primary handles writes; replicas in Tokyo, London, or São Paulo serve reads locally. For read-heavy applications, the latency improvement over a centralized Postgres instance is measurable and real.

libSQL / Turso forked SQLite to add a network protocol, native replication primitives, and user-defined functions without recompiling. You get embedded local performance and the ability to access the database over HTTP for tooling and admin use.

The Concurrency Misconception

The most persistent myth about SQLite is that it can’t handle concurrent access. Under WAL mode — which should be your default for any production deployment — concurrent readers never block writers and writers never block readers.

The real constraint is serialized writes: SQLite processes one write transaction at a time. On modern NVMe storage, that single writer can sustain tens of thousands of write transactions per second. For the vast majority of web applications (where reads outnumber writes 10:1 or more), this isn’t a bottleneck.

The essential WAL mode setup:

PRAGMA journal_mode=WAL;
PRAGMA busy_timeout=5000;
PRAGMA synchronous=NORMAL;
PRAGMA cache_size=-64000;
PRAGMA foreign_keys=ON;

The busy_timeout pragma is critical — without it, concurrent write attempts return SQLITE_BUSY immediately instead of retrying.

Where SQLite Beats PostgreSQL

  • Read-heavy single-server apps: When your dataset fits in memory or on fast NVMe, every query is a local function call. Latency drops from milliseconds to microseconds.
  • Edge deployments: Apps on Fly.io or Cloudflare benefit enormously from a database that lives on the same machine as the application.
  • Internal tools and dashboards: The operational overhead of a dedicated Postgres instance for a five-person admin panel is hard to justify.
  • Bounded data volumes: If your SaaS tool generates a few gigabytes per tenant at most, SQLite’s theoretical ceiling is irrelevant.

Where PostgreSQL Still Wins

Write-heavy transactional workloads (payments, inventory), multi-server horizontal scaling, and complex queries with CTEs and window functions are still PostgreSQL territory. The choice isn’t ideological — it’s workload-specific.

Three Key Takeaways

  1. WAL mode changes the concurrency equation. Default journal mode SQLite and WAL mode SQLite are meaningfully different tools. Always use WAL for production.
  2. Litestream is the unlock. The backup and disaster recovery story that made SQLite unsuitable for production is solved. A single binary handles continuous replication to object storage.
  3. Match the database to the deployment model. SQLite’s advantages are most pronounced on single-server or edge deployments. The moment you need genuine multi-writer horizontal scaling, move to PostgreSQL.

Read the full article at novvista.com for a detailed workload comparison table, LiteFS setup walkthrough, and an honest assessment of where SQLite still falls short.

Originally published at NovVista