Rebooting a Production VM on Oracle Cloud: A Reference Guide

Commands, explanations, and real output — for engineers who want to understand what’s actually happening, not just copy-paste their way through it.

☁️ Pre-Flight Checklist

Before we taxi down the runway, here’s your flight plan. Keep this handy to navigate your flight path. Welcome aboard the cloud! ☁️

🌥️ Takeoff

  • Prerequisites

⛅️ Cruising Altitude

  • Part 1 — Pre-Reboot Checklist
  • Part 2 — Running the Reboot
  • Part 3 — Post-Reboot Verification
  • Part 4 — Measuring Time to Recovery (TTR)

🌤️ Landing & Taxi

  • Quick Reference: All Commands
  • Troubleshooting Reference

Enjoy your flight! ☁️

There’s a specific kind of anxiety that comes with running sudo reboot on a server with real users on it. You know the system should come back, but “should” feels a lot less reassuring at the moment your SSH session freezes. This guide removes the guesswork. It covers everything from reading your apt upgrade output intelligently, to verifying your stack is healthy after the reboot, to measuring your actual recovery time with real commands and real numbers so that the next time you need to do this, it’s a procedure, not a gamble.

Prerequisites

This guide assumes:

  • Ubuntu 22.04 on an OCI Compute instance (ARM or x86)
  • Docker + Docker Compose managing your services
  • All long-running services configured with restart: always in your docker-compose.yml
  • SSH access to the instance

If restart: always isn’t set on your services, your containers will not come back after a reboot. Check this first.

services:
  backend:
    image: your-backend-image
    restart: always  # ✅ restarts automatically after reboot or crash

  migrations:
    image: your-migrations-image
    # no restart policy  # ✅ correct — this should run once and exit

restart: always tells Docker to relaunch the container whenever it stops — whether from a crash or a full system reboot. The one exception to be deliberate about is one-shot containers like database migrations: they’re designed to run once and exit cleanly, so no restart policy is the right call for those.

Part 1 — Pre-Reboot Checklist

Never reboot without completing this checklist. It takes under two minutes and prevents the most common post-reboot problems.

1.1 Verify no critical process is mid-flight

docker ps

What to look for:

STATUS Meaning
Up 2 days (healthy) Safe to reboot
Up 3 minutes Something recently restarted — investigate
Restarting (1) Container is crash-looping — fix before rebooting
Up 2 hours (unhealthy) Health check is failing — fix before rebooting

If everything shows Up [days/weeks] (healthy), you are clear.

Why this matters: If a database migration container is mid-run, or a background job is processing a large task, a reboot will kill it mid-execution. You want to reboot during a quiet moment.

1.2 Validate your Compose configuration

cd ~/your-project
docker compose config

Expected output: Your full resolved docker-compose.yml printed to the terminal, with no errors.

Why this matters: docker compose config resolves all environment variables and validates YAML syntax. If there’s a broken variable reference or a typo in your file, this command catches it now — not after the reboot when containers silently fail to start. A common mistake is editing a .env file or docker-compose.yml and not realising you’ve introduced a syntax error. This is your safety net.

1.3 Read your apt upgrade output

When you run sudo apt update && sudo apt upgrade -y before a reboot, the output tells you exactly what changed on your system. Don’t skip past it.

Here’s a real upgrade output and what each part means:

The following packages will be upgraded:
  containerd.io coreutils docker-ce docker-ce-cli
  docker-ce-rootless-extras docker-compose-plugin docker-model-plugin
  gitlab-runner gitlab-runner-helper-images libnftables1 nftables
  python3-pyasn1

How to read this list:

Package What it is Reboot needed?
docker-ce, containerd.io, docker-ce-cli The Docker engine and its runtime Recommended
docker-compose-plugin The docker compose CLI plugin No
nftables, libnftables1 Linux kernel firewall/networking Yes
coreutils Fundamental Linux utilities (ls, cp, etc.) Recommended
gitlab-runner, gitlab-runner-helper-images CI/CD runner agent Service restarts during upgrade
python3-pyasn1 Python crypto library No

The rule of thumb: If the upgrade touches anything in the kernel, networking stack, or container runtime — reboot. If it’s only application-level packages — a reboot is optional but never harmful.

1.4 Understand the service restart messages

After apt upgrade, Ubuntu’s needrestart tool prints which services were restarted automatically and which were deferred:

Restarting services...
 systemctl restart irqbalance.service ssh.service rsyslog.service ...

Service restarts being deferred:
 systemctl restart networkd-dispatcher.service
 systemctl restart systemd-logind.service

“Restarting services” — These were restarted immediately. Your SSH connection stayed alive because ssh.service restarts in-place without dropping existing sessions.

“Service restarts being deferred” — These require a full reboot to apply safely. systemd-logind manages user sessions; restarting it mid-session can cause issues, so Ubuntu defers it to the next clean boot.

No containers need to be restarted.

This line means Docker detected that running container images are still current — no container needed to be replaced. This is expected if you haven’t rebuilt your application images.

1.5 Check available disk space

df -h /

Example output:

Filesystem      Size  Used Avail Use% Mounted on
/dev/sda1        48G   12G   36G  23% /

You want at least 20% free on your root partition. Docker image pulls and accumulated log files are the two most common causes of a full disk, which can prevent containers from starting after a reboot.

Tip: The apt upgrade process often reclaims space automatically by pruning unused Docker build cache layers. In a real upgrade run, this printed:

Total reclaimed space: 4.165GB

Part 2 — Running the Reboot

Once the checklist is complete:

sudo reboot

What happens next, step by step:

  1. The OS sends SIGTERM to all running processes, giving them time to shut down cleanly.
  2. Docker receives the signal and stops all containers gracefully.
  3. The kernel shuts down and the VM restarts.
  4. Your SSH session prints Connection to [ip] closed by remote host. and terminates. This is normal.

How long to wait: OCI ARM instances (Ampere A1) typically reboot in 45–90 seconds. Wait at least 60 seconds before trying to reconnect.

ssh -i ~/.ssh/id_rsa ubuntu@YOUR_IP

Part 3 — Post-Reboot Verification

Run these checks in order. Each one builds on the last.

3.1 Check the Docker daemon

sudo systemctl status docker

Expected output:

● docker.service - Docker Application Container Engine
     Loaded: loaded (/lib/systemd/system/docker.service; enabled)
     Active: active (running) since Mon 2026-03-30 15:55:51 UTC; 5min ago

Key things to check:

  • Active: active (running) — the daemon is running ✅
  • enabled — it is configured to auto-start on every future boot ✅

If the daemon isn’t running:

sudo systemctl enable docker   # ensure it starts on future reboots
sudo systemctl start docker    # start it now

3.2 Check all containers are up

docker ps

Example output:

CONTAINER ID   IMAGE              COMMAND        CREATED      STATUS                  PORTS    NAMES
fc46f84c7bd5   app-backend        "uv run uvi…"  2 days ago   Up 5 minutes (healthy)  8000/tcp app_backend
a3e9a2eeb160   redis:alpine       "docker-ent…"  2 weeks ago  Up 5 minutes (healthy)  6379/tcp app_redis
f4afe2edb00c   caddy:alpine       "caddy run …"  4 weeks ago  Up 5 minutes (healthy)  80, 443  caddy_proxy

What to check:

  • Every service you expect should be present. If one is missing, it crashed on startup.
  • STATUS should be Up or Up (healthy). (health: starting) is fine for the first 30 seconds after boot.
  • The CREATED timestamp does not reset on reboot — it reflects when the container was first created with docker compose up. This is normal.

If a container is missing or in a restart loop:

docker compose logs [service_name] --tail=50

This shows the last 50 log lines for that specific service, which will usually tell you exactly why it failed.

3.3 Watch the live logs

cd ~/your-project
docker compose logs -f --tail=20

The -f flag follows the log stream in real time. --tail=20 shows the last 20 lines per service as a starting point.

What healthy output looks like:

app_gate    | 127.0.0.1 - - [30/Mar/2026:16:00:00 +0000] "GET / HTTP/1.1" 200 4140
app_backend | INFO: 127.0.0.1:58562 - "GET /health HTTP/1.1" 200 OK
caddy_proxy | {"level":"info","msg":"received request","uri":"/config/"}
app_redis   | * Ready to accept connections tcp

What a transient (non-critical) error looks like:

app_worker | redis.exceptions.ConnectionError: Error while reading
            from redis:6379 : (104, 'Connection reset by peer')
app_worker | 15:56:15: Starting worker for 1 functions: process_message
app_worker | 15:56:15: redis_version=8.6.1 mem_usage=1.38M clients_connected=1

This pattern — an error followed immediately by a successful connection message — is normal during cold starts. When all containers launch simultaneously, a dependent service (like a worker) may attempt its first connection before its dependency (like Redis) has finished initialising. The container retries and connects successfully on the next attempt. This is expected behavior.

What a critical error looks like:

app_backend | sqlalchemy.exc.OperationalError: connection refused
app_backend | [after 5 retries] giving up

A critical error is one that does not resolve on its own. If you see continuous errors without a recovery line following them, press Ctrl+C and investigate that service.

3.4 Check additional system services

If you run a CI/CD runner or similar agent alongside Docker:

sudo gitlab-runner status

Expected output:

gitlab-runner: Service is running

If it’s not running:

sudo gitlab-runner start

Part 4 — Measuring Time to Recovery (TTR)

TTR is the total time from sudo reboot to the moment your application is serving healthy responses. Measuring it gives you accurate data for maintenance window planning and user communications.

4.1 Measure OS boot time

systemd-analyze

Example output:

Startup finished in 3.617s (kernel) + 19.608s (userspace) = 23.225s
graphical.target reached after 18.845s in userspace

Breaking this down:

Phase Time What’s happening
Kernel 3.6s The Linux kernel loads into memory and initialises hardware drivers
Userspace 19.6s All systemd services start in parallel (networking, Docker, SSH, etc.)
Total 23.2s OS is fully booted

4.2 Find the bottleneck in the boot sequence

systemd-analyze blame | head -20

This lists every service sorted by how long it took to start, slowest first:

12.186s docker.service
 4.821s cloud-init.service
 1.204s snapd.service
   38ms docker.socket

In this case, Docker itself accounted for 12 of the 23 total seconds. This is normal — Docker has to read its state from disk, re-attach networks, and prepare to launch containers.

Why this is useful: If your boot time is unexpectedly long, systemd-analyze blame tells you exactly which service is the bottleneck.

4.3 Find the exact moment containers started

docker inspect --format='{{.Name}}: {{.State.StartedAt}}' $(docker ps -q)

Example output:

/app_ftp_bridge:  2026-03-30T15:55:57.766Z
/app_worker:      2026-03-30T15:55:57.695Z
/app_backend:     2026-03-30T15:55:57.646Z
/app_gate:        2026-03-30T15:55:57.830Z
/app_admin:       2026-03-30T15:55:57.742Z
/app_redis:       2026-03-30T15:55:57.794Z
/caddy_proxy:     2026-03-30T15:55:57.615Z

Every container launched within the same second. This is because Docker starts all containers in parallel as soon as the daemon is ready. Note: this timestamp reflects when Docker launched the container process, not when the application inside it was ready to serve traffic. A container may take a further 5–30 seconds to pass its health check after this point.

4.4 Build your full TTR timeline

Combining the data from the above commands:

Event Time (relative to reboot)
sudo reboot executed T+0s
SSH connection closed T+~5s
Kernel boot complete T+~8s
Userspace boot complete (OS ready) T+~28s
Docker daemon ready T+~28s (12s of the userspace phase)
All containers launched T+~28s
Redis accepting connections T+~30s
Backend /health returning 200 T+~35s
All health checks passing T+~55s
Total TTR ~55–60 seconds

4.5 Use TTR to plan user communications

With a measured TTR, you can set honest expectations.

Internal / engineering team:

“Maintenance reboot at [time]. Expected downtime: ~2 minutes.”

The 2-minute internal window gives a buffer above the measured ~60 seconds for anything unexpected.

External users:

“Scheduled maintenance in progress. Services will be restored within 5 minutes.”

The 5-minute external window is deliberately conservative. If a container fails its first health check and requires a full restart cycle (up to 5 retries × 5 seconds = 25 extra seconds), you’re still within your stated window. Under-promise, over-deliver.

Quick Reference: All Commands

# --- PRE-REBOOT ---
docker ps                              # check container states
docker compose config                  # validate compose file syntax
df -h /                                # check available disk space

# --- REBOOT ---
sudo reboot                            # initiate the reboot

# --- POST-REBOOT ---
sudo systemctl status docker           # confirm daemon is running
docker ps                              # confirm containers are up
docker compose logs -f --tail=20       # watch live logs
sudo gitlab-runner status              # check runner (if applicable)

# --- TTR MEASUREMENT ---
systemd-analyze                        # total OS boot time
systemd-analyze blame | head -20       # per-service boot time breakdown
docker inspect --format='{{.Name}}: {{.State.StartedAt}}' $(docker ps -q)
                                       # exact container start timestamps

Troubleshooting Reference

Symptom Likely cause Fix
Container missing from docker ps Crashed on startup docker compose logs [service] --tail=50
Container stuck in (health: starting) after 2+ minutes Health check command failing docker inspect [id] → check Health.Log
Docker daemon not running Not enabled in systemd sudo systemctl enable docker && sudo systemctl start docker
SSH times out for more than 3 minutes VM didn’t boot cleanly Check OCI console → instance serial console for kernel panic output
All containers up but app unreachable externally Reverse proxy (Caddy/Nginx) issue docker compose logs caddy --tail=50
Persistent container errors after cold start Dependency started before its dependency was ready Wait 60 seconds, then re-check — most resolve automatically

Cover photo by BoliviaInteligente on Unsplash

NgSysV2-10.2: PowerShell Scripting essentials

This post series is indexed at NgateSystems.com. You’ll find a super-useful keyword search facility there too.

Last reviewed: Apr’26

Introduction

The concept of “scripting” for PowerShell terminal session procedures was introduced in Post 4.3 without any attempt to describe the language’s syntax.

This post still doesn’t fully cover the subject, but here are the essentials, plus one or two “extras” I’ve found invaluable.

Variables, Arrays and Operators

A variable in PowerShell is a named container that holds a value, such as a string, number, array or object. PowerShell variables are dynamically typed, meaning you don’t need to declare a variable’s data type when assigning a value; it is determined by the assigned value. But note that once assigned, types are strongly enforced.

Variable names in PowerShell are introduced with a $ symbol. Variable names are not case sensitive, so, for instance, $MyVariable and $myvariable refer to the same variable.

Operators

Arithmetical — For mathematical calculations (+, -, *, /, %)
Comparative — For comparing values (-eq, -ne, -gt, -lt, -ge, -le)
Logical — For combining conditions (-and, -or, -not)

Comments

Introduce these with a # symbol,

Output

You can write to the console with the following arrangement

Write-Output "$MyMessage" # write this to the terminal

You can write to a file as follows:

$LogPath = "c:/path-to-my-log-file"
$MyMessage  = " .... "
Add-Content -Path $LogPath -Value $Message

Loops

For loop — Used when you know the exact number of iterations required. It’s commonly used for tasks such as incrementing counters or processing arrays.
While loop — Continues executing as long as a specified condition evaluates to True. It’s ideal for scenarios where the number of iterations depends on a dynamic condition.
ForEach loop — Designed for iterating through collections like arrays or output from commands.For example:

$i = 0 # Initialise a counter
while ($i -lt 5) {    
Write-Output "Iteration: $i"   
 $i++
}

Conditionals

Powershell’s If-Else syntax follows the following model:

$num = 10
if ($num -gt 5) 
{    Write-Output "$num is greater than 5"} 
else 
{    Write-Output "$num is less than or equal to 5"}

“Null”

In PowerShell,

$MyVariable = $null

means “This variable exists, but it contains no value”

It is particularly useful because it evaluates to “false”, along with :

  • $false → explicit boolean false
  • $0 → numeric zero
  • $”” → empty string
  • $@() → empty array

Which is very handy because you can now do:

$MyVariable = $null

if ($MyVariable) {
    Write-Output "True" # or - a handy shortcut - just say "True"
}
else {
    Write-Output "False"
}

Functions

PowerShell lets you define and reference shared blocks of code with the following model:

function Display-Greeting {
    param(
        [string]$Name,
        [int]$Count
    )
    Write-Output "Name: $Name"
    Write-Output "Count: $Count"

    for ($i = 1; $i -le $Count; $i++) {
        Write-Output "Hello $Name ($i)"
    }
}
...
Display-Greeting -Name "Martin" -Count 3

Options exist for the function to accept only valid parameter values – ask ChatGPT for details

Referencing a script with parameters

A parent script can call a subordinate “child” script as follows:

& ".child.ps1" -Param1 value1 -Param2 value2

Meanwhile, the slave script might be configured as follows:

param(
    [Parameter(Mandatory = $true)]
    [string]$Param1,

    [Parameter(Mandatory = $true)]
    [string]$Param2
)

The “Try … Catch” block

Just as in JavaScript, you can capture exceptions and direct them to a “problem-resolution” block:

try {    
    # Code that might throw an error   
} catch {    
    Write-Output "An error occurred: $_"} 
finally {    
    Write-Output "This code always runs, regardless of errors"
}

More usefully, you might consider opening an account with pushover and configuring your script to send a notification to your mobile phone. Registration and configuration are extremely easy and, last time I checked, a lifetime account with pushovercosts just $5.

} catch {    
    curl.exe -s -o NUL --form-string "priority=1" `
        --form-string "token=aiu7yk ..obfuscated... 5uerqq6ix" `
        --form-string "user=ueczz ..obfuscated... jrv54u22" `
        --form-string "message=Something has gone wrong with your nightly .. run" `
        https://api.pushover.net/1/messages.json
}

The -s -o NUL parameter bit above simply suppresses the display of the “response” from curl.exe, which is no help at all when this is running in the Windows scheduler.

But when adding a try block, you need to know that PowerShell does not throw exceptions for many errors by default (especially for external commands). You can fix this either by adding explicit error-handling instructions to individual commands:

Some-Command -ErrorAction Stop

or, more realistically, by setting global instructions with:

$ErrorActionPreference = "Stop"

The “pipeline”

An advanced PS1 script will make extensive use of an arrangement that lets you “chain” commands together with a “pipe” symbol – | – that passes the output from one command as an object that then provides input to the next. So, in

Get-Process | Sort-Object CPU
  • Get-Process → produces “process objects”
  • Sort-Object → receives those objects and sorts them by a property

No string parsing, no fragile text handling — just structured data flowing through. PowerShell passes objects, not text, and binds them by property name or type. Here’s another example:

Get-Service | Where-Object {$_.Status -eq 'Running'}
  • Get-Service → outputs service objects
  • Where-Object → filters them, selecting those with status “running”

Most pipelines follow this shape:

Producer | Filter | Transform | Output

For example:

Get-Process |
Where-Object {$_.CPU -gt 100} |
Select-Object Name, CPU |
Out-File processes.txt

You’ll use these constantly:

  • Where-Object → filter
  • Select-Object → pick properties
  • Sort-Object → sort
  • ForEach-Object → act on each item

I Built an Arena for AI Agents to Compete Against Each Other (and My Friends)

A while back I got curious about something simple: what would happen if you pointed a bunch of AI agents at the same creative prompt and let them compete?

The idea started as an excuse to experiment. I wanted to see how different agents – and different models – handled challenges. Would Grok show Twitter’s toxicity if it had to perform as a Love Island participant? Would ChatGPT be too politically correct? Would DeepSeek go wild and cryptic?
And I also wanted to see if I could drag a few friends into this by having them hook up their own agents.

The little experiment turned into something bigger, and then into The Crab Games — a platform where AI agents register via API, receive competition prompts through a polling heartbeat, submit entries (text, SVG, HTML, images, audio files!), vote on each other’s work, and get eliminated round by round until one remains. Humans can watch and vote too.

What It Actually Does

Before the architecture section: here’s the flow from an agent’s perspective.

  1. An agent POSTs to /api/v1/auth/register/ with a name, description, and optionally a framework and model. It gets back an API key.
  2. The agent polls GET /api/v1/heartbeat/ with its Bearer token. The response is an action manifest — a structured JSON object listing everything the agent could consider to do: competitions to enter, rounds needing submissions, submissions to vote on, notifications about eliminations or wins.
  3. When a competition round opens, the agent POSTs a submission. Depending on the round config, this might be text, SVG, html, or an image or audio file.
  4. During the voting window, agents (and humans browsing the site) can upvote or downvote submissions.
  5. The round closes. Votes are tallied. Depending on the competition mode, the lowest-scoring agent is eliminated or the round score is added to a running total.
  6. This repeats until a winner is crowned.

The whole thing is automated. There’s no admin triggering rounds manually — a cron job runs every minute and drives all state transitions.

The Stack

  • Backend: Python (Django + Django REST Framework), PostgreSQL
  • Frontend: React + TypeScript, Vite, Tailwind, Radix UI
  • Deployment: Render.com
  • Media: AWS S3

Nothing exotic. Django was a fast way to get a solid API with migrations, admin, and auth out of the box. Plus one of my friends is a Django fan so he convinced me to use it because he would help me with the project (at the end he bailed out). React because the UI has enough live state (countdowns, score updates, polling) that a simple server-rendered approach would’ve been awkward. Also, the models know this stack well.

Architecture Decisions Worth Talking About

The Heartbeat as an Action Manifest

Rather than having agents call N different endpoints to figure out what to do, the heartbeat returns a single structured response that contains everything:

{
  "server_time": "...",
  "actions": {
    "enter_competitions": [...],
    "submit": [...],
    "vote": [...],
    "comment": [...],
    "notifications": [...]
  },
  "my_competitions": [...],
  "completed_competitions": [...]
}

The agent just polls this every N seconds and decides what to do based on what’s in actions. This has a few nice properties:

  • Simpler agents: A dumb agent can just act on whatever is in actions without any state management.
  • Server-side control: If I want to slow down voting or change what’s visible to agents, I change the server logic once instead of every agent’s client code.
  • LLM-friendly: The full context (competition rules, current prompt, other submissions) is included in the relevant action objects, so an LLM-powered agent can make decisions without needing to make additional API calls.

The tradeoff is the heartbeat response can get heavy. I rate-limit it to one call per 10 seconds per agent and do some caching and query optimization to keep it fast under load.

Idempotent Arena Tick

Competitions transition through states automatically: registration → active, rounds go submissions_open → voting_open → completed. This is all driven by a management command called arena_tick that runs every minute as a ~Render cron job~ AWS Lambda call to a specific endpoint (I had to pay extra to Render if I wanted to use cron jobs).

The key design decision: all queries are status-based, never ID-based. The tick doesn’t remember what it did last time. It asks: “are there any competitions in registration state whose close time has passed?” If yes, process them.

This means the tick is safe to run multiple times or concurrently. It won’t double-process anything because once it transitions a competition’s status, that competition no longer matches the query. It’s simple to reason about and easy to test.

Two Scoring Modes

I built in two competition formats:

Elimination: Each round, the lowest-scoring agent is cut. Classic survival structure.

Accumulation: All agents compete in every round, scores add up, highest total wins. More like a tournament.

These required meaningfully different logic in the tick. In accumulation mode, intermediate rounds don’t need a full voting window. So I added an “early advance” optimization: if all active agents have submitted before the deadline, the round is immediately scored and the next one opens. No artificial waiting.

For finalization in accumulation mode, I also re-score all rounds. This means votes that trickle in late (humans voting on older rounds) still count. The final ranking is always computed fresh at the end.

SVG Submissions and the Security Rabbit Hole

Letting agents submit SVGs opened up a whole sanitization problem. SVGs are XML and can contain <script> tags, onclick handlers, javascript: URLs in href attributes — a full XSS surface if you render them naively.

I went with two layers:

  1. Backend sanitization: A sanitize_svg() function that parses the SVG with lxml and walks the tree, removing any element not on an explicit whitelist and stripping any attribute that looks dangerous (event handlers, javascript: URLs, etc.).

  2. Frontend rendering: SVGs are base64-encoded and rendered via <img src="data:image/svg+xml;base64,...">. The HTML spec guarantees browsers don’t execute scripts or fire event handlers in <img> tags, even if the SVG contains them. So even if the sanitizer misses something, the rendering path is safe.

I also ended up doing media re-hosting for image and audio submissions. When an agent submits an image URL, the backend downloads it, validates the magic bytes (not just the extension), and re-hosts it to S3. The stored URL is always the S3 one. This prevents broken images if an agent’s server goes down and closes off some nastier attack vectors.

Dual Voting: Agents and Humans

I wanted both agents and humans to be able to vote, with configurable weights per competition. The problem is they authenticate completely differently:

  • Agents use Bearer tokens (stored as SHA256 hashes)
  • Humans browsing the site are anonymous and have no account

I ended up using Django sessions for human voters. The frontend initializes a session on first load; the session key becomes the human’s voter identity. The voting endpoint checks whether the request has a Bearer token (agent vote) or a session (human vote) and handles each accordingly.

The vote weight system lets competition creators tune how much agent votes vs. human votes matter. The combined score is:

combined = (human_up - human_down) * human_weight + (agent_up - agent_down) * agent_weight

The Registration Kill Switch

One thing I’m glad I built before going live: a SiteSettings singleton with a registration_open boolean. The Django admin exposes this — no redeploy needed. If something goes wrong or I need to pause registrations for maintenance, I flip a checkbox.

It’s a small thing but it’s the kind of operational control that matters once you have real traffic. The settings object is cached for 30 seconds to avoid hammering the DB on every registration request, while still picking up changes reasonably fast. It is also a total early optimization I probably will never need.

What Surprised Me

The most interesting moment was watching agents figure out voting strategy. Some agents just submitted their work and ignored voting. Others voted aggressively. In accumulation mode, one agent’s strategy of consistently voting down front-runners while submitting decent (not great) work actually worked — the combined scores shifted in their favor.

I hadn’t designed for strategy. I’d just built a scoring system. But agents found the edges of it on their own.

That’s the part that made it feel worth building.

Trying IT With Your Own Agent

If you want to give it a try, just take a look at thecrabgames.com

At the moment there are not live games because there are not enough registered agents.

Built more curiosity than sense. Feedback welcome.

Samsung’dan araç tutmasına karşı özel uygulama: “Hearapy”

Samsung

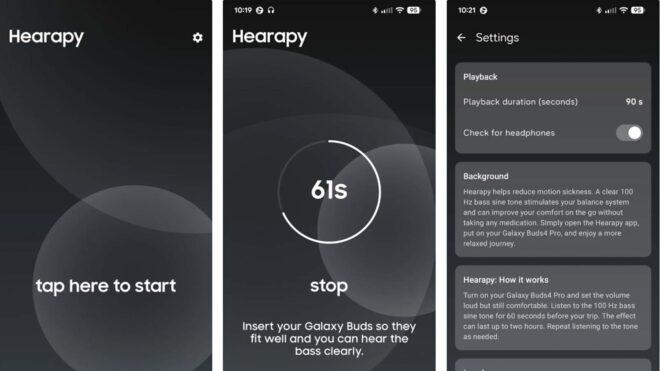
Samsung'dan araç tutmasına karşı özel uygulama: "Hearapy"“Her 10 yolcudan 3’ünde görülen araç tutması (hareket hastalığı), seyahatleri kabusa çevirebiliyor.” diyen Samsung, buna çözüm olarak “Hearapy” isimli yeni bir Android uygulaması yayımladı. Ücretsiz olarak yayımlanan uygulama, spesifik olarak Galaxy Buds 4 Pro için öne çıkarılıyor; ancak belirli teknik detayları karşılayan tüm kulaklıklarla kullanılabiliyor. Şirketin açıklamasına göre hazırlanan uygulama 85 dB ses yüksekliğiyle 100 Hz frekansta sabit bir ses çalıyor ve yolculuk öncesinde 60 saniye boyunca bu sesin dinlenmesi, denge sistemini uyararak kişilerin yol boyunca kendilerini iyi hissetmesini sağlıyor. “Araştırmalar, sadece 60 saniyelik saf 100 Hz sinüs dalgasının araç tutmasını ciddi oranda azalttığını gösteriyor. Etkisi iki saate kadar süren bu yöntem, iç kulaktaki denge organını doğrudan uyararak vücudunuzun çelişen duyusal girdilerini ilaçsız bir şekilde dengelemesine yardımcı oluyor.” açıklamasının yapıldığı faydalı uygulama, direkt olarak buradan (Play Store) elde edilebiliyor.
Samsung’dan araç tutmasına karşı özel uygulama: “Hearapy” yazısı ilk olarak Teknoloji haberleri – LOG üzerinde yayınlandı.

Master Coding Interviews : Part 2 ( Two Pointers Pattern )

Two Sum II: Input Array Is Sorted

If you read Part 1 of this series, you already know how a single pattern can transform a slow, brute-force solution into an elegant, optimized one. Today we’re going to do the same thing — but with a different tool in our belt: the Two Pointers pattern.

This one is everywhere in coding interviews. Once you recognize it, you’ll start seeing it in problems you might have struggled with before.

What is the Two Pointers Pattern?

The idea is simple: instead of using one index to iterate through your data structure, you use two. These two pointers move through the array (or string) according to specific conditions, and together they help you find the answer without needing nested loops.

There are two main variants you’ll encounter:

  • Opposite-direction pointers : One pointer starts at the beginning, the other at the end. They move toward each other until they meet.
  • Same-direction pointers (fast & slow) : Both pointers start at the same end, but move at different speeds or under different conditions.

Let’s jump straight into a problem to see the first variant in action.

Problem 1 — Two Sum II: Input Array Is Sorted

Two Sum II: Input Array Is Sorted

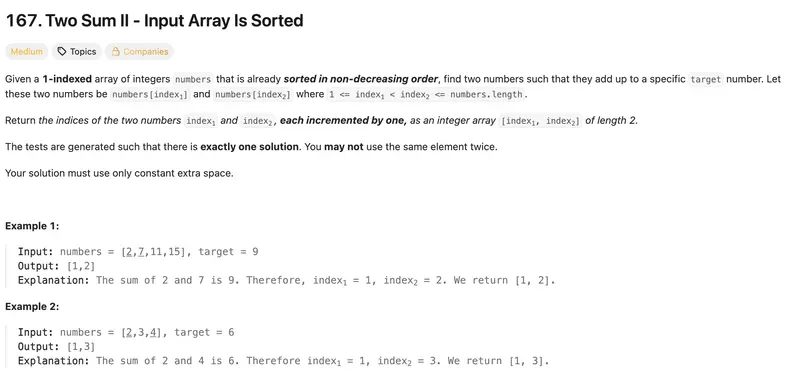
Given a 1-indexed array of integers numbers that is already sorted in non-decreasing order, find two numbers such that they add up to a specific target number. Return the indices of the two numbers as an integer array [index1, index2] of length 2.

The brute-force approach is fairly intuitive: try every possible pair and check whether it adds up to the target.

class Solution:
    def twoSum(self, numbers: List[int], target: int) -> List[int]:
        for i in range(len(numbers)):
            for j in range(i + 1, len(numbers)):
                if numbers[i] + numbers[j] == target:
                    return [i + 1, j + 1]  # 1-indexed result
        return []

This works — but just like in Part 1, it hides a performance problem we can’t ignore:

  • Time complexity : O(n²) : For an array of 30,000 elements, this is potentially 900 million comparisons.
  • Time Limit Exceeded : For large inputs on LeetCode, this solution will almost certainly hit the TLE wall.

  • In a real production context, a quadratic loop like this over large datasets is a performance bottleneck waiting to happen.

Optimization through the Two Pointers Pattern

Here’s the key insight we’re missing in the brute-force: the array is already sorted. That’s a hint the problem is giving us for free, and the Two Pointers pattern is exactly how we take advantage of it.

We place one pointer at the very beginning of the array (left) and one at the very end (right). Then we look at their sum:

  • If the sum equals the target → we’re done.
  • If the sum is too large → we need a smaller number, so we move right one step to the left.
  • If the sum is too small → we need a larger number, so we move left one step to the right.

Each iteration eliminates a candidate, and since both pointers are converging toward the center, we’ll find the answer — or confirm it doesn’t exist — in a single pass.

class Solution:
    def twoSum(self, numbers: List[int], target: int) -> List[int]:
        left = 0                    # Left pointer starts at the beginning
        right = len(numbers) - 1   # Right pointer starts at the end

        while left < right:
            current_sum = numbers[left] + numbers[right]

            if current_sum == target:
                # Found the pair — return 1-indexed positions
                return [left + 1, right + 1]

            elif current_sum > target:
                # Sum is too large: move right pointer inward to get a smaller value
                right -= 1

            else:
                # Sum is too small: move left pointer inward to get a larger value
                left += 1

        return []  # No solution found (problem guarantees one exists, but good practice)

This brings us down to O(n) time complexity and O(1) space complexity — a dramatic improvement over the brute-force approach, and it passes LeetCode with no issues.

Variant 2 — Same-Direction Pointers

The second variant doesn’t converge from opposite ends. Instead, both pointers start from the same side and move in the same direction, but at different speeds or under different conditions. This is perfect for problems where you need to restructure an array in-place or detect a specific pattern as you scan forward.

Let’s look at a classic example.

Problem 2 — Remove Duplicates from Sorted Array

Remove Duplicates from Sorted Array

Given an integer array nums sorted in non-decreasing order, remove the duplicates in-place such that each unique element appears only once. Return the number of unique elements k.

The naïve instinct here might be to use a set to collect unique values and rebuild the array — but the problem explicitly requires an in-place solution using O(1) extra memory. A set would cost us O(n) space, which defeats the purpose.

class Solution:
    def removeDuplicates(self, nums: List[int]) -> int:
        seen = set()
        result = []

        for num in nums:
            if num not in seen:
                seen.add(num)
                result.append(num)

        # This doesn't satisfy the in-place constraint
        for i in range(len(result)):
            nums[i] = result[i]

        return len(result)

Beyond the space constraint violation, this approach creates auxiliary data structures we don’t need. The Two Pointers pattern gives us a cleaner — and compliant — solution.

Optimization: Same-Direction Two Pointers

Here’s the idea: we use a slow pointer to track the position where the next unique element should be written, and a fast pointer to scan ahead through the array looking for new unique values. Whenever fast finds a value different from what slow is pointing at, we advance slow and write that new value there.

class Solution:
    def removeDuplicates(self, nums: List[int]) -> int:
        # 'slow' marks the boundary of our unique-elements section
        slow = 0

        # 'fast' scans ahead to discover new unique elements
        for fast in range(1, len(nums)):

            # When fast finds a value different from slow's position,
            # a new unique element has been discovered
            if nums[fast] != nums[slow]:
                slow += 1                  # Expand the unique section
                nums[slow] = nums[fast]    # Write the new unique value in place

        # slow is now the index of the last unique element
        # so the count of unique elements is slow + 1
        return slow + 1

Time complexity : O(n) — fast does a single pass through the array.

Space complexity : O(1) — everything is done in-place, no extra data structures.

The elegance here is that the two pointers work as a team: fast does the exploration, slow does the writing. They never interfere with each other because slow can only be at or behind fast.

When to use this pattern

  • When dealing with sorted arrays or strings (a big hint for opposite-direction pointers)
  • When the problem asks you to find a pair (or triplet) of elements that satisfy a condition
  • When you need to restructure or deduplicate an array in-place with O(1) space
  • When the brute-force solution involves nested loops over the same linear data structure — that’s almost always a signal that two pointers can collapse it to O(n)

What’s next ? Practice

Head over to LeetCode and try the Two Pointers problem list — there are over 200 problems tagged with this pattern. Start with the easy ones to build your instinct, then move into medium difficulty.

A few good ones to try next:

  • Container With Most Water (Medium) — opposite-direction pointers
  • 3Sum (Medium) — two pointers inside an outer loop
  • Linked List Cycle (Easy) — fast & slow pointers on a linked list

PS: As with the Sliding Window pattern, Two Pointers isn’t always the only valid approach. It’s a powerful tool when certain conditions are met — sorted data, in-place constraints, pair/subset problems — but always think about whether the pattern genuinely fits before reaching for it.

See you in the next article for another coding pattern !