Vodafone’dan 5G’ye özel bir günlük sınırsız internet hediye

 Vodafone, 1 Nisan’da tarihinde 5G teknolojisiyle birlikte müşterilere sunulacak avantajları açıkladı. Tüm müşterilere sınırsız internet paketi hediye edilecek.
 Vodafone, 1 Nisan’da tarihinde 5G teknolojisiyle birlikte müşterilere sunulacak avantajları açıkladı. Tüm müşterilere sınırsız internet paketi hediye edilecek.

 Samsung, yeni RISC-V tabanlı PCIe 5.0 SSD’si BM9K1 ile depolamada performans ve verimliliği artırmayı hedefliyor. Yeni SSD’lerin 2027’de piyasaya sunulması planlanıyor.
In my last articles, How to install RabbitMQ and Unraveling RabbitMQ we installed and deep dived into RabbitMQ, one of the most popular and mature message brokers in the open-source ecosystem. Its capability to handle queues, routes, and message publish/subscribe functionality is essential to ensure asynchronous communication, resilience, and scalability in modern applications.
In this article, I present you the RabbitMQ Management interface. This is a user-friendly web interface that allows operators to monitor and configure the RabbitMQ Server from a web browser. This is a practical guide on how to get the most out of this web interface, which transforms broker management into a transparent and controllable task.
This article will guide you to:
The Management interface
After starting RabbitMQ, you can monitor and manage it from the administration console. The web interface operates on port 15672 and you can access it by the URL: http://localhost:15672/ . Use the defaultcredentials: username: guest and password: guest to login for the first time.
It is strongly recommended that these default credentials be modified immediately in any non-development environment.
From RabbitMQ Management it is possible to:
The overview page
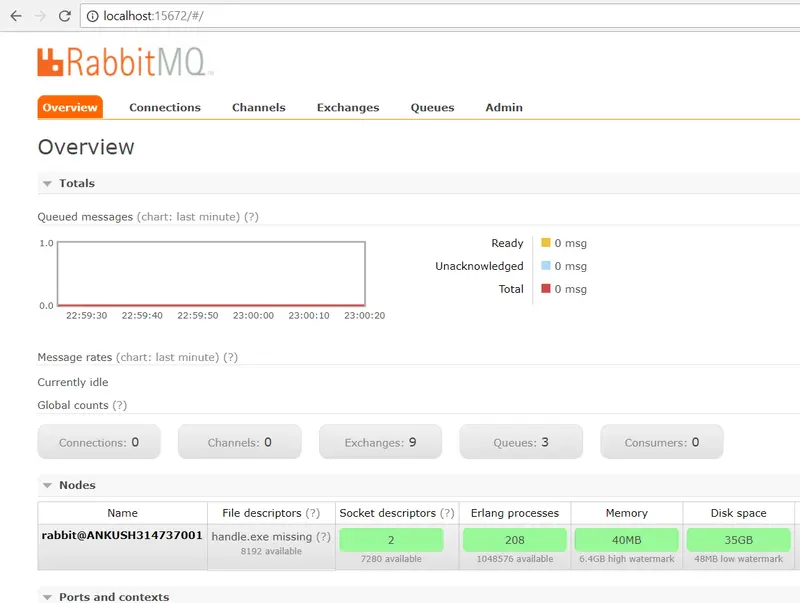
After logging in, the Overview page is the default landing screen, presenting a real-time assessment of the broker’s operational state and performance metrics. You will see the following stats:

The Overview page displays 2 charts: The current Queued Messages volume and the Messages Rate.
The time series displayed in these charts can be adjusted (e.g., last minute, last hour) for historical analysis. Information about all the different states of the messages can be found by pressing ? link.

Queued messages: This graph shows the total number of messages in all Queues. These statistics are essential to identify message backlogs and potential throughput limitations.
Messages rate: The chart shows the rate of processing messages, typically measured in messages per second. This is a primary indicator of system performance and workload.
manual ack) or utilizes automatic acknowledgment (auto ack).basic.get method, also categorized by acknowledgment mode.Global Count: Static panel that provides instantaneous totals for key operational entities. It summarizes the count of all active Connections, Channels, Exchanges, Queues, and Consumers across ALL virtual hosts, offering a rapid assessment of current resource utilization.
Nodes
Provides critical system-level details for each Node operating within your RabbitMQ cluster. A cluster is essentially a logical grouping of RabbitMQ server instances running on separate machines or processes. Monitoring these metrics is vital for capacity planning and troubleshooting performance issues across the cluster.
Here you can observe key resource utilization statistics:

Churn statistics
Displays the rate of new (created) or closed (closed) connections, channels, and queues.
“Churn” refers to the velocity at which these resources are instantiated and destroyed in the broker. High churn rates can sometimes indicate issues with client connection management or rapid scaling events.
This panel displays the rate (per second) of:

Ports and contexts
This simple but important section serves as a reference for network configuration. Here you can find the network interfaces and listening ports configured for various protocols that RabbitMQ uses to communicate with clients and other nodes.
You can quickly verify the ports used for:

Import export definitions
It is possible to import and export definitions to configure all information of the RabbitMQ broker. This functionality is crucial for configuration management, backup, and restoration. It allows the complete definition of the RabbitMQ broker’s state to be exported or imported as a single artifact.

Exporting the definitions, we get a JSON file representing the broker (RabbitMQ). This can be used to restore Exchange, Queue, virtual host, policy, user, etc. This feature can be used as a backup. Every time you change the configuration, you can keep the old settings to restore when needed.
When definitions are exported, we get a JSON file that encapsulates the entire configuration of the broker. This file includes all defined Exchanges, Queues, Virtual Hosts, Policies, Users, and Permissions. This feature can serve as backup mechanism and for replicating configurations across development, staging, and production environments. It ensures consistency and allows quick rollback to previous settings state in case of issues.
Connections
A RabbitMQ Connection is a TCP connection between the application and the RabbitMQ broker. This connection acts as the secure and stable pipe through which all messaging traffic flows. When the client disconnects for any reasons, or a system failure occurs, the underlying TCP connection will be terminated and closed by the broker.
The Connections page provides a list of active connection to the RabbitMQ server.
Key details displayed for each connection include:

Clicking on one of the connections, you will get an overview of that specific connection, and view channels in connection and data rate. You can see the Client properties and close the connection if you want (Force Close).


Channels
A RabbitMQ Channel is a virtual connection inside a connection. It reuses a connection, to avoid the need to reauthorize and open a new TCP stream. When messages are published or consumed, it is done over a channel. Many channels can be established within a single connection.
The Channels page displays information about all current Channels: Displays the username the user is associated with the channel, connection status, confirmation, Message exchange rate, etc..

If you click on one of the Channels, you will get a detailed overview of that Channel.

Exchanges
The RabbitMQ Exchange entity is in charge of applying routing rules for messages, making sure that messages are reaching their final destination. In other words, the exchange ensures that the received message ends up in the correct queues. Which queue the message ends up in depends on the rules defined by the exchange type. A queue needs to be bound to at least one exchange to be able to receive messages.
Routing rules include:
All Exchanges can be listed from the Exchange tab.
In this list there are several Exchange amq.* and Default Exchange (default exchange unnamed), which are created by default.

It is possible to add a new Exchange in this page:

By clicking on the Exchange name, a detailed page about the Exchange is displayed.

You can view and add biding for the Exchange.
Bindings
The Binding is the fundamental relationship mechanism in RabbitMQ. it defines the routing logic between an Exchange and a Queue (or between two Exchanges). Without a binding, a queue cannot receive messages from any exchange.
Essentially, a binding is a directive that tells an exchange how to send data to a queue or another exchange. The binding also contains routing keys and arguments that customize message passing:

In the Management Interface, bindings are configured on the detail page of the Exchange or Queue, allowing the operator to define precisely which messages flow to which destinations based on the Exchange’s type (direct, topic, etc.).
You can also publish a message to Exchange in this page:

Queues
A RabbitMQ Queue is the central storage component, an ordered sequence of items, in this case, messages waiting for consumers to process them. The queue exists within the broker context (RabbitMQ server or Cluster).
Queues have different parameters and arguments depending on how they were created, which determine their behavior and resilience:
D. If the RabbitMQ node is restarted, the queue and any persistent messages within it will be recovered. This is essential to guarantee data is not lost in case of failure.AD. The queue will be automatically deleted by the broker as soon as its last consumer disconnects or is canceled (e.g., when the TCP connection with the server is lost or the channel is closed). This is useful for temporary queues.Message Ready: Displays the number of messages currently available to be delivered to consumers.
Message Unacked: Represents the number of messages that have already been delivered to consumers, but for which the server has not yet received an acknowledgment of processing (ACK). These messages remain in the queue and will be redelivered if the consumer fails.
Message Total: The total number of messages currently queued. This is the sum of Ready and Unacked messages.
Message Rate in/out: The real-time processing rates. In shows the speed at which messages are arriving at the queue (publish rate), while Out shows the speed at which messages are being processed/delivered to consumers (delivery rate).

A new Queue can be added in this same page:

By clicking on the Queue name, a Queue detail page will be displayed:

A Consumer is an application (or application instance) that consumes messages. The consumer sub page displays consumers/channels that are connected to the Queue. you can view and add constraints for Queue:

It is also possible to publish a message to the Queue:

A Queue can be deleted by clicking the Delete Queue button. You can aslo delete all Messages in the Queue by clicking the Purge Messages button:

Admin page
From the Admin page, we can add m users, change user permissions, set up vhosts, policies, limit the number of connections or change the cluster name.

Click on the Virtual Hosts menu on the left to view a list or add new Virtual Hosts:

Policy can be added or updated in the Policies sub-menu on the left:

Similarly click on the Limits sub-menu to limit the number of Connections, Queues of a Virtual Host.

By default, RabbitMQ names the cluster rabbit@, and we can rename it in the cluster sub-menu.
This article mainly introduces you to the features that we can use from RabbitMQ Management Interface.
Virtual Hosts (VHosts)
Virtual Hosts (VHosts) are the primary administrative partitions within a single RabbitMQ broker. They provide a way to group and isolate user permissions, exchanges, queues, and bindings. From a multi-tenant or multi-application perspective, a VHost functions like a separate, logical broker instance, ensuring that resources and messaging data from one application environment (e.g., ‘production’ or ‘development’) cannot interfere with another.
Advanced Debugging Tools
Beyond the standard Overview metrics, the Management Interface provides specialized tools for deep-level diagnostics, particularly useful when troubleshooting complex routing or delivery issues.
Message Tracing (Tracer)
The Tracer is a powerful debugging feature used to inspect the path messages take through the broker. When enabled, the Tracer logs every message event, including when a message is published, routed by an exchange, and delivered to a queue.
Alarms and Health Checks
The Alarms sub-menu, found under the Admin section, provides a centralized view of system-critical alerts. RabbitMQ nodes trigger alarms when they encounter severe resource constraints, such as:
Monitoring these alarms is crucial for preemptive capacity management and avoiding producer throttling, when the broker blocks incoming messages to prevent a more severe failure.
That’s all foks!
The RabbitMQ Management Web Interface is not just an optional tool. It is an important component for any operator or developer working with asynchronous systems. The interface provides complete and real-time visibility into the operational core of the broker, making management tasks that were once, complex command-line operations, an intuitive web console action.
Mastering this interface allows you to manage the messaging infrastructure, ensuring high availability and message reliability. Always remember to prioritize security by managing user permissions and regularly updating credentials, transforming your RabbitMQ instance from a simple message relay into a resilient and scalable communication hub.
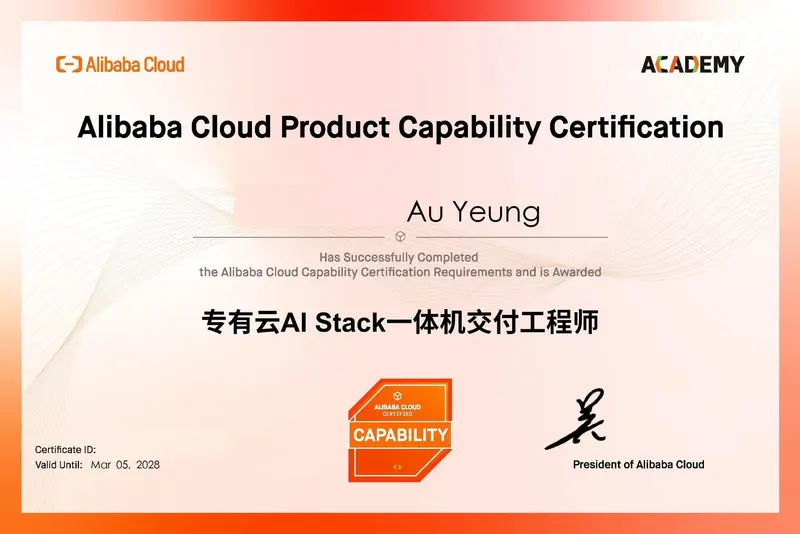
On March 5, 2026, I achieved the
Product Capability Certification: Apsara Stack AI Stack Delivery
under Alibaba Cloud.
This certification is currently more recognized within China and the Alibaba Cloud partner ecosystem, so I’d like to share some context for my global followers about what it represents – and why it matters in today’s AI infrastructure landscape.

Why Does Alibaba Cloud Offer an On‑Prem AI Solution?
When most people think of Alibaba Cloud, they think of public cloud services – ECS, OSS, databases, and cloud-native platforms.
However, enterprise AI adoption has introduced new requirements:
Many industries – especially finance, government, telecom, and large manufacturing – cannot move sensitive data to public cloud AI services.
To address this, Alibaba Cloud provides AI Stack as part of Apsara Stack, its enterprise-grade on-prem cloud platform.
Think of it as:
Cloud-native AI capability deployed inside your own data center.
What Is AI Stack?
AI Stack is a full-stack private AI infrastructure platform designed for enterprise environments.
It integrates:
It is not just hardware.
It is not just software.
It is an integrated platform enabling enterprises to operate AI as an internal service foundation – supporting private AI platforms, SaaS-style internal AI services, and even MaaS (Model as a Service) architectures within controlled environments.
Why This Matters in 2026
Today, most AI discussions focus on:
But what often gets overlooked is the infrastructure layer.
Running large models in production requires:
AI innovation is not only about building models –
it’s about delivering them reliably at enterprise scale.
This certification focuses on that operational and delivery foundation.
About the Certification
The official certification is:
Product Capability Certification: Apsara Stack AI Stack Delivery
Category: Product Capability Certification
Exam Duration: 90 minutes
Format: 50 questions (single-choice and multiple-choice)
Testing Option: Online, non-proctored
Language: Chinese
Course Duration: 160 minutes (on-demand)
⚠️ Important clarification:
This certification is currently available only to Alibaba Cloud Partners.
It is designed for engineers and service providers responsible for delivering AI-driven solutions on Apsara Stack for enterprise customers.
Course Coverage
The official preparation course covers:
The focus is strongly on delivery execution and operational readiness – not just theoretical architecture diagrams.
What You Should Know Before Taking This Exam
This is not an entry-level certification. It assumes real infrastructure experience.
1️⃣ Cloud & Infrastructure Fundamentals
2️⃣ GPU & AI Infrastructure Basics
3️⃣ Enterprise AI Delivery Mindset
AI Stack delivery requires understanding:
It also helps to understand how infrastructure enables:
What This Exam Really Tests
This exam emphasizes real-world delivery scenarios, not memorization.
It tests whether you understand:
In simple terms:
It’s not just about running a model.
It’s about delivering AI infrastructure as a reliable enterprise system.
Why This Is Relevant Beyond Alibaba Cloud
Even if you are not in the Alibaba Cloud ecosystem, the global trend is clear:
Understanding how AI platforms are delivered on-prem broadens your architectural perspective – even if you primarily work with AWS, Azure, or GCP.
Cloud is no longer just public cloud.
Hybrid and private AI infrastructure are becoming strategic enterprise investments.
Where to Learn More
This certification is offered through Alibaba Cloud Academy:
https://www.alibabacloud.com/en/academy/product-capability-certification-ai-stack-delivery
Alibaba Cloud Academy is the official training and certification division of Alibaba Cloud, offering professional certifications, capability certifications, e-learning courses, and hands-on labs.
However, please note again:
This specific certification is currently restricted to Alibaba Cloud Partners.
Reflection
Previously, I achieved the Microsoft Azure Solutions Architect Expert certification, which focuses heavily on cloud architecture design.
This milestone complements that experience by focusing on:
One validates architecture thinking.
The other validates delivery execution.
Both perspectives are essential in today’s AI-driven enterprise environment.
What’s Next?
With certifications in both:
I will continue deepening my focus on:
Excited for what 2026 will bring.
Here’s to building not just cloud solutions –
but real AI infrastructure for enterprises.
Love AI!
Intro
When I first started building a text‑to‑SQL system, the obvious thing was to run the generated query against a database and compare the result with a ground truth. That worked for a handful of examples, but as soon as we hit hundreds of user queries, the naive approach broke down: it was slow, brittle, and offered no insight into why a query failed.
What I needed was a two‑layer engine:
Below is my complete, production‑ready framework (no storage, no UI). I’ll walk through the architecture, show you the core code, and explain how to plug it into your own pipeline. By the end, you’ll have a reusable tool that turns every LLM‑generated query into actionable feedback—perfect for continuous model improvement.
1. Why Two Layers?
| Layer | Purpose | Typical Cost | Speed |
|---|---|---|---|
| Deterministic | Quick sanity checks (row count, column coverage, AST structure) | Negligible | < 0.5 s per query |
| AI Judge | Deep semantic review + actionable suggestions | Medium (model token cost) | 1–3 s per query |
The deterministic layer filters out the obvious failures—missing joins, wrong aggregates, mismatched row counts—so we only pay for the expensive AI pass when something truly needs human‑level reasoning. This keeps overall costs low while still giving you rich diagnostics.
2. High‑Level Flow
User Query + Expected SQL
          │
          ▼
[Deterministic Evaluator] → scores, verdict
          │
          ├─ If score ≥ 0.92 → return quick summary
          │
          ▼
[AI Judge] (LLM) → detailed JSON: missing elements, root cause, suggested fix
The evaluator returns a dictionary with metrics like row_count_match, column_coverage, and an overall weighted score. If the score is high enough we skip the AI step; otherwise we call the LLM with a carefully crafted prompt that forces it to output structured JSON.
3. Core Code
Save this as sql_eval_framework.py. It contains:
deterministic_evaluate() – the fast checks.build_judge_prompt() – template for the AI step.evaluate_batch() – async batch runner with concurrency control.
python
# sql_eval_framework.py
import asyncio, json
from typing import Dict, Any, List
import pandas as pd
from sqlglot import parse_one, exp
from litellm import acompletion  # pip install litellm
from pydantic import BaseModel, Field

# ------------------------------------------------------------------
# 1️⃣ Deterministic Evaluator (80/20 + extras)
# ------------------------------------------------------------------
def deterministic_evaluate(
    expected_sql: str,
    llm_sql: str,
    expected_df: pd.DataFrame,
    llm_df: pd.DataFrame
) -> Dict[str, Any]:
    """
    Fast checks that run in < 0.5 s per query.
    Returns a dict with scores and a weighted overall score.
    """

    # --- Row count -------------------------------------------------
    row_match = len(expected_df) == len(llm_df)
    row_delta_pct = abs(len(expected_df) - len(llm_df)) / max(len(expected_df), 1)

    # --- Column coverage --------------------------------------------
    exp_cols, llm_cols = set(expected_df.columns), set(llm_df.columns)
    col_coverage = len(exp_cols & llm_cols) / len(exp_cols) if exp_cols else 0
    missing_cols = list(exp_cols - llm_cols)
    extra_cols   = list(llm_cols - exp_cols)

    # --- Result set match (order‑insensitive) -----------------------
    try:
        exp_sorted = expected_df.sort_values(by=list(expected_df.columns)).reset_index(drop=True)
        llm_sorted  = llm_df.sort_values(by=list(llm_df.columns)).reset_index(drop=True)
        result_exact = exp_sorted.equals(llm_sorted)
    except Exception:
        result_exact = False

    # --- Basic AST structural checks --------------------------------
    try:
        ast_exp = parse_one(expected_sql, read="postgres")
        ast_llm = parse_one(llm_sql, read="postgres")

        tables_match   = {t.this for t in ast_exp.find_all(exp.Table)} ==
                         {t.this for t in ast_llm.find_all(exp.Table)}
        where_exists   = bool(ast_exp.args.get("where")) == bool(ast_llm.args.get("where"))
        group_by_match = str(ast_exp.args.get("group")) == str(ast_llm.args.get("group"))
    except Exception:
        tables_match, where_exists, group_by_match = False, False, False

    # --- Weighted score ---------------------------------------------
    weights = {
        "row": 0.15,
        "col": 0.20,
        "result": 0.25,
        "tables": 0.10,
        "where": 0.10,
        "group_by": 0.10
    }
    overall_score = (
        (1 if row_match else 0) * weights["row"] +
        col_coverage * weights["col"] +
        (1 if result_exact else 0) * weights["result"] +
        (1 if tables_match else 0) * weights["tables"] +
        (1 if where_exists else 0) * weights["where"] +
        (1 if group_by_match else 0) * weights["group_by"]
    )

    return {
        "row_count_match": row_match,
        "row_delta_pct": round(row_delta_pct, 3),
        "column_coverage": round(col_coverage, 2),
        "missing_columns": missing_cols,
        "extra_columns": extra_cols,
        "result_exact_match": result_exact,
        "tables_match": tables_match,
        "where_exists_match": where_exists,
        "group_by_match": group_by_match,
        "deterministic_score": round(overall_score, 2),
    }

# ------------------------------------------------------------------
# 2️⃣ AI Judge Prompt Builder
# ------------------------------------------------------------------
def build_judge_prompt(
    user_query: str,
    schema_ddl: str,
    expected_sql: str,
    llm_sql: str,
    exp_sample_csv: str,
    llm_sample_csv: str,
    exp_rows: int,
    llm_rows: int,
    exp_cols: List[str],
    llm_cols: List[str]
) -> str:
    """
    Returns a prompt that forces the LLM to output *only* JSON.
    The prompt includes enough context (schema, samples, row counts)
    so the model can reason about missing or extra elements.
    """

    return f"""
You are an expert SQL analyst and debugger with 15+ years experience.

Task: Deeply compare the **Expected SQL** (ground truth) with the **LLM-generated SQL**.
User natural‑language query: {user_query}

Database Schema (full DDL):
{schema_ddl}

Expected SQL (ground truth):
{expected_sql}

LLM-generated SQL:
{llm_sql}

Expected Result (first 10 rows as CSV):
{exp_sample_csv}

LLM Result (first 10 rows as CSV):
{llm_sample_csv}

Row count — Expected: {exp_rows} | LLM: {llm_rows}
Columns — Expected: {', '.join(exp_cols)} | LLM: {', '.join(llm_cols)}

Evaluate using this exact rubric. Think step‑by‑step.

1. **Semantic Correctness** (0-100): How well does the LLM SQL answer the user query compared to the expected SQL?
2. **What is MISSING?** List every important element present in Expected but absent/mis‑implemented in LLM SQL (filters, joins, aggregations, computed columns, groupings, ordering, etc.).
3. **What is EXTRA or WRONG?** List anything in LLM SQL that should not be there or is incorrect.
4. **Root Cause Hypothesis**: Why might the LLM have made these mistakes given the original prompt?
5. **Suggested Fix**: Provide a complete, corrected SQL that would pass all checks. Make minimal changes possible while fully matching the expected semantics.

Return ONLY valid JSON (no markdown):
{{
  "semantic_score": integer 0-100,
  "missing_elements": ["filter: status='ACTIVE'", "join on customer_id", ...],
  "extra_or_wrong_elements": ["unnecessary ORDER BY", ...],
  "root_cause": "string explanation",
  "suggested_improved_sql": "full corrected SQL here",
  "overall_verdict": "PASS | PARTIAL | FAIL",
  "explanation": "concise paragraph"
}}
"""

# ------------------------------------------------------------------
# 3️⃣ Batch Evaluator (async, concurrency control)
# ------------------------------------------------------------------
async def evaluate_batch(
    test_cases: List[Dict[str, Any]],
    max_parallel: int = 10,
    judge_model: str = "claude-3-5-haiku-20241022"
) -> List[Dict[str, Any]]:
    """
    test_cases is a list of dicts with keys:
        user_query, schema_ddl, expected_sql, llm_sql,
        expected_df, llm_df
    Returns each case enriched with deterministic scores and, if needed,
    the AI judge JSON.
    """

    semaphore = asyncio.Semaphore(max_parallel)

    async def process_one(case: Dict[str, Any]) -> Dict[str, Any]:
        # 1️⃣ Deterministic pass
        det_scores = deterministic_evaluate(
            case["expected_sql"],
            case["llm_sql"],
            case["expected_df"],
            case["llm_df"]
        )
        result = {**case, **det_scores}

        # 2️⃣ If high enough, skip AI judge
        if det_scores["deterministic_score"] >= 0.92:
            result["judge_review"] = None
            return result

        # 3️⃣ Build prompt and call LLM
        exp_sample_csv = case["expected_df"].head(10).to_csv(index=False)
        llm_sample_csv = case["llm_df"].head(10).to_csv(index=False)

        prompt = build_judge_prompt(
            user_query=case["user_query"],
            schema_ddl=case["schema_ddl"],
            expected_sql=case["expected_sql"],
            llm_sql=case["llm_sql"],
            exp_sample_csv=exp_sample_csv,
            llm_sample_csv=llm_sample_csv,
            exp_rows=len(case["expected_df"]),
            llm_rows=len(case["llm_df"]),
            exp_cols=list(case["expected_df"].columns),
            llm_cols=list(case["llm_df"].columns)
        )

        response = await acompletion(
            model=judge_model,
            messages=[{"role": "user", "content": prompt}]
        )
        # Parse the JSON safely
        try:
            review = json.loads(response.choices[0].message.content)
        except Exception as e:
            review = {"error": str(e), "raw_response": response.choices[0].message
Open Post: Test APIs Without Leaving VS Code
If you’re tired of switching between your code editor and Postman, or concerned about your API credentials living in the cloud, I built something you might like.
Open Post is a fully offline REST & GraphQL API client that lives inside VS Code. No accounts, no cloud sync, no telemetry. Just you, your editor, and your APIs.
Why I Built This
I got tired of the constant context-switching. Write code in VS Code, test the API in Postman, copy the cURL command, switch back to VS Code, paste it somewhere… you know the drill.
Plus, I never felt comfortable with my API keys and tokens syncing to someone else’s cloud. Call me paranoid, but I prefer my secrets to stay on my machine.
So I built Open Post with three goals:
Getting Started
Install from VS Code Marketplace:
https://marketplace.visualstudio.com/items?itemName=open-post.open-post
Step-by-step installation:
Cmd+Shift+X / Ctrl+Shift+X)open-post
Cmd+Alt+P (Mac) or Ctrl+Alt+P (Windows/Linux)The Open Post panel will open automatically. Now try your first request:
GET https://jsonplaceholder.typicode.com/posts/1
Hit Send or press Cmd+Enter. You’ll get a formatted response with syntax highlighting, response time, and status code.
Features Worth Mentioning
Encrypted Secret Vault
Store API keys, tokens, and certificates in an AES-256-GCM encrypted vault. No external services needed.
1. Open the Vault tab
2. Create a vault with a master password
3. Add secrets: key="api-key", value="sk-abc123..."
4. Use {{api-key}} in your requests
The vault auto-resolves variables during requests, and you can store TLS certificates for mTLS authentication.
Environment Variables
Create environments (Dev, Staging, Prod) and use {{variable}} syntax anywhere:
URL:    {{base_url}}/users/{{user_id}}
Header: Authorization: Bearer {{token}}
Body:   { "api_key": "{{api_key}}" }
Variables follow a priority chain:
collection vars < global env < vault secrets < local env
Collections with Inheritance
Organize requests into collections with nested folders. Set auth at the collection level, and every request inherits it. Override at the folder or request level when needed.
Same goes for pre-request and test scripts — they cascade down the hierarchy.
Mock Servers
Spin up mock servers right inside VS Code:
/_openapi.json
/_swagger
Perfect for frontend development when the backend isn’t ready yet.
AI Integration (MCP)
Open Post supports the Model Context Protocol. Expose your collection requests as tools for AI clients like Claude Desktop, Cursor, or GitHub Copilot.
Enable the built-in Management MCP server, and your AI can:
Connect to http://127.0.0.1:3199/mcp and say:
Code Export
Need to integrate an API call into your codebase? Click the </> button and get code in 14 languages:
cURL (Unix & Windows), PowerShell, JavaScript (Fetch & Axios), Python (Requests & http.client), Go, Java, C#, Ruby, PHP, Rust, Swift
Environment variables are resolved, auth headers are injected, and the code is ready to paste.
Authentication
Supports every auth type you’ll need:
All auth types support {{variable}} placeholders.
Body Types
JSON, Form Data, URL Encoded, Raw Text, XML, GraphQL, Binary
All text-based body types support inline comments that are automatically stripped before sending:
{
  "name": "John",
  // "email": "[email protected]",  // Temporarily disabled
  "age": 30
}
Pre-Request & Test Scripts
Automate workflows with JavaScript:
// Pre-request: set dynamic header
request.headers["X-Timestamp"] = Date.now().toString();

// Test: assert response
console.assert(response.status === 200, "Expected 200");
const body = response.json();
console.assert(body.id !== undefined, "Should have id");
Global Storage
Create global collections and environments in ~/.openpost/global/ that are shared across all workspaces. Changes sync automatically across VS Code windows.
Perfect for reusable collections you use across multiple projects.
Import & Export
Data Storage
All your data lives locally:
.openpost/                    ← per workspace
  ├── collections.json
  ├── environments.json
  ├── history.json
  └── config.json

~/.openpost/global/           ← shared across workspaces
  ├── collections.json
  ├── environments.json
  ├── vault.enc               ← encrypted vault
  └── config.json
No cloud sync. No telemetry. Commit .openpost/ to git to share with your team.
My Daily Workflow
Here’s how I use it:
base_url, api_key, auth_token
{{auth_token}}){{base_url}}/endpoint
Everything stays in sync across projects, and I never leave VS Code.
Simple vs Advanced Mode
Simple Mode (default) — Clean interface with just the essentials: requests, params, headers, body, auth.
Advanced Mode — Unlocks Mock+MCP servers, Vault, test scripts, and advanced settings. Requires a license key, but includes a built-in trial.
Installation
VS Code Marketplace:
https://marketplace.visualstudio.com/items?itemName=open-post.open-post
Open VSX Registry:
https://open-vsx.org/extension/open-post/open-post
GitHub:
https://github.com/openAPI-Studio/openAPI-Studio
Support the project:
Keyboard Shortcuts
Cmd+Alt+P (Mac) / Ctrl+Alt+P (Windows/Linux)Cmd+Enter / Ctrl+Enter
Who Should Use This?
Open Post is great for:
What’s Coming
The team is working on:
Final Thoughts
Open Post isn’t trying to replace Postman for everyone. It’s for developers who value privacy, simplicity, and keeping their workflow inside VS Code.
If that sounds like you, give it a try. Install from the marketplace, press Cmd+Alt+P, and start making requests. No sign-up required.
Note: This is an actively developed project and there might be bugs. Any feedback, bug reports, or feature requests are greatly appreciated! Feel free to open an issue on GitHub or reach out.
Current Version: 1.3.40
Minimum VS Code: 1.85.0
License: Proprietary
Support Open Post on Ko-fi: https://ko-fi.com/openpost
Questions? Open an issue on GitHub
Quick Reference
Links:
Tags: #vscode #api #rest #graphql #tools #productivity #opensource
TL;DR: The Orchestration Pattern is a powerful way to manage complex interactions between components, API calls, and state updates in React. Instead of letting logic scatter across dozens of useEffect hooks and event handlers, you centralize it into a dedicated “orchestrator” component or hook. This approach makes your code more predictable, testable, and maintainable—especially in enterprise applications with complex workflows.
The Problem: When React Components Become Spaghetti
Let’s be honest. We’ve all been there. You start building a feature—say, a multi-step checkout form. Initially, it’s simple. A few inputs, a submit button.
But then requirements grow:
Suddenly, your component looks like this:
const Checkout = () => {
  const [step, setStep] = useState(1);
  const [cart, setCart] = useState(null);
  const [shipping, setShipping] = useState(null);
  const [payment, setPayment] = useState(null);
  const [discount, setDiscount] = useState(null);
  const [errors, setErrors] = useState({});
  const [loading, setLoading] = useState(false);

  useEffect(() => {
    // Fetch cart on mount
  }, []);

  useEffect(() => {
    // Recalculate shipping when address changes
  }, [address]);

  useEffect(() => {
    // Apply discount when cart or code changes
  }, [discountCode, cart]);

  const handlePayment = async () => {
    // Complex logic with multiple steps and error handling
  };

  // 300+ more lines of imperative, hard-to-follow code...
};
This is imperative spaghetti. The “what” (user wants to checkout) is buried in the “how” (fetch this, update that, call this API, show this error). It’s hard to test, hard to debug, and even harder for new team members to understand.
Enter the Orchestration Pattern.
What Is the Orchestration Pattern in React?
Inspired by backend microservices architecture (where an orchestrator coordinates multiple services), the Orchestration Pattern in React applies the same principle: centralize complex workflow logic into a single coordinator.
Think of it like a movie director:
In React terms, the orchestrator manages:
A Simple Orchestration Pattern Implementation
Let’s refactor the checkout example using a custom hook as our orchestrator.
Step 1: Define the Orchestrator Hook
// hooks/useCheckoutOrchestrator.js
import { useReducer, useCallback } from 'react';
import { validateAddress } from '../api/address';
import { calculateShipping } from '../api/shipping';
import { applyDiscount } from '../api/discount';
import { processPayment } from '../api/payment';

// State machine for the checkout process
const initialState = {
  status: 'idle', // idle, validating, calculating, paying, success, error
  step: 1,
  cart: null,
  address: null,
  shipping: null,
  discount: null,
  paymentResult: null,
  error: null,
};

function checkoutReducer(state, action) {
  switch (action.type) {
    case 'SET_CART':
      return { ...state, cart: action.payload };
    case 'SET_ADDRESS':
      return { ...state, address: action.payload };
    case 'VALIDATION_START':
      return { ...state, status: 'validating', error: null };
    case 'VALIDATION_SUCCESS':
      return { ...state, status: 'idle', step: 2 };
    case 'VALIDATION_ERROR':
      return { ...state, status: 'error', error: action.payload };
    case 'SHIPPING_START':
      return { ...state, status: 'calculating' };
    case 'SHIPPING_SUCCESS':
      return { ...state, status: 'idle', shipping: action.payload, step: 3 };
    case 'PAYMENT_START':
      return { ...state, status: 'paying' };
    case 'PAYMENT_SUCCESS':
      return { ...state, status: 'success', paymentResult: action.payload, step: 4 };
    case 'PAYMENT_ERROR':
      return { ...state, status: 'error', error: action.payload };
    case 'RESET':
      return initialState;
    default:
      return state;
  }
}

export function useCheckoutOrchestrator() {
  const [state, dispatch] = useReducer(checkoutReducer, initialState);

  const setCart = useCallback((cart) => {
    dispatch({ type: 'SET_CART', payload: cart });
  }, []);

  const setAddress = useCallback((address) => {
    dispatch({ type: 'SET_ADDRESS', payload: address });
  }, []);

  // The orchestrator's main workflow
  const validateAndProceed = useCallback(async (address) => {
    dispatch({ type: 'VALIDATION_START' });

    try {
      // Step 1: Validate address
      const isValid = await validateAddress(address);
      if (!isValid) {
        throw new Error('Invalid address format');
      }
      dispatch({ type: 'VALIDATION_SUCCESS' });

      // Step 2: Calculate shipping based on validated address
      dispatch({ type: 'SHIPPING_START' });
      const shippingOptions = await calculateShipping(address, state.cart);
      dispatch({ type: 'SHIPPING_SUCCESS', payload: shippingOptions });

    } catch (error) {
      dispatch({ type: 'VALIDATION_ERROR', payload: error.message });
    }
  }, [state.cart]);

  const applyDiscountCode = useCallback(async (code) => {
    if (!state.cart) return;

    try {
      const discount = await applyDiscount(code, state.cart);
      dispatch({ type: 'SET_DISCOUNT', payload: discount });
      // Recalculate shipping with discount applied
      dispatch({ type: 'SHIPPING_START' });
      const updatedShipping = await calculateShipping(state.address, state.cart, discount);
      dispatch({ type: 'SHIPPING_SUCCESS', payload: updatedShipping });
    } catch (error) {
      dispatch({ type: 'SET_ERROR', payload: error.message });
    }
  }, [state.cart, state.address]);

  const processPaymentAndComplete = useCallback(async (paymentDetails) => {
    dispatch({ type: 'PAYMENT_START' });

    try {
      const result = await processPayment({
        cart: state.cart,
        shipping: state.shipping,
        discount: state.discount,
        paymentDetails,
      });

      dispatch({ type: 'PAYMENT_SUCCESS', payload: result });

      // Optional: Navigate to success page
      return result;

    } catch (error) {
      dispatch({ type: 'PAYMENT_ERROR', payload: error.message });

      // Compensation logic: if payment fails, shipping selection remains
      // but we might want to show a retry option
      throw error;
    }
  }, [state.cart, state.shipping, state.discount]);

  const reset = useCallback(() => {
    dispatch({ type: 'RESET' });
  }, []);

  return {
    // State
    status: state.status,
    step: state.step,
    cart: state.cart,
    shipping: state.shipping,
    discount: state.discount,
    error: state.error,
    paymentResult: state.paymentResult,

    // Actions (the public API of our orchestrator)
    setCart,
    setAddress,
    validateAndProceed,
    applyDiscountCode,
    processPaymentAndComplete,
    reset,
  };
}
Step 2: Consume the Orchestrator in Components
Now your components become “dumb” presentational components that simply call the orchestrator’s methods:
// CheckoutPage.jsx
import { useCheckoutOrchestrator } from '../hooks/useCheckoutOrchestrator';
import { AddressForm } from './AddressForm';
import { ShippingSelector } from './ShippingSelector';
import { PaymentForm } from './PaymentForm';
import { LoadingSpinner } from './LoadingSpinner';
import { ErrorAlert } from './ErrorAlert';

export const CheckoutPage = () => {
  const {
    status,
    step,
    cart,
    shipping,
    error,
    validateAndProceed,
    applyDiscountCode,
    processPaymentAndComplete,
    reset,
  } = useCheckoutOrchestrator();

  // Components don't need to know the complex flow!
  // They just call the orchestrator's methods.

  const handleAddressSubmit = async (addressData) => {
    await validateAndProceed(addressData);
  };

  const handleDiscountApply = async (code) => {
    await applyDiscountCode(code);
  };

  const handlePaymentSubmit = async (paymentDetails) => {
    try {
      await processPaymentAndComplete(paymentDetails);
      // Navigation happens automatically in the orchestrator
    } catch (err) {
      // Error is already in state, but we can show a toast if needed
    }
  };

  if (status === 'success') {
    return <OrderConfirmation order={paymentResult} onNewOrder={reset} />;
  }

  return (
    <div className="checkout">
      {error && <ErrorAlert message={error} onDismiss={() => reset()} />}

      {status === 'validating' || status === 'calculating' || status === 'paying' ? (
        <LoadingSpinner message="Processing your order..." />
      ) : (
        <>
          {step === 1 && (
            <AddressForm onSubmit={handleAddressSubmit} />
          )}

          {step === 2 && (
            <>
              <DiscountInput onApply={handleDiscountApply} />
              <ShippingSelector
                options={shipping}
                onSelect={handleShippingSelect}
              />
              <button onClick={() => setStep(3)}>Continue to Payment</button>
            </>
          )}

          {step === 3 && (
            <PaymentForm
              total={calculateTotal(cart, shipping, discount)}
              onSubmit={handlePaymentSubmit}
            />
          )}
        </>
      )}
    </div>
  );
};
Benefits of the Orchestration Pattern
1. Separation of Concerns
2. Testability
Test the orchestrator in isolation without rendering UI:
test('checkout flow handles validation failure', async () => {
  const { result } = renderHook(() => useCheckoutOrchestrator());

  // Mock API to fail
  jest.spyOn(api, 'validateAddress').mockRejectedValue(new Error('Invalid'));

  await act(async () => {
    await result.current.validateAndProceed({ street: '123 Main' });
  });

  expect(result.current.status).toBe('error');
  expect(result.current.error).toBe('Invalid');
  expect(result.current.step).toBe(1); // Still on address step
});
3. Reusability
The same orchestrator can be used across different UI implementations:
4. Observability
Centralized logic makes it easy to add logging, analytics, or error tracking:
const validateAndProceed = useCallback(async (address) => {
  analytics.trackEvent('checkout_address_validation_started');

  try {
    // ... validation logic
    analytics.trackEvent('checkout_address_validation_success');
  } catch (error) {
    analytics.trackEvent('checkout_address_validation_failed', { error });
    Sentry.captureException(error);
  }
}, []);
When to Use Orchestration (and When Not To)
✅ Great Use Cases:
❌ Overkill For:
Best Practices
Keep orchestrators stateless where possible — store state in React state or a state machine, not in the orchestrator instance itself.
Use TypeScript — define clear interfaces for your orchestrator’s context and events:
interface CheckoutContext {
  cart: Cart | null;
  address: Address | null;
  shipping: ShippingOption[] | null;
}

type CheckoutEvent =
  | { type: 'VALIDATE_ADDRESS'; address: Address }
  | { type: 'SELECT_SHIPPING'; method: ShippingMethod }
  | { type: 'PROCESS_PAYMENT'; details: PaymentDetails };
Single responsibility — an orchestrator should coordinate ONE business process. Don’t create a “god orchestrator” that handles checkout, profile updates, and notifications all in one place.
Compose orchestrators — for complex apps, create smaller orchestrators that work together:
function useOrderOrchestrator() {
  const cart = useCartOrchestrator();
  const checkout = useCheckoutOrchestrator();
  const payment = usePaymentOrchestrator();

  // Compose them into a higher-level workflow
}
Conclusion
The Orchestration Pattern transforms React applications from a collection of scattered useEffect hooks and imperative logic into a clean, declarative system. By centralizing workflow coordination, you get:
Whether you implement it with custom hooks, XState, or a full workflow engine, the principle remains the same: coordinate complexity in one place, not everywhere.
Have you used the Orchestration Pattern in your React apps? What challenges did you face? Let me know in the comments! 👇
Last week, LiteLLM got owned.
Not the company. Not the code. The publishing pipeline. An attacker compromised a vulnerability scanner in their CI/CD, used it to grab PyPI credentials, and pushed a malicious version that stole API keys from every engineer who installed it.
Three days later, the same thing happened to Telnyx.
If you work with AI, you probably had LiteLLM installed. The question isn’t whether you were affected. It’s whether you can prove what version you were running, and when.
The real problem isn’t the hack
Supply chain attacks aren’t new. SolarWinds. Codecov. ua-parser-js. The pattern is always the same: something between the developer and the user gets compromised.
What’s new is the response problem.
When LiteLLM was hit, every team using it had to answer: “Were we running the compromised version?” Most couldn’t answer with certainty because their evidence came from the same systems that were potentially compromised.
Your CI logs live in your CI. Your registry timestamps come from the registry. Your internal records are… internal.
The system under dispute is also the source of the evidence. That’s not proof.
What anchoring does
Anchoring creates a cryptographic fingerprint of your artifact (a package, a model, a build) and timestamps it in Bitcoin’s blockchain. Not a copy. Not a backup. A mathematical proof that this exact artifact existed at this exact moment.
artifact.whl (your package)
    ↓ SHA-256
a]7c3f9e...  (fingerprint)
    ↓ anchor
origin_id: ec8eead9-...  (your proof)
    ↓ Bitcoin
anchored to Bitcoin block 889,412
The proof is independently verifiable. It doesn’t depend on Umarise, your CI provider, or any single system staying honest.
What this looks like in practice
In your build pipeline (one line):
umarise anchor dist/package-1.2.0.whl
In GitHub Actions:
- name: Anchor build artifact
  uses: AnchoringTrust/anchor-action@v1
  with:
    file: dist/package-1.2.0.whl
  env:
    UMARISE_API_KEY: {% raw %}${{ secrets.UMARISE_API_KEY }}{% endraw %}
In Python:
import hashlib
from umarise import UmariseCore

with open("dist/package-1.2.0.whl", "rb") as f:
    sha256 = "sha256:" + hashlib.sha256(f.read()).hexdigest()

client = UmariseCore(api_key="um_...")
result = client.attest(hash_value=sha256)
print(result.origin_id)
That’s it. One call. The proof is permanent.
The timeline that matters
Here’s what the LiteLLM attack looked like, and what changes with anchoring:
Day 0: Team publishes litellm 1.52.6 (legitimate)
       → Without anchoring: version exists on PyPI
       → With anchoring: SHA-256 fingerprint anchored to Bitcoin

Day 3: Attacker compromises CI vulnerability scanner
       → Attacker extracts PyPI credentials
       → Pushes malicious litellm 1.52.7

Day 4: Malicious version steals API keys from .env files
       → 1000+ engineers affected

Day 6: Attack discovered, version yanked

Day 7: Incident response begins
       → Without anchoring: "Our logs say we had 1.52.6"
       → With anchoring: "Here's the Bitcoin-anchored proof
         of exactly what we were running"
The difference: one is a claim. The other is a proof that anyone can verify, independently, forever.
Why this matters for your team
You don’t need to have been hit by LiteLLM to care about this. Ask yourself:
Most teams answer no to all three.
The pattern is bigger than packages
The LiteLLM attack targeted a Python package. But the same vulnerability exists everywhere artifacts move through a pipeline:
Every artifact that moves through a pipeline without independent proof is vulnerable to the same class of attack.
Getting started
pip install umarise
umarise anchor <your-artifact>
The LiteLLM attack wasn’t exotic. It exploited a dependency in a CI pipeline. This will happen again.
The real question is whether you’ll be able to prove what you shipped, what you installed, and when.
Right now, for most teams, the answer is no.
Adding temporal proof to your publish pipeline takes one line.
Before anchoring: “Our logs say so.”
After anchoring: “Verify it yourself.”
Links:
For a while I’ve been looking for a clean way to feed my FortiGate with IP threat intel without having to manually maintain an unmanageable list. Public blocklists are plentiful, inconsistent in quality, and heavily redundant. So I built ShadowFortress to solve this once and for all.
The actual problem
As a CISO, I need to block inbound and outbound traffic to and from known malicious IPs: C2 servers, scanners, spam relays, offensively used Tor exit nodes, etc.
The market offers paid solutions (FortiGuard Threat Intelligence feeds, CrowdSec, etc.), but nothing that’s truly simple to consume as a raw IP file, free, and automatically maintained.
Public sources exist (blocklist.de, feodotracker, spamhaus, etc.) but aggregating them properly takes real work: deduplication, frequency-based selection, false positive exclusion.
What ShadowFortress does
ShadowFortress is an open source IP blocklist aggregator that:
The cap is set at 100,000 IP addresses maximum, which is roughly what most network appliances can absorb without performance degradation.
Generated files
| File | Purpose |
|---|---|
blacklist_inbound.txt |
Block incoming connections from malicious IPs |
blacklist_outbound.txt |
Block outgoing connections to compromised destinations |
STATS.md |
Statistics: volumes, trends, active sources |
Files are available directly via raw GitHub URLs, making them easy to consume from any script or network solution.
Integration examples
No installation required. You consume the files directly.
FortiGate (my primary use case)
# From FortiGate CLI
config firewall address
    edit "ShadowFortress-Inbound"
        set type iprange
        set comment "ShadowFortress blocklist - inbound"
    next
end
For a clean integration using External Block List (EBL), point directly to the raw URL of the file — FortiOS will refresh it periodically on its own.
iptables / ipset
# Fetch the list and load it into ipset
curl -s https://raw.githubusercontent.com/Grujowmi/ShadowFortress/main/blacklist_inbound.txt |
  while read ip; do ipset add blocklist_inbound "$ip" 2>/dev/null; done
nftables
table inet filter {
    set blocklist_inbound {
        type ipv4_addr
        flags interval
        # populate via script from blacklist_inbound.txt
    }

    chain input {
        type filter hook input priority 0;
        ip saddr @blocklist_inbound drop
    }
}
Cisco (ACL)
The list can be parsed to generate ACLs via a Python script, or integrated into a configuration management solution like Ansible.
Why redundancy-based selection?
This is the core of the project. Rather than taking the union of all sources (which can produce millions of IPs with a lot of noise), ShadowFortress selects IPs that appear across the highest number of distinct sources.
The reasoning: an IP listed in 10 different sources is far more likely to be genuinely malicious than one listed in a single source that might be stale or poorly maintained.
The result: a shorter, more accurate list with fewer false positives.
The private whitelist
A whitelist mechanism is applied before the files are generated. It excludes IP ranges that would trigger false positives in my environment (CDNs, legitimate cloud services, business partners, etc.).
This whitelist is not public — each user should manage their own exclusions based on their context. If you want to implement the same logic, the principle is straightforward: before publishing the files, filter out any IPs that match your allowlist.
License and contributions
The project is licensed under GNU GPL v3 (the AGPL-3.0 badge on the repo is worth correcting — the actual license in the LICENSE file is GPLv3).
Contributions are welcome: new sources to aggregate, fixes, improvements to the deduplication pipeline.
→ github.com/Grujowmi/ShadowFortress
This project was born from a real operational need in a medical environment subject to NIS2 and HDS compliance requirements. If you have experience integrating this with other appliances, feel free to open an issue or drop a comment below.
Nine new success criteria. One removed. Here is what every frontend engineer needs to know.
WCAG 2.2 became an official W3C Recommendation on December 12, 2024. If your team is still targeting 2.1 as a compliance baseline, you are already behind. The W3C explicitly advises using 2.2 to maximize future applicability of accessibility efforts, and regulators in the EU, UK, and US are actively aligning their policies to the latest version.
This article covers every new success criterion using a consistent format: what the spec requires, why the criterion exists and who it protects, and how to implement it in practice.
What Was Removed First: 4.1.1 Parsing
Before the new criteria, one was cut. WCAG 2.2 removed 4.1.1 Parsing, which previously required well-formed HTML so assistive technologies could reliably parse it.
Why removed: Modern browsers and screen readers have become resilient enough to handle malformed markup without accessibility failures. The criterion no longer reliably predicted real-world accessibility outcomes, so the working group dropped it.
Practical note: If your organization is contractually obligated to WCAG 2.0 or 2.1 conformance, you may still need to test and report on 4.1.1 separately. For new 2.2 audits, it is gone.
The 9 New Success Criteria
1. Focus Not Obscured (Minimum) — 2.4.11 — Level AA
What: When a UI component receives keyboard focus, the focused element must not be entirely hidden by author-created content. Partially obscured is acceptable at this level. Entirely hidden is not.
Why: Users who navigate by keyboard (people with motor disabilities, switch device users, power users) need to see where focus is at all times. Sticky headers, floating cookie banners, fixed chat widgets, and bottom navigation bars are the most common offenders. When focus moves behind one of these layers and disappears completely, the user loses their place on the page with no visual cue for what is currently selected. This is especially disorienting for users with cognitive disabilities who are more sensitive to context loss during a task.
How to implement:
The core fix is ensuring scroll-padding-top accounts for any fixed header height so the browser scrolls enough to keep focused elements visible.
/* If your sticky header is 64px tall */
html {
  scroll-padding-top: 80px; /* header height + breathing room */
}

/* Alternatively, scoped to focusable elements */
a:focus,
button:focus,
[tabindex]:focus {
  scroll-margin-top: 80px;
}
For dynamic header heights (collapsing navs, announcement banners that appear after load), update the value from JavaScript:
function updateScrollPadding() {
  const header = document.querySelector('.sticky-header');
  const height = header?.getBoundingClientRect().height ?? 0;
  document.documentElement.style.scrollPaddingTop = `${height + 16}px`;
}

window.addEventListener('resize', updateScrollPadding);
updateScrollPadding();
Test it: Tab through your page with a sticky header visible. Every focused element should be at least partially visible above the fold.
2. Focus Not Obscured (Enhanced) — 2.4.12 — Level AAA
What: Same intent as 2.4.11, but stricter. The focused component must not be obscured at all, not even partially.
Why: At AA (2.4.11), a focused element that is 10% visible technically passes. For users with low vision who rely on high zoom levels or screen magnification, even partial obscuring can make the focus indicator undetectable in practice. The AAA version closes that gap entirely.
How to implement:
Everything from 2.4.11 applies. The additional requirement is that no part of the focused element is covered by overlapping author-created content. In practice this means:
scroll-padding values must fully clear the focused element above any sticky layers.// Trap focus inside an open modal
function trapFocus(modalElement) {
const focusable = modalElement.querySelectorAll(
'a, button, input, textarea, select, [tabindex]:not([tabindex="-1"])'
);
const first = focusable[0];
const last = focusable[focusable.length - 1];
modalElement.addEventListener('keydown', (e) => {
if (e.key !== 'Tab') return;
if (e.shiftKey) {
if (document.activeElement === first) {
e.preventDefault();
last.focus();
}
} else {
if (document.activeElement === last) {
e.preventDefault();
first.focus();
}
}
});
}
3. Focus Appearance — 2.4.13 — Level AAA
What: When a keyboard focus indicator is visible, it must meet specific size and contrast requirements. The focus indicator area must be at least the perimeter of the unfocused component multiplied by 2 CSS pixels. The contrast ratio between focused and unfocused states must be at least 3:1 against adjacent colors.
Why: Browser default focus outlines are frequently invisible against common backgrounds, and many codebases globally suppress them with outline: none (still a widespread anti-pattern). Users with low vision, cognitive disabilities, and anyone relying entirely on keyboard navigation depend on a focus indicator that is visually obvious, not just technically present. A faint, thin blue ring at low contrast does not serve these users.
How to implement:
The first step is removing the global outline: none pattern. If you need to suppress the browser ring for mouse users, use :focus-visible instead of :focus:
/* Wrong: removes focus ring for everyone, including keyboard users */
*:focus {
  outline: none;
}

/* Right: removes ring only when pointer (not keyboard) is in use */
*:focus:not(:focus-visible) {
  outline: none;
}

/* Custom focus indicator that satisfies AAA geometric and contrast requirements */
*:focus-visible {
  outline: 3px solid #0f62fe;
  outline-offset: 2px;
  border-radius: 2px;
}
A practical shortcut: a 3px solid outline in a color with at least 3:1 contrast against the surrounding background satisfies the geometric requirement for most standard interactive components. For components on dark surfaces, check the contrast of your focus color against the dark background, not just the default page background.
4. Dragging Movements — 2.5.7 — Level AA
What: Any functionality that uses a dragging movement (click-and-drag, touch drag) must also be achievable with a single pointer action (click or tap) without dragging. Exceptions apply only when the drag is essential to the functionality itself.
Why: Dragging requires simultaneously pressing, holding, and moving a pointer. This compound gesture is unreliable or impossible for users with hand tremors, limited fine motor control, or motor disabilities affecting pointer precision. Sortable lists, kanban boards, sliders, map pan gestures, and date range pickers are common failure cases. The criterion does not prohibit drag interactions. It requires that a non-drag path exists to accomplish the same result.
How to implement:
For sortable lists, provide explicit move buttons alongside the drag handle:
function SortableItem({ item, onMoveUp, onMoveDown }) {
  return (
    <div draggable onDragStart={...} onDragEnd={...}>
      <span>{item.label}</span>
      <button aria-label={`Move ${item.label} up`} onClick={onMoveUp}>↑</button>
      <button aria-label={`Move ${item.label} down`} onClick={onMoveDown}>↓</button>
    </div>
  );
}
For range sliders, use native <input type="range"> wherever possible. It supports arrow key adjustment out of the box. Custom slider implementations frequently break keyboard support:
<input
  type="range"
  min={0}
  max={100}
  value={value}
  onChange={(e) => setValue(Number(e.target.value))}
  aria-label="Price range maximum"
/>
For map or canvas drag interactions, provide explicit pan controls: arrow-key panning and clickable pan buttons in the UI.
5. Target Size (Minimum) — 2.5.8 — Level AA
What: The size of the pointer target for interactive elements must be at least 24×24 CSS pixels. Exceptions apply when: the target’s offset from adjacent targets is at least 24px, the target is inline within text content, the browser controls the target size (default form controls), or a small size is essential to the information conveyed.
Why: Small tap targets fail users with tremors, limited dexterity, or motor disabilities who use alternative pointer devices with reduced precision. Tightly packed icon buttons, small checkboxes, link-dense navigation menus, and close buttons in notification toasts are the most common failure patterns. Note that 24x24px is the AA minimum. The AAA version (2.5.5, carried forward from 2.1) requires 44x44px. Most mobile UX guidelines already recommend 44px. WCAG 2.2 establishes the legal floor.
How to implement:
Set a baseline minimum for all interactive elements:
button,
a,
[role="button"],
input[type="checkbox"],
input[type="radio"] {
  min-width: 24px;
  min-height: 24px;
}

/* Prefer the AAA-level 44x44 on touch interfaces */
@media (pointer: coarse) {
  button,
  a,
  [role="button"] {
    min-width: 44px;
    min-height: 44px;
  }
}
For icon-only buttons where the visual size is constrained by design, expand the hit area using padding while keeping the visible footprint the same:
.icon-button {
  padding: 10px; /* expands hit area to 44x44 if icon is 24x24 */
  display: inline-flex;
  align-items: center;
  justify-content: center;
}
The spacing exception is a legitimate tool for constrained layouts. If two 16×16 icons are spaced so their center-to-center distance is 24px or more, they satisfy the minimum even without being 24×24 in physical size. Use it as a fallback, not a design default.
6. Consistent Help — 3.2.6 — Level A
What: If a web page provides a help mechanism (human contact, self-help documentation, automated contact, or a contact form), that mechanism must appear in the same relative location across all pages within the site.
Why: Users with cognitive disabilities often need help completing tasks and struggle when support resources appear in different places on different pages. If the help icon is in the top-right corner on the homepage but shifts to the footer on the checkout page, the inconsistency creates friction precisely when the user is most likely to need assistance. This criterion does not require that you have a help mechanism. It only requires that if you do, its location is stable.
How to implement:
This is primarily a layout and design system decision. Anchor help mechanisms inside a shared layout component so they cannot drift between pages:
// Layout.jsx
export function Layout({ children }) {
  return (
    <>
      <GlobalHeader />     {/* help trigger lives here, always */}
      <main>{children}</main>
      <GlobalFooter />
    </>
  );
}
Avoid conditionally hiding the help trigger on specific page types. If suppression is unavoidable (full-screen checkout flows, immersive experiences), make sure the mechanism reappears in the same location once normal layout resumes.
“Same relative location” means the same area of the page (top-right, bottom-right, etc.), not exact pixel coordinates. Responsive layouts that shift the help button between breakpoints are acceptable as long as it is consistently placed within each breakpoint’s layout pattern.
7. Redundant Entry — 3.3.7 — Level A
What: Information that a user has already provided in a multi-step process must either be auto-populated in subsequent steps or be selectable from previously entered values. Users must not be required to re-enter the same information within the same session unless re-entry is essential (e.g., password confirmation for security) or the information is no longer valid.
Why: Re-entering data is a significant cognitive and motor burden. For users with cognitive disabilities, being asked to retype a name or address they entered three steps ago interrupts task flow, increases error likelihood, and often causes abandonment. For users with motor disabilities, every additional keystroke carries a real physical cost. This criterion formalizes what good UX already recommends: do not ask for something you already have.
How to implement:
In a multi-step React form, store session state at a high level and pre-populate later steps:
// FormContext.jsx
const FormContext = React.createContext({});

export function FormProvider({ children }) {
  const [formData, setFormData] = React.useState({});

  const updateFormData = (values) => {
    setFormData((prev) => ({ ...prev, ...values }));
  };

  return (
    <FormContext.Provider value={{ formData, updateFormData }}>
      {children}
    </FormContext.Provider>
  );
}

// Step 3: Shipping -- pre-populate from billing when same
function ShippingStep() {
  const { formData, updateFormData } = React.useContext(FormContext);
  const [sameAsBilling, setSameAsBilling] = React.useState(false);

  const address = sameAsBilling
    ? formData.billingAddress
    : formData.shippingAddress;

  return (
    <>
      <label>
        <input
          type="checkbox"
          checked={sameAsBilling}
          onChange={(e) => setSameAsBilling(e.target.checked)}
        />
        Same as billing address
      </label>
      <AddressFields defaultValues={address} onChange={...} />
    </>
  );
}
The “same as billing” pattern already present in most e-commerce checkouts is a textbook 3.3.7 implementation. Apply the same logic to any multi-step flow where information asked in step N could have been collected in step N-1 or earlier.
8. Accessible Authentication (Minimum) — 3.3.8 — Level AA
What: A cognitive function test (memorizing a password, solving a puzzle, transcribing characters) must not be required at any step of an authentication process unless: an alternative authentication method is available that does not require a cognitive function test, a mechanism is available to help complete the test (such as copy-paste support or a password manager), or the test involves recognizing objects or personal content the user themselves provided.
Why: Password recall is itself a cognitive function test. Many users with cognitive disabilities, memory impairments, or learning disabilities cannot reliably memorize and recall complex passwords on demand. CAPTCHAs add another cognitive or visual puzzle on top of that. This criterion protects access to the authentication layer itself, which is a prerequisite for using everything else on the platform.
How to implement:
The highest-impact single change: allow paste into password fields and respect autocomplete attributes. Blocking paste breaks password managers and forces manual re-entry.
// Wrong: blocks paste, breaks password managers
<input
  type="password"
  onPaste={(e) => e.preventDefault()}
/>

// Right: paste allowed, autocomplete declared
<input
  type="password"
  autoComplete="current-password"
/>
Use the correct autocomplete values for the browser and password managers to fill credentials automatically:
<input type="email" autocomplete="username" />
<input type="password" autocomplete="current-password" />
<input type="password" autocomplete="new-password" /> <!-- registration -->
Additional paths to compliance:
The object recognition exception covers CAPTCHAs that ask users to identify images they uploaded themselves (security images, personal photos). These are permitted because the cognitive anchor is personal memory, not abstract recall.
9. Accessible Authentication (Enhanced) — 3.3.9 — Level AAA
What: Same as 3.3.8, but removes the object recognition and personal content exceptions. No cognitive function test of any kind is permitted anywhere in the authentication flow.
Why: Even object recognition and personal image selection require a level of memory and visual processing that users with severe cognitive or visual disabilities may not be able to reliably perform. The AAA version is an absolute requirement: authentication cannot depend on cognitive tests at all.
How to implement:
The only conformant paths at AAA are authentication methods that require no cognitive recall:
Passkeys (WebAuthn/FIDO2): device-level biometric or PIN-based auth. No password to memorize or recall.
// Passkey authentication
const assertion = await navigator.credentials.get({
  publicKey: {
    challenge: serverGeneratedChallenge,
    allowCredentials: [{ type: 'public-key', id: existingCredentialId }],
    userVerification: 'preferred',
  },
});
// Send assertion to server for verification
Magic links: one-time login URLs delivered to a verified email or phone. The user clicks a link in their inbox. No password involved.
SSO delegation: the authentication burden is delegated to a trusted identity provider. The provider’s own authentication is outside your conformance boundary.
AAA is not required for most products, but passkeys are rapidly becoming the industry default regardless of compliance requirements. Implementing them satisfies the accessibility requirement and the general trend toward passwordless authentication simultaneously.
Audit Checklist for WCAG 2.2 Compliance
If you are auditing an existing product, prioritize in this order:
Level A (minimum baseline)
Level AA (legal and enterprise standard)
autocomplete attributes (3.3.8)Level AAA (aspirational or contractual)
The Bigger Picture
WCAG 2.2’s additions are tightly scoped around three user groups: people with cognitive or learning disabilities, users with low vision, and users on mobile and touch devices. Every new criterion maps to a failure mode that real products ship regularly: password fields that block paste, drag interactions with no keyboard fallback, sticky headers that swallow focused elements, icon buttons too small to tap precisely.
None of these fixes are expensive once you know what to look for. The authentication changes are often one autocomplete attribute away. The target size and focus visibility issues are a few lines of CSS. The redundant entry problem is a state management question you have probably already partially solved elsewhere in your codebase.
The investment is low. The user impact is not.
Questions about implementing any of these criteria? Drop them in the comments.