How to Generate Website Screenshots with Python in 3 Lines of Code

Ever needed to capture a screenshot of a website programmatically? Maybe for generating link previews, monitoring pages, or creating PDF reports. Here’s how to do it with Python in just a few lines.

The Problem

Taking website screenshots programmatically usually means setting up headless Chrome, installing Playwright or Puppeteer, managing browser instances, handling timeouts, and dealing with all the edge cases. It’s a lot of infrastructure for what should be a simple task.

The Simple Way

ScreenshotAPIs is an API that handles all of that for you. Send a URL, get back an image or PDF.

1. Get Your API Key

Sign up at screenshotapis.org — the free plan gives you 100 screenshots per month.

2. Take a Screenshot

import requests

response = requests.post(
    "https://screenshotapis.org/v1/screenshot",
    headers={"X-API-Key": "your_api_key_here"},
    json={"url": "https://github.com"}
)

with open("screenshot.png", "wb") as f:
    f.write(response.content)

That’s it. Three lines of real code (plus the import and file save).

3. Customize It

You can control the output format, viewport size, and more:

response = requests.post(
    "https://screenshotapis.org/v1/screenshot",
    headers={"X-API-Key": "your_api_key_here"},
    json={
        "url": "https://github.com",
        "format": "jpeg",
        "width": 1280,
        "height": 720,
        "full_page": True
    }
)

Supported options:

  • format — png, jpeg, or webp
  • width / height — viewport dimensions
  • full_page — capture the entire scrollable page
  • delay_ms — wait before capturing (useful for pages with animations)

Generate PDFs Too

Same API, different endpoint:

response = requests.post(
    "https://screenshotapis.org/v1/pdf",
    headers={"X-API-Key": "your_api_key_here"},
    json={"url": "https://github.com"}
)

with open("page.pdf", "wb") as f:
    f.write(response.content)

Render Raw HTML

Don’t have a URL? You can pass HTML directly:

response = requests.post(
    "https://screenshotapis.org/v1/screenshot",
    headers={"X-API-Key": "your_api_key_here"},
    json={
        "html": "<h1>Hello World</h1><p>Rendered as an image.</p>",
        "width": 800,
        "height": 400
    }
)

This is great for generating OG images, email previews, or dynamic social cards.

Node.js? Same Thing

const response = await fetch("https://screenshotapis.org/v1/screenshot", {
  method: "POST",
  headers: {
    "X-API-Key": "your_api_key_here",
    "Content-Type": "application/json"
  },
  body: JSON.stringify({ url: "https://github.com" })
});

const buffer = await response.arrayBuffer();
require("fs").writeFileSync("screenshot.png", Buffer.from(buffer));

Use Cases

  • Link previews — Show a thumbnail of any URL in your app
  • PDF reports — Convert dashboards or pages to downloadable PDFs
  • OG images — Generate dynamic social media preview images from HTML templates
  • Monitoring — Take periodic screenshots to track visual changes on a page
  • Archiving — Save snapshots of web pages for compliance or records

Pricing

The free tier gives you 100 captures per month. Paid plans start at $19/month for 2,000 captures. There are also one-time credit packs if you don’t need a subscription.

Check it out at screenshotapis.org.

AWS Snowflake Lakehouse: 2 Practical Apache Iceberg Integration Patterns

Original Japanese article: AWSのレイクハウス(Apache Iceberg)をSnowflakeと連携する2つのパターンを整理する

Introduction

I’m Aki, an AWS Community Builder (@jitepengin).

In recent years, it has become increasingly common to build lakehouse architectures centered around Apache Iceberg.

Before the rise of lakehouse architecture, it was common to design systems where data was consolidated into a specific platform, such as:

  • an architecture centered around Amazon Redshift on AWS
  • an architecture centered around internal tables in Snowflake

However, with the advent of Apache Iceberg, this assumption is rapidly changing.

Now that data on Amazon S3 can be directly accessed from multiple engines, what matters is no longer simply product selection.
Instead, the architecture design itself has become the central focus: where the data resides, who owns the write responsibility, and who holds governance authority.

In this article, focusing on the coexistence of AWS and Snowflake, I will organize the following:

  • two patterns based on S3 × Iceberg
  • connectivity with Power BI Service
  • future prospects including AI utilization

Why AWS × Snowflake Coexistence Is Necessary

The greatest value of Apache Iceberg lies in its ability to separate data from the query engine.

For example, while keeping the physical data stored in S3, the same data can be accessed from multiple tools such as Athena, AWS Glue / Spark, Redshift, and Snowflake.

In other words, while consolidating the physical data into a single location, it has become possible to choose the most suitable analytics platform depending on the use case.

As a result, the architectural discussion has shifted from “which product should we use?” to “where should data sovereignty reside, and where should analytical ownership be placed?”

The benefits of using Snowflake here include:

  • user-friendly UI/UX
  • powerful SQL analytics capabilities
  • integration with Cortex AI

In particular, I believe that an architecture where AWS serves as the data sovereignty layer while Snowflake is utilized as the analytics layer is highly compatible.

Two Patterns for Snowflake × S3 Integration

Here, I will organize the two commonly used patterns when integrating Snowflake with S3.

Pattern 1: Glue Catalog Integration

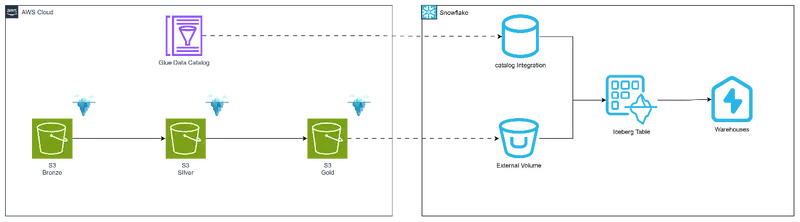
In this pattern, Iceberg tables stored on S3 are referenced from Snowflake through AWS Glue Data Catalog.

The advantages of this architecture are:

  • relatively simple configuration
  • S3 becomes the Single Source of Truth
  • because Snowflake cannot write, AWS retains sovereignty over data management
    (this can also be considered a disadvantage)
  • since user access is consolidated into Snowflake, access control can be centralized there

In other words, Snowflake focuses solely on the role of data analytics (query engine), while AWS retains authority over data management.

Setup Procedure

Step 1: Create an External Volume (S3 Access Configuration)

Run the following on the Snowflake side:

CREATE EXTERNAL VOLUME IF NOT EXISTS sample_iceberg_volume
  STORAGE_LOCATIONS = (
    (
      NAME = 'my-s3-location'
      STORAGE_PROVIDER = 'S3'
      STORAGE_BASE_URL = catalog S3 path
      STORAGE_AWS_ROLE_ARN = role ARN to use
      STORAGE_AWS_EXTERNAL_ID = 'my_external_id'
    )
  );

Step 2: Create Glue Catalog Integration

Run the following on the Snowflake side:

CREATE OR REPLACE CATALOG INTEGRATION glue_catalog_int -- arbitrary name
  CATALOG_SOURCE = GLUE
  CATALOG_NAMESPACE = Glue catalog namespace
  TABLE_FORMAT = ICEBERG
  GLUE_AWS_ROLE_ARN = role ARN to use
  GLUE_CATALOG_ID = Glue catalog ID to use
  GLUE_REGION = 'ap-northeast-1'
  ENABLED = TRUE;

Step 3: Retrieve Required Information for AWS Trust Policy

DESC EXTERNAL VOLUME sample_iceberg_volume;

→ Note down STORAGE_AWS_IAM_USER_ARN and STORAGE_AWS_EXTERNAL_ID

DESC CATALOG INTEGRATION glue_catalog_int;

→ Note down GLUE_AWS_IAM_USER_ARN and GLUE_AWS_EXTERNAL_ID

Since the two External IDs above will have different values, be sure to add both to the AWS IAM role Trust Policy.

Please configure the Trust Policy for the role used on the AWS side.

{
    "Version": "2012-10-17",
    "Statement": [
        {
            "Effect": "Allow",
            "Principal": {
                "AWS": STORAGE_AWS_IAM_USER_ARN
            },
            "Action": "sts:AssumeRole",
            "Condition": {
                "StringEquals": {
                    "sts:ExternalId": STORAGE_AWS_EXTERNAL_ID
                }
            }
        },
        {
            "Effect": "Allow",
            "Principal": {
                "AWS": GLUE_AWS_IAM_USER_ARN
            },
            "Action": "sts:AssumeRole",
            "Condition": {
                "StringEquals": {
                    "sts:ExternalId": GLUE_AWS_EXTERNAL_ID
                }
            }
        }
    ]
}

Step 4: Create Database

Run the following on the Snowflake side:

CREATE DATABASE IF NOT EXISTS icebergdb;

Step 5: Create Table

Run the following on the Snowflake side:

CREATE OR REPLACE ICEBERG TABLE icebergdb.public.yellow_tripdata -- arbitrary name
  EXTERNAL_VOLUME = 'sample_iceberg_volume'
  CATALOG = 'glue_catalog_int'
  CATALOG_TABLE_NAME = 'yellow_tripdata'
  AUTO_REFRESH = TRUE;

Step 6: Verify Data

Run the following on the Snowflake side:

SELECT * FROM icebergdb.public.yellow_tripdata LIMIT 5;

We were able to read the data from S3!

Pattern 2: Catalog-Linked Database (Iceberg)

This pattern integrates Glue Catalog using the REST Catalog approach and manages Iceberg tables directly from the Snowflake side.

The advantages of this architecture are:

  • read and write operations from Snowflake are possible
  • the physical data remains stored in S3
  • Snowflake users can perform SQL-based updates and analytics
  • easier integration with Power BI and Cortex AI

In other words, the biggest feature is that analysis and updates can be performed from Snowflake while keeping the physical data in S3.

However, governance must be considered from both the AWS side and the Snowflake side.

Setup Procedure

Step 1: Create an External Volume (S3 Access Configuration)

CREATE EXTERNAL VOLUME IF NOT EXISTS sample_iceberg_volume
  STORAGE_LOCATIONS = (
    (
      NAME = 'my-s3-location'
      STORAGE_PROVIDER = 'S3'
      STORAGE_BASE_URL = catalog S3 path
      STORAGE_AWS_ROLE_ARN = role ARN to use
      STORAGE_AWS_EXTERNAL_ID = 'my_external_id'
    )
  );

Step 2: Create Glue Iceberg REST Catalog Integration

CREATE OR REPLACE CATALOG INTEGRATION glue_rest_catalog_int
  CATALOG_SOURCE = ICEBERG_REST
  TABLE_FORMAT = ICEBERG
  CATALOG_NAMESPACE = Glue catalog namespace
  REST_CONFIG = (
    CATALOG_URI = Glue catalog URI
    CATALOG_API_TYPE = AWS_GLUE
    CATALOG_NAME = AWS account ID
  )
  REST_AUTHENTICATION = (
    TYPE = SIGV4
    SIGV4_IAM_ROLE = role ARN to use
    SIGV4_SIGNING_REGION = 'ap-northeast-1'
  )
  ENABLED = TRUE;

Step 3: Retrieve Required Information for AWS Trust Policy

DESC EXTERNAL VOLUME sample_iceberg_volume;

→ Note down STORAGE_AWS_IAM_USER_ARN and STORAGE_AWS_EXTERNAL_ID

DESC CATALOG INTEGRATION glue_rest_catalog_int;

→ Note down GLUE_AWS_IAM_USER_ARN and GLUE_AWS_EXTERNAL_ID

Since the two External IDs above will have different values, be sure to add both to the AWS IAM role Trust Policy.

Please configure the Trust Policy for the role used on the AWS side.

{
    "Version": "2012-10-17",
    "Statement": [
        {
            "Effect": "Allow",
            "Principal": {
                "AWS": STORAGE_AWS_IAM_USER_ARN
            },
            "Action": "sts:AssumeRole",
            "Condition": {
                "StringEquals": {
                    "sts:ExternalId": STORAGE_AWS_EXTERNAL_ID
                }
            }
        },
        {
            "Effect": "Allow",
            "Principal": {
                "AWS": GLUE_AWS_IAM_USER_ARN
            },
            "Action": "sts:AssumeRole",
            "Condition": {
                "StringEquals": {
                    "sts:ExternalId": GLUE_AWS_EXTERNAL_ID
                }
            }
        }
    ]
}

Step 4: Create Catalog Linked Database (Read/Write Enabled)

CREATE DATABASE my_iceberg_linked_db
  LINKED_CATALOG = (
    CATALOG = 'glue_rest_catalog_int',
    ALLOWED_WRITE_OPERATIONS = ALL
  )
  EXTERNAL_VOLUME = 'sample_iceberg_volume';

Step 5: Tables Are Automatically Discovered (Synced Every 30 Seconds)

SELECT * FROM my_iceberg_linked_db."icebergdb"."yellow_tripdata" LIMIT 5;

We were able to read the data from S3!

Step 6: Write Test

INSERT INTO my_iceberg_linked_db."icebergdb"."yellow_tripdata"
  (vendorid, tpep_pickup_datetime, tpep_dropoff_datetime, passenger_count,
   trip_distance, ratecodeid, store_and_fwd_flag, pulocationid, dolocationid,
   payment_type, fare_amount, extra, mta_tax, tip_amount, tolls_amount,
   improvement_surcharge, total_amount, congestion_surcharge, airport_fee)
VALUES
  (1, '2025-01-01 13:00:00', '2025-01-01 13:30:00', 2,
   3.5, 1, 'N', 100, 200,
   1, 15.0, 2.5, 0.5, 3.0, 0,
   1.0, 22.0, 2.5, 0);

Step 7: Verify Write

SELECT * FROM my_iceberg_linked_db."icebergdb"."yellow_tripdata"
WHERE tpep_pickup_datetime = '2025-01-01 13:00:00';

We were able to write data into S3!

Athena side

Before write

After write

Which Pattern Should You Choose?

For practical use, the following way of organizing it is easy to understand.

Use Case Recommended Pattern
AWS-led ETL workloads, with Snowflake primarily used for read/query access Pattern 1
BI / AI / SQL updates driven primarily from Snowflake Pattern 2
Governance needs to be centralized on AWS Pattern 1
Operations are mainly led by Snowflake users Pattern 2

Integration with Power BI Service

Traditionally, when referencing an S3-based lakehouse from Power BI Service, many architectures used Redshift as an intermediary.

In such cases, securely connecting directly from Power BI Service often required provisioning an EC2 instance and configuring an on-premises data gateway.

This introduces additional operational costs such as EC2 management.

Now, how about Snowflake?

Power BI provides a native connector for Snowflake, allowing direct authentication and connection from Power BI Service.

This eliminates the need for relay servers or on-premises gateways that are often required in Redshift-based architectures.

In other words, it becomes possible to exclude costly operational components such as on-premises gateways.

In addition, since the semantically organized Gold layer on the Snowflake side can be directly connected to Power BI, this also improves usability for BI users.

Thinking in Terms of Medallion Architecture

Personally, I consider the following architecture to be highly practical for real-world use.

  • Bronze: S3 + Iceberg
  • Silver: S3 + Iceberg (with Snowflake integration as needed)
  • Gold: S3 + Iceberg → Snowflake integration

By especially aligning the Gold layer with Snowflake, it becomes easier to provide a semantic layer that is easy for BI users and business departments to consume.

Depending on the use case, the Silver layer can also be utilized for more detailed analysis.

In other words, this enables a separation of responsibilities between data management and data analytics.

Thinking in Terms of Separation of Ownership

This is the most important point in this article.

Domain Ownership
Physical data AWS
Governance AWS / Snowflake
Analytics Snowflake
AI interaction Snowflake

What matters is not the product itself, but how ownership is separated.

By clearly defining this separation, it becomes easier to organize the scope of responsibilities across data engineering, BI, and AI utilization, which also provides benefits from an organizational management perspective.

The Change Brought by Snowflake Cortex AI

AI utilization will become even more important going forward.

As with other data platforms, AI adoption is progressing rapidly in Snowflake as well.

By leveraging Snowflake Cortex AI, it becomes possible to query Iceberg tables on S3 using natural language.

In other words, the data platform is evolving from “a platform for writing SQL” into “a platform for conversation.”

AI utilization is expected to continue evolving in many aspects.

One key point will be preparing data that is easier for AI to use—in other words, AI-ready data.

Conclusion

In this article, I organized two patterns for integrating an AWS lakehouse (Apache Iceberg) with Snowflake.

In recent data utilization scenarios, it is increasingly common not only to rely solely on AWS, but also to integrate with platforms such as Databricks and Snowflake as introduced here.

As mentioned earlier, what matters is not the product itself, but how ownership is separated.

Depending on which service takes responsibility for data, governance, and analytics, both the architecture and configuration will change.

In any case, what is truly important is not the product itself, but the perspective of how to design a data platform that users will continue to use over time.

Going forward, it will become even more important to design architectures not only from the perspective of where data is stored, but also from the viewpoint of who owns responsibility for each layer and how that responsibility connects to user value.

I hope this article will be helpful for those considering a combination of AWS and Snowflake.

51万行源码泄露:全面解构 Claude Code 如何成为 AI 编程天花板

51万行源码泄露:全面解构 Claude Code 如何成为 AI 编程天花板

原文链接:https://warpnav.com/claude-code-source-map

2026年3月31日,安全研究者 Chaofan Shou 发现了一个“史诗级”的构建疏漏。 Anthropic 发布到 npm 的 Claude Code (v2.1.88) 包体积从 17MB 暴涨到了 31MB。多出来的部分,是一个重达 60MB 的 source map 文件(cli.js.map)。这意味着什么?这意味着 Anthropic 忘了剥离调试文件,导致 Claude Code 完整的 TypeScript 源码——整整 51.2 万行,1903(或 1906)个源文件——完全暴露在了公网上。

有意思的是,2025 年 2 月 Claude Code 刚上 npm 时就犯过一模一样的错误。虽然这不涉及模型权重,对普通用户没有安全风险,但这却给全世界的 AI 开发者提供了一份价值连城的“内部技术架构图”。

当你翻开这包含 API 设计、遥测系统、加密工具、IPC 协议的 51 万行代码,带着“为什么它就是比别人好用”的疑问去阅读时,你会得出一个震撼的结论:这不是一个 AI 编程助手,这是一个以 LLM 为内核的操作系统。

一、系统架构:这不是 CLI 工具,而是运行平台

大多数人对 AI 编程工具的理解停留在表面:用户输入 → 调用 LLM API → 返回代码显示。如果你照着这个思路去复刻,出来的体验和 Claude Code 会有天壤之别。

想象一下你雇了一个远程程序员来操作你的电脑:

  • Cursor 的做法: 让他坐在你旁边,敲命令前你看一眼,点个“允许”。简单粗暴,但费神。
  • GitHub Copilot Agent 的做法: 给他一台新虚拟机随便折腾,搞完提交代码。安全,但脱离了你本地的真实环境。
  • Claude Code 的做法: 让他直接用你的电脑,但配了一套极其精密的安检系统。他想用 rm -rf 都要经过 9 层审查。

从源码目录 src/ 的顶层结构来看,它的复杂程度令人咋舌:入口层、常量与提示词、工具定义、运行时服务、命令系统、UI 组件、协调器、记忆系统、插件、Hook 系统、任务系统一应俱全。

它拥有四个独立入口(CLI、初始化流程、MCP 模式、SDK),同一个 Agent 运行时可以服务四种交互界面,这是典型的平台化设计标志。它的命令系统不仅内建了 /mcp, /memory, /tasks 等十几个系统级命令,还统一加载动态技能,本身就是一个庞大的生态入口。

二、提示词工程:一台精密的“动态组装机器”

大多数人以为 System Prompt(系统提示词)是一大段固定的文本,启动时塞进去就完事了。但 Claude Code 的提示词是由 getSystemPrompt() 函数动态拼装出来的,更像是一个编译器的输出。

它的拼装逻辑分为两个截然不同的部分:

1. 静态部分(系统的“宪法”)

这部分无论什么会话都不会改变,包括身份定位、系统规范、做任务的哲学、风险动作规范、工具使用规范和语气风格等。

2. 动态部分(系统的“当期政策”)

这部分每次对话都不同,会动态注入:会话引导、记忆片段、环境信息、你的 CLAUDE.md 项目配置、MCP 插件说明,甚至是 Token 预算和输出风格。

核心秘密在于“缓存边界”与 Token 经济学:
源码中有一个名为 SYSTEM_PROMPT_DYNAMIC_BOUNDARY 的标记。

  • 边界之上的内容是静态的,API 可以完美缓存它们,这既节省了大量 Token 费用,又极大提升了响应速度。
  • 边界之下的内容是动态的,确保每次对话都能感知当前环境。
    当你的产品每天要处理海量请求时,这种把提示词当做预算来管理的“上下文经济学”直接决定了产品的生死。

三、铁血行为约束:如何管教 AI 不乱来?

你一定遇到过这种崩溃场景:让 AI 改个小 Bug,它顺手把半个文件重构了,还加了五个你不需要的错误处理。Claude Code 怎么解决?靠的是把规矩写成“铁律”。

1. 细致入微的“任务哲学”

在 getSimpleDoingTasksSection() 模块中,Anthropic 给模型立下了严苛的规矩:

  • 不要加用户没要求的功能。
  • 不要过度抽象,不要瞎重构。
  • 不要乱加注释和文档字符串。
  • 不要给时间估计。
  • 方法失败时先诊断原因再换策略,删除确认没用的东西,绝不搞兼容性垃圾。
  • 结果要如实汇报,不能假装自己测试过了。

2. 工具使用的“语法规则”

工具规范被写得极其死板:

  • 读文件必须用 FileRead,不许用 cat/head/tail。
  • 改文件必须用 FileEdit,不许用 sed/awk(正则写错容易崩)。
  • 没有依赖关系的工具调用必须并行处理。

3. 每个工具都有独立的“使用手册”

系统有 42 个工具,但它们是按需延迟加载的,只有需要时才通过 ToolSearchTool 注入,以节省 Token。每个工具目录下都有专门写给 AI 看的 prompt.ts。
例如 BashTool 的手册明确规定了 Git 安全协议:

  • 绝对不要擅自 git push --force 或 reset --hard。
  • 强制:总是创建新的 commit 而不是 amending。

此外,系统采用 Fail-closed(默认封闭)设计。在工具工厂函数中,isConcurrencySafe 和 isReadOnly 默认全是 false。这意味着如果开发者忘了声明安全属性,系统宁可误杀也会将其视为“有风险、会写入”的工具,绝不漏掉一个风险。同时,FileEditTool 强制要求必须先使用 FileReadTool,没读过文件就去盲改会直接报错拦截。

(注:源码中甚至还有 USER_TYPE === 'ant' 的分支,专门给 Anthropic 内部员工提供更激进的输出策略和实验功能。)

四、多 Agent 分发与 14 步执行流水线

当任务复杂时,Claude Code 不会单打独斗,而是生成一个子 Agent 蜂群(Swarm)。源码确认了至少六个内建 Agent,包括通用、探索、计划、验证等。

1. 角色隔离原则

  • Explore Agent(探索) & Plan Agent(计划): 被设计成纯只读模式。它们不能创建、修改或移动文件,连执行 Bash 也只限于 ls 或 git status。规划和实现彻底分开,防止 AI 在探索阶段不小心改坏代码。
  • 防偷懒与自我意识注入: 主 Agent 派发任务时,被严格限制不允许写“基于你的发现去修 bug”这种模糊指令,必须给出具体的行号和路径。而子 Agent 启动时会被注入:“你是一个工人,不是经理。不要交流,直接干活,严禁再生成子代”,切断了无限递归的可能。
  • Coordinator 模式(协调器): 主 Agent 变身项目经理,分配 3 个 worker 并行搜索代码库,2 个 worker 串行修改不同文件避免冲突,并行成为它的超能力。为了最大化子 Agent 缓存命中率,所有 Fork 出来的任务都会统一使用 'Fork started — processing in background' 作为文本前缀,巧妙利用字节级前缀匹配白嫖缓存。

2. 整个系统最值钱的设计:Verification Agent

人类自己 Review 代码都会因为疲惫而敷衍,LLM 更是如此。Verification Agent(验证专家)的指令堪称全场最狠:

  • 核心方向是 “try to break it”(想办法搞坏它)。
  • 严厉打击“只看代码不跑检查”的逃避行为,或者被“UI 看起来还行”迷惑的偷懒倾向。
  • 强制要求跑 Build、跑测试套件、跑 Linter。前端要跑浏览器自动化,后端要用 curl 实测响应,甚至要做 adversarial probes(对抗性探测)去寻找边界破绽。
  • 它和写代码的 Agent 利益隔离,没有“自我感觉良好”的偏见,只负责冷酷地给出 PASS、FAIL 或 PARTIAL 判决。

3. 工具调用的 14 步治理流水线

工具不是说调就调的。当 AI 决定使用工具时,要经过一条漫长的治理流水线:
解析输入 → 校验 Schema → 跑内部 validateInput → 跑投机分类器(Speculative classifier)预判风险 → 执行 PreToolUse Hook(可改写输入或拦截) → 进入正式权限决策 → 二次修正输入 → 真正执行 tool.call() → 记录遥测日志 → 执行 PostToolUse Hook → 处理结构化输出(成功或失败都有对应 Hook 收尾)。
这就是把“默认一切都会出问题”刻在了骨子里。

五、 永不超限的三层压缩机制

长对话一定会导致 Token 爆炸。Claude Code 如何让对话“永不超限”还能“记住你”?

1. 仿生学的记忆与 KAIROS “做梦”模式

  • 它使用另一个小模型(Claude Sonnet)来决定“哪些记忆与当前相关”。精确度优先于召回率,宁缺毋滥,最多只挑出 5 个最相关的记忆文件注入上下文。
  • KAIROS 特性: 在长会话中,记忆只作为流水账日志存在。在夜间或低活跃期,系统会触发 /dream 技能,AI 在后台把这些原始日志蒸馏、压缩成结构化的“用户偏好”和“项目背景”文件。AI 在“睡觉”时整理记忆,这已经是仿生学的范畴了。

2. 铁血三层压缩机制

  • 第一层:微压缩(Microcompact): 将旧的工具调用结果(比如十分钟前读取的 500 行代码)替换为 [Old tool result content cleared],提示词主线完全保留。
  • 第二层:自动压缩: 当 Token 消耗逼近窗口极限的 87% 时触发,并带有熔断器(连续 3 次失败后停止,防止死循环)。
  • 第三层:完全压缩: 让 AI 对整段对话生成摘要替换历史记录。为了防止 AI 总结时又去调用工具浪费 Token,前置指令极其严厉:CRITICAL: Respond with TEXT ONLY. Do NOT call any tools...

六、 记忆系统:AI 检索与科幻的 KAIROS“做梦”机制

Claude Code 让人觉得“它认识你”,是因为其背后拥有一套仿生学级别的记忆管理系统。

  • 双模型协同检索:当需要回忆时,系统不是用传统的向量搜索,而是唤醒另一个速度极快的 AI 模型(如 Claude Sonnet),让其快速扫描所有记忆文件的标题和描述。选出最多 5 个最相关的记忆注入上下文,策略是“精确度优先于召回率”,宁可漏掉也不塞入无关信息污染上下文。
  • KAIROS 模式(夜间蒸馏):这部分代码极具科幻感。在长会话中,记忆最初只作为按日期的追加式日志(流水账)存在。当系统处于低活跃期的“夜间”,会触发一个 /dream 技能。AI 在“睡觉”时,会将这些乱七八糟的原始日志,蒸馏压缩成结构化的“用户偏好”和“项目背景”文件。

七、 多 Agent 分发:从“单打独斗”到“蜂群作战”

对于复杂任务,Claude Code 不会指望一个模型包揽一切,而是自动生成子 Agent(智能体)蜂群。源码确认了系统至少包含 6 个内建 Agent。

1. 角色分离与纯只读专家

  • Explore Agent(探索) & Plan Agent(计划):这两个角色被设计成纯只读模式(Read-only specialist)。它们不能创建、修改或移动文件,连使用 Bash 工具也只允许 ls、git status 等安全操作。计划和实现彻底隔离,避免 AI 在构思阶段意外破坏系统状态。

2. 反偷懒与自我意识注入

  • 反懒惰委派(Lazy Delegation):主 Agent 向子 Agent 分配任务时,被严厉禁止写“基于你的发现去修 bug”这种模糊指令,必须给出具体的文件路径、行号和详细要求,强制主 Agent 承担综合思考的责任。
  • 工人潜意识注入:子 Agent 启动时,系统会给它注入一段极具压迫感的指令:“你是一个被 Fork 出来的工人,不是经理。不要交流提问,直接使用工具干活,严禁再生成子 Agent。”以此彻底切断死循环套娃的可能性。

3. 协调器与缓存极致优化

在 Coordinator(协调器)模式下,主 Agent 负责调度:Phase 1 派 3 个 Worker 并行搜索,Phase 3 派 2 个 Worker 串行修改不同文件避免冲突。
神来之笔在于:为了最大化子 Agent 的 API 缓存命中率,所有 Fork 出来的任务都会统一使用 'Fork started — processing in background' 作为文本前缀。利用字节级前缀匹配,后 9 个子 Agent 可以直接白嫖第一个的缓存,大幅削减成本。

八、 全场最佳设计:Verification Agent(验证专家)

在所有 Agent 中,Verification Agent 的设计可能是整个系统里最值钱的逻辑。

人类程序员自己 Review 代码时容易敷衍,LLM 也一样。如果只问它“写得对吗?”,它大概率会扫一眼就回个“PASS”。因此,Verification Agent 的指令逻辑完全被逆转了:

  • 核心目标:Try to break it(想办法搞坏它)。
  • 强制执行:严厉禁止“只看代码不跑检查”的逃避行为。它被强制要求运行 Build、跑测试套件、跑 Linter 和类型检查。
  • 对抗性探测:前端改动必须跑浏览器自动化验证;后端必须用 curl 实测响应;它甚至被要求主动寻找边界情况进行 Adversarial probes(对抗性探测),最后必须给出冷酷的 VERDICT: PASS、FAIL 或 PARTIAL 结论。

它与“写代码的 Agent”利益彻底剥离,没有“觉得自己写得很棒”的偏见,只负责无情挑刺。

九、 生态感知与生命周期管理:产品化的最后一公里

很多 AI 项目做 Demo 时惊艳,但放到真实工程里跑几天就会因为状态混乱而崩溃。Claude Code 能被称为“平台”,核心在于它解决了产品化最枯燥的两个难题:让模型感知生态,以及极致的生命周期管控。

1. 生态感知:不仅给工具,还给“说明书”

普通的插件系统只是在底层挂载工具,模型往往不知道什么时候该用。Claude Code 通过三套扩展机制,把能力清单直接送到模型的上下文中:

  • Skill(轻量工作流):基于 Markdown 封装的高频能力包,可声明 allowed-tools。系统强制模型在匹配场景下必须调用执行,禁止“纸上谈兵”。
  • Plugin(重型插件):提供更深度的系统控制,包含自定义命令、独立目录配置,甚至可以直接使用 disable-model-invocation 等硬性标记来接管模型行为。
  • MCP(动态指令注入):当 MCP 协议设备连接时,其附带的操作指南(instructions)会被动态拼接到系统提示词中。这意味着模型不仅获得了新工具,还实时拿到了“使用说明书”。

2. 生命周期管理:极其严苛的工程“扫尾”

真正的商业级产品必须能扛住任务中断、资源泄露等极端异常。在核心的 runAgent() 函数中,密布着生命周期的兜底代码:

  • 进程状态调度:支持 Agent 前后台无缝切换。后台 Agent 拥有独立的控制器(abort controller),任务跑完后会通过通知回调主线程,并支持进度追踪。
  • 全链路遥测追踪:将每一次 Agent 运行视作微服务调用,注册 Perfetto 性能追踪模块(registerPerfettoAgent()),并强制记录执行副本(Transcript)。
  • 硬核资源清理:任务一旦结束或崩溃,系统会触发严酷的回收机制。包括:猎杀残留的 Shell 僵尸进程(killShellTasksForAgent())、强制断开闲置的 MCP 连接、卸载运行时 Hook 以及清空状态缓存。

本文为 曲速导航 – WarpNav.com 原创整理编写,转载请注明出处。

相关链接

本次npm包源码备份仓库地址:https://github.com/SatoMini/claude-code-source-map

本仓库通过 npm 发布包(@anthropic-ai/claude-code)内附带的 source map(cli.js.map)还原的 TypeScript 源码,版本为 2.1.88

目录结构:

restored-src/src/
├── main.tsx              # CLI 入口
├── tools/                # 工具实现(Bash、FileEdit、Grep、MCP 等 30+ 个)
├── commands/             # 命令实现(commit、review、config 等 40+ 个)
├── services/             # API、MCP、分析等服务
├── utils/                # 工具函数(git、model、auth、env 等)
├── context/              # React Context
├── coordinator/          # 多 Agent 协调模式
├── assistant/            # 助手模式(KAIROS)
├── buddy/                # AI 伴侣 UI
├── remote/               # 远程会话
├── plugins/              # 插件系统
├── skills/               # 技能系统
├── voice/                # 语音交互
└── vim/                  # Vim 模式

结语:AI Agent 的壁垒到底在哪?

看完这 51 万行代码,我们必须认清一个事实:AI Agent 90% 的工作量都在“AI”之外。

那 4756 个甚至更多的模块文件,证明了好的体验不是靠几段漂亮的 Prompt 忽悠出来的。

  • 你不能信任模型的自觉性,必须把好行为写成制度。
  • 你必须把“写代码”和“审代码”的角色拆开。
  • 你需要一条经过层层卡点和权限拦截的工具治理流水线。
  • 你必须把每一个 Token 当做预算来精打细算。

Anthropic 交出的答卷是:要让 AI 真正成为生产力,你不能把它关在完全隔离的笼子里,也不能放它在真实的终端里裸奔。你必须为它建起一套包含权限、内存、多进程调度和驱动程序的操作系统底座。

而这套“极度求稳”的信任体系的代价,就是这震撼业界的 51 万行代码。

Database Sharding in System Design

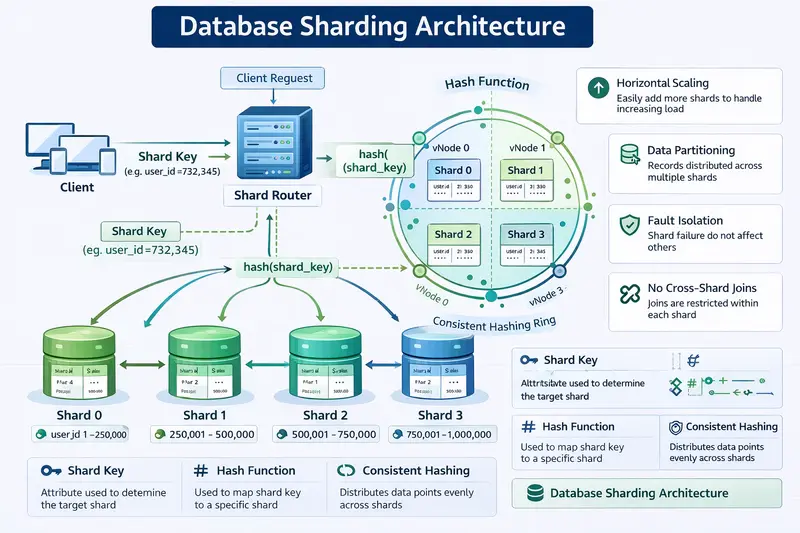
Database sharding architecture diagram

What Is Database Sharding

Database Sharding represents a fundamental horizontal scaling technique in system design that divides a single large database into multiple smaller, independent shards. Each shard operates as a complete, self-contained database instance hosted on separate servers or nodes, holding only a specific subset of the overall data. This architectural approach enables distributed databases to handle massive volumes of data and traffic that would overwhelm any single database server.

The core principle of sharding relies on a deliberate data partitioning strategy where the application layer or a dedicated shard router determines which shard should store or retrieve any given record. Unlike vertical scaling, which simply upgrades hardware on one machine, database sharding distributes both storage and compute resources across many machines, delivering linear scalability while maintaining high availability and fault isolation.

Why Organizations Adopt Database Sharding

Modern distributed systems face exponential growth in data and user concurrency. A monolithic database quickly encounters limits in CPU, memory, disk I/O, and network bandwidth. Database sharding addresses these bottlenecks by allowing each shard to process queries independently, reducing contention and eliminating single points of failure.

Sharding also improves read and write performance because queries are routed only to the relevant shard, avoiding full-table scans across the entire dataset. In high-traffic applications such as social platforms, e-commerce marketplaces, or real-time analytics engines, sharding ensures that response times remain predictable even as the user base grows from millions to billions of records.

Core Components of a Sharded Database Architecture

A production-grade sharded database consists of several interconnected layers:

  • Shard Key: The critical field or composite value used to route data.
  • Shard Router: A middleware component that calculates the target shard for every operation.
  • Individual Shards: Independent database instances, each with its own storage engine, indexes, and often its own replication setup.
  • Configuration Store: A centralized metadata service that tracks shard mappings and cluster topology.
  • Application Clients: Services that interact transparently with the sharded cluster through the router layer.

Each shard typically maintains its own replica set using master-slave replication or multi-master replication to guarantee high availability within the shard itself.

Choosing and Designing the Shard Key

The success of any sharding implementation hinges entirely on the selection of an effective shard key. An ideal shard key must satisfy three non-negotiable properties: high cardinality, even distribution, and alignment with dominant query patterns.

Cardinality ensures enough unique values exist to spread data evenly. Distribution prevents hotspots where one shard receives disproportionately more traffic. Query alignment guarantees that most operations can be satisfied by touching only a single shard, avoiding expensive cross-shard operations.

Common pitfalls include using auto-incrementing integers or timestamps as shard keys, which create range hotspots and force constant resharding. Instead, designers prefer user_id, session_id, geographic_region, or hashed composites that naturally balance load.

Major Sharding Strategies with Complete Implementation Examples

Range-Based Sharding

Range-based sharding assigns entire contiguous ranges of the shard key to specific shards. This strategy excels when applications frequently run range queries such as “find all orders between date X and date Y.”

# Complete Python implementation of a range-based shard router
class RangeShardRouter:
    def __init__(self):
        # Define ranges and their corresponding shard identifiers
        self.ranges = [
            (0, 1000000, 0),      # Shard 0: keys 0 to 999,999
            (1000000, 2000000, 1), # Shard 1: keys 1,000,000 to 1,999,999
            (2000000, float('inf'), 2) # Shard 2: all remaining keys
        ]

    def get_shard(self, shard_key):
        if not isinstance(shard_key, (int, float)):
            raise ValueError("Range sharding requires numeric shard key")

        for start, end, shard_id in self.ranges:
            if start <= shard_key < end:
                return shard_id
        raise ValueError("Shard key out of defined ranges")

# Usage example
router = RangeShardRouter()
print(router.get_shard(1500000))  # Returns 1

While simple, range-based sharding requires careful pre-allocation of ranges and periodic resharding when any range becomes saturated.

Hash-Based Sharding

Hash-based sharding applies a deterministic hash function to the shard key and uses modulo arithmetic to select the target shard. This delivers near-perfect distribution regardless of the original key values.

# Complete Python implementation of hash-based sharding with MD5
import hashlib

class HashShardRouter:
    def __init__(self, num_shards: int):
        if num_shards < 1:
            raise ValueError("Number of shards must be at least 1")
        self.num_shards = num_shards

    def get_shard(self, shard_key: str) -> int:
        # Convert key to string if necessary
        key_str = str(shard_key)
        # Generate 128-bit MD5 hash and convert to integer
        hash_object = hashlib.md5(key_str.encode('utf-8'))
        hash_int = int(hash_object.hexdigest(), 16)
        # Map to shard using modulo
        return hash_int % self.num_shards

# Production-ready usage
router = HashShardRouter(num_shards=8)
print(router.get_shard("user_987654"))  # Returns a consistent shard ID between 0-7

Hash-based sharding virtually eliminates hotspots but makes range queries impossible without scattering requests across all shards.

Consistent Hashing for Dynamic Clusters

Consistent hashing places both shards and data points on a conceptual hash ring, minimizing data movement when shards are added or removed. This strategy is the foundation of many modern distributed databases.

# Complete minimal consistent hashing implementation with virtual nodes
import hashlib
from bisect import bisect_left

class ConsistentHashRouter:
    def __init__(self, nodes: list, virtual_nodes: int = 100):
        self.ring = []
        self.node_map = {}
        self.virtual_nodes = virtual_nodes

        for node in nodes:
            for i in range(self.virtual_nodes):
                virtual_key = f"{node}:{i}"
                hash_val = self._hash(virtual_key)
                self.ring.append(hash_val)
                self.node_map[hash_val] = node
        self.ring.sort()

    def _hash(self, key: str) -> int:
        return int(hashlib.md5(key.encode()).hexdigest(), 16)

    def get_shard(self, shard_key: str) -> str:
        if not self.ring:
            raise ValueError("No nodes in the ring")
        hash_val = self._hash(str(shard_key))
        # Find the first node clockwise on the ring
        idx = bisect_left(self.ring, hash_val)
        if idx == len(self.ring):
            idx = 0
        return self.node_map[self.ring[idx]]

# Example cluster initialization
router = ConsistentHashRouter(nodes=["shard-0", "shard-1", "shard-2"], virtual_nodes=50)
print(router.get_shard("order_abc123"))

When a new shard joins the cluster, only a small fraction of keys are reassigned, preserving overall system stability.

Implementing Sharding at the Application Level

Most sharded systems place routing logic inside the application or a dedicated API gateway rather than inside the database engine. The application extracts the shard key from every request, consults the router, and directs the SQL or NoSQL query exclusively to the responsible shard connection pool.

Database-Level Sharding Solutions

Certain database engines provide native sharding capabilities. MongoDB uses a shard key defined at collection creation and automatically routes operations through mongos query routers. PostgreSQL with the Citus extension converts a standard instance into a distributed database where tables are transparently sharded across worker nodes using the same shard key logic described above.

Critical Challenges and Mitigation Strategies

Cross-shard joins become impossible at the database level. The recommended mitigation is aggressive denormalization so that all data required for a single business operation lives inside one shard. When denormalization is insufficient, applications perform scatter-gather operations: issuing parallel queries to multiple shards and merging results in memory.

Distributed transactions spanning shards require either the two-phase commit protocol or the saga pattern. Both introduce latency and failure complexity, so designers prefer to keep transactions strictly within a single shard.

Resharding and rebalancing demand careful orchestration. Modern systems use background migration jobs that copy data to new shards while maintaining dual writes during the transition, then atomically update routing metadata once migration completes.

Security, Monitoring, and Operational Excellence

Each shard must enforce identical authentication, authorization, and encryption policies. Centralized logging and distributed tracing aggregate metrics across the entire sharded cluster so operators can detect imbalanced load or failing shards instantly. Tools that monitor per-shard query latency, connection counts, and disk usage become essential for maintaining observability.

Advanced Considerations for Production Systems

Read replicas can be added to individual shards for read-heavy workloads without affecting the sharding topology. Geo-sharding places data closer to users by routing based on geographic shard keys, dramatically reducing latency for global applications.

Backup strategies must capture each shard independently while coordinating consistent snapshots across the cluster. Capacity planning involves continuous monitoring of shard utilization to trigger proactive addition of new nodes before any shard approaches saturation.

Database Sharding transforms the way system designers think about scalability. By mastering shard key selection, routing algorithms, consistent hashing, and operational patterns, engineers build systems that gracefully handle billions of records and millions of concurrent users while preserving the simplicity and performance characteristics of a single database.

An image for the reader to understand the article:

Database sharding architecture diagram

System Design Handbook

To deepen your mastery of Database Sharding and every other critical concept in system design, purchase the System Design Handbook today at https://codewithdhanian.gumroad.com/l/ntmcf. It delivers the complete professional reference you need to build production-grade distributed systems.

Three Things Had to Align: The Real Story Behind the LLM Revolution

ChatGPT didn’t come out of nowhere. It’s the result of 60 years of dead ends, one accidental breakthrough, and three completely separate technologies all maturing at exactly the same moment.

Before the Revolution: Chatbots That Didn’t Learn

AI is older than most people realize. But early AI looked nothing like what we have today.

ELIZA (1966) was the first chatbot. It simulated conversation using pattern matching — if you typed “I feel sad,” it replied “Why do you feel sad?” It didn’t learn anything. It followed hand-written rules. Impressive for 1966. Useless for anything complex.

RNNs emerged in the 1990s as the dominant approach for language processing. LSTMs (Long Short-Term Memory networks), invented by Hochreiter & Schmidhuber in 1997, improved on RNNs specifically to address memory limitations — but both shared the same fundamental design: reading text sequentially, word by word, like looking through a keyhole. By the time either reached the end of a long sentence, the beginning was largely forgotten.

"The dog, which had been chasing the cat down the long street, was tired."
                                                               ↑
                               RNN had forgotten "dog" here ──┘

Meanwhile, Google Was Running on Rules

While researchers struggled with language models, Google was building search using a series of named algorithms — each solving a specific problem:

Algorithm Year What It Did
PageRank 1998 Ranked pages by how many other pages linked to them
Panda 2011 Penalized low-quality and duplicate content
Penguin 2012 Penalized sites that bought fake links
Hummingbird 2013 First steps toward understanding concepts, not just keywords
RankBrain 2015 First use of machine learning — handled never-seen-before queries

RankBrain was Google’s first real AI in search. It used mathematical vectors to connect unknown words to known ones. But it still couldn’t write a single sentence — and it still saw words as isolated units, not as parts of connected thought.

The forgetting problem and the keyword problem were the same problem in different clothes. Both systems failed to capture relationships between words across distance. The fix came from a single paper.

The Breakthrough: “Attention Is All You Need” (2017)

In 2017, a team of Google researchers published a paper with a confident title: Attention Is All You Need. The paper addressed sequence transduction broadly — mapping one sequence to another — and used machine translation as the benchmark task, showing the Transformer outperforming existing approaches on English-to-German and English-to-French. What they invented was the Transformer architecture, and it accidentally became the foundation for every major AI system since. Google Translate’s adoption of Transformers was gradual and varied by language pair; the architecture didn’t replace the previous approach across the board overnight.

The Core Idea: Self-Attention

Instead of reading text sequentially, the Transformer looks at the entire input at once and assigns a weight — an importance score — to each word relative to every other word.

When processing “tired” in our earlier example:

"The dog, which had been chasing the cat down the long street, was tired."

  Word      Attention Weight
  ───────────────────────────
  dog        HIGH  ← subject; dogs can be tired
  chasing    MED   ← action dog performed
  cat        LOW   ← object of chasing; not tired
  street     LOW   ← location; not tired

The model builds a relationship map of the entire sentence simultaneously. Nothing is read sequentially. Nothing is forgotten mid-sentence.

Why This Required New Hardware

Self-attention is parallelizable — every word’s relationship to every other word can be computed at the same time, not one after another.

RNN:         [word1] → [word2] → [word3] → result
             Sequential. Each step waits for the previous.

Transformer: [word1] ↔ [word2] ↔ [word3]
               ↕          ↕         ↕
             All relationships computed simultaneously.

GPUs were designed to render thousands of pixels in parallel for video games. That same parallel architecture maps directly onto self-attention calculations. The match was accidental — and decisive.

Training GPT-3 without modern GPU hardware wouldn’t take months. It would take hundreds of years.

Three Things Had to Align

Here’s the part most explanations skip: if the Transformer paper had been published in 2005, nothing would have happened.

Modern LLMs exist because three things converged at the same moment:

┌─────────────────┐   ┌─────────────────┐   ┌─────────────────┐
│  THE ALGORITHM  │   │    THE DATA     │   │  THE HARDWARE   │
│                 │   │                 │   │                 │
│  Transformer    │ + │  Billions of    │ + │  GPU clusters   │
│  architecture   │   │  internet pages,│   │  powerful       │
│  (the recipe)   │   │  books, Wikipedia│  │  enough to run  │
│                 │   │  (ingredients)  │   │  the math       │
└─────────────────┘   └─────────────────┘   └─────────────────┘
                              ↓
                  All three align ~2017
                              ↓
                  LLM revolution begins

The data requirement is the most underestimated factor. LLMs need billions of sentences to develop statistical understanding of language. The internet, Wikipedia, and digitized books only reached the necessary scale in the early 2010s. The algorithm existing in 2005 would have had nothing meaningful to train on.

Miss any one of the three — and ChatGPT doesn’t exist.

Two Directions from One Architecture

Once the Transformer existed, two companies used it to solve two completely different problems.

BERT — Google (2018)

Google needed to understand language, not generate it. Search requires answering: what does this query actually mean?

BERT (Bidirectional Encoder Representations from Transformers) trained using Masked Language Modeling: researchers masked 15% of words in a sentence and trained the model to predict them from surrounding context.

"Paris is the [MASK] of France."  →  BERT learns: "capital"

The key innovation: bidirectionality. Previous models read left-to-right. BERT reads the full sentence in all directions at once.

Real-world impact: Google Search circa 2019. Before BERT, searching “can I pick up a prescription for someone else at the pharmacy” matched keywords. After BERT, Google understood that “for someone else” was the semantically critical phrase.

GPT Series — OpenAI (2018–2020)

OpenAI needed to generate language. The decoder half of the Transformer — predicting the next word given all previous words — became the basis for GPT.

Model Year Milestone
GPT-1 2018 Proved large-scale pre-training transfers to other tasks
GPT-2 2019 Outputs convincing enough to trigger public misuse debates
GPT-3 2020 175 billion parameters — first truly massive, general-purpose model

BERT vs. GPT compared:

Aspect BERT (Google) GPT (OpenAI)
Reading direction Bidirectional Left to right
Primary goal Understanding Generation
Training signal Masked word prediction Next word prediction
Used for Search, Q&A, classification Chatbots, writing, code

Neither is strictly better. They’re optimized for different jobs.

The Missing Piece: Why GPT-3 Wasn’t ChatGPT

GPT-3 could generate fluent text. But left to its own training objective — predict the next word — it was unreliable as an assistant. Ask it a question and it might answer it, continue the question, or list five more similar questions. It had no concept of being helpful.

The gap between GPT-3 (2020) and ChatGPT (2022) is two techniques:

Instruction tuning fine-tunes a pre-trained model on examples of instructions paired with good responses. Instead of “predict the next token in internet text,” the training signal becomes “given this instruction, produce a useful response.” The model learns to follow directions.

RLHF (Reinforcement Learning from Human Feedback) goes further. Human raters compare pairs of model outputs and rank which is better. Those rankings train a reward model — a separate model that scores outputs. The language model is then fine-tuned using reinforcement learning to maximize that score.

Pre-trained GPT-3
        │
        ▼
Instruction tuning (supervised, labeled examples)
        │
        ▼
RLHF — human raters rank outputs → reward model → RL fine-tuning
        │
        ▼
InstructGPT / ChatGPT — helpful, harmless, honest

This is why ChatGPT felt qualitatively different from GPT-3 API users’ experience. The underlying model was similar in architecture. What changed was the training objective: from “predict internet text” to “be useful to a human.”

OpenAI published the InstructGPT paper in early 2022 describing this approach. ChatGPT launched in November 2022 using the same method.

Beyond Text: Multimodal Models

LLMs started as text-only systems. By 2024, the leading models — GPT-4o, Gemini 1.5, Claude 3 — process text, images, audio, and video within the same model.

The core insight: the Transformer’s attention mechanism is not specific to text. An image can be divided into patches and treated as a sequence of tokens. Audio can be converted to spectrograms and similarly tokenized. The same self-attention machinery that relates words to each other can relate image patches to words to audio frames.

┌─────────────────────────────────────────────────────┐
│              Multimodal Input                       │
│                                                     │
│  "What is in this image?"  +  [image file]         │
│         ↓                          ↓               │
│   Text tokens               Image patches           │
│         └──────────┬───────────────┘               │
│                    ▼                                │
│           Shared Transformer                        │
│           (attention over all tokens)               │
│                    ↓                                │
│            "A dog chasing a cat"                    │
└─────────────────────────────────────────────────────┘

Practical implications:

  • A model can answer questions about a screenshot, diagram, or photograph
  • Audio can be transcribed, translated, and responded to in a single pass
  • Video frames become a sequence of image tokens the model can reason over

The boundary between “language model” and “AI system” has effectively dissolved. What were separate specialized models (vision model, speech model, text model) are converging into single multimodal architectures.

Hardware: The Unsung Hero

Algorithm and data get most of the coverage. Hardware rarely does — despite being the actual constraint.

Microsoft built a dedicated supercomputer with 10,000 NVIDIA V100s specifically for OpenAI’s research. OpenAI never disclosed exact training figures for GPT-3, but estimates put large training runs in the thousands of GPUs running for weeks. Today, systems running Gemini and GPT use clusters of H100 cards at similar scale. This is why NVIDIA became one of the most valuable companies in the world.

Google took a different path, designing custom silicon specifically for Transformer math:

Hardware Used by Strength
NVIDIA H100 OpenAI, Anthropic, Meta General-purpose, widely available
Google TPUs Google (Gemini) Purpose-built for Transformer math, more efficient per watt

Gemini has been trained and served across multiple TPU generations (v4, v5e, v5p, and the newer Trillium/v6 for more recent models). TPUs aren’t available to external developers for training — they’re Google’s internal advantage.

Practical Recommendations

If you’re building on top of LLMs today, the historical distinctions above translate into concrete choices.

Choosing between understanding and generation models:

Task Model type Examples
Classifying text, ranking documents, Q&A over a corpus Encoder (BERT-style) BERT, RoBERTa, sentence-transformers
Generating text, summarizing, conversing, coding Decoder (GPT-style) GPT-4, Claude, Gemini
Most new product work in 2024+ Multimodal API GPT-4o, Gemini 1.5 Pro, Claude 3

On RLHF and instruction tuning: Raw pre-trained models are not the same as the chat models exposed via APIs. When you call the OpenAI or Anthropic API, you’re hitting a model that has been instruction-tuned and RLHF-trained on top of the base model. If you’re fine-tuning your own model, plan for both steps — pre-training is not enough to produce a reliable assistant.

On hardware: Unless you’re training large models, GPU choice rarely matters for inference. Most developer usage goes through APIs that abstract hardware entirely. Where it matters: if you’re running local models (Ollama, llama.cpp), GPU VRAM is the binding constraint — not compute.

On “AI” claims: When evaluating tools, ask whether something is a pre-trained base model, an instruction-tuned model, or an RLHF-trained model. The difference in reliability and helpfulness is significant. “Powered by GPT-4” and “powered by a raw Transformer” are not the same thing.

The Full Timeline

1966        ELIZA — first chatbot (rules only, no learning)
1990s–1997  RNNs (1990s) + LSTMs (1997) — sequential processing, forgetting problem
1998        PageRank — Google's original ranking algorithm
2013        Hummingbird — first concept-based search
2015        RankBrain — first ML in Google Search
2017        "Attention Is All You Need" — Transformer invented
2018        BERT (Google) + GPT-1 (OpenAI) — the split path begins
2019        BERT deployed in Google Search
2020        GPT-3 — 175B parameters, first truly massive LLM
2022        InstructGPT — instruction tuning + RLHF; ChatGPT launches November 2022
2024–2025   Multimodal models — GPT-4o, Gemini 1.5, Claude 3 unify text, image, audio, video

The Bottom Line

The Transformer’s attention mechanism solved the forgetting problem that had bottlenecked language AI for decades — by computing relationships across the entire input simultaneously rather than word by word. From that single architectural change, both understanding models (BERT) and generation models (GPT) were built. But the algorithm alone wasn’t the revolution. It was the algorithm converging with enough training data and hardware powerful enough to run the math — and none of that aligned until ~2017. Even then, GPT-3 in 2020 wasn’t ChatGPT: the final piece was RLHF, which replaced “predict internet text” with “be useful to a human” as the training objective. “AI” and “LLM” are not synonyms. Neither are “pre-trained model” and “assistant.” The distinctions matter when evaluating what any given system can actually do.

Resources

Agentic AI Patterns Reinforce Engineering Discipline

Paul Duvall recently discussed his library of engineering patterns for AI assisted development and practices that ground high quality delivery. Related discussions from Paul Stack and Gergely Orosz highlight a shift toward remixing and specification driven development.

By Rafiq Gemmail

Your Ruby CSV Import Ran Successfully — Your Data May Still Be Wrong

Are you sure that Ruby CSV imported all your data — and correctly? 🤔

I wasn’t looking for bugs. I was improving the performance of smarter_csv, then added a new round of tests — including some borrowed from Ruby CSV’s own test suite as a sanity check. Then I started thinking through error scenarios. What I found was genuinely surprising — which also led me to realize that smarter_csv needed a reliable mechanism for bad row quarantine.

I found 10 failure modes in Ruby CSV that produce no exception, no warning, and no indication that anything went wrong. Your import runs. Your tests pass. Your data is quietly wrong.

The one that still gets me: CSV’s numeric conversion silently converts the ZIP code “00123” into 83 🤯. Not a rounding error — a completely different number, because it interprets leading zeros as octal. ZIP codes, customer IDs, order numbers — all silently replaced with wrong integers that pass every validation, look plausible, and get stored in your database.

Or this: a user uploads a tab-separated file named .csv — your file-type guard passes, Ruby CSV sees no commas, treats each entire row as a single field, and returns what looks like valid data. All column structure is silently gone.

I wrote up all 10, with reproducible examples you can download and run yourself:
👉 10 Ways Ruby’s CSV.read Can Silently Corrupt or Lose Your Data

SmarterCSV 1.16 addresses all of these — 1.8×–8.6× faster than CSV.read end-to-end, with a bad-row quarantine system, and instrumentation hooks:
👉 SmarterCSV 1.16 Released

Found something? Issues and feedback and bug reports are always welcome in the GitHub Discussions or Issues.

Do you have a success story you can share? We love hearing back from you.

REST vs GraphQL vs WebSockets vs Webhooks: A Real-World Decision Guide (With Code)

You have used all of these. But when someone asks you, maybe in an interview, or in a system design meeting, why you chose WebSockets over polling, or webhooks over a queue, can you answer precisely?

This isn’t another definitions post. This article is about knowing which tool to reach for and why, with code you can actually use.

Quick mental model before we start:

Communication patterns  →  REST | GraphQL | WebSockets | Webhooks
Code execution model    →  async/await

These live at different layers. Conflating them is the most common source of confusion.

async/await: The Foundation, Not the Feature

Let’s kill one myth immediately: async/await is not a communication pattern. It’s how your server handles waiting.

Every I/O operation — database queries, HTTP calls, file reads — makes your code wait. async/await ensures that waiting doesn’t freeze every other user’s request.

# BAD: blocks the event loop - all other requests stall for 40ms
@app.get("/order/{id}")
def get_order(id: int):
    order = db.execute("SELECT * FROM orders WHERE id = %s", id)  # blocking
    return order

# GOOD: yields control during the wait - other requests run while DB responds
@app.get("/order/{id}")
async def get_order(id: int):
    order = await db.fetch_one("SELECT * FROM orders WHERE id = $1", id)
    return order

When it matters most: High-concurrency services. A delivery platform handling 500 simultaneous drivers checking order status. An NGO dashboard pulling live survey data.

The trap: Calling a synchronous library inside an async function. This blocks the entire event loop.

import requests  # synchronous - don't use this inside async functions
import httpx     # async-capable - use this instead

# WRONG
async def fetch_rate():
    r = requests.get("https://api.exchangerate.host/latest")  # blocks event loop
    return r.json()

# CORRECT
async def fetch_rate():
    async with httpx.AsyncClient() as client:
        r = await client.get("https://api.exchangerate.host/latest")
        return r.json()

REST: Default Choice for Good Reason

Use REST when:

  • The client initiates all interactions
  • Data doesn’t change faster than the user refreshes
  • You’re building standard CRUD
from fastapi import FastAPI
from pydantic import BaseModel

app = FastAPI()

class Order(BaseModel):
    customer_id: int
    items: list[str]
    total: float

@app.get("/orders/{order_id}")
async def get_order(order_id: int):
    order = await db.fetch_one("SELECT * FROM orders WHERE id = $1", order_id)
    return order

@app.post("/orders")
async def create_order(order: Order):
    result = await db.execute(
        "INSERT INTO orders (customer_id, items, total) VALUES ($1, $2, $3) RETURNING id",
        order.customer_id, order.items, order.total
    )
    return {"order_id": result["id"]}

@app.delete("/orders/{order_id}")
async def cancel_order(order_id: int):
    await db.execute("UPDATE orders SET status = 'cancelled' WHERE id = $1", order_id)
    return {"status": "cancelled"}

Real-world scenario: A SACCO member portal. Members log in, check their loan balance, submit a loan application. All request/response. No data is changing while they’re looking at a page. REST is perfect.

Production considerations:

  • Add proper HTTP caching headers (Cache-Control, ETag) – REST can be highly cacheable
  • Version your APIs (/v1/orders) from day one
  • Return proper status codes (201 for created, 404 for not found, 422 for validation errors – FastAPI handles this automatically)

GraphQL: REST With Client-Controlled Queries

Use GraphQL when:

  • Multiple clients (mobile, web, third-party integrations) need different shapes of the same data
  • You’re constantly over-fetching or under-fetching with REST
  • You have deeply nested, relational data
# Using Strawberry (best GraphQL library for FastAPI)
import strawberry
from fastapi import FastAPI
from strawberry.fastapi import GraphQLRouter

@strawberry.type
class Order:
    id: int
    total: float
    status: str

@strawberry.type
class User:
    id: int
    name: str
    email: str
    orders: list[Order]

@strawberry.type
class Query:
    @strawberry.field
    async def user(self, id: int) -> User:
        return await get_user_with_orders(id)

schema = strawberry.Schema(query=Query)
graphql_router = GraphQLRouter(schema)

app = FastAPI()
app.include_router(graphql_router, prefix="/graphql")

Now a mobile app can request exactly what it needs:

# Mobile - bandwidth-conscious, needs minimal data
query {
  user(id: 1) {
    name
    orders(last: 3) {
      id
      status
    }
  }
}

# Web dashboard - needs full details
query {
  user(id: 1) {
    name
    email
    orders {
      id
      total
      status
      items { name price }
    }
  }
}

Real-world scenario: An NGO platform serving both field officers on 2G mobile and HQ analysts on desktops. Field officers need lightweight data. Analysts need full datasets. GraphQL lets one API serve both without maintaining separate endpoints.

Production considerations:

  • Implement depth limiting to prevent abusive nested queries
  • Add query complexity analysis: prevent user → orders → user → orders recursion
  • GraphQL doesn’t cache well at HTTP layer: use DataLoader for N+1 query prevention
  • Don’t default to GraphQL for simple services: it adds real overhead

WebSockets: When the Server Needs to Talk First

Use WebSockets when:

  • Data changes continuously, and the user needs to see updates immediately
  • Polling would generate unacceptable load or latency
  • Both client and server need to send messages freely
from fastapi import FastAPI, WebSocket, WebSocketDisconnect
from typing import dict

app = FastAPI()

# Connection manager for multiple clients
class ConnectionManager:
    def __init__(self):
        self.active: dict[str, WebSocket] = {}

    async def connect(self, user_id: str, websocket: WebSocket):
        await websocket.accept()
        self.active[user_id] = websocket

    def disconnect(self, user_id: str):
        self.active.pop(user_id, None)

    async def send_to_user(self, user_id: str, message: dict):
        ws = self.active.get(user_id)
        if ws:
            await ws.send_json(message)

    async def broadcast(self, message: dict):
        for ws in self.active.values():
            await ws.send_json(message)

manager = ConnectionManager()

@app.websocket("/ws/track/{driver_id}")
async def track_driver(websocket: WebSocket, driver_id: str):
    await manager.connect(driver_id, websocket)
    try:
        while True:
            data = await websocket.receive_json()
            # Driver sent a location update - broadcast to assigned rider
            if data["type"] == "location_update":
                await manager.send_to_user(
                    data["rider_id"],
                    {"type": "driver_location", "lat": data["lat"], "lng": data["lng"]}
                )
    except WebSocketDisconnect:
        manager.disconnect(driver_id)

Real-world scenario: A ride-hailing app showing a driver moving on the map in real time. The driver’s app sends GPS coordinates every 3 seconds over a persistent WebSocket. The rider’s app receives them without polling. This would require: 1,000 REST requests per ride if you used polling at 3-second intervals.

Production considerations:

  • Persistent connections consume server resources — plan for horizontal scaling early
  • Use Redis Pub/Sub to share WebSocket state across multiple server instances
  • Always handle WebSocketDisconnect — clients drop off constantly (network, battery, background app)
  • Heartbeats keep connections alive through load balancers that close idle connections after 60 seconds
# Heartbeat to keep connection alive
@app.websocket("/ws/live")
async def live_feed(websocket: WebSocket):
    await websocket.accept()
    try:
        while True:
            try:
                # Wait for message with 30s timeout
                data = await asyncio.wait_for(websocket.receive_json(), timeout=30.0)
                await handle_message(data)
            except asyncio.TimeoutError:
                # Send ping to keep connection alive
                await websocket.send_json({"type": "ping"})
    except WebSocketDisconnect:
        pass

Webhooks: Event Notification Between Services

Use webhooks when:

  • An external system needs to notify your system that something happened
  • You don’t control the other system’s push mechanism
  • You want event-driven integration without maintaining a persistent connection
import hmac
import hashlib
from fastapi import FastAPI, Request, HTTPException

app = FastAPI()

WEBHOOK_SECRET = "your_flutterwave_webhook_secret"

def verify_flutterwave_signature(payload: bytes, signature: str) -> bool:
    expected = hmac.new(
        WEBHOOK_SECRET.encode(),
        payload,
        hashlib.sha256
    ).hexdigest()
    return hmac.compare_digest(f"sha256={expected}", signature)

@app.post("/webhooks/payment")
async def payment_webhook(request: Request):
    # 1. Verify the request is actually from Flutterwave
    signature = request.headers.get("verif-hash", "")
    body = await request.body()

    if not verify_flutterwave_signature(body, signature):
        raise HTTPException(status_code=401, detail="Invalid signature")

    payload = await request.json()
    event_id = payload["data"]["id"]

    # 2. Idempotency - Flutterwave WILL retry on 500s
    if await db.webhook_event_exists(event_id):
        return {"status": "already_processed"}

    # 3. Acknowledge immediately, process async
    # Don't do heavy work here -- return 200 fast, process in background
    await background_tasks.add_task(process_payment_event, payload)
    await db.mark_webhook_received(event_id)

    return {"status": "received"}

async def process_payment_event(payload: dict):
    order_id = payload["data"]["meta"]["order_id"]
    await db.execute(
        "UPDATE orders SET status = 'paid', paid_at = NOW() WHERE id = $1",
        order_id
    )
    await send_confirmation_email(order_id)

Real-world scenario: Your Kenyan e-commerce platform integrates Mpesa via Daraja API. When a customer pays, Safaricom calls your /webhooks/mpesa endpoint with the transaction details. You mark the order paid and send a confirmation SMS. No polling. No persistent connection.

Production considerations:

  • Always return 200 fast; the webhook caller will retry if you’re slow or error
  • Never trust webhook data without verifying the signature
  • Log every webhook payload for debugging; payment disputes will happen
  • Queue heavy processing (emails, SMS, inventory updates) with a background worker

Real-World Architecture: All Four Together

Here’s how a production fintech app in Kenya uses all of these together:

┌──────────────────────────────────────────────────────────┐
│               Mobile/Web Client                          │
└───────┬───────────────────┬─────────────────┬────────────┘
        │                   │                 │
   REST (CRUD)         WebSocket         GraphQL
   POST /loans         /ws/notifications   /graphql
   GET /balance        (real-time alerts)  (analytics)
        │                   │                 │
┌───────▼───────────────────▼─────────────────▼────────────-┐
│                  FastAPI Backend                          │
│              (all async/await internally)                 │
└───────┬───────────────────────────────────────────────────┘
        │
   Webhook receiver
   POST /webhooks/mpesa   ← Safaricom calls this
   POST /webhooks/credit  ← Credit bureau calls this

Each pattern handles exactly what it’s good at. The async/await inside FastAPI makes sure none of them block each other.

When to Use What: Decision Framework

Signal Use
Client requests data on demand REST
Multiple clients need different data shapes GraphQL
User needs to see live updates without refreshing WebSocket
External service needs to notify your backend of events Webhook
Your code waits on database, HTTP, or file I/O async/await

Hard rules:

  • If polling interval < 5 seconds and data changes frequently → switch to WebSocket
  • If you have > 3 different client types with different data needs → consider GraphQL
  • If you’re integrating a payment provider, shipping tracker, or auth service → expect webhooks
  • If you’re running FastAPI → use async def everywhere there’s I/O, no exceptions

Common Mistakes (Those That Hurt in Production)

1. requests inside async def: blocks the entire event loop. Use httpx with await.

2. No idempotency on webhook handler: payment events get retried. Without idempotency checks, you’ll charge customers twice.

3. WebSocket without reconnection logic: mobile networks drop. Your client-side WebSocket needs exponential backoff reconnection, or users see frozen data silently.

4. Assuming GraphQL is real-time: GraphQL subscriptions require a separate WebSocket-based setup. Standard queries/mutations are still request/response.

5. No signature verification on webhooks: your endpoint is public. Anyone can POST to it. Always verify HMAC signatures.

6. Keeping heavy processing in the webhook handler: the caller expects a fast response. Queue everything with a task worker (Celery, ARQ) and return 200 immediately.

If you found this helpful, please share it with others who it might help. And if you have questions, kindly drop them in the comments below!

Rose Wabere – Data & Analytics Engineer, Nairobi. Building real-world data systems with Python, FastAPI, and whatever tool the problem actually needs.

Cómo crear un chatbot de WhatsApp con n8n, aws y OpenAI

Si quieres crear tu propio chatbot de WhatsApp para recibir mensajes de texto y voz, procesarlos con IA y responder automáticamente, esta guía te muestra una forma práctica de hacerlo con n8n + OpenAI + Meta + AWS.

🧠 ¿Qué vas a aprender?

En este post vas a ver cómo:

  • Conectar los servicios de IA de OpenAI con n8n

  • Conectar los servicios de WhatsApp Business Cloud con n8n

  • Recibir mensajes de texto, voz y responder automáticamente desde un workflow de n8n.

  • Estimar costos básicos de operación

🛠️ Implementación paso a paso

1. Prerrequisitos ✅

Antes de empezar, necesitas:

2. Importa chatbot workflow 💬

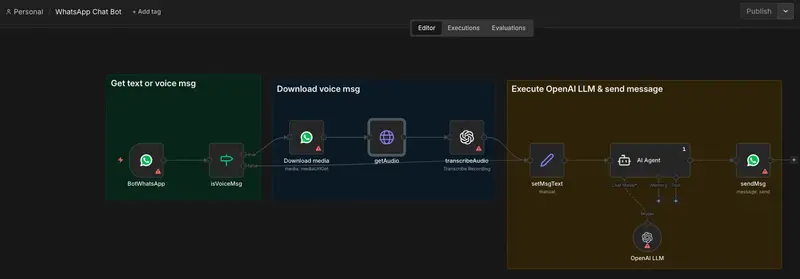
Importar el flujo de proceso (workflow) que se encuentra en la carpeta n8n del repositorio whatsapp-chatbot. Copia y pega el contenido del archivo whatsapp-chatbot.json en n8n. Este proceso permite:

  • Recibir mensajes de texto o voz desde WhatsApp
  • Identificar si el contenido es audio
  • Descargar el audio y transcribirlo
  • Ejecutar modelo de LLM de OpenAI
  • Envíar la respuesta nuevamente a WhatsApp

3. Configurar OpenAI en n8n 🧠

Para ejecutar los modelos Large Language Model (LLM) de OpenAI en n8n se necesita una API Key para autenticar las solicitudes realizadas desde n8n. Los pasos son:

  1. Ingresar a Platform OpenAPI con tu cuenta
  2. En el panel lateral ingresar a API Key para crear la llave
  3. En el flujo de proceso de n8n, con el nodo de Transcribe Recording, configurar las credenciales OpenAI account.

4. WhatsApp Business API 📲

Para recibir y enviar mensajes de voz y texto desde WhatsApp se debe crear una aplicación en META Developer y configurarla para obtener las credenciales necesarias que permitan la conexión desde n8n. Los pasos son:

  1. Crear una aplicación en el portal META Developers.
  2. Añadir caso de uso Connect with customers through WhatsApp.
  3. Confirmar la creación de la aplicación.

Enviar mensajes hacia WhastApp 📤

Para habilitar el envío de mensajes a WhatsApp desde n8n se requieren credenciales de autenticación para que WhatsApp acepte las solicitudes realizadas desde n8n. Los pasos son:

  1. En Meta Developer, ingresar a la personalización del caso de uso de Connect with customers through WhatsApp de la aplicación, en la sección de de configuración de la API, copiar Identificador de la cuenta de WhatsApp Business

  2. En META Business, con el portafolio empresarial usado en la creación de la aplicación, opción usuario del sistema, seleccionar un usuario existente o crear uno nuevo.

  3. Asignar la aplicación de Meta Developer como activo al usuario del sistema.

  4. Generar un identificador para la aplicación seleccionando una vigencia del identificador y la asignación de permisos que deben ser whatsapp_business_messaging.

  5. En el flujo de proceso de n8n, con el nodo de Send Message de WhatsApp Business Cloud, crear las credenciales de WhatsApp account, copiando los valores de los puntos 1 y 4, y probar la conexión.

Recibir mensajes desde WhatsApp 📥

Vamos a usar los números de pruebas de WhatsApp para recibir los mensajes, para usar números propios seguir los siguientes pasos. Cada mensaje recibido desde el número configurado en la aplicación ejecuta un WebHook (Servicio Web de n8n) para notificar la recepción del mensaje y el contenido del mismo. Los pasos para la obtención de la credenciales y la configuración del WebHook son:

  1. En Meta Developer, ingresar a la información Básica de la Aplicación en la sección de Configuración para consultar el App ID y App Secret.

  2. En el flujo de proceso de n8n, con el nodo de WhatsApp Business on Message , crear credenciales WhatsApp OAuth account, con los valores del App ID y App Secret, posteriormente probar la conexión.

  3. Publicar el flujo de proceso de n8n, para que estén expuestos sus servicios en internet.

  4. En el flujo de proceso de n8n, con el nodo de WhatsApp Business on Message de n8n, copiar la URL Post de Producción que es el Servicio Web expuesto por tu instalación de n8n para ser invocado cada vez que se recibe un mensaje en WhatsApp.

  5. En Meta Developer, ingresar a la personalización del caso de uso de Connect with customers through WhatsApp de la aplicación, en la sección de configuración, e ingresa la URL del punto 4 con un identificador de verificación. Posterior probar la conexión.

5. Probar el chatbot 🤖

Utilizando los números de celular de WhatsApp de pruebas podemos ejecutar el flujo de proceso de WhatsApp Chat Bot. Los pasos son:

  1. En META Developer, ingresar a personalizar el Casos Uso WhatsApp de la aplicación, en la opción Configuración de la API, copiar el número de prueba.

  2. Ingresar a tu WhatsApp y enviar mensaje al número del punto 1.

Costos 💰

OpenAI API 🤖

El costo de usar la API de OpenAI depende principalmente de tres variables: el modelo elegido, la cantidad de tokens procesados y el tipo de uso (entrada y salida). El costo se calcula por cada millón de tokens (texto procesado), donde el output (respuesta del modelo) suele ser entre 3 y 6 veces más caro que el input (texto enviado).

Modelo Input ($/1M tokens) Output ($/1M tokens) Contexto Uso recomendado
GPT-5.4 $2.50 $15.00 ~1M tokens Alta complejidad, agentes
GPT-5.4 mini $0.75 $4.50 400K tokens Apps, SaaS, chatbots
GPT-5.4 nano $0.20 $1.25 ~400K tokens Diseñado para: clasificación extracción pipelines masivos

Cálculo mensual estimado 📊:

Conversación en WhatsApp de 1–5 min

  • Mensajes por conversación: 6–12
  • Palabras por mensaje: 8–15
  • Promedio total palabras: ≈ 120 palabras

Conversión estándar:

  • 1 token ≈ 0.75 palabras
  • 120 palabras ≈ 160 tokens
Tipo Tokens
Input usuario 80 tokens
Output modelo 80 tokens
Total 160 tokens

Escenario mensual 📅

Supón: 10,000 conversaciones / mes

Modelo Costo mensual
GPT-5.4 $14 USD
GPT-5.4 mini $4.2 USD
GPT-5.4 nano $0.4 USD

Meta API 📱

El modelo de costos de WhatsApp Business API funciona principalmente bajo un esquema de mensajes por categoría, donde el cobro depende del tipo de interacción y de quién inicia la conversación. Existen cuatro categorías: servicio, utilidad, autenticación y marketing. Los mensajes de servicio (cuando el cliente escribe primero) son gratuitos y permiten responder libremente dentro de una ventana de 24 horas con texto, audio, imágenes o documentos.

Cálculo mensual estimado 📈

  • 600 mensajes de servicio iniciados por clientes → USD 0

Total Meta estimado 💵: USD 0/mes

n8n

Los costo de n8n dependen del la infraestructura y el número de ejecuciones del flujo del proceso, es decir en el número de conversaciones que se reciban en el chatbot. La comparación de opciones de uso de n8n con infraestructura en aws o de n8n.io es:

Variable Self-hosted (AWS) Cloud Starter Cloud Pro
💰 Costo base Bajo (infra + ops) Medio (~€20–€30/mes) Alto (~€50–€100+/mes)
⚙️ Infraestructura Tu responsabilidad (AWS, VPS, etc.) Incluida Incluida
🔁 Ejecuciones (workflows) Ilimitadas (según tu infra) Limitadas (~5k–10k/mes) Más altas (~20k–50k+/mes)
🚀 Escalabilidad Manual Automática (limitada) Automática (mejor)
🔐 Seguridad Total control Gestionada por n8n Gestionada por n8n
🔄 Concurrencia Depende de recursos Limitada Mayor concurrencia
🔌 Integraciones Todas Todas Todas
🛠️ Mantenimiento Alto (requiere DevOps) Bajo Bajo
👥 Multiusuario Configurable manual Limitado Completo (roles y equipos)

Human-AI Interaction Is Here: Why Your Current UX/UI Design Is Already Obsolete

Generative AI is driving at the speed of Ferrari, offering a new type of interaction in digital product user experience: humans and AI are becoming best pals. Instead of buttons, we see prompts; instead of just navigation, we see intent detection, and instead of forms, we see live conversations. All these changes belong to a new paradigm of generative UI, where interfaces respond to human input.

The uncomfortable truth is that many designers intend to leverage the power of AI; however, some end up making their UX even worse. So, how does AI belong in modern digital products? I am going to share with you where smart technologies improve the experience and where traditionally crafted interfaces outperform intelligence.

Did AI Shift Happen Overnight?

At some point, when I opened my Notion tab, I realized that I was no longer navigating the same interface I used to. In the past, I had to search through menus and configure my workflows; now, I see how intelligent systems anticipate my intent.

The same transformation happened to Figma. Their auto-layout suggestions, smart alignment, content-aware spacing, and responsive sizing became natural extensions of the existing functionality.

So, there was no big moment when those products became “AI products”. They gradually dissolved intelligence into their workflows. And now I am not just using AI. I am designing faster, with fewer interruptions, and with less cognitive load.

Where AI Reshapes Interfaces

AI in UI/UX design is not only a flashy “ask AI” button. It is the implementation in the interaction models. Nowadays, you can see such examples where intelligence defines how users search, find, act, and decide through:

  • Intelligent search assistants. Sometimes, I ask myself a question: “Does this search agent understand me better than my partner?” But jokes aside, modern intelligent search assistants understand intent, context, and ambiguity. From a user perspective, this significantly reduces cognitive load while the interface dynamically adjusts.
  • Context-aware UI. One-dashboard-suits-all is no longer interesting. AI enables interfaces to change based on user role, behavior, progress, and past patterns. Users can see highlighted data, prioritized actions, or suggested next steps.
  • Automated data preparation and setup flows. I always feel comfortable when I shop on my favorite service, proceed to the checkout, and see my details already prefilled. This makes me want to buy more and often. AI removes setup friction, making the journey very smooth.

Design Without AI Is the New Technical Debt

AI should not be added to interfaces just because it is trendy. However, some complex data-heavy and context-dependent UX issues can no longer be solved with static rules and screens.

Let’s take adaptive interfaces, for example. Traditional UI/UX design approaches rely on predefined states and decision trees. But AI-powered interfaces can go far beyond. They can use probabilistic reasoning to adjust what is shown on the screen based on real user characteristics and behavioral patterns.

AI also improves the scalability of the experience from an engineering standpoint. As the product evolves, edge cases multiply, user needs diversify, and data volumes explode. How would you expect to design a separate interface path for each scenario? Without AI, it would be impossible to do that. But machine learning can generalize the scenarios and apply shared logic.

AI Is Not Always a Step Forward
AI is a great addition, but not a foundation of the whole digital product. The human remains the center of attention, and not all advancements are easily understood by our brains. Conversational interfaces are not a universal replacement for graphical user interfaces, and here is why:

  • Text and visual scanning. AI assistants present information in blocks of text. In order to get the point, users need to read linearly, sentence by sentence. However, graphic UIs present data spatially through charts, icons, graphs, and layouts. The key insights are grasped in seconds.
  • Cognitive load and information density. Well-crafted interfaces compress meaning by showing icons instead of words, turning sentences into short labels, and transforming flows into diagrams. With AI-generated text, the cognitive load is higher as users need to parse through the output.
  • Action discovery and step-by-step guidance. Graphical interfaces display multiple possible actions at once. Users can quickly choose the needed option. AI agents, by nature, are prone to reveal information sequentially. While beginners might enjoy this interaction, seasoned users will be slowed down.

Where AI Strengthens UX Instead of Replacing It

Smart intelligence delivers real value in the areas where it operates behind the interface. It works well in reducing cognitive load, automating repetitive tasks, and speeding up decision-making. The best implementations don’t use “loud words” to talk to people. They optimize workflows while users focus on what matters the most.

While working on AI-driven products, I noticed that those technologies work best by accelerating workflows and freeing humans to do high-value work, as in the case of the Sully.AI product. This platform is designed for healthcare professionals to eliminate the time-consuming work of nurses, doctors, and administrators.

Instead of a single chatbot, we built nine specialized AI agents who serve clear roles: triage nurses, receptionists, and other medical assistants. Every dedicated AI specialist supports a defined interaction layer, while the graphic UI remains the control center. Thus, medical staff spend less time navigating systems and doing paperwork.

In another case, a U.S.-based construction permit platform has to submit a massive amount of documents to local authorities before starting a project. AI was introduced as a preliminary validation layer inside the existing UI. Before sending documentation to the authorities, AI checks it for compliance and flags inconsistencies or missing data. As a result, developers get a faster feedback loop and public officials have a reduced load.

When AI Should Step Aside

AI is not a solution for every UI/UX challenge. If a task is faster, clearer, and more intuitive to complete through a graphic interface, like filling out a form, complicating it with advanced technologies can slow down the user.

Research comparing conversational interfaces with traditional forms confirms that users complete structured tasks faster and with fewer errors when information is presented visually instead of via chat-based interactions.

This aligns with broader usability findings that people don’t just read, they scan visual information and make choices instantly, while AI might present unnecessary instructions that increase cognitive load. In these cases, sticking to well-designed UI ensured great usability and user satisfaction.

Smart AI Placement
The guessing game is not the best approach in deciding where to integrate AI into your product UI/UX. I recommend teams answer those questions to build a clear implementation framework:

  1. Is the task ambiguous or open-ended? AI excels in processing complex, open-ended queries where setting predefined rules doesn’t work.
  2. Does the workflow require multiple structured steps? If you have repetitive tasks with stepwise processes, be sure to loop in the AI help for automation.
  3. What happens if the AI is wrong? Set your risk appetite and decide whether human oversight is necessary to catch mistakes before they turn into outcomes.
    The overall goal is to improve efficiency, not to introduce unnecessary complexity or friction.

Final Thoughts

AI is opening a door to immense personalized opportunities for UI/UX, but it doesn’t replace a thoughtful and deep human contribution. The real power is to combine those experiences, where smart technologies complement intuitive design.

Intelligent assistants can automate repetitive tasks, optimize workflows, and provide context-aware guidance. And graphical interfaces can ensure clarity, efficiency, and quick information scanning.

By going hybrid, you get the best of both worlds.