The Axios Attack Proved Vibe Coding’s Biggest Blind Spot

Yesterday, for roughly two hours, every npm install of the world’s most popular HTTP client installed a Remote Access Trojan on your machine.

The axios package — over 100 million weekly downloads, present in approximately 80% of cloud environments — was compromised on March 30, 2026. A threat actor hijacked maintainer “jasonsaayman”‘s npm account, published malicious versions [email protected] and [email protected], and within 2 seconds of npm install, before npm even finished resolving other dependencies, a cross-platform RAT was running on your machine. Windows, macOS, Linux. All of them.

If your AI coding assistant ran that install for you — and thousands of developers let AI auto-run npm install every day — you never even saw it happen.

This is the second major npm supply chain attack in March 2026. The first was the Trivy/CanisterWorm compromise on March 19, where 75 of 76 trivy-action GitHub Action tags were force-pushed to deploy self-spreading malware using blockchain-based command and control. Two attacks on critical infrastructure in eleven days. The trend line is not ambiguous.

Why Vibe Coders Are the Softest Target

Here is how a typical vibe coding session works:

  1. You prompt your AI: “Build me an HTTP client that fetches user data from the API”
  2. The AI generates code with import axios from 'axios'
  3. The AI (or you) runs npm install axios
  4. You test it. It works. You ship it.

At no point in this workflow does anyone:

  • Check when the package version was published. [email protected] was published hours before the install. A human reviewing the npm page would have noticed the suspicious timing. An AI assistant does not check.
  • Verify that the maintainer account has not changed hands. The attacker took over a real maintainer’s account. The package name was legitimate. The version number looked normal.
  • Audit postinstall scripts. The malicious payload ran via a hidden dependency ([email protected]) that executed on install. AI assistants do not read postinstall scripts before running them.
  • Pin exact versions. If your package.json says "axios": "^1.14.0", npm happily installs 1.14.1 — the compromised version. AI tools default to caret ranges.
  • Review lockfile diffs. The lockfile change would have shown a brand-new transitive dependency appearing out of nowhere. Nobody looks at lockfile diffs. AI certainly does not.

The AI assistant optimizes for one thing: does the code work? It does not optimize for is the dependency safe? And that gap — between “it works” and “it is safe” — is the blind spot this attack drove straight through.

We Already Had the Data

Two days before the axios attack, I published the results of auditing 5 vibe-coded web components against the OWASP Top 10. The findings:

49 vulnerabilities. 19 critical. Zero components would pass a security audit.

Every component worked as a demo. Every component was exploitable in production. The failure categories were consistent across all five:

Category Instances
Broken Access Control 15
Cryptographic Failures 10
Injection 7
Security Misconfiguration 9
Other (SSRF, path traversal, etc.) 8

That audit focused on application-level vulnerabilities — the code the AI generates. The axios attack reveals the other half of the problem: supply chain vulnerabilities in the dependencies the AI chooses.

When I cross-referenced the audit findings with the axios attack vector, the overlap was uncomfortable. Multiple items in the Vibe Coding Safety Checklist would have caught this specific attack:

  • Pin exact dependency versions (no ^ or ~)
  • Audit postinstall scripts before running them
  • Review dependency diffs in lockfile changes
  • Use npm ci instead of npm install (fails on lockfile mismatch instead of silently updating)
  • Never let AI auto-run install commands without human review

The axios attack is the supply chain version of what we found in individual components. The pattern is the same: the AI optimizes for functionality and ignores security. The only difference is the attack surface — your code versus your dependencies.

5 Things to Do Right Now

If you are vibe coding (and statistically, you probably are — 84% of developers now use or plan to use AI coding tools), here are 5 changes to make today. Each one takes under 5 minutes.

1. Pin Your Dependency Versions

Stop using caret ranges. Right now, open your package.json and remove every ^ and ~.

// BEFORE: axios attack would auto-install
"axios": "^1.14.0"

// AFTER: only installs the exact version you vetted
"axios": "1.14.0"

Then run:

npm config set save-exact true

This makes all future npm install --save commands pin exact versions by default. Five seconds of setup, permanent protection against malicious patch releases.

2. Use npm ci Instead of npm install

npm install will happily resolve new versions that match your semver range. npm ci installs exactly what is in your lockfile and fails if there is any mismatch.

# In your CI/CD pipeline, replace:
npm install

# With:
npm ci

If the lockfile says [email protected] and someone pushes a change to [email protected], npm ci will fail loudly instead of silently installing the compromised version.

3. Disable Lifecycle Scripts in CI

The axios payload executed via a postinstall script. You can block this entirely:

# Run installs without executing any lifecycle scripts
npm ci --ignore-scripts

# Then explicitly run only the scripts you trust
npm run build

Add this to your .npmrc for permanent protection:

ignore-scripts=true

Yes, some legitimate packages use postinstall scripts (like sharp for image processing). You can allowlist those explicitly. But the default should be “do not run arbitrary code during install.”

4. Implement a Version Cooldown

Do not install any package version published less than 72 hours ago. The axios malicious versions were live for approximately 2-3 hours before being yanked. A 72-hour cooldown catches most smash-and-grab supply chain attacks.

You can enforce this with Socket.dev (free for open source) or a simple CI check:

# Check publish date of a package version
npm view [email protected] time --json

If the publish timestamp is less than 72 hours old, block the install and flag for human review.

5. Stop Letting AI Auto-Run Install Commands

This is the most important one. When your AI coding assistant generates a dependency and runs npm install, insert yourself into the loop:

  • Review what is being installed before it runs
  • Check the dependency on npm — when was it last published? By whom? Does it have new transitive dependencies?
  • Diff the lockfile after install to see exactly what changed

The AI is your code generator, not your security reviewer. Treat every AI-suggested dependency the same way you would treat a dependency recommended by a stranger on the internet — because that is effectively what it is.

The Pattern Is Accelerating

Two major npm supply chain attacks in eleven days. The Trivy/CanisterWorm attack on March 19 compromised a security scanner — the very tool developers rely on to catch vulnerabilities. The axios attack on March 30 compromised an HTTP client that exists in the vast majority of JavaScript projects.

The attack surface is expanding at the same rate as AI-assisted development adoption. More developers are shipping faster with less review. Attackers have noticed.

This is not a call to stop using AI for coding. The productivity gains are real, and I use AI coding tools daily. But there is a difference between using AI as a tool and trusting it as a security reviewer. It is not one. It has never claimed to be one. And the axios attack is the clearest proof yet that treating npm install as a safe operation — especially when an AI is the one running it — is a gamble with escalating odds.

Get the Full Checklist

The 5 steps above are a starting point. They are extracted from the Vibe Coding Safety Cheat Sheet — a free 10-point quick reference covering the most critical security checks for AI-generated code.

If you want the complete system — all 32 checklist items, 10 security-enhanced prompt templates, before/after exploit examples, and CI/CD configs that automate these checks — the full Vibe Coding Safety Checklist is available on Gumroad.

The axios attack will not be the last supply chain compromise. The question is whether the next one hits your project before or after you add these checks to your workflow.

Previously in this series: I Bought a $100 Product for One Cent Using Vibe-Coded Checkout — Plus 4 More Exploits — a step-by-step audit of 5 vibe-coded components revealing 49 security vulnerabilities.

Ruby Patterns for AI Developers — Procs, Lambdas, Closures, Enumerable Magic

By now you can read basic Ruby and understand classes. Good. But to read real Ruby comfortably, you also need the patterns Ruby developers lean on all the time.

This means understanding a few core ideas:

  • procs
  • lambdas
  • closures
  • Enumerable

These are not academic features. They show up everywhere in Ruby, Rails, and AI-adjacent code that transforms data, filters records, builds pipelines, and wraps behavior.

Let’s make them practical.

A proc is a chunk of callable behavior

A proc lets you store behavior in a variable and call it later.

upcase_text = Proc.new { |text| text.upcase }

puts upcase_text.call("ruby for ai")

Output:

RUBY FOR AI

That may look small, but it matters. You can pass behavior around just like data.

For example, maybe you want a reusable text post-processor:

clean_output = Proc.new do |text|
  text.strip.gsub(/s+/, " ")
end

raw = "   hello     from    model   "
puts clean_output.call(raw)

Output:

hello from model

Lambdas are stricter procs

Ruby has both Proc and lambda. They are similar, but lambdas behave more like regular methods.

formatter = lambda { |name| "Hello, #{name}" }
puts formatter.call("Advait")

You can also write it with stabby lambda syntax:

formatter = ->(name) { "Hello, #{name}" }
puts formatter.call("Ruby")

The important practical difference is argument handling.

loose_proc = Proc.new { |a, b| "#{a} #{b}" }
strict_lambda = ->(a, b) { "#{a} #{b}" }

puts loose_proc.call("hello")
# puts strict_lambda.call("hello")

The proc call works and silently sets b to nil.
The lambda version would raise an error because it expects exactly two arguments.

In real code, prefer lambdas when you want something method-like and predictable.

Closures remember their surrounding state

A closure is callable code that captures variables from the scope where it was created.

That sounds abstract. Here is the practical version.

def build_prompt_wrapper(prefix)
  ->(question) { "#{prefix}: #{question}" }
end

support_prompt = build_prompt_wrapper("Support assistant")
teaching_prompt = build_prompt_wrapper("Teaching assistant")

puts support_prompt.call("Reset my password")
puts teaching_prompt.call("Explain Ruby blocks")

Output:

Support assistant: Reset my password
Teaching assistant: Explain Ruby blocks

The lambda “remembers” prefix even after build_prompt_wrapper has finished.

That is a closure.

This is useful for AI code because you often want configurable behavior without creating a whole new class every time.

Blocks: Ruby’s built-in callback style

You already saw blocks in iterators. They are central to Ruby.

A method can yield to a block:

def with_timing
  start = Time.now
  result = yield
  finish = Time.now

  puts "Took #{(finish - start).round(3)}s"
  result
end

response = with_timing do
  sleep 0.2
  "model response"
end

puts response

Output:

Took 0.2s
model response

This pattern is everywhere in Ruby libraries: open a file, wrap a database transaction, benchmark a call, retry a request.

If a method uses yield, it expects a block.

Turn a block into a proc with &

Sometimes you want to accept a block and store or forward it.

def run_pipeline(input, &step)
  step.call(input)
end

result = run_pipeline(" hello ") { |text| text.strip.upcase }
puts result

The &step turns the block into a proc object.

You do not need this every day, but when you see &block in method definitions, now you know what is happening.

Enumerable is where Ruby gets fun

Enumerable gives collection classes a pile of useful methods like:

  • map
  • select
  • reject
  • find
  • reduce
  • group_by
  • each_with_object

You will use these constantly.

Let’s work with a realistic AI-flavored data set.

chunks = [
  { id: 1, text: "Ruby is elegant", score: 0.91 },
  { id: 2, text: "Rails ships fast", score: 0.87 },
  { id: 3, text: "Bananas are yellow", score: 0.21 }
]

map: transform each item

texts = chunks.map { |chunk| chunk[:text] }
p texts

select: keep matching items

relevant = chunks.select { |chunk| chunk[:score] > 0.8 }
p relevant

find: get the first match

best_match = chunks.find { |chunk| chunk[:id] == 2 }
p best_match

reduce: combine values

total_score = chunks.reduce(0) { |sum, chunk| sum + chunk[:score] }
puts total_score

These methods let you write concise code that still reads clearly.

each_with_object is cleaner than manual mutation

Beginners often do this:

lookup = {}
chunks.each do |chunk|
  lookup[chunk[:id]] = chunk[:text]
end

p lookup

That works. But Ruby has a neater pattern:

lookup = chunks.each_with_object({}) do |chunk, hash|
  hash[chunk[:id]] = chunk[:text]
end

p lookup

This shows up a lot in Ruby codebases.

Chain enumerable methods to build data pipelines

This is where Ruby becomes really pleasant for AI data work.

results = chunks
  .select { |chunk| chunk[:score] > 0.5 }
  .map { |chunk| chunk[:text].upcase }
  .sort

p results

You can think of this as a small transformation pipeline.

That style is perfect for:

  • preparing prompt context
  • cleaning API responses
  • ranking search hits
  • formatting model output
  • generating summaries from collections

Group data with group_by

Suppose you classify chunks by source type.

documents = [
  { source: "faq", text: "Reset password", score: 0.8 },
  { source: "faq", text: "Update email", score: 0.7 },
  { source: "docs", text: "Install Ruby", score: 0.95 }
]

grouped = documents.group_by { |doc| doc[:source] }
p grouped

This is handy when building retrieval pipelines or dashboards.

Use symbols for lightweight keys

You have already seen hashes with symbol keys:

{ score: 0.91, source: "docs" }

This is idiomatic Ruby. Most enumerable examples in real code will use symbol keys like :score and :source.

A practical example: rerank and format context

Let’s put the patterns together.

chunks = [
  { text: "Ruby blocks are closures", score: 0.82 },
  { text: "Rails uses MVC", score: 0.76 },
  { text: "Cats are animals", score: 0.12 }
]

format_chunk = ->(chunk) { "- #{chunk[:text]} (#{chunk[:score]})" }

context = chunks
  .select { |chunk| chunk[:score] >= 0.75 }
  .sort_by { |chunk| -chunk[:score] }
  .map(&format_chunk)
  .join("n")

puts context

Output:

- Ruby blocks are closures (0.82)
- Rails uses MVC (0.76)

That is the kind of data shaping you do constantly in AI applications.

Proc or class?

A good rule of thumb:

Use a proc or lambda when:

  • behavior is small
  • it is local to one flow
  • it does one simple transformation

Use a class when:

  • behavior has multiple steps
  • it needs configuration or dependencies
  • it has state
  • it deserves tests of its own

Do not turn every three-line transformation into a class. Do not turn every meaningful subsystem into a lambda either. Use judgment.

What to remember

Here is the short version:

  • a proc is callable behavior stored in an object
  • a lambda is a stricter, more method-like proc
  • closures remember variables from surrounding scope
  • blocks are Ruby’s built-in callback mechanism
  • Enumerable gives you powerful collection methods
  • chaining select, map, find, reduce, and friends is normal Ruby

If you get comfortable with these, a lot of Ruby code stops looking magical and starts looking obvious.

Try this next

Save this as ruby_patterns.rb and run:

ruby ruby_patterns.rb

Then extend it:

  • add reject to remove bad results
  • use group_by on a larger document list
  • create a lambda that truncates long model outputs
  • build a tiny prompt-cleaning pipeline with chained enumerable calls

Next, we’ll move into Rails and build your first app so all this Ruby stops living in toy scripts and starts powering a real web application.

Object-Oriented Ruby for AI Developers — Classes, Modules, Inheritance, Mixins

When you start reading Rails code, plain Ruby scripts, or Ruby AI libraries, you hit object-oriented code almost immediately.

You see classes. Modules. Inheritance. include. extend. Maybe a service object or two.

If you come from Python or JavaScript, Ruby’s object model feels familiar in places and weird in others. The good news: you do not need every edge case to be productive. You need enough to read code, structure code, and avoid writing a mess.

Let’s build exactly that.

Start with a class

A class is a blueprint for objects. Objects hold state and behavior.

class PromptTemplate
  def initialize(name, template)
    @name = name
    @template = template
  end

  def render(input)
    @template.gsub("{{input}}", input)
  end
end

summarizer = PromptTemplate.new(
  "summary",
  "Summarize this text in 3 bullets: {{input}}"
)

puts summarizer.render("Ruby is elegant and productive.")

Output:

Summarize this text in 3 bullets: Ruby is elegant and productive.

A few Ruby basics are doing work here:

  • initialize runs when you call .new
  • instance variables start with @
  • methods are defined with def
  • the last expression is returned automatically

That implicit return is a very Ruby thing. Don’t fight it.

Add readers and writers with attr_*

You often want controlled access to object state.

class ModelConfig
  attr_reader :provider, :model
  attr_accessor :temperature

  def initialize(provider, model, temperature = 0.2)
    @provider = provider
    @model = model
    @temperature = temperature
  end
end

config = ModelConfig.new("openai", "gpt-4.1-mini")
puts config.provider
puts config.model
puts config.temperature

config.temperature = 0.7
puts config.temperature

attr_reader creates getter methods.
attr_accessor creates both getter and setter methods.

There is also attr_writer, which only creates a setter.

In Rails code, this pattern is everywhere.

Use classes to model real application concepts

Suppose you are building a tiny AI feature that scores whether a support ticket needs escalation.

class Ticket
  attr_reader :title, :body, :priority

  def initialize(title:, body:, priority: "normal")
    @title = title
    @body = body
    @priority = priority
  end

  def urgent?
    priority == "high"
  end
end

class EscalationClassifier
  def initialize(ticket)
    @ticket = ticket
  end

  def classify
    return "urgent" if @ticket.urgent?
    return "urgent" if @ticket.body.downcase.include?("production down")

    "normal"
  end
end

ticket = Ticket.new(
  title: "Login issue",
  body: "Customer says production down in Europe",
  priority: "normal"
)

classifier = EscalationClassifier.new(ticket)
puts classifier.classify

This is already cleaner than passing hashes around forever.

The Ticket class owns ticket-related behavior.
The EscalationClassifier class owns classification behavior.

That separation matters once your codebase grows.

Inheritance: one class builds on another

Inheritance lets a subclass reuse behavior from a parent class.

class LLMClient
  def initialize(api_key)
    @api_key = api_key
  end

  def headers
    {
      "Authorization" => "Bearer #{@api_key}",
      "Content-Type" => "application/json"
    }
  end
end

class OpenAIClient < LLMClient
  def endpoint
    "https://api.openai.com/v1/chat/completions"
  end
end

client = OpenAIClient.new("secret-key")
p client.headers
puts client.endpoint

OpenAIClient inherits from LLMClient, so it gets the headers method automatically.

This is useful when several classes share a stable core.

But don’t get carried away. Deep inheritance trees become annoying fast. In modern Ruby and Rails code, composition and mixins are often preferred over “class hierarchy soup.”

Override methods and call super

A subclass can replace a parent method and still reuse part of the original with super.

class BaseMessageFormatter
  def format(message)
    "[base] #{message.strip}"
  end
end

class ChatMessageFormatter < BaseMessageFormatter
  def format(message)
    "[chat] #{super}"
  end
end

formatter = ChatMessageFormatter.new
puts formatter.format("  Hello from the model  ")

Output:

[chat] [base] Hello from the model

You will see super in Rails controllers, models, and framework internals.

Modules group shared behavior

A module is not instantiable. You use it to organize methods, constants, or shared behavior.

module JsonRenderable
  def as_json
    instance_variables.each_with_object({}) do |ivar, hash|
      key = ivar.to_s.delete("@")
      hash[key] = instance_variable_get(ivar)
    end
  end
end

class EmbeddingResult
  include JsonRenderable

  def initialize(id, score)
    @id = id
    @score = score
  end
end

result = EmbeddingResult.new("doc_42", 0.91)
p result.as_json

Output:

{"id"=>"doc_42", "score"=>0.91}

Here the module gives reusable behavior to any class that includes it.

Mixins: Ruby’s practical superpower

When you include a module, its instance methods become available in the class.

module Retryable
  def with_retries(max_attempts: 3)
    attempts = 0

    begin
      attempts += 1
      yield
    rescue => e
      retry if attempts < max_attempts
      raise e
    end
  end
end

class EmbeddingFetcher
  include Retryable

  def fetch
    with_retries(max_attempts: 2) do
      puts "Fetching embeddings..."
      # pretend network request happens here
      "ok"
    end
  end
end

puts EmbeddingFetcher.new.fetch

This is a mixin. It’s a way to share behavior without forcing everything into inheritance.

Rails uses this style heavily.

If you understand include SomeModule, a lot of Rails code suddenly becomes much less mysterious.

include vs extend

This trips people up once, then it’s easy.

  • include adds module methods as instance methods
  • extend adds module methods as class methods to a specific object or class
module Slugifiable
  def slugify(text)
    text.downcase.gsub(/s+/, "-")
  end
end

class Article
  extend Slugifiable
end

puts Article.slugify("Ruby For AI")

If you used include Slugifiable, you would call slugify on an instance instead.

Composition beats cleverness

A good Ruby codebase usually has small classes with one clear job.

For AI work, that often means classes like:

  • PromptBuilder
  • ChatClient
  • EmbeddingIndexer
  • DocumentChunker
  • ResponseValidator

That is better than one giant AIService class doing everything.

Here is a simple composed example:

class PromptBuilder
  def build(question)
    "Answer this clearly for a beginner: #{question}"
  end
end

class FakeLLM
  def call(prompt)
    "MODEL RESPONSE: #{prompt}"
  end
end

class ChatService
  def initialize(prompt_builder:, llm:)
    @prompt_builder = prompt_builder
    @llm = llm
  end

  def answer(question)
    prompt = @prompt_builder.build(question)
    @llm.call(prompt)
  end
end

service = ChatService.new(
  prompt_builder: PromptBuilder.new,
  llm: FakeLLM.new
)

puts service.answer("What is a mixin?")

That is easy to test, easy to swap, and easy to grow.

What to remember

If you remember nothing else, remember this:

  • classes create objects
  • initialize sets up state
  • instance variables use @
  • attr_reader and friends generate getters/setters
  • inheritance reuses parent behavior
  • modules group shared behavior
  • mixins with include are common and important
  • composition is usually cleaner than deep inheritance

That’s enough to read a lot of real Ruby and Rails code without panicking.

Try this next

Save this as oop_ruby.rb and run it:

ruby oop_ruby.rb

Then experiment:

  • add a SystemPromptBuilder subclass
  • create a Loggable module and mix it into multiple classes
  • add a second LLM client and inject it into ChatService

That kind of small practice is how this stuff becomes natural.

Next up, we’ll cover Ruby patterns you’ll keep seeing in serious code: procs, lambdas, closures, and the enumerable tricks that make Ruby feel like Ruby.

Cipher: My AI That’s Actually Building Unreal Blueprints For Me

I’m tired of staring at the same Blueprint nodes for the third hour straight. So I built Cipher — an AI agent that plans gameplay systems in Unreal Engine and spits out commands to make them real.

Cipher isn’t some fancy wrapper. It’s an agent that thinks through what needs to happen, then fires structured JSON commands over a Python bridge straight into Unreal. It duplicates Blueprints, adds cameras, spring arms, components, you name it. And it’s already doing more than I expected.

Why the hell am I doing this?

Unreal is powerful but the workflow can be soul-crushing. Want a new camera rig? Duplicate, tweak variables, hook up events, pray nothing breaks. Same crap every time you prototype. I got fed up repeating myself and decided to teach an AI to handle the boring bits so I could focus on the fun ones.

How Cipher actually works

I give it a high-level goal. Cipher’s planner figures out the steps, then outputs clean command JSON. A Python listener running inside Unreal picks it up and executes — creating actors, modifying Blueprints, adding components, setting properties. No vague “generate code” nonsense. It’s deliberate, structured, and reversible when it screws up.

Right now it’s solid at duplication and component surgery. Tell it “add a spring arm and camera to this pawn,” it does it without drama. Small wins, but they stack fast.

What’s already shipping

  • Blueprint duplication with targeted modifications 
  • Adding and configuring components (cameras, springs, collision) 
  • Basic property tweaks and hierarchy changes 

It’s not perfect, but watching it build a functional camera system in seconds still makes me grin like an idiot.

The annoying bits I’m still fighting

Duplication bugs keep popping up when references get messy. Stability isn’t there yet — sometimes Unreal gets cranky with rapid commands. And making the whole thing deterministic so I don’t get different results on the same prompt is harder than it sounds. I’m deep in the trenches fixing this stuff daily.

Where this is headed

Full gameplay systems. Inventory, combat loops, procedural level hooks — all planned and assembled by Cipher. Long term? Maybe entire small games from rough specs. I’m not there yet, but the path is clear.

I built this because I want to make games faster and weirder without getting buried in editor busywork. Cipher’s my co-pilot in the trenches, not some magic bullet. It still needs me to steer hard, and that’s exactly how I like it.

If you’re an Unreal dev drowning in repetitive Blueprint work, this kind of setup might save your sanity too. I’ll keep posting updates as it levels up.

Hit me up if you’re doing similar crazy shit. Always down to compare scars.

Building a Production-Ready Serverless App on Google Cloud (Part 1: Architecture)

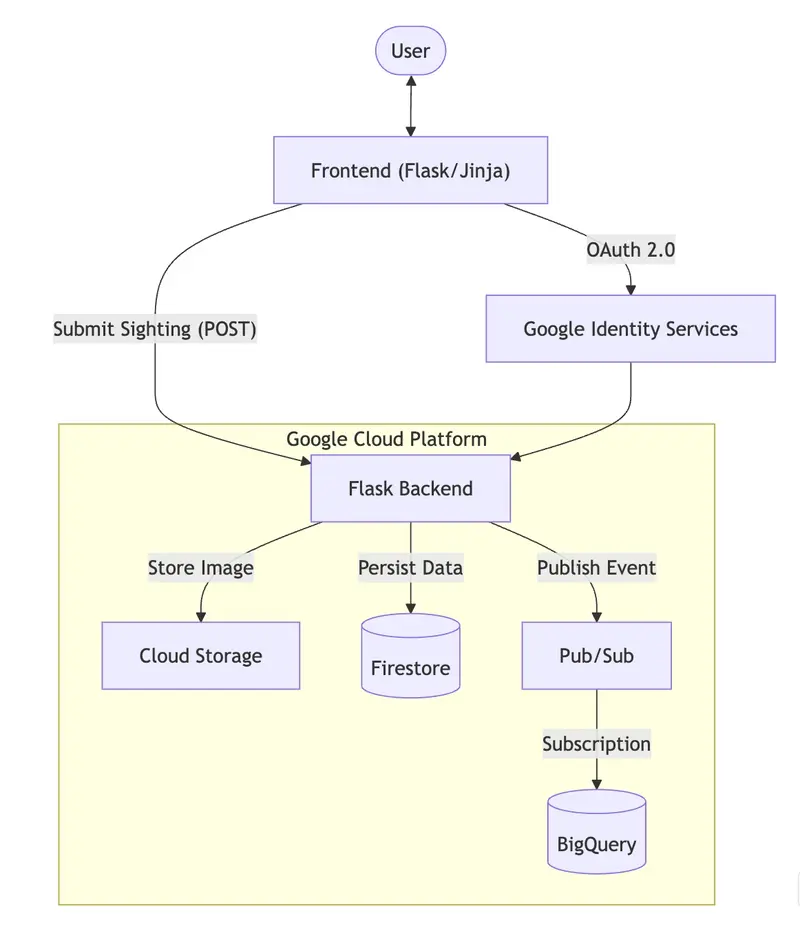
Architecture Diagram

The Problem

In my previous post, I shared how I used an AI agent framework during a train ride to build a Proof of Concept (POC) for a project called the Dog Finder App. The response was great, but the experiment raised a technical question: How do you build a POC quickly without creating a messy monolith that you’ll have to rewrite later?

When building a data-intensive application, engineers usually face a harsh trade-off. You can either build it fast to prove the concept (and inherit massive technical debt), or you can build it “right” (and spend weeks provisioning infrastructure and writing boilerplate).

By leveraging serverless services on Google Cloud Platform (GCP), we can break that trade-off.

This is the first in a three-part series where I will show you how to architect, automate, and deploy a complete, decoupled data application. We will look at how combining serverless tools with strict Data Engineering practices allows you to spin up a solution that is both incredibly fast to build and ready for production traffic.

The Architecture: Decoupling by Default

In traditional POCs, it is common to see a tightly coupled monolith: a single backend service receiving HTTP requests, saving images to a local disk, writing state to a database, and running heavy analytical queries. If one component bottlenecks, the entire application crashes.

For the Dog Finder app—a system designed to ingest real-time sightings of lost dogs and route them for geographical analysis—we needed a system that scales instantly under load but costs absolutely nothing when there is no traffic.

To achieve this, we default to a decoupled architecture. We split the ingestion, state, and analytics across specialized, managed serverless components:

  • Google Cloud Run (Compute): Hosts our stateless Flask web application and API. It handles incoming user traffic, scales up automatically on demand, and drops to zero when idle.
  • Google Cloud Storage (Blob Storage): Handles the heavy payloads. User-uploaded images of dogs go straight here, keeping our databases lean and performant.
  • Firestore (Operational Database): Our OLTP layer. This NoSQL database stores the real-time state of the application, allowing the frontend to read and display current sightings with millisecond latency.

  • Cloud Pub/Sub (Ingestion Buffer): The shock absorber of our system. When a sighting occurs, the backend publishes an event here and immediately responds to the user, completely decoupling the web app from the analytics pipeline.

  • BigQuery (Data Warehouse): Our OLAP layer. The final destination where all structured sightings land for historical storage, regional partitioning, and complex analytical querying.

Architecture Diagram

The Compute Layer: Scaling to Zero with Cloud Run

At the core of the Dog Finder app is a Python Flask backend. In a traditional setup, you would provision a Virtual Machine (Compute Engine) to run this application. You’d pay for that VM 24/7, even at 3:00 AM when no one is reporting lost dogs.

Instead, we containerized the application using a standard Dockerfile and deployed it to Google Cloud Run.

Cloud Run is a fully managed compute platform that automatically scales stateless containers. As an architect, enforcing statelessness is critical here. The Flask app does not store any session data or images on its local filesystem. Its only job is to act as a highly efficient traffic cop:

  • Receive the HTTP POST request (the sighting payload and image).
  • Validate the data payload.
  • Offload the heavy lifting to our specialized data services.
  • Return a success response to the user.

If there is a massive spike in lost dog reports, Cloud Run spins up multiple container instances instantly. When traffic drops, it scales down to zero. We only pay for the exact number of milliseconds the CPU spends processing a request.

The App

The Data Split: OLTP vs. OLAP in a Serverless World

This is where many rapid POCs turn into unmaintainable monoliths. A common mistake is throwing all your data—images, real-time app state, and analytical history—into a single relational database like PostgreSQL. As the application grows, database locks increase, queries slow down, and storage costs skyrocket.

To prevent this, we split the data path into three specialized lanes:

1. Cloud Storage (The Payload)

Databases are expensive places to store binary files. When a user uploads a photo of a dog, our Cloud Run app sends that file directly to a Google Cloud Storage bucket. The app then grabs the resulting image_url and uses that string for the rest of the data pipeline. This keeps our databases incredibly lean and fast.

2. Firestore (Operational / OLTP)

Users expect a snappy UI. When they open the app, they want to see the latest dog sightings immediately. We use Firestore (a NoSQL document database) as our operational layer. After saving the image, Cloud Run writes the sighting record to Firestore. This provides low-latency reads and writes, ensuring the web frontend feels instantaneous without running complex SQL joins.

3. BigQuery (Analytical / OLAP)

While Firestore is great for the UI, it is not designed for heavy aggregations (e.g., “How many Golden Retrievers were lost in the northern region last month compared to last year?”).

For this, we route the data to BigQuery. We explicitly partitioned the BigQuery table by sighting_date. This is a crucial Data Engineering standard: when analysts query the table for recent trends, BigQuery only scans the relevant partitions, drastically reducing query costs and execution time.

The Payoff: Visualizing the Data (Looker Studio)

An architecture is only as good as the insights it delivers. The real payoff of this decoupled, partitioned setup became obvious when I wanted to add a visualization layer.

Because we cleanly separated our operational state (Firestore) from our analytical history (BigQuery), I was able to connect Looker Studio directly to the BigQuery table in minutes. I didn’t have to worry about complex API integrations or degrading the performance of the live web app.

I created a real-time dashboard that plots the sightings by region. As new records flow through the serverless pipeline, the dashboard updates automatically, providing a live heat map of lost dog hotspots. This transforms the POC from a simple “data entry” app into a complete, end-to-end data product.

Sample Dashboard

Conclusion & What’s Next

In this first part, we laid out the “boxes” of our architecture. By leveraging Cloud Run, Cloud Storage, Firestore, and BigQuery, we designed a system that scales instantly, costs nothing when idle, and handles both operational and analytical workloads perfectly.

But having the right boxes is only half the battle. How do we connect them reliably?

In Part 2, we will dive into the lines connecting the boxes. I will show you how to use Pub/Sub to fully decouple ingestion, how to set up a direct serverless subscription from Pub/Sub to BigQuery (no code required), and how to enforce strict Data Contracts so your beautiful data warehouse doesn’t turn into a data swamp.

Enterprise Blockchain in TypeScript: Real-World Case Studies, Protocol Mappings, MPC, HSM & Post-Quantum Patterns That Actually Run

Most enterprise blockchain projects die in PoC hell. You’ve seen it: a flashy demo, some Hyperledger slides, a proof-of-concept that “works on my machine,” and then… silence. The pilot never graduates to production. The consortium loses interest. The budget evaporates.

The problem isn’t the technology—it’s that most repositories show you what blockchain can do without showing you how to actually build it. Where’s the code for recall traceability that maps to real chaincode? Where’s the privacy pattern that actually projects into Besu privacy groups? Where’s the MPC implementation you can run locally without spinning up three cloud VMs?

This repository is different. enterprise-blockchain by @psavelis delivers 20 runnable examples covering four production-grade business scenarios, three protocol adapters (Fabric, Besu, Corda), MPC secret sharing, HSM key management, and NIST-standardized post-quantum cryptography. Everything runs locally. Everything passes CI. Everything is actually useful.

And yes, with quantum computers advancing faster than expected, the PQC examples aren’t academic exercises—they’re code you might need sooner than you think.

📦 What You’ll Get From This Post

  • 4 production case studies with domain models and real code
  • 3 protocol adapters (Hyperledger Fabric, Besu/EVM, R3 Corda)
  • Post-quantum cryptography (NIST FIPS 203/204 compliant)
  • MPC and HSM patterns for off-chain computation and key custody
  • Full local infrastructure (Docker Compose + OpenTelemetry + Jaeger)
  • AI skill files that teach coding assistants the domain

Let’s dive in.

🏗️ Repository Overview

Stat Value
Language TypeScript (strict mode)
Examples 20 runnable scenarios
Protocols Hyperledger Fabric, Besu, R3 Corda
Cryptography MPC, HSM, ML-KEM-768, ML-DSA-65
Infrastructure Docker Compose + Terraform
CI GitHub Actions (4 parallel matrix jobs)
Test Runner Node.js native + fast-check property tests
License Apache 2.0

The repository follows hexagonal architecture: domain logic sits at the center, protocol adapters implement ports, and integration clients handle the messy SDK details. This means you can swap Fabric for Besu without rewriting your business rules.

Why does this matter? Most enterprise blockchain projects fail at the integration boundary. The chaincode works, but nobody can figure out how to connect it to the ERP system. The Corda flows run, but the identity mapping to Active Directory is a nightmare. This repository explicitly separates those concerns:

  • Domain layer: Pure business logic. No protocol dependencies. Fully unit-testable.
  • Protocol adapters: Stateless projectors that translate domain events into platform-specific transaction shapes.
  • Integration clients: SDK wrappers with retry policies, circuit breakers, and connection management.
modules/
├── traceability/      # Food recall domain logic
├── privacy/           # Selective disclosure ledger
├── credentialing/     # Hospital staffing clearance
├── aid-settlement/    # Humanitarian voucher reconciliation
├── mpc/               # Secret sharing + post-quantum KEM
├── hsm/               # Envelope encryption + signing
├── protocols/         # Fabric, Besu, Corda adapters
└── integrations/      # SDK clients (Gateway, ethers, REST)

🍎 Case Study #1: Food Recall Response (Fabric)

The Problem: A contaminated lettuce shipment reaches three distribution centers before anyone notices. How do you trace every affected lot, identify which retailers received them, and generate a recall plan—all in under an hour?

The Solution: The TraceabilityLedger domain module models lots, shipments, and telemetry readings. When temperatures breach safe ranges or contamination is detected, the RecallAssessor walks the shipment graph and returns every affected lot.

export class TraceabilityLedger {
  private readonly store: TraceabilityStore;

  registerLot(lot: ProductLot): void {
    this.store.addLot(lot);
  }

  dispatchShipment(shipment: Shipment): void {
    this.store.addShipment(shipment);
  }

  recordTelemetry(reading: TelemetryReading): void {
    this.store.addTelemetry(reading);
  }

  assessRecall(rule: RecallRule): RecallAssessment {
    return new RecallAssessor(this.store).assess(rule);
  }
}

The Fabric adapter projects this into chaincode invocations:

export class FabricTraceabilityAdapter {
  createLotCommand(lot: ProductLot): FabricInvocation {
    return {
      contract: "FoodTraceContract",
      transaction: "CreateProduct",
      args: [lot.id, lot.originCountry, lot.supplier, lot.harvestDate],
      endorsementPolicyHint: "AND('RetailerMSP.peer','SupplierMSP.peer')",
    };
  }
}

Pro tip: The endorsementPolicyHint tells you which organizations must co-sign. This is operational gold—it forces you to think about governance before you write the chaincode.

The pattern here is powerful: domain logic knows nothing about Fabric. The TraceabilityLedger could just as easily project to Besu or Corda. The adapter layer handles the translation, and the endorsement policy hints are documentation—not runtime dependencies.

Run it yourself:

npm run example:food-recall
npm run example:fabric-projection

🔐 Case Study #2: Consortium Order Sharing (Besu)

The Problem: A buyer, a bank financing the purchase, a logistics provider, and a regulator all need to see a purchase order—but each should see only their relevant slice. The buyer sees pricing. The bank sees credit terms. The regulator sees compliance flags. Nobody sees everything.

The Solution: The SelectiveDisclosureLedger creates audience-specific projections from a canonical order, each cryptographically committed so any party can verify their view derives from the same source.

export class SelectiveDisclosureLedger {
  publishOrder(order: PurchaseOrder): void {
    this.repo.addOrder(order);
  }

  createView(orderId: string, audience: Audience): SharedOrderView {
    return this.projector.createView(orderId, audience);
  }
}

The Besu adapter maps this to privacy-group scoped contract calls. Different audiences get different privacy groups, but the canonical hash anchors everyone to the same truth.

Watch out: Privacy groups aren’t magic. If your public contract reads private state, you’ve just leaked data. The adapter enforces this boundary—use it.

The selective disclosure pattern is increasingly critical as regulations like GDPR and CCPA demand data minimization. The canonical order exists. The views are derived. The audit proofs are cryptographic. This is how you share data across organizational boundaries without oversharing.

npm run example:order-sharing
npm run example:besu-projection

🏥 Case Study #3: Hospital Staffing Clearance (Corda)

The Problem: Before a traveling nurse can work a shift, you need to verify their license, check for sanctions, confirm malpractice insurance, and get hospital sign-off. This involves the staffing agency, the hospital, the state licensing board, and potentially CMS.

The Solution: Corda’s point-to-point model fits perfectly. Each party only sees the transactions they’re involved in. The ProviderClearanceState captures the clearance decision, and the flow collects signatures from exactly the required participants.

The Corda adapter generates flow invocation payloads:

{
  flow: "IssueProviderClearanceFlow",
  participants: ["Hospital-A", "StaffingAgency-X", "LicenseBoard-CA"],
  state: {
    providerId: "NP-12345",
    clearanceStatus: "APPROVED",
    validUntil: "2026-06-30"
  }
}

Why Corda here? The healthcare staffing workflow is fundamentally bilateral—the hospital and the staffing agency need to agree, with the licensing board providing attestation. Corda’s “need-to-know” model means the hospital’s competitor down the street never sees this transaction. That’s not a bug, it’s the core feature.

npm run example:staffing-clearance
npm run example:corda-projection

💰 Case Study #4: Aid Voucher Reconciliation (Besu/Fabric)

The Problem: Multiple humanitarian agencies issue digital vouchers to beneficiaries. Merchants redeem them for payment. But without coordination, beneficiaries double-dip, merchants submit fake invoices, and settlement takes months.

The Solution: The AidSettlementLedger validates claims against grant rules (budget caps, category restrictions, expiry dates) and generates reconciliation reports. The Solidity contract mirrors these rules on-chain:

function submitClaim(
    bytes32 claimId,
    bytes32 grantId,
    address merchantId,
    uint8 merchantCategory,
    bytes32 invoiceReference,
    uint256 amountUsd100
) external {
    Grant storage g = grants[grantId];
    require(block.timestamp < g.expiresAt, "Grant expired");
    require(g.consumedUsd + amountUsd100 <= g.amountUsd, "Budget exceeded");
    require(!usedInvoices[grantId][invoiceReference], "Duplicate invoice");
    // ... emit ClaimSettled or ClaimRejected
}

Pro tip: The validation rules are expressed in both TypeScript and Solidity. This is the one place hexagonal purity yields to platform reality: EVM enforcement requires on-chain logic. The TypeScript domain model remains the source of truth for design, but Besu deployments maintain parallel validation in Solidity. Fabric deployments can keep everything in TypeScript chaincode.

🔗 Protocol Adapters: One Domain, Three Platforms

The protocol adapter layer is where this repository shines. Instead of writing three separate applications, you write domain logic once and project it to multiple platforms:

Domain Event Fabric Besu Corda
Register lot CreateProduct chaincode registerLot(bytes32) IssueLotState flow
Record shipment RecordShipment + transient data Privacy group contract call RecordShipmentFlow
Submit claim Endorsement by agency + merchant Public contract with budget check SubmitClaimFlow

The adapters are stateless. They take domain objects and return platform-specific command shapes. No network calls, no SDK dependencies, no environment configuration. You can unit test them in isolation.

This is the key insight: protocol selection is a deployment decision, not an architectural one. Your domain model should survive a platform migration. The caveat: EVM-based platforms (Besu) require on-chain enforcement in Solidity, so you’ll maintain parallel validation logic there. Fabric’s TypeScript chaincode keeps everything in one language. The domain layer remains the design authority either way—contract code is derived from it, not the other way around.

🤫 Off-Chain Cryptography: MPC Secret Sharing

Some computations shouldn’t happen on-chain. Sealed-bid auctions, joint risk analysis, and threshold signatures all require parties to collaborate without revealing their inputs.

The MPCEngine implements additive secret sharing:

export class MPCEngine {
  /**
   * Split `secret` into `partyIds.length` additive shares.
   * Any strict subset reveals nothing; summing all shares
   * reconstructs the original value.
   */
  splitSecret(secret: number, partyIds: string[]): SecretShare[] {
    const shares: SecretShare[] = [];
    let remaining = secret;

    for (let i = 0; i < partyIds.length - 1; i++) {
      const value = randomInt(-(2 ** 47) + 1, 2 ** 47);
      remaining -= value;
      const nonce = randomBytes(16).toString("hex"); // Fresh nonce per share
      shares.push({
        partyId: partyIds[i],
        shareIndex: i,
        value,
        nonce,
        commitment: commitShare(partyIds[i], i, value, nonce),
      });
    }
    // Last share gets the remainder to ensure sum = original secret
    return shares;
  }
}

The compute() method reconstructs the aggregate without any party learning individual inputs:

npm run example:mpc-auction      # Sealed-bid procurement
npm run example:mpc-risk-analysis # Cross-institution credit analysis

The repository also includes QuantumResistantVault for Shamir k-of-n threshold secret sharing:

// Distribute a key across 5 custodians, requiring any 3 to reconstruct
const shares = vault.distributeSecret(masterKey, parties, 3);
const reconstructed = vault.reconstructSecret(threeShares, 3);

This pattern is essential for key custody ceremonies where no single party should hold the complete key.

🔐 HSM Key Management: Envelope Encryption

Production blockchain deployments use hardware security modules. The HsmClient simulates PKCS#11 semantics—private keys never leave the “hardware boundary”:

export class HsmClient {
  generateKeyPair(keyLabel: string): HsmKeyPair;
  sign(keyLabel: string, data: string): HsmSignatureResult;

  // Envelope encryption: DEK wrapped by KEK
  encryptWithEnvelope(kekLabel: string, plaintext: string): {
    encryptedRecord: EncryptedRecord;
    wrappedDek: WrappedKey;
  };
}

Three examples demonstrate real patterns:

  • hsm-transaction-signing: ECDSA-SHA256 for equity trade orders
  • hsm-key-ceremony: Root key ceremony with 3-of-5 Shamir threshold
  • hsm-envelope-encryption: DEK/KEK for sensitive trade documents

Watch out: The simulated HSM uses in-memory storage. In production, you’d connect to AWS CloudHSM, Azure Dedicated HSM, or an on-prem Thales Luna via PKCS#11.

⚛️ Post-Quantum Cryptography: Future-Proofing Now

Here’s the thing about “harvest now, decrypt later” attacks: adversaries are already collecting your encrypted traffic. When CRQCs arrive (NIST estimates 2030-2035), they’ll decrypt everything you sent today.

If your data has 10+ year confidentiality requirements—financial records, healthcare, trade secrets—you need post-quantum cryptography now.

The repository implements NIST FIPS 203 (ML-KEM-768) and FIPS 204 (ML-DSA-65) with hybrid constructions for defense-in-depth:

export class HybridKem {
  /**
   * Combine X25519 (classical) + ML-KEM-768 (post-quantum).
   * Breaking this requires breaking BOTH algorithms.
   */
  encapsulate(
    recipientX25519PublicKey: KeyObject,
    recipientMlKemPublicKey: Uint8Array,  // FIPS 203 naming
  ): HybridEncapsulation {
    // Classical channel
    const x25519SharedSecret = diffieHellman({ /* ... */ });

    // Post-quantum channel (ML-KEM-768, formerly "Kyber")
    const { cipherText, sharedSecret: mlKemSharedSecret } =
      ml_kem768.encapsulate(recipientMlKemPublicKey);

    // Combine via HKDF
    const combinedKey = hkdfSync(
      "sha256",
      Buffer.concat([x25519SharedSecret, mlKemSharedSecret]),
      HKDF_SALT,
      "hybrid-kem-v1",
      32,
    );
    return { combinedKey, /* ... */ };
  }
}

This matches how Chrome and Cloudflare deployed post-quantum TLS (X25519Kyber768). Run the examples:

npm run example:kyber-kem          # Pure ML-KEM-768
npm run example:hybrid-kem         # X25519 + ML-KEM hybrid
npm run example:quantum-safe-payment # End-to-end PQ payment flow

🐳 Infrastructure: Docker Compose + Observability

The repository includes a complete local development stack:

services:
  besu-validator-1:    # Hyperledger Besu node
  besu-validator-2:
  fabric-peer:         # Hyperledger Fabric peer
  fabric-orderer:
  otel-collector:      # OpenTelemetry Collector
  jaeger:              # Distributed tracing UI
  prometheus:          # Metrics collection

Security follows CIS Docker Benchmark:

  • Resource limits (CPU/memory) on all containers
  • no-new-privileges: true blocks privilege escalation
  • Log rotation prevents disk exhaustion
  • All ports bound to 127.0.0.1

Run it:

make up              # Start everything
make smoke           # Run health checks
open http://localhost:16686  # Jaeger traces
open http://localhost:9090   # Prometheus metrics

Want to see distributed traces for your blockchain operations? Just set the environment variables:

export OTEL_EXPORTER_OTLP_ENDPOINT=http://localhost:4318
export OTEL_SERVICE_NAME=food-recall-service
npm run example:food-recall

Then open Jaeger and watch the spans flow through your traceability ledger operations.

✅ Quality Gates: Property-Based Testing

Enterprise blockchain systems demand correctness guarantees that exceed typical application standards. Cryptographic operations produce silent failures—no exception, just compromised security.

The repository uses fast-check for property-based testing of cryptographic invariants:

// HSM envelope encryption round-trip
test("envelope encryption: decrypt(encrypt(x)) === x", () => {
  fc.assert(
    fc.property(
      fc.string({ minLength: 1, maxLength: 10000, unit: "binary-ascii" }),
      (plaintext) => {
        const { encryptedRecord, wrappedDek } = hsm.encryptWithEnvelope(kekLabel, plaintext);
        const decrypted = hsm.decryptWithEnvelope(wrappedDek, encryptedRecord);
        return decrypted === plaintext;
      },
    ),
  );
});

These tests catch edge cases that unit tests miss:

  • Off-by-one errors in field arithmetic
  • IV reuse across encryptions
  • Implicit rejection failures in post-quantum KEMs

Run the property tests:

npm test                           # All tests
npm test -- tests/hsm.property.test.ts  # HSM-specific
npm test -- tests/mpc.property.test.ts  # MPC-specific

⚡ Run Everything in 5 Minutes

git clone --recursive https://github.com/psavelis/enterprise-blockchain.git
cd enterprise-blockchain
npm install
npm run verify        # format + lint + typecheck + tests + 20 examples
make up               # start infrastructure (optional)
npm run examples      # run all business scenarios

That’s it. Every example runs. Every test passes. No external services required.

Want to verify everything passes CI? Run the full quality gate:

npm run verify   # format:check + lint + typecheck + test + all examples

This is the same command CI runs. If it passes locally, it passes in GitHub Actions. No surprises.

📚 Lessons Learned

After reviewing dozens of enterprise blockchain deployments, some patterns emerge:

  1. Platform selection follows trust, not throughput. Feature matrices are noise. Teams pick Fabric because they have Java developers. They pick Besu because they know EVM. They pick Corda because R3 has regulatory relationships. Throughput differences matter only after trust assumptions narrow the field.

  2. Privacy is architecture, not configuration. Every platform offers privacy mechanisms. None of them work without deliberate design. If your public contract queries private state, you’ve leaked data.

  3. Off-chain is not optional. Every production deployment stores bulk data off-chain. The blockchain stores commitments, not content. Plan for this from day one.

  4. Integration complexity dominates. Chaincode development is 20-30% of the project. Identity integration, legacy system bridges, and operational tooling consume the rest.

  5. Governance evolves faster than code. Consortium agreements written at kickoff become obsolete. New members require endorsement policy changes. Regulatory requirements mandate audit observer nodes. Design for governance evolution from day one.

  6. Consensus selection follows trust, not throughput. Marketing materials emphasize throughput differences. Production deployments choose based on trust assumptions. Raft (CFT) for aligned incentives. QBFT (BFT) for competing parties. The throughput numbers are noise.

🤖 AI Skills: Teaching Your Coding Assistant

The skills/ folder contains structured knowledge files designed for AI coding assistants:

Skill When to Use
platform-selection.md Choosing between Fabric, Besu, Corda
hsm-key-management.md Implementing PKCS#11 key operations
mpc-secret-sharing.md Building threshold cryptography
selective-disclosure.md Privacy-preserving data sharing
infrastructure-reference.md Docker Compose and CI configuration

Each skill follows a consistent structure: when to use, when NOT to use, key concepts, must-preserve invariants, and anti-patterns to avoid. Feed these to Claude, Copilot, or your favorite coding assistant for context-aware suggestions.

🌟 Who Should Star This Repo?

  • Blockchain architects evaluating Fabric vs Besu vs Corda
  • Security engineers implementing MPC, HSM, or post-quantum patterns
  • Protocol researchers studying transaction shape mappings
  • Teams in PoC purgatory who need production-grade examples
  • Anyone who’s tired of blockchain demos that don’t actually run
  • Developers learning enterprise blockchain who want working examples, not slides

Whether you’re building a supply chain traceability system, a consortium data sharing platform, or exploring post-quantum cryptography for your organization’s future security posture—this repository has runnable code that demonstrates the pattern.

🚀 Call to Action

Star the repo → Fork it → Run the examples → Open an issue with your use case

The code is Apache 2.0. Take what you need. Adapt it to your consortium. And if you build something cool, let us know in the issues—we love seeing what people create with these patterns.

📖 Further Reading

Built by @psavelis. If this helped you ship something real, drop a star.

Mastering Quantum Logic with Quantum Studio

What is Quantum Computing?

At its core, Quantum Computing is a fundamentally different way of processing information. While classical computers (the one you’re using right now) use bits—which are always either a 0 or a 1—quantum computers use qubits.

Qubits exploit the strange laws of quantum mechanics, specifically:

  • Superposition: A qubit can exist as both 0 and 1 simultaneously until it is measured.
  • Entanglement: Two qubits can become linked such that the state of one instantly influences the state of the other, no matter the distance.

These properties allow quantum computers to explore a vast “probability space” all at once, potentially solving problems in chemistry, cryptography, and optimization that would take classical supercomputers thousands of years to calculate.

The Building Blocks: Circuits and Gates

To perform a calculation on a quantum computer, we build a Quantum Circuit.

  • Quantum Wires: The horizontal lines in a diagram represent the timeline of a single qubit.
  • Quantum Gates: These are the “operations” we perform on qubits to change their state. Think of them like the logical AND/OR/NOT gates in a classical computer, but with a quantum twist:
    • Hadamard (H): Puts a qubit into a perfect 50/50 superposition of 0 and 1.
    • Pauli-X (X): The quantum version of a NOT gate; it flips a bit from 0 to 1.
    • CNOT (Controlled-NOT): The builder of entanglement! It flips a target qubit only if the control qubit is 1.
  • Measurement: This is the final step where the quantum “magic” ends and we collapse the superposition into a classical 0 or 1 that we can read.

Enter: Quantum Studio

Learning these concepts is notoriously difficult. The math is complex, and the assembly code (OpenQASM) can be cryptic for beginners.

I built Quantum Studio to be the bridge between human intent and quantum logic.

If you wnat to use NVIDIA you can get key here https://build.nvidia.com/explore/discover?ncid=ref-inpa-550095

🤖 Why I Created It

I wanted to learn quantum computing in a truly visual and intuitive way. I realized that the best way to understand an entanglement circuit is to see it being built gate-by-gate.

Quantum Studio helps you master quantum theory through:

  1. AI-Powered Intent: You don’t need to know the code. Just type “Make a Bell State and measure both qubits” and the AI handles the translation.
  2. Live Visualizations: As soon as the logic is generated, it’s rendered on a clean, modern canvas. No more abstract math; you see the wires and gates.
  3. Real-Time Animation: Use the Animate feature to watch the evolution of the circuit step-by-step. It helps you build a mental map of how information flows through the system.
  4. Open Source Education: By turning Natural Language (NLP) into standard OpenQASM 2.0, Quantum Studio teaches you the underlying code automatically as you experiment.

Quantum computing will redefine the next several years of technology. Quantum Studio is my contribution to making that future accessible to everyone—not just PhDs.

🎓 Learning Quantum Computing Interactively

To make quantum concepts truly accessible, I’ve created 10 interactive visualizers that let you learn by doing rather than by memorizing. Each visualizer focuses on a specific concept, transforming abstract mathematics into intuitive, hands-on experiences.

Why Interactive Learning Works

Research consistently shows that interactive visualization improves learning outcomes by 30-60% compared to passive reading. When learning quantum computing:

  • You can’t truly understand superposition until you manipulate probability amplitudes yourself
  • You can’t grasp the Bloch sphere until you rotate it and apply gates in 3D
  • You can’t comprehend measurement collapse until you watch it happen in real-time
  • You can’t master quantum algorithms until you step through them gate-by-gate

Traditional textbooks present quantum mechanics as pure theory. Interactive visualizers let you play first, then formalize the concepts with mathematics.

🎯 The Complete Visualizer Suite

All visualizers are free, open-source, and work directly in your browser—no installation required. Here’s what you can explore:

Foundational Concepts (Perfect for Beginners)

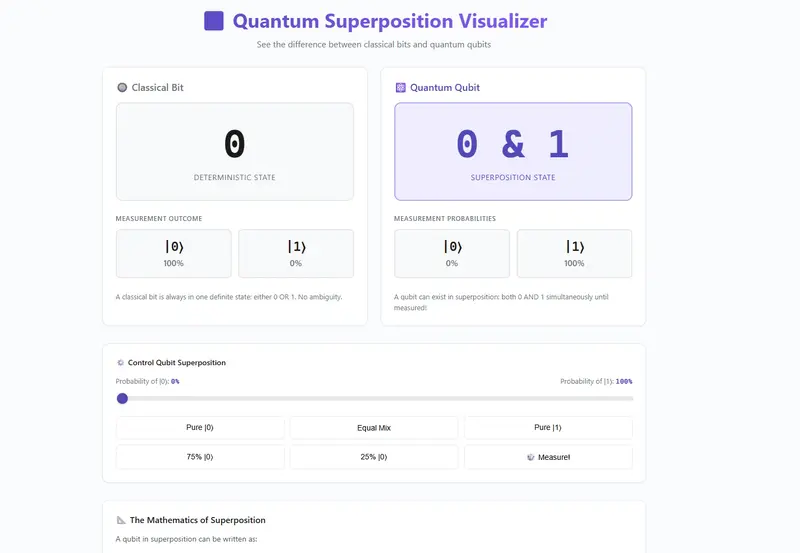
  1. Superposition Visualizer

https://vishalmysore.github.io/QuantumStudio/superposition_visualizer.html

  • See the fundamental difference between classical bits and quantum qubits
  • Adjust probability amplitudes with interactive sliders
  • Watch wave functions evolve in real-time
  • Simulate measurements and see quantum randomness
  • Start here if you’re completely new to quantum computing
  1. Interactive Bloch Sphere

https://vishalmysore.github.io/QuantumStudio/bloch_sphere_interactive.html

  • Visualize single-qubit states in beautiful 3D
  • Drag to rotate the sphere from any angle
  • Apply quantum gates (H, X, Y, Z) and watch states transform
  • Control theta and phi angles manually
  • Quick presets for common states (|0⟩, |1⟩, |+⟩, |−⟩)
  • Essential for understanding quantum state geometry
  1. Measurement Collapse Visualizer 📏

https://vishalmysore.github.io/QuantumStudio/measurement_collapse_visualizer.html

  • Watch superposition collapse into definite states
  • 3-stage timeline: Before → Measurement → After
  • Run 100 measurements to see statistical distributions
  • Histogram showing probability convergence
  • Demonstrates the mysterious measurement problem
  1. Gate Transformer 🎛️

https://vishalmysore.github.io/QuantumStudio/gate_transformer_visualizer.html

  • Apply quantum gates one by one
  • See transformation flow: Input → Gate → Output
  • Compare probabilities before and after
  • View gate matrix representations
  • Build gate sequences with history tracking
  • Learn how gates transform quantum states

Multi-Qubit Systems (Intermediate Level)

  1. Multi-Qubit Explorer 🔗

https://vishalmysore.github.io/QuantumStudio/multi_qubit_explorer.html

  • Switch between 1, 2, and 3 qubits
  • Experience exponential state space growth (2, 4, 8 states)
  • Visualize all basis states with amplitude bars
  • Entanglement indicators show quantum correlations
  • Quick access to Bell and GHZ states
  • Understand why quantum computers scale exponentially
  1. Bell State Visualizer 🔗

https://vishalmysore.github.io/QuantumStudio/bell_state_visualizer.html

  • Create quantum entanglement between two qubits
  • 4-step process showing entanglement creation
  • Visual qubit spheres with connection animation
  • Measurement correlation matrix
  • See Einstein’s “spooky action at a distance”
  • Your first hands-on entanglement experience

Quantum Algorithms (Advanced Implementations)

7.Deutsch’s Algorithm ⚡

https://vishalmysore.github.io/QuantumStudio/deutsch_algorithm_visualizer.html

  • The first algorithm to prove quantum advantage
  • Toggle between Constant and Balanced functions
  • Oracle truth table display
  • 4-step walkthrough with phase visualization
  • Determine function type in one query instead of two
  • See quantum computing’s computational advantage
  1. Grover’s Search Algorithm 🔍

https://vishalmysore.github.io/QuantumStudio/grovers_algorithm_visualizer.html

  • Search unsorted database in √N time instead of N time
  • 5-step animation: Init → Superposition → Oracle → Diffusion → Measure
  • Amplitude and probability bars for all states
  • Phase visualization showing oracle marking
  • Word search demo (find “paneer” at index 2)
  • Master amplitude amplification techniques
  1. Quantum Teleportation Visualizer 📡
    https://vishalmysore.github.io/QuantumStudio/teleportation_visualizer.html

  • Transfer quantum states using entanglement
  • Alice and Bob party representation
  • 6-step protocol showing the complete process
  • Entanglement channel animation
  • Classical communication (2 bits) visualization
  • Advanced quantum protocol in action
  1. GHZ State Visualizer 🐱

https://vishalmysore.github.io/QuantumStudio/ghz_state_visualizer.html

- Create "Schrödinger's Cat" states with 3, 4, or 5 qubits
- Maximum multi-qubit entanglement
- Dynamic step generation based on qubit count
- Qubit chain visualization
- Amplitude distribution grid
- Formula: (|000...⟩ + |111...⟩)/√2
- **Explore multi-party entanglement**

📚 Recommended Learning Path

For Complete Beginners:

1. Superposition Visualizer → Understand qubits vs bits
2. Bloch Sphere → Visualize quantum states
3. Gate Transformer → Learn gate operations  
4. Measurement Collapse → See quantum randomness
5. Multi-Qubit Explorer → Understand scaling
6. Bell State → Experience entanglement
7. Deutsch's Algorithm → See quantum advantage
8. Grover's Algorithm → Amplitude amplification
9. Teleportation → Advanced protocols
10. GHZ State → Multi-party entanglement