Real-Time Sign Language Translation with MediaPipe, Flutter, and Gemini Nano

SignSpeak

Real-Time Sign Language Translation with MediaPipe, Flutter, and Gemini Nano
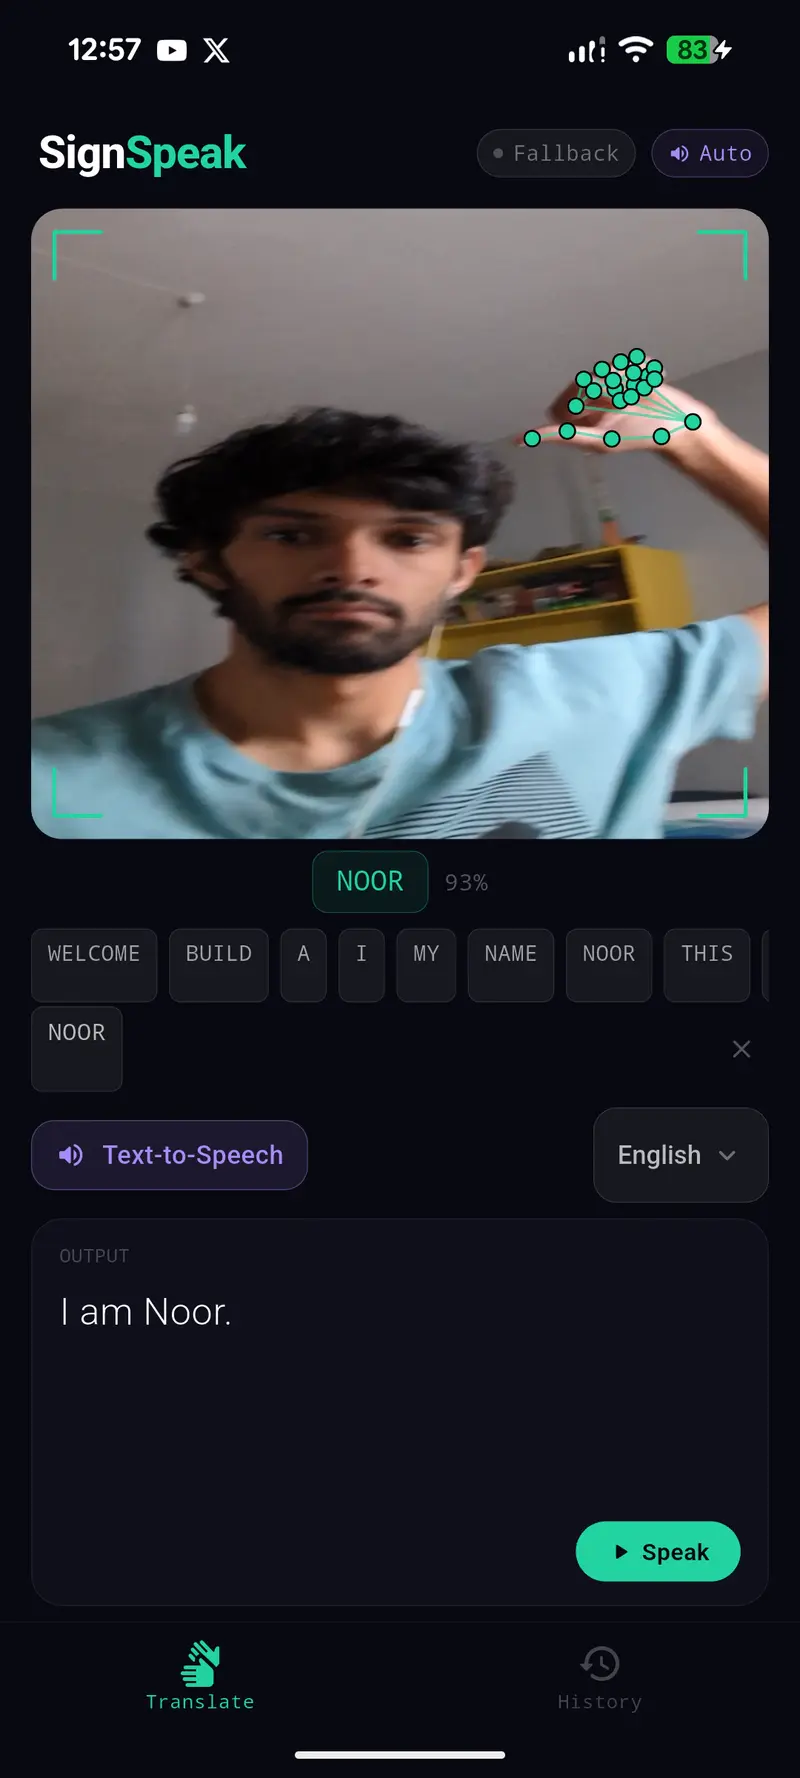
Build with AI – 2026 | Noor


SignSpeak is a mobile application designed to bridge the communication gap for the Deaf and Hard-of-Hearing community. By combining on-device computer vision with an on-device large language model, it translates American Sign Language (ASL) gestures and custom hand signs into natural, complete English sentences in real time – entirely offline, with no data sent to any server. Its defining feature is a fully customizable vocabulary: new signs, names, or even full phrase shortcuts can be added by any user without retraining from scratch.

1. MediaPipe: The Digital Skeleton of Gesture Recognition

What is MediaPipe?

MediaPipe is an open-source framework developed by Google for building multimodal, on-device machine learning pipelines. It provides production-ready solutions for tasks such as face detection, pose estimation, and – most relevant here – hand landmark detection. MediaPipe is designed to run efficiently on mobile hardware without requiring a network connection, making it a natural fit for a privacy-first application.

In SignSpeak, the Hand Landmarker solution is used. It detects and tracks the 3D coordinates of 21 individual points (landmarks) on a human hand from a single camera frame. These points cover every joint of every finger plus the wrist, providing a rich geometric representation of any hand shape or pose.

The 21 Hand Landmarks

Each landmark is expressed as a normalised (x, y, z) coordinate. The x and y values are pixel positions relative to the image width and height, and z represents depth relative to the wrist. The 21 points are distributed as follows:

Index Landmark Description
0 WRIST Base anchor point for all normalisation
1–4 THUMB CMC → MCP → IP → TIP
5–8 INDEX FINGER MCP → PIP → DIP → TIP
9–12 MIDDLE FINGER MCP → PIP → DIP → TIP
13–16 RING FINGER MCP → PIP → DIP → TIP
17–20 PINKY FINGER MCP → PIP → DIP → TIP

Landmark 0 (WRIST) is the anchor for all normalisation. Landmark 9 (MIDDLE MCP) defines the span.

How MediaPipe is Used in SignSpeak

Since sign language frequently involves both hands, SignSpeak configures MediaPipe to track up to two hands simultaneously. For each detected hand, the (x, y, z) values of all 21 landmarks are extracted, producing a raw vector of 63 values per hand. With two hands, this gives 126 raw values per frame.

To make the model robust to differences in hand size, camera distance, and position within the frame, these coordinates are normalised before being used as model input:

  • Wrist-relative: Each coordinate is shifted by subtracting the wrist position (landmark 0), so the wrist is always at the origin (0, 0, 0).
  • Scale-normalised: Each shifted coordinate is divided by the Euclidean distance between the wrist and the middle finger MCP joint (landmark 9). This “span” acts as a scale factor, so the same sign made close to or far from the camera produces an identical feature vector.

The formula in Python is span = np.linalg.norm(mid_mcp - wrist). In Dart (Flutter), the equivalent must use sqrt(dx*dx + dy*dy + dz*dz) – not the squared distance – to match the training data exactly.

⚠️ Critical: Feature Extraction Must Match Exactly
The single most common cause of poor accuracy when moving from Python to Flutter is a mismatch in normalisation. The Python training pipeline uses np.linalg.norm (Euclidean distance, i.e. square root). The Flutter inference code must use the identical formula. Using squared distance instead will produce a completely different scale and render the model unreliable.

2. Gemini Nano: Bringing Intelligence to the Edge

What is Gemini Nano?

Gemini Nano is the smallest and most efficient model in Google’s Gemini family, purpose-built for on-device inference. Unlike cloud-based LLMs, Gemini Nano runs entirely on the device’s hardware using Android’s AICore runtime, requiring no internet connection and sending no user data off-device. It is available on supported devices including the Pixel 8 series and Samsung Galaxy S24 series.

Why an LLM for Sign Language?

ASL has a grammatically different structure from spoken English. Signers routinely omit articles (a, the), auxiliary verbs (is, are, was), and tense markers. A direct transcription of detected signs would produce telegraphic output such as “WATER NEED” or “NAME MY”. Gemini Nano’s role in SignSpeak is to act as an interpreter: it receives the raw sign tokens and a context-aware prompt, and returns a fluent English sentence (because LLMs are only next word predictors am I right :D). The prompt is designed with few-shot examples:

You are a sign language interpreter. Convert ASL sign tokens into
natural fluent English sentences.

WATER NEED       → I need some water please.
NAME MY NOOR     → My name is Noor.
HELP ME PLEASE   → Could you please help me?

Output ONLY the final sentence. No explanation. Under 15 words.

How to Install and Enable Gemini Nano on Android

Gemini Nano is accessed via the AICore system service. Enabling it requires the following steps on a supported device:

  1. Update AICore: Open the Google Play Store and search for “AICore”. Ensure it is updated to the latest version.
  2. Enable Developer Options: Go to Settings → About Phone and tap Build Number seven times until Developer Mode is enabled.
  3. Enable Gemini Nano: In Settings → System → Developer Options, scroll to find “Gemini Nano” or search for “AICore Settings”. Toggle on “Enable Gemini Nano” and “Enable On-Device Model”.
  4. Wait for model download: The on-device model downloads silently in the background. This can take 10–15 minutes on Wi-Fi. The device must be charging and connected to Wi-Fi. The model is not available until this download completes.
  5. Verify availability: Connect the device via USB and run:
adb shell cmd aicore status

The output should confirm the model is downloaded and AICore is running. In SignSpeak, Gemini Nano is accessed via a Flutter MethodChannel that bridges to the Android-native AICore SDK. If the on-device model is unavailable, the app transparently falls back to the Gemini Flash API (cloud) or a rule-based sentence assembler.

3. The Python Pipeline: From Camera to Trained Model

The gesture recognition model is built using a three-stage Python pipeline located in the custom_model/ directory. All three scripts share the same MediaPipe feature extraction logic to ensure consistency between training data and inference.

collect.py – The Data Gatherer

Purpose

collect.py uses your PC webcam and MediaPipe to capture hand landmark data for each sign you want to recognise. Instead of recording raw video or images, it records only the 126 normalised landmark coordinates per frame – this is both compact and already in the exact format the model needs.

How to Use

Install dependencies:

pip install mediapipe opencv-python numpy

Run the script from the custom_model/ directory:

python collect.py

The webcam window opens showing a live hand skeleton overlay. For each sign in the SIGNS list:

  1. Get into position with your hand(s) in the correct gesture.
  2. Press SPACE. A 5-second countdown begins – use this time to settle into the pose.
  3. The script automatically captures 10 frames at 0.5-second intervals. A white border flashes on each capture. The terminal prints each shot as OK or MISSED.
  4. When you have enough samples for a sign, press N to advance to the next one.
  5. Press Q at any time to quit and save all collected data so far.

ℹ️ Two-handed signs: Signs marked as TWO_HANDED (e.g. WELCOME, HELP, MORE) display a purple [TWO-HANDED] label. The “Hands:” counter in the top-right turns green only when the required number of hands are detected. For two-handed signs, ensure both hands are fully visible in the frame before pressing SPACE.

Customising the Sign Vocabulary

The list of signs to collect is defined at the top of the script:

SIGNS = [
    'none',       # always required as the negative class
    'hello',
    'my',
    'name',
    'noor',       # a custom sign - any gesture you define
    'welcome',
    # add more here...
]

'none' must always be first. It is the negative class – the gesture the model predicts when no recognisable sign is being made. Every other sign can be any word, name, or phrase you choose. The gesture itself is entirely up to you: pick any distinct, static hand shape for each token.

Adding New Signs Without Recollecting Everything

One of the most practical features of this pipeline is the ability to add new signs incrementally. Because the training data is stored as a plain CSV file, you can append rows for new signs without discarding the data you have already collected.

To add a new sign to an existing dataset:

  1. Add the new sign to the SIGNS list in collect.py. Place it at the end, after all existing signs. Do not reorder or remove any existing entries – the label index (position in the list) must stay the same.
  2. Set the starting index: At the bottom of the script, set sign_idx to the index of your new sign so collection jumps straight to it without re-running existing signs.
  3. Run collect.py: New rows will be appended to the existing data/landmarks.csv. All previous sign data is preserved.
  4. Update labels.txt: The script automatically rewrites data/labels.txt with the full updated list.
  5. Retrain: Run python train.py. It reads the updated CSV, detects all present classes, and trains a new model with the expanded vocabulary.

ℹ️ Why you must retrain even for one new sign: The output layer of the MLP is sized to the number of classes. Adding a new sign changes that count, so a new model must be exported. However, all the previously collected data remains valid and is automatically included – you only spend time collecting samples for the new sign.

Files Generated by collect.py

  • data/landmarks.csv – one row per captured frame, containing a label index followed by 126 normalised landmark coordinates.
  • data/labels.txt – the ordered list of sign names, one per line. The line number (zero-indexed) is the label ID used in the CSV.

train.py – The Brain Builder

Purpose

train.py reads the collected CSV, trains a Multi-Layer Perceptron (MLP) neural network using TensorFlow, and exports the result as a quantised TFLite model ready for mobile deployment.

How to Use

Install dependencies:

pip install tensorflow scikit-learn pandas matplotlib

Run:

python train.py

Training typically completes in 1–3 minutes. EarlyStopping monitors validation accuracy and halts training once the model stops improving, so you do not need to manually tune the number of epochs.

Model Architecture

The classifier is a four-layer MLP. The input is the 126-value normalised feature vector; the output is a softmax probability distribution over the number of sign classes:

Input:   126 features
         ↓
Dense 128  + BatchNorm + Dropout(0.3)
         ↓
Dense 64   + BatchNorm + Dropout(0.2)
         ↓
Dense 32
         ↓
Dense N    + Softmax         (N = number of sign classes)

BatchNorm stabilises training between layers. Dropout prevents the network from over-relying on any single feature, which matters because many signs share similar finger configurations. The final Softmax layer outputs a confidence percentage for each class.

Files Generated by train.py

  • exported_model/gesture_classifier.tflite – the trained model, quantised to INT8 (~45 KB). This is the file loaded by Flutter.
  • exported_model/gesture_labels.txt – the label list corresponding to the model’s output indices. Must be copied to Flutter alongside the .tflite file.
  • exported_model/training_curves.png – accuracy and loss curves across epochs for both training and validation sets.
  • exported_model/confusion_matrix.png – a grid showing true vs. predicted labels across the test set. Signs on the diagonal are correctly classified; off-diagonal entries reveal confusions between visually similar signs.

test_model.py – The Real-World Check

Purpose

test_model.py lets you verify the trained model against your own live webcam before deploying to a phone. It is the fastest way to catch issues with specific signs before going through the Flutter build cycle.

How to Use

Install dependencies:

pip install tflite-runtime opencv-python

Run:

python test_model.py

The script opens your webcam, runs hand landmark detection, and performs inference on every frame. The display shows:

  • The predicted sign label in large text at the bottom of the frame, greyed out when confidence is below the 75% threshold.
  • A confidence percentage next to the label.
  • A ranked bar chart of the top 3 predictions on the right side – useful for diagnosing which signs are being confused with each other.
  • A live FPS counter and hand count in the top bar.

Target: Aim for consistent confident predictions (≥85%) on all signs before moving the model to Flutter. If two signs are frequently confused, check the confusion matrix from train.py and collect additional samples for those specific classes.

4. Importing the Trained Model into Flutter

Once test_model.py confirms the model performs well, it can be integrated into the Flutter app in five steps.

Step 1: Copy Model Files into the Project

copy exported_modelgesture_classifier.tflite  signspeakassetsmodels
copy exported_modelgesture_labels.txt         signspeakassetsmodels

Step 2: Register Assets in pubspec.yaml

Both files must be declared in pubspec.yaml so the Flutter build system bundles them into the app:

flutter:
  uses-material-design: true
  assets:
    - assets/models/

Step 3: Add the tflite_flutter Dependency

dependencies:
  tflite_flutter: ^0.12.1

Then run flutter pub get.

Step 4: Load and Run the Model

The TfliteGestureClassifier service handles loading, feature extraction, and inference:

// Initialise once at app startup
_interpreter = await Interpreter.fromAsset(
  'assets/models/gesture_classifier.tflite',
  options: InterpreterOptions()..threads = 2,
);

final labelData = await rootBundle.loadString(
  'assets/models/gesture_labels.txt',
);
_labels = labelData.trim().split('n');

At inference time, the raw MediaPipe landmarks are normalised and passed to the interpreter:

// Build the 126-feature input vector
final input  = [extractFeatures(allHands).toList()];  // [[f0..f125]]
final output = List.generate(1, (_) => List.filled(_labels.length, 0.0));

_interpreter.run(input, output);

// Map index to label
final maxIdx = output[0].indexWhere((p) => p == output[0].reduce(max));
final label  = _labels[maxIdx];
final conf   = output[0][maxIdx];

Step 5: Normalise Identically to collect.py

The feature extraction in Dart must be byte-for-byte equivalent to the Python normalisation. The critical rule is to use the square root (Euclidean norm), not the squared distance:

// Dart - must match collect.py exactly
final dx   = lm[9].x - wristX;
final dy   = lm[9].y - wristY;
final dz   = lm[9].z - wristZ;
final span = sqrt(dx * dx + dy * dy + dz * dz) + 1e-6;  // dart:math sqrt

for (int i = 0; i < 21; i++) {
  out[offset + i*3 + 0] = (lm[i].x - wristX) / span;
  out[offset + i*3 + 1] = (lm[i].y - wristY) / span;
  out[offset + i*3 + 2] = (lm[i].z - wristZ) / span;
}

✅ The app automatically detects the model. If gesture_classifier.tflite is present in assets/models/, TfliteGestureClassifier loads it on startup and the app switches from the built-in rule-based classifier to the trained model. The debug console prints TFLite classifier loaded: N classes to confirm. If the file is absent, the app falls back to geometry rules silently.

SignSpeak – Build with AI 2026
MediaPipe · Gemini Nano · TensorFlow Lite · Flutter

Rust and Zig Solve the Same Problems Very Differently

git-lrc

Hello, I’m Shrijith Venkatramana. I’m building git-lrc, an AI code reviewer that runs on every commit. Star Us to help devs discover the project. Do give it a try and share your feedback for improving the product.

Here are six small examples that reveal two completely different language philosophies.

With the recent Bun port to Rust (from Zig) with LLM assistance is setting the interwebs ablaze, I felt going a bit deeper into how Rust and Zig differ in their approaches to solving concrete problems.

Most discussions about Rust and Zig become philosophical quickly.

But the philosophy itself is just the starting point.

A deeper understanding can come from how each philosophy shapes day to day engineering tasks such as:

  • allocating memory
  • handling errors
  • sharing state
  • building binaries
  • interfacing with C
  • structuring dependencies

I’ll walk you through a a few examples, after which, the two languages may start feeling fundamentally different.

If one were to summarize, Rust keeps asking:

“How can the compiler make this difficult to misuse?”

Zig keeps asking:

“How can the programmer see exactly what is happening?”

Let’s go through a few examples.

Example 1: Creating a Dynamic Array

Let’s start with something boring.

A growable list of integers.

Rust

fn main() {
    let mut numbers = Vec::new();

    numbers.push(1);
    numbers.push(2);
    numbers.push(3);
}

Very little ceremony.

You do not think about allocation yet.

You do not think about cleanup.

You do not think about allocator strategy.

Rust intentionally compresses those concerns away unless you need them.

Zig

const std = @import("std");

pub fn main() !void {
    var gpa = std.heap.GeneralPurposeAllocator(.{}){};
    defer _ = gpa.deinit();

    const allocator = gpa.allocator();

    var numbers = std.ArrayList(i32).init(allocator);
    defer numbers.deinit();

    try numbers.append(1);
    try numbers.append(2);
    try numbers.append(3);
}

The first reaction many engineers have:

“Why so explicit?”

But after a while, the important thing becomes obvious:

  • allocator choice is visible
  • allocation lifetime is visible
  • cleanup is visible
  • failure is visible

The language forces resource awareness into the code itself.

That changes how systems evolve.

In Rust, memory management becomes something the compiler heavily assists with.

In Zig, memory management remains part of the engineering model.

That difference shows up everywhere later.

Example 2: Invalid References

This example makes Rust’s philosophy impossible to miss.

Rust

fn main() {
    let mut values = vec![1, 2, 3];

    let first = &values[0];

    values.push(4);

    println!("{}", first);
}

Rust rejects this.

Because push() may reallocate the vector internally, invalidating the reference.

The interesting part is not the compiler error.

The interesting part is what Rust optimizes for.

This category of bug is historically painful:

  • crashes under load
  • intermittent corruption
  • impossible‑to‑reproduce failures
  • security vulnerabilities

Rust treats these as unacceptable failure classes.

So the compiler intervenes aggressively.

Zig

Zig allows the same pattern.

const std = @import("std");

pub fn main() !void {
    var gpa = std.heap.GeneralPurposeAllocator(.{}){};
    defer _ = gpa.deinit();
    const allocator = gpa.allocator();

    var values = std.ArrayList(i32).init(allocator);
    defer values.deinit();

    try values.append(1);
    try values.append(2);
    try values.append(3);

    const first = &values.items[0]; // reference to first element

    try values.append(4); // may reallocate, invalidating 'first'

    std.debug.print("{}n", .{first.*});
}

This code compiles and runs – but the reference first may become dangling after the second append. The program can crash or read garbage.

Zig’s philosophy differs.

Zig assumes:

The programmer should understand when memory relocation is possible.

That sounds dangerous.

And sometimes it is.

But there is another side.

Rust scales correctness mechanically.

Zig scales understanding culturally.

That is a very different engineering assumption.

Example 3: Error Handling

The two languages start feeling stylistically similar while still revealing very different priorities.

Rust

use std::fs;

fn read_file() -> Result<String, std::io::Error> {
    let content = fs::read_to_string("config.json")?;
    Ok(content)
}

The ? operator keeps propagation concise.

Errors stay explicit.

Control flow remains visible.

This is one of Rust’s best design choices.

Zig

const std = @import("std");

fn readFile(allocator: std.mem.Allocator) ![]u8 {
    const file = try std.fs.cwd().openFile("config.json", .{});
    defer file.close();

    return try file.readToEndAlloc(allocator, 1024 * 1024);
}

The important difference is subtle.

Zig keeps allocation visible even during convenience APIs.

That becomes surprisingly important in large systems.

Many production issues are really resource issues in disguise:

  • allocation spikes
  • hidden copies
  • unexpected buffering
  • allocator fragmentation
  • ownership confusion

Zig keeps reminding you those things exist.

Rust tries harder to abstract them safely.

Example 4: Shared State Across Threads

This is where Rust becomes genuinely impressive.

Rust

use std::sync::{Arc, Mutex};
use std::thread;

fn main() {
    let counter = Arc::new(Mutex::new(0));

    let mut handles = vec![];

    for _ in 0..10 {
        let counter = Arc::clone(&counter);
        handles.push(thread::spawn(move || {
            let mut num = counter.lock().unwrap();
            *num += 1;
        }));
    }

    for handle in handles {
        handle.join().unwrap();
    }
}

There is ceremony here.

But Rust does something powerful:

  • ownership is tracked
  • mutation is controlled
  • thread safety is enforced
  • races become much harder accidentally

Rust’s concurrency story is restrictive because unrestricted concurrency has historically been catastrophic.

The language deeply distrusts shared mutable state.

For good reason.

Zig

Zig provides the same primitives with less ceremony.

const std = @import("std");

var counter: i32 = 0;
var mutex = std.Thread.Mutex{};

fn worker() void {
    mutex.lock();
    defer mutex.unlock();
    counter += 1;
}

pub fn main() !void {
    var threads: [10]std.Thread = undefined;
    for (&threads) |*t| {
        t.* = try std.Thread.spawn(.{}, worker, .{});
    }
    for (threads) |t| {
        t.join();
    }
    std.debug.print("counter: {}n", .{counter});
}

Zig’s approach feels much closer to C.

The primitives are straightforward.

The language trusts you more.

That simplicity appeals – especially when debugging.

But correctness depends more directly on engineer discipline.

Rust tries to make dangerous concurrency difficult.

Zig tries to make concurrency understandable.

Example 5: Interfacing With C

This is one of Zig’s most interesting strengths.

Zig

const c = @cImport({
    @cInclude("sqlite3.h");
});

That is basically it.

Zig’s C interoperability story feels unusually direct because the language positions itself close to C semantics.

Many systems engineers notice this immediately.

Teams with large existing C codebases find incremental migration realistic.

Rust

Rust has strong FFI support.

But it usually looks more like:

use std::ffi::{c_int, c_void};

extern "C" {
    fn sqlite3_open(filename: *const i8, ppDb: *mut *mut c_void) -> c_int;
}

Or it involves:

  • bindgen
  • unsafe blocks
  • wrapper layers
  • ownership translation

Rust tries to preserve safety guarantees across language boundaries.

Zig optimises for minimal friction.

Again:

  • Rust prioritises correctness constraints
  • Zig prioritises mechanical transparency

The same pattern keeps reappearing.

Example 6: Building a Static Binary

This example seems operationally boring until you have maintained deployment pipelines long enough.

Zig

zig build -Dtarget=x86_64-linux-musl

Done.

The first time many infra engineers try this, the reaction is:

“Wait, seriously?”

Zig’s toolchain story feels aggressively practical.

Almost as if someone tired of fighting build environments designed it.

Rust

Rust’s tooling is excellent.

Cargo is excellent.

But static cross‑compilation in Rust often introduces real‑world friction:

  • linker configuration
  • musl edge cases
  • OpenSSL issues
  • Dockerised builders
  • target setup
  • CI complexity

None of this is impossible.

But operationally, Zig often feels mechanically lighter.

That matters more than people think – especially for small infrastructure teams.

One Thing That Becomes Obvious After These Examples

Rust and Zig do not compete on syntax.

They compete on where engineering responsibility should live.

Rust says:

“The compiler should aggressively constrain dangerous behaviour.”

Zig says:

“The programmer should see the dangerous behaviour directly.”

That difference affects:

  • APIs
  • tooling
  • concurrency
  • debugging
  • deployment
  • dependency culture
  • architecture style

Even the ecosystems reflect it.

Rust’s ecosystem is rich, abstracted, and ambitious.

Zig’s ecosystem is smaller, simpler, and operationally direct.

The Interesting Part Is How These Philosophies Fail

Rust failure mode:

“The system became architecturally complicated because the compiler demanded precision.”

Zig failure mode:

“The system stayed understandable, but correctness depended heavily on engineer discipline.”

Both are real costs.

Both become more visible as systems and teams grow.

What I Would Personally Optimise For

If multiple teams will maintain critical infrastructure for years:

I would strongly lean Rust.

The compile‑time guarantees compound in value organisationally.

If a small systems team deeply values operational simplicity and explicit control:

Zig becomes extremely attractive.

Especially for:

  • tooling
  • infrastructure utilities
  • embedded systems
  • lightweight services
  • C migration layers

The deeper insight is this:

Rust optimises for preventing mistakes. Zig optimises for exposing reality.

Depending on the system, either property can be more valuable.

Practical Checklist

Before choosing either language, ask:

  • Will many engineers touch this code?
  • Is deployment simplicity a major concern?
  • Is memory corruption a serious business risk?
  • Is debugging or correctness the bigger pain today?
  • Does the team already understand systems programming deeply?
  • Will this system survive for many years?
  • Is operational complexity already growing too quickly?
  • Are hidden abstractions becoming a problem?

Most teams answer these emotionally.

The operational consequences arrive later.

Final Takeaway

After enough examples, the philosophical split becomes very hard to unsee.

Rust keeps moving complexity toward the compiler.

Zig keeps moving complexity toward the engineer.

Both choices carry costs.

The real question is:

“Which failure mode does this system tolerate better?”

Over to you…

If you have built serious systems in either language:

Which part became the actual long‑term cost?

What became painful once the codebase, deployment surface, and team started growing?

git-lrc

*AI agents write code fast. They also silently remove logic, change behavior, and introduce bugs — without telling you. You often find out in production.

git-lrc fixes this. It hooks into git commit and reviews every diff before it lands. 60-second setup. Completely free.*

Any feedback or contributors are welcome! It’s online, source-available, and ready for anyone to use.

GitHub logo

HexmosTech
/
git-lrc

Free, Micro AI Code Reviews That Run on Commit

AI agents write code fast. They also silently remove logic, change behavior, and introduce bugs — without telling you. You often find out in production.

git-lrc fixes this. It hooks into git commit and reviews every diff before it lands. 60-second setup. Completely free.

See It In Action

See git-lrc catch serious security issues such as leaked credentials, expensive cloud
operations, and sensitive material in log statements

git-lrc-intro-60s.mp4

Why

  • 🤖 AI agents silently break things. Code removed. Logic changed. Edge cases gone. You won’t notice until production.
  • 🔍 Catch it before it ships. AI-powered inline comments show you exactly what changed and what looks wrong.
  • 🔁 Build a…

SafeMind AI: An Autonomous Emotional Sanctuary (Powered by Gemma 4)

This is a submission for the Gemma 4 Challenge: Build with Gemma 4

What I Built

Mental health crises don’t wait for business hours. When someone is experiencing a panic attack at 2 AM, a generic chatbot isn’t enough. They need immediate, empathetic, and highly intelligent intervention.

SafeMind AI is a comprehensive emotional sanctuary that bridges the gap between private journaling and active therapy. It acts not just as a conversational chatbot, but as an autonomous therapeutic agent. It proactively identifies emotional distress, maintains persistent long-term semantic memory, and dynamically routes users to standardized clinical tools like Cognitive Behavioral Therapy (CBT) records, PHQ-9 assessments, and grounding exercises.

Key Engineering Features:

  • Real-Time Architecture: A hardware-accelerated frontend that talks to a Python/Flask backend, featuring instant DOM updates for mood tracking without page reloads.
  • Emergency Kill-Switch: Engineered using JavaScript AbortControllers to instantly sever the LLM network request if a user panics and wants to cancel a thought mid-generation.
  • Voice Accessibility: Native Web Speech APIs for real-time dictation, allowing users to review their spoken text before sending it to the model.

Demo

Try the live application here: SafeMind AI Live App
(Note: It may take 30-50 seconds for the Render server to spin up on the first click!)

Here is a complete video walkthrough of SafeMind AI in action:

Code

You can view the full source code and system architecture here:
[https://github.com/shahulhameed-csecore/SafeMind-AI]

How I Used Gemma 4

For this project, I specifically chose the Gemma 4 26B MoE (Mixture-of-Experts) model via API.

While the smaller E2B/E4B models are incredible for edge deployment, SafeMind AI required the deep emotional reasoning capabilities of a larger parameter model to accurately handle crisis intervention and clinical tool routing. However, a dense 31B model could introduce latency, which ruins the conversational therapy experience.

The 26B MoE architecture offered the perfect equilibrium:

  1. Agentic Routing: I utilized Gemma 4’s advanced instruction-following capabilities to act as a therapeutic agent. If a user expresses overwhelming panic, Gemma 4 autonomously embeds a tool-call in its response, prompting the UI to launch a cinematic “Release (Burn) Exercise” or CBT record directly in the chat.
  2. Persistent RAG Memory: To simulate genuine human empathy, SafeMind uses Gemma 4 in tandem with a Pinecone vector database. Past chat logs are vectorized so Gemma 4 can recall if a user was stressed about an exam last week and follow up on it today.
  3. High-Speed Empathy: By utilizing the MoE architecture combined with asynchronous Server-Sent Events (SSE), tokens stream instantly to the UI, providing lightning-fast Time-to-First-Token (TTFT) for a seamless voice-therapy experience.

We built an AI mock interview workspace for early job seekers

Interviews are stressful for a very practical reason: most people do not know what kind of follow-up questions they will face until they are already in the room.

Over the past few weeks, another developer and I have been building Offer Ready, an AI-powered workspace for resume review and mock interview practice.

The idea is simple: instead of giving users generic interview questions, we try to generate questions from their actual resume, target role, experience level, and interview round.

What it does today

Offer Ready currently supports:

  • resume diagnosis based on role fit and project depth
  • AI mock interviews with role-aware follow-up questions
  • answer hints and improvement suggestions during the session
  • interview records and review notes across sessions
  • invite-based alpha access while we keep improving the product

The current focus is not to replace human interviewers or coaches. It is more like a practice environment where candidates can discover weak spots before the real interview.

Tech stack

We are building it with:

  • React / Vite on the frontend
  • Supabase for auth and alpha invite access
  • OpenAI for resume analysis, question generation, and feedback
  • Vercel for deployment

One interesting product challenge has been balancing structure and flexibility. For example, target roles need presets for common paths like Engineering, Data, Product, and AI / ML, but users also need to type custom roles when the presets do not fit.

What we are looking for

We are still in alpha, so we are mostly looking for early feedback from people who are preparing for interviews, switching roles, or building tools in the career / AI space.

If you want to try it, the app is here:

https://offer-ready.vercel.app

We are sharing alpha invite codes and product updates in Discord:

https://discord.gg/v7aXbAx2yN

Would love to hear what you think, especially around the mock interview flow and whether the feedback feels useful in a real preparation workflow.

Improving Plugin Developer Workflows in WordPress Projects

Over the years, one thing I have noticed while building WordPress plugins is that development speed is rarely limited by coding itself.

Most of the time gets consumed by repetitive workflows.

Refreshing local environments.

Testing plugin activation repeatedly.

Switching between admin panels and code editors.

Manually clearing caches.

Rebuilding assets for small UI changes.

Debugging conflicts between plugins.

Setting up the same boilerplate structure again and again.

As projects grow, these small interruptions slowly reduce development quality and focus.

This article is about some practical workflow improvements that helped me build plugins more consistently and maintain them with less friction over time.

The Real Problem Is Context Switching

In many WordPress projects, developers constantly move between:

  • wp-admin
  • terminal
  • browser devtools
  • API testing tools
  • database tools
  • frontend build systems

That context switching becomes exhausting in larger projects.

I started realizing that improving developer workflow was not just about speed. It was about reducing mental overhead.

Good workflows make developers think more about systems and less about repetitive setup tasks.

Standardizing Plugin Structure Early

One mistake I made in older plugins was treating every project differently.

Different folder structures.

Different naming patterns.

Different initialization methods.

This becomes difficult to maintain after a few projects.

Now I try to keep a consistent structure across plugins:

plugin/
├── admin/
├── frontend/
├── includes/
├── assets/
├── templates/
├── languages/
├── build/
└── plugin.php

Even small consistency improvements help when returning to projects months later.

It also makes onboarding easier if another developer joins the project.

Separating Logic From Hooks

Earlier, I used to place too much logic directly inside WordPress hooks.

Example:

add_action('init', function () {
    // large logic block
});

This works initially but becomes difficult to debug and test later.

Now I prefer keeping hooks lightweight and moving actual logic into dedicated classes or services.

Example:

add_action('init', [Plugin_Bootstrap::class, 'init']);

Then the internal system handles responsibilities separately.

This small shift improves readability and long term maintainability significantly.

Using Local Development Environments Properly

For a long time I underestimated local environments.

I used shared staging environments for plugin development which created multiple problems:

  • inconsistent debugging
  • plugin conflicts
  • slow iteration
  • unstable testing

Moving to proper local WordPress setups improved development speed immediately.

Especially for:

  • database resets
  • plugin testing
  • API debugging
  • Gutenberg experiments
  • frontend asset rebuilding

Now I treat local setup as part of the engineering workflow itself.

Automating Repetitive Tasks

One of the biggest workflow improvements came from automating small repetitive tasks.

Examples:

  • automatic asset builds
  • plugin packaging
  • linting
  • formatting
  • environment setup
  • deployment preparation

Even basic npm scripts help a lot.

Example:

{
  "scripts": {
    "dev": "vite",
    "build": "vite build",
    "lint": "eslint ."
  }
}

The goal is not complexity.

The goal is reducing manual repetition.

Better Debugging Improves Development Speed

A surprising amount of plugin development time goes into debugging.

Especially:

  • hooks firing unexpectedly
  • AJAX failures
  • REST API permission issues
  • plugin conflicts
  • caching problems

I started improving debugging by:

  • using clearer logging
  • isolating plugin features
  • reducing hidden dependencies
  • organizing hooks properly
  • documenting critical flows

The cleaner the internal system becomes, the easier debugging gets later.

Documentation Is Part of the Workflow

I used to think documentation was something written after development.

Now I see it differently.

Good documentation improves development itself.

Especially in async environments.

Even simple things help:

  • folder explanations
  • API notes
  • setup instructions
  • hook references
  • architecture decisions

When returning to a project after months, documentation saves enormous time.

This becomes even more important in distributed teams.

Frontend Tooling Changed Plugin Development

Modern frontend tooling has improved WordPress plugin workflows significantly.

Using:

  • React
  • Vite
  • TypeScript
  • modular components

makes plugin admin interfaces much easier to scale.

At the same time, WordPress still teaches important lessons about backward compatibility, extensibility, and long term maintenance.

I think combining modern frontend workflows with WordPress architecture creates very strong engineering foundations.

Open Source Changed How I Think About Systems

Publishing code publicly changes development habits.

You naturally start:

  • organizing code better
  • documenting decisions
  • reducing shortcuts
  • improving readability
  • thinking about maintainability

Even small open source projects encourage better engineering discipline.

That mindset has influenced how I approach plugin systems today.

Final Thoughts

Improving developer workflows is not about chasing productivity trends.

It is about building systems that reduce friction over time.

The longer a project lives, the more important maintainability becomes.

Small workflow improvements compound:

  • cleaner structure
  • better tooling
  • reusable patterns
  • documentation
  • automation
  • reduced repetition

WordPress development taught me that sustainable systems matter more than fast temporary solutions.

And in long term engineering work, reducing friction is often more valuable than adding complexity.

Another simple TCP chat in C#? Why not

Does this low-latency TCP runtime:

  • let me build something in one evening instead of two days?
  • assume writing the code will take the whole day, but we finish the topic in 2 hours?
  • solve website refactoring problems without trying multiple approaches?

None of these things 🙂

Because obviously it’s not an AI agent.
I had to start like this because posts without mentioning AI are kind of niche these days 😉

So what will be in the post?

Well – I created a library for client-server communication with, let’s say, a bit of a mixed style. Something like actor-style, message-driven with RPC over TCP transport.

It was created mainly out of the need for simplicity and as little code as possible, but with an API as high-level as possible.

When using simple socket wrappers before, you usually have one receiving endpoint at your disposal, which is generally nice, but what next?

Once the message is ready, we have it in the form of bytes and now you can deal with it yourself…

Some libraries don’t even frame the message, so assembling the data from the stream is additionally passed on to us.

Having worked with many client-server projects, I had a rough framework of what I expected.

Over time, the concept changed, even very often, but ultimately the library gives me what I expect (of course, for today 😄).

Moving on to the main topic – our simple chat

I set myself a challenge – console chat with as little code as possible.

I didn’t fully achieve that 😄 but I’m still satisfied because this minimalist code offers quite good performance on the server side using simple techniques.

Project assumptions

  • global chat
  • each user automatically connects to the server and joins the chat

Without further ado, let’s get to the best part: the code.

Server side

[EAttr(ChannelId = ChatSync)]
public static class MainChat
{
    [EAttrChannel(ChannelType = EChannelType.Share, ChannelTasks = 1)]
    public const ushort ChatSync = 1;

    [EAttrPool(MaxPoolObjs = 1000)]
    public const ushort MsgPool = 1;

    static List<byte> _message = [0, 0, 0, 0];
    static readonly EArrayBufferWriter _bufferMsg = new(5000);
    static readonly List<MyUserServer> _users = [];

    static long RegisterUser(MyUserServer user)
    {
        if (!_users.Contains(user))
        {
            _users.Add(user);
            return user.UserId;
        }
        return 0;
    }

    [EAttr(PoolId = MsgPool, MaxParamSize = 4096)]
    static void PushMsg(MyUserServer user, List<byte> msg)
    {
        _message.RemoveRange(4, _message.Count - 4);
        BinaryPrimitives.WriteInt32LittleEndian(CollectionsMarshal.AsSpan(_message), user.UserId);
        _message.AddRange(msg);

        if (user.ESerial.Serialize(_bufferMsg, _message) < 1)
            return;

        var payload = _bufferMsg.WrittenSpan;
        for (int i = 0; i < _users.Count; i++)
        {
            var u = _users[i];
            if (!u.SendSerialized("PushMsg", payload) && u.Status == ESocketServerStatus.Dead)
            {
                _users.RemoveAt(i);
                i--;
            }
        }
    }
}

As you noticed, we work on a static class (we don’t need to create an instance if we only have one global room).

We also have two receiving methods.

When does a method become a receiver?

It is when it has the first argument inheriting from the EUserServer class.

This is a kind of contract – a method with: EUserServer and one optional parameter (message) becomes an endpoint.

In our example, the first parameter is the MyUserServer class, which looks like this:

public class MyUserServer : EUserServer
{
    static int _idValue;
    public int UserId { get; private set; }

    public MyUserServer(ESocketResourceServer ers) : base(ers) { }

    protected override void OnConnected()
    {
        UserId = Interlocked.Increment(ref _idValue);
    }
}

Technically, we don’t even really need the MyUserServer class here, but it helps assign a simple id to users after they connect.

Back to our main code.

The first thing that catches the eye is that these objects in MainChat:

static List<byte> _message = [0, 0, 0, 0];
static readonly EArrayBufferWriter _bufferMsg = new(5000);
static readonly List<MyUserServer> _users = [];

are not thread-safe … and in a sense this is true.

However, we use the attribute: ChatSync, which synchronizes all sockets to one thread thanks to the EChannelType.Share option and one task executing ChannelTasks = 1.

To illustrate: if we had EChannelType.Private set, each socket would call our access points on its own thread, breaking thread safety 😅

Fortunately, we can work with objects synchronously, allowing us to implement optimization techniques.

And there are several of them:

  • to reduce the pressure on GC, we use a reusable List<byte> msg object, which becomes reusable by setting PoolId = MsgPool in the attribute
  • we serialize once on one buffer and send the same bytes to everyone
  • the library uses SendSerialized, i.e. mixed sync/async sending, so that slow clients do not block the loop and thus do not create backpressure
  • disconnected clients are removed inline in a loop

In fact, that’s all on the server side – the main logic fits in 45 lines.

And here, if anyone is still curious how we initialize the server:

var serv = new ETCPServer<MyUserServer>(new ERSA(PrivatePemKey, PrivatePemKeyToSign));
serv.Start(EAddress.Get());

… yes, encryption is required.
I found no reason not to require it.

Client side

The client part is much simpler.

We don’t need to worry too much about performance because, as a rule, each client has its own logical machine.

var client = new EUserClient(new ERSA(PublicPemKey, PublicPemKeyToSign));
if (await client.Connect(EAddress.Get()) == 0)
{
    long id = await client.SendWithResponse("RegisterUser");
    if (id > 0)
    {
        Console.WriteLine($"You have joined the chat room as User({id})");
        while (true)
        {
            var message = Console.ReadLine();

            var bytesMsg = Encoding.UTF8.GetBytes(message ?? "").ToList();
            if (bytesMsg.Count > 4000 || bytesMsg.Count < 1)
            {
                Console.WriteLine("Message length is out of range");
                continue;
            }

            if (!await client.Send("PushMsg", bytesMsg))
            {
                Console.WriteLine("Failed to send message");
                continue;
            }
        }
    }
    else
    {
        Console.WriteLine("Failed to join the room");
        Environment.Exit(0);
    }
}
else
{
    Console.WriteLine("Failed to connect to the server");
    Environment.Exit(0);
}

In the usual way, we connect to the server, join the global room and can immediately write.

To make sure we joined successfully, we use SendWithResponse to guarantee a response.

Below is a simple class that receives messages from the server:

public static class MainChat
{
    [EAttr(PoolId = 1, MaxParamSize = 4096)]
    static void PushMsg(EUserClient user, List<byte> msg)
    {
        if (msg.Count <= 4)
            return;

        var spanMsg = CollectionsMarshal.AsSpan(msg);

        int userId = BinaryPrimitives.ReadInt32LittleEndian(spanMsg[..4]);
        string message = Encoding.UTF8.GetString(spanMsg[4..]);
        Console.WriteLine($"User({userId}): {message}");
    }
}

That’s all, really.

We could have tried to reduce another dozen lines, but I don’t think it’s worth it. We would have to make too many compromises.

Even now, while typing in the console, we can get a message from the server appended to ours 😄

But you can add a solution to this problem yourself.

Repo

Link to my repo with complete example:

Github: EnjoySockets

There is also a small benchmark comparing 3 libraries to show roughly where EnjoySockets ranks in terms of performance.

There are plans for an even more extensive example, showing almost all aspects of the library, but that’s for another post.

P.S. This library isn’t AI, but it should speed up your work 😉

Thanks for reading and just enjoy it 😄

How to Estimate LLM API Cost Before Shipping Your AI App

Most AI app prototypes look cheap.

Then production happens.

A developer tests an LLM feature with 20 prompts, gets a few good responses, and assumes the cost is manageable. But production cost is not based on one prompt. It is based on:

input tokens
output tokens
requests per user
users per day
retry rate
tool calls
prompt caching
conversation history
model choice

That is where many teams get surprised.

The mistake is simple: they estimate the cost of a single API call instead of estimating the cost of the full production workflow.

The basic LLM cost formula

At the simplest level, LLM cost is:

Input cost  = input tokens  × input price
Output cost = output tokens × output price

Total cost = input cost + output cost

But real applications are rarely that simple.

A chat application may include:

system prompt
user message
conversation history
retrieved context
tool schemas
intermediate reasoning steps
final response

So the real token budget looks more like:

Total input tokens =
  system prompt tokens
+ user prompt tokens
+ conversation history tokens
+ retrieved context tokens
+ tool schema tokens
+ intermediate step tokens

And output tokens may include:

assistant response
tool call arguments
intermediate responses
summaries
structured JSON outputs

That is why cost grows faster than expected.

Example: a simple AI assistant

Assume we are building an internal AI assistant.

Each request uses:

Input tokens per request: 3,000
Output tokens per request: 800
Requests per day: 10,000

Daily token volume:

Input tokens/day  = 3,000 × 10,000 = 30,000,000
Output tokens/day =   800 × 10,000 =  8,000,000

Monthly token volume:

Input tokens/month  = 900,000,000
Output tokens/month = 240,000,000

Now multiply that by your provider’s model pricing.

This is where architecture decisions start to matter.

A larger model may give better results, but if the workload is high-volume, the cost difference can become significant. A smaller model may be good enough for classification, routing, extraction, or summarization tasks.

The hidden cost: output tokens

Developers often focus on input tokens.

That is a mistake.

Output tokens are usually more expensive than input tokens for many LLM providers. Also, verbose responses increase latency and cost.

For example, this output style:

{
  "answer": "...",
  "reasoning": "...",
  "sources": [...],
  "confidence": "...",
  "follow_up_questions": [...]
}

may be useful, but it costs more than:

{
  "answer": "...",
  "sources": [...]
}

Structured output is great, but every field has a cost.

For production systems, response design is architecture.

RAG makes the cost calculation harder

In a Retrieval-Augmented Generation system, every request may include retrieved chunks.

Example:

System prompt: 800 tokens
User question: 100 tokens
Retrieved chunks: 5 chunks × 700 tokens = 3,500 tokens
Conversation history: 1,500 tokens
Output reserve: 800 tokens

Total request size:

text 800 + 100 + 3,500 + 1,500 = 5,900 input tokens

A RAG system is not just a vector database problem. It is also a token budgeting problem.

Agentic workflows multiply cost

Agentic AI makes cost estimation even more important.

A simple chat request may be one LLM call.

An agent task may involve:

1. Intent classification
2. Planning
3. Tool selection
4. Tool execution
5. Observation
6. Retry or correction
7. Final answer generation

That means one user request can become 5 to 10 LLM calls.

If each step uses different prompts, context, and outputs, the real cost is:

Cost per user task =
  planning cost
+ tool-selection cost
+ tool-call argument generation cost
+ observation summarization cost
+ retry cost
+ final answer cost

This is why “cost per API call” is the wrong metric for agents.

The better metric is: cost per completed task

Prompt caching can change the economics

If your provider supports prompt caching, repeated prompt sections can be cheaper.

Good candidates for caching:

system prompts
policy instructions
tool definitions
schema descriptions
static business rules
large reusable context blocks

But caching only helps when the repeated portion is stable.

Bad candidates for caching:

user-specific data
frequently changing retrieved chunks
dynamic conversation history
real-time tool outputs

So, when estimating cost, separate your input into:

cacheable tokens
non-cacheable tokens

This gives a more realistic estimate.

What architects should estimate before production

Before shipping an LLM feature, estimate at least these numbers:

Average input tokens per request
Average output tokens per request
Requests per active user per day
Expected daily active users
Retry rate
Cache hit percentage
Number of LLM calls per workflow
Peak traffic multiplier
Monthly token volume
Cost per user
Cost per business transaction

For enterprise systems, also estimate:

cost by use case
cost by department
cost by model
cost by workflow step
cost by failed request
cost with and without caching

This helps prevent surprises later.

A practical example

Suppose we have:

Daily active users: 2,000
Requests per user per day: 15
Input tokens per request: 4,000
Output tokens per request: 700
LLM calls per workflow: 2
Retry rate: 10%

Total daily workflows:

2,000 × 15 = 30,000 workflows/day

Including two LLM calls per workflow:

30,000 × 2 = 60,000 LLM calls/day

Including 10% retry rate:

60,000 × 1.10 = 66,000 effective calls/day

Daily input tokens:

66,000 × 4,000 = 264,000,000 input tokens/day

Daily output tokens:

66,000 × 700 = 46,200,000 output tokens/day

Monthly estimate:

Input tokens/month  = 7.92 billion
Output tokens/month = 1.386 billion

Now the architecture conversation changes.

This is no longer a “small AI feature.” This is a production inference workload.

Ways to reduce LLM cost

The most effective cost controls are usually architectural, not prompt hacks.

  1. Use smaller models for simple steps

Do not use a frontier model for every task.
Use smaller or cheaper models for:

classification
routing
metadata extraction
summarization
guardrail checks
format validation

Use larger models only where reasoning quality matters.

  1. Reduce unnecessary context

More context is not always better.

In RAG systems, sending 15 chunks when 5 are enough increases cost and can reduce answer quality.

Control:

chunk count
chunk size
conversation history
tool schema size
metadata verbosity
  1. Cache stable prompt sections

If the same system prompt, policy text, or tool definitions are reused across requests, caching can reduce cost.

Design prompts with reusable stable sections.

  1. Summarize long conversations

Instead of sending the full conversation every time, maintain a compact memory summary.

Example:

Full conversation history: 12,000 tokens
Compressed summary: 1,200 tokens

That difference matters at scale.

  1. Measure cost per workflow, not cost per call

A single user action may trigger multiple model calls.

Track:

cost per chat response
cost per document processed
cost per support ticket resolved
cost per SQL answer generated
cost per agent task completed

Business-level cost is more useful than API-level cost.

The real lesson

LLM cost estimation is not just finance work. It is architecture work.

Your cost depends on:

model choice
prompt design
context size
RAG strategy
agent loop design
tool schema size
retry handling
caching strategy
output format

That means developers and architects should estimate cost before shipping, not after the bill arrives.

I created a free calculator for this:

👉 LLM Inference Cost Calculator

It helps estimate:

daily cost
monthly cost
cost per user
cost per workflow
token volume
prompt caching impact
multi-model comparison

You can also explore the broader calculator hub here:
👉 SuperML AI Calculators

Final thought

The future of AI architecture will not be only about choosing the best model.

It will be about choosing the right model, for the right step, with the right context, at the right cost.

That is the difference between a demo and a production AI system.


LLM Inference Cost Calculator — Estimate Production LLM API Costs | SuperML — SuperML.dev

Estimate daily and monthly LLM inference costs across OpenAI, Anthropic, Google, Mistral, and Meta models. Includes prompt caching, cost-per-user, token burn-down, and multi-model comparison.

favicon
superml.dev

COSS Weekly: RadixArk launches with $100M in seed funding, Hermes Agent surpasses OpenClaw, SAP invests in n8n at a $5.2B valuation, and more

This week in COSS: n8n announces a strategic investment from SAP that doubles its valuation to $5.2 billion, RadixArk launches with $100 million in seed funding to build open infrastructure for frontier AI, and the open source community debates whether AI is a threat or an asset to code security following Cal.com’s decision to close its source.

We also feature the following companies in Cossmology: Bubble Lab, Discourse, Insomnia, JumpServer, Karakeep, Legal Data Hunter, ntfy.sh, Pirsch Analytics, Read the Docs, Sayr, Swetrix, Tailscale, Tolgee, Vitality, and Wraps.

COSS Headlines

AI has a sprawling data problem. Airbyte has just launched a tool to fix it.

Companies mentioned: Airbyte
Media Mention · The New Stack

Kilo Code Raises $8M Seed Round to Scale Open-Source AI Coding Agent

Companies mentioned: Kilo Code
Funding · VC Tavern

The Lost Pixel Team Is Joining Figma

Companies mentioned: Lost Pixel
Announcement · lost-pixel.com

How OpenAI scaled to 900 million weekly users with Ory

Companies mentioned: Ory
Media Mention · The New Stack

Our $100M Seed to Build Open Infrastructure for Frontier AI

Companies mentioned: RadixArk
Funding · RadixArk Blog

Announcing SAP’s strategic investment in n8n

Companies mentioned: n8n
Funding · n8n Blog

OpsMill Raises $14 Million in Series A to Fund Product Development & Growth

Companies mentioned: OpsMill
Funding · OpsMill

AI’s not going to kill open source code security

Companies mentioned: Cal.com
OSS News & Views · The Register

Cal.com just went closed source over AI, but AI is exactly why open source still wins

Companies mentioned: Cal.com
OSS News & Views · XDA Developers

Hermes Agent Just Took OpenClaw’s OpenRouter Top Spot

Companies mentioned: Nous Research, OpenRouter, OpenClaw
OSS News & Views · RoboRhythms

More COSS Headlines →

Featured COSS Companies

Sayr

Source-available project management tool

Discourse

Open-source community discussion platform

Tolgee

Open-source app localization platform

Read the Docs

Documentation hosting and build platform

Pirsch Analytics

Privacy-friendly, cookieless web analytics

Swetrix

Cookieless, open-source web analytics

Wraps

Open-source AWS email infrastructure

Bubble Lab

AI-native workflow automation platform

Tailscale

Zero-config VPN built on WireGuard

Legal Data Hunter

Open legal data index for 110+ countries

ntfy.sh

Open-source push notification service

Insomnia

Open-source API client & testing platform

Karakeep

AI-powered self-hostable bookmark manager

JumpServer

Open-source PAM platform for secure access

Vitality

AI-powered fitness & nutrition tracker

More COSS Companies →

Breaking the Stateless Curse: Hermes Agent and the Case for Persistent AI Agents

This is a submission for the Hermes Agent Challenge

The most expensive thing most AI agents forget is not your name. It’s the work they just did.

You let an agent spend thousands of tokens learning your environment, inspecting your repository, debugging issues, figuring out project conventions, and working through a useful engineering task—sometimes even discovering a workflow that reliably works. Then you close the session, come back the next day, and much of that context is gone. The repository is still there, but the agent has forgotten what it learned about it, how it solved the problem, and which workflow actually got the job done.

For short-lived tasks, that’s not a huge issue. If all you need is a summary, a SQL query, or a quick browser automation task, stateless execution works fine. But once agents start touching repeated engineering work, automation, or operational workflows, forcing them to rediscover the same solutions over and over becomes an expensive design flaw.

That’s what makes Hermes Agent from Nous Research interesting.

Hermes is not being pitched as just another coding copilot or a chatbot wrapper with tool access bolted on. The more ambitious idea is that successful execution should create reusable operational knowledge. If an agent solves a meaningful problem once, it should not have to relearn the same workflow from scratch the next time.

If that works reliably, it changes what open-source agents can become.

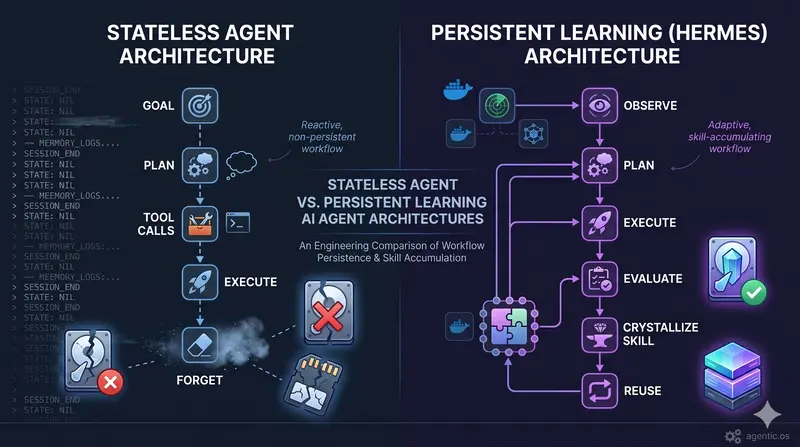
The Stateless Agent Problem

Most current agent frameworks effectively behave like this:

Goal → Plan → Tool Calls → Execute → Return Result → Forget

That lifecycle works surprisingly well—until the work becomes repetitive.

Imagine asking an agent to scan a repository, identify missing license headers, generate patches, run tests, and commit validated changes. A capable system might spend significant time inspecting the filesystem, inferring project conventions, handling failures, and refining its approach before it gets the task right.

Now run that exact same task a week later. Most agents will start from zero as though the previous execution never happened.

The same thing happens with recurring operational issues. If an agent spends twenty minutes discovering that a flaky CI failure came from one dependency mismatch and a bad environment variable, you would reasonably expect that discovery to be reusable. Instead, most systems replay the entire debugging process.

That’s the inefficiency. A human engineer would either remember the pattern or document the solution. Stateless agents generally do neither.

What Hermes Is Trying to Change

Hermes attempts to change that lifecycle by inserting a learning loop. Instead of behaving like a linear sequence, the intended model looks more like this:

Observe → Plan → Execute → Evaluate → Crystallize Skill → Reuse

The important difference is what happens after execution. Rather than treating task completion as the end of the interaction, Hermes evaluates whether the workflow it just used is worth keeping.

  • Did the task succeed?
  • Which actions actually mattered?
  • Was the solution a one-off workaround, or does it represent a reusable operational pattern?

If the answer is yes, Hermes can retain that workflow as a reusable Skill instead of forcing the model to rediscover the same process later. That’s a much more compelling idea than simply preserving chat history.

What a Skill Actually Looks Like

“Procedural memory” sounds abstract until you think about what is actually being stored. Hermes’ approach to procedural workflows is much closer to inspectable skill artifacts than opaque memory blobs, which is a much healthier model than treating memory as hidden vendor state.

Conceptually, a crystallized skill artifact looks something like this:

# repo-license-remediation
version: 1.2

tags:
  - python
  - repository
  - compliance

inputs:
  - repo_path
  - license_header

required_tools:
  - filesystem
  - regex_match
  - file_write
  - terminal
  - git

steps:
  1. Scan Python files
  2. Detect missing headers
  3. Generate patch
  4. Run tests
  5. Commit validated changes

This is fundamentally different from remembering prior prompts or conversation snippets. This is operational knowledge.

Remembering that I prefer concise responses is personalization. Remembering how to safely repair a repository issue is actual capability. That distinction matters.

Procedural Memory Is More Interesting Than Chat Memory

A lot of AI products advertise memory, but most of the time that means conversation continuity, user preferences, or retained prompt context. That is useful, but it does not necessarily make the system better at doing work.

The more meaningful distinction is between remembering facts and remembering procedures. Humans become effective engineers because they internalize repeatable workflows. You do not memorize every exact command forever, but you do remember how to approach a recurring integration issue or how to remediate a familiar failure pattern.

Hermes is aiming much closer to that model. Its architecture can be thought of in three distinct layers:

  • Working Memory: Short-lived execution state including the current task context, temporary variables, and recent tool outputs. This is standard agent behavior.
  • Episodic Memory: Longer-lived contextual recall mapping project metadata, user preferences, and prior historical decisions to improve continuity.
  • Procedural Memory: The interesting layer. It stores reusable workflows like debugging routines, deployment procedures, remediation pipelines, and integration playbooks.

If this layer works well, the system improves with repetition instead of simply remembering conversations.

The Scaling Problem

Persistent procedural memory sounds great until you hit the obvious question: What happens when the agent accumulates hundreds of workflows? Dumping all of them into the context window every time would be terrible for token efficiency, latency, and reasoning quality. A staged retrieval model makes much more sense:

  • Discovery Stub (~20 tokens): Start with the minimum—just the skill name and a short description to determine relevance.

    Example: Python repository license remediation workflow

  • Signature Layer (~200 tokens): If the workflow looks useful, retrieve expected inputs, required tools, and configuration assumptions to validate applicability.

  • Blueprint Layer (~1,000+ tokens): Only when the workflow is actually executed do you load the full steps, command sequences, and tool invocation logic.

This is dramatically more scalable than brute-force memory stuffing. One caveat: if you are evaluating Hermes critically, it is worth checking which parts of this are implemented exactly as described today versus which represent broader architectural direction. But conceptually, this is the right shape of solution.

Trying Hermes Yourself

Setup itself looks straightforward, but the more interesting question is not whether Hermes can run—it’s whether repeated tasks actually become smarter.

The baseline setup follows a quick terminal sequence:

curl -fsSL https://hermes-agent.nousresearch.com/install.sh | bash
hermes setup
hermes

Hermes also supports running beyond the terminal—across messaging interfaces and isolated execution backends—which makes the architecture feel operational rather than purely conversational.

A worthwhile test is giving it something that actually requires multi-step reasoning, like scanning a test repository, identifying missing headers, and generating a local patch. The real validation is whether the second execution feels noticeably cleaner, faster, and less wasteful.

Where Hermes Fits Compared to Other Frameworks

  • LangChain: Gives developers raw building blocks and enormous flexibility. That is great if you want full architectural control, but it also means assembling everything yourself. Hermes feels more opinionated out of the box.
  • AutoGen: AutoGen shines in multi-agent conversational workflows, but conversation-heavy systems can become noisy and expensive fast. Hermes feels less focused on agent dialogue and more focused on raw execution workflows.
  • OpenDevin: Clearly aligned with software engineering automation and workspace environments. Hermes feels slightly broader, aiming at general operational agent behavior.
  • OpenClaw: Adjacent rather than directly competitive. OpenClaw is strong around orchestration and communication routing, while Hermes is more interesting around procedural learning and self-improving execution.

Infrastructure Design Matters

A powerful agent without execution isolation is a liability. Giving unrestricted shell access to an LLM is not a serious production strategy.

Hermes supports multiple execution backends, including restricted local execution, Docker containers, SSH environments, Singularity, and remote sandbox environments like Modal. This matters because practical automation requires isolation.

A realistic workflow might involve a Slack alert triggering an isolated environment, Hermes validating deployment state, detecting a known failure pattern, applying a learned remediation workflow, and reporting back. That starts looking much less like a toy demo and much more like something operations teams could actually use.

Where This Can Go Wrong

The risks here are real:

  • Skill Drift: A workflow that worked six weeks ago may be wrong today because dependencies changed, APIs evolved, or CLI flags broke. Without revalidation, procedural memory becomes stale automation debt.
  • Faulty Generalization: An agent might incorrectly promote a brittle edge-case fix into a reusable standard workflow. That becomes dangerous quickly because repeated incorrect automation is often worse than forcing fresh reasoning every time.
  • Security Risk: Persistent procedural memory can preserve unsafe commands, environment assumptions, or patterns that risk credential leakage. Any self-improving execution system needs strict governance.

Practical Safeguards

If anyone plans to use something like this in production, the minimum checklist probably includes:

  • Human approval before newly created skills are allowed into active reuse.
  • Verification across multiple successful runs before allowing autonomous reuse.
  • Automated smoke testing, version control, and strict least-privilege execution boundaries.

Without those controls, procedural memory becomes accumulated operational risk instead of useful automation.

Why This Matters for Open Source

The bigger issue here is ownership.

A lot of proprietary AI systems assume persistent memory belongs inside vendor infrastructure. That creates lock-in, opaque automation logic, poor auditability, and painful migration stories.

If an open agent can retain reusable operational knowledge in inspectable, version-controlled artifacts, teams can audit agent behavior, share playbooks, migrate freely, and actually own the workflows the system learns. If your agent discovers something useful, that knowledge should live in infrastructure you control—not disappear into a hosted memory layer.

That may be the more important shift.

Discussion

  1. Would you trust a self-improving agent for non-critical automation today? Why or why not?
  2. What specific safeguards would you require before letting one touch production infrastructure?

I Built 7 Free Minecraft Plugins in a Weekend

The setup

I run a Minecraft economy survival server. A small one. The kind where most plugins on the marketplace are either over-engineered for a 60-player community or have a config that takes longer to write than just rebuilding the feature from scratch.

So I rebuilt seven of them from scratch. Each one targets exactly the thing I needed and skips the rest. They’re MIT-licensed and they’re all on github.com/astroworld-mc. They run on Paper 1.20+, Spigot, and Purpur.

This post is the story of building them. What each one does, why I bothered when there’s already something on SpigotMC for it, and the lessons that repeated across all seven.

The seven

AstroSimpleAFK. Detects idle players and tags them with [AFK] in the tab list. Most AFK plugins I tried also did “AFK kick after 20 minutes” with a permission tree five levels deep and a database. I just needed tab-list status and a /afk toggle.

AstroCustomMOTD. Custom MOTD with a random rotation of taglines and a one-line maintenance mode that flips the MOTD plus rejects non-staff joins. Existing MOTD plugins layer this with %placeholders% and a NodeJS-style config DSL. Mine is 6 lines of YAML.

AstroJoinLeave. Per-group join and leave messages with optional welcome titles for first-time joins. Hooks LuckPerms if it’s there; falls back to a single message group otherwise.

AstroPlayerStats. SQLite-backed stats (playtime, joins, kills, deaths, blocks broken, blocks placed) with %astrostats_*% PlaceholderAPI placeholders. No web dashboard. The stats live in the bot and a Discord embed.

AstroAutoSave. Periodic save-all with broadcast warnings (“Server saving in 30 seconds…”). Vanilla autosave isn’t broadcast and most server owners don’t realize the lag spike comes from it.

AstroBackCooldown. Per-LuckPerms-group cooldowns on the Essentials /back command. Default group: 30 seconds. VIP: 10 seconds. Staff: no cooldown. Three lines of YAML.

AstroChatBot. Keyword-matching chat bot that responds to player questions. Player types “how do i set home”, bot replies “/sethome “. Configurable per-keyword cooldown so it doesn’t spam. Supports multiple languages by keyword group.

The setup that worked

For all seven I used the same Maven skeleton. One pom.xml that I copied between projects, with a relocation for shading the Astroworld utility package so plugins don’t conflict if you load multiple:

<plugin>
  <groupId>org.apache.maven.plugins</groupId>
  <artifactId>maven-shade-plugin</artifactId>
  <version>3.5.0</version>
  <executions>
    <execution>
      <phase>package</phase>
      <goals><goal>shade</goal></goals>
      <configuration>
        <relocations>
          <relocation>
            <pattern>com.astroworld.util</pattern>
            <shadedPattern>com.astroworld.AstroSimpleAFK.shaded.util</shadedPattern>
          </relocation>
        </relocations>
      </configuration>
    </execution>
  </executions>
</plugin>

The relocation is the kind of detail that matters once you have more than two plugins from the same author. Without it, the moment two plugins ship the same utility class with different versions, one of them silently breaks.

Config patterns I kept reusing

After plugin 3 I noticed I was rewriting the same three things every time:

A config.yml migration on load. When you ship v1.0 and then v1.1 adds a new key, you don’t want to crash because the user’s old config doesn’t have it. Standard pattern:

@Override
public void onEnable() {
    saveDefaultConfig();
    int version = getConfig().getInt("config-version", 1);
    if (version < CURRENT_VERSION) migrateConfig(version);
}

private void migrateConfig(int from) {
    if (from < 2) {
        getConfig().set("new-feature", true);  // sensible default
    }
    if (from < 3) {
        getConfig().set("another-feature", "default");
    }
    getConfig().set("config-version", CURRENT_VERSION);
    saveConfig();
}

It feels like overkill at v1.0 when there’s only one version. It’s not. The moment you ship v1.1 with a new feature, every user who copies the new JAR over the old one wants this to work without losing their existing config.

A Messages helper that pulls strings from messages.yml. Don’t hardcode chat strings. Don’t store them in config.yml. Put them in a separate file users can edit without touching settings.

public class Messages {
    private static FileConfiguration messages;

    public static String get(String key, String fallback) {
        return ChatColor.translateAlternateColorCodes('&',
            messages.getString(key, fallback));
    }
}

The fallback parameter is important. If a user is on the latest plugin with an old messages.yml, you want a sane default, not a missing string.

One LuckPerms hook helper. All five of the plugins that need permissions integration use the same pattern:

public String getGroup(Player p) {
    LuckPerms api = LuckPermsProvider.get();
    User user = api.getUserManager().getUser(p.getUniqueId());
    if (user == null) return "default";
    return user.getPrimaryGroup();
}

If LuckPerms isn’t installed, this returns "default" for everyone. The plugin keeps working with one tier, which is what you want.

A bug I shipped, and what I learned

For AstroPlayerStats I shipped v1.0.0 with a synchronous SQLite write on every block-break event. On a busy server with one player digging through a tunnel with Efficiency V, that’s around 25 writes per second. SQLite handles this if you don’t fsync after every write, but my code called connection.commit() after each insert. So 25 fsyncs per second, on a single shared spinning disk.

The first user to install it ran /tps and saw 14 TPS. They came into Discord and asked if it was supposed to do that.

The fix took an hour: batch writes into a per-player queue, flush every 5 seconds or every 100 events whichever comes first, with one transaction per flush.

private final Map<UUID, Queue<StatEvent>> pending = new ConcurrentHashMap<>();

@EventHandler
public void onBlockBreak(BlockBreakEvent e) {
    pending.computeIfAbsent(e.getPlayer().getUniqueId(),
        k -> new ConcurrentLinkedQueue<>())
        .add(new StatEvent(StatType.BLOCK_BROKEN, 1));
}

// Scheduled task, async, every 5 seconds:
private void flush() {
    try (Connection conn = pool.getConnection()) {
        conn.setAutoCommit(false);
        for (var entry : pending.entrySet()) {
            // ... batched inserts
        }
        conn.commit();
    } catch (SQLException ex) {
        // log and keep events in queue for next flush
    }
}

TPS went back to 20. The lesson is one every Minecraft developer knows by lunchtime on their first plugin: never block the main thread, never call commit() in a hot path, and never trust the synchronous JDBC API to be fast enough.

What you should do if you build your own

A few things I wish someone had told me before plugin #1:

Start with a clean plugin.yml. Set api-version: '1.20' so the server doesn’t print legacy warnings. Set load: STARTUP only if you actually need to register listeners that other plugins depend on. Skip softdepend for plugins that aren’t required to function (PlaceholderAPI usually is softdepend, LuckPerms usually isn’t unless you’re a permissions plugin).

Don’t shade Paper’s API. I’ve seen plugins ship a 12 MB JAR because they shaded paper-api. The server already has it. Shading it makes your JAR huge and can break class loading in subtle ways.

Write README sections in this order: features, install, commands, permissions, config, compatibility. That’s what server owners look for, in that order. Putting “About the developer” at the top is a tell.

Ship a sample config.yml with every option commented. Server owners read the config, not the plugin documentation. If your config has six keys and four of them don’t say what they do, you’ve already lost half your installs.

Test on Paper, Spigot, and Purpur. They’re API-compatible 99% of the time, that 1% will bite you. Tab-list manipulation in particular changed between Paper builds within the same Minecraft version twice in 2024.

The code

All seven plugins, source + JARs, are at github.com/astroworld-mc, MIT licensed.

The server they were built for runs at astroworldmc.com. The data API I built alongside is at api.astroworldmc.com and is also open.

If you fork or improve any of them, I’d love to see what you change. The README of each repo points to the issue tracker.

Built by Astroworld. Plugins, API, and tools at github.com/astroworld-mc. Hosting that runs them well: Astroworld Hosting.