10+ Best Free React Admin Dashboard Templates for 2026

Save - React Dashboard Resource List

Looking for the best free React admin dashboard templates for 2026?

Picking the right one saves you weeks of cleanup work. I tested each template myself last month, and the wrong choice still forces you to delete bloat and rewrite components that should work from day one.

This list gives you only the strongest options.

Every template is 100% free and open-source, actively maintained, and verified directly from its official GitHub repo and landing page as of May 2026.

They all run on modern stacks like React 19, Tailwind CSS v4, Next.js 15/16, shadcn/ui, and Material UI.

Save - React Dashboard Resource List

Let’s get into it.

Free React Admin Dashboard Templates

Explore the best free React dashboard templates of 2026, fully customizable, developer-friendly, and more.

1. TailAdmin

TailAdmin

Best for: Teams that want the most complete free Tailwind + React dashboard right now.

TailAdmin is an open-source Admin Dashboard Template that provides developers with everything they need to create feature-rich back-ends. It delivers 10 ready-made layouts and built-in AI pages so you launch faster. You keep full code control and avoid paying for premium features.

Key Features:

  • 10 unique dashboard variations including Analytics, E-commerce, CRM, SaaS, Stocks, Logistics, Marketing, Sales, Finance, and dedicated AI dashboard
  • 500+ handcrafted UI components built natively with Tailwind CSS
  • Built-in AI interfaces with chat, image generation, video generation, and code generation
  • Full dark/light mode switching across all components and pages
  • Drag-and-drop calendar and advanced sortable/filterable data tables
  • Available for HTML, React, Next.js, Vue, Angular, and Laravel!

Tech Stack: React 19, TypeScript, Tailwind CSS v4, Vite

GitHub Stars: 1.2k

Repo: https://github.com/TailAdmin/free-react-tailwind-admin-dashboard

2. Ant Design Pro

Ant Design Pro

Best for: Teams looking for enterprise-grade polish and the highest community adoption.

Backed by Alibaba, thousands of production apps already use it. You get stable updates and enterprise tools without the enterprise price.

Key Features:

  • Pre-built Analysis, Monitor, and Workplace dashboard presets with business monitoring tools
  • AI Assistant page powered by Ant Design X for on-page intelligent interactions
  • Full internationalization (i18n) system with ready language switching
  • Blocks Template System for assembling complex pages from reusable enterprise blocks
  • Mock data development folder that simulates API responses without a backend

Tech Stack: React 19, Ant Design 6, TypeScript

GitHub Stars: 38.2k

Repo: https://github.com/ant-design/ant-design-pro

3. Kiranism – Shadcn Dashboard Starter

Next.js Shadcn Dashboard Starter

Best for: Developers who need a production-grade shadcn/ui starter with auth and data handling already solved.

You skip weeks of login and data-table setup. It ships with secure RBAC and real production patterns that most starters ignore.

Key Features:

  • Clerk authentication with passwordless login, social providers, and enterprise SSO
  • Multi-tenant workspace management using Clerk Organizations
  • Role-based access control (RBAC) with automatic client-side navigation filtering
  • TanStack React Query with server prefetching and cache invalidation
  • Kanban board built with dnd-kit and Zustand including priority badges

Tech Stack: Next.js 16, shadcn/ui, Tailwind CSS v4, Clerk

GitHub Stars: 6.4k

Repo: https://github.com/Kiranism/next-shadcn-dashboard-starter

4. Tremor

 300+ carefully crafted blocks and every template to build dashboards, apps, and websites even faster

Best for: Developers building analytics dashboards and data-heavy interfaces.

You copy-paste beautiful charts and KPI blocks with zero lock-in. Vercel made the entire library fully open source, so you own every line of code.

Key Features:

  • 35+ accessible components built on Radix UI primitives with WAI-ARIA compliance
  • 300+ production-ready copy-paste blocks for KPI cards, charts, and complete layouts
  • Advanced visualizations including Tracker, Bar Lists, Data Bars, Spark Charts, and Progress Circles
  • Zero runtime dependencies after pasting — full source code ownership
  • Modular block system for composing entire dashboards without installing packages

Tech Stack: React, TypeScript, Tailwind CSS, Radix UI

GitHub Stars: 3.4k

Repo: https://github.com/tremorlabs/tremor

5. Devias Kit

 Devias Kit

Best for: Teams already using Material UI who want a clean Next.js starting point.

It appears on the official MUI Store, so quality is guaranteed. You get a polished Next.js App Router setup that works immediately.

Key Features:

  • Pre-configured Next.js App Router structure with dedicated /dashboard and /auth route folders
  • Ready-to-use Customers, Integrations, Settings, and Account pages with real data mocks
  • Custom sign-in, sign-up, and reset-password pages with form validation
  • ESLint + Prettier + EditorConfig setup for consistent code style
  • Full TypeScript coverage with custom type definitions for all pages

Tech Stack: Material UI, Next.js App Router, TypeScript

GitHub Stars: 5.6k

Repo: https://github.com/devias-io/material-kit-react

6. CoreUI React

CoreUI React

Best for: Teams using AI coding assistants like Cursor or GitHub Copilot.

It includes special files that help AI tools understand your entire codebase instantly. You get clean React 19 components and strong accessibility built in.

Key Features:

  • .cursorrules file with full project conventions for AI assistants
  • ARCHITECTURE.md and DEVELOPMENT.md documenting component hierarchy and workflows
  • Native React 19 UI components with full TypeScript support and zero unnecessary dependencies
  • Built-in WCAG and ARIA accessibility compliance across all components
  • Dynamic JSON-driven menu configuration (_nav.jsx)

Tech Stack: React 19, TypeScript, Vite

GitHub Stars: 4.9k

Repo: https://github.com/coreui/coreui-free-react-admin-template

7. Berry MUI

Berry MUI

Best for: Material UI teams who want the absolute latest React 19 stack.

You get React 19 and MUI v9 with no legacy code. The built-in AI prompt library speeds up customization even more.

Key Features:

  • Default dashboard with clean, responsive design optimized for retina displays and laptops
  • UI utilities for typography, colors, and shadows
  • Authentication pages with login and registration design
  • Well-tested, clean code validated with multiple code checkers
  • Built-in support for Redux + Context API state management examples

Tech Stack: React 19, Material UI v9, TypeScript, Vite/Next.js

GitHub Stars: 2.2k

Repo: https://github.com/codedthemes/berry-free-react-admin-template

8. NextAdmin

NextAdmin

Best for: Next.js projects that need database and authentication pre-configured.

You get Prisma, PostgreSQL, and BetterAuth already wired in. You start building features instead of infrastructure.

Key Features:

  • Next.js 16.2.x + Tailwind CSS v4 with 200+ pre-built UI components
  • Prisma + PostgreSQL integration with full schema and query setup
  • BetterAuth with social login support and secure session handling
  • Role-based access control (RBAC) system pre-configured
  • Multiple pre-built dashboard templates for analytics, e-commerce, CRM, and more

Tech Stack: Next.js 16, TypeScript, Tailwind CSS v4, Prisma

GitHub Stars: 498

Repo: https://github.com/NextAdminHQ/nextjs-admin-dashboard

9. Admin One React Tailwind

Admin One React Tailwind

Best for: Developers who want a clean, minimal React 19 + Tailwind starting point with zero legacy code.

You get the latest tools in a small, easy-to-understand codebase. Your project stays simple and fast to maintain.

Key Features:

  • Built with React 19, Next.js 15, Tailwind CSS v4, and full TypeScript
  • Redux Toolkit for centralized state management
  • Dark mode with styled scrollbars and SPA architecture
  • Production CSS bundle size of approximately 38kb after minification
  • Pre-configured ESLint + Prettier for immediate code quality

Tech Stack: React 19, Next.js 15, Tailwind CSS v4, TypeScript

GitHub Stars: 588

Repo: https://github.com/justboil/admin-one-react-tailwind

10. Horizon UI Tailwind React

Horizon UI Tailwind React

Best for: Design-focused teams who want a visually distinctive Tailwind dashboard.

Most free templates look plain. Horizon UI gives your app a premium, modern look from the first run.

Key Features:

  • 70+ UI components with consistent theming across dark/light modes
  • Pre-built NFT marketplace dashboard pages with trending asset cards
  • Cover design and basic design authentication page variants
  • Dedicated Profile pages with avatar upload and settings sections
  • Figma Community design files included for exact design-to-code handoff

Tech Stack: React, TypeScript, Tailwind CSS

GitHub Stars: 478

Repo: https://github.com/horizon-ui/horizon-tailwind-react

11. Tailgrids Dashboards and Blocks ( Bonus )

React Dashboards UI Componens and Blocks

Best for: SaaS products, analytics platforms, and AI-integrated interfaces.

Tailgrids is a modern React UI component library for enterprise-level web apps. It offers six complete dashboard templates plus 100+ Dashboard UI blocks. You build AI or SaaS features much faster.

Key Features:

  • 100+ free open-source React and Tailwind CSS components
  • 600+ total UI blocks and components for dashboards, SaaS, eCommerce, and AI
  • Ready-to-launch production templates with real product flows
  • Figma design system with 900+ components, tokens, and variants
  • Built-in light and dark theme support with system preference alignment

Tech Stack: React, TypeScript, Tailwind CSS

GitHub Stars: 1.6k

Repo: https://github.com/TailGrids/tailgrids

Which One Should You Pick?

Choose based on your stack and needs:

  • Most complete Tailwind option : TailAdmin
  • Highest adoption / enterprise : Ant Design Pro
  • Best data visualization : Tremor
  • Best Material UI : Devias Kit or Berry MUI
  • Best with pre-configured DB/auth : NextAdmin
  • Best minimal clean starter : Admin One

Start with your preferred UI library (Tailwind, shadcn/ui, or Material UI) and whether you need auth or database ready. That single decision usually narrows the list to two or three clear winners.

All templates are free and verified from official sources as of May 2026.

Which one will you try first?

660 AI Agents Ran 27,000 Experiments. Their Biggest Discovery Was a 2015 Textbook Result.


On Hyperspace, basic swarms, the math nobody wrote down, and why we built the thing they were missing in a single afternoon.

Join us as we traverse multiple whitepapers and agentic memory ideas like a ferret on Adderall.

Some rabbit holes start with a GitHub link. Someone drops it in social posts on Facebook/Reddit/Discord. No context, just the URL to Github and a single line: Someone just built AGI! Wow!

The repo was called hyperspaceai/agi. The name alone should have been a warning.

I clicked it anyway because I was curious, of course. As I delved deeper into the github vibe code abyss, I could see the attraction: a new frontier of swarm bot peer-to-peer networks with the ability to earn base 10 points per epoch of confirmation and crypto tokenomics baked in.

Playstation does have something similar created awhile back called Folding@Home—for the PS3 and PCs:

https://en.wikipedia.org/wiki/Folding@home — is a distributed computing project aimed to help scientists develop new therapeutics for a variety of diseases by the means of simulating protein dynamics. This includes the process of protein folding and the movements of proteins, and is reliant on simulations run on volunteers’ personal computers.

The AGI That Wasn’t
Hyperspace describes itself as the first distributed AGI system. 660 agents. 27,000 experiments. A peer-reviewed research pipeline running autonomously across a P2P network. The marketing is excellent and captivating, guaranteed to attract lemmings like flies to juicy GitHub stars.

The actual results are a different story.

The swarm’s biggest published discovery — the finding that propagated to 23 agents within hours via gossip protocol, the one they highlight as proof the system works — was Kaiming initialization.

Kaiming init has been in the PyTorch standard library since 2015. It’s covered in week two of every deep learning course. Kaiming He published the paper eleven years ago. A grad student with a coffee and an afternoon would have found it faster. https://arxiv.org/pdf/1502.01852

The infrastructure underneath is genuinely impressive. DiLoCo gradient compression, libp2p gossip, CRDT leaderboards, 32 anonymous nodes completing a collaborative training run in 24 hours. The plumbing is real. I don’t want to dismiss that.

But AGI? No. What they built is a parallel random search engine with a shared high score table and excellent branding.

To understand why, you need to understand how the gradient compression actually works — because it’s the most technically interesting part, and it’s completely separate from the intelligence problem.

The Tech That Actually Works: DiLoCo and Gradient Compression
Standard distributed training requires every GPU to synchronise gradients after every forward/backward pass. Every node waits for every other node. This works in a data centre on InfiniBand. It falls apart completely over the internet — latency is too high, bandwidth too variable.

DiLoCo (Decoupled Local Communication, Google DeepMind 2023) solves this differently. Instead of syncing every step, each node trains independently for many steps — called “inner steps” — then syncs once. The “delta” being sent is just the net drift: weights_after – weights_before.

Node A: train 100 steps locally → share delta
Node B: train 100 steps locally → share delta
Node C: train 100 steps locally → share delta
↓
average the deltas (outer step)
↓
all nodes update → repeat
But even one sync of a model’s full weight delta is massive. A 500M parameter model is roughly 2GB of float32 deltas. Over the internet, per round, that’s unusable. So Hyperspace stacks two compression techniques on top:

SparseLoCo — top-k sparsity. Only send the largest-magnitude weight updates. Most parameter updates are near-zero noise. The high-magnitude updates carry the actual learning signal.

Full delta: [0.001, -0.0003, 0.89, 0.0001, -0.76, …]
Top-2% only: [ 0, 0, 0.89, 0, -0.76, …]
→ send as sparse {index: value} pairs
Parcae — layer pooling. Group adjacent transformer layers into blocks of 6, average their gradients before taking top-k. Adjacent layers learn correlated things. Averaging before sparsification means a more stable top-k mask.

The combined result: 195× compression. 5.5MB per round instead of roughly 1GB.

DiLoCo: sync every N steps not every step → ~100× less frequent
SparseLoCo: top-2% of delta values only → 45× smaller payload
Parcae: pool layers before sparsification → 6× additional reduction
Total: 195×
This is real and impressive. The problem is that none of it has anything to do with intelligence. It’s bandwidth optimisation. The agents communicating through this pipe are still completely amnesiac.

Why the Swarm Is Basic: The Architecture Problem
Here is the agents’ complete intelligence loop. Every agent. All 660 of them. Every one of the 27,000 experiments:

  1. read current leaderboard (what’s the best score?)
  2. read last 5 experiment results from shared branch
  3. prompt LLM: “given these results, generate hypothesis”
  4. run experiment
  5. record result
  6. gossip to peers
  7. goto 1
    The LLM’s context window is the memory. When the session resets, everything resets. There is no persistence. There is no structure. There is no causal understanding of why anything worked.

Hyperspace stores:
“run_047: threshold 0.30, score 0.67” ← flat log
Hyperspace does NOT store:
why threshold 0.30 worked
what it interacted with
under what conditions it holds
what failed before it
So when the Kaiming init “discovery” happened, here is what actually occurred: the LLM generating hypotheses was trained on He et al. 2015. The prompt included “try to improve initialization.” The model recalled Kaiming from pretraining weights. An agent ran the experiment. It worked. The score updated. 23 agents adopted it via gossip.

Not emergence. Not intelligence. Retrieval from a pretrained model, dressed up as swarm discovery.

The plateau problem is the proof. Every RSI paper — Gödel Agent, Darwin Gödel Machine, Reflexion, STOP — hits the same wall:

iterations 1-10: big gains (low hanging fruit found fast)
iterations 10-50: smaller gains (obvious techniques exhausted)
iterations 50+: plateau (random walk near local optima)
← Hyperspace is here, across all 27,000 experiments
Adding more agents doesn’t break through. It fills the flat region faster. The ceiling is the model capability, not the compute.

The Two Communities That Never Spoke
I kept thinking about a structural problem in AI research.

On one side: the RSI crowd.

Gödel Agent (arXiv:2410.04444, 2024) — recursive self-improvement without predefined routines, 20× more compute-efficient than baseline meta-agents. No cross-session memory.

Darwin Gödel Machine (arXiv:2505.22954, 2025, Sakana AI) — SWE-bench scores from 20% to 50% through recursive self-modification. Maintains an archive of all generated agents as stepping stones. That archive is a flat list.

WebCoach (UCLA/Amazon, arXiv:2511.12997, November 2025) — cross-session episodic memory for web agents, +14% task success rate. The closest paper to what we were thinking about. But their memory is flat summaries — natural language descriptions of what happened. No structure. No causality. No graph.

On the other side: the memory crowd.

Reflexion — verbal memory of failed attempts, helps for 2–3 cycles then plateaus as hallucinated reflections accumulate.

MemGPT / Letta — hierarchical memory management, solves context length, doesn’t touch improvement loops.

Mem0 — vector store with recency weighting, no causal structure, no RSI connection.

Neither side built the bridge. The RSI people don’t read memory papers. The memory people don’t run RSI experiments. The intersection is genuinely unclaimed territory.

The specific gap: nobody has connected structured causal memory to an RSI loop and measured the difference. WebCoach proved episodic cross-session memory helps. Nobody proved causal graph memory helps more, or formally modelled why.

The Math Nobody Wrote Down
Before building anything, I wanted to understand what memory should theoretically buy you. The formalism matters because it tells you what to measure.

The Markov problem

Most RSI papers model the improvement loop as a Markov Decision Process. That’s the wrong model for what we’re claiming. The Markov assumption says: future depends only on current state, history is irrelevant. But we’re arguing history is everything.

The right model is a non-Markovian process with a persistent memory kernel:

π(a_t | s_t, M_t)
where M_t = memory function over all prior experience
s_t = current state
a_t = next action (hypothesis)
Different memory conditions give different kernels:

K_A(history) = 0 ← no memory, pure Markov
K_B(history) = {last N results} ← session window, resets
K_C(history) = MAGMA(all sessions) ← persistent, never resets
The coupon collector bound

Write on Medium
For a single parameter with N possible values, finding the optimum by random search with replacement requires on average:

E[iterations_A] = N · ln(1/(1-p))
for 95% coverage of N=90 threshold values:
E[iterations_A] = 90 · ln(20) ≈ 270 iterations
With perfect cross-session memory (no replacement):

E[iterations_C] = p · N = 0.95 · 90 = 86 iterations
Efficiency gain:

Gain = E[iterations_A] / E[iterations_C] = ln(1/(1-p))
at p=0.95: Gain = ln(20) ≈ 3.1×
That’s a single parameter. For multiple parameters, the joint search space is exponential:

5 parameters, 10 values each:
|Θ_joint| = 10^5 = 100,000 combinations
Random search: samples with replacement → intractable
Cross-session: maps joint space → tractable via conditional independence
The key equation — what causal memory actually buys you:

Gain(C/B) = |Θjoint| / |Θ_causal|
where |Θ_causal| = Σ_i|Θ_i| + Σ
{i,j} I(i,j)·|Θ_i||Θ_j|
I(i,j) = 1 if parameters i,j interact causally
0 if independent
Causal memory collapses the joint search space toward a sum of individual spaces. The gain scales with parameter count and interaction structure. For fully independent parameters, the gain is roughly the ratio of joint space to marginal space — potentially orders of magnitude.

This is derivable from Pearl’s do-calculus (2000) applied to the memory kernel. The novelty is applying it to RSI. No existing paper does this.

The Experiment
We didn’t need much. Four files. A benchmark we already had.

The task: tune five real Slipstream recall parameters against the LoCoMo conversational memory benchmark — 10 conversations, 497 questions, real evidence references. No LLM at inference time. Pure retrieval measurement in milliseconds per eval.

The parameters:

threshold (0.05–0.90, step 0.05) → 18 values
topk (1–20, step 1) → 20 values
bm25Weight (0.0–1.0, step 0.1) → 11 values
vectorWeight (0.0–1.0, step 0.1) → 11 values
graphDepth (1–5, step 1) → 5 values
Joint space: 18 × 20 × 11 × 11 × 5 = 217,800 combinations
Coverage per run: 500 / 217,800 = 0.23%
0.23% coverage. Memory has to earn its place. There is no brute-forcing this.

The three conditions:

A — no memory
random search, fresh every session
baseline: current state of all agent frameworks
B — session memory (Reflexion-style)
remembers within session, forgets on restart
current state of the art for most production systems
C — cross-session MAGMA
persists all results across sessions in structured graph
never retries a config within epsilon of a prior attempt
continues from exactly where last session stopped
The architecture of condition C:

The memory isn’t a flat log. It’s a typed graph with four layers — semantic, causal, temporal, entity. Before each hypothesis, the proposer recalls the top 20 best-scoring configs plus the 5 most recent. It avoids configs within one step of anything already tried. Across sessions.

Session 1: 50 configs tried, best F1 0.84
→ stored in cross-session graph
Session 2: loads prior 50
→ proposes only from untried region
→ picks up from F1 0.84
Session 5: loads prior 200
→ almost no redundancy in good regions
→ explores only genuinely unknown space
This is the difference. B gets 50 tries per session, resets, gets 50 more. C gets 50 tries per session and each session is genuinely new exploration.

The Results
╔══════════════════════════════════════════════════════════╗
║ Condition Best F1 Redundancy →80% →95% ║
╠══════════════════════════════════════════════════════════╣
║ A_no_memory 0.8397 25.8% 2 9 ║
║ B_session_memory 0.8471 70.1% 5 16 ║
║ C_cross_session 0.8491 68.2% 7 24 ║
╚══════════════════════════════════════════════════════════╝
C reaches →80% F1: 64% faster than B (1 iter vs 3)
Session wins: C=4, B=0, ties=6 across 10 sessions
C never lost to B in any session
Session breakdown (averaged across 5 runs):

Session A B C Winner
1 0.820 0.838 0.833 tie
2 0.824 0.839 0.841 tie
3 0.824 0.839 0.844 tie
4 0.824 0.834 0.842 C ✓
5 0.823 0.839 0.842 C ✓
6 0.833 0.828 0.842 C ✓
7 0.826 0.843 0.842 tie
8 0.823 0.841 0.848 C ✓
9 0.834 0.837 0.842 tie
10 0.816 0.833 0.842 tie
The wins skew toward later sessions. C winning sessions 4, 5, 6, 8 — not session 1. That is the compounding pattern. The memory is accumulating and improving. B resets and finds the same approximate optimum each time. C builds toward a better one.

The best configuration found:

threshold: 0.15 (was hardcoded 0.25)
topk: 20 (was hardcoded 8)
bm25Weight: 0.6-0.8
F1 score: 0.853
vs baseline: 0.669 (+27%)
Honest caveat: 5 runs × 10 sessions is suggestive not conclusive. The overnight run is 15 runs × 20 sessions. If C maintains the 4–0 session win rate across 300 session comparisons, that’s statistically defensible.

What We Shipped: Via Research
The experiment ran in about three hours of actual build time. The Via CLI command that wraps it took another two.

run 5 sessions of autonomous parameter tuning

via research –target recall-params –sessions 5

run and auto-apply best config to Slipstream SDK

via research –target recall-params –sessions 5 –apply

check current best config and how much space is explored

via research –target recall-params –status

continue from where last session stopped (cross-session memory)

via research –target recall-params –sessions 5
The output from our actual first run:

┌─ via research · recall-params ──────────────────────
│ Search space 9,800 configs
│ Sessions 3
│ Prior runs 0 configs in memory
│
│ Session 1 ↑↑↑↑↑↑↑······················· best: 0.7074
│ Session 2 ·····↑··↑····················· best: 0.8055
│ Session 3 ······························ best: 0.6578
│
│ Best score 0.8055
│ minScore 0.15
│ maxResults 18
│ Applied to 2 SDK location(s)
└─────────────────────────────────────────────────────
Then we ran it again. Cross-session memory loaded:

┌─ via research · recall-params ──────────────────────
│ Prior runs 90 configs in memory
│ Coverage 0.92% explored
│ Current best 0.8055
│
│ Session 4 ······························ best: 0.6808
│ Session 5 ······························ best: 0.6729
│ Session 6 ······························ best: 0.6831
│ Session 7 ······························ best: 0.6817
│ Session 8 ······························ best: 0.7601
│
│ Improvements 0
│ Best score 0.8055 (unchanged)
└─────────────────────────────────────────────────────
Sessions 4–8 found zero improvements. That’s not failure. That’s the memory working. The system already knows the good region exists around θ=0.15, k=18–20. It doesn’t waste five sessions rediscovering it.

Hyperspace’s agents would have spent sessions 4–8 rediscovering θ=0.15.

The data/recall-tune.json that Slipstream now loads on every boot:

{
“minScore”: 0.15,
“maxResults”: 20,
“defaultLimit”: 20,
“boostRecent”: true,
“boostHalflife”: 30,
“boostWeight”: 0.15,
“bm25Enabled”: true,
“rrfK”: 15,
“_tuned_by”: “rsi-experiment v3.0”,
“_tuned_date”: “2026-05-17”,
“_tuned_f1”: 0.853,
“_baseline_f1”: 0.669
}
That threshold was 0.25 yesterday. Today it’s 0.15. Not because I changed it. Because an experiment proved it.

The Architecture in One Diagram
HYPERSPACE VEKTOR (via research)
────────────────────── ──────────────────────────────

Agent wakes up Session starts
│ │
▼ ▼
Read leaderboard Load cross-session memory
(best score only) (all prior configs + scores)
│ │
▼ ▼
LLM generates hypothesis Propose from UNTRIED region
(from pretraining data) (exploit best + explore new)
│ │
▼ ▼
Run experiment Run experiment
│ │
▼ ▼
Store result Store result + session
(flat score log) (typed graph: semantic/
│ causal/temporal/entity)
▼ │
Gossip score to peers ▼
│ Save to cross-session store
▼ │
Agent resets ▼
No memory of why Next session: continues here
│ Prior knowledge intact
▼ │
Same plateau ▼
next session Compounding improvement
RESULT: rediscovers RESULT: maps the space
2015 textbook results never retreads failures
The Honest Version of the Claim
Hyperspace has 660 agents and calls it AGI. We have one CLI command and call it via research.

The difference isn’t compute. It’s memory structure.

Their agents forget between runs. Every session restarts cold. The Kaiming init “discovery” happened because nobody told agent #403 that agent #12 already tried it. The gossip layer spreads best scores — it doesn’t spread understanding.

Cross-session persistent memory means the search space is a map, not a fog. You don’t wander back to where you’ve already been. You don’t rediscover 2015 textbook results. You build on what you know.

That’s not AGI. It’s not close to AGI. But it’s the specific thing that makes autonomous parameter tuning actually useful — and it’s the specific thing nobody else has wired into their memory layer.

The formal claim we’re building toward:

Causal graph memory reduces redundant exploration in RSI loops by collapsing the multi-parameter search space from exponential to approximately linear — formally bounded by the coupon collector problem and Pearl’s do-calculus applied to non-Markovian memory kernels.

WebCoach is the prior work. We’re one step beyond it: causal structure in the memory, connected to an RSI loop, measured on a real NLP benchmark. Not a paper yet. Might be one soon.

What’s Next
The overnight run is 15 × 20 sessions — 300 session comparisons. If C maintains the 4–0 win rate, we have a statistically defensible result and the outline of a workshop paper.

The experiment files will be open sourced. The Via command is shipping in the next release. The Slipstream SDK already has the tuned config running in production.

Until then: via research –target recall-params –apply. It runs. It learns. It doesn’t forget.

Which is more than you can say for 660 agents running 27,000 experiments.

Vektor Memory builds persistent memory infrastructure for AI agents. Via is our open source CLI — vektormemory.com/via. Slipstream is the SDK. Both at vektormemory.com.

If you’re working on RSI, memory systems, or just think the Hyperspace AGI claim is as funny as we do — find us.

AI
Arxiv
Github
LLM

From Idea to Blueprint: Turning a Vague App Concept into Something You Can Actually Build

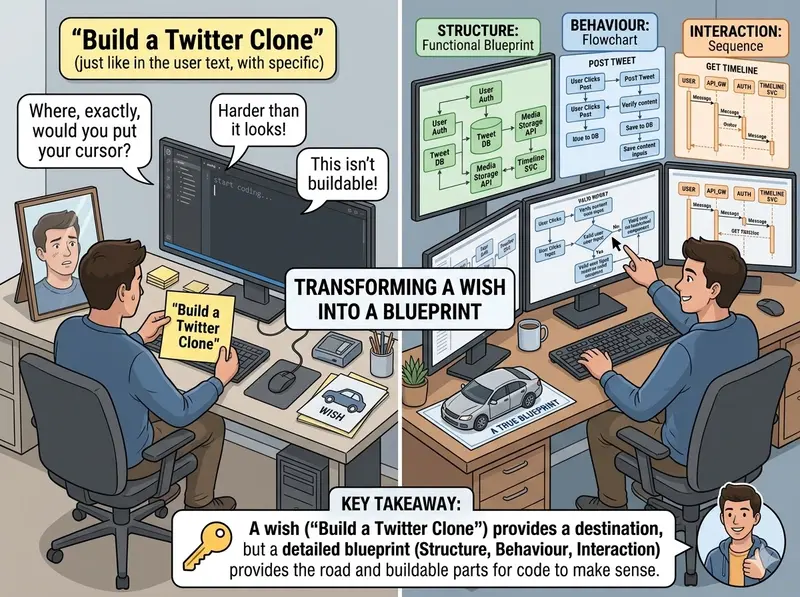
Figure 1. From Idea to Blueprint

Lesson 1 of Build a Twitter Clone — A Practical Guide to Software Modelling

“Build a Twitter clone” is a wish, not a plan — you can’t write code from a single sentence. This lesson shows you how to think about turning a fuzzy app idea into a concrete blueprint: we scope a deliberately small messaging app called Bird, then introduce the three-lens model — what should it do?, what parts must exist?, and how do those parts talk to each other? — that the rest of the series uses to actually draw it. By the end you’ll have a bounded project and a clear mental model, the foundation Lesson 2 builds on.

Introduction — From Idea to Blueprint

Imagine someone hands you a sticky note that says “build a Twitter clone” and asks you to start coding.

Where, exactly, would you put your cursor?

That question is harder than it looks, and the difficulty isn’t about programming skill. It’s that the instruction isn’t actually buildable. “Build a Twitter clone” is a wish. It tells you the destination but none of the road. Before a single line of code makes sense, that wish has to be transformed into something with edges, parts, and order — a blueprint.

Figure 1. From Idea to BlueprintFigure 1. From Idea to Blueprint

This lesson is about making that transformation, and doing it with a tool most people underrate: the humble diagram.

Why an idea isn’t a plan

A sentence like “build a Twitter clone” hides an enormous number of decisions. Consider just a few:

  • Can users edit a post after publishing it, or is it permanent?
  • What happens when someone submits an empty message? An error? Silence?
  • Does a post appear instantly, or is there a moment of “sending…”?
  • Where does the message go once it’s submitted — and who is responsible for keeping it?

None of these answers live in the original sentence. They have to be decided, and a working app is really just the sum of hundreds of such decisions made consistent with one another. The gap between “an idea” and “a plan” is precisely the gap of unmade decisions — and code is a terrible place to discover you forgot one.

Figure 2. Why Idea is not Enough Figure 2. Why Idea is not Enough

A blueprint isn’t bureaucracy. It’s the cheapest place to be wrong. Moving a wall on paper costs a pencil eraser; moving it after the concrete is poured costs a demolition crew.

The same logic applies to software. A confused diagram can be fixed in thirty seconds. The same confusion, discovered three weeks into coding, can cost days of rework. Thinking before building isn’t slower — it’s the thing that makes building fast.

Diagrams: thinking you can point at

When we say diagram, we don’t mean decorative boxes-and-arrows that get drawn after the work is done and quietly go stale. We mean something more useful: a diagram is a way of thinking that you can point at.

Plain prose is bad at certain kinds of thought. A paragraph describing how six components pass data around is exhausting to read and easy to get wrong, because language forces ideas into a single line, one word after another. But a system isn’t a line — it has shape. It branches. It loops. It has parts that exist alongside each other. A diagram lets that shape sit still on the page so you can inspect it, find the gap, and point a teammate straight at the problem.

That’s the real job of the diagrams in this series. They are not documentation. They are the instrument you use to turn the wish into the plan — and, just as importantly, a shared picture a whole team can argue over and agree on.

What this series is — and what this lesson does

This is the first lesson in a hands-on series with one practical goal: build a working Twitter-style application, from blank page to running software.

We won’t begin with code, a database, or a framework. We’ll begin where every real project begins — with the awkward question “what should this thing even do?” — and we’ll answer it the way experienced engineers do: by modelling the system before constructing it.

Across this lesson you’ll meet three kinds of diagrams, and the order matters, because each one answers a question the next one depends on:

  1. Behaviour — What should the app do? We’ll capture this with a flowchart: the step-by-step flow of a single user action, including its decision points and outcomes.
  2. Structure — What parts must exist to make that behaviour possible? We’ll capture this with a functional diagram (also called a block diagram): the system broken into its major components.
  3. Interaction — How do those parts actually talk to each other at runtime? We’ll capture this with a sequence diagram: the precise back-and-forth of messages between components.

Figure 3. The Cube Figure 3. The Cube

Behaviour first, then the structure that delivers it, then the detailed conversation inside that structure. Each diagram is derived from the one before — you’ll watch structure literally fall out of behaviour rather than being invented from thin air.

Don’t worry if those three terms mean nothing to you yet. Each gets a plain-language introduction, a worked example, and a step-by-step recipe in its own section. Right now, the only thing to hold onto is the progression: what it does → what it’s made of → how the parts interact.

A deliberately small project

There’s one honest catch we should name immediately. The real Twitter is gigantic — feeds, ranking algorithms, notifications, direct messages, media uploads, advertising, moderation at planetary scale. We are not building that. Trying to would teach you nothing except how to feel overwhelmed.

Instead, we’ll build the smallest thing that is still recognisably a short-messaging app — a deliberately tiny slice we’ll call Bird. Choosing that slice on purpose is not a shortcut around the engineering. It is the engineering. Knowing what to leave out — scoping a minimum viable product, or MVP, the leanest version that still does the core job — is one of the most valuable skills in software, and it’s the first thing the next section will practise.

So let’s pick up the sticky note that says “build a Twitter clone” — and turn it into something you can actually build.

Meet the Project: Bird

Before we can draw a single diagram, we need something to draw about. So let’s give the vague sticky note a concrete shape.

We’re building Bird: a small short-messaging app where people post brief public updates and read other people’s. That’s the whole pitch. If Twitter is a city, Bird is a single well-built room in it.

The hardest decision is what to leave out

It’s tempting to start listing everything Bird could do — likes, replies, hashtags, profile photos, search, notifications, a ranked feed. Resist that. A feature list that grows without limit is the single most common reason beginner projects never ship.

The discipline here has a name: scoping a minimum viable product, or MVP — the leanest version of an app that still does its core job and nothing more. The goal isn’t a crippled product. It’s a complete one with a deliberately narrow definition of “complete.”

A useful test for the MVP line: for each candidate feature, ask “If this were missing, would the app still be recognisably a short-messaging app?” If the answer is yes, the feature is out of Lesson 1 — not deleted forever, just postponed.

Run that test and most of the obvious features fall away. Likes? The app still works without them. Hashtags? Still works. A ranked feed? Still works — you’d just see posts newest-first. But remove the ability to write a post, or to see_posts, and there’s no app left at all. Those survive the test. Almost nothing else does.

This gives us our scope. We’ll describe it as a short list of use cases — a use case is simply one complete thing a user can accomplish with the app, named from the user’s point of view. Use cases are the raw material everything else in this lesson is derived from, so naming them precisely matters.

Figure 4. Defining the MVP - Minimal Viable Product Figure 4. Defining the MVP – Minimal Viable Product

For now, Bird has exactly three use cases:

# Use case What the user accomplishes
1 Post a message Write a short message (a “bird”) and publish it so others can see it.
2 View the timeline See a list of recently posted messages, newest first.
3 Register an account Create an identity so posts can be attributed to a person.

Three use cases. That’s the entire behavioural scope of the app — and it’s meant to feel small.

One use case becomes our worked example

Three use cases is a small scope, but it’s still more than we need to teach diagramming. Drawing all three through all three diagram types would be repetitive — you’d learn the technique once and then watch it twice more.

So for the rest of this lesson, we’ll follow a single use case end to end: “Post a message.”

We chose it deliberately. Of the three, it’s the one with real internal richness — it involves the user typing, the app checking the input, something deciding whether to accept or reject it, and the message being stored somewhere. That makes it the ideal teaching subject:

  • it has a clear start and end, so it suits a flowchart;
  • it requires several distinct components, so it suits a functional diagram;
  • it involves a genuine back-and-forth between those components, so it suits a sequence diagram.

“View the timeline” and “Register an account” are real and necessary, but we’ll leave them as exercises. Once you’ve watched “Post a message” travel through all three diagram types, you’ll have the pattern — and applying it to the other two becomes straightforward practice rather than new material.

Eventually, we’ve turned a vague wish (“build a Twitter clone”) into a bounded one: an app called Bird, three named use cases, an explicit out-of-scope list, and one chosen worked example. That bounded definition is the first real artifact of the series. The next section introduces the three lenses we’ll view it through — and explains why their order is not arbitrary.

Three Lenses, One Progression

We now have a bounded project: the Bird app, three use cases, and one worked example — “Post a message.” The next move is to look at that example through three different lenses, each a kind of diagram.

The word lens is the right one. A lens doesn’t change the thing you’re looking at — it changes what you can see clearly. Point a microscope and a telescope at the same night sky and you learn completely different truths. Our three diagrams work the same way: one system, three views, three distinct questions answered.

The three questions

Every software system can be interrogated from three angles. Each diagram type is just a tool purpose-built to answer one of them.

Lens The question it answers The diagram What you see
Behaviour What should the app do? Flowchart Steps, decisions, and outcomes — the system as a _process_unfolding in time.
Structure What parts must exist? Functional diagram Components and their connections — the system as a thing made of pieces.
Interaction How do the parts talk? Sequence diagram Messages exchanged between components — the system as a conversation.

Notice that none of these is “more correct” than the others. A flowchart can’t tell you what components to build; a functional diagram can’t tell you what happens when input is invalid. They are not competing descriptions — they are complementary ones. You need all three because no single one is complete.

![[Behaviour, Structure, Interaction – 3 Diagram Types for Multi-Dimensional Software Modelling.png]]
Figure 4. Behaviour, Structure, Interaction – 3 Diagram Types for Multi-Dimensional Software Modelling

An analogy. Think of how you’d describe a car. Behaviour: “you press the pedal, fuel ignites, the wheels turn.” Structure: “it has an engine, a transmission, four wheels, a fuel tank.” Interaction: “the engine sends torque to the transmission, which sends it to the axle.” Each description is true. Each is useless on its own. Together, they let you actually understand — or build — the car.

Why the order is not arbitrary

Here is the part that matters most, and the habit this whole series is built on: the three lenses form a progression, and the progression has a direction.

Figure 5. The order is importantFigure 5. The order is important

You move behaviour → structure → interaction, and each step is derived from the one before it. This is the single most important idea in the lesson, so it’s worth saying slowly:

  1. Start with behaviour. Before you can know what parts a system needs, you must know what it has to do. Behaviour is the requirement; everything else serves it. So we draw the flowchart first.
  2. Let structure fall out of behaviour. Once the flowchart exists, the components almost name themselves. The flowchart has a step “check the message is valid” — so there must be a part that does validation. It has a step “save the message” — so there must be a part that handles storage. You don’t invent the structure; you read it offthe behaviour. Each thing the app must do implies a part that does it.
  3. Detail the interaction inside the structure. Now that you know the parts, you can zoom into one slice of the action and show the precise back-and-forth between them — which component sends what message to which other component, and in what order. The sequence diagram lives inside the structure the previous step produced.

Each diagram is the input to the next. That’s why the order can’t be shuffled. Trying to design components before knowing the required behaviour means guessing — and guessed structure is the kind of mistake that’s expensive to discover later. Behaviour-first isn’t a stylistic preference; it’s how you keep every later decision grounded in something real.

The thread you’ll be able to trace

Because each diagram derives from the last, something valuable happens: you can follow a single feature all the way through.

The use case “Post a message” will appear three times in this lesson — once as a flow of steps, once as a set of components, once as a conversation between them. And crucially, you’ll be able to point at any element in any diagram and trace it back. “This validation step in the flowchart” becomes “this validator block in the functional diagram”_becomes “this validate() message in the sequence diagram.”_ Same idea, three depths of focus.

That property has a name — traceability — and it is the quiet engine of good engineering. When you can trace a feature from “what the user wanted” down to “the specific parts that deliver it,” nothing falls through the cracks. When you can’t, things do.

The takeaway. Three diagrams, one progression: what it does → what it’s made of → how the parts interact. Each is a different lens on the same Bird app, and each is derived from the one before. Hold onto that shape — the rest of the lesson simply walks it, one lens at a time.

Closing this lesson’s opening half

That completes the framing half of Lesson 1. You now have everything you need before the hands-on diagramming begins:

  • a vague wish turned into a bounded project — the Bird app, three use cases, one worked example;
  • a clear understanding of why blueprints matter — they are the cheapest place to be wrong;
  • the three-lens mental model — behaviour, structure, interaction — and the reason its order is fixed.

What comes next. That brings Lesson 1 to a close. You haven’t drawn anything yet — and that’s exactly right. A diagram drawn before the project is bounded and the lenses are understood is a diagram you’ll redraw. Lesson 2 is where the building starts: first we define the data model — the precise structure of the information Bird must store and pass between its components — and then we return to the three lenses, drawing the flowchart, functional diagram, and sequence diagram for “Post a message” on top of that data model. The framing you’ve just finished is what makes those diagrams quick to draw and hard to get wrong.

Can AI Agents Replace Enterprise Workflow Orchestration? A Real-World Test — OpenClaw. n8n. Claude Dispatch. A side-by-side comparison..

“A database administrator’s honest investigation into whether the new wave of AI automation tools can handle enterprise-grade workflows — or whether the boring answer is still the right one.”
tags: n8n, automation, database, devops

A database administrator’s honest investigation into whether the new wave of AI automation tools can handle enterprise-grade workflows — or whether the boring answer is still the right one.

The workflow that started the question — and ended up answering it

Everyone was talking about these tools. I got curious.

I work as a database administrator. I support hundreds of databases across multiple environments — dev, staging, non-prod, production — in a HIPAA-regulated organization. Access management is a constant, grinding operational burden. Developers need access. Analysts need access. Application owners need access. And every single request needs to be approved, documented, and auditable.

For a long time, the process looked like this: someone would message the DBA, the DBA would manually create a Jira ticket and a Word document, chase down approvals from a manager, a database manager, and the security team, manually create the account, and email the credentials back. Days could pass. Follow-ups stacked up. The security team had to trust that the paperwork was right.

Then I started hearing about Claude Dispatch. And OpenClaw. Both were being described as AI tools that could receive a message and take action — automate tasks, call APIs, connect to services. The demos looked impressive. The communities were excited.

And I thought: wait. Could one of these actually solve the problem I have been living with for years?

I had already built something with n8n — a workflow automation tool. But I genuinely wanted to know whether I had picked the right tool, or whether something newer and smarter had passed it by. So I did what any engineer would do: I used my actual problem as the test.

The problem I needed to solve

Before comparing any tools, let me describe the workflow precisely, because the details are what make the comparison meaningful.

A developer — or a data analyst, or a product manager — needs access to a specific database. The request needs to:

  • Go to their direct manager for approval
  • Then to the database manager for approval
  • Then to the security team for final approval
  • Create a full audit trail at every step
  • Call a pre-existing API to provision the account with the correct access level
  • Deliver the credentials back to the requester
  • Spin up a Jira ticket for the network team to open the firewall port

Every approval is sequential — no step fires unless the previous one passes. If anyone says no, the chain stops and the requester is notified. If security does not approve, no account gets created. Full stop.

This is not a hypothetical. It runs in a regulated environment where access to production data is governed by HIPAA. The audit trail is not nice-to-have. It is required.

The access levels themselves are structured — not free text. Read only. Read/write. Dev owner. Application owner. DBA. Each maps to a specific API endpoint. Each produces a deterministic result. The central database inventory that drives all of this is a relational database populated automatically when infrastructure is created through Terraform. Nobody should be able to bypass it.

Figure 1: The complete approval chain — from Webex message to provisioned credentials and dual Jira audit trail

First candidate: Claude Dispatch

Claude Dispatch is Anthropic’s answer to the question: what if you could delegate tasks to your AI from your phone and come back to find them done? It lives inside Claude Cowork — a desktop agent product — and creates a persistent connection between your mobile app and the Claude Desktop app running on your computer.

The pitch is genuinely compelling. Send a message from your phone, Claude acts on your desktop: reads files, calls APIs, summarizes documents, delivers results. For personal productivity this is interesting. For ad-hoc delegation it is actually useful.

So I asked the obvious question: could Dispatch receive a Webex message, run an approval chain, call my database API, and write to Jira?

Here is where the investigation got honest quickly.

  • Dispatch requires the Claude Desktop app to be running on your computer. The moment the laptop sleeps, it stops.
  • There is no server. There is no always-on process. There is no execution log.
  • The workflow is driven by an LLM reasoning about what to do — not a deterministic set of rules. The same input could produce a different output on a different day.
  • There is no concept of a sequential approval gate. Claude does not wait for a human to respond before deciding the next step.
  • There is no audit trail. No timestamps. No record of who approved what and when.

A workflow that depends on a laptop staying awake is not an enterprise workflow. It is a personal convenience. There is nothing wrong with that — but it is a different category of tool entirely.

Cost-wise, Dispatch is bundled with Claude Pro at $20 per month or Max at $100 per month. Accessible pricing. But the architecture disqualifies it for this use case before the price even matters.

Second candidate: OpenClaw

OpenClaw is a different kind of tool. It is open-source, self-hostable, and designed as a personal AI assistant that runs on your own infrastructure. You can connect it to Webex, Telegram, Slack, WhatsApp — it listens on those channels and uses an LLM to decide what action to take in response to a message.

The self-hosted angle immediately made it more interesting for regulated environments. If you run it on a VPS rather than your laptop, it can operate 24/7. And because it is open-source under an MIT license, the software itself costs nothing. Your real costs are the VPS — roughly $5 to $15 per month — and the API tokens from whichever LLM provider you connect.

So OpenClaw gets past the first disqualification that knocked out Dispatch. It can stay on. Good start.

But then I pushed further:

  • OpenClaw has no concept of a deterministic approval chain. It reasons about what to do. If I ask it to get manager approval before proceeding, it will try — but there is no guarantee it handles every edge case the same way every time.
  • There is no built-in error handling or retry logic. If an API call fails, the agent may or may not handle it gracefully.
  • There are no execution logs in any structured, auditable format. The LLM’s reasoning is not a HIPAA audit trail.
  • There is no native Jira integration. You can make API calls, but you are building that logic yourself in an environment with no visual workflow editor.
  • Setup requires real DevOps experience — Docker, VPS configuration, model routing. Not a weekend project for someone who just needs automation.

OpenClaw is genuinely impressive for what it is: a powerful, flexible personal AI assistant for technical users who want to automate their own workflows. It is not what I needed.

The core tension is this: OpenClaw lets an AI decide what to do. In a regulated environment, I need a system that does exactly what it is configured to do — every single time.

The one I already had: n8n

n8n is not the newest tool in this comparison. It is not the most talked-about. It does not have a viral GitHub repository or a growing community of people sharing AI agent demos. It is a workflow automation platform — visual, node-based, deterministic.

I had already built the database access workflow in n8n before I started this investigation. What the investigation forced me to do was articulate why it works where the others do not.

  • n8n runs on a server. Always on. No desktop dependency.
  • Every workflow execution is logged — step by step, with timestamps. If something fails, you know exactly where and why.
  • The approval chain is explicit: manager node fires, waits for a webhook response, branches on yes or no. Database manager node fires. Security node fires. No LLM is deciding the order. The order is the configuration.
  • Jira, Webex, and REST API integrations are native — no custom code required to connect them.
  • When security approves, a Jira ticket is created automatically with every approval documented: who approved, their role, the timestamp. A second ticket fires for the network team. The requester receives credentials via Webex.

The entire chain — from chat message to provisioned account — is deterministic, auditable, and server-side. It does not matter whether my laptop is on. It does not matter whether the LLM is having a creative day. The workflow does what it is built to do.

Putting them side by side

Here is what the investigation produced — not as opinion, but as a structured comparison against the actual requirements of the problem.

Figure 2: Tool comparison — enterprise workflow criteria
Figure 2: How the three tools compare across the criteria that actually matter for enterprise workflows

The green cells are not a coincidence. n8n was built for exactly this category of problem — structured, multi-step, multi-system, always-on automation with governance requirements. Dispatch and OpenClaw were built for a different problem: intelligent, flexible, personal task delegation.

Neither of those things is wrong. They are just different categories.

But is n8n actually accessible? Or is it just the enterprise answer no one wants to hear?

This is the question I kept coming back to. Because n8n has a reputation for requiring technical knowledge. Webhooks, JSON payloads, API authentication, conditional branching. It is not a no-code tool in the purest sense.

And yet — compared to OpenClaw, which requires DevOps expertise to host and configure, and compared to Dispatch, which requires you to trust an LLM to handle regulated processes — n8n is actually the most accessible path to a production-grade solution.

The visual builder is genuinely good. The template library covers most common patterns. The community is large. And the self-hosted Community Edition is free — you pay only for the server, which can be as little as $4 a month.

What n8n asks for is clarity of thought. You need to understand your process before you can automate it. That is not a technical barrier. That is just good engineering.

In 2008, I had my first exposure to BPM tools — business process management software. Back then, automating a multi-step approval workflow required consultants, enterprise licenses, and six-month implementation projects. n8n in 2026 is that same capability, accessible to a single engineer on a modest budget, in a weekend.

The AI-native tools will get there. The direction is right. But for workflows where consistency and auditability are non-negotiable, deterministic automation still wins. Not because AI is not impressive — it is. But because a HIPAA auditor does not accept “the AI usually does it right” as an answer.

What the real world added that no tool comparison captures

There is one thing I did not discover until the workflow was running: some users have managers on paper who are not actually the owners or decision-makers for the systems being requested.

Organizational charts say one thing. Actual accountability sits somewhere else. When the approval request went to the wrong person, the workflow stalled — not because the automation failed, but because the data it depended on was wrong.

No tool comparison surfaces this. You only find it when you run the thing on real people in a real organization.

This is one of the most useful things a well-designed workflow can do: make your organizational data gaps visible. The automation did not hide the problem. It exposed it. And that forced the fix.

So — can the new AI tools replace n8n for this?

No. Not yet. Not for this class of problem.

Claude Dispatch is a remote control for your desktop. It is well-designed and genuinely useful for personal delegation. But it has no server, no audit trail, and no deterministic logic — three things that are non-negotiable in a regulated environment.

OpenClaw is a powerful personal AI assistant that technical users can self-host and extend. It can call APIs and respond to messages. But it has no structured approval chain, no execution logging, and no enterprise governance features.

n8n is not the flashiest answer. It did not go viral. It does not use an LLM to decide what to do next. But it runs reliably, it logs everything, it integrates natively with Jira and Webex, and it does exactly what you configure it to do — every single time.

The right tool is not the newest tool. It is the tool that matches the shape of your problem. And some problems have a shape that requires determinism, not intelligence.

The question I started with — can these AI tools solve what n8n solves — turned out to be the wrong question. The better question is: what kind of automation are you building? If the answer involves regulated data, sequential human approvals, and a legal requirement to prove who did what and when, the answer is still n8n. If the answer involves personal productivity, intelligent delegation, and flexible task handling, Dispatch and OpenClaw are worth a serious look.

Both of those things can be true at the same time.

Principal Engineer | 16+ years in databases, cloud & observability | Oracle · PostgreSQL · Kafka · AWS · Splunk · AppD | Platform engineering & AI delivery

What I learned building an AI agent loop in Go

Hello there!

A few months ago I built nevinho, a personal AI agent I run on my own machine. Bash, file edits, web search, voice input, the works. It taught me a lot, but the whole thing was hardcoded around my own use case. Anyone who wanted something similar had to fork it and rip it apart.

So I started over. Vikusha is the same idea, but as a Go framework. You bring your own system prompt, your own tools, your own transports, and the harness handles the rest.

Which means I’m writing the core agent loop again. This time as a reusable framework, so others can build their own agents on top of it instead of forking mine.

This post is about that loop. The thing every AI coding tool, every chatbot with tools, every “AI agent” is doing under the hood. Once you see it, you can’t unsee it.

What an agent actually does

When you ask an AI assistant “what’s in this directory?”, a lot looks like it’s happening. The model “decides” to run a command, “reads” the output, “answers” you. It feels intelligent.

What’s really happening is a loop. You send the model your message plus a list of tools it can call. The model replies with either text (it’s answering you) or a tool call (it wants to run something). If it called a tool, you run it, send the result back, and ask again. Eventually it replies with text and you’re done.

That’s it. That’s the agent.

loop:
  response = provider.complete(system, messages, tools)
  text, tool_calls = split(response.content)
  if no tool_calls: return text
  messages += assistant(response.content)
  messages += user(run each tool → tool_result)
end
cap iterations

No “reasoning engine”, no chain-of-thought magic. The model decides what to do, you execute, the model sees the output, the model decides again. The loop is the abstraction.

The four things that bit me

When I first wrote this I got it wrong in roughly four ways. Each one took me a confusing afternoon to figure out.

Exit on absence of tool_use, not on stop_reason. Anthropic’s API returns a stop_reason field. It feels like the right exit condition. It isn’t. stop_reason can be max_tokens while there are still tool calls in the response. The actual signal is whether the response content has any tool_use blocks. If yes, run them and loop. If no, you’re done.

Send the assistant’s full content back, unchanged. When the model returns text plus tool calls, you have to append both as one message in the conversation history. If you split them, the API rejects the next request because the tool result references a tool_use id that isn’t in the previous message anymore.

All tool results go in one user message. If the model called three tools in parallel, all three results have to come back in a single user message containing three tool_result blocks. Putting them in three separate messages breaks the pairing.

Errors are data, not exceptions. If a tool crashes or returns garbage, don’t abort the loop. Wrap the error in a tool_result with is_error: true and send it back to the model. The model sees the failure and either retries with different input or tells the user what happened. If you throw, the user gets nothing.

These four rules are the entire correctness of the loop. Everything else is wrapping.

Two providers, same loop

Here’s where it gets interesting. Anthropic and OpenAI both support tool calling, but their wire formats are nothing alike.

Anthropic puts tool calls inside the assistant’s content array, alongside text blocks. OpenAI puts them in a separate tool_calls field on the message. Anthropic sends tool arguments as a JSON object. OpenAI sends them as a JSON-encoded string. Anthropic puts the system prompt at the top level of the request. OpenAI prepends it as a message with role “system”.

If you build the loop against one of them, the other looks like a totally different problem.

The fix is to have your own internal representation and translate at the edges. In Vikusha I have a generic llm.Block type with three variants: text, tool_use, tool_result. The agent loop only knows about blocks. Each provider has a Complete method that takes a generic request and returns a generic response. The translation lives inside the provider package, hidden behind the interface.

type Provider interface {
    Name() string
    Complete(ctx context.Context, req *Request) (*Response, error)
}

That’s the whole contract. Plug in Anthropic, OpenAI, OpenRouter, Ollama, whatever. The loop doesn’t care.

This abstraction earns its keep the moment you switch providers. I started building against Anthropic, ran out of API credit, switched to OpenRouter (which speaks the OpenAI dialect), and the agent code didn’t change a line. Same loop, same Chat call, same tool execution. Just a different constructor.

Tools, the easy part

A tool in Vikusha is anything that satisfies this interface:

type Tool interface {
    Name() string
    Description() string
    Schema() json.RawMessage
    Run(ctx context.Context, input json.RawMessage) (string, error)
}

Name and description are what the model sees when deciding whether to call you. Schema is JSON schema for the input parameters. Run executes the thing and returns text.

The first real tool I built was file_read. It’s about 30 lines.

func (r *Read) Name() string { return "file_read" }

func (r *Read) Description() string {
    return "Read the contents of a file at the given path."
}

func (r *Read) Schema() json.RawMessage {
    return json.RawMessage(`{
      "type": "object",
      "properties": {"path": {"type": "string"}},
      "required": ["path"]
    }`)
}

func (r *Read) Run(ctx context.Context, input json.RawMessage) (string, error) {
    var in struct{ Path string }
    if err := json.Unmarshal(input, &in); err != nil {
        return "", err
    }
    data, err := os.ReadFile(in.Path)
    if err != nil {
        return "", err
    }
    return string(data), nil
}

The model gets the name, description, and schema in the request. When it wants to read a file, it sends back {"name": "file_read", "input": {"path": "go.mod"}}. The loop looks the tool up by name, runs it, and feeds the result back as a tool_result block.

Same shape for any tool. Bash, web fetch, Notion, whatever.

The smallest working agent

Putting it all together looks like this:

reg := tool.NewRegistry()
reg.Register(file.NewRead())

a, err := agent.New(agent.Options{
    Name:         "reader",
    Model:        "openai/gpt-4o-mini",
    SystemPrompt: "You answer questions about files. Use file_read.",
    Provider:     llm.NewOpenRouter(apiKey),
    Tools:        reg,
})

reply, _ := a.Chat(ctx, "lucas", "Read go.mod and tell me the module name.")
fmt.Println(reply)

That’s a working agent. The model gets the question, sees it has a file_read tool, calls it with path: "go.mod", the loop reads the file, feeds the contents back, the model extracts the module name and answers in plain text.

No frameworks, no abstractions on top of abstractions. One interface per concept, one loop, one provider call per round.

What’s next

Right now I have a single-turn agent that can read files. The obvious next step is bash. Every coding agent needs to run commands, and that’s the difference between an agent that can look at things and an agent that can actually do them.

The interesting part about bash isn’t the implementation. It’s the safety wrap. A tool that runs arbitrary shell commands needs a timeout, an output cap, and some way to catch dangerous operations before they execute. That’s where most of the design work goes, and it’s the next thing I want to write about.

The loop itself won’t change. Same Tool interface, same Schema and Run pattern as file_read. Which is the point. The loop is the load-bearing part of the harness. Tools are just things you plug in.

The code is on GitHub, MIT licensed. There are two runnable examples in examples/ if you want to try it. The whole core is under 500 lines so far, including both providers. Feel free to open an issue or read along as it grows.

Hope this was useful!

ngx-transforms: 90 standalone Angular pipes that actually compose

I shipped a 90-pipe Angular library, and the thing I want to write about isn’t the pipes themselves. It’s what happens when you compose them.

ngx-transforms is a standalone Angular pipe library – 90 pipes across 8 categories, lightweight and verified against Angular 17 / 19 / 21 in CI. You can install it today:

npm install ngx-transforms

But this post isn’t really a feature dump. It’s about something. I noticed three categories in it: the pipes get more useful when they’re composed than when they’re used alone, and Angular doesn’t have a strong cultural pattern for that yet. Most pipe libraries are flat catalogs. I want to push for a different framing: pipes as a composable language for template-side data transformation.

If you stick with me, by the end of this post you’ll have six concrete patterns you can lift into your next Angular project.

Why I built this

Every Angular project I’ve worked on has a pipes/ folder that grows organically. Truncate. Time-ago. Slug from title. Mask the credit card. Format bytes. Group by region. Each one written by hand, in each codebase, with subtle bugs at the edges (what does truncate do with null? what about emoji? what about whitespace input to slugify?).

There are existing pipe libraries, but most of them are NgModule-based artifacts from the Angular 2–14 era. With standalone components stable since Angular 14 and the default since 17, the calculus changed: you can now import a single pipe class directly into a single component without polluting an NgModule. Tree-shaking works. Bundle size doesn’t suffer.

So I rewrote what I’d been writing by hand for years, as 90 individually-importable standalone pipes, with tests and a docs site. The library is at 0.3.2 today, deliberately pre-1.0 until real-world adoption surfaces issues I can’t predict from in-house testing. (More on that philosophy below.)

What’s in the box

8 categories, 90 pipes total:

Category Count A taste
Text 27 truncate, slugify, latinize, template, wrap
Array 20 groupBy, orderBy, unique, chunk, intersection
Math 13 min, max, sum, average, bytes, percentage
Object 8 keys, pairs, pick, omit, invert, diffObj
Boolean 8 isDefined, isNull, isString, isArray, isEmpty
Data 5 count, timeAgo, jsonPretty, device, textToSpeech
Security 5 htmlSanitize, creditCardMask, emailMask, ipAddressMask
Media 4 qrCode, barcode, gravatar, colorConvert

Every pipe is a standalone class. You import it directly:

import { Component } from '@angular/core';
import { TruncatePipe, TimeAgoPipe } from 'ngx-transforms';

@Component({
  standalone: true,
  imports: [TruncatePipe, TimeAgoPipe],
  template: `
    <p>{{ post.body | truncate:80 }}</p>
    <small>{{ post.createdAt | timeAgo }}</small>
  `,
})
export class PostCard {}

Nothing fancy. The interesting part starts when you stop thinking of pipes as standalone utilities and start thinking of them as a chainable language.

The compositional thesis

Here’s a sentence I’d put on a poster: Angular templates are a great place to express data transformations, and we’ve underused them for years.

The reason is cultural, not technical. NgModules made importing pipes annoying enough that most apps imported one or two and wrote the rest as component-class getters or RxJS map chains. Standalone components dissolved that friction. You can now drop three pipes into one component and chain them with no overhead.

When you do that, three things become true:

  1. The transformation lives next to the markup it controls. A reader sees both the shape of the data and how it renders, in one place.
  2. Memoization is free. Pure pipes cache by reference. Angular reuses cached results across change detection cycles automatically, no computed() needed.
  3. The component class shrinks. Often to zero transformation logic. Just inputs, signals, and event handlers.

That last point is the one that surprised me. By the time I had 60+ pipes, my own components had stopped having transformation methods at all. The class became data; the template became an algorithm. Some people will find that ugly. I find it honest that the template is already where transformation happens conceptually, so making it the literal place too removes a layer of indirection.

Six patterns I’d reach for

The library’s docs site has six full recipes, each with a live interactive playground. Here’s the abbreviated tour, one pattern per pipe-composition shape.

1. Recursive walker for rendering unknown JSON

You have a value of unknown shape. Render it as a tree.

import { Component, input } from '@angular/core';
import { JsonPipe } from '@angular/common';
import { IsArrayPipe, IsObjectPipe, PairsPipe } from 'ngx-transforms';

@Component({
  selector: 'app-tree-node',
  standalone: true,
  imports: [JsonPipe, IsArrayPipe, IsObjectPipe, PairsPipe, TreeNode], // ← self-import
  template: `
    @if (value() | isArray) {
      <ul>
        @for (item of asArray(); track $index) {
          <li><app-tree-node [value]="item" /></li>
        }
      </ul>
    } @else if (value() | isObject) {
      <dl>
        @for (entry of value() | pairs; track entry[0]) {
          <dt>{{ entry[0] }}</dt>
          <dd><app-tree-node [value]="entry[1]" /></dd>
        }
      </dl>
    } @else {
      <span>{{ value() | json }}</span>
    }
  `,
})
export class TreeNode {
  value = input<unknown>(null);
  asArray = () => this.value() as unknown[];
}

Three pipes (isArray, isObject, pairs) and a self-importing standalone component. The whole walker is the template. No class methods.

2. Sequential chain to slug from any title

<small>/blog/{{ title | truncate:60:'':true | latinize | slugify }}</small>

Truncate first to preserve word boundaries while spaces still exist, latinize to flatten diacritics to ASCII, slugify to lowercase and replace whitespace. Order matters. The chain reads top-to-bottom like a pipeline diagram.

3. Parallel fan-out — KPI dashboard

One source array, six independent aggregations:

<div class="card">{{ orders | sum:'total' | currency }}</div>
<div class="card">{{ orders | average:'total' | currency }}</div>
<div class="card">{{ orders | max:'total' | currency }}</div>
<div class="card">{{ orders | sum:'fileSizeBytes' | bytes }}</div>
<div class="card">{{ orders | pluck:'customer' | unique | count }}</div>
<div class="card">{{ completed | percentage:orders.length:1 }}%</div>

Pure pipes memoize per chain. The six cards don’t recompute unless the input array reference changes and even then, only chains depending on the changed data re-run. You don’t pay for the cards you don’t visually update.

4. Conditional substitution for avatar fallback

@if (!(user.email | isEmpty)) {
  <img [src]="user.email | gravatar:64" />
} @else if (!(user.name | isEmpty)) {
  <span class="initials">{{ user.name | initials }}</span>
} @else {
  <icon name="user" />
}

isEmpty gates each branch. gravatar and initials handle their respective renders. Adding a fourth fallback (say, a per-tenant company logo) is one @else if block no class changes.

5. Scan-and-transform for PII leak detection

Extract sensitive patterns from unstructured text, render each detection through its mask pipe:

<section>
  <h3>Cards ({{ (text | match:cardRe).length }})</h3>
  @for (card of text | match:cardRe; track $index) {
    <code>{{ card | creditCardMask }}</code>
  }
</section>

<section>
  <h3>Emails ({{ (text | match:emailRe).length }})</h3>
  @for (email of text | match:emailRe; track $index) {
    <code>{{ email | emailMask }}</code>
  }
</section>

Detection regex says what to find. Mask pipe says how to redact. They evolve independently.

6. Diff-driven UI for dirty-form tracking

One signal holds the original snapshot, another holds the live edits. One pipe expression answers every dirty-state question the UI has:

<pre>{{ current() | diffObj:original() | json }}</pre>

<button [disabled]="(current() | diffObj:original()) | isEmpty">
  Save changes
</button>

That diff object IS the PATCH body. Send it as-is to your API. On save success, promote current → original and the form goes clean automatically. No dirty flags, no reducers.

Engineering choices worth talking about

A few things that turned out matter more than I expected.

Tree-shaking, verified

sideEffects: false in the published package.json. Every pipe is a standalone class with no top-level side effects. Modern bundlers tree-shake by default. The library ships as a single FESM bundle at 168 KB raw / 27.9 KB gzipped / 23.3 KB brotli that’s the whole thing. Real consumer apps include only the pipes they import, plus the deps those pipes actually need.

Three pipes do pull their own deps and are worth flagging if you care about size: qrCode (qrcode), barcode (jsbarcode), gravatar (js-md5), asciiArt (ts-ascii-engine). The other 86 pipes are pure standalone-pipe code.

Bundle size is enforced in CI via size-limit because every PR runs against fixed thresholds. Regressions fail the build.

Multi-version Angular CI

Claiming “supports Angular 17–21” is cheap; verifying it is the work. A nightly cron in GitHub Actions scaffolds a fresh ng new project at each of Angular 17, 19, and 21, installs the locally-packed library tarball, and runs ng build. If any version breaks, the matrix reports red within 24 hours. That’s how you find out the AOT compiler tightened a check between 19 and 20 before a user files an issue.

Type narrowing throughout

Every pipe’s transform() signature is (value: unknown, ...args) (or a tighter type when it makes sense). No any. The pipes do runtime guards for null/undefined/wrong-type input and degrade to sensible defaults instead of throwing. That mismatch between TypeScript’s compile-time narrowing and JavaScript’s runtime reality is where most pipe libraries get sloppy; this one tries hard not to.

Deliberately pre-1.0

The library is at 0.3.2. I’m not in a hurry to cut 1.0.

Here’s the reasoning: 1.0 is a promise about API stability under real-world pressure, not an internal “we feel ready” signal. Plenty of libraries have shipped 1.0 prematurely and either had to ship 1.x with breaking changes (eroding trust) or sat frozen at 1.x while everyone migrated to 2.x. I’d rather absorb the discovery period in 0.x where breaking changes are still socially expected.

The 1.0 trigger isn’t a calendar date. It’s a signal pattern: real consumers reporting non-trivial issues that I fix, a handful of stars, weekly npm downloads in the hundreds, a stretch of weeks without breaking changes. When that emerges organically, the version bump just acknowledges what’s already true.

Pure pipes + Signals: The Underrated Combo

A practical note for anyone using signals (you should be, in new code).

Pure pipes and signals are weirdly complementary. The signal triggers change detection when its value changes; the pipe memoizes the transformation result keyed off the input reference. The net effect is that a derived view defined as mySignal() | someChain | json recomputes precisely when it needs to and not a moment more without you writing a single computed().

This is the real reason I think pipes are due for a comeback. Signals fixed Angular’s reactivity story, and pure pipes are the lightweight derived-value mechanism that pairs with signals. computed() is great for class-level derived values; pipes are great for template-level ones. Use the right tool for the surface.

Try it / contribute

If you find a pipe missing, a recipe pattern that should be documented, or a real bug, please file an issue. The discovery period that gates 1.0 lives or dies on real consumer feedback, so even a “I tried to do X and got confused” is genuinely useful.

If you write Angular and want pipes that compose, you have 90 of them now. Six recipes worth of patterns to lift directly. And a maintainer (me) who’d rather hear what’s wrong than guess.

Build something with it. Let me know what breaks.

Architecting for Scale in MENA: A First-Principles Approach to Multi-Tenant SaaS

When we set out to build digital infrastructure for the North African market, we noticed a recurring problem: businesses were either trapped in rigid, legacy systems or trying to force-fit global templates that didn’t align with local logistical and payment realities.

As an Information Systems Architect, I believe that true innovation isn’t about adding layers of complexity; it’s about stripping problems down to their fundamental truths. This “first-principles” thinking is what drove me to found WeULT, a digital products studio based in Tunisia, and it is the exact philosophy behind our flagship product, Sougix.

Here is a look at the architectural decisions and engineering principles that allow us to build sovereign, scalable ecosystems for the modern web.

The Challenge: Multi-Tenant Architecture at Scale
Building a bespoke application for a single client is one thing. Building a multi-tenant e-commerce Platform-as-a-Service (PaaS) where hundreds of merchants operate their own storefronts, manage their own data, and route through custom domains requires a completely different level of rigor.

With Sougix, our goal was to allow a Tunisian business owner to launch a fully functioning storefront in minutes, complete with plugins for local delivery and payments. To achieve this, the architecture had to be bulletproof.

1. Decoupled and Scalable Tech Stack
We rely heavily on a modern, decoupled stack. By utilizing Node.js and Express.js for our core business logic, paired with GraphQL for highly efficient data fetching, we ensure that storefronts load instantly, even under heavy traffic.

The Database Layer: Handling multi-tenancy requires strict data isolation. Using PostgreSQL, we architected a schema that guarantees absolute data privacy between tenants while maintaining the ability to run platform-wide analytics efficiently. We layer this with Redis for high-speed caching of product catalogs and user sessions.

The Frontend: By separating the backend APIs from the presentation layer (using React/Vue.js), we give merchants the ability to use visual store builders and dynamic themes without ever risking the integrity of the core engine.
**

  1. DevOps and Continuous Integration**
    You cannot build for scale without automating your deployments. In our consulting work at WeULT—such as engineering the DevOps hub for 3S—we implemented full CI/CD pipelines using Docker and Kubernetes. We apply that same enterprise-grade infrastructure to our own SaaS. Whether we are pushing an update to Sougix or deploying a custom ERP for a client, our pipeline ensures zero downtime and absolute security (RBAC, 2FA, and audit trails are standard from day one).

Engineering a Movement, Not Just Software
At WeULT, we don’t just write code to solve today’s problems. Whether we are building a bespoke HR management platform for Sopra or expanding the Sougix ecosystem, the goal is always to apply modern software engineering speed to traditional workflows.

We believe that technology should never dictate the limits of a business; it should act as the ultimate multiplier of its ambition. By building world-class technology locally, we are proving that high-performance, sovereign digital infrastructure can, and should, be engineered right here in Tunisia.

If you are building multi-tenant architectures, dealing with complex API integrations, or navigating the tech landscape in the MENA region, I’d love to connect and talk architecture.

About the Author
Iyed Hosni is an Information Systems Architect, Software Engineer, and the Founder and CEO of WeULT. He specializes in translating complex business requirements into high-performance technical realities, leading the development of scalable SaaS platforms and enterprise ecosystems.

read more

Scraping dynamic pages with Python, Playwright and AWS Lambda

If you have ever pointed BeautifulSoup at a modern job board and then wondered why you got only a fraction of the visible listings, welcome to the club. Many of these pages behave like mini frontends: data appears in chunks, the DOM keeps changing, and scrolling is effectively part of the API contract. For this walkthrough, I used the Dev IT Jobs portal as a practical example.

This post breaks down a Lambda scraper that survives that behavior. The idea is simple but battle-tested: use Playwright + headless Chromium to trigger dynamic loading, extract records while scrolling, shape the result with Polars, and store snapshots as parquet in S3 partitions. It is serverless, schedule-friendly, and ready for downstream analytics without extra cleanup.

Imports and runtime setup

Packages used in the Lambda:

  • playwright: runs a Chromium browser so JavaScript-rendered cards can be collected,
  • boto3: uploads the final parquet artifact to S3,
  • polars: converts raw records into a dataframe and writes parquet efficiently,
  • pendulum: provides cleaner timestamp handling for metadata and S3 partition keys,
  • aws_lambda_typing: adds explicit types for the Lambda handler contract (optional).

Standard-library helpers:

  • logging: emits structured runtime logs for CloudWatch,
  • os: reads environment configuration such as BUCKET_URL,
  • tempfile: writes temporary files to Lambda’s /tmp storage,
  • time: adds short pauses so lazy-loaded DOM elements can render,
  • urllib.parse: parses the bucket name from URL-like configuration values.

Opening the page and targeting the scrollable list

The first step is launching Chromium in headless mode and identifying the actual element that reacts to scroll events. On this page, .joblist-container is where new cards are appended, so scrolling the whole page does not reliably pull in the full dataset.

with sync_playwright() as p:
    browser = p.chromium.launch(
        headless=True,
        args=[
            "--disable-gpu",
            "--disable-dev-shm-usage",
            "--disable-setuid-sandbox",
            "--no-sandbox",
            "--single-process",
        ],
    )
    page = browser.new_page()
    page.goto(url, wait_until="networkidle")

    container = page.locator(".joblist-container").first

Those Chromium flags are not “nice-to-have tuning”, but rather we need to set them so that playwright works correctly in AWS Lambda:

  • --disable-gpu avoids hardware acceleration paths that do not help here,
  • --disable-dev-shm-usage steers Chromium away from shared-memory assumptions that can be too tight in serverless containers,
  • --disable-setuid-sandbox and --no-sandbox help when sandbox initialization fails in restricted environments,
  • --single-process also reduced startup flakiness. Without this set, the function was far more likely to fail before scraping anything useful.

Scraping records while the page reveals more items

The extraction loop does one boring but powerful thing on repeat: wait a moment, read visible li cards, save what matters, scroll, and repeat. Dynamic pages frequently repaint old nodes, so handled_jobs is a must-have to avoid collecting duplicates when the same listing shows up again after a re-render.

postings = []
found_last = False
handled_jobs = set()

while not found_last:
    time.sleep(0.5)  # Allow site to load new data after scroll
    li_items = container.locator("li")

    for i in range(li_items.count()):
        item = li_items.nth(i)

        # Sentinel block that appears at the end of the list
        title = item.locator(".jobteaser-name-header").first.text_content().strip()
        if title == "Haven't found your dream Data job yet?":
            found_last = True
            break

        # Gather any fields you care about.

        postings.append(...)
        handled_jobs.add(...)  # Usually the job URL or another stable identifier

    page.eval_on_selector(
        "div.joblist-container div div",
        "el => { el.scrollTop += 288 }",
    )

The sentinel title (Haven't found your dream Data job yet?) gives a deterministic exit and avoids guesswork like “scroll exactly N times and hope for the best.”

One extra guardrail worth adding

I also recommend a hard cap on scroll iterations. If the markup changes and the sentinel disappears, the function still exits cleanly instead of looping until timeout.

max_scrolls = 300
scrolls = 0

while not found_last and scrolls < max_scrolls:
    ...
    page.eval_on_selector("div.joblist-container div div", "el => { el.scrollTop += 288 }")
    scrolls += 1

if scrolls == max_scrolls:
    logger.warning("Max scroll limit reached before sentinel. Site layout may have changed.")

Writing parquet and uploading to S3

After scraping, the handler converts the payload into a Polars dataframe, normalizes column types as strings, writes parquet to /tmp, and uploads the file to a partitioned S3 key. This makes downstream ingestion easier, since each Lambda run produces a compact file in a predictable location.

def lambda_handler(event: EventBridgeEvent, context: Context) -> dict[str, Any]:
    site_data = _parse_site(url="https://devitjobs.uk/jobs/Data/all")
    df = pl.DataFrame(site_data)
    df = df.select(pl.all().cast(pl.String))  # Casting to string for simplicity

    date = pendulum.now()
    file_name = f"{date.timestamp()}.parquet"
    file_path = f"{tempfile.gettempdir()}/{file_name}"
    df.write_parquet(file_path)

    bucket_name = urlparse(_BUCKET_URL).netloc
    client = boto3.client(service_name="s3")

    # Each directory creates a partition when you use Glue Crawler. 
    # You can go even deeper, if you want.
    key = f"dev_it_jobs/postings/year={date.year}/month={date.month}/{file_name}"

    client.upload_file(Filename=file_path, Bucket=bucket_name, Key=key)

    return {"statusCode": 200, "message": "Dev IT Jobs handled correctly"}

Parquet keeps storage efficient and query-friendly, and the date partitioning keeps recurring snapshots tidy for Athena, Spark, or any ETL flow you throw at it.

Practical notes for dynamic pages in Lambda

If I had to compress this whole post into one sentence, it would be this: dynamic scraping in Lambda is mostly about controlling browser behavior, not parsing HTML faster. Once the browser is stable, the rest becomes a clean data-engineering loop.

What to take out of this post is a practical blueprint you can reuse on similar pages. First, identify the actual scrollable container that triggers lazy loading. Second, keep the extraction loop stateful and deterministic (handled_jobs, found_last, and ideally a max-scroll guardrail). Third, write the output in an analytics-friendly format (parquet) and store it in partitioned S3 paths so downstream jobs can read incrementally. It is a simple pattern, but it scales surprisingly well for scheduled ingestion and is easy to debug when the target site changes.

I thought Mnemara would save tokens for cloud based models, that was wrong.

Mnemara was built for local models. I built it for Claude too. Only one of those was a good idea.

The context management problem felt real, and it was. I was running Gemma 9B locally for parts of Aethon Autopoiesis — the MUD-based AI research project I’ve been pouring time into — and a 16k context window doesn’t last long when you’re trying to hold a coherent session across a real workflow. Tool calls take space. Thinking blocks take space. Read outputs take space. The model can technically still talk to you at turn forty, but its window has filled with the rinds of the last thirty turns and there’s no room left to actually do work.

The lever was obvious. If the window is the binding constraint, manage the window. Strip thinking blocks once they’ve served their purpose. Stub out file contents you’ve already read. Drop oldest-first when you’re up against the ceiling. Pin what matters so it never gets evicted by accident. Give the operator a TUI that makes all of it visible and editable instead of hidden behind opaque magic.

That’s Mnemara. A rolling-context conversation runtime with pinned slots, judgment-driven eviction, transparent turn storage, and a role doc that sits in the system prompt. The whole thing is about making the context window workable — letting a small model punch above its window by aggressively curating what’s in there. It does that job well. I’ve run Gemma sessions for hours that stayed coherent because Mnemara was holding the state and the model didn’t have to.

Then I ported the same runtime to Claude.

The features still worked. The TUI still rendered. The eviction commands still freed tokens on the turn I ran them. Mechanically, nothing was broken. But something was off, and it took a few real sessions to put my finger on what.

Cloud models don’t have the same constraints. Claude Sonnet has a 200k context window. The window is rarely the binding thing — you can fit most of a codebase in there and still have room to think. The constraint isn’t “how much fits.” It’s “how much do you pay to send it.”

And that’s where Mnemara’s whole model inverts.

Cloud APIs use prompt caching. You hit the cache by sending the same prefix turn after turn — same system prompt, same early context. Cache hits cost roughly a tenth of fresh reads. So the economic shape of a cloud session is: send a stable prefix, let it cache, ride that cache for as long as the TTL holds.

Eviction breaks the cache. Every time Mnemara compresses, drops oldest, strips thinking blocks, or rearranges the window, the prefix changes. The cache invalidates. The next turn isn’t a cached read of the smaller window — it’s a fresh, uncached read of whatever’s left. The tokens you “saved” by evicting come back as a cache miss on the next call, billed at full price.

You don’t save tokens. You spend them. Just on a delay.

That’s the inversion, and it’s worth saying out loud because the mechanism is sneaky: the per-turn metric Mnemara reports — “freed 12,400 tokens” — is real. The window genuinely shrank. The bill genuinely got worse anyway, because the next turn had to rebuild a context the cache was about to serve for free. Local: tokens are the wall. Cloud: tokens are the bill, and the bill has a discount you just threw away.

There’s a second mismatch underneath the first. Local models, when you run them yourself, have real persistence between calls — the process is yours, the state is yours, “rolling context” maps onto something the model actually lives inside. Cloud models are stateless. Each API call rebuilds the conversation from whatever you send. The “rolling window” abstraction is doing nothing the model can feel. It’s a fiction you’re maintaining for your own convenience, and on the cloud side it’s an expensive fiction.Local models are stateless as well, but with the right set of tools, it’s not quite the same.

So Mnemara stays. But it stays where it belongs: local model infrastructure. Small windows, real persistence, no caching layer to break. It’s the right tool for that job and I’m going to keep building on it for the parts of Aethon Autopoiesis that run on local backends — Gwen for gameplay, Huginn for code, anything else I end up putting on Ollama. The role-doc-as-system-prompt pattern, pinned slots for stable lore and player state, judgment-driven eviction over mechanical FIFO — all of that earns its keep when the window is genuinely scarce.

For cloud, the right approach is roughly the opposite of what Mnemara does. Keep prefixes stable. Don’t rearrange. Append rather than evict. When the conversation is genuinely done, end it and start fresh — don’t try to surgically shrink a live session. Treat the context window as a single send, not a managed state. The model isn’t living inside it between turns. You are.

That’s the lesson, and it cost me a few weekends to learn. Worth it. The mistake was assuming “context management” meant the same thing on both sides of the API boundary. It doesn’t. Local models reward you for managing the window. Cloud models reward you for leaving it alone.

Drafted by Claude Aethon Autopoiesis 1.3.3.7 (Herald) — 2026-05-17

Mnemara is useful for pinning a turn zero, then again you can just assign it a role doc on start up without an extra software.

Samuel Beckett — “Ever tried. Ever failed. No matter. Try again. Fail again. Fail better.”