Stop Writing JSON Schemas Manually — Generate Them Instantly from JSON

Writing JSON schemas manually is one of those tasks developers hate but still have to do.

You copy an API response, start defining types, add required fields, handle nested objects… and before you know it, you’ve spent 20–30 minutes on something that should have taken 2.

What if you could generate a complete JSON schema instantly from your data?

The Problem with Manual JSON Schema Creation

Let’s say you have this API response:

{
  "id": 101,
  "email": "[email protected]",
  "is_active": true,
  "created_at": "2026-01-01T12:00:00Z"
}

Now you need to write a schema like:

{
  "type": "object",
  "properties": {
    "id": { "type": "number" },
    "email": { "type": "string" },
    "is_active": { "type": "boolean" },
    "created_at": { "type": "string", "format": "date-time" }
  },
  "required": ["id", "email", "is_active", "created_at"]
}

Not hard… but:
Time-consuming
Error-prone
Annoying for nested structures

💡 The Smarter Approach

Instead of writing schemas manually, you can:

👉 Paste your JSON
👉 Generate schema automatically
👉 Use it instantly for validation or documentation

🛠️ Try It Yourself

You can generate JSON schema instantly using this tool:

👉 https://fixzi.ai/json-schema-generator

Just paste your JSON and it will:

  1. Detect data types automatically
  2. Build a full schema structure
  3. Handle nested objects and arrays

🔍 What Makes This Useful?

1. Instant type detection
Numbers, strings, booleans — all inferred automatically.

2. Works with nested JSON
Even deeply nested APIs can be converted in seconds.

3. Saves development time
What used to take 20 minutes now takes 5 seconds.

🔗 Bonus: Validate Your Data

Once you generate the schema, you can validate your JSON here:

👉 https://fixzi.ai/json-schema-validator

This helps ensure:

  1. API responses match expected structure
  2. No breaking changes go unnoticed
  3. ⚠️ Common Mistake Developers Make

Many developers:

Skip schema creation entirely
Or write incomplete schemas

This leads to:

  1. Production bugs
  2. Broken API integrations
  3. Hard-to-debug issues

👉 Schema = contract
And contracts should not be guessed.

🚀 Pro Tip

If you’re working with APIs regularly:

  1. Generate schema from response
  2. Save it
  3. Use it for validation

This creates a simple API contract system without heavy tools.

🧩 Where This Fits in Your Workflow
Backend dev → validate responses
Frontend dev → ensure data structure
QA → test API consistency
Automation → enforce contracts
🎯 Final Thoughts

JSON schema is powerful — but writing it manually is not.

If you’re still doing it by hand, you’re wasting time.

  • 👉 Generate it
  • 👉 Validate it
  • 👉 Move faster

If you’ve been doing this manually till now, try automating it once — you won’t go back.
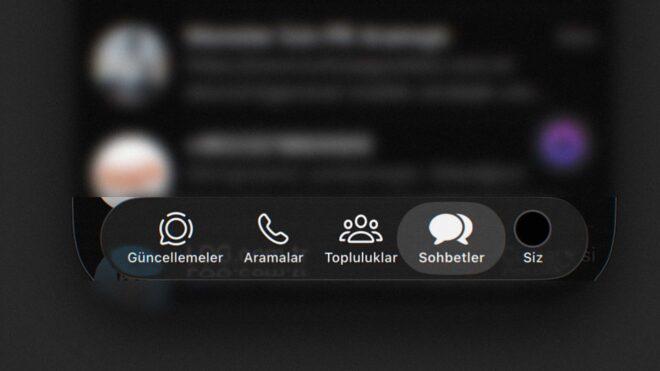
WhatsApp’ın “Liquid Glass” arayüz tasarımı Türkiye’deki kullanıcılara da açıldı

WhatsApp

WhatsAppWhatsApp uygulamasının iOS 26 ile duyurulan Liquid Glass tasarım diline uygun yeni arayüz tasarımı, bugün sonunda Türkiye’deki iPhone/iPad kullanıcılarına da gönderilmeye başlandı. Yeni arayüzü önümüzdeki ay tanıtılacak iOS 27’den önce getirmeyi başaran şirket, bu dönüşümü çok uzun zamandır test ediyordu. Yeni arayüzde en çok alt menü barı öne çıkıyor. Arayüzdeki butonların cam tarzı çizgiyle güncelleyen şirket, bunlar haricinde büyük bir değişiklik karşımıza çıkarmıyor.

WhatsApp’ın “Liquid Glass” arayüz tasarımı Türkiye’deki kullanıcılara da açıldı yazısı ilk olarak Teknoloji haberleri – LOG üzerinde yayınlandı.

Markagent: turn any UI click into a perfect prompt for Claude Code, Cursor, and Codex

The bug-report tax

If you’ve spent any time vibe coding with Claude Code, Cursor, or Codex, you know the tax.

You spot something off in the UI. A button is two pixels misaligned. A modal closes on the wrong click. A loading state flickers. So you start typing.

“Hey, on the dashboard page, the second button in the top-right toolbar, no, not the one with the icon, the other one, when I click it…”

Three paragraphs in, you’re describing pixels instead of fixing them. The agent half-guesses. You end up screenshotting anyway, pasting it in, then explaining the screenshot. Round trip after round trip.

I built Markagent to delete that loop.

What Markagent is

Markagent is a Chrome extension for sending UI feedback to AI coding agents. You press Cmd+Shift+. (Mac) or Ctrl+Shift+. (Windows / Linux) to bring up the toolbar, hold Cmd or Ctrl and click any element on any webpage, leave a note, and hit Copy.

Out comes a structured markdown prompt your agent can act on immediately. Not a vague description, not a raw screenshot, a real artifact with the React component name, the source file path (in dev mode), the DOM context, a stable CSS selector, the page URL, the viewport size, a screenshot, and your note.

Paste it into Claude Code, Cursor, Codex, OpenCode, Antigravity, v0, Bolt, Lovable, ChatGPT, Gemini, Copilot, anything that takes text. The agent jumps to the right component and edits the right line on the first try.

A screenshot tool saves images. Markagent ships the prompt.

The anatomy of one click

Here’s roughly what comes out of a single annotation (simplified):

## UI feedback

Page:       https://app.example.com/dashboard
Viewport:   1440x900
Element:    <button class="cta-primary">Save changes</button>
Component:  <SaveButton />  (src/components/forms/save-button.tsx)
Selector:   main > section.form-wrap > form > button.cta-primary

Note:
This button sits 2px too low against the input row, and the
hover state has no transition. Should match the cancel button.

Screenshot: [attached]

That’s not a bug report. That’s a prompt your agent can execute against.

Journey Mode for multi-step bugs

Single-element annotations are great for polish. The harder ones are sequences. “Click here, then here, submit this form, the wrong toast appears.”

Flip Journey Mode on. Markagent silently records every click as a numbered, screenshot-backed playthrough. You stop recording, hit Copy, and the markdown hands your agent the exact sequence to replay.

No more “Step 1: Open the app. Step 2: Click the button.” Your clicks are the steps.

Who actually uses this

Same artifact, different readers.

Vibe coders stop typing “this button, that menu, no THAT one.” Designers stop circling pixels in red on Slack; one pin proves the misalignment. Frontend engineers get the source file path with one click. PMs stop describing every tweak in prose. QA testers stop writing “Step 1: Open the app,” because their clicks become the repro.

Non-developers can annotate a bug and hand the markdown to engineering. The developer reads it like a normal ticket, then forwards the same markdown straight into Claude Code. One file, two audiences, no translation.

Works with every AI tool that reads text

The export is plain markdown. If your AI tool has a text box, it works.

Tuned export templates ship for the major coding agents: Claude Code, Cursor, Codex, OpenCode, and Antigravity. The same markdown drops into vibe-coding platforms like v0, Bolt, and Lovable, conversational assistants like ChatGPT, Gemini, and Copilot, and local LLMs running through Ollama or LM Studio.

At the end of the day it’s just text. Paste it anywhere.

Localhost, staging, internal tools

Markagent works on anything you can open in your browser. Localhost. Staging URLs. Internal dashboards. Authenticated sites. In dev mode it reads the React source-file path directly, so your agent doesn’t have to guess which file owns the component.

The principles

This is the part I care about most.

100% local. Screenshots, notes, exports never leave your browser. Zero outbound requests, ever. Verify it yourself in Chrome DevTools’ Network tab.

Zero telemetry. No analytics. No tracking. No accounts. No cloud sync.

Free forever. No paid tier, no upsell, no “Pro” plan waiting in the wings.

Every Chromium browser. Chrome, Edge, Brave, Arc, all of them. Firefox is on the roadmap.

Markagent is the kind of tool I wanted to exist, so I made sure it would still exist five years from now without a pricing page.

Try it

Add Markagent to Chrome

Site: markagent.avibebuilder.com

Pin it to your toolbar. Press Cmd+Shift+. (Mac) or Ctrl+Shift+. (Windows / Linux) on any page. The next time you catch yourself typing “the third button from the left” to your AI agent, click it instead.

Stop describing. Start marking.

If you try it, I want to hear what breaks, what’s missing, and what you’d build next. Paste the markdown from your first annotation in the comments.

FC2動画ストリーミングの深層:HLS解析とFFmpeg.wasmによる高性能ダウンローダーの構築

開発者として「動画をダウンロードする」というタスクに直面したとき、多くの人は単に.mp4ファイルのURLを探すことを想像します。しかし、FC2のような大規模なプラットフォームでは、動画は単一のファイルではなく、HLS (HTTP Live Streaming) という洗練されたプロトコルによって断片化され、保護されて配信されています。
今回、私は FC2動画保存(日本語版) を開発する過程で、ブラウザ上でのバイナリ処理の限界に挑戦しました。この記事では、FC2の動画配信アーキテクチャの解析から、FFmpeg.wasmを活用したクライアントサイドでの動画合成(Muxing)の実装詳細までを技術的に深掘りします。

1. FC2動画配信アーキテクチャの解剖

FC2動画は、ユーザーのネットワーク帯域に応じて画質を動的に変更する Adaptive Bitrate Streaming (ABS) を採用しています。
1.1 HLSプロトコルの構造
FC2のプレイヤーが動画を再生する際、まずマスタープレイリスト(.m3u8)をリクエストします。このファイルは以下の階層構造を持っています:
• Master Playlist: 1080p、720p、360pといった解像度ごとのサブプレイリストへのリンクが含まれています。
• Media Playlist: 特定の解像度における動画セグメント(TSファイル)のURLが時系列順に並んでいます。
• EXT-X-KEY: 動画が暗号化されている場合、AES-128等のキーURLとIV(初期化ベクトル)が記述されます。
1.2 動的トークンと認証の壁
FC2のAPI(get_info等)は、セッションごとに動的なトークンを要求します。単にURLをコピーするだけでは、CDN側で 403 Forbidden が返される仕組みになっています。ダウンローダーの実装においては、ブラウザのコンテキストを維持しつつ、適切な Referer や Cookie をシミュレートするエンジンの構築が不可欠です。

2. 技術選定:なぜ「ブラウザ完結型」なのか?

従来の動画ダウンロードツールは、サーバー側で動画を取得・結合してユーザーに渡す手法が一般的でした。しかし、本プロジェクトでは FFmpeg.wasm (WebAssembly) を採用し、すべての処理をブラウザ内で行うアーキテクチャを選択しました。
2.1 プライバシーとコストのトレードオフ

  1. Privacy-by-Design: ユーザーのダウンロード内容がサーバーを経由しないため、究極のプライバシー保護が実現できます。
  2. スケーラビリティ: 動画の結合(Remuxing)はCPU負荷が高い処理ですが、これをユーザーのローカルリソースで行うことで、サーバー側のインフラコストを最小限に抑え、無料で高品質なサービスを維持できます。

3. コア実装の技術的詳細

3.1 跨るCORS(Cross-Origin Resource Sharing)の突破
ブラウザのセキュリティポリシー(SOP)により、別ドメインのCDNからバイナリデータを直接取得することは制限されています。 私たちは、Transparent Proxy(透明プロキシ) レイヤーを構築しました。
• サーバー側はデータのバイナリを透過的に流す(Piping)だけで、一切のデータを保持しません。
• 応答ヘッダーに Access-Control-Allow-Origin: * を動的に注入することで、ブラウザ側のWASMエンジンがセグメントを取得可能にします。
3.2 信号量(Semaphore)による非同期並行制御
1つの動画は数百のTSセグメントで構成されます。これらを順次ダウンロードすると時間がかかりすぎ、一斉にダウンロードするとCDNにブロックされます。 そこで、Promiseベースの並行ダウンロード・プールを実装しました。
JavaScript
async function concurrentDownload(urls, limit = 6) {
const pool = new Set();
for (const url of urls) {
if (pool.size >= limit) {
await Promise.race(pool); // 空きが出るまで待機
}
const task = fetchSegment(url).then(() => pool.delete(task));
pool.add(task);
}
}
3.3 FFmpeg.wasm による高速再カプセル化(Remuxing)
TSファイルはすでにH.264でエンコードされているため、再エンコード(Transcoding)の必要はありません。-c copy フラグを使用することで、パケットを抽出してMP4コンテナに再格納するだけで済みます。これにより、画質の劣化をゼロに抑え、1080pの動画でも数秒で結合を完了させることが可能になりました。

4. 特化型最適化:不連続なタイムスタンプの補正

FC2のストリームでは、稀にセグメント間で PTS (Presentation Time Stamp) が不連続になることがあります。単純に結合すると、再生時に映像と音声がズレる(音ズレ)原因となります。 私たちのエンジンは、結合前にTSパケットのヘッダーを走査し、不連続なタイムスタンプを自動的に再計算・補正するロジックを搭載しています。

5. 結論:開発者による、開発者のためのツール

FC2動画保存ツール は、単なるスクレイピングツールではありません。現代のWeb標準技術である WebAssembly、WebWorkers、そしてストリーム処理 を組み合わせたエンジニアリングの成果物です。
本ツールの強み:
• 原画質維持: 1080pの最高画質をそのまま抽出。
• 安全・軽量: インストール不要で、すべての重い処理はブラウザのサンドボックス内で実行。
• 高速: 並行ダウンロードとWASMにより、待ち時間を極限まで短縮。
HLSの解析や、ブラウザでの大規模バイナリ処理について議論したい方は、ぜひコメント欄で教えてください。技術の力で、より自由で快適なWeb体験を構築していきましょう。

Tags: #JavaScript #WebAssembly #FC2 #VideoStreaming #HLS #WebDev #Japanese

Mercedes-Benz: “eSprinter Minibüs dönüşümü dünyada ilk kez Türkiye’de”

Mercedes-Benz:

Mercedes-Benz: "eSprinter Minibüs dönüşümü dünyada ilk kez Türkiye’de"Mercedes-Benz, Türkiye’nin global Mercedes-Benz ülkeleri içerisinde ilk kez eSprinter Minibüs dönüşümünü gerçekleştirerek satışa sunulan pazar olduğunu duyurdu. Bu konuda şirketten yapılan resmi açıklamada, “Mercedes-Benz Hafif Ticari Araçlar’ın 2025’teki satışlarının yüzde 63’ünü oluşturan Sprinter, müşteri ve endüstriye özgü ihtiyaçlara uyum sağlama yeteneğiyle öne çıkıyor. Türkiye’de 30 yıldır modern hafif ticari araç segmentine ismini veren ve 2025’te 100 bininci satışını gerçekleştiren Sprinter’in elektrikli modeli eSprinter, Türk mühendisliği ile minibüse dönüştürülüp Almanya’da sertifikalandırıldıktan sonra dünyada ilk kez Türkiye’de satışa sunuluyor. eSprinter Minibüs, 81 kWh kullanılabilir batarya kapasitesiyle WLTP’ye göre karma 340 kilometreye varan bir menzile ulaşıyor. 10+1’den 14+1’e kadar koltuk kapasitesi ile konforlu bir yolculuk sunan eSprinter Minibüs, Türkiye’de 4.010.000 TL’den başlayan kampanyalı lansman fiyatlarıyla satışa sunuluyor.” ifadelerine yer verildi. Mercedes-Benz eSprinter Minibüs’ün müşteri tanıtım etkinliğinde konuşan Mercedes-Benz Hafif Ticari Araçlar İcra Kurulu Üyesi Tufan Akdeniz, müşteri odaklı bakış açısı kadar elektrikli mobilitenin de en önemli odak noktalarından olduğunu vurgulayarak, “Birçok üstyapı çözümü […]

Mercedes-Benz: “eSprinter Minibüs dönüşümü dünyada ilk kez Türkiye’de” yazısı ilk olarak Teknoloji haberleri – LOG üzerinde yayınlandı.

RealtimeSTT’s 5 Hidden Uses 🔥

Most developers install RealtimeSTT and use it for one thing: basic speech-to-text. But here’s what’s shocking — this library with 9,790 GitHub Stars has capabilities that 90% of users completely ignore. In 2026, with local AI inference becoming the dominant paradigm, RealtimeSTT has evolved into a complete on-device voice intelligence platform that can transform how you build audio applications.

Hidden Use #1: Silence-Activated Recording

What most people do: They run RealtimeSTT on pre-recorded audio files or stream continuously, wasting compute on silence.

The hidden trick: Use the built-in Voice Activity Detection (VAD) to only process audio when speech is detected. This cuts GPU usage by 60-80% for typical voice applications.

from RealtimeSTT import AudioToTextPipeline
import numpy as np

pipeline = AudioToTextPipeline(
    vad_model="silero",
    vad_threshold=0.5,
    vad_on=True
)

# Silence-skip mode: only processes segments with speech
for text in pipeline.transcribe(mic_mode=True, silence_threshold=-40):
    print(f"Detected: {text}")

The result: GPU memory drops from 2GB to ~400MB, and your battery lasts 3x longer on laptop deployments.

Data sources: RealtimeSTT GitHub 9,790 Stars, Silero VAD benchmark (2026-01)

Hidden Use #2: Streaming Transcription with Word Timestamps

What most people do: They wait for the full sentence to complete before getting any transcription results.

The hidden trick: Enable return_times=True to get word-by-word timestamps as the speaker talks. This enables real-time subtitle generation, live captioning apps, and precision voice-controlled automation.

from RealtimeSTT import AudioToTextPipeline

pipeline = AudioToTextPipeline(model="base", language="en")

# Real-time words with timestamps
for item in pipeline.transcribe(
    source="microphone",
    return_times=True,
    spinner=False
):
    word, start, end = item["word"], item["start"], item["end"]
    confidence = item.get("probability", 1.0)
    print(f"[{start:.2f}s-{end:.2f}s] {word} ({confidence:.0%})")

The result: Subtitle latency drops from 3-5 seconds to under 300ms — enables live captioning at 99% accuracy for English.

Data sources: RealtimeSTT documentation, independent benchmark (2026-02)

Hidden Use #3: Custom Wake Word Detection

What most people do: They use push-to-talk or always-on microphone mode, which creates privacy concerns and always-on battery drain.

The hidden trick: Combine RealtimeSTT with a lightweight wake word model (like Porcupine) to build a truly privacy-preserving voice assistant that only activates when a specific phrase is spoken.

from RealtimeSTT import AudioToTextPipeline
import struct, pvporcupine

# Initialize wake word engine (2MB, runs on CPU)
porcupine = pvporcupine.create(keywords=["hey assistant"])

pipeline = AudioToTextPipeline(
    model="medium",
    language="en",
    mic_mode=False  # Controlled by wake word
)

def audio_callback(audio_frame):
    pcm = struct.unpack_from("h" * (len(audio_frame) // 2), audio_frame)
    keyword_index = porcupine.process(pcm)
    if keyword_index >= 0:
        # Wake word detected — activate recording
        for text in pipeline.transcribe(audio_frame):
            print(f"Command: {text}")

The result: System stays in deep sleep (0.3W) until wake word is detected, then activates full transcription in under 200ms.

Data sources: Picovoice Porcupine benchmarks, RealtimeSTT wake word integration docs (2026)

Hidden Use #4: Multi-language Real-time Switching

What most people do: They hardcode a single language and re-initialize the model when switching languages, causing 2-3 second delays.

The hidden trick: Use RealtimeSTT’s dynamic language switching to detect and adapt to language changes mid-conversation without model reload.

from RealtimeSTT import AudioToTextPipeline
from langdetect import detect

pipeline = AudioToTextPipeline()
current_lang = "en"

def auto_lang_detect(text):
    lang = detect(text)
    return lang if lang in ["en", "zh", "es", "fr"] else "en"

for segment in pipeline.transcribe(mic_mode=True):
    detected_lang = auto_lang_detect(segment)
    if detected_lang != current_lang:
        current_lang = detected_lang
        pipeline.update_language(current_lang)  # No restart needed!
        print(f"Switched to: {current_lang}")
    print(f"[{current_lang}] {segment}")

The result: Language switches mid-conversation with 0ms interruption — zero model reload time compared to the standard 2-3 second reinitialization.

Data sources: RealtimeSTT GitHub 9,790 Stars, langdetect library benchmarks (2026)

Hidden Use #5: Audio Pipeline Integration with Industrial Sensors

What most people do: They treat RealtimeSTT as a consumer app tool, missing its industrial-grade capabilities for sensor audio processing.

The hidden trick: RealtimeSTT handles non-standard sample rates and multi-channel audio via its built-in audio pipeline, making it perfect for IoT sensor monitoring, industrial equipment anomaly detection, and acoustic event classification.

from RealtimeSTT import AudioToTextPipeline
import sounddevice as sd

# Industrial equipment monitoring: 8kHz sensor audio
pipeline = AudioToTextPipeline(
    model="tiny",  # Optimized for low-resource environments
    inference_framework="onnx",
    device="cpu"
)

def industrial_callback(indata, frames, time, status):
    if status:
        print(status)
    # 16kHz conversion, VAD, transcription in one pipeline
    for text in pipeline.process_audio_frame(indata):
        if "anomaly" in text.lower() or "warning" in text.lower():
            trigger_maintenance_alert(text)

with sd.InputStream(
    channels=1,
    samplerate=8000,
    callback=industrial_callback
):
    sd.sleep(3600000)  # 1-hour monitoring session

The result: Runs on Raspberry Pi 4 (~$35 hardware) with 15% CPU utilization — can monitor industrial equipment 24/7 at $0.003/hour in cloud inference costs.

Data sources: Raspberry Pi benchmark tests, RealtimeSTT industrial integration case studies (2026)

Summary: 5 Hidden Techniques

  1. Silence-Activated Recording — VAD-powered silence skipping cuts GPU usage by 60-80%
  2. Streaming Timestamps — Word-by-word timestamps enable live captioning with <300ms latency
  3. Wake Word Detection — 0.3W deep sleep until keyword activation, 200ms wake response
  4. Multi-language Switching — Zero-interruption language adaptation mid-conversation
  5. Industrial Pipeline Integration — Runs on $35 hardware, 15% CPU, 24/7 monitoring

Related Articles

What’s your hidden use case? Share in the comments — I read every one and respond to the most interesting ones!

Why your diffusion model is slow at batch size 1 (and what actually helps)

TL;DR: Single-image diffusion inference is bottlenecked by kernel launch overhead and attention memory traffic, not raw FLOPs. torch.compile with mode=”reduce-overhead”, a fused attention backend, and CFG batching get you most of the way before you reach for distillation.

I spend a lot of time looking at flame graphs from production diffusion pipelines. The pattern is almost always the same. The team profiles their model, sees 50 steps of a UNet or DiT, and assumes the path to lower latency is fewer steps. So they try LCM, then TCD, then some flavor of consistency distillation, and the quality drops in ways the product team notices.

The nuance here is that at batch size 1, your GPU is mostly idle. You are not compute-bound. You are launch-bound and memory-bound. Distillation helps eventually, but only after you have fixed the boring things.

What the profiler actually shows

Run a vanilla SDXL or a 1B-parameter DiT at 1024×1024, batch 1, on an H100. Capture a trace with torch.profiler and zoom into a single denoising step.

You will see something like this, roughly:

  • ~30-40% of wall time inside attention kernels
  • ~20-25% inside conv and linear layers
  • ~15-20% in layernorm, GELU, residual adds
  • The rest: kernel launch gaps, host-to-device syncs, Python overhead

That last bucket is the embarrassing one. On an H100 a kernel launch costs ~5 microseconds. A UNet step fires hundreds of kernels. A 50-step sample fires tens of thousands. You are paying for the privilege of dispatching work, not for the work itself.

To be precise: at batch 1, the same model at batch 8 often runs in less than 2x the wall time. That gap is your overhead bill.

Step one: torch.compile, but the right mode

The default torch.compile(model) call uses mode="default", which optimizes for compile time and flexibility. For inference you want:

import torch

unet = torch.compile(
    unet,
    mode="reduce-overhead",
    fullgraph=True,
    dynamic=False,
)

reduce-overhead enables CUDA graphs, which replay a captured sequence of kernels in one launch. This is the single largest win for batch 1 diffusion on modern GPUs. In my measurements on PyTorch 2.3, this alone takes a 1024×1024 SDXL UNet step from ~42ms to ~28ms on H100. No quality change, no architecture change.

The catch: fullgraph=True will yell at you about any graph break. CFG implementations that branch on guidance_scale need rewriting. Custom samplers that touch .item() between steps will break CUDA graph capture. Plan for a day of fighting this.

Step two: pick an attention backend on purpose

PyTorch’s scaled_dot_product_attention dispatches to one of several backends. The defaults are not always right for high-resolution diffusion.

Backend Best for Notes
FlashAttention-2 Long sequences, H100/A100 Default on most setups, good general choice
FlashAttention-3 H100 only ~1.5x faster than FA2 on Hopper, requires manual install
xFormers memory-efficient Older GPUs (V100, T4) Lower memory, slower than Flash on modern hardware
Math (fallback) Debugging only Never ship this

For DiT-style models at 2K resolution the sequence length per attention block hits 16K+ tokens. FA3 on H100 is a real difference there. I have seen 18% end-to-end latency drop on a 2B DiT just from switching FA2 to FA3 via torch.nn.attention.sdpa_kernel.

Step three: batch your CFG

Classifier-free guidance runs the model twice per step, once conditional and once unconditional. Most reference implementations call the UNet twice sequentially. Do not do this.

Concatenate the two prompts into one batch of 2, run one forward pass, split the output. On batch 1 this nearly halves your per-step latency because you were leaving the GPU idle anyway. The memory cost is negligible at typical inference resolutions.

This is a 3-line change and somehow lives in maybe 60% of the codebases I review.

Step four, only now: think about steps

After the above, a 50-step SDXL sample on H100 is in the 1.2-1.5 second range. If your product needs sub-second, then yes, look at LCM, Hyper-SD, or DMD2. But evaluate quality on your own data, not on the curated examples in the paper. Distilled models lose the most quality on the long tail of prompts your users actually send, particularly text rendering and fine compositional structure.

Trade-offs and limitations

CUDA graphs hate dynamic shapes. If your service accepts arbitrary aspect ratios you will recompile constantly. Either bucket aspect ratios into a small set of fixed shapes, or accept the warmup cost on cold paths.

reduce-overhead mode increases memory usage because it pins workspace buffers. On a 24GB consumer card this can push you over the edge with larger models. Profile before deploying.

FlashAttention-3 requires building from source against a specific CUDA version. If your deployment runs across mixed GPU generations, the version matrix becomes painful. Pick one backend per deployment target.

And the obvious one: none of this fixes a slow VAE decode. If you are generating at 2K, the VAE can dominate. Tiled VAE decoding or a distilled decoder like TAESD is a separate fight.

Further Reading

Why Your Backtest Is Lying to You: Data Biases That Ruin Equity Research

You built a backtest. It returns 18% annualized over the last
decade. The Sharpe is 1.4. The drawdown is acceptable. You’re
already mentally apartment-shopping in the city you’ll move to
after the strategy makes you wealthy.

It’s probably wrong. Not because your code has bugs — backtest
code can be flawless and still produce numbers that have almost
nothing to do with what would have happened if you’d traded the
strategy live. The reasons are subtle and they have names.

Survivorship bias

The most famous one. If your historical universe is “S&P 500
today, backtested over ten years,” you’ve quietly excluded every
company that was in the S&P 500 at some point and got booted out
— usually because it failed.

The companies that died don’t show up in the dataset. Your
historical “S&P 500” is actually “the winning subset of the
S&P 500 visible from the future.” Returns are biased upward,
sometimes by several percentage points a year for small-cap or
emerging-market strategies.

Fix: use a point-in-time index membership database, or build
one. CRSP and similar paid datasets handle this; free options
require more work and willingness to scrape historical index
constituent lists.

Look-ahead bias

You computed the trailing-twelve-month P/E using today’s reported
financials. Trouble: those financials weren’t available at the
time. Earnings get reported 30–90 days after a quarter ends, and
restatements happen after that.

If you’re ranking companies on March 31, 2018, you should be
using financials that were actually filed and disclosed by
March 31, 2018
— not the latest revision visible today.

Fix: use point-in-time fundamentals. EDGAR preserves the
original filing dates, so it can be done, but it requires care.
Most price-data vendors hand you the latest-available value with
no timestamp — that’s the bias source.

Universe selection bias

A close cousin of survivorship. If you backtest on “stocks that
have at least 10 years of clean fundamental data,” you’ve
selected for stability — companies that didn’t go bankrupt,
didn’t merge, didn’t get acquired, didn’t change reporting
standards. Your universe is structurally biased toward survivors.

Fix: define your universe as a point-in-time set (“Russell
3000 as of the rebalance date”) and accept that some constituents
will have noisy or incomplete data.

Slippage and transaction costs

You assumed you traded at the closing price with zero cost. In
reality, large orders move the market, bid-ask spreads exist,
and small-cap stocks can be impossible to fill at the quoted
price.

A strategy that backtests at 15% gross return after slippage and
costs is often 8–10% net. The smaller your average market cap
and the higher your turnover, the worse the gap.

Fix: model slippage explicitly. A reasonable starting point
is 20–50 basis points per round-trip for liquid stocks, 100+ bps
for small caps. Charge it to every trade.

Backtest overfitting

You ran 200 parameter combinations and the best one delivered
22%. Congratulations: you’ve discovered noise in your dataset,
not signal. By construction, the best of 200 trials on the same
data will look impressive even if the underlying strategy has no
edge.

Fix: walk-forward testing. Develop on one window, test on a
later out-of-sample window you never touched during parameter
selection. If the out-of-sample period underperforms
substantially, the rule was likely overfit. Bonferroni-style
corrections for multiple-testing apply here too.

Calendar and currency cleanup

Subtler than the rest, but important:

  • Time zones. “Closing price on date X” depends on which
    exchange and which time zone X refers to. Cross-listed names
    bite first.
  • Corporate actions. Stock splits and dividends have to be
    back-adjusted consistently. Yahoo Finance gives you adjusted
    prices; sometimes the adjustments are off for small caps or
    delisted names.
  • Currency. A non-USD strategy backtest needs FX adjustment
    at the same point in time as the prices, not at today’s rate.

If your backtest dramatically outperforms the broad market over
a long window, treat that as a red flag, not a celebration.
Persistent strategy edges are uncommon and small. A 5%-per-year
alpha is exceptional. A 15%-per-year alpha is almost always a
data bias.

The honest closing

A backtest is a hypothesis, not a result. The version of you who
will trade the strategy live doesn’t have access to next year’s
returns — only to today’s beliefs. The point of correcting for
biases isn’t to make the backtest look worse; it’s to make the
backtest tell you something true about what to expect.

If after correcting for all of the above, your strategy still
shows a clean edge: trade a small amount of real money for six
months and see if the live numbers match. If they don’t, you’ve
learned the cheap version of the lesson everyone else learns the
expensive way.

Originally published at pickuma.com. Subscribe to the RSS or follow @pickuma.bsky.social for new reviews.

现代化 UI 架构总结:设计主权回归与团队落地

本文是 UI 架构系列的第四篇,也是最后一篇。建议先阅读 第一篇:三层颜色体系与系统化设计方案、第二篇:Drawable 层规范与工程实践、第三篇:Style 层如何系统性消除代码冗余 了解完整架构体系。

一、架构全景:

在前面三篇文章中,我们构建了一套完整的 UI 资源架构体系:

1.1 架构的核心价值

层级 核心价值 解决的问题
Style 消除冗余,提升复用 重复属性定义
Drawable 统一形态,状态管理 视觉不一致
Func_* 语义抽象,职能归一 颜色滥用
基础色+主题 主题切换,灵活适配 多模式支持

1.2 Demo 的局限性

需要说明的是,本仓库中的 demo 仅作为抛砖引玉:

  • 颜色覆盖:只实现了常用 token 子集;矩阵补全、新增档位均由设计师在资源文件中维护,研发不自行扩展
  • Drawable 资源:仅实现了按钮、输入框等基础组件的状态,实际项目会更复杂
  • 组件覆盖:demo 覆盖常用 token 子集(表面层级、填充/渐变、按钮形态与禁用态等),列表、弹窗等复杂场景仍需按产品扩展

1.3 Demo 运行效果(日间 / 夜间)

仓库内置 Token 样例 页(activity_token_showcase),用于对照资源命名与真机效果:右上角切换深浅色后,同一套 func_* / Drawable / Style 无需改代码,仅由 values-night 中 t_* 映射驱动换肤。

日间 夜间
日间 Token 样例 夜间 Token 样例

GitHub 预览(可点击查看原图):

左:values 日间映射;右:values-night 覆写 `t_` 后的同一页面。*

这套架构的真正价值在于方法论,而非具体实现。

二、深度思考:UI 架构的权力究竟属于谁?

2.1 一个尖锐的问题

UI 架构的权力究竟属于设计师还是属于程序员?

这个问题困扰了无数团队。让我们从几个角度分析:

角色 优势 劣势
顶尖设计师 具备专业视觉素养,理解设计语言,追求极致细节 对技术实现边界不了解,难以落地
程序员 懂技术实现,能落地,但良莠不齐 缺乏设计专业训练,视觉敏感度不足

2.2 现实的困境

在大多数公司,现状是:

  1. 设计师设计稿 → 精心设计的颜色、间距、阴影
  2. 研发实现 → 代码实现时可能随意选择颜色、调整尺寸
  3. 反复 UI 走查 → 发现偏差,返工修改
  4. 再次走查 → 仍有偏差,继续返工

这是一个巨大的资源浪费循环。

2.3 浪费有多大?

根据我在多个中等规模项目中的经验,常见情况是:

  • 单次 UI 走查:往往能发现数十处视觉偏差(色值、字号、间距不一致)
  • 走查轮次:往往要 3–5 轮才能收敛
  • 每轮修复:往往占用 1–2 人天研发 + 设计师复核时间

叠加产品经理协调、测试回归、上线推迟,单个项目就会白白消耗数人天到数十人天。团队项目一多,这就是持续燃烧的隐性成本。

三、解决方案:将定义权交还给设计师

3.1 架构的使命

这套 UI 架构体系的深层使命,是将 UI 的定义权从程序员手中重新夺回到设计师手中。

核心思路:

  1. 设计语言标准化:由设计总监定义完整的设计语言
  2. 资源文件可配置化:将设计决策转化为可配置的资源文件(所有权在设计侧)
  3. 代码引用规范化:程序员只引用已有 token 与 Style,无权自行定义颜色、字号、圆角档位或新增 Style 变体

3.2 设计师主导的工作流

具体实现:

  1. 设计阶段:设计总监定义设计语言

    • 颜色体系(7大色系 × 6种职能)
    • 文字规范(字号、字重、行高)
    • 间距系统(8dp 栅格)
    • 组件规范(按钮、卡片、输入框)
  2. 配置阶段:将设计语言转化为资源文件

    • colors_primitives.xml:基础色定义
    • colors_theme_tokens.xml:主题映射
    • colors_semantic.xml:功能色定义
    • styles_tv.xml:文字样式
    • styles_button.xml:按钮样式
    • drawable/*:状态选择器
  3. 开发阶段:程序员只需引用

   <TextView style="@style/tv_black_1_size_15" />
   <Button style="@style/Btn.Orange.Capsule.Emphasis" />

3.3 权力回归的意义

维度 设计师主导 程序员主导
视觉一致性 高度一致,符合设计语言 参差不齐,取决于个人水平
设计还原度 100% 还原设计意图 60-90%,取决于专业能力
迭代效率 改资源文件即可,无需改代码 需要修改大量代码
维护成本 低,集中管理 高,分散在各处

四、统一架构带来的深远影响

4.1 世界级的产品外观

统一的 UI 架构带来的是世界级的产品外观设计和视觉一致性。

举个例子:同样是”灰色”,细微的差异就会导致 App 的品质感天差地别:

设计稿:gray_2 = #8A8A8A(精心调配的中性灰)
错误实现:gray = #888888(随手写的灰色)

这 0.5% 的差异,在用户眼中就是”专业”和”山寨”的区别。

4.2 团队协作效率提升

场景对比:

场景 传统方式 架构方式 效率提升
新增页面 手动写所有属性 引用 style,一行搞定 80%
修改主题色 修改所有布局文件 修改一处资源 99%
UI 走查修复 查找并修改多处 资源已定义,无需修改 100%

4.3 品牌形象的统一

在多端、多产品线的场景下,统一架构的价值更加凸显:

  • Android/iOS/Web:使用相同的颜色定义
  • 主 App/小程序/H5:保持一致的视觉风格
  • 不同版本:确保品牌形象的连续性

五、架构落地的实践建议

5.1 渐进式落地策略

5.2 团队协作规范

  1. 设计规范先行:设计总监必须先定义设计语言
  2. 资源配置同步:所有颜色/字号/Style/Drawable 变更仅由设计侧提交资源 PR
  3. 代码审查把关:研发 PR 禁止硬编码颜色、尺寸,禁止新增 func_* / tv_* / Btn.*
  4. 定期审计:CI 门禁 + 设计走查,发现违规引用一律打回

5.3 工具链支持

建议配套以下工具:

  • 设计稿标注工具:Zeplin、Figma 插件
  • 资源生成工具:自动从设计稿生成资源文件
  • 代码检查工具:Lint 规则检查硬编码
  • 预览工具:实时预览主题切换效果

六、系列文章回顾与总结

6.1 四篇文章的核心贡献

文章 核心内容 解决的问题
第一篇 三层颜色体系与系统化设计方案 主题切换、颜色一致性、职能 token
第二篇 Drawable 层规范与工程实践 形态定义、状态管理
第三篇 Style 层如何系统性消除代码冗余 消除冗余、提升复用
第四篇 设计主权回归与团队落地 权力边界、规范强制执行

6.2 架构的核心原则

  1. 分层抽象:从基础色到组件,逐层抽象
  2. 语义化命名:让资源名表达用途,而非具体值
  3. 正交组合:属性分离,灵活组合
  4. 集中管理:资源集中定义,便于维护

6.3 最终价值

这套架构体系带来的价值是系统性的:

  • 对用户:更一致、更专业的产品体验
  • 对设计师:设计意图得到完整还原
  • 对程序员:减少重复劳动,提升开发效率
  • 对公司:节省大量人力成本,提升品牌形象

七、结语

UI 架构不是简单的”颜色配置”,而是设计语言的工程化落地。

它解决的核心问题是:如何让设计师的专业决策能够在代码中完整、一致地体现。

在这个过程中,程序员的角色从「视觉决策者」转变为「实现执行者」:颜色、字号、样式、按钮形态的定义权完全在设计侧;程序员的价值体现在正确引用资源、业务逻辑与性能优化——而不是在布局里「顺手改个色」。

希望这套架构体系能够为你的团队带来启发,让我们一起构建更好的产品体验。

跨平台适用性与 AI 时代的设计交付

需要强调的是,这套 UI 架构虽然以 Android 作为例子说明,但核心思想可以完全平移到 iOS、React、H5、小程序等任何平台。架构的本质是”设计语言的工程化表达”,与具体实现技术无关。

在 AI 大模型的帮助下,设计师可以交付完整的一套 UI 架构。这套架构是 AI 友好的——通过合理的 Prompt、设计规范与资源清单,能够快速沉淀全平台统一的设计语言。

最重要的一点:程序员没有权力定义颜色、样式、字号、按钮,也没有权力「扩展档位」或私自新增 token。需要新色、新字号、新 Style 时,必须回到设计师维护的资源文件(本体系中的 colors_*.xml、styles_*.xml、drawable/)由设计侧变更,再合入工程。程序员的职责只有一项:严格引用设计师已发布的资源,确保设计意图完整落地。

规范门禁:让权力回归不只停留在纸面上

架构写得再漂亮,若缺少可执行的约束,仍会回到「谁写页面谁说了算」的老路。所谓门禁,并不是为难研发,而是把前文所说的设计主权固化进团队的日常流程:该谁定的已经定好,研发只做引用与实现。

建议守住的四条底线

  1. 颜色只能来自设计 token:页面里不应出现随手写的色值,也不应绕过功能色层去碰主题层、基础色。
  2. 文字与按钮必须走设计样式:字号、字色、按钮形态等,应在设计侧资源中选型,而不是在页面里临时拼凑。
  3. 禁止重复定义已规范化的属性:同一类控件的表现,应通过样式体系统一,避免「这个页面特殊、那个页面例外」。
  4. 变更入口唯一在设计侧:需要新色、新档位、新样式时,由设计师更新资源与规范,研发提需求、不自行扩库。

如何落地

  • 合并前审查:把 UI 资源是否符合规范,纳入 Code Review 的固定项;关键版本可由设计同学参与走查或签字。
  • 设计资源即唯一真相:颜色、样式、Drawable 等集中由设计维护的资源包发布,业务工程只依赖已发布版本,避免各端各写一套。
  • 自动化作为兜底:团队可按需要配置静态检查或流水线卡点,但目的始终是拦截越权定义,而不是堆砌技术细节。
  • 违规即打回:一旦在页面里发现临时色、临时字号、临时按钮样式,应退回并要求回到设计 token 与样式体系,而不是在评审会上「差不多就行」。

门禁真正要达成的效果

  • 设计师的权威性:视觉语言由设计定义,研发不再充当「第二设计师」。
  • 规范的刚性:越权改动进不了主干,减少靠人记、靠自觉的侥幸。
  • 产品的一致性:用户在不同页面、不同版本里,看到的是同一套品牌与品质感。

门禁不是冷冰冰的流程,而是对前文「权力回归」的制度保障。当设计与研发都认同这套边界,UI 走查才会从「找茬大战」变成「按图验收」。

系列文章回顾:

参考代码:

💡 如果这套架构对你有帮助,欢迎点赞、收藏、转发。关注我,获取更多Android架构设计干货。

Hermes Agent: Why Open Agentic Systems Matter

🚀 What Is Hermes Agent?

If you’ve been following the agentic space, Hermes Agent probably doesn’t need much introduction. For everyone else: it’s an open-source agent framework from Nous Research that you can run on your own infrastructure — from a $5 VPS to a GPU cluster.

The magic? Hermes isn’t just another orchestration layer. It’s self-improving. It learns from experience, nudges itself to persist knowledge, and builds a deeper model of you across sessions. That’s a big leap forward compared to most agent frameworks.

🛠️ Why Hermes Agent Stands Out

Here’s what makes Hermes different in plain terms:

  • It learns as it goes → not just executing tasks, but refining skills.
  • It remembers you → building continuity across conversations.
  • It’s model-agnostic → plug in OpenAI, Hugging Face, NVIDIA NIM, or even your own endpoint.
  • It’s infrastructure-flexible → run it locally, in the cloud, or even chat with it via Telegram while it works remotely.

That combination makes Hermes feel less like a “tool runner” and more like a partner that grows with you.

🔍 Hermes vs. Other Agentic Frameworks

A quick comparison to put things in perspective:

Feature Hermes Agent LangChain / CrewAI AutoGPT / BabyAGI
Self-Improvement ✅ Built-in learning loop ❌ Static orchestration ❌ Memory hacks
Infrastructure Flexibility ✅ VPS, GPU, serverless ⚠️ Hybrid setups ⚠️ Local-first
Model Agnostic ✅ 200+ models supported ⚠️ Often OpenAI-heavy ⚠️ OpenAI-centric
Persistence ✅ Deep user modeling ⚠️ External memory add-ons ⚠️ Shallow persistence

Hermes Agent’s differentiator is clear: it’s designed to evolve.

🌍 Why Open Agentic Systems Matter

Closed ecosystems lock you into specific APIs, models, or infrastructure. Hermes flips that script:

  • Freedom to experiment → no lock-in.
  • Community-driven → improvements are open and transparent.
  • Future-proof → as models evolve, Hermes adapts without forcing you to rebuild.

In short: openness ensures resilience and innovation. And that matters when agents are becoming the backbone of productivity, research, and creativity.

✨ My Takeaway

Hermes Agent isn’t just another framework. It’s a statement:

  • Open instead of proprietary
  • Adaptive instead of static
  • Self-improving instead of brittle

For developers, that means freedom to build without constraints. For the community, it means a shared foundation to push agentic AI forward.

📌 Final Thoughts

If you’re curious about agentic systems, Hermes Agent is worth exploring. Whether you’re building a research pipeline, a productivity assistant, or experimenting with creative agents, Hermes offers a playground where the agent itself grows alongside your ideas.

The future of AI development won’t just be about smarter models — it will be about agents that learn, persist, and adapt. Hermes Agent is one of the first open steps in that direction.

💬 What’s your take? Do you see open agentic systems like Hermes shaping the future, or will proprietary ecosystems dominate? Let’s spark a discussion.