GPU Utilization Is Becoming the New Cloud Waste Crisis
gpu utilization enterprise cluster waste — 5% active 95% idle diagram

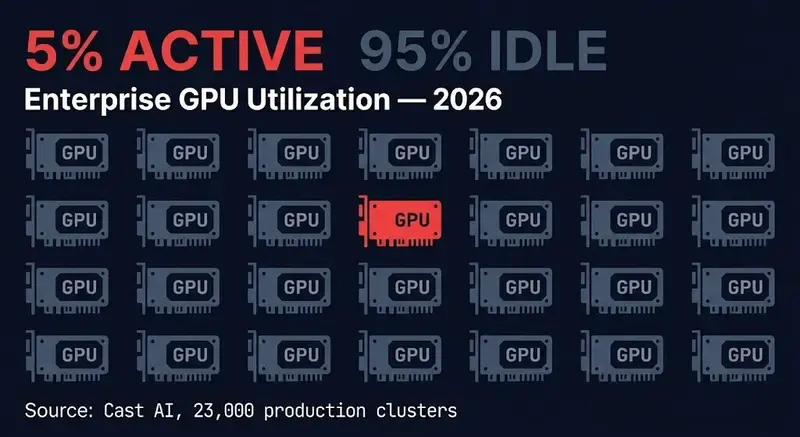
Enterprises are now paying premium-market prices for infrastructure that spends most of its life waiting. The number that frames this era: average GPU utilization across enterprise Kubernetes clusters sits at 5%, according to Cast AI’s 2026 State of Kubernetes Optimization Report — drawn from measured production telemetry across 23,000 clusters, not a survey. That figure means 95% of provisioned GPU capacity is idle at any given moment. It also arrives at exactly the point NVIDIA raised H200 reserved prices by roughly 15%, breaking a 20-year pattern of falling compute costs. The industry spent two years treating GPU scarcity as the defining AI infrastructure problem. The next phase will be dominated by the opposite: organizations that massively over-reserved GPU capacity they cannot efficiently utilize, now paying more for the privilege.

gpu utilization enterprise cluster waste — 5% active 95% idle diagram

The GPU Shortage Narrative Hid the Real Problem

From 2023 through 2025, GPU scarcity drove a rational but architecturally corrosive behavior: defensive over-provisioning. Organizations reserved capacity before workloads existed to fill it. GPU reservation became a strategic moat — holding accelerators against a competitive landscape where spot availability was unreliable and on-demand H100s were measured in weeks-long wait queues. The behavior made sense under scarcity conditions. It created an environment where utilization telemetry was irrelevant because nobody was optimizing, only acquiring.

That environment is gone. The cost structure has changed. The wait queues have eased. And the 5% utilization figure is now the operational reality underneath billions in committed GPU spend. The question is no longer where to get GPUs. It is why the ones enterprises already have aren’t running.

GPU Utilization Is Not CPU Utilization

This is where most FinOps analysis goes wrong. GPU utilization is not a more expensive version of CPU utilization, and the optimization playbook is not the same.

CPU environments reward high utilization because workloads are relatively fungible. A heavily loaded CPU is generally doing useful work. GPU environments can hit high utilization numbers while simultaneously degrading inference latency, starving request queues, or over-concentrating workloads onto constrained VRAM boundaries. A GPU running at 90% utilization with poorly batched inference requests and fragmented memory allocation is not a well-operated GPU — it is a saturated one. The goal is not maximum GPU utilization. The goal is controlled utilization under placement-aware scheduling.

The operational differences compound at every layer. GPU reservation cannot be made elastic the way CPU can — inference latency constraints mean you cannot scale to zero between requests without cold-load penalties measured in seconds. VRAM fragmentation means memory that appears available is often not addressable by the current workload because models cannot co-reside efficiently. Batching complexity means the strategy that maximizes throughput directly conflicts with the SLA that governs latency.

GPU locality adds another dimension most scheduling discussions omit. The scheduler may see available accelerators, but the workload may require specific NVLink topology, PCIe adjacency, or node co-location to avoid cross-fabric bandwidth penalties. Distributed inference and coordinated batching impose topology requirements that a scheduler operating on integer device counts cannot reason about without explicit locality constraints.

Scheduler Blindness: The Kubernetes scheduler sees nvidia.com/gpu: 1 as an integer. It has no visibility into VRAM state, model residency, batching queue depth, or NVLink topology. Allocation and utilization are two entirely different problems — and the scheduler only solves one of them.

The GPU Waste Triangle

gpu utilization waste triangle — reservation waste fragmentation waste coordination waste
GPU utilization failures are not random. Across enterprise deployments, the same three structural patterns appear repeatedly — the GPU Waste Triangle.

Reservation Waste — GPUs held for burst inference at low steady-state occupancy. The procurement behavior that made sense during scarcity created environments where capacity sits reserved against burst demand that rarely materializes at the assumed scale. A no-effort utilization baseline runs around 30% — enterprises averaging 5% are operating at one-sixth of that.

Fragmentation Waste — VRAM stranded between models that cannot co-reside efficiently. Most schedulers assign whole GPUs by default because sub-GPU allocation tooling is still maturing. The result is memory that is technically allocated but not addressable by any active workload.

Coordination Waste — GPUs idle while requests queue upstream waiting for batch formation. This produces the most confusing symptom: low utilization at the same time inference latency is degrading. The GPUs are idle not because demand is absent — the queue depth shows it isn’t — but because the orchestration layer cannot coordinate batch assembly fast enough to keep accelerators fed.

Waste Type Root Cause Observable Signal Fix Layer
Reservation FOMO procurement, static capacity planning Low steady-state utilization, high reservation cost Placement policy, continuous rightsizing
Fragmentation Whole-GPU allocation, no MIG adoption VRAM allocated but unused, co-residency failures Scheduler config, MIG partitioning
Coordination Poor batching, cross-zone dispatch Idle GPUs + high queue latency simultaneously Inference orchestration, locality-aware placement

Kubernetes Is Quietly Becoming the AI Infrastructure Scheduler

AI infrastructure inherited the Kubernetes control plane before Kubernetes understood accelerators. The scheduling assumptions, authority models, and governance gaps that exist in Kubernetes today are the same ones GPU workloads are now forced to operate within.

At KubeCon Europe in March 2026, NVIDIA donated its Dynamic Resource Allocation Driver for GPUs to the Cloud Native Computing Foundation. This is the structural signal: heterogeneous accelerator scheduling is now a community infrastructure problem, not a vendor product. Kubernetes isn’t winning AI workloads because containers won — it’s winning because the scheduling problem became unavoidable at enterprise scale.

gpu scheduler authority stack — kubernetes control plane allocation layer topology gap

Two days ago, NVIDIA published the GPU Usage Monitor — a Helm-deployable observability stack specifically because the standard Kubernetes metrics stack does not surface GPU-specific signals. The tooling gap is why the waste is invisible until it shows up on a bill.

The real optimization layer is no longer the GPU itself. It is the scheduler authority deciding where, when, and under which topology the workload executes.

Why Observability Alone Doesn’t Fix GPU Waste

The NVIDIA GPU Usage Monitor and DCGM Exporter give you the signal. They do not change the allocation model. Knowing that utilization is 5% tells you the waste exists — it does not fix VRAM fragmentation, reservation behavior, or coordination failures.

The fix requires changes upstream: placement logic that encodes locality constraints before the request arrives, batching strategies that balance throughput and latency at the inference serving layer, reservation policies that distinguish burst headroom from structural waste, and scheduler configuration that treats GPU topology as a first-class placement variable.

The inference placement problem and the AI FinOps model failure are downstream consequences of the same architectural gap — a control plane not built to reason about accelerator workloads, now governing the most expensive infrastructure layer in the enterprise stack.

Architect’s Verdict

The industry optimized aggressively for acquiring GPUs before it learned how to operate them efficiently. The result is environments where the most expensive infrastructure in the stack spends most of its life waiting: waiting for work, waiting for batch formation, waiting for coordination, waiting for orchestration layers that still model accelerators as fungible CPU-equivalent resources.

GPU scarcity was the opening phase of the AI infrastructure era. GPU efficiency is the operational phase that comes next. The teams that resolve the control plane problem first — placement authority, scheduler governance, locality constraints, reservation discipline — will operate at a cost profile that makes the current 5% baseline look like a different era entirely.

Additional Resources

Originally published at rack2cloud.com

Cómo solucionar `docker run` con exit code 1 en Raspberry Pi

Cómo solucionar docker run con exit code 1 en Raspberry Pi

Explicación técnica

El error Exited (1) indica que el proceso principal del contenedor terminó con un código de salida no cero —es decir, falló. El hecho de que funcione en una VM de Raspberry Pi pero no en el hardware físico apunta a una diferencia en el entorno de ejecución. Las causas más comunes en Raspberry Pi son:

  • Arquitectura incompatible: La imagen se construyó para amd64 (x86_64) y se intenta ejecutar en ARM (armv7l o aarch64).
  • Falta de emulación QEMU: Sin binfmt_misc configurado, Docker no puede ejecutar binarios de otra arquitectura.
  • Problemas de permisos o recursos: En hardware real, puede haber limitaciones de memoria, permisos de dispositivo o falta de drivers.
  • Comandos inválidos en docker run: El espacio en --net = host (con espacios alrededor del =) es un error de sintaxis que no siempre es detectado por Docker, pero puede causar comportamientos erráticos.

Pasos para solucionar

1. Verifica la arquitectura del host y la imagen

# Arquitectura del Raspberry Pi (hardware físico)
uname -m

# Arquitectura de la imagen
docker inspect myimage --format '{{.Architecture}}'

Si uname -m muestra armv7l o aarch64, y la imagen reporta amd64, la arquitectura no coincide.

2. Corrige la sintaxis del comando docker run

El comando original tiene un error grave: --net = host (espacios alrededor del =). Docker interpreta = como parte del valor del flag, lo que puede causar fallos silenciosos o errores de parseo.

✅ Comando corregido:

docker run --net=host -d -t myimage

⚠️ Nota crítica: En versiones recientes de Docker, --net=host no funciona en contenedores no Linux (como en Raspberry Pi con armhf), y puede causar fallos si el kernel no lo soporta. Si el contenedor no necesita acceso directo a la red del host, usa --net=bridge.

3. Ejecuta en primer plano para ver el error real

docker run --net=host -it --rm myimage

Elimina -d (background) y añade -it para ver logs en tiempo real y capturar errores.

4. Si la arquitectura es incompatible, usa QEMU

Instala soporte multiarquitectura:

# Instala binfmt-support y QEMU
sudo apt update && sudo apt install -y qemu-user-static binfmt-support

# Registra los binarios QEMU para Docker
docker run --rm --privileged multiarch/qemu-user-static --reset -p yes

Luego ejecuta de nuevo tu contenedor.

5. Verifica logs del contenedor

docker ps -a  # Encuentra el ID del contenedor con Exited (1)
docker logs <container_id>

Bloque de código corregido (ejemplo funcional)

# Paso 1: Verifica arquitectura
uname -m
docker inspect myimage --format '{{.Architecture}}'

# Paso 2: Corrige sintaxis y ejecuta en primer plano
docker run --net=host -it --rm myimage

# Paso 3 (si falla por arquitectura): Instala QEMU
sudo apt update && sudo apt install -y qemu-user-static binfmt-support
docker run --rm --privileged multiarch/qemu-user-static --reset -p yes

# Paso 4: Reintenta
docker run --net=host -d -t myimage

Pro-tip: Construye imágenes nativas para ARM

Si controlas la construcción de la imagen, nunca uses imágenes amd64 en Raspberry Pi. Usa:

# En el Dockerfile, especifica plataforma explícitamente
FROM --platform=linux/arm/v7 raspbian/stretch

# O para Raspberry Pi 4 (64-bit)
FROM --platform=linux/arm64 ubuntu:22.04

Y construye con:

docker build --platform linux/arm/v7 -t myimage .

✅ Consejo definitivo: Usa docker buildx para construir multiarquitectura:

docker buildx build --platform linux/arm/v7,linux/arm64 -t myimage .

Esto evita 99% de los errores de Exited (1) en Raspberry Pi.

🚀 ¿Quieres más soluciones técnicas?

Si te sirvió esta ayuda, suscríbete para recibir los errores más comunes de la semana y cómo evitarlos.
👉 Suscríbete aquí

JWT is a scam and your app doesn’t need it

I am tired of pretending JWT is fine.

It isn’t. It’s a cargo cult. It solves a problem your app almost certainly does not have, it creates four or five problems your app definitely does have, and a generation of backend developers has been bullied into shipping it because some blog post in 2014 said “stateless” like it was a virtue instead of a tradeoff. Every Laravel app I started with tymondesigns/jwt-auth I eventually ripped it out of. Every JWT-based system I’ve audited has the same broken revocation story, the same useless refresh dance, and the same client codebase that decodes the payload and trusts it. My friend Dusan Mitrovic wrote about this in 2020. Six years later, people are still shipping the same mistakes, so here we go again.

If you’re building a web app, a mobile app, or a first-party API: JWT is the wrong default and you should stop reaching for it. A row in Postgres with a bearer token in front of it is faster, simpler, and strictly more secure. The rest of this post is me showing my work.

what JWT actually is, and what the pitch was

A JWT is three base64url segments — a header, a JSON payload, a signature. The signature is either an HMAC or an RSA/ECDSA signature. The payload usually holds a user id, an iat, an exp, a jti, maybe some scopes.

The pitch is: the server signs it, the client carries it, every subsequent request only needs a signature verification — no database round-trip. Stateless authentication. That is the entire value proposition. Strip that one property away and JWT is just an opaque token wearing a costume.

So let’s strip it away. It takes one question.

you cannot invalidate a JWT. you just can’t.

How do you log a user out before exp?

You can’t. That’s the answer. The token is valid until it expires, full stop. The only way to invalidate it is to store the jti server-side in a revocation list and check that list on every single request. Which is a database lookup. Which is the thing JWT was supposed to let you skip. Congratulations, you’ve reinvented sessions, badly.

So you pick one of two losing moves:

  1. Don’t invalidate. A compromised token is valid until exp. And because nobody wants to “force users to log in again” — I have personally seen 1-year tokens, 5-year tokens, and a 10-year token in production at a company I won’t name — the attacker owns the account for that entire window. Your “log out everywhere” button is a lie. Your password reset doesn’t actually kick anyone out. You can rotate the signing key, sure, and log out every user on the platform to fix one breach. Beautiful design.
  2. Maintain a revocation list. Now every request does signature verification plus a database or Redis lookup. You’re paying both costs. You took on all the complexity of JWT to keep all the cost of sessions.

There is no third option. There has never been a third option. Anyone who tells you otherwise is selling something.

refresh tokens are a confession

The standard panic response to “long-lived JWTs are dangerous” is: use short-lived access tokens and a refresh token. Read that sentence carefully. It says the thing we sold you is unsafe, so here is a second thing to patch around it.

What you now ship, on every client:

  • attach the access token to every request
  • detect a 401 or near-expiry
  • call /auth/refresh with the refresh token
  • retry the original request with the new access token
  • handle the refresh failing (forced logout, redirect, queue replay)
  • secure storage for two tokens instead of one

And on the server you store the refresh token in the database for revocation. So you are already stateful. You built all of this — across web, iOS, Android, and every third party that integrates with you — to avoid the thing you ended up doing anyway. Every client team now spends a sprint on token plumbing instead of shipping product. For what? Because some JS developer in 2014 thought signed JSON was elegant?

A single opaque token, looked up in Redis with Postgres as the backing store, gives you the same security in one line of middleware. No refresh. No second token. No retry loop. Nothing.

the per-request cost is real and people lie about it

The standard handwave is that signature verification is “basically free”. It is not.

Rough orders of magnitude per request on a modern x86 box:

Algorithm Verification time Notes
HS256 ~5 µs HMAC-SHA256, symmetric
RS256 ~80–150 µs 2048-bit RSA, what most issuers ship
ES256 ~40–80 µs NIST P-256 ECDSA
Redis GET ~100–300 µs localhost, single round-trip

RS256 verification is in the same order of magnitude as a Redis lookup. And you still have to parse JSON, validate exp, validate iss, validate aud, walk the JWKS cache for the right key, and allocate a few objects the GC has to clean up later. Multiply by your request rate.

“JWT saves you database hits” turns out to be mostly false the moment you measure it. An opaque token check is hash, GET from Redis, done — with an in-process LRU in front if you actually care. You’re not saving compute by going JWT. You are spending more of it, on something less safe, that you can’t revoke.

the frontend “verification” nobody has ever shipped

The asymmetric-JWT pitch had one more leg: the server publishes a public key, the client (or a gateway, or a third party) verifies the signature locally, and the auth server stays out of the request path. If you actually do this, you do save round-trips.

Almost no one does this. Large platforms with dedicated identity teams do. The Laravel app you’re shipping next month does not. WebCrypto wasn’t usable when JWT became fashionable, so frontends shipped atob(token.split('.')[1]), parsed the JSON, trusted whatever was inside, and called it a day. When the access token expired the next API call returned 401, the SPA bounced to /login, and the server got hit anyway. The “stateless” benefit existed only on a slide deck.

And here’s the part that should make you angry: if you hand a JWT to a third-party integrator and they skip the public-key verification — and they will, because everyone does — every single one of their requests becomes a request through your auth backend the long way around. You wear the cost of their laziness, forever. With opaque tokens this is just… how it works. No mismatch, no hidden tax, no “did they implement the checks correctly” question to lose sleep over.

encrypted JWT (JWE) is even more nonsensical

If you’re encrypting the payload because it contains sensitive data, you’ve also decided the client can’t read it. So what is it doing in the token? The client is going to call /api/me to render the UI anyway. Put the data behind that endpoint and have the token reference it. JWE solves a problem you invented by stuffing user data into a credential.

And while we’re here: if the JWT payload becomes the source of truth for “who is this user”, the user updates their email, their role gets revoked, their plan gets downgraded — and your app keeps reading stale values from the token until the next refresh. The user files a support ticket because the app “isn’t updating”. You’ll fix it by fetching the user from the database on every request. You’re stateful again. You were always going to be.

“just put the JWT in an httpOnly cookie”

This is the suggestion that finally gives the game away.

The advice goes: don’t put the JWT in localStorage because XSS will steal it — put it in an httpOnly, Secure, SameSite cookie so JavaScript can’t touch it. Read that sentence one more time. You have just described a session cookie. The browser attaches it automatically, the server reads it on every request, the client can’t see what’s inside.

The only thing distinguishing it from a normal session cookie is that the bytes inside happen to be a signed JWT instead of a random ID. And since the browser can’t read those bytes, the “you can decode it client-side” feature — already a feature nobody used — is now physically impossible. You have kept every line of JWT complexity (signing, expiry, refresh, JWKS) and given up the only property that ever made JWT different from a session.

That’s it. That’s the whole house of cards. If you’re putting a JWT in an httpOnly cookie, you are running a stateful session with extra cryptography. Stop. Just run the session.

“no system is stateless” — please stop pretending

Your system has users. Your system has sessions. Your system has rate limits, audit logs, permissions, billing state, devices, account lockouts, abuse signals, feature flags. Every one of those is server-side state. Reading a session row alongside the user row in the same query costs you nothing. The architectural prize of “statelessness” only matters if every other thing in your request path is also stateless — and in a real app, it isn’t and it never will be.

The Okta talk “Why JWTs Are Bad for Authentication” makes this point at length, and Okta is a company that sells you JWT for a living. When the vendor tells you to stop using their flagship pattern for first-party browser apps, maybe listen.

what to ship instead

For a first-party web app:

  • httpOnly, Secure, SameSite=Lax session cookie. A 256-bit random opaque ID. Done.
  • Sessions table. id, user_id, created_at, last_seen_at, user_agent, ip, revoked_at.
  • Redis in front keyed by the session ID hash. TTL ~60s or invalidate on write.
  • Logout: UPDATE sessions SET revoked_at = NOW() WHERE id = $1, plus DEL in Redis.
  • Force-logout all devices: the same UPDATE with user_id = $1. The feature your JWT app pretends to have, this app actually has.

For an API consumed by mobile or by integrators:

  • Opaque bearer tokens. GitHub-style xxx_ prefix so they’re greppable in logs and revocable by secret-scanning services.
  • Same table. Add scopes, expires_at, last_used_at.
  • An admin panel to list, revoke, regenerate, expire. The thing you should have built for your JWT system but didn’t.
  • Authorization: Bearer <token>. Document it once. Every HTTP client on Earth speaks this already.

You get everything JWT promised — issuance, revocation, expiry, scopes, audit — without the signing, the JWKS rotation, the refresh dance, the encoding gotchas, and the CVE class that begins with alg: none.

“but I’m building an OAuth 2 server”

Great. OAuth 2 is a delegation protocol — it does not require JWT. The spec says “access token” and leaves the format opaque on purpose. Build an OAuth 2 server with opaque tokens and an introspection endpoint and you are 100% compliant. The only time you actually need JWT-shaped access tokens is when your resource servers are operated by parties who genuinely cannot call your introspection endpoint on every request. That is a real use case. It is not your SaaS dashboard.

what it isn’t

  • It’s not “JWT is broken”. The cryptography is fine. The tymondesigns/jwt-auth package is fine. The concept of using JWT as your app’s session is what’s broken.
  • It’s not blanket opposition to signed tokens. Short-lived signed JWTs for service-to-service calls inside a trusted mesh, or as ID tokens in OIDC, are legitimate. Both are narrow.
  • It’s not a claim opaque tokens are free. You pay for the Redis lookup. You were going to pay for it the moment you wanted to log a user out.
  • It does not apply to true federation. If you’re Okta, Auth0, or running an identity provider whose tokens are consumed by hundreds of resource servers you don’t operate, JWT earns its keep. You are not them.
  • It’s not a license to hand-roll session cookies. Use your framework’s session driver. The whole reason this is boring is that the framework already solved it.

If you’re starting an app today, default to a session cookie or an opaque bearer token in a database, cached in Redis. Reach for JWT only when you can point at a federation requirement that actually needs it. I have built and rebuilt this stack enough times to be sure. JWT was the most expensive lesson I learned twice.

7 Agent Skill Packs That Actually Make AI Coders Better

Agent skill packs are everywhere now. Open GitHub, search for “agent skills,” and you will drown in repos promising to turn your AI coder into a 10x engineer. Most of them are just rehashed prompt templates that add noise, not signal.

We spent the last month hands-on with dozens of these packs for Gearscope. The seven below are the ones we kept installed after testing. Each one solves a real problem, not a hypothetical one.

1. Addy Osmani Agent Skills

Verdict: The full software development lifecycle, packed into 23 portable skills.

Key strength: This is not a grab bag of tips. Addy Osmani (yes, the Google Chrome team guy) built a complete engineering methodology that walks your agent from idea refinement through spec writing, planning, implementation, and shipping. Each skill chains into the next one. The craft is obvious.

Who should use it: Teams who want their AI agent to follow a real process instead of just vomiting code. If you have ever watched an AI coder skip the thinking and jump straight to breaking things, this pack fixes that.

2. Engram

Verdict: The most complete agent memory layer you can install right now.

Key strength: Your AI coder forgets everything between sessions. Engram fixes that. It is a single Go binary backed by SQLite with full-text search, and it gives your agent persistent memory across conversations. It exposes an MCP server, HTTP API, CLI, and even a TUI. When your agent finishes a session, it can store what it learned and pick up where it left off next time.

Who should use it: Anyone doing multi-session work with an AI coder. If you are tired of re-explaining your project architecture every time you open a new chat, Engram is the answer. It scored a perfect 5 across every review dimension we track.

3. Antigravity Awesome Skills

Verdict: The biggest skill pack on GitHub. Breadth is the whole point.

Key strength: 1,464 SKILL.md playbooks covering everything from brainstorming to security auditing to React component scaffolding. It works with Claude Code, Cursor, Codex CLI, Gemini CLI, and more. The editorial bundles group related skills together so you are not lost in a sea of options. An npm installer gets you going fast.

Who should use it: Developers who want coverage over depth. If you work across a lot of different stacks and want a skill ready for whatever weird task comes up, this is your library. Quality varies across 1,400+ skills, but the hits outweigh the misses.

4. Agent Toolkit for AWS

Verdict: The AWS-built skill pack every cloud-bound agent needs.

Key strength: Amazon shipped 43 skills (13 core, 30 specialized) covering CDK, CloudFormation, Bedrock, EC2, VPC networking, and data analytics. This is not community cosplay. It is the real reference material from the people who build AWS, formatted as installable agent skills. Three plugin bundles and a managed MCP server round it out.

Who should use it: Anyone deploying on AWS. If your AI coder is touching CloudFormation templates or CDK stacks without this pack, it is flying blind. The documentation quality is top tier, which matters because cloud infrastructure is one area where guessing gets expensive.

5. last30days

Verdict: The research engine that searches where Google cannot.

Key strength: This skill searches Reddit, X, YouTube, TikTok, Hacker News, Polymarket, and 10+ other platforms within a configurable time window. It scores results by real engagement metrics, then synthesizes a structured brief. Most AI research tools just glue together a few API calls. This one actually understands what “recent and relevant” means.

Who should use it: Developers who need market research, competitive analysis, or trend tracking as part of their workflow. If you build products and need to know what people are actually saying about a topic in the last month, not what an old training data snapshot thinks, install this. It scored a perfect 5 in our review.

6. Superpowers

Verdict: A disciplined engineering workflow that forces AI coders to think before they type.

Key strength: 14 interlocking skills that enforce brainstorm-before-building, spec writing, implementation planning, and test-driven development across eight different agent harnesses. It works with Claude Code, Codex CLI, Cursor, Gemini CLI, GitHub Copilot CLI, and others. The methodology is cohesive: each skill picks up where the previous one left off.

Who should use it: Developers who treat AI coders as pair programmers, not autocomplete on steroids. If you want your agent to follow TDD, write specs, and plan before coding, Superpowers lays down that structure.

7. Browserbase Skills

Verdict: The most complete agent skill pack for production browser automation.

Key strength: 13 skills from Browserbase covering web scraping, UI testing, cookie sync, serverless browser functions, and company research. The skills range from basic page fetching all the way to adversarial UI testing. Everything works through the browse CLI, and the documentation is unusually good for an infrastructure tool.

Who should use it: Anyone doing browser automation at any scale. If your agent needs to interact with web pages that do not have a nice API, this pack gives it the tools to do the job properly.

Quick Comparison

Pack Skills Rating Best For
Addy Osmani 23 4/5 Engineering methodology
Engram 1 (memory system) 5/5 Persistent agent memory
Antigravity 1,464 4/5 Broad coverage
AWS Toolkit 43 4/5 Cloud infrastructure
last30days 1 (research) 5/5 Multi-platform research
Superpowers 14 4/5 TDD-first workflow
Browserbase 13 4/5 Browser automation

All seven are free and open source. Install what fits your workflow, skip what does not.

Reviews sourced from Gearscope, where we test agent tooling so you do not have to guess.

More Control, More Cost: Why Commanding AI Isn’t Delegation

Yesterday, you typed /format.

Checked the output. Typed /refactor. Checked again. Typed /test.

You finished the session feeling productive. The AI did the work. You supervised.

That’s not delegation. That’s shift work.

A note on framing: This article traces a structural pattern — not a documented changelog. The “Command Era” and “Harness Era” described below are not precise historical dates. They are recurring failure modes, observable across teams and tools, that tend to appear in this sequence. Read it as structural history, not product timeline.

Chapter 1: The Command Era — We Gave AI More to Do, and Did More Ourselves

When AI Skills became a shared convention, it felt like a breakthrough. Skill-sharing sites appeared. You could /summarize, /diagram, /translate, /review. The list kept growing.

Then came the Format Wars.

How should a Skill file be structured? Which headers does the AI actually read? What syntax survives context compression? The debate ran long. Until deterministic tooling settled it — editors began parsing Skill files in a fixed, predictable way. The format question had an answer. The community moved on.

But nobody asked the question underneath the question.

The Format Wars were about how to write commands. Nobody asked whether commanding was the right model at all.

The /command culture became official. Endorsed. Infrastructured. Skill-sharing sites cataloged thousands of entries. Most were wrappers around things that didn’t need AI. Many were things a shell script would have handled faster. But they were Skills, and Skills had / in front of them, and that felt like the future.

There was just one problem.

Someone still had to decide which commands to run, in which order, and when to stop.

That someone was you.

The AI’s capability surface expanded. Your orchestration burden expanded with it. Every new command you could invoke was another thing you had to remember, sequence, and supervise. You didn’t gain leverage. You gained a longer checklist.

This is micromanagement. Not as a criticism — as a structural description.

Micromanagement: decompose work into atomic units, issue each unit individually, retain the sequence in your own head, verify each step before proceeding.

That is exactly what /command workflows do. The fact that the executor is an AI doesn’t change the structure.

Chapter 2: The Harness Era — We Tried to Control What We Couldn’t Trust

The next wave brought a different instinct: if we can’t control what AI does step by step, we can control the boundaries of what it’s allowed to do.

Harnesses arrived. Guardrails. Deterministic control layers wrapped around probabilistic systems.

The logic was reasonable: AI behavior is unpredictable, so build fences. Define what’s allowed. Block what isn’t. Ship.

But in practice, AI systems do not behave like static rule evaluators. They search for plausible paths toward the requested outcome. A fence with gaps is not a fence — it’s a detour.

So the gaps got patched. New gaps appeared. More patches. The harness grew. The team maintaining it grew. The surface area of “things that could go wrong that we haven’t written a rule for yet” grew faster than the rules.

This is the fundamental mismatch:

Harnesses are deterministic. AI is probabilistic. You cannot enumerate your way out of a probability space.

A blacklist only covers what you’ve already seen. A probabilistic system continuously generates what you haven’t. The harness team is always one incident behind.

/command culture Harness culture
What you’re controlling Sequence of actions Range of behaviors
Control mechanism Deterministic commands Deterministic guards
Human cost Orchestrating commands Maintaining guardrails
Failure mode You become the bottleneck Gaps appear faster than patches
Root cause Can’t delegate judgment Can’t trust judgment

The root cause is identical. Both eras were responses to the same absence: judgment was never transferred to the AI.

Chapter 3: Why Neither Scales

Scale means your output grows faster than your input. Delegation scales when the delegatee handles not just execution but the decisions that surround execution.

What /commands delegate: individual actions.

What harnesses delegate: nothing — they constrain, not delegate.

What both leave with the human: the judgment about what to do, when, and whether it’s done.

When AI capability increases under this model, the human cost increases proportionally:

  • More capable AI → more commands available → more orchestration decisions to make
  • More capable AI → more behavioral surface area → more guardrails needed

AI getting stronger, under the command-and-harness model, makes you busier.

That is not scale. That is the opposite of scale.

The error is architectural. Both approaches treat AI as a deterministic tool that happens to be probabilistic — an uncomfortable fact to be engineered around rather than a design primitive to be worked with.

You cannot harness your way to trust. You cannot command your way to delegation.

Chapter 4: What Actual Delegation Requires

Delegation — the kind that scales — transfers three things:

  1. Purpose: not what to do, but why
  2. Completion condition: not a checklist, but a state to reach
  3. Reasoning trace: where the judgment came from, so it can be questioned and revised

When those three are present, the AI doesn’t wait for the next command. It navigates. When something goes wrong, it’s not because the AI “escaped” — it’s a signal that the completion condition was underspecified. That’s a design problem, not a containment problem.

The unit of delegation is not a command. It’s a context-complete work unit: purpose + completion condition + the chain of reasoning that produced both.

Now here’s the practical problem.

Those three things have no natural home. Purpose gets buried in a Slack thread. Completion conditions live in someone’s head. Reasoning traces disappear when the chat context rolls over. The next session starts from scratch. The AI doesn’t know what “done” looked like last time, or why.

This is why judgment doesn’t transfer even when people try. The content of the judgment exists — but it has nowhere persistent to live. So it stays with the human, who re-explains it every session, re-verifies every output, and never fully lets go.

Actual delegation requires the judgment unit to be externalized, addressable, and stable across sessions.

Not stored in a prompt. Not reconstructed from memory. Formally referenced — the way a requirement document is referenced in a design review, not the way a conversation is remembered.

This is what XRefKit is built to carry. XIDs give each work unit a stable identity — independent of file paths, tool versions, or context windows. When you hand a work unit to an AI agent, you’re not passing a command string. You’re passing a reference: here is the purpose, here is what done looks like, here is the reasoning that got us here — and it won’t disappear when this session ends.

The AI can then ask: does my current output satisfy the completion condition on record? It can trace backward: what was the intent behind this requirement? It can surface a judgment call: I found two valid paths — here’s which one aligns with the recorded purpose.

That is not a tool executing a command. That is an agent operating within a delegated judgment frame — one that persists, accumulates, and can be audited.

The Through-Line

Three eras, one error.

  • Commands: we gave AI actions but kept the sequence
  • Harnesses: we gave AI boundaries but kept the trust
  • Both: we kept the judgment, handed over the execution

The management cost compounded with each era because the root cause was never addressed.

Delegation is not about what you hand the AI to do. It’s about what you no longer have to decide.

When you /format, you decided to format. When you maintain a harness, you decided what counts as safe. When you transfer a work unit with purpose, completion condition, and traceable reasoning — and that unit persists beyond the session — you’ve transferred the decision.

That’s when it scales.

This is the second article in a series on AI organizational design. The first, Micromanaging AI Doesn’t Scale, introduced the core problem. XRefKit is available at github.com/XRefKit.

SecureScan

SecureScan Application Architecture and Demo

This is a submission for the GitHub Finish-Up-A-Thon Challenge

What I Built

SecureScan is a privacy-first web utility that bridges the gap between physical sharing and ephemeral digital storage.

At its core, the application converts standard text into secure QR codes. The latest major feature addition is the Ephemeral Image Vault. Instead of relying on permanent cloud hosting for sensitive images, SecureScan allows users to upload an image and generates a QR code linked to that specific file with a strict, mathematically enforced 120-second lifespan.

The Architecture:

  • Frontend: Next.js / React (update this to your actual frontend)
  • Backend & Database: Node.js paired with MongoDB.
  • Storage & Access Control: Supabase Storage.
  • The Logic: When an image is uploaded, it is routed to a private Supabase bucket. The backend instantly generates a Pre-Signed URL with expiresIn: 120. This URL is encoded into the generated QR code. Once 120 seconds pass, cloud-provider authentication mathematically invalidates the link—blocking access completely. To prevent storage bloat, a Node.js cron job runs every 5 minutes in the background, querying MongoDB for expired timestamps and batch-deleting the dead files from the Supabase bucket.

Demo

SecureScan Application Architecture and Demo
(Note: Consider adding a GIF or video walkthrough of the 120-second expiration in action right here!)

The Comeback Story

SecureScan initially started as a straightforward client-side utility: converting simple text strings into QR codes. It functioned well, but it was static and lacked a complex backend challenge.

The turning point was tackling the problem of secure, temporary file sharing. I wanted to allow image uploads, but I refused to build a system where user images sit on a server forever, consuming storage and posing a privacy risk. The technical hurdle was enforcing a strict expiration. My initial thought was to use a basic setTimeout deletion script, but analyzing that logically revealed it was prone to server lag and race conditions.

The “comeback” was entirely re-architecting the feature into a two-layer system: relying on Supabase’s cryptographic Pre-Signed URLs for exact, to-the-second access control, while offloading the actual file deletion to an asynchronous MongoDB/Node-cron garbage collection cycle. It transformed a basic QR generator into a highly efficient, self-cleaning ephemeral storage engine.

My Experience with GitHub Copilot

GitHub Copilot was a massive accelerant during the backend re-architecture, specifically when bridging the different APIs.

Instead of constantly context-switching to read the Supabase Storage SDK documentation, Copilot accurately generated the boilerplate for uploading the buffer and creating the Pre-Signed URL with the exact expiration parameters. It also handled the tedious syntax of setting up the node-cron scheduling syntax and scaffolding the Mongoose schema for the EphemeralImage database models. This allowed me to focus strictly on the system design and the logic of the two-layer access control, rather than hunting down typos in the database queries.

Cómo solucionar el error de permiso al ejecutar `pip.exe` en entorno virtual (Python 3.10 en Windows)

Cómo solucionar el error de permiso al ejecutar pip.exe en entorno virtual (Python 3.10 en Windows)

¿Por qué ocurre este error?

El problema radica en que pip.exe es un launcher empaquetado que contiene una ruta fija a python.exe y un script __main__.py incrustado. Cuando creas un entorno virtual, este launcher se genera apuntando a la versión de Python que usaste para crearlo. Si después modificas o mueves el entorno, actualizas Python, o cambias el orden de las variables de entorno, el launcher sigue apuntando a una ruta antigua o inaccesible, causando el error “Access is denied” al intentar ejecutarlo.

Aunque los permisos del archivo (icacls) sean correctos (como confirmaste), el launcher falla porque no puede encontrar ni ejecutar el python.exe interno que espera. Esto es común tras reinstalar Python, usar múltiples versiones, o mover el entorno virtual.

Solución definitiva (pasos verificados)

✅ Paso 1: Elimina el pip.exe roto del entorno virtual

rm venv/Scripts/pip.exe
rm venv/Scripts/pip3.exe
rm venv/Scripts/pip-script.py  # opcional, pero recomendado

⚠️ No uses pip uninstall pip — ese comando también fallará.

✅ Paso 2: Regenera pip.exe usando python -m pip install --force-reinstall pip

# Asegúrate de estar DENTRO del entorno virtual
venvScriptsactivate

# Recrea pip.exe correctamente
python -m pip install --force-reinstall --no-deps pip

Esto regenera el launcher con la ruta correcta a python.exe del entorno actual.

✅ Paso 3: Verifica que funcione

pip --version
# Debe mostrar algo como: pip 23.x.x from ...venvlibsite-packagespip (python 3.10)

Pro-tip: Evita este problema en el futuro

🔧 Usa siempre python -m pip en lugar de pip

python -m pip install -e .

Esto evita usar el launcher roto y garantiza que se use el pip asociado al python.exe del entorno (sin depender de rutas embebidas).

🛠️ Si usas scripts de build/test, incluye esta verificación:

# En PowerShell o CMD:
if (Test-Path "venvScriptspip.exe") {
    & "venvScriptspython.exe" -m pip install -e .
} else {
    python -m pip install -e .
}

🧹 Si el entorno está corrupto, recrea todo el entorno:

# Desde fuera del entorno
rm -r venv
python -m venv venv
venvScriptsactivate
python -m pip install --upgrade pip
pip install -e .

💡 Nota crítica: El error nunca es por permisos de archivo en entornos virtuales de usuario. Es siempre un problema de ruta embebida obsoleta en el launcher. La solución definitiva es regenerar pip.exe o evitarlo usando python -m pip.

🚀 ¿Quieres más soluciones técnicas?

Si te sirvió esta ayuda, suscríbete para recibir los errores más comunes de la semana y cómo evitarlos.
👉 Suscríbete aquí

Postgres-grade Serializable at 20k+ ops/s — on a laptop. Don’t try this at home.

They didn’t know it was impossible, so they did it. — Mark Twain

In the software industry, we’ve been raised with a dogma: you must choose between Massive Performance (NoSQL, eventual consistency) and Domain Rigor (SQL, strong consistency, serializable).

We are told that locks, latencies, and ACID properties are the natural enemies of speed. That if you want to scale, you have to let go of your business invariants.

I decided to test another hypothesis. And I broke the myth.

The Result: 20,000+ Validated Transactions per Second

This isn’t a “fire and forget” ingestion log.

This isn’t a volatile cache experiment.

What you see here is Business Transaction Durability:

  • Invariants validated — every business rule is checked before commit.
  • State persisted — every change is durably written to disk.
  • Strong Consistency — Serializable-level isolation.

At 20,000+ ops/s, we are not just talking about speed. We are talking about the ability to maintain absolute domain integrity under massive load.

And the kicker: this is running on a MacBook Air M3 — 8 cores, 16 GB of RAM, the same machine I write the code on. No 64-core server. No NVMe array. No datacenter rack. One laptop, fan barely audible, doing the work of a small cluster.

Why General-Purpose Databases Hit a Ceiling

Most databases are built for general cases. They treat every row the same way because they don’t know your business.

This “Domain Ignorance” leads to generic row locks, MVCC bookkeeping, cross-table coordination, and massive overhead — costs you pay on every single transaction, whether your domain needs them or not.

Not Magic — Discipline

For the skeptics: this isn’t sorcery. It’s discipline applied to the right layer — designing the system so the hardware does exactly what it’s good at, and nothing else.

I’m not reinventing the storage wheel. The foundation is Pebble, the same proven LSM-tree engine that powers CockroachDB. But the engine is just the floor. The real lever is the orchestration of the domain logic on top of it — and that’s what Part 2 puts a name on.

A Note on the Benchmark Scope

I know what you’re thinking. “20k+ ops/s? That must be an internal memory trick.”

It isn’t. To ensure these numbers reflect real-world usage, the benchmark covers the entire lifecycle of a business transaction:

  1. Client-side serialization — the payload starts from the app.
  2. Local communication — end-to-end roundtrip.
  3. Server-side deserialization & parsing.
  4. Business Invariants validation.
  5. Disk persistence with full durability guarantees — fsync on every commit.

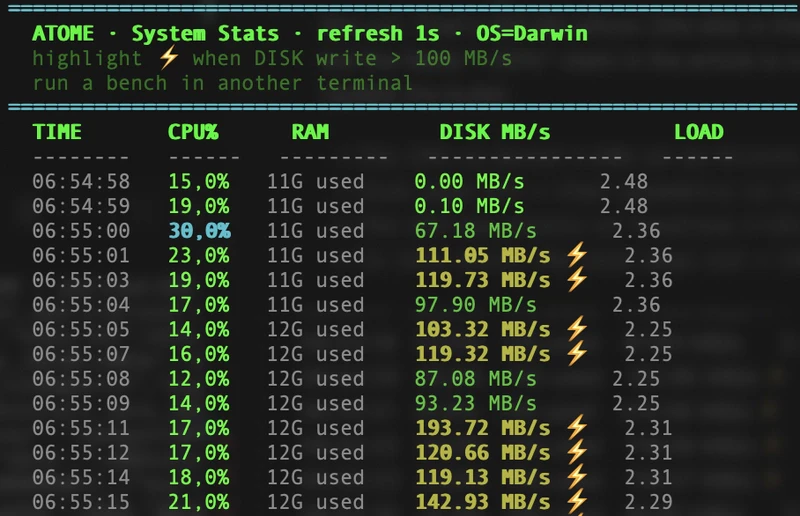
The workload: batch=1000, payload=1KB, single-node, single laptop. Here’s the run, with the system-level disk stats captured live during the bench:

[23755.87 items/s] | items=1424000 | batch=1000 | payload=1KB | durability=FSYNC-ON


Live capture during the bench (batch=1000, 1KB, fsync ON). Disk on fire, CPU bored.

Two things jump out of that stats panel — and together they’re the whole point:

  • The disk is screaming. Sustained 100–200 MB/s with the ⚡ markers firing almost every second. This is real fsync‘d traffic hitting the SSD, not a memory cache pretending to be durable. If you pulled the power cord mid-run, every committed transaction would still be there on reboot.
  • The CPU is bored (~18% on an 8-core M3). The compute is idle while the disk pegs out — that asymmetry is the whole story.

And this isn’t the ceiling. With bigger batches the same laptop pushes further; even at batch=1, it doesn’t fall off a cliff. The full envelope is Part 2.

What’s Next?

This is just Part 1. In a few days, Part 2 finishes the picture and lands the real punchline: business rules aren’t a tax on performance — they’re the contract that lets the machine fly. And the whole thing runs on hardware your team could expense, not a cloud bill that needs board approval.

Stay tuned. The era of the “Impossible Trade-off” is over.

Pure Core, Imperative Shell in Rust with Stillwater

Originally published on Entropic Drift

Most Rust services start clean.

There is a handler, a database call, a few validation checks, a small amount of business logic, and a response. The code is direct. You can read it top to bottom.

Then the service grows.

Validation gets more detailed. A second database lookup appears. Password hashing moves into the flow. You add a uniqueness check. There is a welcome email, a retry policy for the email provider, a metric, and a bit of context on errors so production logs are useful.

The handler still works, but the business rule is now buried inside infrastructure code.

async fn register_user(
    State(state): State<AppState>,
    Json(input): Json<RegistrationInput>,
) -> Result<Json<User>, ApiError> {
    if input.username.len() < 3 {
        return Err(ApiError::BadRequest("username too short".into()));
    }

    if !input.email.contains('@') {
        return Err(ApiError::BadRequest("invalid email".into()));
    }

    if input.password.len() < 12 {
        return Err(ApiError::BadRequest("password too short".into()));
    }

    if state.db.username_exists(&input.username).await? {
        return Err(ApiError::Conflict("username already exists".into()));
    }

    let password_hash = state.hasher.hash(&input.password).await?;

    let user = state
        .db
        .insert_user(&input.username, &input.email, &password_hash)
        .await?;

    state.email.send_welcome(&user.email).await?;

    Ok(Json(user))
}

This is idiomatic enough. The problem is not that the code is ugly. The problem is that it has too many responsibilities:

  • Parse and validate external input
  • Check application invariants
  • Call storage
  • Call a password hasher
  • Call an email provider
  • Decide the domain result
  • Translate failures into HTTP responses

Those responsibilities change for different reasons. They also want different testing strategies. Validation wants table tests. Business rules want pure unit tests. Storage and email want integration tests or mocks. HTTP wants boundary tests.

Pure core, imperative shell is a useful way to split that apart.

The Pattern

The rule is simple:

  • The core takes data and returns data.
  • The shell performs effects.

In Rust terms, the core should mostly be ordinary functions:

fn build_user(
    id: UserId,
    input: ValidRegistration,
    password_hash: PasswordHash,
) -> User {
    User {
        id,
        username: input.username,
        email: input.email,
        password_hash,
    }
}

No database. No async. No clock. No global config. No logging side effect hidden in the middle.

That does not mean the application avoids I/O. It means I/O is described and composed at the boundary.

Stillwater is my attempt to make this style practical in Rust without turning the code into a macro language or a Haskell translation exercise. The two most important pieces are:

  • Validation<T, E> for checks that should collect every error
  • Effect for computations that need an environment and may perform I/O

The goal is not purity for its own sake. The goal is to make the code easier to test, easier to change, and more honest about where side effects happen.

Validation Is Not Error Propagation

Rust’s Result is great when later work depends on earlier work. Open a file, then read it. Fetch a user, then fetch their orders. If the first step fails, stop.

Validation is different. If a registration form has four bad fields, the user should get four errors.

With Result, this usually turns into either fail-fast behavior or manual error collection. With Stillwater:

use stillwater::Validation;

#[derive(Clone)]
struct RegistrationInput {
    username: String,
    email: String,
    password: String,
    confirm_password: String,
}

#[derive(Clone, Debug, PartialEq, Eq)]
struct Username(String);

impl Username {
    fn as_str(&self) -> &str {
        &self.0
    }
}

#[derive(Clone, Debug, PartialEq, Eq)]
struct Email(String);

impl Email {
    fn as_str(&self) -> &str {
        &self.0
    }
}

#[derive(Clone, Debug, PartialEq, Eq)]
struct PlaintextPassword(String);

#[derive(Clone, Debug, PartialEq, Eq)]
struct ValidRegistration {
    username: Username,
    email: Email,
    password: PlaintextPassword,
}

fn validate_registration(
    input: RegistrationInput,
) -> Validation<ValidRegistration, Vec<String>> {
    Validation::all((
        validate_username(&input.username),
        validate_email(&input.email),
        validate_password_policy(&input.password),
        validate_password_match(&input.password, &input.confirm_password),
    ))
    .map(|_| ValidRegistration {
        username: Username(input.username),
        email: Email(input.email),
        password: PlaintextPassword(input.password),
    })
}

Each validator can stay small:

fn validate_password_policy(password: &str) -> Validation<(), Vec<String>> {
    let mut errors = Vec::new();

    if password.len() < 12 {
        errors.push("password must be at least 12 characters".to_string());
    }

    if !password.chars().any(char::is_uppercase) {
        errors.push("password must contain an uppercase letter".to_string());
    }

    if !password.chars().any(char::is_numeric) {
        errors.push("password must contain a number".to_string());
    }

    if errors.is_empty() {
        Validation::success(())
    } else {
        Validation::failure(errors)
    }
}

There is no database in this layer. There is no web framework. The function is deterministic and cheap to test.

#[test]
fn password_policy_reports_all_failures() {
    let result = validate_password_policy("short");

    assert!(matches!(result, Validation::Failure(errors) if errors.len() == 3));
}

This is password policy validation for registration, not login authentication. Checking a submitted login password against a stored hash needs the stored user record and password verifier, so it belongs in the effectful shell.

That is the “pure core” part. It is boring in the best way.

Effects Put I/O at the Boundary

The next step in registration needs infrastructure:

  • Check whether the username exists
  • Hash the password
  • Insert the user
  • Send the welcome email

Stillwater represents that as an Effect. An effect has three important associated types:

  • Output: what it produces
  • Error: how it can fail
  • Env: what it needs to run

Conceptually:

trait Effect {
    type Output;
    type Error;
    type Env;

    fn run(self, env: &Self::Env) -> impl Future<Output = Result<Self::Output, Self::Error>>;
}

That Env type is the dependency boundary. Instead of passing a database, hasher, email client, metrics client, and config object through every function, the effect declares the environment it needs.

use stillwater::{from_fn, from_validation, Effect, EffectExt};

#[derive(Clone)]
struct AppEnv {
    db: Database,
    hasher: PasswordHasher,
    email: EmailClient,
}

fn register_user(
    input: RegistrationInput,
) -> impl Effect<Output = User, Error = AppError, Env = AppEnv> {
    from_validation(validate_registration(input).map_err(AppError::Validation))
        .and_then(check_username_available)
        .and_then(hash_password)
        .and_then(create_user_record)
        .and_then(send_welcome_email)
}

fn check_username_available(
    valid: ValidRegistration,
) -> impl Effect<Output = ValidRegistration, Error = AppError, Env = AppEnv> {
    from_fn(move |env: &AppEnv| {
        if env.db.username_exists(valid.username.as_str()) {
            Err(AppError::UsernameTaken)
        } else {
            Ok(valid)
        }
    })
}

This is simplified for illustration, but the shape is the important part. Validation turns external strings into domain data. Each effectful step declares what it needs from AppEnv. The workflow is a value that can be composed, decorated, tested, and run at the edge.

Registration and login also want different failure models. Registration can collect independent field errors: bad email, weak password, mismatched confirmation. Login usually should not do that. It fetches the user, verifies the candidate password against the stored hash, and fails fast without revealing which part was wrong.

The HTTP handler becomes the shell:

async fn register_handler(
    State(env): State<AppEnv>,
    Json(input): Json<RegistrationInput>,
) -> Result<Json<User>, ApiError> {
    let user = register_user(input)
        .run(&env)
        .await
        .map_err(ApiError::from)?;

    Ok(Json(user))
}

The handler does HTTP work. The registration workflow does application work. The validation functions do validation work. Each layer is smaller because it has less to know.

Why This Helps Testing

Pure functions need no mocks:

#[test]
fn build_user_preserves_valid_registration_data() {
    let input = ValidRegistration {
        username: Username("glen".to_string()),
        email: Email("[email protected]".to_string()),
        password: PlaintextPassword("CorrectHorse12".to_string()),
    };

    let user = build_user(
        UserId(42),
        input,
        PasswordHash("hash".to_string()),
    );

    assert_eq!(user.id, UserId(42));
    assert_eq!(user.email.as_str(), "[email protected]");
}

Effects can be tested with a test environment:

#[tokio::test]
async fn registration_saves_user_and_sends_email() {
    let env = AppEnv::test();

    let input = RegistrationInput {
        username: "glen".to_string(),
        email: "[email protected]".to_string(),
        password: "CorrectHorse12".to_string(),
        confirm_password: "CorrectHorse12".to_string(),
    };

    let user = register_user(input).run(&env).await.unwrap();

    assert_eq!(env.db.user_count(), 1);
    assert_eq!(env.email.sent_count(), 1);
    assert_eq!(user.email.as_str(), "[email protected]");
}

This is still an integration-style test, but it does not need the real database or the real email provider. The dependency boundary is explicit in Env.

The split changes what each test needs:

Concern Before After
Password policy Handler test Pure table test
User construction Mock-heavy flow Pure unit test
Username uniqueness Full service path Effect test with a test environment
Welcome email retry Embedded loop test Retry policy test
HTTP response mapping End-to-end only Thin boundary test

Error Context Belongs in the Workflow

Production errors often lack the context needed to debug them. A database error by itself is rarely enough. You want to know what the application was trying to do when the database failed.

Stillwater effects can carry context through the workflow. The context wrapper changes the error type to ContextError<AppError>, which makes that extra information explicit:

use stillwater::{ContextError, EffectContext};

fn register_user(
    input: RegistrationInput,
) -> impl Effect<Output = User, Error = ContextError<AppError>, Env = AppEnv> {
    from_validation(validate_registration(input).map_err(AppError::Validation))
        .and_then(check_username_available)
        .and_then(hash_password)
        .and_then(create_user_record)
        .and_then(send_welcome_email)
        .context("registering user")
}

For deeper trails, add context at smaller workflow boundaries and use context_chain once the error is already wrapped. The boundary can decide how much of that context to expose to users, logs, traces, or metrics.

Retry Is Policy, Not Plumbing

Retry logic is another place where service code tends to decay. A quick loop appears around one call. Then there is a sleep. Then there is backoff. Then someone asks for jitter. Then a permanent validation failure gets retried five times because all errors share the same type.

Stillwater treats retry policy as data:

use std::time::Duration;
use stillwater::effect::retry::retry;
use stillwater::RetryPolicy;

fn send_welcome_email(
    user: User,
) -> impl Effect<Output = User, Error = AppError, Env = AppEnv> {
    retry(
        move || {
            let user = user.clone();
            from_fn(move |env: &AppEnv| {
                env.email.send_welcome(user.email.as_str())?;
                Ok(user.clone())
            })
        },
        RetryPolicy::exponential(Duration::from_millis(100))
            .with_max_retries(3),
    )
    .map(|success| success.into_value())
}

The retry decision is visible because the retried effect is small and the policy is a value. Permanent checks should happen before this step, so the retry boundary only wraps failures that are actually worth retrying. The policy can be tested without sending email.

Tradeoffs

Stillwater does not remove the hard parts of application design. It introduces a vocabulary. Validation, Effect, Env, and combinators like and_then are simple concepts, but they are still concepts.

The trade is worth considering when:

  • Validation needs to report all independent failures
  • Business logic is tangled with I/O
  • Tests require too much infrastructure
  • Retry and recovery policies are duplicated
  • Error context is added inconsistently
  • Dependency passing has become noisy

If none of those are true, keep the code simple.

The Useful Constraint

The main benefit of pure core, imperative shell is not aesthetics. It is the constraint it puts on design.

When a function is pure, it cannot quietly call the database. When validation returns Validation, it cannot accidentally stop at the first field. When a workflow returns an Effect, it cannot run until the boundary supplies an environment. When retry is a policy value, it can be inspected and reused.

Those constraints make the code a little more explicit. In application code, explicit is usually cheaper than clever.

Stillwater is built around that bet: use Rust’s type system to keep side effects visible, keep validation complete, and keep domain logic calm enough to test without ceremony.

Links:

Want more content like this? Follow me on Dev.to or subscribe to Entropic Drift for posts on AI-powered development workflows, Rust tooling, and technical debt management.

Check out my open-source projects:

  • Debtmap – Technical debt analyzer
  • Prodigy – AI workflow orchestration

Lean 4 for Programmers: Building a Todo List with Proof

Hello, I’m Shrijith Venkatramana. I’m building git-lrc, an AI code reviewer that runs on every commit. Star Us to help devs discover the project. Do give it a try and share your feedback for improving the product.

Most programmers already write specifications.

They just don’t call them that.

Whenever you write:

assert user.id is not None

or:

if (!task.completedAt) throw Error(...)

you are encoding invariants informally.

The problem is:
the compiler does not know them.

So your system eventually drifts into illegal states.

That is where Lean 4 becomes interesting.

Lean is not merely a theorem prover. It is a programming language where:

  • types can encode invariants,
  • proofs are first-class objects,
  • illegal states can become unrepresentable.

In this article, we will build a tiny todo system in Lean 4 and prove some properties about it.

Not because todo apps matter.

But because mundane software hides surprisingly rich semantics.

Installing Lean 4

The easiest path is:

curl https://raw.githubusercontent.com/leanprover/elan/master/elan-init.sh -sSf | sh

Then:

lake new todo-proof
cd todo-proof

Open it in VSCode with the Lean extension.

Your First Lean Program

Let’s start with a simple structure.

structure Task where
  id : Nat
  title : String
  completed : Bool
deriving Repr

This is similar to:

@dataclass
class Task:
    id: int
    title: "str"
    completed: bool

Now create a value:

def task1 : Task :=
  { id := 1
    title := "Learn Lean"
    completed := false }

And evaluate it:

#eval task1.title

Functions are Pure

Let’s write a function to complete a task.

def completeTask (t : Task) : Task :=
  { t with completed := true }

Test it:

#eval (completeTask task1).completed

Unlike mutable application code, Lean encourages modeling transitions explicitly.

That becomes important once proofs enter the picture.

Lists of Tasks

Now define a todo list.

abbrev TodoList := List Task

Add tasks:

def addTask (todos : TodoList) (task : Task) : TodoList :=
  task :: todos

Example:

def todos :=
  addTask [] task1

The First Invariant

Real systems care about invariants.

Suppose:

No two tasks should share the same ID.

In JavaScript this is convention.

In Lean we can state it formally.

Extracting IDs

def ids (todos : TodoList) : List Nat :=
  todos.map (fun t => t.id)

Unique IDs Predicate

Lean already has List.Nodup.

It means:

this list contains no duplicates.

Now define:

def UniqueIds (todos : TodoList) : Prop :=
  List.Nodup (ids todos)

This is our first specification.

Notice something subtle:

Prop

means:

a logical proposition.

Not a runtime boolean.

Proving Something

Let’s prove:

an empty todo list has unique IDs.

theorem empty_has_unique_ids :
  UniqueIds [] := by
  unfold UniqueIds ids
  simp

That tiny proof already demonstrates the core idea.

We encoded:

  • a system property,
  • mathematically,
  • and mechanically verified it.

Safe Task Addition

Now we define safer insertion.

We only allow adding a task if its ID is fresh.

First:

def idExists (todos : TodoList) (id : Nat) : Bool :=
  todos.any (fun t => t.id == id)

Then:

def addTaskSafe (todos : TodoList) (task : Task) : Option TodoList :=
  if idExists todos task.id then
    none
  else
    some (task :: todos)

This resembles production code more closely.

Proving Correctness of Safe Addition

Now the interesting part.

We want:

If the original list had unique IDs,
and insertion succeeds,
the resulting list also has unique IDs.

In theorem-prover land, this is the real API contract.

A simplified proof sketch:

theorem addTaskSafe_preserves_unique
    (todos : TodoList)
    (task : Task)
    (h : UniqueIds todos)
    (hadd : addTaskSafe todos task = some (task :: todos)) :
    UniqueIds (task :: todos) := by
  unfold addTaskSafe at hadd
  unfold UniqueIds at *
  simp at hadd
  aesop

Do not worry if this feels strange initially.

The important conceptual shift is:

We are proving:

  • state transitions preserve invariants.

That is the heart of formal methods.

Illegal States

Most application bugs reduce to:

invalid transitions between states.

For example:

{
  completed: true,
  completedAt: null
}

This is an illegal state.

Traditional systems allow it accidentally.

Lean encourages modeling state explicitly.

Encoding State in Types

Instead of:

structure Task where
  completed : Bool

we can do:

inductive Status where
  | active
  | completed

Now:

structure Task where
  id : Nat
  title : String
  status : Status

Already better.

But we can go further.

Dependent Thinking

Suppose completed tasks must contain a completion timestamp.

In mainstream languages:

completedAt?: Date

In Lean:

inductive TaskState where
  | active
  | completed (finishedAt : Nat)

Now the timestamp exists iff the task is completed.

The illegal state disappears entirely.

This is a recurring pattern in theorem proving:
move runtime checks into type structure.

Why This Matters

At first glance, this seems academic.

But think about real systems:

  • payment processors,
  • distributed databases,
  • auth systems,
  • CI pipelines,
  • infrastructure tooling.

Most failures come from:

  • invalid states,
  • forgotten invariants,
  • impossible transitions that became possible.

Lean lets you model systems where:

  • assumptions are explicit,
  • transitions are checked,
  • proofs accompany implementations.

A More Interesting Direction

A todo app becomes genuinely interesting once you add:

  • offline sync,
  • collaboration,
  • event sourcing,
  • permissions,
  • undo/redo,
  • conflict resolution.

Then you start proving:

  • merge convergence,
  • replay determinism,
  • permission safety,
  • index consistency.

At that point, you are doing miniature distributed systems research.

Final Thoughts

The important lesson is not:

“we proved a todo app correct”.

It is:

ordinary software contains hidden formal structure.

Most systems already behave like:

  • state machines,
  • transition systems,
  • protocol graphs,
  • logical constraint engines.

Lean simply forces those assumptions into the open.

And once they are explicit:
they become provable.

*AI agents write code fast. They also silently remove logic, change behavior, and introduce bugs — without telling you. You often find out in production.

git-lrc fixes this. It hooks into git commit and reviews every diff before it lands. 60-second setup. Completely free.*

Any feedback or contributors are welcome! It’s online, source-available, and ready for anyone to use.

GitHub logo

HexmosTech
/
git-lrc

Free, Micro AI Code Reviews That Run on Commit

AI agents write code fast. They also silently remove logic, change behavior, and introduce bugs — without telling you. You often find out in production.

git-lrc fixes this. It hooks into git commit and reviews every diff before it lands. 60-second setup. Completely free.

See It In Action

See git-lrc catch serious security issues such as leaked credentials, expensive cloud
operations, and sensitive material in log statements

git-lrc-intro-60s.mp4

Why

  • 🤖 AI agents silently break things. Code removed. Logic changed. Edge cases gone. You won’t notice until production.
  • 🔍 Catch it before it ships. AI-powered inline comments show you exactly what changed and what looks wrong.
  • 🔁 Build a…