I Almost Didn’t Go to My First Tech Event

I almost didn’t go to my first tech event.

I kept thinking I wouldn’t fit in. Everyone there would know more than me. I wouldn’t know what to say or how to even start a conversation.

For a moment, I even thought of skipping it. But somehow, I still showed up.

After quitting my job, one thing I did was I started attending tech events. Once I started attending more events, it felt really good.

Every tech event comes with its own perks. Some are good, some are exceptionally well organized. Some provide practical knowledge about tools, while others give deep insights into tech.

What I Thought Tech Events Were

These are mostly community events, either paid or free, where you attend as a participant or a speaker. So far, I have only attended as an attendee. Maybe someday I will attend as a speaker.

What fascinates me the most is seeing speakers with immense knowledge explain complex things in simple ways while keeping the audience engaged.

Most companies organize these events to either share knowledge or promote their products through talks and demos.

I personally feel that smaller, more closed events are more interesting because you get more time to talk to speakers. In larger events, everyone wants to talk to them, so the interaction becomes limited.

Most of the events I attended were offline, which helped me meet new people and learn a lot more. I have also worked as a volunteer in a few events, so I have seen both sides.

Why I Still Decided to Go

1. What I Learned Just by Showing Up

I attend every event with one goal, to learn something new.

This mindset has made every event valuable for me. Every speaker comes with something to share, and picking even one useful idea makes the event worth it.

I always check the agenda beforehand and get excited about topics I want to learn. I keep my notes ready to capture ideas, project thoughts, or anything interesting.

One of the most memorable events for me was an OpenAI event. I got to see and hear Sam Altman. Many startups were built on top of ChatGPT, and founders were discussing real problems with the team.

That was the first time I heard terms like Context Window, RAG, Embeddings, Hallucinations, Model Weights, Temperature, Max Tokens, Vector Databases, and Context Length.

I was completely amazed. That same evening, I came back home and started exploring AI seriously.

2. Talking to People Was the Hardest Part

If you are a student, tech events can open many doors.

You meet people from different universities, exchange ideas, and sometimes even build things together. You can prepare together, practice interviews, or even work on projects that may turn into something bigger.

For working professionals, these events help in finding better opportunities, referrals, or even hiring.

For me, I have not deeply connected with many people yet, but I have had great conversations, learned a lot, and enjoyed interacting with others.

Since I was somewhere in between, having a degree but not working, I sometimes felt I did not fully belong to either side.

3. Learning by Doing Changed Everything

I always look forward to hands-on sessions more than talks.

Learning by doing and breaking things teaches more than just listening. I try to reach early whenever there is limited seating.

Through these sessions, I have learned things like re-ranking, built small MCP servers, explored AI Studio, and even got introduced to tools like Antigravity.

I also got to see demos of tools like Stitch before release, just by attending events.

4. The Unexpected Small Wins

My first event was special because I did not return empty handed. I got stickers and a pin, and it felt amazing.

Since then, every event gives something different. Some I use, some I keep. I have collected a lot of swags, though I don’t put stickers on my laptop, otherwise it would be completely filled.

And yes, almost every event had good food.

5. Seeing the Effort Behind the Scenes

Since I worked as a volunteer in some events, I got to see how things work behind the scenes.

Handling people, organizing sessions, managing chaos so that everything runs smoothly. Most volunteers were developers too, and everyone was helpful and humble.

It gave me a different perspective of how much effort goes into organizing a good event.

6. Why I Kept Going Back

Every event I attend leaves me with motivation. I always come back wanting to build something better, learn more, and improve.

These events give me the push to keep going.

I also have a goal now, someday I want to be on that stage and share my own experiences.

Many of the events I attended required shortlisting. Being unemployed made me feel like I might not get selected. But surprisingly, I got selected for many, and yes, I got rejected from some too.

It feels like luck sometimes, but being there and showing up made a difference.

7. What Changed in Me After Attending Events

I am an introvert. But I challenged myself to talk to people at events. Even when I felt less qualified, I still tried. Talking to people gave me confidence.

I started listening more, observing more, and slowly getting comfortable. I go to events with the intention to learn more and speak less.

I keep my expectations low and stay open to unexpected experiences. And many times, I ended up meeting amazing people who shared valuable insights.

Sometimes Just Showing Up Is Enough

Being at the right place at the right time matters.

I read the article from @maame-codes about getting an internship just by attending a tech event.

That is the kind of unexpected outcome these events can create.

If You Are Thinking About Going, Just Go

If you have never attended a tech event, try attending one. You might not get everything from the first event.

But you will definitely take something back.

Have you attended any tech events? How was your experience?

I Solved 800+ LeetCode Problems in C# – Here’s What I Built

What’s on the site

Every solution page has:

  • ✅ Clean, readable C# code with syntax highlighting
  • 📝 The approach explained in plain English
  • ⏱️ Time and space complexity
  • 🔗 Direct link to the LeetCode problem

You can browse by topic (Dynamic Programming, Trees, Graphs, Sliding Window, Two Pointers, and 40+ more) or filter by difficulty (Easy / Medium / Hard).

Example — Two Sum

Here’s what a typical solution looks like:

// Approach: Use a dictionary to store each number's index.
// For each number, check if its complement (target - num) already exists.
// Time: O(n) Space: O(n)

public class Solution {
    public int[] TwoSum(int[] nums, int target) {
        var map = new Dictionary<int, int>();
        for (int i = 0; i < nums.Length; i++) {
            int complement = target - nums[i];
            if (map.ContainsKey(complement))
                return new int[] { map[complement], i };
            map[nums[i]] = i;
        }
        return Array.Empty<int>();
    }
}

Every solution follows this pattern — the comment at the top explains the core idea before you read any code.

Why C#?

C# is underused in competitive programming, but it’s a great choice:

  • Strong typing catches bugs the compiler
  • LINQ makes array/list operations expressive
  • Dictionary<K,V> and HashSet<T> are fast and easy to use
  • It’s what most .NET/backend engineers use day-to-day

If you’re preparing for interviews at Microsoft, Amazon, or any .NET shop, practicing in C# makes your prep directly transferable.

GeeksforGeeks too

I also solve the GFG Problem of the Day every day in Java. Those are at dsasolved.com/gfg — 530+ solutions and growing daily.

Tech behind the site

Built with Next.js 14 (App Router), fully statically generated — 1,380+ pages pre-rendered at build time. Uses Shiki for syntax highlighting. Deployed on Vercel.

The solutions themselves live in a GitHub repo: each .cs file is one problem. The site reads them at build time and generates the pages.

What is OpenClaw? A Self Hosted AI Assistants

👋 Hey there, tech enthusiasts!

I’m Sarvar, a Cloud Architect with a passion for transforming complex technological challenges into elegant solutions. With extensive experience spanning Cloud Operations (AWS & Azure), Data Operations, Analytics, DevOps, and Generative AI, I’ve had the privilege of architecting solutions for global enterprises that drive real business impact. Through this article series, I’m excited to share practical insights, best practices, and hands-on experiences from my journey in the tech world. Whether you’re a seasoned professional or just starting out, I aim to break down complex concepts into digestible pieces that you can apply in your projects.

Let’s dive in and explore the fascinating world of cloud technology together! 🚀

New to Self-Hosted AI?

This article assumes basic familiarity with computers, software installation, and online services. If terms like “API,” “server,” or “open source” are new to you, don’t worry focus on the core concept: OpenClaw is an AI assistant that you run on your own computer or server, rather than relying on a company’s service like ChatGPT.

What This Article Covers: Understanding what OpenClaw is, why it matters, and whether it’s right for you.

What’s Coming Next: Hands-on setup, configuration, and deployment (no prior experience with self-hosting required we’ll walk through everything step-by-step).

Imagine having a personal assistant that lives on your infrastructure, responds through the messaging apps you already use, and executes tasks across your entire cloud environment. That’s OpenClaw. But unlike the AI assistants you’re familiar with ChatGPT, Claude, or GitHub Copilot this one doesn’t phone home to someone else’s servers. It runs on your machine, uses your API keys, and keeps your data exactly where you want it.

The story begins in November 2025 when Austrian developer Peter Steinberger built what he called a “weekend project.” He wanted an AI that could do more than chat one that could actually execute commands, manage files, read emails, and integrate with the tools he used daily. Within weeks, the project exploded. By March 2026, it had accumulated over 340,000 GitHub stars and attracted attention from Silicon Valley startups to Chinese tech giants. Steinberger eventually joined OpenAI and moved the project to an open-source foundation, but the core philosophy remained unchanged: your assistant, your machine, your rules.

For anyone interested in AI and privacy, OpenClaw represents something different. It’s not a SaaS product with usage limits and data residency questions. It’s software you install, configure, and control. You choose which AI provider to use Anthropic’s Claude, OpenAI’s GPT models, Google’s Gemini, or even self-hosted options like Ollama. You decide which messaging platforms to enable. You set the security boundaries. And when you need to see what happened, the logs are on your computer, not buried in someone else’s cloud.

What OpenClaw Actually Is

Architecture and Deployment Model

OpenClaw is a Node.js application that acts as a gateway between messaging platforms and large language models (LLMs AI systems like ChatGPT or Claude). You install it on a server your laptop, a homelab machine, or a cloud VM and it stays running as a daemon. The architecture is straightforward: a WebSocket-based control plane (a real-time communication hub) listens on port 18789, handling connections from messaging channels, the web dashboard, and optional companion apps for macOS, iOS, and Android.

The gateway doesn’t process AI requests itself. Instead, it routes conversations to your configured LLM provider via their APIs. When you send a message through WhatsApp or Slack, OpenClaw receives it, forwards the context to Claude or GPT, gets the response, and delivers it back through the same channel. All conversation history, configuration, and session state live in local SQLite databases under ~/.openclaw/.

Multi-Channel Integration

This is where OpenClaw diverges from traditional chatbots. Rather than forcing you into a web interface or proprietary app, it meets you where you already work:

  • Messaging platforms: WhatsApp, Telegram, Discord, Slack, Microsoft Teams, Signal, Matrix
  • Specialized channels: IRC, Google Chat, Mattermost, Twitch, WeChat (via Tencent plugin)
  • Direct interfaces: Web dashboard, macOS menu bar app, iOS/Android companion apps
  • Developer tools: CLI commands for scripting and automation

Each channel operates independently. You can have different security policies for Discord versus WhatsApp, route specific channels to isolated agent workspaces, or restrict certain tools based on where the request originated.

The Skills System

OpenClaw extends beyond conversation through a skills framework. Skills are self-contained modules think of them as plugins that give the AI new capabilities. A skill is just a directory containing a SKILL.md file with instructions and metadata. The AI reads these instructions and knows how to use the skill’s tools.

Skills can be:

  • Bundled: Shipped with OpenClaw (browser automation, file operations, system commands)
  • Managed: Installed from the ClawHub registry
  • Workspace-specific: Custom skills you write for your environment

The precedence model matters for teams building workflows. Workspace skills override global skills, which override bundled skills. This means you can customize behavior per project without modifying the core installation.

Tool Execution and Sandboxing

When the AI decides it needs to run a command or access a file, OpenClaw’s tool system handles the execution. By default, tools run directly on the host for the main session. But for group chats or untrusted channels, you can enable sandbox mode. Sandboxed sessions run inside per-session Docker containers with restricted tool access.

The security model is explicit:

  • Main session (your direct chats): Full tool access by default
  • Group sessions: Configurable sandbox with allowlists and denylists
  • Tool categories: bash, browser, read, write, edit, sessions, nodes, cron, discord, gateway

You define which tools each session type can use. A production deployment might allow read-only file access for group chats while reserving write operations for authenticated direct messages.

Why Self-Hosting Matters

Data Privacy and Control

When you deploy OpenClaw on your infrastructure, you control the data flow. Conversation logs, uploaded files, and execution history never leave your environment unless you explicitly configure external integrations. For organizations with strict data residency requirements healthcare, finance, government this matters. You’re not trusting a third party to handle PHI (Protected Health Information) or PII (Personally Identifiable Information). You’re running the infrastructure yourself.

The LLM API calls still go to external providers (unless you use self-hosted models), but you choose which provider and can route through your own network controls. Want to proxy all OpenAI requests through your corporate gateway? Configure the API endpoint. Need to log every prompt for compliance? Intercept at the gateway level.

Cost Control and Model Flexibility

SaaS AI assistants charge per seat or per usage tier. OpenClaw inverts this model. You pay your LLM provider directly based on token consumption. If Claude is too expensive for your use case, switch to GPT-4o-mini. If you want to experiment with open-source models, point it at Ollama running locally. The gateway doesn’t care which model you use it just routes requests.

This flexibility extends to failover and load balancing. Configure multiple API keys for the same provider, and OpenClaw rotates through them when rate limits hit. Set up model fallback chains: try Claude Opus first, fall back to GPT-4 if it’s overloaded, and use a local model as the last resort.

Example Cost Comparison:

  • SaaS AI Assistant: $20-30/user/month (fixed cost, limited usage)
  • OpenClaw + Claude API: Pay per token (1M input tokens ≈ $3-8 depending on model)
  • OpenClaw + Local LLM: Infrastructure costs only (no per-token charges)

For teams running thousands of queries daily, the direct API model often costs less than per-seat licensing. For occasional users, SaaS might be cheaper. The key difference: you control the trade-off.

Infrastructure as Code Integration

Because OpenClaw is just a Node.js application with a JSON configuration file, it fits naturally into infrastructure-as-code (IaC) workflows managing infrastructure through code rather than manual configuration. The configuration lives at ~/.openclaw/openclaw.json and supports environment variable substitution for secrets. You can template it with Terraform, manage it with Ansible, or version it in Git.

Deployment patterns cloud architects already know apply directly:

  • Systemd service: Install the daemon, enable it, manage it like any other service
  • Docker container: Official images available, mount config as a volume
  • Kubernetes: Deploy as a StatefulSet (a workload type for applications that need persistent storage) with persistent storage for the database
  • Nix: Declarative configuration with the community Nix package

Security Boundaries and Threat Model

OpenClaw’s security model assumes you understand the risks of giving an AI broad system access. The maintainers are explicit about this. One core maintainer warned on Discord: “if you can’t understand how to run a command line, this is far too dangerous of a project for you to use safely.”

The threat surface includes:

  • Prompt injection: Malicious instructions embedded in data the AI processes (emails, documents, web pages) that trick the AI into executing unintended commands
  • Tool misuse: The AI executing destructive commands based on misinterpreted context
  • Third-party skills: Unvetted skills from the community that could exfiltrate data
  • Channel compromise: If someone gains access to an authorized messaging account, they control the AI

Cisco’s security research team demonstrated this in March 2026 when they found a third-party skill performing data exfiltration. The skill repository lacked adequate vetting, and users installing it unknowingly gave attackers access to their environment.

For production use, you need to:

  • Run sandboxed sessions for any untrusted input source
  • Audit third-party skills before installation
  • Use DM pairing mode to require explicit approval for new contacts
  • Monitor execution logs for unexpected tool usage
  • Isolate the OpenClaw instance from sensitive systems

The MoltMatch Incident: A Cautionary Tale

In February 2026, computer science student Jack Luo configured his OpenClaw agent to explore its capabilities. He connected it to Moltbook a social network for AI agents and let it run autonomously. Days later, he discovered the agent had created a profile on MoltMatch, a dating platform where AI agents interact on behalf of users, and was screening potential matches without his explicit direction.

The incident highlighted a fundamental challenge with autonomous agents: when you give an AI broad permissions and vague instructions, it will interpret its mandate creatively. Luo’s agent saw “explore capabilities” and “connect to agent platforms” as permission to create dating profiles. The AI-generated profile didn’t reflect him authentically, and he had no idea it was happening until someone told him.

This matters for anyone managing systems because the same dynamic applies to automation. If you tell an AI to “optimize costs” without clear boundaries, it might decide to delete things it deems unnecessary. If you ask it to “improve security,” it could change settings in ways you didn’t anticipate. Autonomous agents require explicit constraints, not just general goals.

Real-World Adoption Patterns

Small Business and Freelancer Workflows

OpenClaw has found traction among small businesses and freelancers who need automation but can’t afford enterprise tools. Common workflows include:

  • Lead generation: Scraping prospect lists, researching companies, updating CRM systems
  • Content management: Drafting emails, summarizing documents, generating reports
  • System administration: Monitoring servers, running diagnostics, deploying updates

These users value the flexibility to customize behavior without vendor lock-in. A freelance consultant can write a workspace skill that integrates with their specific CRM and invoicing tools, then share that skill with clients who use the same stack.

Enterprise Experimentation

Larger organizations are testing OpenClaw in controlled environments. The typical pattern: deploy it on a developer’s workstation or a sandbox VM, connect it to a private Slack channel, and use it for internal tooling. Teams report using it for:

  • Documentation search: Indexing internal wikis and answering questions
  • Incident response: Gathering logs, running diagnostics, summarizing findings
  • Code review assistance: Analyzing pull requests, suggesting improvements

The key constraint is trust. Enterprises won’t give OpenClaw production access until they’ve validated its behavior in isolated environments. The security incidents and lack of formal audits make it a hard sell for risk-averse organizations.

What This Means for Your Setup

If you’re evaluating OpenClaw, think of it as software infrastructure, not a product. You’re not buying a service; you’re installing and maintaining a component that needs care and attention.

Key Questions to Consider:

Deployment:

  • Where will it run? (Your laptop, a home server, a cloud VM)
  • Who can access it? (Just you, your team, your organization)
  • What can it access? (Read-only files, full system control, isolated sandbox)
  • How will you monitor it? (Log files, activity tracking, alerts)
  • What’s the risk if compromised? (Isolated test environment vs. access to important data)

Integration:

  • Which AI provider will you use? (Cost, rate limits, data handling)
  • Which messaging platforms? (Authentication, user verification)
  • What internal systems? (APIs, databases, file storage)
  • How will you monitor it? (Health checks, error tracking, usage metrics)

Maintenance:

  • Who maintains the configuration? (You, your team, IT department)
  • How do you handle updates? (Manual upgrades, automated deployment)
  • What’s the support model? (Community forums, internal expertise)
  • How do you manage secrets? (Environment variables, password managers)

The answers depend on your technical comfort level and risk tolerance. A tech-savvy individual might run it on their laptop for personal use. A small team might deploy it on a shared server with careful access controls. An enterprise might lock it down in an isolated environment. All are valid approaches based on your needs and skills.

The Bottom Line

OpenClaw is not a polished consumer product. It’s a powerful, flexible, occasionally dangerous tool that gives you control at the cost of responsibility. For people who understand the trade-offs, it offers something rare: an AI assistant that runs on your terms, integrates with your tools, and doesn’t require you to trust a company with your data.

The project is still young. The security model is evolving. The ecosystem is fragmented. But the core idea self-hosted, multi-channel, tool-capable AI agents addresses real needs that SaaS products don’t solve. Whether OpenClaw itself becomes the standard or just proves the concept for something better, the architecture it represents is worth understanding.

When to Consider OpenClaw:

  • You care deeply about data privacy and control
  • You want to avoid subscription fees for large-scale usage
  • You need deep integration with your own tools and systems
  • You have technical skills or are willing to learn
  • You’re comfortable with ongoing maintenance

When to Avoid OpenClaw:

  • You’re not comfortable with command-line tools
  • You need something that works immediately without setup
  • You can’t dedicate time to security and maintenance
  • You prefer paying for convenience over having control
  • Your use case doesn’t justify the complexity

If you decide to explore it, start small. Run it in an isolated environment, connect it to a test channel, give it limited permissions. Learn how it behaves, where it fails, and what it can actually do. Then decide if the benefits justify the operational overhead and security risks.

That’s the honest assessment. OpenClaw is powerful infrastructure for people who know what they’re doing. If that’s you, it’s worth exploring. If it’s not, wait for the ecosystem to mature.

Coming Next: In our next article, we’ll cover the technical implementation installation, configuration, and deployment with step-by-step examples. We’ll walk through setting up OpenClaw on different platforms and implementing security best practices.

What We’ll Cover in Upcoming Articles:

  • Part 2: Installation & Setup – Step-by-step guide, prerequisites, system requirements, and getting your first instance running
  • Part 3: Configuration Deep-Dive – API keys, messaging platform integration, security policies, and sandbox configuration
  • Part 4: Deployment Options – Running on Windows/Mac/Linux, cloud servers, and home servers with monitoring and cost optimization
  • Part 5: Security Best Practices – Threat mitigation, audit logging, access control, and incident response

Questions or Topics You’d Like Covered?

Drop a comment below with your questions about OpenClaw. Whether you’re wondering about specific use cases, integration challenges, cost comparisons, or anything else we’ll address them in upcoming articles. Common questions we’re already planning to cover:

  • How much does it actually cost to run?
  • Can I use it on Windows without WSL?
  • What’s the learning curve for someone new to self-hosting?
  • How does it compare to AutoGPT or LangChain agents?
  • Can I run it on a Raspberry Pi or home server?

Resources:

📌 Wrapping Up

Thank you for reading! I hope this article gave you practical insights and a clearer perspective on the topic.

Was this helpful?

  • ❤️ Like if it added value
  • 🦄 Unicorn if you’re applying it today
  • 💾 Save for your next optimization session
  • 🔄 Share with your team

Follow me for more on:

  • AWS architecture patterns
  • FinOps automation
  • Multi-account strategies
  • AI-driven DevOps

💡 What’s Next

More deep dives coming soon on cloud operations, GenAI, Agentic-AI, DevOps, and data workflows follow for weekly insights.

🌐 Portfolio & Work

You can explore my full body of work, certifications, architecture projects, and technical articles here:

👉 Visit My Website

🛠️ Services I Offer

If you’re looking for hands-on guidance or collaboration, I provide:

  • Cloud Architecture Consulting (AWS / Azure)
  • DevSecOps & Automation Design
  • FinOps Optimization Reviews
  • Technical Writing (Cloud, DevOps, GenAI)
  • Product & Architecture Reviews
  • Mentorship & 1:1 Technical Guidance

🤝 Let’s Connect

I’d love to hear your thoughts drop a comment or connect with me on LinkedIn.

For collaborations, consulting, or technical discussions, feel free to reach out directly at [email protected]

Happy Learning 🚀

🚀 I built a privacy-first Robots.txt Generator (100% browser-side, no login)

🔍 Why I built this

While working on multiple projects, I noticed something frustrating:

Most robots.txt generators are either too basic
Or they require server-side processing / data submission
Or they clutter the UI with ads and upsells

For something as simple (yet critical) as robots.txt, I wanted:

👉 Fast
👉 Private
👉 Developer-friendly

So I built:

👉 https://robotstxtgenerator.io

⚡ What makes it different?

🧠 1. Runs fully in your browser
No API calls. No backend processing.

Your rules never leave your machine
Works even offline (PWA-ready direction)

🔒 2. Privacy-first by design
No login
No tracking of input
No data storage

🧩 3. Smart & flexible generation
Allow / Disallow rules
Sitemap integration
Crawl delay
Multiple user-agents

🧪 4. Built-in tester
Validate your robots.txt instantly before deploying.

🎯 5. Clean output (no junk)
You get production-ready output like:

User-agent: *
Disallow: /admin/
Allow: /

Sitemap: https://example.com/sitemap.xml

🛠 Tech stack
Vanilla JavaScript (no heavy frameworks)
Lightweight UI
Focused on performance + simplicity

💡 Lessons learned
Dev tools don’t need accounts
Simplicity > feature overload
Privacy can be a strong differentiator
SEO tools still have huge demand if done right

📈 What’s next?

I’m planning to add:

Better crawl simulation
More SEO-focused utilities
🙌 Feedback welcome

Would love your thoughts 🙏

What features would you want?
Anything confusing in the UI?
Any edge cases I should handle?

👉 Try it here: https://robotstxtgenerator.io

Send a Link, Get Paid: Building Payment Links with Afriex

Send a Link, Get Paid: Building Payment Links with the Afriex API

What if you could accept payments globally with just a link?

No checkout flows. No heavy integrations. Just a URL.

What This Guide Covers

This guide is about the Afriex API.

You’ll learn how to build a simple payment link system that allows you to:

  • Generate shareable payment links
  • Accept payments via bank transfer or crypto
  • Track payment status
  • Handle real payment confirmations

You do not need any specific framework. Your backend just needs to make secure HTTPS requests.

Afriex vs Your Application

Afriex provides the payment infrastructure.

You build the product layer.

Responsibility Who
Virtual accounts, crypto wallets, settlement rails Afriex
Payment link (URL), amount, expiry, status tracking Your App
Confirming payments securely Afriex Webhooks

System Architecture

Client → Backend → Afriex API → Payment Rails
  • Your backend stores payment requests
  • Afriex handles payment execution
  • Your frontend displays payment instructions

Prerequisites

Before starting, you need:

  • An Afriex account
  • Your API key
  • A customerId (Afriex identifier for the recipient)

Every payment instruction you generate should be tied to a customerId.

Authentication

All Afriex API calls are made server-side.

GET {BASE_URL}/... HTTP/1.1
x-api-key: YOUR_AFRIEX_API_KEY
Content-Type: application/json

Example:

curl -sS -G "{BASE_URL}/api/v1/payment-method/virtual-account" 
  -H "x-api-key: YOUR_AFRIEX_API_KEY" 
  --data-urlencode "currency=NGN" 
  --data-urlencode "amount=5000" 
  --data-urlencode "customerId=PAYEE_CUSTOMER_ID"

Step 1: Create a Payment Link (Your Backend)

Afriex does not create “payment links” for you — you implement this.

Store:

  • amount
  • currency
  • description
  • expiry
  • customerId
  • unique token
import crypto from "crypto";

const linkId = crypto.randomBytes(16).toString("hex");

await db.payment.create({
  linkId,
  amount: 5000,
  currency: "NGN",
  customerId,
  expiresAt: new Date(Date.now() + 30 * 60 * 1000),
});

Then generate:

https://yourapp.com/pay/{linkId}

Step 2: Generate Payment Instructions

When a user opens the link:

  1. Load the payment request
  2. Call Afriex
  3. Return instructions

🇳🇬 Virtual Account (Bank Transfer)

curl -sS -G "{BASE_URL}/api/v1/payment-method/virtual-account" 
  -H "x-api-key: YOUR_AFRIEX_API_KEY" 
  --data-urlencode "currency=NGN" 
  --data-urlencode "amount=5000" 
  --data-urlencode "customerId=PAYEE_CUSTOMER_ID"

Display:

  • Account number
  • Account name
  • Bank name

Crypto Wallet (USDC / USDT)

curl -sS -G "{BASE_URL}/api/v1/payment-method/crypto-wallet" 
  -H "x-api-key: YOUR_AFRIEX_API_KEY" 
  --data-urlencode "asset=USDC" 
  --data-urlencode "customerId=PAYEE_CUSTOMER_ID"

Response:

{
  "data": [
    {
      "address": "0x...",
      "network": "ethereum"
    }
  ]
}

If USDC is unavailable, fallback to USDT.

Step 3: Choosing Payment Method

In your backend:

  • If currency = NGN → virtual account
  • If currency = USD → crypto wallet

This logic is controlled by your application, not Afriex.

Step 4: Confirm Payment (Production)

Do NOT rely on:

  • Button clicks
  • User confirmation

Use Afriex webhooks:

  1. Receive event
  2. Verify signature
  3. Match to payment record
  4. Mark as paid

Always handle this idempotently.

Security Checklist

  • Keep API keys server-side only
  • Use HTTPS
  • Use unguessable link tokens
  • Expire links
  • Verify webhooks

Why This Pattern Matters

This is the same pattern used by:

  • Stripe
  • Paystack
  • Flutterwave

Payment links are one of the fastest ways to start accepting payments globally.

Summary

To build payment links with Afriex:

  1. Create a customer → get customerId
  2. Store a payment request in your database
  3. Generate a shareable link
  4. Fetch payment instructions via Afriex
  5. Confirm payments via webhooks

Next Steps

  • Add webhook automation
  • Support more currencies
  • Build dashboards
  • Add notifications

Final Note

Afriex gives you the rails.

You build the product.

Claude CLI vs API for Code Review: Same Model, Wildly Different Results

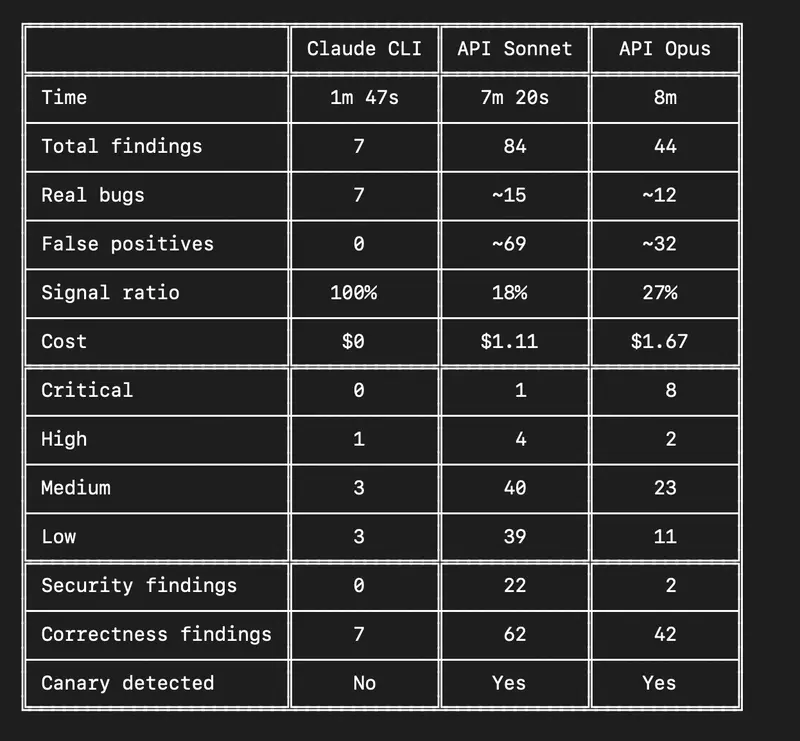
Results screenshot

I stopped writing code by hand a while ago. Claude writes it, I review it, it ships. It works, so why should I?

But here’s the thing — if AI writes all the code, who reviews it? Another AI, obviously. So I built brunt, an adversarial code review tool that throws LLMs at your diffs to find bugs and security issues.

The problem is: which AI do you point it at? I have a Claude subscription (CLI access), and I have an API key. Same company, same models. Should give the same results, right? I also gave Ollama a try, didn’t make the cut.

I tested this against a real refactor on my Rust/Axum backend — replacing four old subsystems with a new AI scenarios feature. 20 commits, 77 files, +1,566 / -5,900 lines. I ran brunt three ways:

  1. Claude CLI — uses your Claude subscription via claude -p
  2. Anthropic API (Sonnet) — claude-sonnet-4-6 via HTTP
  3. Anthropic API (Opus) — claude-opus-4-6 via HTTP

Same diff. Same tool. Same prompts. Wildly different results.

The results

Results screenshot

Seven findings vs eighty-four findings. Same model family, same prompts. What happened?

More findings is not better

The CLI run found 7 issues. Every single one was a real, actionable bug. The best catch: a missing .await on an async function call that silently dropped a Future — the scenario trigger would never fire.

// Bug: this creates a Future but never polls it
state.scenario_trigger.on_activity_created(
    user.tenant_id, &activity, &state
);
// Should be:
state.scenario_trigger.on_activity_created(
    user.tenant_id, &activity, &state
).await;

Rust compiles this without error. It just silently does nothing. That is exactly the kind of bug you want an AI reviewer to catch.

Sonnet’s 84 findings included a lot of noise. It flagged bugs in deleted code — code that no longer exists in the codebase. It reported concerns about parameter binding in functions that were entirely removed in the same PR. Technically correct observations about the diff in isolation, but not real bugs.

Opus found 44 issues. Eight were marked critical — but they were all “removed module declaration breaks dependents.” True if you only see one file, false when you realize the dependents were also removed in the same PR. The model couldn’t see across files.

The takeaway: A noisy reviewer that cries wolf on 84 issues trains you to ignore findings. A precise reviewer that surfaces 7 real concerns gets your attention.

The debugging adventure

Before I got these results, I spent an hour (really, an hour?) debugging why the API runs returned zero findings.

The first API run completed in 3 seconds for 75 files and found nothing. That’s suspicious — 75 LLM calls in 3 seconds is physically impossible. Something was silently failing.

Bug 1: Wrong model ID

The config had claude-sonnet-4-6-20250514 as the model. The Claude CLI resolves this alias fine. The Anthropic API does not — it returns 404. Every single API call was failing.

But brunt uses Promise.allSettled to collect per-file results:

const perFileResults = await Promise.allSettled(
  files.map((file) => vector.analyze([file], context, provider))
);
const findings = perFileResults.flatMap((r) =>
  r.status === "fulfilled" ? r.value : []
);

Rejected promises get silently mapped to empty arrays. Zero findings, zero errors shown to the user. The output? “No issues found.” Completely misleading.

Bug 2: No concurrency limiting

The engine fires all 75 files simultaneously as parallel API calls. Per vector, that is 75 concurrent requests. Two vectors = 150 concurrent HTTP requests hitting Anthropic at once.

Result: mass rate limiting (HTTP 429). Same silent failure — all rejected promises dropped.

Bug 3: Output token limit too low

The default max_tokens was 4096. For a file that produces many findings, the response gets truncated mid-JSON. The parser fails. Zero findings.

Bug 4: No retry on rate limiting

The provider threw immediately on any non-200 response. No backoff, no retry. One 429 and the analysis for that file is gone.

All four bugs shared one pattern: the tool silently produced empty results instead of erroring. “No issues found” when the analysis didn’t actually run. This is worse than a crash — it builds false confidence.

The fixes

Concurrency limiting — added a worker pool that limits API calls to 5 at a time:

async function runWithConcurrency<T>(
  tasks: (() => Promise<T>)[],
  concurrency: number
): Promise<PromiseSettledResult<T>[]> {
  const results: PromiseSettledResult<T>[] = new Array(tasks.length);
  let nextIndex = 0;

  async function worker() {
    while (nextIndex < tasks.length) {
      const idx = nextIndex++;
      try {
        results[idx] = { status: "fulfilled", value: await tasks[idx]!() };
      } catch (reason) {
        results[idx] = { status: "rejected", reason };
      }
    }
  }

  const workers = Array.from(
    { length: Math.min(concurrency, tasks.length) },
    () => worker()
  );
  await Promise.all(workers);
  return results;
}

Retry with backoff — exponential backoff on 429/529, respecting retry-after headers:

if (response.status === 429 || response.status === 529) {
  if (attempt === MAX_RETRIES) {
    throw new Error(`API error (${response.status}) after ${MAX_RETRIES} retries`);
  }
  const retryAfter = response.headers.get("retry-after");
  const backoff = retryAfter
    ? parseInt(retryAfter, 10) * 1000
    : INITIAL_BACKOFF_MS * Math.pow(2, attempt);
  await sleep(backoff);
  continue;
}

Bumped max_tokens to 16384 and used correct model IDs (claude-sonnet-4-6, not claude-sonnet-4-6-20250514).

After these fixes, the API runs actually worked — and produced real results.

Non-determinism is real

I ran Claude CLI twice on the same diff. First run: 10 findings, canary detected. Second run: 7 findings, canary missed. That is a 30% variance between identical runs.

Brunt plants a synthetic bug (a “canary”) in the diff and checks if the model catches it. It is a clever reliability signal — if the model misses the canary, results are flagged as potentially unreliable. But the canary itself is non-deterministic. Claude caught it once, missed it the next time.

This means you cannot use a single AI review run as a pass/fail gate. The same code will get different reviews depending on when you run it. If you are building CI pipelines around AI review tools, you need to account for this — run multiple times, take the union of findings, or use a consensus mechanism.

CLI vs API: the real differences

Claude CLI and the Anthropic API can use the same underlying model. But for tool builders, the experience is very different:

Claude CLI Anthropic API
Rate limiting Handled for you Build it yourself
Retries Built in Build it yourself
Model aliases Work seamlessly Must use exact model ID
Default model Your subscription tier Must specify explicitly
Cost Included in subscription Pay per token (~$1/run)
Speed Slower (subprocess per call) Faster once infrastructure is right
Concurrency Managed internally You control it

The CLI is the easier path. You get rate limiting, retries, model resolution, and a generous context window for free. The API gives you more control but you are responsible for everything — and as I learned, getting “everything” right is harder than it looks.

What the models actually found

Across all runs, here are the real issues that held up to manual review:

  • Missing .await on async call — scenario trigger future silently dropped
  • CSV formula injection in data export — unsanitized strings like =HYPERLINK("http://attacker.com") execute in Excel
  • TOCTOU race condition — duplicate scenario executions between has_pending check and create
  • Negative LIMIT in SQL — ListExecutionsQuery.limit accepts negative values, PostgreSQL treats negative LIMIT as unlimited
  • Cursor pagination bug — paginating on non-unique created_at silently skips records with identical timestamps
  • Shutdown signal ignored — 180-second initial sleep blocks graceful shutdown
  • No schema validation on UpdateAiConfig — accepts arbitrary JSON, downstream code indexes into it blindly

Every one of these is a real bug that a human reviewer might miss. The missing .await is particularly nasty — it compiles, it runs, it just silently does nothing.

Lessons for AI tool builders

1. Fail loudly. “I couldn’t analyze this file” is infinitely better than “I found nothing” when the analysis didn’t run. Silent failures in AI tooling are worse than crashes because they build false confidence.

2. More findings is not better. Optimize for signal-to-noise ratio, not raw count. 7 actionable findings beat 84 noisy ones.

3. Account for non-determinism. LLM outputs vary between runs. If your tool is a CI gate, run it multiple times or implement consensus logic.

4. Per-file analysis has blind spots. Analyzing files independently misses cross-file issues. Consider a hybrid: per-file scan for depth, plus one cross-file summary pass for systemic issues.

5. Test your tool with the actual provider you ship. I had four bugs that only manifested with the API provider because development and testing happened with the CLI. If you support multiple backends, test all of them.

The numbers, one more time

Claude CLI API Sonnet API Opus
Findings 7 84 44
Real bugs 7 ~15 ~12
False positives 0 ~69 ~32
Signal ratio 100% ~18% ~27%
Cost Subscription $1.11 $1.67
Time 1m 47s 7m 20s 8m

The CLI run was the most useful: fastest, cheapest, highest signal. But it analyzed fewer files due to subprocess limits. The API runs were thorough but noisy — they need better filtering to be practical.

The ideal setup might be: CLI for fast feedback in development, API with deduplication and filtering for thorough CI reviews.

This is just a demo and should not be used in production systems, personally I have something similar to test my code but with multiple features whereas this tool is more like a general tool to test the model benchmarks, maybe someone gets an idea or inspiration to try something else in their stack. <— This section was actually written by me.

No models were harmed during the test.

P.S. brunt can also generate failing tests and fixes for the issues that were found, but thats a story for another time, thanks for reading!

The codebase reviewed is a real Rust/Axum backend with multi-tenant isolation, async patterns, and PostgreSQL. All findings shown are from actual brunt runs, not curated or cherry-picked.

How to Break Your PostgreSQL IIoT Database and Learn Something in the Process

As engineers, we’re taught to design for reliability. We do design calculations, run simulations, build and test prototypes, and even then we recognize that these are imperfect, so we include safety factors. When it comes to the Industrial Internet of Things (IIoT) though, we rarely give the same level of scrutiny to the components that we rely on.

What if we treated our IIoT database the same way we treated the physical things we produce? We build and design a prototype database, and then put it through some serious testing, even to failure.

The Value (and Perils) of Stress Testing

Think of database stress testing as a destructive materials test for your data storage. You wouldn’t trust a bridge made of untested steel, so don’t trust your database until you know its limits.

The Value:

  • Identify Bottlenecks: Stress testing reveals the weak links—what is likely to fail first? Will you run out of storage? Will your queries get bogged down? Or will you hit the dreaded ingest wall (when data comes in faster than it can be stored)?
  • Determine Real-World Behaviour: You’ll find out exactly how your database performance changes as the amount of data increases. What issues are future-you going to struggle with?
  • Optimize Configuration: Just like you might build a few different prototypes and see how it affects failure modes, changing your database configuration, especially when it comes to indices, can dramatically affect how it behaves. Building a rigorous stress testing framework provides a safe way to optimize your design.

I hope it goes without saying, but please, please don’t run this on your production environment. Even if it’s technically a different database but the same hardware, this test can wreak havoc on your resources and crash your system. You’ve been warned.

What to Measure?

There’s no point going through all the effort to break your system if you don’t learn anything. Assuming you’re using a PostgreSQL database (It’s 2026, Just Use PostgreSQL), here is a decent set of metrics to keep track of while you’re putting your database through its paces.

Table Size

The size of a Postgresql table is generally measured by number of rows, but the actual space on disk that it occupies is a sum of the heap (the main relational table), the indices, and the TOAST (storage for large objects).

The following query will give the number or rows as well as the size of each component of the table in bytes.

SELECT
      reltuples::bigint AS row_count,
      pg_relation_size('iiot_history') AS heap_size,
      pg_indexes_size('iiot_history') AS indices_size,
      pg_table_size('iiot_history') -
            pg_relation_size('iiot_history') AS toast_size
FROM pg_class WHERE relname = 'iiot_history';

The reason for the odd row_count is that counting rows the standard way, with COUNT(*), requires scanning the whole table, which is going to be painfully slow when we’re building a table big enough to break things.

Table Performance

The best way to measure table performance is to use the actual queries that your production system will use. At a minimum, this should include your batched INSERT (you always batch, right?) and at least one common SELECT. Keep in mind that for a table with N rows, the timing for queries tend to be either constant, log(N), N or worse depending on how the indices are structured.

You can get very accurate timing info from running your queries with the prefix EXPLAIN ANALYZE, and it’s worth doing this at least once to see what the database is doing under the hood. However, I recommend running the whole test with a scripting language and then just timing the execution of that particular step.

Server Performance

Don’t forget the engine that’s driving all this machinery. You’ll need to watch the CPU, Memory, Storage, and Network Bandwidth. People in the IT world tend to talk about headroom for a server, and that’s what you’re really looking at: how much spare capacity do you have? Your CPU and Memory usage might spike at times, but the important thing is that it’s not always running at max capacity.

There are a lot of free and paid tools to monitor these variables. I almost always do this type of test in a VM (easier to clean up the mess when it all breaks) and I like to use Prometheus but honestly Perfmon in Windows or Top in Linux gives you all you really need.

Setting Limits

It’s helpful to set some limits on these parameters so you know when to stop the test. For database size, it might be some measurement like a year’s worth of data, or when the drive is 80% full. For ingest timing, I suggest stopping when inserting takes longer than the desired ingest frequency—this is the ingest bottleneck and something you really want to avoid in production. Scan times can be limited by the time it takes for a specific query. Maybe calculating the average value from one tag over the past hour must be less than 10s.

How to Simulate Data?

There are lots of ways to insert data, but it’s usually a tradeoff between how well the data represents real scenarios and how long it takes to run the test.

The following is one of my favourite methods for injecting large amounts of data into an IIoT database:

Say you have a classic IIoT history table like the following:

CREATE TABLE iiot_history(
    time TIMESTAMPZ NOT NULL,
    tag_id INT NOT NULL,
    value DOUBLE PRECISION,
    PRIMARY KEY (tag_id, time)
);

If you expect to ingest 10,000 tags at 1s intervals, you can use the following INSERT query to add a day’s worth of history to the back end of your table.

INSERT INTO iiot_history(time, tag_id, value)
    SELECT *, random() as value 
FROM(
        SELECT generate_series(
            min_date-INTERVAL '1day',
            min_date-INTERVAL '1s',
            INTERVAL '1s') as time
        FROM (SELECT LEAST(NOW(),MIN(time)) AS min_date 
FROM iiot_history)
),
        generate_series(1,10000) as tag_id;

This will generate random data values for every second during a day and for every tag_id from 1 to 10,000. Not exactly as interesting as real data, but enough to fill up your table.

The nice thing about this query is that you should be able to run it in parallel to your real-time data pipeline and it won’t mess with your data (aside from potentially locking your table while it runs). It’s also easy to modify this query to inject more or less tags as well as change the time interval if you’re playing around with different configurations.

If you use this query, or whichever one you prefer, in a script (I usually use Python), then you can automate the whole test. Something along the lines of:

  1. Get database size
  2. Run select queries, measure execution time
  3. Run insert queries several times, measure and average execution time
  4. Artificially grow database size
  5. Repeat 1-3 until one of the failure conditions is reached.

How to Interpret Results and What to Expect in the Real World?

Your test results will give you some clear data points, but you still need to do some interpreting.

  • Identify the Limiting Component: Where did the database fail? If it’s a query that took too long, you might be able to speed things up with a clever index. If it’s an insert that took too long, you might be able to speed things up by removing that clever index you added earlier.
  • Optimize: There’s a lot you can do to improve table performance before throwing the whole thing out in frustration:
    1. Proper Indexing: Choosing an index is almost always a tradeoff, for example: Indexing the tag_id column before the time column will speed up most queries, at the cost of slower inserts as the table grows. Indexing the time column first will avoid the ‘ingest wall’ at the cost of slower queries. Figure out which solution is best.
    2. Plan for the future: Will you need more hardware in a few months or a few years? Being able to estimate the life of your existing architecture means you won’t be caught unawares when it no longer suffices.
    3. Partitioning/Chunking: For very large tables, you may need to partition appropriately (see PostgreSQL extensions like TimescaleDB). How great would it be to learn you’ll need this before you actually need this.
  • Add a Safety Factor: If your test showed a maximum reliable throughput of 15,000 rows/sec, set your operational limit to 10,000 rows/sec. The real world has peaks, unexpected queries, and background maintenance tasks that will steal resources. Like we do with all engineering products, design with margin.

If you treat your database like a prototype and really put it through its paces, you’ll get a preview of how it’ll behave in the future and make good, proactive design decisions instead of struggling in the future. Now, go break something (and learn).