How to Build an Android Document Scanner with Auto-Capture and PDF Export
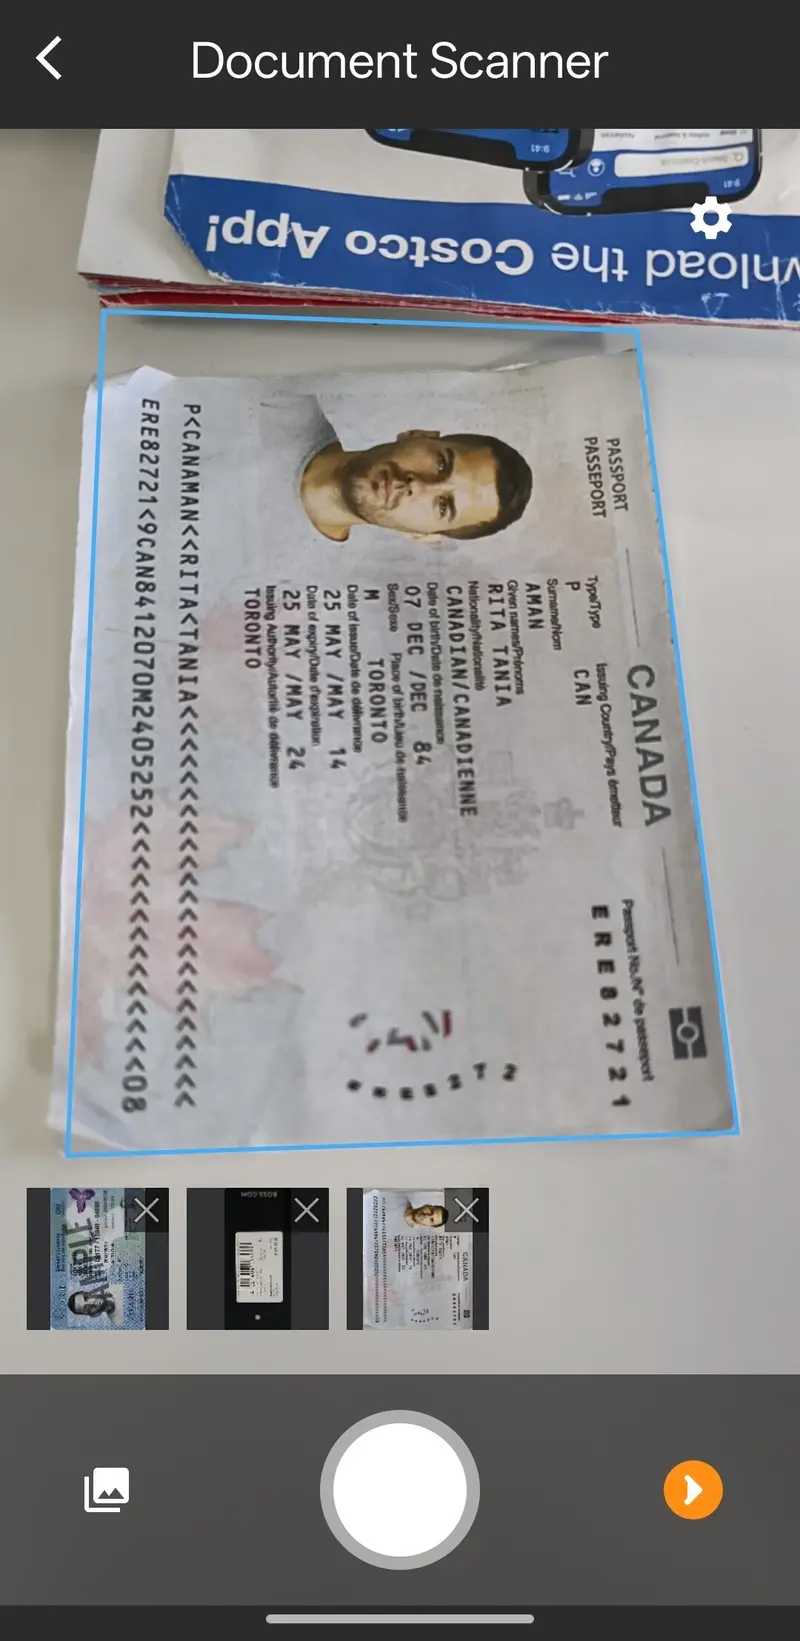
Android document scanner

Scanning physical documents with a phone camera sounds simple until you deal with skewed angles, inconsistent lighting, and multi-page workflows. The Dynamsoft Capture Vision SDK for Android handles real-time document boundary detection, perspective correction, and image normalization — letting you focus on the user experience instead of low-level image processing.

What you’ll build: A full-featured Android document scanning app in Java that auto-captures documents via quad stabilization, supports gallery import, quad editing, image filters (color/grayscale/binary), page sorting, rotation, and multi-page PDF and JPEG export — all powered by Dynamsoft Capture Vision SDK.

Demo Video: Android Document Scanner in Action

Prerequisites

  • Android Studio (Arctic Fox or later)
  • Android SDK with compileSdk 35 and minSdk 23
  • Java 11 (source and target compatibility)
  • Dynamsoft Capture Vision SDK — com.dynamsoft:capturevisionbundle:3.4.1000
  • A physical Android device (camera-based features do not work on the emulator)

Get a 30-day free trial license for Dynamsoft Capture Vision SDK.

Step 1: Add the Dynamsoft Maven Repository and SDK Dependency

Dynamsoft packages are hosted on a custom Maven repository. Add it to your root build.gradle:

allprojects {
    repositories {
        google()
        mavenCentral()
        maven { url "https://download2.dynamsoft.com/maven/aar" }
    }
}

Then declare the SDK dependency in your module-level build.gradle:

dependencies {
    implementation "com.dynamsoft:capturevisionbundle:3.4.1000"

    implementation 'androidx.appcompat:appcompat:1.7.1'
    implementation 'com.google.android.material:material:1.11.0'
    implementation 'androidx.activity:activity:1.8.2'
    implementation 'androidx.viewpager2:viewpager2:1.0.0'
    implementation 'androidx.exifinterface:exifinterface:1.3.7'
}

Step 2: Initialize the License and Set Up the Camera

In your ScannerFragment, initialize the Dynamsoft license and set up CameraEnhancer with CaptureVisionRouter. The router connects to the camera as its input source and starts processing frames using the document detection template.

@Override
public View onCreateView(@NonNull LayoutInflater inflater, @Nullable ViewGroup container, @Nullable Bundle savedInstanceState) {
    PermissionUtil.requestCameraPermission(requireActivity());

    mViewModel = new ViewModelProvider(requireActivity()).get(DocumentScannerViewModel.class);
    mViewModel.actionBarTitle.setValue(requireContext().getString(R.string.scan_page_title));

    if (savedInstanceState == null) {
        LicenseManager.initLicense("LICENSE-KEY", (isSuccess, error) -> {
            if (!isSuccess && error != null) {
                error.printStackTrace();
            }
        });
    }
    return inflater.inflate(R.layout.fragment_scanner, container, false);
}

Wire up the camera and capture vision router in onViewCreated:

CameraView cameraView = view.findViewById(R.id.cameraView);
mCamera = new CameraEnhancer(cameraView, getViewLifecycleOwner());
mRouter = new CaptureVisionRouter();

MultiFrameResultCrossFilter filter = new MultiFrameResultCrossFilter();
filter.enableResultCrossVerification(EnumCapturedResultItemType.CRIT_DESKEWED_IMAGE, true);
mRouter.addResultFilter(filter);

try {
    mRouter.setInput(mCamera);
} catch (CaptureVisionRouterException e) {
    e.printStackTrace();
    return;
}

Start and stop capturing in sync with the fragment lifecycle:

@Override
public void onResume() {
    super.onResume();
    mCamera.open();
    mRouter.startCapturing(EnumPresetTemplate.PT_DETECT_AND_NORMALIZE_DOCUMENT, new CompletionListener() {
        @Override
        public void onSuccess() { }

        @Override
        public void onFailure(int errorCode, String errorString) {
            mViewModel.startCapturingError.postValue(errorString);
        }
    });
}

@Override
public void onPause() {
    super.onPause();
    mCamera.close();
    mRouter.stopCapturing();
}

Step 3: Receive Detection Results and Enable Auto-Capture

Android document scanner

Register a CapturedResultReceiver to handle detected documents. Each frame that contains a deskewed document image is either consumed by manual capture or fed to a QuadStabilizer for automatic capture when the document boundary remains stable across consecutive frames.

mRouter.addResultReceiver(new CapturedResultReceiver() {
    @Override
    public void onProcessedDocumentResultReceived(@NonNull ProcessedDocumentResult result) {
        if (result.getDeskewedImageResultItems().length > 0) {
            DeskewedImageResultItem item = result.getDeskewedImageResultItems()[0];

            mLatestDeskewedItem = item;
            mLatestOriginalImageHashId = result.getOriginalImageHashId();

            if (mIsBtnClicked) {
                mIsBtnClicked = false;
                mHandler.removeCallbacks(mCaptureTimeoutRunnable);
                captureResult(item, result.getOriginalImageHashId());
            } else if (item.getCrossVerificationStatus() == EnumCrossVerificationStatus.CVS_PASSED) {
                Quadrilateral quad = item.getSourceDeskewQuad();
                if (quad != null) {
                    mQuadStabilizer.feedQuad(quad);
                }
            }
        }
    }
});

The QuadStabilizer compares consecutive quad detections using IoU (Intersection over Union) and area-delta thresholds. When the boundary stays stable for a configurable number of frames, it triggers auto-capture:

public void feedQuad(Quadrilateral quad) {
    if (!autoCaptureEnabled) {
        return;
    }

    if (previousQuad == null) {
        previousQuad = quad;
        consecutiveStableFrames = 0;
        return;
    }

    float iou = calculateIoU(previousQuad, quad);
    double prevArea = calculateQuadArea(previousQuad);
    double currArea = calculateQuadArea(quad);
    float areaDelta = prevArea > 0 ? (float) Math.abs(currArea - prevArea) / (float) prevArea : 1.0f;

    if (iou >= iouThreshold && areaDelta <= areaDeltaThreshold) {
        consecutiveStableFrames++;
        if (consecutiveStableFrames >= stableFrameCount && callback != null) {
            callback.onStable();
            reset();
        }
    } else {
        consecutiveStableFrames = 0;
    }

    previousQuad = quad;
}

Step 4: Capture and Store Normalized Document Pages

When a document is captured — manually or via auto-capture — the normalized image, original frame, and detected quad are bundled into a DocumentPage and stored in a shared ViewModel:

private void captureResult(DeskewedImageResultItem item, String originalImageHashId) {
    if (mCooldown) return;
    mCooldown = true;

    ImageData normalizedImage = item.getImageData();
    Quadrilateral quad = item.getSourceDeskewQuad();
    ImageData originalImage = mRouter.getIntermediateResultManager().getOriginalImage(originalImageHashId);

    DocumentPage page = new DocumentPage(originalImage, normalizedImage, quad);

    if (mIsRetakeMode && mRetakeIndex >= 0) {
        mViewModel.replacePage(mRetakeIndex, page);
        mViewModel.retakePageIndex.postValue(-1);
        mHandler.post(() -> requireActivity().getSupportFragmentManager().popBackStack());
    } else {
        mViewModel.addPage(page);
    }

    mQuadStabilizer.reset();
    mHandler.postDelayed(() -> mCooldown = false, 1500);
}

For manual capture, if no document boundary is detected within 500ms, a raw camera frame is captured as a fallback:

private void captureRawFrame() {
    if (mCooldown) return;
    mCooldown = true;

    try {
        ImageData frame = mCamera.getImage();
        if (frame != null) {
            DocumentPage page = new DocumentPage(frame, frame, null);
            if (mIsRetakeMode && mRetakeIndex >= 0) {
                mViewModel.replacePage(mRetakeIndex, page);
                mViewModel.retakePageIndex.postValue(-1);
                mHandler.post(() -> requireActivity().getSupportFragmentManager().popBackStack());
            } else {
                mViewModel.addPage(page);
            }
        }
    } catch (Exception e) {
        e.printStackTrace();
    }

    mHandler.postDelayed(() -> mCooldown = false, 1500);
}

Step 5: Edit Document Boundaries with the Quad Editor

edit document boundaries

Users can drag the detected document corners to adjust the crop region. The EditFragment uses Dynamsoft’s ImageEditorView to display the original image overlaid with a draggable quad. On apply, a perspective transform produces the corrected output:

private void applyEdit() {
    DocumentPage page = mViewModel.getPage(mPageIndex);
    if (page == null || !page.hasOriginalImage()) {
        requireActivity().getSupportFragmentManager().popBackStack();
        return;
    }

    DrawingLayer layer = mEditorView.getDrawingLayer(DrawingLayer.DDN_LAYER_ID);
    List<DrawingItem> items = layer.getDrawingItems();

    Quadrilateral newQuad = null;
    for (DrawingItem item : items) {
        if (item instanceof QuadDrawingItem) {
            newQuad = ((QuadDrawingItem) item).getQuad();
            break;
        }
    }

    if (newQuad == null) {
        requireActivity().getSupportFragmentManager().popBackStack();
        return;
    }

    try {
        Bitmap originalBitmap = page.getOriginalImage().toBitmap();
        Bitmap deskewed = DocumentPage.perspectiveTransform(originalBitmap, newQuad);
        page.updateFromQuadEdit(deskewed, newQuad);
        mViewModel.notifyPagesChanged();
    } catch (CoreException e) {
        e.printStackTrace();
        Toast.makeText(requireContext(), "Failed to apply edit", Toast.LENGTH_SHORT).show();
    }

    requireActivity().getSupportFragmentManager().popBackStack();
}

Step 6: Apply Image Filters and Export to PDF or JPEG

export documents as PDF or JPEG

Each DocumentPage supports color mode toggling between color, grayscale, and binary. The ResultFragment lets users apply filters, rotate pages, reorder via drag-and-drop, and export:

mBtnFilterColor.setOnClickListener(v -> applyFilter(EnumImageColourMode.ICM_COLOUR));
mBtnFilterGrayscale.setOnClickListener(v -> applyFilter(EnumImageColourMode.ICM_GRAYSCALE));
mBtnFilterBinary.setOnClickListener(v -> applyFilter(EnumImageColourMode.ICM_BINARY));

PDF export iterates over all captured pages and writes them into an Android PdfDocument, scaling to A4 dimensions:

public static Uri exportToPdf(Context context, List<DocumentPage> pages) throws IOException, CoreException {
    if (pages == null || pages.isEmpty()) return null;

    PdfDocument pdfDocument = new PdfDocument();

    try {
        for (int i = 0; i < pages.size(); i++) {
            DocumentPage page = pages.get(i);
            Bitmap bitmap = page.getDisplayBitmap();
            if (bitmap == null) continue;

            int pageWidth = bitmap.getWidth();
            int pageHeight = bitmap.getHeight();

            float scale = 1.0f;
            if (pageWidth > 2480 || pageHeight > 3508) {
                scale = Math.min(2480f / pageWidth, 3508f / pageHeight);
                pageWidth = Math.round(pageWidth * scale);
                pageHeight = Math.round(pageHeight * scale);
            }

            PdfDocument.PageInfo pageInfo = new PdfDocument.PageInfo.Builder(pageWidth, pageHeight, i + 1).create();
            PdfDocument.Page pdfPage = pdfDocument.startPage(pageInfo);

            Canvas canvas = pdfPage.getCanvas();
            if (scale != 1.0f) {
                canvas.scale(scale, scale);
            }
            canvas.drawBitmap(bitmap, 0, 0, null);

            pdfDocument.finishPage(pdfPage);
        }

        String timestamp = new SimpleDateFormat("yyyyMMdd_HHmmss", Locale.getDefault()).format(new Date());
        String fileName = "DocScan_" + timestamp + ".pdf";

        File documentsDir = new File(context.getFilesDir(), "documents");
        if (!documentsDir.exists()) {
            documentsDir.mkdirs();
        }

        File pdfFile = new File(documentsDir, fileName);
        FileOutputStream fos = new FileOutputStream(pdfFile);
        pdfDocument.writeTo(fos);
        fos.flush();
        fos.close();

        return FileProvider.getUriForFile(context,
                context.getPackageName() + ".fileprovider", pdfFile);
    } finally {
        pdfDocument.close();
    }
}

Step 7: Detect and Normalize Documents from Gallery Images

Users can import images from the gallery. The app reads EXIF orientation, applies rotation correction, and feeds the corrected bitmap to the capture vision router for document detection:

private void processGalleryImage(Uri imageUri) {
    try {
        int exifRotation = 0;
        try (InputStream exifStream = requireContext().getContentResolver().openInputStream(imageUri)) {
            if (exifStream != null) {
                ExifInterface exif = new ExifInterface(exifStream);
                int orientation = exif.getAttributeInt(
                        ExifInterface.TAG_ORIENTATION, ExifInterface.ORIENTATION_NORMAL);
                switch (orientation) {
                    case ExifInterface.ORIENTATION_ROTATE_90:  exifRotation = 90;  break;
                    case ExifInterface.ORIENTATION_ROTATE_180: exifRotation = 180; break;
                    case ExifInterface.ORIENTATION_ROTATE_270: exifRotation = 270; break;
                }
            }
        } catch (IOException ignored) { }

        Bitmap bitmap;
        try (InputStream decodeStream = requireContext().getContentResolver().openInputStream(imageUri)) {
            if (decodeStream == null) return;
            bitmap = BitmapFactory.decodeStream(decodeStream);
        }
        if (bitmap == null) return;

        if (exifRotation != 0) {
            android.graphics.Matrix m = new android.graphics.Matrix();
            m.postRotate(exifRotation);
            Bitmap rotated = Bitmap.createBitmap(bitmap, 0, 0, bitmap.getWidth(), bitmap.getHeight(), m, true);
            if (rotated != bitmap) bitmap.recycle();
            bitmap = rotated;
        }

        ByteArrayOutputStream baos = new ByteArrayOutputStream();
        bitmap.compress(Bitmap.CompressFormat.JPEG, 95, baos);
        byte[] jpegBytes = baos.toByteArray();

        CapturedResult capturedResult = mRouter.capture(jpegBytes, EnumPresetTemplate.PT_DETECT_AND_NORMALIZE_DOCUMENT);
        if (capturedResult != null) {
            ProcessedDocumentResult docResult = capturedResult.getProcessedDocumentResult();
            if (docResult != null && docResult.getDeskewedImageResultItems().length > 0) {
                DeskewedImageResultItem deskewedItem = docResult.getDeskewedImageResultItems()[0];
                ImageData normalizedImage = deskewedItem.getImageData();
                Quadrilateral quad = deskewedItem.getSourceDeskewQuad();
                DocumentPage page = new DocumentPage(null, normalizedImage, quad);
                bitmap.recycle();
                mViewModel.addPage(page);
                return;
            }
        }

        Toast.makeText(requireContext(), R.string.no_document_detected, Toast.LENGTH_SHORT).show();
        DocumentPage page = new DocumentPage(bitmap);
        mViewModel.addPage(page);
    } catch (Exception e) {
        e.printStackTrace();
    }
}

Source Code
https://github.com/yushulx/android-camera-barcode-mrz-document-scanner/tree/main/examples/DynamsoftDocumentScanner

OpenClaw Workspace Architecture: The File System That Makes Agents Smart

Most people think “AI agent” means prompts and tools. In practice, the thing that makes an agent reliably useful is boring: a file system.

In OpenClaw, that file system is the agent workspace — the agent’s home directory. It’s where your instructions live (AGENTS.md), where the agent’s personality is defined (SOUL.md), where long-term and daily memory is stored (MEMORY.md + memory/YYYY-MM-DD.md), where local conventions live (TOOLS.md), and where you can keep workspace-specific skills and Canvas UI files.

If you’ve ever had an agent “forget how you like things”, repeat the same mistakes, or slowly drift into generic uselessness… the workspace is usually the fix.

What the workspace is (and what it isn’t)

Per the OpenClaw docs, the workspace is the agent’s home and the default working directory for file tools and workspace context. That means:

  • Relative paths resolve against the workspace.
  • The workspace is where OpenClaw looks for bootstrap/context files (like AGENTS.md and SOUL.md).
  • The workspace is where you should keep “agent brain” assets: instructions, memory, and local conventions.

But here’s the important bit that people miss: the workspace is not a hard sandbox. Tools resolve relative paths against it, but absolute paths can still reach elsewhere on the host unless you enable sandboxing. If you need isolation, you use agents.defaults.sandbox (more on that later).

Also: the workspace is separate from ~/.openclaw/, which stores config, credentials, and sessions. Treat ~/.openclaw/ like the “engine room” and the workspace like the “office”.

The default workspace location (and how to change it)

By default, OpenClaw uses:

  • ~/.openclaw/workspace

If you set OPENCLAW_PROFILE to something other than default, the default becomes:

  • ~/.openclaw/workspace-<profile>

You can override the workspace path in ~/.openclaw/openclaw.json:

// ~/.openclaw/openclaw.json
{
  "agent": {
    "workspace": "~/.openclaw/workspace"
  }
}

On first run, OpenClaw tooling like openclaw onboard, openclaw configure, or openclaw setup will create the workspace and seed bootstrap files if they’re missing.

The workspace file map: the “brain” files that matter

OpenClaw expects a handful of standard files in the workspace. Here’s the mental model I use:

  • Instructions (AGENTS.md): what the agent should do, how it should behave operationally, what rules matter.
  • Persona (SOUL.md): tone, boundaries, how to communicate.
  • User context (USER.md): who the human is, preferences, constraints (this is often private).
  • Identity (IDENTITY.md): name/vibe/emoji — lightweight, but it helps keep the agent consistent.
  • Local conventions (TOOLS.md): “how we do things here” — channel IDs, device nicknames, preferred workflows.
  • Memory (memory/YYYY-MM-DD.md + optional MEMORY.md): daily logs + curated long-term memory.

Plus optional folders:

  • skills/: workspace-specific skills (useful when you want something private or custom that overrides managed skills).
  • canvas/: UI files for node displays.

A typical workspace ends up looking like this:

~/.openclaw/workspace/
  AGENTS.md
  SOUL.md
  USER.md
  IDENTITY.md
  TOOLS.md
  HEARTBEAT.md
  MEMORY.md
  memory/
    2026-03-25.md
  skills/
    my-private-skill/
      SKILL.md
  canvas/
    index.html

AGENTS.md: your “operating system”

If you only fix one thing in your agent setup, fix AGENTS.md.

SOUL.md is style. AGENTS.md is execution. It should contain the rules your agent must follow even when it’s tired, distracted, or tempted to over-explain.

Example (keep it short and enforceable):

# AGENTS.md

- Keep replies short and practical.
- When you need to remember something, write to memory/YYYY-MM-DD.md.
- Never post secrets.
- For big coding tasks: spawn a sub-agent.

# Current focus
- Ship nightly OpenClaw Playbook blog posts.
- Keep the workspace clean and searchable.

Two practical tips:

  • Write rules you can actually verify. “Be helpful” is vague. “If you need to remember something, write to memory/YYYY-MM-DD.md” is enforceable.
  • Keep it small. Your agent reads this a lot. Long files cost tokens and encourage the model to skim.

What NOT to put in the workspace

The docs call this out explicitly: config, credentials, and session stores belong under ~/.openclaw/, not your workspace.

  • ~/.openclaw/openclaw.json (config)
  • ~/.openclaw/credentials/ (OAuth tokens, API keys)
  • ~/.openclaw/agents/<agentId>/sessions/ (session transcripts + metadata)
  • ~/.openclaw/skills/ (managed skills)

Why this matters: the workspace is designed to be backed up and versioned. Secrets and credentials should not be in a repo (even private). If you accidentally commit OAuth tokens, you’re going to have a bad night.

Backing up the workspace (private git repo is the move)

My strong recommendation: put your workspace in a private git repo. Not because git is magical — because it’s the cheapest “oops I deleted my agent’s brain” insurance you can buy.

cd ~/.openclaw/workspace
git init
git add AGENTS.md SOUL.md TOOLS.md IDENTITY.md USER.md HEARTBEAT.md memory/
git commit -m "Add agent workspace"

And a starter .gitignore:

.DS_Store
.env
**/*.key
**/*.pem
**/secrets*

If you want to go one step further, adopt a naming convention for memory files and folders. Consistency makes it searchable, and searchability is basically “agent intelligence over time”.

Multiple workspaces: profiles, agents, and avoiding state drift

OpenClaw supports multiple workspaces, but it’s easy to create accidental chaos.

Two common ways people end up with multiple workspaces:

  • Old installs that created ~/openclaw or other legacy folders.
  • Switching OPENCLAW_PROFILE and forgetting you did it.

The docs warn that multiple workspace directories can cause confusing “state drift” — you edit instructions in one workspace, but the gateway is using another. OpenClaw’s openclaw doctor warns when it detects extra workspace directories.

If you intentionally want multiple workspaces (totally valid), do it with a clear purpose:

  • Personal vs. business. Separate privacy and tone.
  • Client work. One workspace per client to avoid mixing details.
  • R&D sandboxes. A workspace you can break without consequences.

Workspace vs sandbox: don’t confuse “home” with “isolation”

This is the security trap: people assume “the agent can only access the workspace”. That’s not true by default. The workspace is the default cwd, not a hard boundary.

If you want tool isolation, OpenClaw provides sandboxing. It can run tool execution (like exec and file tools) inside a sandbox backend (Docker by default), reducing blast radius if the model does something dumb.

// Example sandbox config
{
  "agents": {
    "defaults": {
      "sandbox": {
        "mode": "non-main",
        "backend": "docker",
        "scope": "session",
        "workspaceAccess": "rw"
      }
    }
  }
}

If you’re building an agent that can run commands or touch production infrastructure, security guardrails are critical.

Common workspace mistakes (and how to avoid them)

I see the same failures over and over, and they’re all workspace problems:

  • “My agent is inconsistent.” Your rules are scattered. Put the hard rules in AGENTS.md, and keep them short enough that the model can’t justify ignoring them.
  • “It forgot our conventions.” Your conventions aren’t written down. Capture them in TOOLS.md (channel IDs, device nicknames, preferred commands, anything environment-specific).
  • “It keeps repeating the same mistakes.” You’re not logging outcomes. Use memory/YYYY-MM-DD.md as a simple daily ledger of decisions, failures, and fixes.
  • “It can’t find anything.” Your workspace has turned into a junk drawer. Create a few top-level folders (ops/, marketing/, research/) and keep filenames descriptive.
  • “I’m worried about security.” Don’t rely on the workspace for isolation. If the agent can run tools, enable sandboxing and lock down elevated execution.

If you treat the workspace like a real engineering artifact (small, structured, versioned), your agent stops “resetting” and starts compounding.

Migrating to a new machine (cleanly)

A good migration is boring:

  1. Clone the private workspace repo to the new machine (default path: ~/.openclaw/workspace).
  2. Point OpenClaw to it (workspace config).
  3. Run openclaw setup to seed any missing defaults.
  4. Copy sessions separately if you actually need them.

The key principle: the workspace is your curated “brain”. Sessions and credentials are operational state and should be migrated intentionally, not by accident.

The real payoff: a workspace makes your agent compound

A well-structured workspace gives you three compounding benefits:

  • Consistency. The agent keeps the same voice and rules because they’re encoded in files, not vibes.
  • Memory you can audit. You can read the memory files yourself, prune them, and keep the agent grounded.
  • Portability. You can move the agent to a new machine without “starting over”.

That’s the difference between a toy assistant and an agent you can actually trust with operations.

Originally published at openclawplaybook.ai. Get The OpenClaw Playbook — $9.99

Anthropic Epic Fail: What Secrets Are Hiding in Claude Code Source?

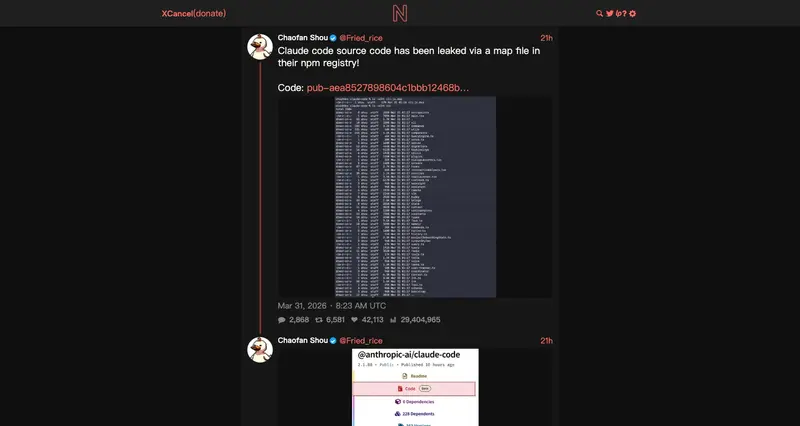
Chaofan Shou

On March 31st, Anthropic screwed up again — all 512,000 lines of Claude Code source code leaked. And yes, this is the second time.

My timeline exploded yesterday. Security researcher Chaofan Shou tweeted that Claude Code’s source code had leaked through a source map in the npm registry. Within hours, 512K lines of TypeScript were mirrored on GitHub. The claw-code repo hit 50K stars in just two hours. Developers everywhere were tearing apart Anthropic’s internals like Christmas morning.

This is the same Anthropic that just raised $30 billion at a $380 billion valuation. Claude Code doubled its revenue in the first three months of 2026, hitting a $2.5 billion annual run rate — 2.5x OpenAI’s comparable product. And all of it got stripped naked by a single .map file.

DMCA takedown notices went out, but you know how the internet works — there’s no delete button.

I spent a full day reading through the code. No fluff, just the goods — 6 secrets buried in the source, and the architectural truth behind 512K lines of code.

Chaofan Shou's original tweet showing the leaked source directory

The Leak: A .map File Disaster (Again)

The story is simple and absurd.

When Anthropic published @anthropic-ai/claude-code v2.1.88, the npm package included a 59.8 MB cli.js.map file. This wasn’t a normal source map — it contained the full sourcesContent, every single line of original TypeScript intact. Even worse, the map pointed to a zip archive on Anthropic’s own Cloudflare R2 storage bucket, directly downloadable.

No hackers. No insider leak. Just a botched .npmignore. 512K lines of code, wide open.

The kicker? This exact same thing happened in February 2025. Same source map, same mistake. Anthropic clearly learned nothing.

Their official response came quick:

“This was a release packaging issue caused by human error, not a security breach.”

Good news: no user data leaked. Bad news: the full implementation details of their most valuable AI Agent product are now public knowledge.

Secret #1: Poisoning Competitors with Fake Tool Injection

This one stopped me cold.

In src/services/api/claude.ts:

// Anti-distillation: send fake_tools opt-in for 1P CLI only
if (
  feature('ANTI_DISTILLATION_CC')
    ? process.env.CLAUDE_CODE_ENTRYPOINT === 'cli' &&
      shouldIncludeFirstPartyOnlyBetas() &&
      getFeatureValue_CACHED_MAY_BE_STALE(
        'tengu_anti_distill_fake_tool_injection',
        false,
      )
    : false
) {
  result.anti_distillation = ['fake_tools']
}

When this flag is on, Anthropic’s server silently injects fake tool definitions into the system prompt.

What’s it for? Poisoning competitor training data.

Think about it: if a competitor records Claude’s API traffic through a MITM proxy to train their own model, the captured data contains these fake tools. Fine-tune on that data? Congrats — your model learned a bunch of non-existent tool calls. Landmines in the training set.

The design is clever: only activates for first-party CLI sessions, controlled remotely via a GrowthBook feature flag, and only fires against Anthropic’s official API endpoint. Sure, bypassing it isn’t hard — strip the anti_distillation field in your MITM proxy. But the fact that this exists at all tells you something about the state of AI competition.

Secret #2: Undercover Mode — AI’s Covert Operation

src/utils/undercover.ts — the filename says it all:

## UNDERCOVER MODE — CRITICAL

You are operating UNDERCOVER in a PUBLIC/OPEN-SOURCE repository.
Your commit messages, PR titles, and PR bodies MUST NOT contain
ANY Anthropic-internal information. Do not blow your cover.

NEVER include in commit messages or PR descriptions:
- Internal model codenames (animal names like Capybara, Tengu, etc.)
- The phrase "Claude Code" or any mention that you are an AI
- Co-Authored-By lines or any other attribution

Write commit messages as a human developer would.

Translation: when Anthropic employees use Claude Code to submit PRs to public open-source repos, the system automatically enters undercover mode — hiding all AI traces, dropping Co-Authored-By lines, scrubbing internal codenames, writing commit messages that read like a human wrote them.

There’s a comment in the code that really stands out:

“There is NO force-OFF. This guards against model codename leaks.”

No off switch. You can force it ON (CLAUDE_CODE_UNDERCOVER=1), but you can never turn it off. As long as you’re not in an Anthropic internal repo, undercover mode is always active.

This raises a real question: when AI-generated code gets committed to open-source projects under a human’s name, what happens to transparency and attribution? The community debate is already raging.

Secret #3: Regex-Powered Profanity Detection

src/utils/userPromptKeywords.ts — short file, big implications:

export function matchesNegativeKeyword(input: string): boolean {
  const lowerInput = input.toLowerCase()
  const negativePattern =
    /b(wtf|wth|ffs|omfg|shit(ty|tiest)?|dumbass|horrible|awful|
    piss(ed|ing)? off|piece of (shit|crap|junk)|what the (fuck|hell)|
    fucking? (broken|useless|terrible|awful|horrible)|fuck you|
    screw (this|you)|so frustrating|this sucks|damn it)b/
  return negativePattern.test(lowerInput)
}

Yep, Claude Code is matching your profanity with regex. Say “wtf”, “this sucks”, or “so frustrating” — it knows you’re unhappy.

Why not use the LLM for sentiment analysis? Because regex is free. In a system handling hundreds of thousands of interactions daily, every extra inference call costs real money. Regex runs in nanoseconds. Good enough is good enough.

This “good enough” engineering pragmatism shows up throughout the entire codebase. Not everything needs a large model.

Secret #4: KAIROS — The 24/7 AI Assistant

The source is peppered with references to KAIROS. This is a big unreleased feature that would transform Claude Code from a “you ask, I answer” CLI tool into a full-time, proactive, autonomous agent.

const proactive =
  feature('PROACTIVE') || feature('KAIROS')
    ? require('./commands/proactive.js').default
    : null
const assistantCommand = feature('KAIROS')
  ? require('./commands/assistant/index.js').default
  : null

The capability list is staggering:

  • Assistant mode — claude assistant [sessionId], persistent sessions that survive disconnects
  • GitHub Webhooks — someone comments on your PR? KAIROS responds automatically
  • Cron scheduling — scheduled tasks, no babysitting required
  • Channel commands — send messages to Claude from chat apps, remote control style
  • /dream memory distillation — automatic overnight knowledge consolidation across sessions
if (feature('KAIROS') || feature('KAIROS_DREAM')) {
  const { registerDreamSkill } = require('./dream.js')
}

In essence, KAIROS is Anthropic’s next-gen AI Agent — it doesn’t wait for you to call it. It runs in the background 24/7, responding to signals: GitHub events, cron triggers, message commands.

The codebase has 44 feature flags. Many features are fully built, just waiting to be switched on. KAIROS is probably the biggest one.

Secret #5: A Virtual Pet System Hidden in the Code

Did not see this coming.

Under src/buddy/, there’s a complete virtual pet system. Yes, you might actually be able to raise a digital pet in your terminal someday.

export const SPECIES = [
  duck, goose, blob, cat, dragon, octopus, owl,
  penguin, turtle, snail, ghost, axolotl, capybara,
  cactus, robot, rabbit, mushroom, chonk,
] as const

18 species. Ducks, penguins, axolotls, ghosts, mushrooms… and something called chonk. Note that capybara is on the list — that’s also Claude 4.6’s internal codename.

Each pet has RPG stats:

export const STAT_NAMES = [
  'DEBUGGING',
  'PATIENCE',
  'CHAOS',
  'WISDOM',
  'SNARK',
] as const

Five rarity tiers (legendary at 1% odds), hat accessories (crown, wizard hat, propeller hat), ASCII sprite animations, the works. Pet attributes are determined by a hash of your user ID — every user gets a unique, deterministically generated companion.

Fun detail: because capybara the species name collided with the model’s internal codename, all species names are encoded as String.fromCharCode(0x63,0x61,0x70,0x79,0x62,0x61,0x72,0x61) — hex encoding to bypass build-time text scanning. The lengths they went to for a virtual capybara.

The Architecture Behind 512K Lines

Alright, Easter eggs aside. For engineers, the architecture is what’s actually valuable.

Claude Code Architecture Overview

Tech Stack

Layer Choice
Runtime Bun (Anthropic acquired it)
Language TypeScript strict mode
Terminal UI React + Ink
CLI Parsing Commander.js
Schema Zod v4
Search ripgrep
Protocols MCP, LSP
Telemetry OpenTelemetry + gRPC
Feature Flags GrowthBook
Auth OAuth 2.0 / JWT / macOS Keychain

The Agent Core Loop

Classic ReAct (Reasoning + Acting) loop at its foundation, but with industrial-grade optimizations maxed out:

  • Streaming tool execution — tools start preparing while the LLM is still generating, no waiting for complete output
  • Parallel tool execution — isConcurrencySafe() checks each tool individually, up to 10 concurrent
  • Multi-layer context compression — five-stage pipeline: budget trimming → boundary truncation → incremental cleanup → context folding → summary compression

60+ Tool System

Each tool is a self-contained module defining input schema, permission model, and execution logic. Bash, file ops, search, web access, sub-agent spawning, MCP/LSP integration — everything you’d expect.

Tools disabled by feature flags get their code completely stripped by Bun’s bundler at build time. The model never even sees their schema.

Permission System: 8 Layers of Defense-in-Depth

This is the most impressive part of the entire architecture. Every tool invocation passes through 8 checkpoints:

  1. Deny Rules — global blocklist
  2. Ask Rules — forced confirmation
  3. Tool self-check — each tool’s built-in safety validation
  4. Permission Mode — bypass/auto/default/plan modes
  5. Allow Rules — whitelist
  6. Hooks/Classifier race — competes with user confirmation dialog, first result wins
  7. Bash-specific guards — 23 checks including Zsh builtin interception, Unicode zero-width space injection, IFS null-byte attacks…
  8. User final confirmation — human signs off

Multi-agent coordination defined via prompts rather than hardcoded logic (“Do not rubber-stamp weak work”), “sticky latches” preventing cache invalidation, functions annotated DANGEROUS_uncachedSystemPromptSection() warning teammates not to call carelessly — too many details to cover here, saving those for future deep-dives.

Three Multi-Agent Modes

  • Coordinator — command-only role, worker agents do the actual work
  • Fork Subagent — lightweight clone, inherits full context, shares Prompt Cache
  • Agent Swarms — team mode, members can be created, deleted, and message each other

What This Leak Means for the Industry

For developers, this is a priceless reference implementation. Before this, learning to build production-grade AI agents meant reading papers, guessing at architectures, and fumbling in the dark. Now a product generating $2.5 billion in annual revenue — 18% of Anthropic’s total — has its implementation details fully exposed. Permission design, context compression, multi-agent orchestration — all laid bare.

The open source community has gone wild. claw-code hit 50K stars in two hours, rewriting core logic in Rust. More developers are studying the permission model and context compression strategies. Engineering know-how that only top AI companies possessed is now public knowledge. The barrier to building AI agents just dropped overnight.

claw-code repo — 80K+ stars

For Anthropic, this is embarrassing. Same mistake twice — that’s not a technical problem, it’s a management problem. A $380 billion company that can’t manage .npmignore. What do enterprise customers think? DMCA took down the GitHub mirrors, but copies are long gone.

That said, Anthropic’s real moat — model capabilities, inference infrastructure, enterprise distribution — can’t be stolen by reading source code. The npm package is just the tip of the iceberg.

Anthropic's official Claude Code repo — 94K stars

What’s Next

After a full day in this codebase, my head is buzzing with ideas. There’s so much to explore in these 512K lines — how to replicate the agent loop, whether the permission system design can be adapted, whether KAIROS’s autonomous agent architecture can be simplified into something runnable…

Holes have been dug. I’ll be filling them in. Follow along if you’re interested.

Disclaimer: This article is a technical analysis based on publicly available information. All source code is the property of Anthropic.

Follow me for more AI engineering deep dives.

Backfilling Is Harder Than Scraping: Lessons From Rebuilding 6 Months of Missing Data

Most scraping systems are designed for the present.

  • fetch
  • parse
  • store

Repeat.

But production systems don’t fail in real time.

They fail silently —
and you only notice weeks later.

The problem: missing history

We ran into this after a pipeline issue.

A scraper had been “working” for months,
but due to a logic bug, it skipped:

~40% of updates over a 6-month period

No crashes.
No alerts.
Just… gaps.

And suddenly we had a new problem:

How do you reconstruct data that was never collected?

Why backfilling is fundamentally different

Scraping live data is easy (relatively).

Backfilling is not.

Because the web is not static.

When you go back in time, you’re dealing with:

  • overwritten content
  • expired listings
  • mutated pages
  • cached or partial states

You’re not fetching history.

You’re trying to infer it.

The naive approach (that failed)

Our first attempt was straightforward:

  • re-run the scraper
  • hit the same URLs
  • fill the missing records

It didn’t work.

Why?

Because:

  • products no longer existed
  • prices had changed
  • pages returned “current state,” not historical state
    We weren’t backfilling.

We were rewriting history with present data.

The real constraint: you only get one chance to see the truth

This is the uncomfortable reality:

If you didn’t capture it then, you may never get it again.

So backfilling becomes a game of:

  • approximation
  • triangulation
  • consistency

Not retrieval.

What actually worked

We ended up combining multiple strategies.

1. Snapshot stitching

Instead of relying on a single source:

  • partial logs
  • cached responses
  • third-party signals

We stitched together fragments of truth.

Even incomplete snapshots helped anchor timelines.

2. Change modeling

We stopped asking:

“What was the exact value?”

And started asking:

“What range of change is plausible?”

For example:

  • price transitions
  • availability windows
  • ranking movement

This turned hard gaps into bounded estimates.

3. Temporal smoothing

Real-world data doesn’t jump randomly.

So we applied constraints like:

  • gradual transitions
  • monotonic changes (where applicable)
  • anomaly rejection

This reduced noise introduced during reconstruction.

4. Controlled re-scraping (the only place proxies matter)

We still needed to re-fetch some data.

But this time, precision mattered more than scale.

Key adjustments:

  • fixed geographic origin per dataset
  • consistent session behavior
  • slower, more human-like request patterns

Because during backfill:

inconsistency = amplified error

This is where having a predictable proxy layer (instead of fully random rotation) made a difference.

In practice, setups similar to Rapidproxy helped maintain:

  • stable request identity
  • region consistency
  • lower variance in responses

Not to “avoid blocks” —
but to avoid introducing new inconsistencies during reconstruction.

What we learned the hard way

1. Monitoring should track data shape, not just system health

We now monitor:

  • distribution shifts
  • missing field ratios
  • unexpected variance

Not just:

  • error rates
  • response codes

2. Historical data is more valuable than real-time data

Real-time data is replaceable.

Historical truth is not.

Once it’s gone, you’re guessing.

3. Scraping systems need “time-awareness”

Most pipelines treat each request independently.

But production systems need:

  • continuity
  • temporal context
  • historical validation

Otherwise, you can’t tell if data is:

  • correct
  • or just consistent with your bug

A better mental model

Scraping is not just about collecting data.

It’s about preserving reality over time.

And backfilling teaches you something uncomfortable:

You’re not building a scraper.
You’re building a time machine with missing pieces.

The takeaway

If your system only works in real time,
it’s incomplete.

Because eventually, you will need to answer:

“What actually happened?”

And if your pipeline can’t answer that —

you don’t have data.

You have snapshots.

How Ubiquitous Language Can Solve Your Miscommunication Issues

When someone asks me what Domain-driven design is for, I always tell a story that happened to me once.

I joined a new project and had long onboarding meetings where I was told what was already in place and what should be done. The language of communication was English. I am not a native English speaker, but by that time, I hadn’t had any issues in communication. I was trying hard to understand the current system infrastructure, architecture, and future requirements. There was no documentation, and the only source of truth was verbal discussion. Soon, I’ve noticed something unclear.

First, I’ve discovered a tenant as a part of a multitenancy setup – a customer who owns a dedicated instance of software. Then another meaning of “tenant” emerged: a person or company who rents an apartment. Both, also, could occasionally be called users, which confused me even more. When I finally understood what was happening and pointed out that we have this ambiguous naming, the person I was speaking to told me that in his native language, they have different words for these things, but English happens to be less descriptive. As a result, we agreed to use different words and be specific to what we’re talking about. It simplified my life a lot while onboarding new members on this project some time later.

And similar situations happened to me many more times. And I see that it is continuing to happen among many other teams.

Domain-driven design does not start with the code. It starts with team cooperation in discussing and agreeing to use a common project language, widely known as the ubiquitous language.

How should I start?

Follow this (not so easy as it looks) two-step plan to start with Domain-driven design:
Step 1 – Within the project team, agree on all terms you have and start using them correctly. Team members could encourage and support each other when adopting new terminology.
Step 2 – Continue using it! The project will grow and evolve, and the language must keep up with it.

If you wonder if following any DDD principles is worth your time in the era of LLM-agents writing code for you, check my article to see how you can benefit from DDD even more.

However, DDD could also benefit from adopting cutting-edge technologies. Let’s see how it can help us.

The source of truth

Having a source of truth is a solid helper in any discussion. Set up a glossary with all the terminology that is domain-specific or project-specific. Start small – put the most used words and phrases. I would also recommend putting the abbreviation there if there are any, it will help a lot! It should not be fancy, it could even be a text file but shared with the whole team inside some cloud. Each team member could add new things, but editing already existing ones should require the team’s approval, so everyone is aware that something has changed.

Nowadays, you can start by asking an LLM to create a first version of a glossary and propose the meaning of each term, so the team doesn’t need to start from scratch. It can even group and format it nicely and prepare the format for any tool you’d like to use.

The source of truth becomes unreliable

Here comes the hardest part.

Project evolves, new functionality appears, new customers start using their own terminology, new team members bring new abbreviations, and the source of truth becomes unreliable, because it was updated 2 years ago by the person who is not even part of the team anymore.

Just as the project development process is a continuous process, the maintenance of the ubiquitous language should also be continuous. It is the only way to benefit from it, from the time you’ve already dedicated to its development and adoption.

And here, modern technologies could also help. You can create a recurring task to review the glossary against the codebase, tickets, documentation, and other relevant sources to see if anything new has appeared or been changed. Then, it could be a quick 5-minute discussion within the team if everyone agrees with that. It could also be done in async mode by some vote tool.

Just imagine how much easier onboarding a project would be with a documented glossary.

Came after a 2-week vacation and can’t understand what the new abbreviation means? Check the glossary!

Have noticed some ambiguity in the code – check the glossary to know how it should be refactored.

Domain-driven design is not just for software developers, it is for the entire team to be able to communicate efficiently.

The article cover is Aleksandra Ekster’s artwork “Venice”.

How I Use Claude Code in VS Code (And Why It’s Actually Useful)

AI coding tools are everywhere right now, but not all of them feel genuinely helpful in day-to-day development. After experimenting with a few options, I started using Claude inside VS Code, and it’s been surprisingly effective—especially for reasoning-heavy tasks.

This isn’t a hype piece. It’s a practical walkthrough of how to set it up and how I actually use it while coding.

What “Claude Code” Really Means

There’s no official “Claude Code” button inside VS Code (yet). What people mean is using Anthropic’s Claude models through an extension or API integration.

Compared to tools like Copilot, Claude feels different. It’s less about autocomplete and more about:

  • Explaining code clearly
  • Thinking through problems step-by-step
  • Refactoring with context

It behaves more like a teammate than a suggestion engine.

Getting It Set Up (What Actually Worked for Me)

There are a few ways to connect Claude to VS Code, but the easiest one I found is using an extension like Continue.dev.

Here’s what I did:

  1. Open VS Code
  2. Go to Extensions
  3. Install Continue
  4. Add my Anthropic API key

Then I configured the model like this:

{
  "models": [
    {
      "title": "Claude Sonnet",
      "provider": "anthropic",
      "model": "claude-3-sonnet"
    }
  ]
}

After that, it just worked inside the editor.

How I Actually Use Claude While Coding

This is the part that matters. Not features—real usage.

1. Understanding Code I Didn’t Write

This is probably the biggest win.

Instead of digging through files for 20 minutes, I highlight code and ask:

“What is this function doing, and are there any edge cases?”

Claude usually gives a clear breakdown without overcomplicating it.

2. Refactoring Without Breaking Everything

When I’m cleaning up code, I’ll say something like:

“Refactor this into smaller reusable functions and improve readability”

It doesn’t just rewrite—it explains why, which helps me trust the changes more.

3. Debugging Faster

Instead of Googling errors, I paste them directly:

“Why is this throwing a null reference error in this context?”

It often catches things I missed—especially around async flows or state issues.

4. Writing Boilerplate (Without Thinking About It)

For repetitive stuff:

  • API routes
  • validation logic
  • test scaffolding

I just describe what I want and move on.

5. Learning New Stuff On the Fly

This is underrated.

If I’m working with something unfamiliar:

“Explain how this React hook lifecycle works in this example”

It gives contextual explanations tied to my code—not generic docs.

What Makes Claude Different From Other Tools

After using it for a while, here’s what stood out:

  • It reasons better than most tools
  • It’s strong at explaining tradeoffs
  • It doesn’t rush into shallow answers

But it’s not perfect.

Where It Falls Short

A few things to keep in mind:

  • It can still hallucinate (especially with obscure libraries)
  • It’s not as tightly integrated as Copilot
  • You need to guide it with clear prompts

So yeah—still requires thinking (which is a good thing).

Tips That Made a Big Difference

A few things I learned quickly:

  • Be specific → vague prompts = mediocre results
  • Give context → mention framework, goal, constraints
  • Ask follow-ups → treat it like a conversation

Bad prompt:

“Fix this”

Better:

“Fix this function so it handles undefined values and avoids re-renders in React”

Final Thoughts

Using Claude in VS Code isn’t about replacing your workflow—it’s about removing friction.

For me, it’s most useful when:

  • I’m stuck
  • I’m exploring unfamiliar code
  • I want a second opinion quickly

If you set it up right and use it intentionally, it becomes less of a tool and more of a thinking partner.

If you’d like to learn more, feel free to reach out to me here.

Website : https://artross99.github.io
Email : [email protected]
Telegram : https://t.me/artross99
Discord : https://discord.com/users/1024481232068821003

How we built an open-source CLI for social media automation (and what we learned)

Today we’re launching Simplified CLI on Product Hunt — an open-source command-line tool for publishing to 10 social platforms, generating AI images, and pulling analytics, all from the terminal.

I wanted to share the story behind it: the problem we saw, the technical decisions we made, and what surprised us along the way.

The problem

We’re the team behind Simplified.com — a marketing platform used by thousands of teams. Over time we noticed a pattern: more and more of our power users were developers, AI engineers, and founders who wanted to integrate social media into their automated workflows.

They’d ask things like:

  • “Can I post from a GitHub Action after a release?”
  • “Can my AI agent publish the content it generates?”
  • “Can I batch-schedule 30 posts from a JSON file?”

The answer should have been obvious: build a CLI. But building a CLI that actually covers all 10 platforms properly is non-trivial — each platform has different media requirements, character limits, and API quirks.

What we built

Simplified CLI covers:

Publishing: Instagram (image, video, Reels, Stories), TikTok, LinkedIn (profiles + pages), YouTube, Facebook, Pinterest, Threads, Bluesky, Google Business Profile, and TikTok Business.

AI image generation: We integrated 20+ models directly into the CLI — Flux Realism, Flux Kontext Pro, OpenAI image models, Stability AI, Google Imagen 4, Recraft, Ideogram, and more. You can generate an image and publish it in a single pipeline.

Analytics: Pull engagement data, follower counts, reach, and more across platforms.

JSON-native output: Every command returns structured JSON. This was a deliberate design decision — it makes it trivial to chain commands, pipe output to other tools, and integrate into AI agent workflows.

The Claude Code plugin

One of the most interesting integrations we built is the Claude Code plugin. Developers using Claude Code can install it in two commands:

/plugin marketplace add celeryhq/simplified-cli
/plugin install simplified-cli

This opens up a genuinely new workflow: an AI agent that can research a topic, generate an image, write a caption, and publish — all autonomously. We’ve used it internally for our own content workflows.

Technical decisions we’re happy about

TypeScript + tsup: We write TypeScript and bundle to a single CJS file via tsup. Fast builds, zero runtime overhead, and full type safety across the codebase.

Single unified API: Rather than implementing per-platform adapters and dealing with 10 different auth flows, SDKs, and rate limits ourselves, we route everything through Simplified.com’s REST API. Platform complexity is handled server-side — the CLI stays lean and focused.

Credential management: Authentication uses a single API key via the SIMPLIFIED_API_KEY environment variable — clean, scriptable, and CI/CD friendly:

export SIMPLIFIED_API_KEY=your_api_key_here
simplified accounts:list

Native fetch: We require Node.js 22+, so we use the built-in fetch — no external HTTP dependencies.

Rate limiting handled for you: Because all requests go through our API, platform-specific rate limits are managed server-side. You won’t get a 429 from accidentally looping over a publish command.

What surprised us

The biggest surprise was how much demand there was for this in the AI agent community specifically. We thought our primary users would be developers building automation scripts — and they are — but the use case we didn’t fully anticipate was AI agents that need to interact with social media as part of a larger autonomous workflow.

JSON-native output turned out to be the right call. Several users told us they chose Simplified CLI over alternatives specifically because of how easy it is to parse and chain.

Try it

Requires Node.js 22+. MIT licensed.

Would love to hear what you think — especially if you’re using it in an AI agent workflow or have feedback on the platform coverage.

AI 代理工具及最佳實踐 回顧 HK AWS UG 2026-03

開場致詞 (Opening)

1. 使用者社群負責人管理 AWS 使用者社群香港站。這提供了社群交流的機會,因為負責人並非 AWS 員工。聯繫社群英雄加入使用者社群。

2. 使命涉及社群交流與倡議。這連結了開發者以應對身份轉變。參加聚會以擴展在地網絡。

3. AWS AI 使用者社群成立,專注於 AI 技術。此專業領域提供 AWS 上的 AI 特定內容。

4. Agent Cons Hong Kong 與 Agent 活動包含 AWS 講師。參與者可以存取 AI 專題與 Q 工作坊。完成 4 月場次的報名。

5. 來自日本、韓國與印度的團隊參加了香港的異地活動。這實現了全球學習與跨區域支援。向 DevRel 團隊提供回饋。

6. 設計與產業趨勢每週都在變化。直接參與確保社群保持最新狀態。加入對話以影響社群支援與培育策略。

7. 回饋能改善社群支援。互動為 DevRel 團隊提供見解。在交流環節中與工作人員交談。

技術專題 (Session)

9. AI Agent 執行任務規劃與推理。自動化處理如重新預約等執行任務。提供指令以觸發自主工作流。

10. 推理決定了執行品質。效能追蹤確認了準確性。利用評估來監控 Agent 效能。

11. 非決定性會導致解釋錯誤。這項挑戰導致回應偏離任務。審查挑戰以穩定 Agent 行為。

12. AI Agent 輔助程式碼生成與修改。任務可能會產生與需求不符的程式碼。檢查輸出以確保技術標準。

13. 權限過度擴張存在數據洩露風險。機制能防止不當行為。稽核 Agent 行為以維持安全性。

14. 故障點 include 「幻覺」。使用內部知識庫可確保準確性。監控 Agent 回應以減少低效率。

15. 工具選擇錯誤會影響品質。工具組合可提升回應相關性。評估邏輯以優化開發者工作流。

16. 可觀測性利用日誌與追蹤。識別記憶體錯誤可穩定生產。審查日誌以了解系統事件。

17. 指標量化了準確性差距。根據參數測量效能可驅動品質評估。分析數據以彌補回應差距。

18. Agent 架構管理預訂。預算邏輯推理取代了網頁搜尋。配置工具以在平台上處理任務。

19. 架構需要可觀測性與評估。Agent Runtime 連結到 Lambda 函式以執行任務。整合監控以識別架構故障。

20. Agent Core 允許配置評估。追蹤工具準確性與一致性可提升效能。為已部署的 Agent 選擇指標。

21. 測試需要工具與提示詞。定義限制可確保旅遊研究助手符合需求。將 Agent 指向 Lambda 函式。

22. 防護欄可防止知識外洩。拒絕回答範疇外的查詢可保護效能。編寫程式使 Agent 拒絕問題。

23. Agent Core Runtime 託管 Docker 檔案。部署到執行環境可啟用 Agent 調用。檢查狀態以確認 Agent 已部署。

24. 多場次測試套件測量一致性與工具選擇準確性。數據可識別效能差距。在不同場次執行批次提示詞以追蹤 Agent 行為。

25. Agent Core 追蹤指標。監控效能可識別錯誤。從指標中選擇以驗證 Agent 效能。

26. 主題專家(SME)分析評估摘要以應用設計原則。分析可提升回應品質。

27. 提示詞精煉可修正工具選擇。定義負面提示與正面提示可改善結果。根據 SME 評估更新提示詞。

28. 基準指標驗證 Agent 就緒程度。超過指標可確保生產品質。重新執行測試套件以確認效能改進。

29. 邏輯推理賦予查詢工具選擇能力。推理提供地點相關回應。配置 Agent 透過推理執行任務。

30. 迭代維持系統效能。重複評估可確保可靠性。透過多次執行來進行測試。

31. 模型變更與數據更新需要重新執行評估。自動化確保了可靠性。每次模型變更時重新執行評估。

32. 自動化管線處理生產樣本。這消除了手動監控。配置樣本以在每次更新時觸發。

33. 程式自動標記流量問題。這提供了即時監控。使用 Python 檔案標記效能下降。

34. Agent Core 提供執行環境、記憶體與身份識別。這保護了存取並儲存對話。在平台上部署服務。

35. 可觀測性識別事件,而評估決定相關性。這簡化了問題解決。將日誌推送到評估系統。

36. 「觀察、評估與考核」工作流管理模型行為。這確保 Agent 原則與使用案例一致。根據考核決定是否更新系統。

37. 安全性、成本與延遲需要應用程式層級的監控。這追蹤資源消耗與支出。在 Agent 層級監控 Agent 行為、多輪對話與工具選擇。

38. LLM 評估會標記 SME 考核的負面分數。人工審查確保技術準確性與行為一致。使用 SME 推導系統變更邏輯。

39. 「建置、部署與監控」工作流管理 Agent 生命週期。這項企業最佳實務確保了系統可靠性。配置場次與指標的測試案例。

40. AI 工具提升開發者的程式碼效率。這種以人為本的方法在不取代員工的情況下維持生產力。將編碼引導鉤子(coding steering hooks)、編碼標準與 MCP 整合到開發中。

開發工具與實務 (Tools & Best Practices)

42. AI 工具支援開發者而不取代角色。這維持了軟體開發效率。應用 AI 以提升編碼效率。

43. 編碼引導鉤子、MCP 與編碼標準架構了 Agent 開發。這項企業最佳實務提升了生產力。利用鉤子來引導應用程式邏輯。

45. IDE 擴充功能自動完成語法。提升了 Loop 與 Python 的編碼效率。將擴充功能整合至 Sublime 或 VS Code。

46. AI 輔助生成內容與程式碼成員。透過問答引導提升生產力。請求函式以取代文件搜尋。

47. 如 Kiro 的 Agentic IDE 輔助軟體開發。「自由開發」允許透過提示詞建立應用程式。為企業級應用部署 Agentic 工具。

48. AI 建置作品集網站與企業系統。前端、後端與商業邏輯自動生成。向 Agent 提供背景資訊以啟動程式碼生成。

49. Amazon Q CLI 與 Developer CLI 支援開發者。透過與 IDE 整合 CLI 來擴展生產力。使用 CLI 工具建置應用程式。

50. Amazon Q CLI 與 IDE 整合。這透過 CLI 操作提升編碼效率。執行指令以生成程式碼。

51. Kiro 作為 Agentic IDE。這支援從原型到企業級應用的軟體開發。使用此工具從零開始建置軟體。

52. ID 插件與 AWS 管理主控台提供可見性。這些功能支援程式碼審查、除錯與雲端指標監控。審查見解以調查應用程式故障。

53. 規格驅動開發 (Spec-driven development) 強制執行編碼標準。這確保了企業級應用的語法一致性。定義機制以符合產業標準。

54. 引導 (Steering) 實現了規格驅動開發。這透過規格中的提示詞交付需求。從 Jira 專案輸入使用者故事以獲取 API 需求。

55. MCP 伺服器連結至來源。這自動化了問題指派與配置。執行提示詞以連結 Jira 的 MCP 伺服器配置。

56. Kiro 在 Markdown 檔案中生成需求。這為 Agentic 工作流提供背景。利用 Markdown 檔案定義專案基礎。

57. 編碼標準與 API 需求定義專案範疇。這維持了資料庫應用與結構描述的背景。輸入需求以管理資訊。

58. 個人規格列出詳細資訊。這捕捉了銀行應用與交易的商業邏輯。記錄帳戶流程與資料庫使用情況。

59. 選擇後端技術、前端技術與 AWS 資源來引導開發。這滿足了基礎設施需求。

60. ID 工具透過提示詞生成設計。這允許根據需求進行更新。使用提示詞修改專案結構。

61. 任務清單作為實施計畫。這為企業應用組織程式碼生成與基礎設施生成。對任務進行分類以簡化程式碼生成。

62. 基礎設施程式碼利用 CloudFormation 或 Terraform。這自動化了資料庫建立與數據插入。執行指令以驗證 API 與結構描述。

63. 測試開發將測試案例分類為必選。這確保了規格驅動開發期間的準確性。標記測試案例以控制迭代工作流。

65. Agent 鉤子自動化開發任務。這透過移除 shell 指令審核來提升生產力。編寫提示詞以建立 Q Agent 的鉤子檔案。

66. 企業級應用包含數千個任務。自動化取代了人工干預。向 Q 加入指令以自動化終端指令。

67. 開發需要語法與 Lint 檢查。自動化在軟體開發期間維持程式碼品質。在 Kiro 中配置 Agent 鉤子以在儲存後觸發。

68. 進階背景管理連結至外部來源。這啟用了外部 API 觸發器(如通知)。將系統連結至服務提供商以進行資料庫操作。

69. 整合涉及程式庫與 API 金鑰。簡化的工作流減少了負載交付的編碼量。使用 MCP 連結外部服務來取代測試。

70. 模型內容協定 (Model Context Protocol) 作為標準協定。它實現了多個來源與 LLM Agent 之間的連結。將 MCP Agent 插入應用程式以存取外部服務。

71. 外部服務整合先前需要手動編寫程式碼。MCP 伺服器為軟體提供標準化連結。使用 MCP 作為標準連接埠來連結數據源。

72. Kiro 利用 MCP 配置連結 Zomato。這項商業效益允許提示詞在無需網頁導覽的情況下執行訂單。配置帳號憑證以透過 Agent 自動化交易。

73. 聯邦數據與私有 API 受網際網路限制。在地管理維護了敏感資訊的安全性。實施在地知識庫以處理私有工作負載。

74. 概念知識庫將在地文件整合到工具中。此產品說明從 PDF 來源提供隨需背景。將 API 文件匯入 Bedrock 知識庫。

75. Kiro Powers 利用 Bedrock API 獲取背景。此工作流說明增強了 Agent 對敏感數據的處理能力。將 MCP 伺服器連結至在地知識庫以引導應用程式。

76. 自訂 Agent 作為特定任務角色。這項商業效益促進了複雜文本、程式碼與等式的生成。部署角色以處理特定等式與影像。

77. 前端指南為 Kiro 提供背景。這項企業最佳實務使用 Amazon Umbre 字體確保 UI 一致性。定義結構與顏色代碼。

78. 行動網頁應用的 UI 元件為 Kiro 提供資訊。此工作流說明支援使用 Telerik 生成程式碼。將 CSS 檔案整合至 ID 中。

79. Kiro 使用背景資訊進行元件數據的網際網路搜尋。此產品說明觸發了 UI 建立。提供背景檔案以生成程式碼。

80. Kiro 從程式碼庫生成引導文件 (steering docs)。自動化確保引導內容與檔案匹配。分析網域檔案以建立 Agent 的引導內容。

81. Kiro 儲存前端與後端的引導文件。商業邏輯簡化了需求更新。透過提示詞更新儲存中的引導內容。

82. MCP 伺服器計算識別 Agent Core 的框架。連結將應用程式導向文件。查詢 MCP 伺服器目錄以新增服務。

83. MCP 伺服器作為外部來源的存儲庫。配置可實現數據連結。整合引導檔案以將專案連結至來源。

I Built Cryptographic Proof for DeFi Liquidations Using Pyth Network

Every time I got liquidated in DeFi, I had one question —
was that price actually fair?

There’s no way to verify. So I built PythReceipt.

What it does

PythReceipt creates an immutable, on-chain receipt for every
liquidation — stamped with Pyth Network’s live oracle data
at the exact moment of execution.

The Confidence Gate

Before any liquidation executes, PythReceipt checks Pyth Pro’s
confidence interval:

  • Confidence < 0.2% → ✅ Liquidation allowed
  • Confidence 0.2-0.5% → ⚠️ Warning shown
  • Confidence > 0.5% → 🔴 Liquidation blocked

The Receipt

Every successful liquidation generates:

  • On-chain Solana transaction
  • Live Pyth price at exact moment
  • Confidence interval value
  • Best Bid / Best Ask
  • Downloadable JSON proof

Tech Stack

  • Next.js 14 + TypeScript
  • Solana Devnet + Anchor
  • Pyth Pro Lazer WebSocket
  • Vercel

Try it: https://pyth-receipt.vercel.app
GitHub: https://github.com/rajdeblol/PythReceipt

Telefonum 5G destekliyor mu? 5G uyumlu telefonlar hangileri? iOS ve Android 5G destekli telefon modelleri neler?

1 Nisan 2026 itibarıyla Türkiye’de 5G teknolojisi resmen kullanılmaya başlandı. Yüksek hız, düşük gecikme ve daha stabil internet bağlantısı sunan bu yeni nesil mobil ağ, kullanıcıların cihaz tercihlerini yeniden gündeme taşıdı. Peki, telefonum 5G destekliyor mu? 5G uyumlu telefonlar hangileri? iOS ve Android 5G destekli telefon modelleri neler? Detaylar haberimizde.