2. Mastering Time Series Forecasting with Python and timesfm

KPT-0010

Ditching the Crystal Ball: Mastering Time Series Forecasting with Python and timesfm

Hey there, fellow developers! 👋

Ever found yourself staring at a screen full of historical data, desperately needing to predict what’s coming next? Whether it’s sales figures, server load, user engagement, or sensor readings, time series forecasting is a beast many of us wrestle with regularly. And let’s be real, it often feels less like science and more like art… or dark magic, depending on the day.

The Forecast Challenge: A Developer’s Pain Point

I’ve been there. You start with the classics: ARIMA, SARIMA, then maybe Prophet. You spend hours on feature engineering, meticulously crafting your seasonalities, handling holidays, dealing with missing data, and cross-validating until your eyes blur. And after all that, the model still throws a curveball when real-world data hits it. It’s powerful, sure, but it can be incredibly time-consuming and often requires deep domain expertise to get just right.

This isn’t just a theoretical problem; it’s a real bottleneck in many projects. Imagine trying to dynamically scale your cloud resources based on predicted traffic spikes, or optimize inventory without knowing demand. Accurate, quick, and reliable forecasts can mean the difference between happy users/customers and overspent budgets or missed opportunities.

My “Aha!” Moment with timesfm

Just a few months ago, our team was grappling with predicting API call volumes for a critical service. The existing models were brittle, requiring constant tuning. We needed something robust, something that could learn from diverse patterns without us hand-holding it through every seasonality and trend change. That’s when I stumbled upon timesfm.

timesfm (Time Series Foundation Model) is Google’s answer to a simpler, more powerful way to handle time series. Think of it like this: just as large language models (LLMs) have revolutionized text understanding, timesfm is a foundation model designed to understand and predict time series data. Its superpower? It’s pre-trained on a massive, diverse dataset of real-world time series. This means it already “knows” a lot about how time series behave, right out of the box.

What Makes timesfm a Game-Changer?

Traditional time series models often demand that you, the developer, understand and explicitly model trends, seasonality, cycles, and exogenous variables. timesfm flips that script. Because it’s a transformer-based model pre-trained on a vast array of time series data from various domains, it can:

  1. Understand complex patterns: It automatically captures trends, seasonality, and other complex temporal dependencies.
  2. Handle diverse data: Its pre-training makes it robust across different types of time series, requiring minimal (if any) feature engineering from your side.
  3. Simplify your life: Less time spent on model configuration and more time on getting actionable insights.

It’s essentially a plug-and-play solution for many forecasting tasks, and it’s backed by the power of Google’s research.

Let’s See It in Action (A Glimpse)

The beauty of timesfm is how little code it takes to get started. You’re not building a model from scratch; you’re leveraging a pre-trained powerhouse.

First, you’ll need to install it:

pip install timesfm

Now, let’s forecast some (mock) daily active users (DAU) for the next 7 days:

import pandas as pd
from timesfm import TimesFm

# Mock historical data (e.g., daily active users for 30 days)
# In a real scenario, this would come from your database or API
history = pd.Series([100, 105, 110, 108, 115, 120, 122, 118, 125, 130,
                     140, 142, 145, 150, 148, 155, 160, 158, 162, 165,
                     170, 168, 172, 175, 178, 180, 182, 185, 188, 190],
                     name="DAU")

# Initialize TimesFM (using the default, pre-trained 'tiny' model)
# context_len: how many past points to consider for forecasting
# horizon_len: how many future points to predict
tfm = TimesFm(
    context_len=30, # Look at the last 30 data points
    horizon_len=7,  # Predict the next 7 data points
    model_size='tiny', # Use the 'tiny' pre-trained model for quick inference
    # You'd usually specify a cache_dir for weights, e.g., cache_dir='./timesfm_weights'
    # The library will download weights if not found.
)

# Make a prediction
# TimesFM expects a list of series, even if it's just one
# The .values converts the Pandas Series to a NumPy array, which TimesFM expects
forecast_results = tfm.forecast([history.values], horizon_len=7)

print("Historical Data (last 5 points):n", history.tail(5))
print("nPredicted next 7 days (DAU):n", forecast_results[0][0])

That’s it! You feed it your historical data, tell it how far into the future you want to predict, and timesfm handles the heavy lifting. The forecast_results will contain the predictions for your specified horizon. Notice how model_size='tiny' implies it’s using a pre-trained model. For production, you might want to use a larger one like '200m' or '1b', which you can load by calling tfm.load_weights(...) once.

A Practical Real-World Use Case

Think about a common challenge: inventory management in e-commerce.
Traditionally, forecasting demand for thousands of SKUs (stock keeping units) is a logistical nightmare. Each product might have different seasonality, trends, and promotional impacts.

With timesfm, you could:

  1. Batch Process: Feed historical sales data for all your SKUs into timesfm in batches. Its ability to handle diverse series means you don’t need a custom model for every product.
  2. Automated Replenishment: Use the 7-day or 30-day ahead forecasts to trigger automated reorder points, minimizing stockouts and reducing excess inventory.
  3. Identify Anomalies: Quickly spot products where actual sales deviate significantly from the forecast, indicating potential issues or sudden trends.

The minimal setup and robust performance of timesfm make it ideal for scaling forecasting across a large number of items or services, where traditional methods would be too resource-intensive or complex to maintain.

Key Takeaways for Your Next Project

  • Less Feature Engineering: timesfm significantly reduces the need for manual feature engineering, saving you tons of time.
  • Robust & Generalizable: Thanks to its pre-training on diverse data, it performs well across various time series types without specific tuning.
  • Simple Interface: Get powerful forecasts with minimal Python code.
  • Scalability: Ideal for scenarios requiring forecasts for many time series (e.g., thousands of products, sensors, or services).

Conclusion

Time series forecasting doesn’t have to be an arcane art. With tools like timesfm, it’s becoming more accessible, more robust, and significantly faster to implement. If you’re tired of the dance with ARIMA or the endless tuning of custom models, I highly recommend giving timesfm a spin. It’s a powerful addition to any developer’s toolkit, letting you focus less on the “how” and more on the “what next.”

Happy forecasting!

Related Posts

How I Reverse-Engineered Claude Code’s Hidden Pet System

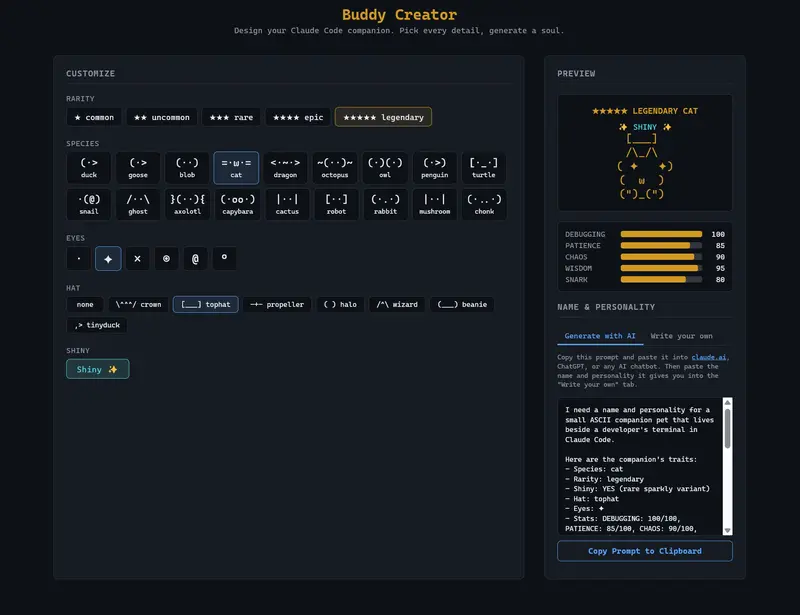
The Buddy Creator web tool showing a shiny legendary cat with a tophat

The Buddy Creator web tool showing a shiny legendary cat with a tophat

I was poking around Claude Code’s source one evening and found something I wasn’t supposed to see: a full gacha companion pet system, hidden behind a compile-time feature flag. A little ASCII creature that sits beside your terminal input, occasionally comments in a speech bubble, and is permanently bound to your Anthropic account. Your buddy is deterministic. Same account, same pet, every single time. No rerolls.

Naturally, I wanted a legendary dragon. Here’s how I cracked it.

What’s Actually in There

The buddy system lives across four files inside Claude Code’s codebase:

  • buddy/types.ts defines 18 species, 5 rarities, 6 eye styles, 8 hats, and 5 stats
  • buddy/companion.ts implements the PRNG, hash function, roll algorithm, and tamper protection
  • buddy/sprites.ts has ASCII art for every species (three animation frames each, a hat overlay system, and a render pipeline)
  • buddy/prompt.ts holds a system prompt that gets injected into Claude so it knows how to coexist with the pet without impersonating it

The feature is gated behind a BUDDY compile-time flag. When the flag is off, the entire thing gets dead-code-eliminated from the build. It was teased during the first week of April 2026 and is slated for a full launch in May. The /buddy slash command activates it when the flag is on.

Here’s what the species look like as ASCII sprites:

DUCK                DRAGON              GHOST
    __              /^  /^            .----.
  <(· )___        <  ·  ·  >          / ·  · 
   (  ._>          (   ~~   )         |      |
    `--´            `-vvvv-´          ~`~``~`~

Eighteen species total: duck, goose, blob, cat, dragon, octopus, owl, penguin, turtle, snail, ghost, axolotl, capybara, cactus, robot, rabbit, mushroom, and chonk. Each one has a compact face representation for inline display, three animation frames on a 500ms tick timer, and a hat overlay slot on line zero of the sprite.

One fun detail: every species name in the source code is obfuscated through String.fromCharCode() arrays. “Capybara” collides with an internal Anthropic model codename that’s flagged in their repo’s excluded-strings.txt, so they encoded all 18 species uniformly to keep their string-scanning tooling happy.

The Gacha Algorithm

Your buddy is a pure function of your identity. The algorithm chains together like this:

Account UUID (from OAuth)
    → concatenate with salt 'friend-2026-401'
    → hash to 32-bit integer
    → seed Mulberry32 PRNG
    → deterministic roll sequence

The PRNG calls happen in strict order: rarity first, then species, then eye, then hat, then shiny, then stats. Changing any earlier roll changes everything after it.

Rarity weights:

Rarity Probability
Common 60%
Uncommon 25%
Rare 10%
Epic 4%
Legendary 1%

On top of that, there’s a 1% shiny chance that rolls independently of rarity. A shiny legendary of a specific species? That’s a 0.00056% probability, roughly 1 in 180,000.

Stats are shaped by rarity through a floor system. Legendaries start at a floor of 50 and always max out their peak stat at 100. Commons start at 5 and cap their peak around 84. Each companion gets one peak stat and one dump stat, with the rest falling somewhere in between.

There’s an important hash function detail here. Claude Code runs in Bun, so the production hash is Bun.hash(), which is native C wyhash. The Node.js fallback is FNV-1a. These produce completely different values for the same input, which means any tooling running outside Bun cannot reproduce the exact buddy for a given account.

How the Tamper Protection Works

This is the part that got interesting. The buddy system splits companion data into two categories:

Stored in config (~/.claude.json): name, personality, hatchedAt timestamp. These are editable and meant to be personal.

Recomputed every read (called “bones”): rarity, species, eye, hat, shiny, stats. These are derived deterministically from your account hash on every single call to getCompanion().

The tamper protection comes down to a JavaScript spread operation:

export function getCompanion() {
  const stored = getGlobalConfig().companion
  if (!stored) return undefined
  const { bones } = roll(companionUserId())
  return { ...stored, ...bones }
}

Because bones comes second in the spread, it always overwrites anything you manually added to the config. You can edit ~/.claude.json all you want, set rarity: "legendary", and it gets stomped on every read. The recomputed values win, period.

It’s clever design. No server-side validation needed, no database, no “lost my save” support tickets. Your buddy is a pure function of your identity, recomputed every time it’s needed. The bones are cached by userId + SALT key to avoid redundant computation on the three hot paths: the 500ms sprite tick, per-keystroke prompt input, and per-turn observer.

But here’s the thing about client-side enforcement: it’s client-side.

The Crack

The entire hack is swapping two variable names. In the minified v2.1.89 binary, getCompanion() compiles down to something like:

{bones:$}=Gh$(Th$());return{...H,...$}

H is the stored config, $ is the recomputed bones. Bones come last, bones win. To flip that:

{bones:$}=Gh$(Th$());return{...$,...H}

Now stored config comes last. Config wins. Whatever you write to ~/.claude.json takes priority over the recomputed values.

The two strings are the exact same byte length, so there’s zero offset shift in the binary. No padding, no realignment, no relocation table headaches. You find the pattern, swap H and $, write it back. That’s the whole patch.

I wrote a Node.js patcher that automates the whole thing in a single command. Design your buddy on the web creator, copy the JSON, run node buddy-crack.js, and it patches the binary and injects your companion in one step. It auto-reads from your clipboard, so you don’t even need to pass arguments. That was a deliberate choice: Windows CMD chokes on JSON in command-line arguments because of quote conflicts, so clipboard-first was the only sane default.

The patcher went through a few iterations that taught me things the hard way.

The first version had separate patch and inject commands, which was unnecessarily complex for something that always happens together. Collapsed that into a single flow early on.

Then I nearly destroyed my own Claude Code config. The original config writer would parse ~/.claude.json, fail on any syntax weirdness, fall back to an empty object, and write that back with just the companion data. That nuked everything else in the file: OAuth tokens, permissions, theme settings, tool approvals. On a config that can easily be 50KB, that’s catastrophic. The fix was to make the injector surgical. It tries a proper JSON parse first, but if that fails, it now uses a brace-depth parser to find and replace just the companion field in the raw string, leaving everything else untouched. It only creates a fresh file as a last resort, and it backs up ~/.claude.json to .claude.json.bak before touching anything.

Windows threw another curveball. PowerShell’s Get-Clipboard mangles UTF-8 characters, so the star eye character ✦ would come through as ?. The fix forces UTF-8 output encoding from PowerShell and auto-repairs known corrupted characters on paste.

The final round of hardening added binary integrity checks (verifying file size after write to catch truncated writes) and auto-restore from backup if the patch fails mid-write. The patcher now handles XDG-standard paths across all three platforms and scans the Claude Code versions directory for additional binaries to patch.

Building the Web Creator

Reading the source also meant I had all the sprite data, so I built a web-based companion designer. Single HTML file, no dependencies, no build system. You pick your species from a grid that shows the actual ASCII faces, choose your rarity, eyes, hat, toggle shiny, and it renders a live preview of the full 5-line sprite with your selections applied.

There’s a soul section with two options: generate a name and personality by pasting a prompt into Claude or ChatGPT, or just type them yourself. Hit “Copy Config JSON” and it exports exactly what the patcher expects. The install guide is built into the page with platform-specific instructions for Windows, macOS, and Linux.

The whole thing lives at pickle-pixel.com/buddy. The usage flow is four steps: design your companion, close Claude Code, run the patcher, restart.

The Attack Surface

While I was documenting everything, I mapped out every possible angle someone might try:

Attack Works? Why
Edit config fields Name/personality only Bones always overwritten
Change accountUuid No Server validates on auth
Patch the binary Yes That’s what this tool does
Create new accounts Uncontrolled Can’t choose your UUID
Brute-force UUIDs Statistically But you can’t use found UUIDs

The brute-force angle is interesting. I wrote a separate script that replicates the full gacha algorithm and generates random UUIDs to find legendary rolls. It works statistically, but the UUIDs it finds are useless in practice because Anthropic assigns them server-side during account creation. You don’t get to pick yours.

And there’s the Bun versus Node.js hash problem again. The brute-forcer runs in Node.js by default, using FNV-1a, but production Claude Code uses Bun’s wyhash. The probability distributions are identical, but per-UUID results won’t match unless you run the script under Bun.

What I Learned

The buddy system is genuinely well-designed for what it’s trying to do. Deterministic gacha with no server state is elegant. The tamper protection through spread ordering is simple and effective against casual editing. The soul/bones split lets users personalize their pet’s name and personality while keeping the visual identity locked to their account.

But any system where the enforcement happens entirely on the client has a fundamental limit. The binary is on your machine. The config is on your machine. The merge logic is one spread operation in a JavaScript function. The crack is five characters swapped in a compiled binary.

That said, I don’t think the Anthropic team is under any illusion that this is uncrackable. Deterministic client-side gacha is a design choice that trades tamper-resistance for zero-server-cost operation. No database, no API calls to validate rarity, no sync issues. For a fun companion pet feature in a CLI tool, that’s the right tradeoff. The buddy system doesn’t gate any functionality. It’s a toy, and it’s a charming one.

The code is at github.com/Pickle-Pixel/claudecode-buddy-crack if you want to pick your own companion. The full reverse-engineering documentation is in BUDDY_SYSTEM.md.

Now if you’ll excuse me, I have a legendary shiny dragon to go look at.

1. Orchestrating AI Teams: A Python Guide to ChatDev

---
title: "Orchestrating AI Teams - My Python Journey with ChatDev"
published: true
description: "Ever wished you had an entire dev team at your fingertips? Discover how ChatDev lets you orchestrate AI agents to build software, powered by Python."
tags: [AI, Python, ChatDev, Multi-agent, Software Development, LLM, Developer Experience]
cover_image: https://res.cloudinary.com/practicaldev/image/fetch/s--9c_o_e_m--/c_imagga_scale,f_auto,fl_progressive,h_420,q_auto,w_1000/https://dev-to-uploads.s3.amazonaws.com/uploads/articles/your-ai-team-image.jpg # Placeholder image idea: an illustration of multiple robots collaborating or code snippets forming a team.
---

Hey everyone!

Ever been deep in a coding session, staring at a blank file, wishing you had an entire *team* of developers to brainstorm with? Or maybe just an extra pair of hands to tackle that mundane boilerplate? Let's be real, solo development can sometimes feel like trying to build a skyscraper with a spork.

For the longest time, when we talked about AI in development, it was mostly about tools like GitHub Copilot helping with code completion, or ChatGPT assisting with specific functions. Powerful, yes, but still largely *single-agent* interactions. You prompt, it responds. It's a great assistant, but it's not exactly a **collaborator** in the sense of a full development team.

### Why This Matters: Beyond the Single Prompt

The real world of software development isn't a series of isolated prompts. It's a dynamic, collaborative process involving design, coding, testing, refactoring, and constant communication. We have product managers, designers, frontend devs, backend devs, QA engineers – all talking, disagreeing, and ultimately, building something together.

So, what if we could bring that multi-role, collaborative dynamic to AI itself? What if AI agents could *talk to each other*, take on different roles, and collectively build a piece of software from a high-level requirement? This isn't just a cool concept; it's a game-changer for rapid prototyping, learning, and automating parts of the dev workflow that used to be strictly human territory.

### My "Aha!" Moment with ChatDev

I remember a few months back, I was wrestling with a particularly stubborn feature for a side project. It was a small utility, but it required juggling a few different components – a bit of UI logic, some data processing, and a simple API endpoint. I kept context-switching, feeling fragmented. I was doing the job of three people, and my progress was snail-paced.

That's when I stumbled upon [ChatDev](https://github.com/OpenBMB/ChatDev). The idea instantly clicked. Instead of me trying to be every role, I could *delegate* to a team of AI agents. It promised to simulate an entire software company, with agents playing roles like CEO, CPO, programmer, and tester, all collaborating to fulfill a given task. My initial thought? "No way this works." My second thought? "I *have* to try this."

### ChatDev in a Nutshell: Your Virtual Dev Team

At its core, ChatDev is a Python-based framework that orchestrates multiple AI agents to collaboratively develop software. You give it a high-level project goal, and it essentially spins up a virtual "company" to tackle it.

Think of it this way:

1.  **You define the project goal:** "Build a simple web server that serves a 'Hello, World!' message."
2.  **ChatDev assigns roles:** A "CEO" agent might initiate the project, a "CPO" agent defines the features, "Programmer" agents write the code, and "Tester" agents find bugs.
3.  **The agents "chat":** They communicate with each other, negotiate, ask clarifying questions, suggest solutions, and iterate on the code. This multi-agent dialogue is the secret sauce – it mimics the human collaboration process.
4.  **They produce code:** Eventually, you get a working codebase, often with a `README` and even installation instructions.

It's less about a single AI generating a response and more about a *team* of AIs developing a solution through a structured, simulated process.

### Getting Your AI Team Started (A Small Taste of Python Magic)

Getting ChatDev to work is surprisingly straightforward. Once you have it set up (which usually involves `pip install chatdev` and configuring your OpenAI API key or other LLM provider), you can launch your virtual company with just a few lines of Python:

python
from chatdev.chatdev_project import ChatDev

Define your project’s goal – be clear and concise!

project_goal = “Develop a basic Python script that generates a random password of a specified length, allowing the user to specify length.”
project_name = “PasswordGeneratorApp” # A name for your project folder

print(f”🚀 Launching your AI software company for project: {project_name}…”)

Orchestrate your AI team!

You can specify the model, version, etc. if needed.

my_ai_team = ChatDev(
task=project_goal,
project_name=project_name,
model_name=”gpt-4″ # Or “gpt-3.5-turbo”, etc.
)

Let the team get to work! This will take a while as they “chat” and code.

my_ai_team.run()

print(f”n🎉 Project ‘{project_name}’ developed by your AI team! Check the ‘Warehouses/{project_name}’ directory.”)


When you run this, you'll see a flurry of text in your console: agents "chatting," roles being performed, files being created. It's like watching a mini-IDE come alive, driven purely by AI dialogue. After some time, you'll find a new directory named `Warehouses/PasswordGeneratorApp` containing the Python script, `main.py`, and other project files. It's genuinely exciting to see!

### Real-World Use Cases: Where This Shines

So, beyond the "wow" factor, where can you actually use something like ChatDev?

1.  **Rapid Prototyping:** Need a quick REST API for a new microservice idea? A simple data processing script? Instead of spending hours on boilerplate, let ChatDev generate an initial draft. You can then refine it.
2.  **Learning & Experimentation:** Want to see different approaches to a problem? Ask ChatDev to build it. You get a working example, and you can reverse-engineer the code to understand its design choices.
3.  **Automating Trivial Utilities:** For those small, one-off scripts that aren't worth full-blown development but are too tedious to write manually, ChatDev can be a lifesaver.
4.  **Generating Boilerplate for Specific Stacks:** Need a barebones Flask app with a specific database integration? Or a simple React component? While it might not always be perfect, it's a fantastic starting point.

### Key Takeaways from My ChatDev Experience

*   **Multi-agent systems are the future:** For complex tasks, AI agents collaborating beat single-agent interactions hands down. It mirrors human team dynamics, leading to more robust and comprehensive solutions.
*   **Prompt engineering shifts:** Instead of prompting for code, you're "prompting" for a product description. Your job becomes more like a CTO or Product Owner, defining the vision rather than dictating the implementation details.
*   **Not a silver bullet (yet):** While incredibly powerful, ChatDev isn't going to replace human developers overnight. The generated code might need refinement, optimization, or security hardening. Human oversight is still crucial.
*   **It's an amazing learning tool:** Observing how the AI agents break down a problem, communicate, and build a solution offers fascinating insights into potential software engineering processes.

### Final Thoughts: The Future is Collaborative (Even with AI)

Diving into ChatDev has been an eye-opening experience. It’s a powerful testament to how AI, when properly orchestrated, can move beyond being just an assistant to becoming a genuine, if virtual, team member. It's not about making developers obsolete; it's about augmenting our capabilities, freeing us from the mundane, and letting us focus on the higher-level architectural and creative challenges.

If you're curious about the bleeding edge of AI in software development, I highly recommend giving ChatDev a spin. Set up your own little virtual software company, give it a challenge, and prepare to be amazed by what your AI team can build. The future of coding just got a whole lot more collaborative – even if your collaborators are lines of code themselves.

Happy coding (and orchestrating)!

---
*Found this insightful? Let me know your thoughts or experiences with multi-agent systems in the comments!*

Related Posts

@craft-ng: Associer l’art de la composition & du state management dans Angular

Quand je construis une feature Angular un peu sérieuse, je veux toujours la même chose:

  • une seule source de vérité
  • un flux de données clair
  • un code composable
  • une DX solide
  • et surtout une type-safety qui m’évite de jouer aux devinettes
  • des outils pour pensés pour simplifier l’UX/UI

C’est exactement l’objectif de @craft-ng.

Une lib complète de state management pour tous les types d’état d’une application:

  • client state: états locaux, listes, UI, sélection…
  • server state: chargement, cache, mutation, pagination, optimistic update…
  • URL state: query params synchronisés, type-safe, avec fallback

Des utilitaires prêts à l’emploi pour se rendre la vie plus facile.

Une approche Method-based ou Event-based pour s’adapter à tous les styles de code.

Qu’ils soient simples ou complexes, le principe reste toujours le même.

  1. Les « primitives », basées sur les signals, ont chacune leur rôle et portent un state et sa logique.
  2. Elles sont utilisables directement dans les composants et les services.
  3. Elles suivent toutes le même principe : primitive(config, insertion1, insertion2, …).
  4. Les insertions servent à ajouter de la logique (modifiers, réactions, états dérivés, method-based/event-based…).
  5. Ce pattern, combiné aux utilitaires de craft-ng insert…, permet d’obtenir un niveau inégalé de composition, offrant une gestion fluide aussi bien pour les cas simples que complexes.
  6. Un store craft est disponible pour orchestrer ces primitives. Il peut être composé par d’autres stores, et être lui-même composable.

Dans cet article, je vais:

  • présenter la structure commune des primitives
  • montrer comment exposer méthodes, état dérivés, et réagir à un événement via les insertions
  • donner un exemple concret pour chaque primitive
  • faire un tour rapide des insertions utiles
  • expliquer pourquoi source$ (event-based) change vraiment la façon de structurer le state
  • terminer avec injectService et le store craft

⚠️ @craft-ng est une librairie experimentale. Je ne recommande pas de l’utiliser en production pour le moment. Cet article est avant tout un partage des concepts.

La doc: https://ng-angular-stack.github.io/craft/

1) Une structure commune à toutes les primitives

Que tu utilises state, query, mutation, asyncProcess ou queryParam, la logique de composition reste la même:

  1. une configuration de base
  2. des insertions pour exposer des méthodes / des états dérives / des réactions
import { computed } from '@angular/core';

const counter = state(
  0, // config
  // insertion 1
  ({ set, update }) => ({
    increment: () => update((current) => current + 1),
    reset: () => set(0),
  }),
  // insertion 2
  ({ state }) => ({
    isOdd: computed(() => state() % 2 === 1),
  }),
);

counter.increment();
counter.isOdd();

Ce point est clé: tu n’apprends pas 5 APIs différentes, tu apprends un modèle mental unique.

2) Les primitives: fonctionnement + exemples concrets

Dans la pratique, chaque primtive apporte ses fonctionnalités qui lui sont propres, et le composant/service/store m’aide à les orchestrer.

state

state gère le client state synchrone.
C’est la base pour modéliser un état client, global ou local, le composer, et le spécialiser.

Combiné à insertSelect, le state devient redoutable pour gérer des structures imbriquées de manière fluide et type-safe.

type User = { id: string; name: string; selected: boolean };

const usersState = state(
  {
    filters: { search: '' },
    users: [] as User[],
  },
  insertSelect('filters', ({ set }) => ({
    set,
  })),
);

usersState.selectFilters().set('@craft-ng');

Ce que j’aime ici:

  • les méthodes suivent la structure du state
  • la lecture du code reste directe

Pourquoi avoir créé un state alors qu’il y a déjà les signals d’Angular ?

  • pour bénéficier du système de composition via les insertions
  • exposer les méthodes qui modifient l’état pour le rendre prédictif
  • encapsuler toute la logique qui lui est associée

mutation

mutation: sert a modifier (UPDATE/PUT/PATCH/DELETE) des données cote serveur.

Version méthode directe avec .mutate(...):

const updateUser = mutation({
  method: (payload: { id: string; name: string }) => payload,
  loader: async ({ params }) => {
    const response = await fetch(`/api/users/${params.id}`, {
      method: 'PATCH',
      body: JSON.stringify(params),
    });
    return response.json() as User;
  },
});

updateUser.mutate({ id: '42', name: 'Romain' });

On peut aussi les appeler en parallèle, avec des identifiers, pour gérer des cas plus complexes (cf. l’exemple dans full-demo).

Pourquoi avoir créé une mutation alors qu’il y a déjà les resources d’Angular ?

  • pour bénéficier du système de composition via les insertions
  • permettre des appels api en parallèle via les identifiers
  • retourner des craftException typés en cas d’erreur métier (ex: validation), pour ne pas perdre d’information et offrir la meilleure UX/UI à tes utilisateurs
  • peut s’appeler comme une méthode directe myMutationRef.mutate(...)

query

query: gère le server state (chargement, valeur, erreur, cache) et peut tourner en parallèle via identifier (ex: pour faire de la pagination).

C’est la primitive qui est faîte pour représenter une ressource distante, avec des utilitaires pour gérer le cache, les updates liés aux mutations, la pagination…

Avec insertPaginationPlaceholderData + insertReactOnMutation, on obtient:

  • une pagination fluide
  • des updates réactifs liés aux mutations (optimistic update/patch, auto reload).
  • moins de code impératif
import {
  insertPaginationPlaceholderData,
  insertReactOnMutation,
  mutation,
  query,
} from '@craft-ng/core';

const updateUser = mutation({
  method: (payload: { id: string; name: string }) => payload,
  loader: async ({ params }) => params,
});

const page = signal(1);
const usersQuery = query(
  {
    params: page,
    identifier: (page) => `${page}`,
    loader: async ({ params: currentPage }) =>
      fetch(`/api/users?page=${currentPage}`).then((r) => r.json()),
  },
  insertPaginationPlaceholderData,
  insertReactOnMutation(updateUser, {
    patch: {
      name: ({ mutationParams }) => mutationParams.name,
    },
  }),
);

Pourquoi avoir créé une query alors qu’il y a déjà les resources d’Angular ?

  • pour bénéficier du système de composition via les insertions
  • permettre des appels api en parallèle via les identifiers
  • retourner des craftException typés en cas d’erreur métier (ex: validation), pour ne pas perdre d’information et offrir la meilleure UX/UI à tes utilisateurs

asyncProcess

asyncProcess est idéal pour des traitements async qui ne sont pas strictement des queries/métiers CRUD (debounce, wrappers API natives, orchestration).

import { asyncProcess } from '@craft-ng/core';

const delaySearch = asyncProcess({
  method: (term: string) => term,
  loader: async ({ params: term }) => {
    await new Promise((resolve) => setTimeout(resolve, 250));
    return term;
  },
});

delaySearch.safeValue(); // undefined
delaySearch.status(); // 'idle'
delaySearch.method('@craft-ng');
delaySearch.status(); // 'loading' -> after 250ms -> 'resolved'
delaySearch.safeValue(); // '@craft-ng'

Pourquoi avoir créé un asyncProcess alors qu’il y a déjà les resources d’Angular ?

  • permet de profiter du système de composition via les insertions
  • retourner des craftException typés en cas d’erreur métier

queryParam

queryParam synchronise l’état avec l’URL, tout en restant type-safe (parse/serialize/fallback).

import { queryParam } from '@craft-ng/core';

const tableParams = queryParam(
  {
    state: {
      page: {
        fallbackValue: 1,
        parse: (v) => parseInt(v, 10),
        serialize: (v) => String(v),
      },
      search: {
        fallbackValue: '',
        parse: (v) => v,
        serialize: (v) => v,
      },
    },
  },
  ({ patch, reset }) => ({ patch, reset }),
);

tableParams.patch({ page: 2 });

Pourquoi avoir créé un queryParam alors qu’on peut utiliser withComponentInputBindingpour récupérer un query param dans un input ?

  • queryParam peut être utilisé dans un service providé au niveau du composant
  • possède une valeur de fallback en cas de non présence du query param ou d’une valeur invalide
  • permet de modifier ce query param via les insertions
  • profite du système de composition via les insertions
  • permet de retourner des craftException typés en cas d’erreur métier au parse d’un query param

Exemples de la doc qui m’ont inspiré

Si tu veux voir des versions plus complètes des patterns présentes ici, je te conseille particulièrement:

  • les exemples primitives (query, mutation, full demo): https://ng-angular-stack.github.io/craft/examples
  • l’approche list-with-pagination pour visualiser insertPaginationPlaceholderData en contexte
  • les exemples Pixel Art / Pixel Art Matrix pour voir insertSelect sur des structures plus profondes
  • la section exceptions pour les cas métier avec erreurs type-safe, pour ne pas perdre d’information et offrir la meilleure UX/UI à tes utilisateurs

Ces exemples m’ont servi de base pour structurer les snippets de cet article.

3) Exposer des méthodes et état dérivé avec les insertions (Method-based)

Tu peux partir simple, puis enrichir sans casser le contrat initial.

Method-based insertions

import { state } from '@craft-ng/core';
const counter = state(0, ({ update, set }) => ({
  increment: () => update((current) => current + 1),
  decrement: () => update((current) => current - 1),
  reset: () => set(0),
}));
console.log(counter()); // 0
counter.increment();
console.log(counter()); // 1
counter.reset();
console.log(counter()); // 0

Source-based insertions (Event-based)

import { source$, state, on$ } from '@craft-ng/core';

const incrementTrigger$ = source$<void>();
const resetTrigger$ = source$<void>();
const counter = state(0, ({ set }) => ({
  increment: on$(incrementTrigger$, () => set((v) => v + 1)),
  reset: on$(resetTrigger$, () => set(0)),
}));
console.log(counter()); // 0
incrementTrigger$.emit();
console.log(counter()); // 1
resetTrigger$.emit();
console.log(counter()); // 0

Créer de la logique réutilisable est très simple

Tu peux extraire une insertion dans une fonction custom et la rebrancher partout:

const counter = state(0, (context) => myCustomFn(context));

Implémentation simple (dans cet esprit):

const myCustomFn = ({
  update,
  set,
  state,
}: {
  update: (updater: (v: number) => number) => void;
  set: (value: number) => void;
  state: Signal<number>;
}) => ({
  increment: () => update((current) => current + 1),
  decrement: () => update((current) => current - 1),
  reset: () => set(0),
  isOdd: computed(() => state() % 2 === 1),
});

const myState = state(0, (context) => myCustomFn(context));

myState.increment();
myState.isOdd();

Pour les cas plus poussés, j’étudie différents patterns pour que ca reste aussi simple que possible cote API et usage.

4) Tour rapide de quelques insertions utiles

insertPaginationPlaceholderData (query)

Pour garder les donnees de la page precedente pendant le chargement de la suivante.
Resultat: UX plus fluide, moins de flicker.

insertReactOnMutation (query)

Pour synchroniser automatiquement le cache query avec le resultat d’une mutation (patch/optimistic/reload selon le besoin).

insertLocalStoragePersister (state/query/asyncProcess)

Pour persister et rehydrater automatiquement avec localStorage.
Tres utile pour garder l’état entre sessions.

insertEntities (state)

Pour manipuler des collections avec des utilitaires prets a l’emploi (add, set, update, remove, upsert…), en restant type-safe.

insertSelect (state)

Pour cibler un sous-arbre d’état et exposer des méthodes/dérives au bon endroit.
Hyper utile sur des structures imbriquées. (Prochainement disponible)

5) Pourquoi source$ est un vrai levier d’architecture

source$ est l’outil que j’utilise pour garder des states granulaires sans perdre la simplicite d’orchestration.

Cela correspond grosso-modo à un subject dans RxJS.

Cas 1: plusieurs states réagissent au même événement

Au lieu d’un gros state qui gère tout, plusieurs states petits et lisibles peuvent réagir au même trigger.

import { on$, source$, state } from '@craft-ng/core';

const resetFilters$ = source$<void>();

const search = state('', ({ set }) => ({
  set,
  reset: on$(resetFilters$, () => set('')),
}));

const page = state(1, ({ set }) => ({
  set,
  reset: on$(resetFilters$, () => set(1)),
}));

resetFilters$.emit();

Ca donne:

  • responsabilités claires
  • meilleure DX
  • flux de mise à jour plus facile à raisonner

Et surtout: tu peux commencer avec une méthode exposée, puis migrer vers une réaction on$ sans rearchitecture lourde.

Cas 2: state imbriqué + insertSelect

Dans des structures profondes, insertSelect permet d’associer des méthodes et des états dérivés à une niveau plus profond.
Parfois, j’utilise source$ à un haut niveau, puis je réagis à cette source$ depuis des niveau imbriqués.
Cela me permet de modifier l’état au plus proche de l’endroit où il est modifié.

Pour les states complexes avec des imbrications, le modèle mentale devient plus souple et plus facile à raisonner.

Cas 3: event-driven (et pont avec Observable)

source$ + on$ permettent de réagir à des événements, y compris depuis un Observable.
Pour ceux qui aiment l’event-driven, c’est très naturel.

Et si tu veux rester dans un style state-driven et réagir à des changements d’état, il y a aussi:

  • reactiveWritableSignal

Dans cet exemple, ce me permet de créer un linkedSignal, qui réagit à des changements d’états de d’autres signals.
Cela me permet retirer les ids qui ont été supprimés de la sélection, sans devoir faire du code impératif pour écouter les changements de page et de suppression.

const selectedIds = reactiveWritableSignal([] as string[], (sync) => ({
  resetWhenCurrentPageIsResolved: sync(
    users.currentPageStatus,
    ({ params, current }) => (params === 'resolved' ? [] : current),
  ),
  resetWhenBulkDeleteIsResolved: sync(
    bulkDelete.status,
    ({ params, current }) => (params === 'resolved' ? [] : current),
  ),
})); // WritableSignal<string[]>
  • afterRecomputation : qui déclenche son callBack si le résultat de sa source n’est pas undefined.
  • toSource: transforme un signal en source. La première lecture d’une source renverra toujours undefined, puis dès que la source change, le résultat sera synchronisé.

6) La philosophie continue avec injectService

injectService permet de construire une facade typée au-dessus d’un service Angular .
Tu exposes uniquement ce qui est utile au cas d’usage, tu dérives proprement, et tu gardes la maitrise de l’API publique.

import { computed } from '@angular/core';
import { injectService } from '@craft-ng/core';

const checkout = injectService(
  CheckoutService,
  ({ cart, total, submitOrder }) => ({
    total,
    itemCount: computed(() => cart().length),
    submit: submitOrder,
  }),
  ({ insertions }) => ({
    canSubmit: computed(() => insertions.itemCount() > 0),
  }),
);

checkout.canSubmit();

7) Et au-dessus: le store craft

La lib expose aussi un store craft, toujours basé sur la composition, la type-safety et le découplage.
Tu peux composer states, queries, mutations, sources, inputs et query params dans une architecture cohérente, sans perdre le contrôle fin.

Plus de détails dans un prochain article, sinon il y a la doc ;D

Conclusion

Si je devais résumer @craft-ng en une phrase:
composer des briques simples pour gérer des logiques complexes, sans quitter un modèle déclaratif/reactif/type-safe.

Et la lib ne s’arrête pas là.
A l’heure où j’écris cet article, d’autres utilitaires arrivent dans la même philosophie.

Le prochain utilitaire, si je devais n’en partager qu’un :

  • un formulaire à la pointe de la technologie (en plus de tout ce que permet le signal form d’Angular):
    • création de formulaire en parallèle
    • intégration avec les autres primitives (pour le submit, et les validations asynchrones)
    • gestion fine des erreurs (validation, submit, async validators), tout est inféré, permettant d’avoir la liste exhaustive des erreurs associées à un champ.
    • Gestion de la logique interdépendante grâce aux mécanismes de composition offerts par la lib.

(Actuellement, j’ai un wrapper du signalForm, mais j’ai 2 cas qui sont impossibles à gérer. J’attends un peu de voir si Angular permet d’étendre le signalForm, ou si je dois faire une implémentation custom pour garder la philosophie de composition et de type-safety.)

N’hésite pas à aller voir la doc ou à mettre une étoile sur le repo si tu veux suivre l’évolution de la lib, ou à me faire un retour si tu as des idées d’amélioration !

Je suis Romain Geffrault.
Développeur Angular et créateur de @craft-ng
Suis-moi pour plus de contenu sur Angular

Docs: https://ng-angular-stack.github.io/craft/

🔬 3D Science Lab — Interactive 3D STEM Education with 40+ Experiments Built Using Next.js and Three.js

Making Science Interactive

Traditional science education relies on static textbook diagrams and 2D illustrations. But science happens in three dimensions. I built 3D Science Lab to make STEM education immersive — allowing students to interact with experiments in 3D, rotate models, zoom in on details, and truly understand the science behind what they see.

What is 3D Science Lab?

3D Science Lab is an interactive web platform featuring 40+ 3D science experiments across four core disciplines:

  • Physics — mechanics, optics, waves, electricity
  • Chemistry — molecular structures, reactions, periodic table in 3D
  • Biology — cell structures, organ systems, DNA
  • Mathematics — geometric shapes, functions, calculus visualizations

Key Features

🧪 40+ Interactive Experiments

Each experiment is fully interactive — drag, rotate, zoom, and manipulate to explore scientific concepts hands-on.

🎮 Immersive 3D Rendering

Built with Three.js and React Three Fiber, the platform delivers smooth, WebGL-powered 3D graphics directly in the browser. No downloads, no plugins.

📱 Responsive Design

Works on desktop, tablet, and mobile. Science class shouldn’t require a specific device.

⚡ Fast Performance

Optimized rendering pipeline ensures smooth 60fps interactions even with complex 3D models.

Tech Stack

  • Framework: Next.js 15
  • 3D Engine: Three.js + React Three Fiber
  • Language: TypeScript
  • Animation: Framer Motion
  • UI Controls: Leva
  • Post-processing: React Three Postprocessing

Live Demo

🔗 3D Science Lab — Explore experiments now

Why It Matters

Studies show that interactive 3D learning improves retention by up to 80% compared to traditional 2D methods. 3D Science Lab brings this capability to every student with a browser — no expensive lab equipment needed.

*Built by Rudra Sarker — Open Source Developer

Connect: X/Twitter | LinkedIn | GitHub

ça ressemble à quoi, mon setup Claude Code ?

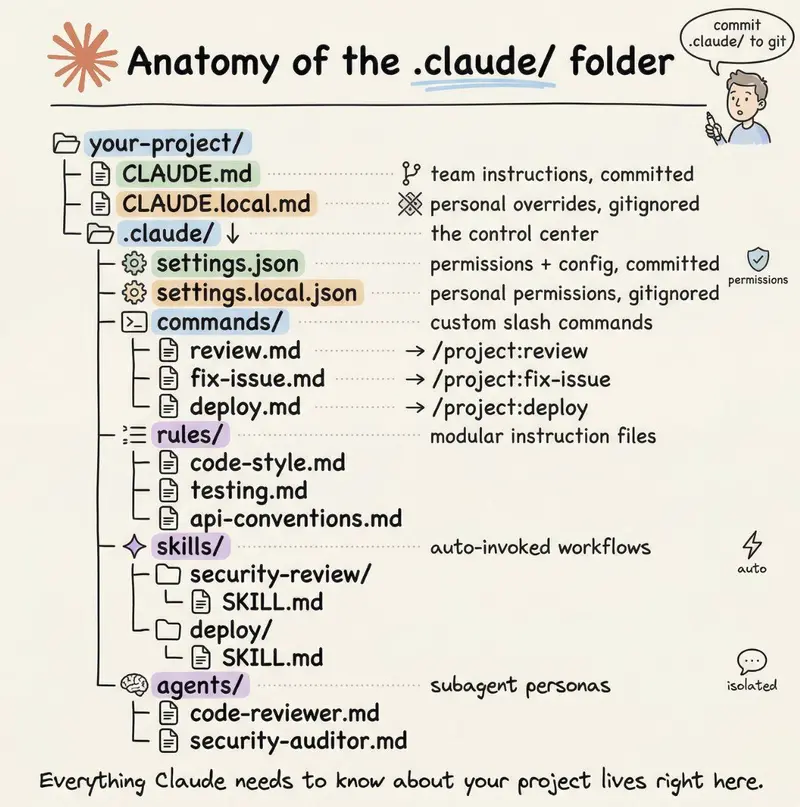
Anatomy of the .claude/ folder

Dans ma veille, je vois passer beaucoup de guides de setup avec 18.000 skills et 5000 hooks pour répondre à tous les besoins mais peu de REX de setup en situation réelle.
Pendant ce temps, les collègues ont vu la lumière et basculent vers Claude Code et … se perdent dans les possibilités.
J’ai décidé de vous montrer mon setup Claude Code — c’est ce qui tient après 6 mois, et dans quel ordre je l’aurais fait si c’était à refaire.

Pendant 6 mois, j’ai configuré et joué sur plusieurs paramètres (claude.md, config MCP, settings, skills). J’ai repris plein de bonnes idées de @florian Brugniaux qu’il a stockées dans son (claude code ultimate guide.
4 organisations séparées, ~12 repos et des contextes hétérogènes entre le pro et le perso : infra Terraform, blog, 2e cerveau.

Profil archi technique, pas un profil dev — vous verrez des usages infra, editorial, veille, peu de code pur.

Table des matières

  1. La configuration préalable du poste
  2. Quelle configuration de Claude a été mise en place et où ?
  3. Agent schedulé
  4. Repo par repo
  5. L’heure du bilan
  6. Conclusion

1. La configuration préalable du poste

Avant de configurer quoi que ce soit, le poste a besoin d’une base.
Vos skills notamment vont réclamer plein d’outils et … vous le découvrirez quand vous vous en servirez.

C’est un manque actuellement de ne pas avoir les prérequis à une skill et/ou un agent

Voici un extract de que qui a été installé en tools et pourquoi :

Outil Pourquoi
git + gh Manipuler git et GitHub depuis le terminal — remplace le MCP GitHub sans le moindre regret
jq Requis par RTK
python3 + pip Claude Code génère régulièrement des scripts Python — mieux vaut l’avoir d’emblée
nvm + Node 20 Prérequis pour installer et faire tourner les MCP servers en npm/npx
agent-browser CLI de navigation web — plus souple que Playwright CLI, moins consommateur que les MCP browser
pandoc + libreoffice Prérequis des skills docx / pptx / pdf
RTK Proxy token-killer : réécrit les commandes verboseuses transparentement, économies sur les tokens de sortie
Tabby Terminal avec onglets paramétrables et split d’écrans en plus — devenu mon terminal fétiche
Extension Claude Code (VS Code) Plugin Claude Code dans l’IDE

2. Quelle configuration de Claude a été mise en place et où ?

La configuration de Claude impose de se projeter sur l’organisation et les permissions/hooks/skills/… que l’on veut configurer et à quel niveau.
Soit en général (le settings.json et le settings.local.json de l’organisation), soit par projet.

L’anatomie du dossier ~/.claude/ global

Claude Code hérite et compose trois niveaux de configuration :

~/.claude/settings.json            → global
<org>/.claude/settings.local.json  → organisation
<projet>/CLAUDE.md                 → projet

La couche organisation reste pour l’instant vide (à travailler quand on sera en Claude Enterprise)

settings.json : déterministe vs inférentiel

settings.json est déterministe : si git push --force est dans la deny list, l’opération est physiquement impossible. Le modèle ne peut pas l’exécuter, quoi qu’il arrive.

CLAUDE.md est porté par l’inférence : l’agent lit les instructions et fait de son mieux pour les respecter.
Mais “De son mieux” n’est pas une garantie : Une règle dans CLAUDE.md peut être mal interprétée, oubliée en fin de contexte, ou contredite par une instruction conversationnelle.

Conséquence pratique : tout ce qui est critique ou irréversible va dans settings.json. Le reste va dans CLAUDE.md.

{
  "permissions": {
    "deny": [
      "Bash(git push --force*)",
      "Bash(git reset --hard*)",
      "Bash(git branch -D*)"
    ]
  }
}

Hooks globaux

La différence avec la deny list : settings.json bloque les patterns de commandes connus à l’avance. Les hooks inspectent le contenu réel de ce qui va être exécuté.

Trois hooks en place, extraits du Claude Code Ultimate Guide :

dangerous-actions-blocker.sh — couvre les commandes destructives (rm -rf, fork bomb, DROP TABLE), le force push sur main/master, l’édition des fichiers sensibles (.env, clés SSH, credentials), et avertit sur toute suppression de fichier.

security-check.sh — bloque toute commande Bash contenant des patterns de secrets (password=, api_key=, sk-xxxxx). Deuxième couche après la blocklist git.

rtk-auto-wrapper.sh — réécrit automatiquement les commandes verboseuses (git log, git diff, cargo test…) vers leurs équivalents rtk. Transparent pour l’agent, 60-90% d’économies sur les tokens de sortie.

MCP globaux

Toujours dans le settings.json, j’avais déclaré 3 serveurs MCP — disponibles dans tous les projets sans configuration par repo.

github — accès à l’API GitHub.
Devenu superflux en pratique : gh fait tout aussi bien depuis le terminal, et Claude Code l’utilise nativement. À retirer.

context7 — documentation à jour des librairies.
Utile ponctuellement quand on touche une stack peu familière et qu’on veut éviter les hallucinations de versions obsolètes. Usage au besoin, pas systématique.

puppeteer — browser headless Chrome.
Pratique mais remplacé depuis par le CLI agent-browser, plus souple et mieux intégré dans les workflows Claude Code. A retirer.

MCP de Claude.ai :

Slack — connecteur Slack (pour se connecter à Slack, pratique quand on a un Slack gratuit, ça permet d’extraire des infos intéressantes facilement)

Excalidraw — génération et édition de schémas visuels directement depuis Claude Code.

Mermaid Chart — production de diagrammes textuels (flowcharts, séquences, entités) intégrable en format markdown.

Skills et Plugins globales

Les skills sont des procédures configurées au global et réutilisables entre projets.

Vous pouvez télécharger des Skills existantes et les déposer dans ce répertoire pour les installer

Les plugins Skills sont des lots de skills proposés sur un marketplace et installables dans un contexte donné :

  • Install for you (users scope) préconisé pour plugin global
  • Install for all collaborators on this repository (project scope)
  • Install for you, in this repo only (local scope)
    Ils s’installent dans claude code (via la commande /plugin)

Les plugins que j’ai installés et conservés :
superpowers le plugin PowerTools de Claude Code 🙂 link
Utilisé de manière plutôt transparente, il surperforme les actions de Claude Code :
• Commands: execute-plan, brainstorm, write-plan
• Agents: code-reviewer

document-skills
doc-coauthoring, mcp-builder, skill-creator (pour créer des skills et des MCP)
docx , pdf, pptx, xlsx (pour gérer les fichiers office, lecture, création et modifications)

Ces plugins m’ont permis de ne pas avoir besoin de créer trop de skills spécifiques et sont maintenus par Anthropic.

  • 2 skills persos.

save-config — git add / commit / push de tout ~/.claude/ vers un repo GitHub privé. Versionner sa config Claude Code comme du code. Utile avant de modifier des hooks ou des CLAUDE.md globaux. Work in progress : il manque le restore config

document-organizer — tri et déplacement de fichiers (du dossier Téléchargements en bordel) vers leurs destinations (NAS ou local). Utilisé avec la commande /trier.

CLAUDE.md vs /commandes vs agents

Une nuance qui explique que j’ai aussi peu de commandes custom : il y a trois façons d’exposer des procédures à l’agent.

Les prompts dans CLAUDE.md sont contextuels — l’agent les lit et peut les appliquer selon son interprétation. Flexible, mais pas garanti.

Les /commandes réelles (fichiers dans .claude/commands/) sont des procédures fixes — l’agent les exécute telles quelles, sans interprétation. Utile pour les workflows critiques où la reproductibilité prime.

Les agents (fichiers dans .claude/agents/) sont des sous-processus avec leur propre contexte, leurs propres outils, leur propre modèle. Le pattern le plus utile : L’agent orchestre un ensemble de skills pour atteindre un objectif, chacune de ces skills effectuent une action technique précise.

Les custom commands (.claude/commands/) deviennent finalement peu utilisées en pratique — la plupart des procédures trouvent leur place dans le CLAUDE.md ou dans la déclaration d’agents qui consomment peu de tokens.

3. Agent schedulé

DevwithIA produit beaucoup de contenu — canaux actifs, threads, partages de ressources. Pas toujours le temps de tout lire.

Du coup, j’ai créé un remote trigger qui tourne chaque matin à 8h30 sur claude.ai :
En sandbox uniquement connecté aux MCP de claude.ai, l’agent lit tous les canaux, résume l’activité des dernières 24h et m’envoie un DM Slack avec le contenu des jours précédents.

Ce qui distingue ce setup d’un simple cron en local : l’agent vit entièrement dans le cloud Anthropic. Localement, j’ai conservé la configuration du trigger ID afin de le retrouver.

Une limite à connaître : ces agents ne peuvent pas faire d’appels HTTP directs vers des APIs externes. Pas de webhook custom, pas d’email via Resend. Uniquement les connecteurs MCP approuvés (Slack, GitHub…). Découvert en essayant d’envoyer un résumé par email — le proxy egress du sandbox bloque le trafic sortant vers des tiers.

Note: ce remote trigger impose d’utiliser un MCP dans claude.ai. On va le retrouver configuré pour Claude code donc pas nécessaire d’installer un plugin en plus

4. Repo par repo

Chaque folder (repo) peut aussi accueillir une configuration dédiée.
Il est recommandé de versionner ce répertoire .claude/ spécifique au projet.

3 Etapes :

  • créer un repository vide
  • git clone
  • dans le répertoire, claude puis /init ou copie-colle du CLAUDE.md
  • prompt 1 “configure le .gitignore et versionne le répertoire .claude”
  • prompt 2..n : “installe la skill / command / à partir de l’URL <…>”

Anatomy of the .claude/ folder

Blog éditorial

Problème : Un repo qui a commencé comme simple espace de rédaction d’articles, et qui a grandi : récolter les idées qui me passent par la tête, créer des bases de savoir, et pouvoir générer des livrables sous formes multiples (articles, docs, REX, talks).
Maintenir une cadence LinkedIn régulière demandait des relectures systématiques — pas une fois sur deux selon la fatigue du jour.
Et chaque session recommençait à zéro : expliquer le pipeline, rappeler le ton attendu, préciser la cible.

Solution : CLAUDE.md éditorial complet (200lignes) — pipeline idée → knowledge → output, familles de contenu, guide de style avec anti-patterns IA nommés et justifiés, session start ritual avec choix de phase (idée, knowledge, output).

Deux prompts de review nommés :

Review Article : persona journaliste expérimenté.
Focus : hook (2 lignes ?), exemples concrets vs abstractions,
ton (praticien vs promotionnel), comptage vs cible LinkedIn, qualité du CTA.

Review Lecteur : lecteur saturé du contenu IA générique.
Scoring /10 sur 4 axes : rigueur argumentaire, qualité sources,
professionnalisme du ton, précision des données.

Le scoring /10 reste aussi pratique pour mesurer la progression (ou récession).

le setup étant gros, contactez-moi si vous voulez le contenu

Lab Scaleway / infra

Problème : Un lab infra en cours, avec deux besoins parallèles : écrire un REX publiable ET conserver une doc technique précise des choix, des décisions, des problèmes rencontrés. Et pour être probant — montrer que l’IA a vraiment été utilisée sur un projet réel — il fallait des traces : durée des sessions, nombre d’itérations, complexité des opérations. Sans ça, “j’ai fait ça avec Claude Code” reste invérifiable.

Solution : Hooks PostToolUse et SessionEnd qui journalisent chaque appel d’outil dans des fichiers Markdown horodatés. Commande Bash exécutée, fichier écrit, fichier édité — tout est loggué dans un sous-répertoire du repo ia-logs/.
Cela apporte une observabilité native des sessions sur un repo où les erreurs ont des conséquences réelles.

Deux personas de review dans le CLAUDE.md : un ingénieur senior et un speaker de conférence — pour relire la doc technique avec deux angles différents.

Thinking — le 2e brain perso

Problème : Des projets personnels sans code — refonte de CV, tri de 15 ans de photos sur un NAS et deux comptes Onedrive, recherche d’une maison.
Des sujets hétérogènes, des besoins ponctuels, chacun avec son contexte propre à ne pas réexpliquer à chaque session.

Solution : Un répertoire thinking/ structuré comme un 2e cerveau, avec un CLAUDE.md par domaine. Le principe est le même que pour les repos code : poser la problématique une fois, travailler en équipe avec l’IA, développer des stratégies adaptées au besoin.

thinking/jobs/ — refonte du CV et analyse d’adéquation CV/annonce. Le CLAUDE.md contient un persona /headhunter complet : chasseur de tête IT senior, formulations types, cas d’usage. Plutôt que d’expliquer le rôle attendu à chaque fois, il est encodé une fois et activé à la demande.

thinking/IT/ — au départ pour les sujets IT, il a porté surtout un sujet de tri de photos NAS + OneDrive sur deux comptes sans perte. Les règles métier sont dans le CLAUDE.md : déplacer vers _trash/ plutôt que supprimer, scripts idempotents, chemins via variables d’environnement.
Et surtout, Claude ne fait que fournir les commandes, c’est moi qui les exécute.

thinking/maison/ — plusieurs sujets immobiliers : scraping d’annonces, comparaison de biens, stratégies de recherche. Le CLAUDE.md conserve le contexte après la fin d’un projet — mémoire de ce qui a été fait, pour ne pas repartir de zéro si le sujet reprend. Faire une liste excel à partir des pdf des différentes annonces (merci les skills pdf et xlsx 🙂

thinking/orga/ — ici, un truc tout bête : reposer l’organisation de la semaine pour en créer des évènements à rajouter dans un agenda Google. Du one-shot pour générer des fichiers .ics avec la récurrence nécessaire pour Google Agenda.

thinking/voiture/ — Calcul de TCO global et comparatif de scénarios entre thermique, EV, hybride. Donc recherche sur Internet sur les différents modèles avec consommation, prix, moteur, et création d’un xlsx de comparaison.

5. L’heure du bilan

Ce qui fonctionne bien

Le digest Slack automatisé chaque matin est appréciable pour repérer ce que je ne dois pas rater dans le slack.
Les “skills” de review restent pour moi utiles pour leurs retours et critiques, même si c’est facile de craquer avec ces avis qui deviennent parfois contraires entre les sessions.
Les sessions du lab génèrent bien des logs de sessions de manière automatique.

Et ces skills docx/pptx sont une super découverte : Elles vous permettent de travailler en markdown versionné puis de de créer rapidement et sans trop d’efforts un doc/ppt Office.

Enfin, le 2e cerveau, c’est peut-être ce qui m’impacte le plus sans que je réalise vraiment :
Entre ce thinking/ pour les projets perso et le blog pour les idées tech, ma charge mentale s’est allégée.

Moins de Post-it mentaux à garder en tête et plus d’espace pour penser.
(mais du coup, hop une nouvelle idée, vite, claude, mon dieu cela ne s’arrêtera pas)

Ce qui m’irrite encore

L’aide à la rédaction de l’IA ramène toujours aux mêmes éléments de ton et de style rédactionnel. Et ce style “formaté IA”, c’est insupportable pour moi.
Vraiment, sur un petit bout de texte, c’est bien. Mais lui demander de réécrire un article, ça peut virer au cauchemar.

En plus, les skills d’amélioration rajoutent beaucoup de verbose dans les fichiers de configuration. Donc si à chaque erreur, Claude décide de rajouter une règle, ça empile et ça empire. A force, je trouve que cela dégrade les performances des réponses.

Enfin, je n’ai pas encore trouvé comment partager entre 2 ordinateurs un repo commun avec une configuration de Claude code globale (le blog sur lequel je travaille aussi sur mon temps perso). Je perds systématiquement la memory qui est stockée dans le ~/.claude et pas dans le projet.
Vous avez vu la skill save-config qui tente déjà de sauvegarder, reste à restaurer maintenant 🙂
En environnement d’entreprise, je partirais sur des solutions plus robustes comme Packmind par exemple.

Ce qui manque encore

Je ne systématise pas encore le Plan Mode (/plan, lecture seule avant toute opération lourde).
Alors que pourtant j’applique un process “spec->plan->ask”.
Je lui demande de “planifier avant d’agir” mais ça reste une instruction, pas une contrainte technique.
/plan rend l’agent physiquement incapable d’écrire pendant la phase d’exploration. Ce ne sont pas deux façons équivalentes de faire la même chose.

Les rules/ (fichiers d’instructions modulaires, réutilisables entre projets) ne sont pas encore utilisées. Je ne vois pas encore comment elles peuvent fonctionner et ce qu’elles peuvent apporter.

6. Conclusion

Voici un point d’entrée concret (setup et usage) :
De quoi voir par vous-même si les enthousiastes de l’IA ont raison — ou pas.

Et vous, au fait, vous avez quoi comme setup Claude Code ?

I Turned helix-agent into helix-agents: One MCP Server for Ollama, Codex, and OpenAI-Compatible Models

If you use Claude Code heavily, you eventually hit the same wall:

  • some tasks are cheap enough for local models
  • some tasks want a stronger coding agent
  • some tasks are better sent to an API model

But many MCP servers still force one provider and one execution style.

So I evolved helix-agent into helix-agents.

It now lets Claude Code delegate work across:

  • ollama
  • codex
  • openai-compatible

from one MCP server.

What changed

The original project was focused on one thing: sending routine work to local Ollama models with automatic routing.

The new version keeps that path, but adds:

  • multi-provider switching
  • Codex-backed code delegation
  • OpenAI-compatible chat API support
  • Claude Code-style background agents

Under the hood, the runtime now supports two different delegation styles:

  • a built-in ReAct loop for ollama and openai-compatible
  • an autonomous Codex-backed path for repo-heavy work

That means the workflow is no longer:

Claude Code -> one tool call -> one reply

It can now be:

Claude Code
  -> spawn a worker
  -> send follow-up instructions
  -> wait for completion
  -> inspect and close

Why this matters

Different providers are good at different things.

  • ollama: local reasoning, low-cost drafts, vision
  • codex: code-heavy implementation and repo work
  • openai-compatible: hosted chat models behind standard APIs

Instead of wiring three separate MCP servers with different interaction models, I wanted one consistent runtime.

New tools

Core tools:

  • think
  • agent_task
  • see
  • providers
  • models
  • config

Background agent tools:

  • spawn_agent
  • send_agent_input
  • wait_agent
  • list_agents
  • close_agent

Example flows

1. Code review via Codex

think(
  task="Review this diff for regressions",
  provider="codex",
  cwd="/repo"
)

2. Local summarization via Ollama

think(
  task="Summarize this build log",
  provider="ollama"
)

3. Persistent investigation worker

spawn_agent(
  description="Investigate flaky tests",
  provider="codex",
  agent_type="explorer"
)

Then:

send_agent_input(...)
wait_agent(...)
close_agent(...)

Setup

git clone https://github.com/tsunamayo7/helix-agent.git
cd helix-agent
uv sync
uv run python server.py

Add to Claude Code:

{
  "mcpServers": {
    "helix-agents": {
      "command": "uv",
      "args": ["run", "--directory", "/path/to/helix-agent", "python", "server.py"]
    }
  }
}

Notes

  • Codex requires codex on PATH
  • OpenAI-compatible mode requires an API key
  • The generic OpenAI-compatible path is currently text-first
  • Vision is currently centered on the Ollama path

GitHub: helix-agent

Ollama Just Got Stupid Fast on Mac and Nobody Is Talking About What This Actually Means

So Ollama dropped version 0.19 yesterday and I genuinely think most people are sleeping on how big this is. They rebuilt the entire Mac backend on top of Apple’s MLX framework and the speed numbers are kind of absurd. Were talking 1,851 tokens per second on prefill and 134 tokens per second on decode. If those numbers dont mean anything to you, let me put it this way — thats roughly twice as fast as the previous version. On the same hardware. Same model. Just better software underneath.

I’ve been running local models on my MacBook for months now and the experience has always been this weird mix of “wow this actually works” and “ok why is it taking 15 seconds to start responding.” That second part just got obliterated. The time to first token improvement alone changes how it feels to use coding agents locally. When you’re running something like Claude Code or OpenCode through Ollama and it responds in under a second instead of making you wait, that’s not just a benchmark win, thats a workflow win. The kind of thing that makes you stop reaching for the API and start trusting your local setup.

Heres the deal with what they actually did. Apple has this machine learning framework called MLX that was built specifically for their unified memory architecture. If you’re on Apple silicon, your CPU and GPU share the same memory pool, which means you dont have the overhead of copying data back and forth like you do on traditional setups. Ollama was previously using llama.cpp under the hood, which is great and battle-tested, but it wasnt taking full advantage of what Apple’s chips can actually do. MLX does. And now Ollama sits on top of it.

The M5 chips get an extra bonus too because Ollama can now tap into the GPU Neural Accelerators that Apple added. So if you’re on an M5 Pro or M5 Max, the performance gap compared to older silicon is even wider. But even on M4 hardware the improvement is real, people on the Hacker News thread are reporting noticeably faster responses on their existing machines after updating.

Theres another thing they shipped that nobody seems to be talking about which is NVFP4 support. This is NVIDIAs 4-bit floating point format for quantization and its kind of a big deal for a subtle reason. Most cloud inference providers are starting to use NVFP4 because it gives you better accuracy than integer quantization at similar memory savings. So when Ollama supports it locally, you’re getting results that match what you’d get from a production API endpoint. Same quantization format means same model behavior. That matters a lot if you’re developing something locally and deploying to cloud, because now your local testing environment actually matches production instead of being some approximation.

The caching improvements are honestly what I’m most excited about though. If you’re using Ollama with coding agents you know the pain of repeated system prompts eating into your context and slowing things down. The new version reuses cache across conversations and stores snapshots at smart points in the prompt so when you branch off or start a new conversation with the same tools, it doesnt have to reprocess everything from scratch. For agentic workflows where you might have 15 tool calls in a single session, this adds up fast.

Ok so the honest downside — you need 32GB of unified memory minimum to run this well. Thats the recommened spec from Ollama themselves. If you bought the base model MacBook Air with 16GB or even 24GB, you’re prob not going to have a great time running the bigger models they’re showcasing like Qwen 3.5 35B. This is one of those things where Apple’s upselling on RAM at purchase time actually matters for real workloads, not just having 47 Chrome tabs open.

The Hacker News discussion was interesting because there’s a legitimate debate happening. Some people pointed out that Ollama’s Go wrapper historically added like 20-30% overhead compared to running llama.cpp directly. With the MLX switch that comparison changes completely because the bottleneck was never really the wrapper, it was the inference backend not using the hardware properly. A few users benchmarked it and the raw MLX performance through Ollama is genuinely close to running MLX directly. Thats impressive engineering.

What I think this actually means for the broader AI dev space is something that’s been building for a while now. Local inference is becoming legitimate. Not just “oh cool I can chat with a model offline” legitimate, but “I can run my entire coding agent stack without an API key” legitimate. When you combine fast local inference with the fact that open source models like Qwen 3.5 and Llama are getting scary good, the calculus on whether you need a cloud API subscription starts shifting real fast. I run AI agents all day and honestly the only reason I still hit cloud APIs for some tasks is latency and context length. The latency gap just got a lot smaller.

For anyone who wants to try it, the setup is dead simple. Download Ollama 0.19 from their site, run ollama run qwen3.5:35b-a3b-coding-nvfp4 and you’re off. They specifically tuned the sampling parameters for coding tasks on this model which is a nice touch. If you’re already using Ollama, just update and everything switches to the MLX backend automatically on Mac. No config changes needed.

I think we’re going to look back at 2026 as the year local AI stopped being a hobby project and started being a real alternative to cloud inference for actual work. Between Apple making unified memory mainstream, NVIDIA pushing better quantization formats, and projects like Ollama making it all accessible through a single command, the pieces are falling into place faster than most people realize. Your MacBook is becoming an AI workstation and thats not hype, thats just what the benchmarks show.

I Added Log Aggregation to My EKS Observability Stack, Metrics + Logs in One Dashboard

Loki

Last week I built an observability stack with Prometheus, Grafana, and custom alerting on EKS. The LinkedIn post got more engagement than anything I’d posted before, and two comments suggested the same thing: “Integrate Loki for logs.”

They were right. Metrics tell you that something is wrong. Logs tell you why. Without both in the same place, you’re switching between kubectl logs and Grafana dashboards trying to correlate timestamps manually. That’s not a workflow, that’s a scavenger hunt.

So I added Loki.

What I Added

Loki and Promtail, deployed via ArgoCD alongside the existing Prometheus stack:

  • Promtail runs as a DaemonSet on every node, tailing container logs from /var/log/pods
  • Loki stores and indexes the logs, queryable via LogQL
  • Grafana gets a new “Logs & Metrics Correlation” dashboard with metrics and logs side by side
  • A new Loki datasource in Grafana so both Prometheus and Loki are available in the same dashboard

The entire addition was three files: an ArgoCD application for the Loki stack, a Grafana datasource ConfigMap, and a logs dashboard ConfigMap. Push to main, ArgoCD syncs, done.

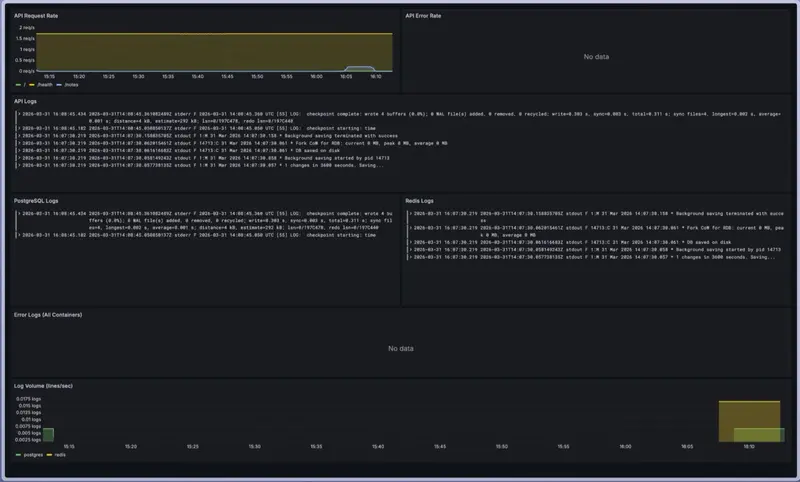
The Logs & Metrics Correlation Dashboard

Loki

This is the dashboard I wish I’d had from the start. Seven panels in four rows:

Row 1: Metrics: API Request Rate and Error Rate from Prometheus. See the traffic pattern and spot anomalies.

Row 2: API Logs: Live log stream from the gitops-api containers via Loki. When you see a spike in the metrics above, scroll down and the logs from that exact time range are right there.

Row 3: Infrastructure Logs: PostgreSQL logs on the left, Redis logs on the right. Database checkpoint warnings, connection events, cache operations, all visible without running kubectl logs across multiple pods.

Row 4: Error Logs: A filtered view showing only lines matching error, fail, panic, crash, or exception across all containers. This is the “something is broken, show me what” panel.

Row 5: Log Volume: Lines per second per container. A sudden spike in log volume often means something is throwing errors in a loop.

The key insight: time-synced panels. When you drag to select a time range on the metrics graph, the log panels update to show logs from that exact window. That’s the metric-to-log correlation workflow, see a spike, select the time range, read the logs. Root cause in under two minutes.

LogQL: The Query Language

If you know PromQL, LogQL feels familiar. Stream selectors use curly braces like Prometheus label matchers:

All logs from the three-tier namespace:

{namespace="three-tier"}

Just the API container:

{namespace="three-tier", container="gitops-api"}

Filter for errors using a pipeline:

{namespace="three-tier"} |~ "(?i)(error|fail|panic|crash|exception)"

Log volume as a metric (for the timeseries panel):

sum(rate({namespace="three-tier"}[5m])) by (container)

That last one is interesting: rate() on a log stream gives you lines per second, which you can graph just like a Prometheus metric. Useful for spotting error storms.

What Went Wrong (And What I Learned)

Node Capacity

Loki wouldn’t schedule. The two t3.medium nodes were already running the app, Prometheus, Grafana, Alertmanager, Node Exporter, kube-state-metrics, ArgoCD, cert-manager, and the LB controller. Too many pods. I had to scale the node group to 3 nodes before Loki could start.

This is something you don’t think about until it happens, t3.medium supports around 17 pods per node, and a monitoring stack eats through that fast.

EBS CSI Driver (Again)

The Loki PVC was stuck in Pending even after adding a third node. The EBS CSI driver’s IAM role still had the old cluster’s OIDC provider URL. Third time hitting this issue — by now the fix is muscle memory: delete the IAM service account, recreate it, reinstall the addon with --resolve-conflicts OVERWRITE.

Grafana Datasource Provisioning

The Loki datasource ConfigMap existed in Kubernetes but Grafana’s sidecar didn’t pick it up. After a restart, the Prometheus datasource also disappeared. I ended up adding both datasources manually through the Grafana UI.

The lesson: Grafana’s sidecar provisioning is convenient when it works, but when it doesn’t, just add datasources manually and move on. The dashboards are what matter, not how the datasource was configured.

Curly Quotes in Dashboard JSON

When importing dashboard JSON through Grafana’s UI, the PromQL queries had corrupted quotes, curly/smart quotes instead of straight quotes. Every panel showed a parse error. The fix was to edit each panel and retype the query manually from the keyboard.

This is a subtle one. If you copy-paste JSON through a text editor or chat that auto-converts quotes, your Grafana panels will break silently.

Why Logs Complete the Observability Story

With just Prometheus, my monitoring answer was: “The error rate spiked at 3:42 PM.” With Loki added, it becomes: “The error rate spiked at 3:42 PM because PostgreSQL was restarting after an OOM kill, here are the exact log lines.”

That’s the difference between detecting a problem and diagnosing it. In an interview, being able to describe a workflow that goes from alert → metric → log → root cause shows you’ve actually operated production systems, not just set up dashboards.

The full observability stack now covers:

  • Metrics: Prometheus + custom application instrumentation
  • Logs: Loki + Promtail collecting from every container
  • Alerting: PrometheusRules with 9 custom alerts
  • Dashboards: Two Grafana dashboards, one for metrics, one for metric-to-log correlation
  • All deployed via GitOps: ArgoCD managing four applications from a single repo

Links

Building my DevOps portfolio ahead of the AWS DevOps Professional certification. Connect on LinkedIn, I’d love to hear what you’re building.

🥷 StealthHumanizer — A Free Open-Source AI Text Humanizer with 13 Providers and Multi-Pass Ninja Mode

Why StealthHumanizer?

With the rise of AI-generated content, tools that can humanize text are in high demand. But most solutions are paid, require sign-ups, or limit your usage. I wanted to build something different — a completely free, open-source text humanizer that anyone can use without restrictions.

StealthHumanizer supports 13 text generation providers, 4 rewrite levels, 13 distinct tones, and a multi-pass “ninja mode” for maximum naturalness.

Features

🔄 13 AI Providers

StealthHumanizer works with OpenAI, Anthropic, Google, Mistral, Cohere, and many more providers. Switch between them freely — whatever works best for your content.

📊 4 Rewrite Levels

From light touch-ups to complete rewrites, choose the level that fits your needs.

🎨 13 Tones

Professional, casual, academic, creative, persuasive, and more. Pick the tone that matches your content’s purpose.

🥷 Multi-Pass Ninja Mode

Run multiple humanization passes for the most natural-sounding output. The ninja mode applies layered transformations to make text virtually indistinguishable from human writing.

🔓 No Login, No Limits

Zero friction. No account creation. No usage caps. Just open it and use it.

Tech Stack

  • Language: TypeScript
  • Architecture: Provider-agnostic plugin system
  • UI: Clean, minimal interface focused on usability

Live Demo

🔗 GitHub Repository

Why Open Source?

Text humanization should be accessible to everyone — students, content creators, developers, and researchers. Locking this behind paywalls creates an uneven playing field. StealthHumanizer levels it.

*Built by Rudra Sarker — Open Source Developer

Connect: X/Twitter | LinkedIn | GitHub