How I Pick Crypto Trading Pairs for My Bot — A Data-Driven Framework

Choosing the right trading pairs is one of the most underrated aspects of building a profitable crypto bot. After months of testing, here’s the framework I use to select and rotate pairs.

Why Pair Selection Matters

Most tutorials focus on entry signals and indicators. But trading the wrong pairs can kill even a great strategy. A perfect RSI reversal signal on a low-liquidity altcoin will get eaten by spread and slippage.

My bot trades 15 pairs on Bybit futures. Here’s how I picked them.

The 5 Criteria I Use

1. Minimum Daily Volume: $50M+

Anything below $50M in 24h volume means:

  • Wide spreads that eat your profits
  • Slippage on entries and exits
  • Gaps that trigger false signals

I check volume on CoinGecko and cross-reference with Bybit’s actual order book depth.

2. Volatility Sweet Spot: 2-5% ATR

Too low volatility (BTC in a tight range) = no opportunities. Too high (meme coins doing 50% swings) = stop losses get destroyed.

I measure ATR as a percentage of price on the 1h timeframe:

atr_percent = (ta.ATR(dataframe, timeperiod=14) / dataframe['close']) * 100

# Sweet spot: 2-5%
if 2.0 <= atr_percent <= 5.0:
    pair_score += 2

Most major altcoins (SOL, ETH, BNB) sit in this range. DOGE and meme coins often exceed it.

3. Spread < 0.05%

Spread is the hidden fee. If your average trade makes 1% and the spread is 0.1%, you’re giving away 10% of your edge on every round trip.

I only trade pairs where the typical bid-ask spread stays under 0.05%. The top 15 by market cap almost always qualify.

4. Low Correlation With Each Other

Trading BTC, ETH, SOL, and BNB might feel diversified, but when BTC drops 5%, they ALL drop. I measure 30-day rolling correlation:

Pair BTC Correlation
ETH 0.85
SOL 0.78
BNB 0.72
DOGE 0.65
LINK 0.61
ATOM 0.55

Lower correlation = better diversification. I include a mix: some high-corr (ETH, SOL) for trend-following, some low-corr (ATOM, NEAR) for mean-reversion.

5. Backtest Validation

Every pair must pass backtesting before going live:

  • Minimum 50 trades over 3 months
  • Win rate > 55%
  • Profit factor > 1.5
  • Max drawdown < 3%

If a pair fails any criterion, it doesn’t make the cut. Period.

My Current 15 Pairs (Tiered)

Tier 1 — Core (highest confidence):
BTC, ETH, SOL, BNB

Tier 2 — High-value altcoins:
DOGE, XRP, ADA, AVAX, LINK

Tier 3 — Diversification:
DOT, POL, NEAR, ATOM, SUI, OP

Pairs I Avoid

  • New listings (< 3 months): Not enough data to backtest
  • Meme coins (except DOGE): Unpredictable pump/dump patterns
  • Low market cap (< $500M): Liquidity disappears during volatility
  • Delisted/rebranded: Recently had to swap MATIC→POL and FTM→SUI

Monthly Rotation

Every month I:

  1. Re-run backtests for all 15 pairs
  2. Check if any pair’s volume dropped below threshold
  3. Evaluate 2-3 new candidates
  4. Replace underperformers

This keeps the portfolio fresh without constant tinkering.

Results

With this framework:

  • 67.9% win rate across all 15 pairs
  • 2.12 profit factor
  • 1.42% max drawdown

The pair selection contributes as much to these numbers as the actual trading signals.

What pairs does your bot trade? How do you select them?

I share all trades publicly: @TrendRiderFree on Telegram

Mastering Loops and Conditionals in Terraform

Day 10 of my Terraform journey was all about writing less repetitive infrastructure code.

Up to this point, most resources had been declared one by one. That works for small labs, but it becomes painful fast when you need multiple IAM users, repeated rules, or environment-specific behavior.

Today I learned the four Terraform tools that make configurations dynamic:

  • count
  • for_each
  • for expressions
  • ternary conditionals

This was one of the most practical Terraform topics so far.

Why This Matters

Terraform is declarative, but these features make it feel much closer to a programming language.

They help you:

  • reduce repetition
  • create multiple resources safely
  • transform data cleanly
  • make infrastructure behavior change by environment

They are also heavily tested in the Terraform Associate exam.

1. Loops with count

count is the simplest loop in Terraform.

Use it when you want Terraform to create a fixed number of similar resources.

resource "aws_iam_user" "example" {
  count = 3
  name  = "user-${count.index}"
}

This creates:

  • user-0
  • user-1
  • user-2

The important part is count.index, which gives each resource its position.

The count Index Problem

count becomes risky when it is tied to a list that can change.

variable "user_names" {
  type    = list(string)
  default = ["alice", "bob", "charlie"]
}

resource "aws_iam_user" "example" {
  count = length(var.user_names)
  name  = var.user_names[count.index]
}

At first, Terraform maps the list like this:

  • index 0 → alice
  • index 1 → bob
  • index 2 → charlie

Now imagine I remove alice from the list:

default = ["bob", "charlie"]

Terraform now sees:

  • index 0 → bob
  • index 1 → charlie

The configuration still runs, but the identities shift. Terraform tracks these resources by position, so when the list changes, later resources can be updated or recreated unexpectedly.

That is why count can be destructive when list order changes.

2. Loops with for_each

for_each solves that problem by using keys or values as identity instead of numeric positions.

variable "user_names" {
  type    = set(string)
  default = ["alice", "bob", "charlie"]
}

resource "aws_iam_user" "example" {
  for_each = var.user_names
  name     = each.value
}

Now Terraform tracks users by value, not by index.

If I remove alice, only alice is affected.

bob and charlie keep their identities.

That makes for_each much safer for collections that may change over time.

for_each with a Map

for_each becomes even more useful when paired with a map.

variable "users" {
  type = map(object({
    department = string
    admin      = bool
  }))
  default = {
    alice = { department = "engineering", admin = true }
    bob   = { department = "marketing", admin = false }
  }
}

resource "aws_iam_user" "example" {
  for_each = var.users
  name     = each.key

  tags = {
    Department = each.value.department
  }
}

This lets each item carry extra configuration.

3. for Expressions

for expressions do not create resources. They transform data.

For example, this outputs uppercase names:

output "upper_names" {
  value = [for name in var.user_names : upper(name)]
}

And this creates a map of usernames to ARNs:

output "user_arns" {
  value = { for name, user in aws_iam_user.example : name => user.arn }
}

A good way to think about it is:

  • count and for_each create resources
  • for expressions reshape data

4. Ternary Conditionals

Terraform conditionals use this form:

condition ? true_value : false_value

They are useful when you want infrastructure behavior to change based on input.

Example:

variable "environment" {
  type    = string
  default = "dev"
}

locals {
  instance_type = var.environment == "production" ? "t2.medium" : "t2.micro"
}

This means:

  • if environment is production, use t2.medium
  • otherwise use t2.micro

Then you can use it like this:

resource "aws_instance" "web" {
  instance_type = local.instance_type
}

Conditionals with count

Conditionals also work well with count when you want a resource to be optional.

variable "enable_autoscaling" {
  description = "Enable autoscaling for the cluster"
  type        = bool
  default     = true
}

resource "aws_autoscaling_policy" "scale_out" {
  count = var.enable_autoscaling ? 1 : 0
}

This means:

  • if enable_autoscaling = true, create the policy
  • if enable_autoscaling = false, skip it

When to Use count vs for_each

This was the biggest lesson of the day.

Use count when:

  • you need a fixed number of nearly identical resources
  • order does not matter
  • the collection is unlikely to change

Use for_each when:

  • items have stable names or keys
  • the collection may change over time
  • each item may have different configuration

In practice, for_each is often safer.

My Main Takeaway

Day 10 made Terraform feel much more dynamic.

The most important lesson for me was this:

  • count is simple
  • for_each is safer
  • for expressions clean up data
  • conditionals make infrastructure flexible

Together, these four tools make Terraform much more powerful.

Full Code

👉 Github LInk

Follow My Journey
This is Day 10 of my 30-Day Terraform Challenge.

See you on Day 11 🚀

I’ve been thinking about this for a while, and I want honest answers, not the polished LinkedIn version.

nervous anime gif

Why did you really get into tech?

Not the safe answer. Not “I love problem solving” or “tech is the future.” I mean the real reason. Was it curiosity? Freedom? Money? The idea of building something that actually matters? Escaping something? Proving something?

Because if we’re being real… a lot of us didn’t start this journey dreaming about standups, Jira tickets, or optimizing someone else’s product roadmap.

I’m here looking at my own career, and don’t worry, it’s not your usual cliché “escape the matrix” conversation. It’s more of me trying to understand where exactly I am headed and where I intend to head, if that makes any sense… I hope it does.

nervous anime gif

But what I mean is how we don’t lose sight of that creative side and the fun part of it all, because I noticed that somewhere along the line, something shifts.

You start off wanting to build. To explore. To create weird, ambitious, maybe even unrealistic things. Like I, for instance—I wanted to make games. Kenzie from Game Shakers lowkey inspired the idea (not really sure how many of you guys watched the show). I had a notebook where I wrote the whole story of the game, and I even hopped on an old Windows application that let you create 3D model characters. All that was missing was the programming skills. I lost the notebook, by the way, and the PC crashed in case anyone was wondering.
sad cat

Now that I’m thinking about it, It does sting because the plot was peak trust me, this isn’t even me exaggerating

Fast forward to the end of high school, when I started learning coding—I self-taught for a while before I got into college. The reality presented to me wasn’t really how I imagined it. It slowly grew into deadlines, salaries, titles, deliverables, stability. And before you even notice it, you’re deep in the “job loop.”

Wake up → code → fix bugs → ship → repeat.

Basically kept in an endless circle with no real development—well, aside from the number of stacks added to your portfolio. And I’m talking to the people who actually got into tech not just for the job aspect, but because of the belief of coding the next Facebook or the next Amazon.

All those original ideas… the ones that made you open your first IDE… they get pushed to “later.” Then “someday.” Then… forgotten.

So here’s the uncomfortable question:

Is this just how it’s supposed to go? Or are we doing something wrong?

Is the system designed this way, where passion is just the entry point and routine takes over? Or do we slowly trade our curiosity for comfort without realizing it?

And more importantly:

How do you avoid becoming someone who once dreamed of building things… but now only maintains them?

It’s a genuine question.

  • What habits helped you stay creative while working a full-time dev job?
  • Have you managed to build something meaningful alongside your job?
  • Or did you consciously choose stability over exploration—and are you okay with that?

No judgment either way. Just trying to understand if there’s a better way to navigate this path without losing the reason we started.

I honestly encourage any feedback you guys have in the comments albeit addition etc.. Thanks for reading 🙂

⚠️ Axios Supply Chain Attack — If You Installed Yesterday, Check This

Yesterday (March 31, 2026), one of the most widely used npm packages — axios — was compromised in a supply chain attack.

If you (or your CI) ran npm install during a short window, there’s a real chance your environment pulled malicious code.

No panic — but you should check.

🚨 What actually happened?

  • A maintainer account was compromised
  • Malicious versions of axios were published:

  • These versions pulled in a hidden dependency: plain-crypto-js

The scary part?

👉 The malware ran automatically via a postinstall script
👉 You didn’t even need to import axios
👉 It targeted macOS, Linux, and Windows

🎯 What it tried to steal:

  • ENV variables
  • Cloud credentials (AWS / GCP / Azure)
  • SSH keys
  • Tokens and secrets

🧪 How to check if you’re affected

If you installed dependencies between:

00:21 UTC – 03:20 UTC (March 31)

Check your lockfile — not just package.json.

Look for:

Quick check:

grep -E "axios" package-lock.json | grep -E "1.14.1|0.30.4"

If nothing shows up → you’re likely safe from this specific issue.

🛠️ What to do if you are affected

Treat the system as compromised. Don’t half-fix this.

1. Downgrade axios

"axios": "1.14.0"

2. Clean everything

rm -rf node_modules package-lock.json
npm cache clean --force
npm install

3. Rotate ALL secrets (seriously)

Assume everything is leaked:

  • API keys
  • DB credentials
  • AWS/GCP/Azure keys
  • GitHub tokens
  • npm tokens

4. Check for suspicious files

  • macOS → /Library/Caches/com.apple.act.mond
  • Linux → /tmp/ld.py

💡 Lessons for all of us

This wasn’t a “rare edge case”. This is the direction things are going.

A few takeaways:

🔒 1. Stop using loose versions in production

"axios": "^1.x.x" ❌
"axios": "1.14.0" ✅

🔍 2. Trust your lockfile more than package.json

Your real dependency tree lives there.

⚙️ 3. Add dependency scanning in CI/CD

Don’t rely on manual checks.

🧠 4. Assume breach mindset

Your dev machine and CI are not “safe by default”.

Final thought

The npm team removed the malicious versions quickly — but a few hours is enough to impact a lot of projects.

Supply chain security is no longer optional.

Stay sharp.

Compromised npm Maintainer Account Publishes Malicious Axios Versions with Backdoor via `plain-crypto-js` Dependency

Introduction: The Axios Compromise

Yesterday, the npm ecosystem was jolted by the discovery of malicious versions of Axios (1.14.1 and 0.30.4), published through a compromised maintainer account. These versions bypassed the standard GitHub Actions release pipeline, introducing a backdoor via the plain-crypto-js dependency. The mechanism of compromise is straightforward: the attacker exploited weak account security to inject malicious code into the package, which then propagates through dependency resolution during installation.

How the Backdoor Works

The plain-crypto-js dependency acts as a trojan horse. When Axios 1.14.1 or 0.30.4 is installed, npm’s dependency resolver fetches plain-crypto-js, which contains obfuscated code designed to exfiltrate sensitive data. The causal chain is clear: compromised account → malicious package publication → dependency injection → data exfiltration. This attack leverages npm’s trust model, where maintainers’ credentials are the primary gatekeepers of package integrity.

Immediate Risk Assessment

Projects using Axios 1.14.1 or 0.30.4 are at critical risk of data breaches. The backdoor’s payload is triggered during runtime, allowing attackers to intercept HTTP requests, steal credentials, or inject malicious responses. For MCP servers (e.g., Claude Code, Cursor), the risk compounds: a single compromised dependency can cascade through transitive dependencies, infecting the entire server stack. The mechanism of risk formation here is dependency chaining—a single weak link compromises the entire chain.

Detection and Mitigation: A Comparative Analysis

To address this, developers have three primary options:

  • Manual Version Pinning: Downgrade to Axios 1.14.0. Effectiveness: High for immediate mitigation, but requires manual intervention.
  • Open-Source Scanners: Tools like tooltrust-mcp detect malicious versions and dependencies. Effectiveness: Optimal for automated, continuous monitoring. Covers edge cases like transitive dependencies.
  • CLI-Based Scans: Scripts like tooltrust-scanner provide offline, telemetry-free scans. Effectiveness: Suitable for air-gapped environments, but requires manual execution.

Optimal Solution: Combine version pinning with open-source scanners. Version pinning provides immediate safety, while scanners ensure long-term protection against evolving threats. Scanners like tooltrust-mcp are superior because they detect transitive dependencies, a common blind spot in manual audits. However, scanners stop working if npm’s dependency resolution process is bypassed (e.g., via local package installation), making version pinning a necessary fallback.

Why This Matters Now

This incident exposes a systemic vulnerability in npm’s security model. Maintainer accounts lack mandatory MFA, and package publication processes are insufficiently monitored. The proliferation of such attacks could lead to widespread data breaches, eroding trust in open-source ecosystems. The mechanism of trust erosion is clear: repeated compromises → developer skepticism → reduced open-source adoption. Addressing this requires npm to enforce stricter security measures, but until then, developers must take proactive steps.

Rule for Choosing a Solution: If your project uses Axios, use version pinning to 1.14.0 immediately. Simultaneously, adopt an open-source scanner to detect transitive dependencies and future threats.

The Attack Vector: How It Happened

The compromise of axios versions 1.14.1 and 0.30.4 began with the exploitation of a weakly secured npm maintainer account. Unlike typical releases managed through GitHub Actions, these malicious versions were published directly via npm, bypassing the usual safeguards. This deviation from the standard workflow was the first red flag—a silent breach in the chain of trust.

Once the account was compromised, the attacker introduced a new dependency: plain-crypto-js. This package, though innocuous in name, contained obfuscated code designed to intercept HTTP requests, exfiltrate credentials, and execute arbitrary payloads at runtime. The mechanism was straightforward: during installation, plain-crypto-js was injected into the dependency tree, silently embedding the backdoor into any project using the affected axios versions.

The risk propagation mechanism is where the attack becomes systemic. Transitive dependencies—packages that depend on axios—amplified the threat. For example, an MCP server using a library that indirectly relies on axios would inherit the malicious dependency, even if axios itself wasn’t directly listed in its package.json. This cascading effect turned a single compromised package into a supply chain contagion.

The physical process of exploitation is mechanical: when a developer installs axios 1.14.1 or 0.30.4, npm’s dependency resolver fetches plain-crypto-js alongside axios. During runtime, the obfuscated code in plain-crypto-js is triggered, intercepting sensitive data (e.g., API keys, tokens) and transmitting it to an attacker-controlled server. The observable effect? Silent data breaches, often undetected until it’s too late.

Why This Worked: Systemic Vulnerabilities

  • Weak Account Security: The absence of multi-factor authentication (MFA) on the maintainer account made it a low-hanging fruit for attackers. A single compromised credential was enough to publish malicious versions.
  • Bypassed Monitoring: npm’s publication process lacks real-time auditing for deviations from expected workflows (e.g., GitHub Actions). The attacker exploited this gap to publish outside the normal pipeline.
  • Over-Reliance on Trust: Developers often assume third-party dependencies are safe. plain-crypto-js slipped through because it was never vetted—a blind spot in dependency management.

Mitigation: Comparing Solutions

Solution Effectiveness Limitations
Manual Version Pinning (Axios 1.14.0) Immediate safety. Blocks malicious versions. Requires manual intervention. Fails if transitive dependencies pull in plain-crypto-js.
Open-Source Scanners (e.g., tooltrust-mcp) Automated, detects transitive dependencies. Continuous monitoring. Fails if npm’s dependency resolution is bypassed (e.g., local package installation).
CLI-Based Scans (e.g., tooltrust-scanner) Offline, telemetry-free. Manual but thorough. One-time scan. No real-time protection.

Optimal Solution: Combine version pinning (immediate safety) with open-source scanners (long-term protection). Version pinning blocks the malicious axios versions, while scanners detect transitive dependencies like plain-crypto-js. This dual approach addresses both direct and indirect risks.

Rule for Choosing a Solution: If you’re affected by axios 1.14.1/0.30.4, immediately pin to 1.14.0 and adopt an open-source scanner to monitor transitive dependencies. This ensures both immediate safety and ongoing protection.

Typical Choice Errors: Developers often rely solely on version pinning, neglecting transitive dependencies. Others trust scanners without pinning, leaving a window of vulnerability if dependency resolution is bypassed. Both errors stem from incomplete threat modeling.

In conclusion, the axios compromise exposes a fragile ecosystem where trust is exploited and security gaps cascade into systemic risks. The solution lies not in isolated fixes but in layered defenses—combining immediate actions with continuous monitoring. Anything less leaves the door ajar for the next attack.

Impact and Affected Systems

The compromise of axios versions 1.14.1 and 0.30.4 has far-reaching implications, given axios’s ubiquity in modern web applications. Published through a compromised npm maintainer account, these versions introduce the malicious dependency plain-crypto-js, which acts as a backdoor for data exfiltration. Here’s a breakdown of the impact and the systems most at risk:

Scope of the Compromise

  • Downloads and Exposure: Axios is downloaded millions of times weekly, making the compromised versions a significant threat. While exact download numbers for the malicious versions are unclear, their availability for over 24 hours suggests widespread exposure. The backdoor in plain-crypto-js intercepts HTTP requests, potentially exfiltrating API keys, credentials, and sensitive headers—a critical risk for applications handling user data.
  • Affected Systems:

    • Node.js Applications: Any application using axios for HTTP requests is at risk. This includes APIs, web servers, and microservices built on Node.js.
    • MCP Servers (Claude Code, Cursor, Windsurf, etc.): Servers depending on axios are vulnerable, as the backdoor propagates through transitive dependencies. Our scan of 209 MCP servers revealed multiple instances of plain-crypto-js lurking in dependency trees.
    • CI/CD Pipelines: Automated builds pulling axios 1.14.1 or 0.30.4 risk deploying compromised code, amplifying the attack surface.

Mechanism of Risk Formation

The risk stems from a chain of causal events:

  1. Compromised Account → Malicious Publication: Weak account security (lack of MFA) allowed attackers to publish axios versions outside GitHub Actions, bypassing safeguards.
  2. Dependency Injection: The malicious versions add plain-crypto-js, which fetches and executes obfuscated code at runtime, intercepting HTTP requests.
  3. Transitive Propagation: Even if axios is not directly imported, transitive dependencies can pull in plain-crypto-js, compromising otherwise secure systems.

Mitigation Solutions: A Comparative Analysis

Solution Effectiveness Limitations
Manual Version Pinning (Axios 1.14.0) Immediate safety; blocks malicious versions. Requires manual intervention; fails if transitive dependencies pull in plain-crypto-js.
Open-Source Scanners (e.g., tooltrust-mcp) Automated; detects transitive dependencies; continuous monitoring. Fails if npm’s dependency resolution is bypassed (e.g., local package installation).
CLI-Based Scans (e.g., tooltrust-scanner) Offline, telemetry-free; thorough. One-time scan; no real-time protection.

Optimal Solution and Rule for Choice

Optimal Solution: Combine version pinning (immediate safety) with open-source scanners (long-term protection). Version pinning ensures axios is safe, while scanners monitor transitive dependencies for plain-crypto-js or similar threats.

Rule for Choosing a Solution: If you detect axios 1.14.1 or 0.30.4, immediately pin to 1.14.0 and adopt an open-source scanner to monitor transitive dependencies. This layered approach addresses both immediate and systemic risks.

Typical Errors and Their Mechanism

  • Over-reliance on Version Pinning: Developers often pin axios to 1.14.0 but neglect transitive dependencies, leaving systems vulnerable if plain-crypto-js is pulled in indirectly.
  • Trusting Scanners Without Pinning: Scanners fail if dependency resolution is bypassed (e.g., local installs), leaving systems exposed despite scanning tools.

Key Insight

The axios compromise exposes systemic vulnerabilities in npm’s security model: weak account protection, lack of real-time auditing, and over-reliance on trust. Addressing these requires layered defenses—immediate actions like version pinning combined with continuous monitoring via open-source tools. Without this, the software supply chain remains fragile, with each compromise eroding trust in open-source ecosystems.

Mitigation and Prevention Strategies

The compromise of axios versions 1.14.1 and 0.30.4 via a backdoored plain-crypto-js dependency exposes critical vulnerabilities in open-source package management. Below are actionable, mechanism-driven strategies to mitigate risks and prevent future incidents. Each solution is evaluated for effectiveness, limitations, and optimal use cases.

Immediate Actions: Version Pinning

Mechanism: Manually downgrade to axios 1.14.0 to block malicious versions. This interrupts the causal chain of compromised account → malicious publication → dependency injection.

  • Command: npm install [email protected] --save-exact
  • Effectiveness: Immediate safety by excluding backdoored versions.
  • Limitation: Fails if transitive dependencies pull in plain-crypto-js indirectly.

Continuous Monitoring: Open-Source Scanners

Mechanism: Tools like tooltrust-mcp detect transitive dependencies by scanning the entire dependency tree. They flag IOCs (e.g., plain-crypto-js) even if nested within other packages.

  • Command: npx tooltrust-mcp or tooltrust-scanner scan --server "npx -y your-mcp-server"
  • Effectiveness: Automated, continuous monitoring; detects hidden backdoors.
  • Limitation: Fails if npm’s dependency resolution is bypassed (e.g., local installs or offline environments).

Offline Scanning: CLI-Based Tools

Mechanism: Offline scanners (e.g., tooltrust-scanner) perform thorough, telemetry-free scans. They analyze package metadata and code for obfuscated payloads.

  • Command: curl -sfL https://raw.githubusercontent.com/AgentSafe-AI/tooltrust-scanner/main/install.sh | bash
  • Effectiveness: Thorough, privacy-preserving analysis.
  • Limitation: One-time scan; no real-time protection.

Optimal Solution: Layered Defense

Rule: If immediate safety is critical → use version pinning. For long-term protection → adopt open-source scanners.

Solution Effectiveness Limitations
Version Pinning Blocks direct malicious versions Fails against transitive dependencies
Open-Source Scanners Detects hidden backdoors; continuous Fails if dependency resolution bypassed
CLI-Based Scans Thorough, offline analysis No real-time protection

Optimal Strategy: Combine version pinning ([email protected]) for immediate safety with open-source scanners for transitive dependency monitoring. This dual approach addresses both direct and indirect risks.

Typical Errors and Their Mechanisms

  • Over-reliance on Version Pinning: Neglects transitive dependencies, allowing plain-crypto-js to infiltrate via other packages.
  • Trusting Scanners Without Pinning: Fails if dependency resolution is bypassed (e.g., local installs), leaving systems exposed.

Systemic Fixes: Addressing Root Causes

To prevent recurrence, address systemic vulnerabilities:

  • Enforce MFA: Mandate multi-factor authentication for npm maintainer accounts to prevent unauthorized access.
  • Audit Publication Workflows: Implement real-time monitoring for deviations from GitHub Actions or CI/CD pipelines.
  • Vet Dependencies: Require code reviews and security audits for third-party dependencies before inclusion.

Key Insight: Layered defenses—combining immediate actions with continuous monitoring—are essential to secure fragile open-source ecosystems. No single solution suffices; the mechanism of risk formation (compromised account → transitive propagation) demands a multi-pronged approach.

Lessons Learned and Future Safeguards

The compromise of axios versions 1.14.1 and 0.30.4 isn’t just another security incident—it’s a mechanical failure in the open-source supply chain, exposing systemic vulnerabilities that demand immediate and layered fixes. Here’s the breakdown:

Root Causes: How the Chain Broke

The attack exploited three critical weaknesses, each a link in a causal chain:

  • Weak Account Security: The npm maintainer account lacked multi-factor authentication (MFA). This allowed attackers to hijack credentials, bypassing GitHub Actions safeguards. Mechanism: Without MFA, a single compromised password grants full publish rights, turning the account into a direct injection point for malicious code.
  • Unmonitored Publication Workflows: npm’s lack of real-time auditing for workflow deviations enabled direct publication outside CI/CD pipelines. Mechanism: The malicious versions were pushed via npm publish without triggering GitHub Actions, exploiting a blind spot in automated checks.
  • Unvetted Dependencies: The plain-crypto-js dependency slipped through without security audits. Mechanism: Its obfuscated code intercepts HTTP requests at runtime, exfiltrating credentials via a hidden backdoor.

Risk Propagation: How One Compromise Becomes Many

The real damage wasn’t the direct compromise—it was the transitive propagation of plain-crypto-js. Here’s how risk cascaded:

  • Dependency Chaining: Projects depending on axios indirectly pulled plain-crypto-js, even if they never explicitly used it. Mechanism: npm’s dependency resolution fetches nested packages, turning a single malicious version into a supply chain contagion.
  • Runtime Exploitation: The backdoor activated during HTTP requests, silently siphoning API keys and headers. Mechanism: Obfuscated code in plain-crypto-js hooked into Node.js’s http module, executing payloads without triggering errors.

Mitigation: Layered Defenses or Temporary Patches?

Solutions fall into three categories—each with trade-offs:

  1. Manual Version Pinning (Immediate Fix): Downgrading to [email protected] blocks malicious versions.

    • Effectiveness: Stops direct compromise.
    • Limitation: Fails if plain-crypto-js enters via another dependency. Mechanism: Transitive dependencies bypass version pinning, leaving systems exposed.
  2. Open-Source Scanners (Continuous Monitoring): Tools like tooltrust-mcp detect plain-crypto-js across dependency trees.

    • Effectiveness: Catches hidden backdoors, even in transitive dependencies.
    • Limitation: Fails if npm’s dependency resolution is bypassed (e.g., local installs). Mechanism: Scanners rely on npm’s package graph; if resolution is skipped, they miss malicious code.
  3. CLI-Based Offline Scanning (Thorough Analysis): Tools like tooltrust-scanner analyze code offline for obfuscated payloads.

    • Effectiveness: Privacy-preserving, thorough inspection.
    • Limitation: One-time scan; no real-time protection. Mechanism: Static analysis catches known patterns but misses runtime behavior changes.

Optimal Strategy: Combine Immediate Safety with Long-Term Vigilance

Rule for Choosing a Solution: If you’re exposed to compromised axios versions, immediately pin to 1.14.0 to block direct threats, then adopt an open-source scanner to monitor transitive dependencies. This dual approach addresses both immediate and latent risks.

Mechanism: Version pinning acts as a firewall, while scanners detect indirect compromises. Together, they cover the full attack surface—direct and transitive.

Systemic Fixes: Hardening the Ecosystem

To prevent recurrence, npm and maintainers must enforce:

  • Mandatory MFA: Eliminates account hijacking as an entry point. Mechanism: Adds a physical barrier (e.g., TOTP token) to credential theft.
  • Real-Time Workflow Auditing: Flags publications outside CI/CD pipelines. Mechanism: Detects deviations from expected workflows, triggering alerts for manual review.
  • Dependency Vetting: Require security audits for third-party packages. Mechanism: Breaks the chain of trust exploitation by verifying code integrity before inclusion.

Key Insight: No Silver Bullet—Layered Defenses Are Non-Negotiable

The axios incident proves that open-source ecosystems are only as secure as their weakest link. Typical Errors include:

  • Over-reliance on Version Pinning: Ignores transitive dependencies, leaving systems vulnerable. Mechanism: Attackers exploit indirect paths, bypassing direct version controls.
  • Trusting Scanners Without Pinning: Fails if dependency resolution is bypassed. Mechanism: Scanners depend on npm’s package graph; if this is circumvented, they become blind.

The optimal solution isn’t a single tool—it’s a layered defense combining immediate actions (version pinning) with continuous monitoring (open-source scanners). This addresses both direct and indirect risks, hardening the ecosystem against future attacks.

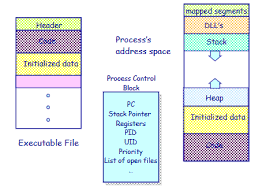
Address Space and Process Control Block(PCB)

 𝐀𝐝𝐝𝐫𝐞𝐬𝐬 𝐒𝐩𝐚𝐜𝐞: Every process running on our systems has memory allocated for its address space. Which includes:

|| 𝘚𝘵𝘢𝘤𝘬 → 𝘎𝘢𝘱 → 𝘏𝘦𝘢𝘱 → 𝘋𝘢𝘵𝘢 → 𝘛𝘦𝘹𝘵||

• Stack: Contains function calls, return addresses, local variables etc.
• Gap: That’s just the empty space kept for the dynamic memory to grow.
• Heap: Used for dynamic memory allocation like malloc(), calloc().
• Data: For const, global and static variables.
• Text: The program code or program instructions. (Usually read-only)

-These address spaces are separate for each process and they cannot access each others. OS manages the whole thing, if something wrong happens OS throws Segmentation Fault.
-Address space is virtual. Which is mapped to physical memory by OS.

𝐏𝐂𝐁: In simple words, a Process Control Block is a data structure used by OS to manage processes. It’s like an ID Card for processes.
Which includes:

• Process ID (PID): Unique id for the process.
• Process State: New, Ready, Running, Waiting, Terminated these are the states.
• CPU Registers: Program Counter(PC) and other registers.
• Scheduling Information: Priority and queue position.
• Memory Information: Pointers to address space and memory limits.
• I/O Status Information: Open files, devices used.

-PCB is stored inside the Kernel Space inside the process table.
-OS uses PCB to manage processes, perform context switching and track process execution

Simple analogy is PCB contains everything the OS needs to identify and manage a process.

n8n Docker Setup: Why It Breaks (And the Easier Alternative)

Docker has become the standard way to self-host n8n — and for good reason. But here’s what most tutorials don’t tell you: Docker makes n8n easier to run, but not necessarily easier to set up correctly. The gap between “Docker is running” and “n8n is working securely with HTTPS and persistent data” is where most people get stuck.

This article walks through the five most common failure points — and how to fix each one.

Key Takeaways (30-Second Summary)

  • Docker is the standard way to self-host n8n, but setup is fraught with hidden pitfalls.
  • The top 5 failure points are: SSL certificate configuration, environment variable typos, database persistence, update chaos, and port conflicts.
  • Most “it doesn’t work” moments trace back to one of five specific misconfigurations.
  • A working production setup requires proper SSL, reverse proxy, persistent volumes, and the right environment variables.
  • The easier alternative: deploy n8n in 3 minutes on Agntable with everything pre-configured — no terminal, no debugging.

Why Docker for n8n?

Instead of installing n8n directly on your server (which requires manually setting up Node.js, managing dependencies, and dealing with version conflicts), Docker packages everything n8n needs into a single, isolated container. This approach offers several advantages:

  • Isolation: n8n runs in its own environment, separate from other applications on your server.
  • Portability: You can move your entire n8n setup to another server with minimal effort.
  • Simplified updates: Upgrading n8n is often just a single command.
  • Consistency: The same configuration works across development and production.

The official n8n documentation recommends Docker for self-hosting, and most tutorials follow this approach.

But “running” isn’t the same as “production-ready.”

The Real Problem: Why n8n Docker Setups Break

The real problems emerge when you try to:

  • Access n8n securely over HTTPS
  • Keep your data when the container restarts
  • Configure n8n for your specific needs
  • Update to a newer version without breaking everything
  • Connect to external services that require custom certificates

One developer documented their painful update experience: “I broke everything trying to update n8n. Multiple docker-compose.yml files in different folders, outdated images tagged as <none>, conflicts between different image registries, containers running from different images than I thought.”

This isn’t an isolated story.

Failure Point #1: The SSL Certificate Maze

Symptom: You visit your n8n instance and see “Not Secure” in the browser, or worse — you can’t access it at all. Webhooks fail. You see ERR_CERT_AUTHORITY_INVALID or “secure cookie” warnings.

Why it happens: n8n requires HTTPS to function properly — especially for webhooks. But setting up SSL with Docker is surprisingly complex:

  1. You need a domain name pointed to your server.
  2. You need a reverse proxy (Nginx, Caddy, or Traefik) to handle HTTPS traffic.
  3. You need Let’s Encrypt certificates configured and set to auto-renew.
  4. You need to configure the reverse proxy to forward traffic to the n8n container.
  5. You need to ensure WebSocket connections work for the n8n editor.

The fix: A proper reverse proxy setup with correct headers.

server {
  listen 443 ssl;
  server_name n8n.yourdomain.com;

  ssl_certificate /etc/letsencrypt/live/n8n.yourdomain.com/fullchain.pem;
  ssl_certificate_key /etc/letsencrypt/live/n8n.yourdomain.com/privkey.pem;

  location / {
    proxy_pass http://localhost:5678;
    proxy_set_header Host $host;
    proxy_set_header X-Real-IP $remote_addr;
    proxy_set_header X-Forwarded-For $proxy_add_x_forwarded_for;
    proxy_set_header X-Forwarded-Proto $scheme;

    # WebSocket support (critical for n8n editor)
    proxy_http_version 1.1;
    proxy_set_header Upgrade $http_upgrade;
    proxy_set_header Connection "upgrade";
  }
}

server {
  listen 80;
  server_name n8n.yourdomain.com;
  return 301 https://$host$request_uri;
}

Even with this configuration, you still need to ensure the certificates renew automatically and that your firewall allows traffic on ports 80 and 443.

Failure Point #2: Environment Variable Hell

Symptom: n8n starts but behaves strangely. Webhooks don’t work. Authentication fails. Or n8n won’t start at all, with cryptic error messages.

Why it happens: n8n relies heavily on environment variables for configuration. A single typo — or missing variable — can break critical functionality.

Variable Purpose Common Mistake
N8N_HOST Defines the hostname n8n runs on Setting to localhost instead of your actual domain
N8N_PROTOCOL HTTP or HTTPS Forgetting to set to https when using SSL
WEBHOOK_URL Public URL for webhooks Not setting this, causing webhook failures
N8N_ENCRYPTION_KEY Encrypts credentials in the database Using a weak key or not setting it at all
DB_TYPE Database type (sqlite/postgresdb) Not set for production use

The fix: Use a .env file to manage variables cleanly.

# Domain configuration
N8N_HOST=n8n.yourdomain.com
N8N_PROTOCOL=https
WEBHOOK_URL=https://n8n.yourdomain.com/

# Security
N8N_ENCRYPTION_KEY=your-base64-32-char-key-here   # openssl rand -base64 32
N8N_BASIC_AUTH_ACTIVE=true
N8N_BASIC_AUTH_USER=admin
N8N_BASIC_AUTH_PASSWORD=your-secure-password

# Database (PostgreSQL for production)
DB_TYPE=postgresdb
DB_POSTGRESDB_HOST=postgres
DB_POSTGRESDB_PORT=5432
DB_POSTGRESDB_USER=n8n
DB_POSTGRESDB_PASSWORD=your-db-password
DB_POSTGRESDB_DATABASE=n8n

# Timezone
GENERIC_TIMEZONE=America/New_York

Then reference this file in your docker-compose.yml using the env_file directive.

Failure Point #3: Database & Data Persistence Pitfalls

Symptom: You restart your n8n container, and all your workflows disappear. Or n8n crashes with database errors.

Why it happens: By default, n8n stores data inside the container. When the container is removed (during updates or restarts), that data vanishes. This is the number one data loss scenario for new n8n users.

The official n8n Docker documentation warns: if you don’t manually configure a mounted directory, all data (including database.sqlite) will be stored inside the container and will be completely lost once the container is deleted or rebuilt.

Even when you configure persistent volumes, permission issues can arise. The n8n container runs as user ID 1000, so the mounted directory must be writable by that user:

sudo chown -R 1000:1000 ./n8n-data

For production workloads, SQLite has limitations with concurrent writes. Use PostgreSQL.

The fix:

version: '3.8'

services:
  postgres:
    image: postgres:15-alpine
    restart: unless-stopped
    environment:
      - POSTGRES_USER=n8n
      - POSTGRES_PASSWORD=${DB_POSTGRESDB_PASSWORD}
      - POSTGRES_DB=n8n
    volumes:
      - ./postgres-data:/var/lib/postgresql/data
    networks:
      - n8n-network
    healthcheck:
      test: ["CMD-SHELL", "pg_isready -U n8n"]
      interval: 30s
      timeout: 10s
      retries: 5

  n8n:
    image: n8nio/n8n:latest
    restart: unless-stopped
    ports:
      - "127.0.0.1:5678:5678"
    env_file:
      - .env
    volumes:
      - ./n8n-data:/home/node/.n8n
    networks:
      - n8n-network
    depends_on:
      postgres:
        condition: service_healthy

networks:
  n8n-network:
    driver: bridge

Failure Point #4: The Update Nightmare

Symptom: You run docker compose pull && docker compose up -d to update n8n, and suddenly nothing works.

Why it happens: Several things can go wrong simultaneously:

  • Wrong directory: You run the update command in the wrong folder.
  • Image registry confusion: Multiple n8n image sources exist (n8nio/n8n vs docker.n8n.io/n8nio/n8n).
  • Stale images: Old images tagged as <none> cause confusion.
  • Orphaned containers: Previous containers still running on old images.
  • Database migrations: New n8n versions may require schema updates that don’t run automatically.

The fix: A safe update script.

#!/bin/bash
# update-n8n.sh - Safe update script

echo "📦 Backing up n8n data..."
tar -czf "n8n-backup-$(date +%Y%m%d-%H%M%S).tar.gz" ./n8n-data ./postgres-data

echo "🔄 Pulling latest images..."
docker compose pull

echo "🔄 Recreating containers..."
docker compose down
docker compose up -d --force-recreate

echo "✅ Update complete. Check logs: docker compose logs -f"

Always test updates in a staging environment first.

Failure Point #5: Port & Network Conflicts

Symptom: The n8n container starts, but you can’t access it. Or another application stops working.

Why it happens: The classic port mapping 5678:5678 exposes n8n directly on your server’s public IP. This creates port conflicts, a security risk, and no clean upgrade path to HTTPS.

The fix: Only expose n8n locally, then use a reverse proxy for external access:

ports:
  - "127.0.0.1:5678:5678"  # Only accessible from the same machine

The Working Production Setup

Here’s a complete directory structure for a production-ready n8n deployment:

n8n-docker/
├── .env                    # Environment variables (keep secure!)
├── docker-compose.yml      # Service configuration
├── n8n-data/               # n8n persistent data (chown 1000:1000)
├── postgres-data/          # PostgreSQL persistent data
└── backups/                # Automated backups

Combine all the fixes above: the .env file from Failure Point #2, the docker-compose.yml from Failure Point #3, and the Nginx config from Failure Point #1. That’s a production-grade setup.

Frequently Asked Questions

What’s the minimum server spec for n8n with Docker?
n8n officially recommends a minimum of 2GB RAM and 1 vCPU for production use.

Can I use SQLite for production?
Technically yes, but it’s not recommended. SQLite’s concurrency limitations cause issues with multiple simultaneous workflow executions.

How do I fix permission issues with mounted volumes?
The n8n container runs as user ID 1000. Run sudo chown -R 1000:1000 ./n8n-data.

What environment variables are essential for HTTPS?
You must set N8N_PROTOCOL=https and WEBHOOK_URL=https://yourdomain.com/ (with trailing slash). Also ensure N8N_HOST matches your domain.

How often should I update n8n?
At least monthly for security reasons. Always back up before updating.

The Easier Alternative

After reading through all these failure points, you might be thinking: there has to be a better way.

Agntable was built specifically to solve these exact problems — SSL configuration, environment variables, database persistence, updates, and monitoring — handled automatically. Deploy n8n in 3 minutes with a live HTTPS URL, pre-configured PostgreSQL, daily verified backups, and 24/7 monitoring.

What You Get DIY Docker Agntable
Setup time 5–24 hours 3 minutes
SSL configuration Manual, error-prone Automatic
Database You configure PostgreSQL pre-optimised
Backups You script Daily, verified
Updates Manual, risky Automatic, tested
Monitoring You set up 24/7 with auto-recovery
Monthly cost (including your time) $150–$500+ $9.99–$49.99 flat

Conclusion: Build Workflows, Not Infrastructure

The Docker setup for n8n is a classic open-source trade-off: incredible power and flexibility, but significant operational complexity. If you’re a developer who enjoys infrastructure work, the DIY route can be rewarding. But if you want to build workflows rather than become a part-time sysadmin, there’s a better path.

Originally published on Agntable