15 AI prompts I actually use as a tech freelancer (with the uncomfortable ones included)

I’ve been freelancing in tech for years. These are the prompts that actually save me time — not the generic “write me an email” stuff, but specific, tested prompts for real freelance situations.

I’ll share 15 free ones here. The full pack has 120, organized by use case.

Client communication

Writing a scope clarification without sounding difficult:

I need to write a professional email to a client who is requesting [scope change] which wasn't in our original agreement. I want to explain why this affects the timeline/cost without sounding defensive. Our original scope was: [X]. What they're asking for now: [Y]. Write a short, direct email that opens the door to a conversation rather than closing it.

Following up on an unpaid invoice (firm but professional):

Write a follow-up email for an invoice that is [X days] overdue. The client has been unresponsive. Tone: firm but professional. Don't apologize. Make it easy for them to pay by [payment method]. Amount: [X]. Invoice number: [Y]. This is the [first/second/third] follow-up.

Declining a project without burning the bridge:

I need to decline a project from [type of client] because [real reason: budget too low / not my specialty / timeline unrealistic]. Write a short, warm email that declines clearly but leaves the door open for future work. Don't be vague. Don't offer a referral unless I say so.

Project management

Turning vague client feedback into actionable tasks:

A client sent this feedback: "[paste feedback]". Extract specific, actionable tasks from it. Group by: design changes / content changes / functionality changes / unclear (needs follow-up question). For anything unclear, write the follow-up question I should ask.

Writing a project status update that doesn’t sound like filler:

Write a weekly status update for a [type of project] project. Current status: [X% done]. Completed this week: [list]. Next week: [list]. Blockers: [list or none]. The client is [technical/non-technical]. Keep it under 150 words. No fluff.

Creating a meeting agenda that actually gets things decided:

Create a 30-minute meeting agenda for [topic]. We need to make decisions on: [decision 1], [decision 2]. Background context: [brief context]. Format: time blocks with clear decision/outcome for each item. Include 5 min for questions.

Technical writing

Writing a README that developers will actually read:

Write a README for [project/tool/script]. It does: [what it does]. The audience: [developers / non-technical users]. Required sections: what it does, prerequisites, installation, usage with example, common issues. Tone: practical, no marketing language.

Explaining a technical decision to a non-technical client:

I need to explain to a non-technical client why I chose [technical decision] over [alternative]. The real reasons: [technical reasons]. Translate this into plain language. Use an analogy if it helps. Max 3 sentences. No jargon.

Sales and proposals

Writing a project proposal introduction:

Write the opening paragraph of a project proposal for [type of project] for [type of client]. My key differentiator: [what makes me different]. The client's main concern is: [timeline / budget / quality / reliability]. Don't start with "I". Lead with their situation, not my credentials.

Responding to a request that’s underbudget:

A potential client has a budget of [X] for a project that realistically costs [Y]. Write a response that: acknowledges their budget without dismissing it, explains what [X] could actually buy, opens the door to a conversation about scope or phasing. Don't be condescending.

Automation and productivity

Writing a bash/PowerShell script comment block:

Write a professional comment block for this script: [paste script]. Include: what it does, requirements, usage example, author, date. Format for [bash/PowerShell/Python]. Keep it concise -- developers will read this.

Turning a messy process into a checklist:

I have this process that I do manually: [describe the process]. Turn it into a numbered checklist that someone else could follow without asking me questions. Identify any steps where decisions need to be made and add decision criteria.

The prompts I use most

The ones I reach for every week:

  • The unpaid invoice follow-up (always uncomfortable, this makes it less so)
  • Vague feedback -> actionable tasks (saves 30 min of confusion on every revision round)
  • Technical decision explanation (clients respond better when they understand the why)

The full pack

These 15 are from a pack of 120 prompts I use in my freelance work, organized into categories: client communication, project management, technical writing, proposals, invoicing, hiring, and automation.

AI Prompt Pack for IT Freelancers — 120 prompts — USD.

All prompts are in Polish and English. Tested on Claude, ChatGPT, and Gemini.

Related articles

Full toolkit: devautomation.gumroad.com

What prompt do you find yourself rewriting from scratch every time? Drop it in the comments — I’ll share what I use.

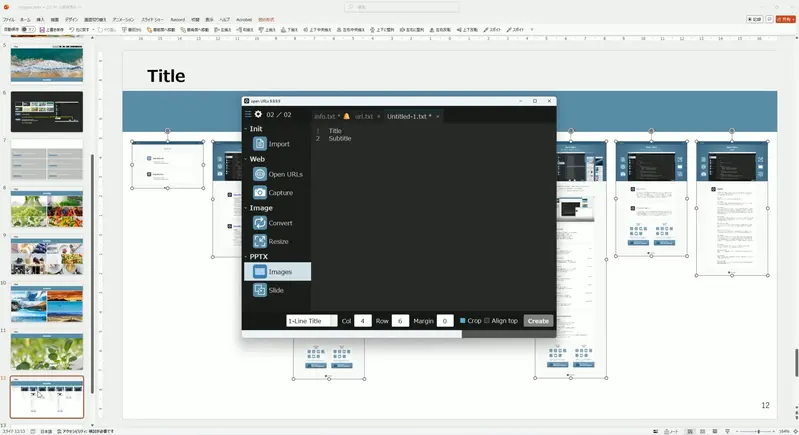
Capture Webpages and Auto‑Insert Them into PowerPoint Instantly on Windows

• Open URLs Lite — Microsoft Store
• Open URLs Pro — Microsoft Store

1. Before: Creating PowerPoint slides manually is painful
For years, I created PowerPoint slides the slow, manual way:

  • Open a webpage
  • Take a screenshot
  • Save the image
  • Open PowerPoint
  • Insert the image
  • Add a title
  • Repeat again and again

If you need to capture 10, 20, or 50 webpages, this process becomes torture.
It easily takes 30 minutes to several hours.

2. After: Now it takes only seconds
So I built a Windows tool that does everything automatically:

  • Enter URLs
  • Click one button
  • The app captures each webpage
  • Generates a PowerPoint deck
  • Inserts each screenshot into its own slide
  • Adds titles automatically

The entire process finishes in a few seconds.

3. How it works
Here’s the simple architecture:

  • Built as a Windows desktop app
  • Uses WebView2 to render webpages
  • Captures screenshots programmatically
  • Generates a PowerPoint file using the Office API
  • Everything runs locally (no data leaves your PC)

4. Use cases
This tool is especially useful for:

  • Competitive research
  • Client reports
  • UI/UX reviews
  • Website archiving
  • Academic or business documentation
  • Creating slide decks from dozens of URLs instantly

5. Try it (Lite and Pro versions)

  • Open URLs Lite – free version
  • Open URLs Pro – includes automatic PowerPoint generation
    Both are available on the Microsoft Store.

6. Final thoughts
If you create PowerPoint slides regularly, this tool can save you hours every week.
I built it because I needed it myself — and I hope it helps you too.

I built this as a Windows desktop app to automate the entire workflow.

Jenkins or GitHub Actions? Deciding the Right CI/CD Tool for Your Workflow

Introduction

Continuous Integration and Delivery is a key part of any software application. Be it a mobile app, a backend app or a website – everything requires CI/CD to make things easier for everyone. From testing and building code to deploying it across environments, CI/CD tools help simplify workflows, reduce manual tasks, and maintain consistency across the development process.

There are tons of options available in the market when it comes to CICD. Among the many available, Jenkins and GitHub Actions stand out as two of the most popular and effective options. Jenkins has been there for a very long time, is mature and is being used by thousands of teams across the globe.

On the other hand, GitHub Actions is designed to work naturally within GitHub, is comparatively newer and is tightly bound to Github (which can be a deal breaker for some folks).

While both are great – which one do you choose? At KubeNine we are inclined towards Github Actions and we’ll tell you why!

What is Jenkins?

Jenkins is a widely used open-source automation server that helps developers build, test, and deploy applications efficiently. For over a decade, it has been a cornerstone of CI/CD workflows, providing teams with the tools needed to automate repetitive tasks.

Supported by a massive community, Jenkins offers an extensive plugin library with over 1,800 plugins, allowing it to integrate with a wide range of open-source and enterprise tools to handle diverse automation needs.

Despite the rise of CI/CD tools like GitLab CI and GitHub Actions, Jenkins is a popular choice among organizations due to its flexibility and extensive capabilities.

According to the Developer Ecosystem Report, 54% of developers rely on Jenkins for their CI/CD needs, showcasing its enduring relevance in the industry.

Below is the architectural diagram of Jenkins:

What is GitHub Actions?

GitHub Actions is an automation tool built directly into GitHub, allowing developers to create workflows for building, testing, and deploying applications.

It simplifies the process of setting up Continuous Integration (CI) and Continuous Delivery (CD) by using YAML-based configuration files stored in the same repository as the code. Also, its completely managed so the users do not have to worry about setting up and managing any instance. This makes it particularly attractive.

One of the key strengths of GitHub Actions is its flexibility. Developers can choose from a vast marketplace of pre-built actions that connect with various tools and services, enabling efficient automation without needing to start from scratch.

GitHub Actions is quickly gaining popularity in the CI/CD space. According to the Developer Ecosystem Report, 51% of developers use GitHub Actions regularly for CI/CD tasks, making it the second most widely adopted tool after Jenkins. Its adoption is especially prominent in personal projects, where 37% of developers rely on it. The simplicity of its setup and its native connection with GitHub repositories make it a go-to choice for many developers and small teams.

GitHub Actions also plays a significant role in the Software Development Life Cycle (SDLC) by automating repetitive tasks like testing and deployment. This not only saves time but also helps developers maintain focus on coding.

Below is the architectural diagram of GitHub Actions, which shows how it operates in a CI/CD pipeline setup:

Building and Pushing a Docker Image: Jenkins vs. GitHub Actions

Let’s walk through the process of setting up a pipeline for both Jenkins and GitHub Actions to build a Docker image and push it to a Docker repository. By comparing the steps, we can better understand the ease of use, setup complexity, and overall user experience.

Setting Up Jenkins: Build and Push Pipeline

We will use Helm to install Jenkins on a Kubernetes cluster and create a pipeline for building and pushing a Docker image.

Steps to Install and Configure Jenkins:

Install Jenkins Using Helm

Add the Jenkins Helm repository:

helm repo add jenkins https://charts.jenkins.io helm repo update

Install Jenkins on your Kubernetes cluster:

helm install jenkins jenkins/jenkins --namespace jenkins --create-namespace

Retrieve the admin password:

kubectl exec --namespace jenkins -it svc/jenkins -c jenkins -- /bin/cat /run/secrets/chart-admin-password

Access Jenkins at http://:8080 and log in using the admin credentials.

Install Required Plugins

Go to Manage Jenkins > Plugins and install the required plugins, such as Pipeline and Docker Pipeline.

Set Up Docker on Jenkins Node

Ensure Docker is installed on the Jenkins agent node.
Add the Jenkins user to the Docker group:

sudo usermod -aG docker jenkins

Create a Pipeline for Docker Build and Push

In Jenkins, create a new Pipeline item.
Add the following script to your pipeline configuration (replace placeholders with your values):

pipeline {
    agent any
    environment {
        DOCKER_USERNAME = credentials('docker-username')
        DOCKER_PASSWORD = credentials('docker-password')
    }
    stages {
        stage('Checkout') {
            steps {
                git url: 'https://github.com/your-username/your-repo.git'
            }
        }
        stage('Build Docker Image') {
            steps {
                sh 'docker build -t your-username/your-image:latest .'
            }
        }
        stage('Push to Docker Hub') {
            steps {
                sh 'docker login -u $DOCKER_USERNAME -p $DOCKER_PASSWORD'
                sh 'docker push your-username/your-image:latest'
            }
        }
    }
}

Run the Pipeline

Save the pipeline and click Build Now to execute the steps. Jenkins will:
Pull the source code from your repository.
Build a Docker image.
Push the image to your Docker repository.

Setting Up GitHub Actions: Build and Push Workflow

GitHub Actions makes it easier to define workflows directly in the repository using YAML files.

Steps to Configure GitHub Actions:

Add a Workflow File

In your repository, create a folder .github/workflows if it doesn’t exist.
Add a file named docker-build-push.yml.

Define the Workflow

Add the following workflow to the file (replace placeholders with your values):

name: Build and Push Docker Image

on:
  push:
    branches: [ "main" ]

jobs:
  build-and-push:
    runs-on: ubuntu-latest
    steps:
      - name: Check out the repository
        uses: actions/checkout@v2

      - name: Log in to Docker Hub
        uses: docker/login-action@v2
        with:
          username: ${{ secrets.DOCKER_USERNAME }}
          password: ${{ secrets.DOCKER_PASSWORD }}

      - name: Build and Push Docker Image
        run: |
          docker build -t your-username/your-image:latest .
          docker push your-username/your-image:latest

Add Secrets

Go to your repository’s Settings > Secrets and variables > Actions.
Add two secrets:

  • DOCKER_USERNAME (your Docker Hub username)
  • DOCKER_PASSWORD (your Docker Hub password)

Commit and Push Changes

Push your changes to the main branch.
GitHub Actions will automatically run the workflow, building the Docker image and pushing it to Docker Hub.
From a practical perspective and based on our experience, we’ve worked extensively with both Jenkins and GitHub Actions, offering services to set up and manage both tools for different teams and projects. What we’ve observed is that there’s nothing wrong with choosing either tool—it all comes down to your unique requirements. The question is:

Which One Is Better: Jenkins or GitHub Actions?

There’s no such thing as a universally “better” tool in the world of CI/CD. However at KubeNine we are inclined more towards Github Actions. The right choice entirely depends on your team’s requirements, project scale, and infrastructure needs

When Jenkins Might Be the Better Option

Jenkins is ideal if you need a self-hosted solution where everything is completely under your control. You can install Jenkins from scratch and configure it to suit your exact requirements.

It has a rich ecosystem of over 1,800 plugins, allowing integration with countless tools and services. Whether you need advanced pipeline customization, on-premises hosting, or compliance with strict organizational policies, Jenkins gives you the flexibility to achieve it all.

However, it’s worth noting that the support for plugins in Jenkins has seen a decline in recent years.

Some plugins are not actively maintained, and keeping them updated can become a challenge. Additionally, the manual setup and maintenance required for Jenkins can be time-consuming, especially for teams that are new to CI/CD.

When GitHub Actions Might Be the Better Option

GitHub Actions is a great choice if you’re looking for something simple and fast. Unlike Jenkins, it doesn’t require a complex setup process. As we demonstrated in the pipeline example above, all you need is a YAML file in your repository.

You simply define the steps, like building a Docker image or running tests, and GitHub handles the rest for you.

For instance, in our example, setting up a pipeline in GitHub Actions was as easy as writing a few lines of YAML. Want to build a Docker image? Just add one line to specify the Docker build action.

Need to push the image to Docker Hub? Add another action for Docker login and push. It’s all optimized for simplicity and speed, making it especially appealing for small to medium-sized teams or personal projects.

If you need more control, GitHub Actions also supports self-hosted runners. This allows you to host your workflows on dedicated virtual machines or servers, ensuring enhanced security and compliance.

For example, in sensitive environments like banking or healthcare, where dedicated VMs are required for better isolation and control, self-hosted runners provide a strong alternative to Jenkins.

Key Considerations:
Factor

Jenkins

GitHub Actions

Ease of Use

Requires manual setup and maintenance, making it more complex for new users.

Minimal setup; simple YAML-based workflows that are ready to use out of the box.

Infrastructure Control

Fully self-hosted; everything from updates to security patches is in your hands.

Offers GitHub-hosted runners for convenience but also supports self-hosted runners for more control.

Security

Full control over servers, suitable for environments with strict compliance requirements.

Self-hosted runners provide similar security, while GitHub-hosted runners are maintained by GitHub.

Customization

Highly customizable with plugins and Groovy pipelines, but requires expertise to configure.

Simple to customize using pre-built actions or by creating your own custom actions.

Speed and Simplicity

Slower setup due to manual configurations and plugin management.

Faster setup; optimized for GitHub-hosted repositories with minimal effort required.

Final Thoughts

Choose Jenkins if:
You require complete control over your CI/CD environment.
Your workflows are highly complex and need extensive customization.
Your organization has the infrastructure to maintain Jenkins servers and manage plugin updates.
Choose GitHub Actions if:
You want a quick and straightforward CI/CD solution.
Your projects are hosted on GitHub, and you prefer everything in one ecosystem.
You’re looking for a scalable solution without the burden of managing infrastructure.

Do You Really Need to Switch from Jenkins to GitHub Actions?

Github Actions might look cool and enticing but don’t switch to just because it looks cool. If your CI/CD pipelines are already fully set up in Jenkins, running smoothly, and your team is comfortable with the tool, there’s no strong reason to switch just for the sake of it. Based on what we’ve discussed so far, such a move may be unnecessary and could lead to additional effort without significant benefits.

However, if you’re starting fresh—whether in a new company or a new project—and your code is hosted on GitHub, GitHub Actions becomes an obvious choice. It’s easy to set up, integrates natively with GitHub repositories, and provides modern features that align well with today’s DevOps workflows. For teams just getting started, GitHub Actions is undoubtedly the more convenient and efficient option.

Ultimately, the need to switch depends on your specific situation. If Jenkins is working well for your team, stick with it. But if you’re looking for a simpler, GitHub-centric solution for new projects, GitHub Actions is the way to go.

Are There Alternatives to Jenkins and GitHub Actions?

Yes, there are several other CI/CD tools available, each designed for different workflows and requirements. Here are four popular alternatives:

1. GitLab CI/CD

Built into GitLab, this tool helps automate builds, tests, and deployments for projects hosted on GitLab.

2. Azure DevOps Pipelines

Microsoft’s CI/CD solution that integrates well with Azure services and supports multiple repositories.

3. CircleCI

A cloud-based CI/CD tool known for its simplicity and support for Docker-based workflows.

4. Bitbucket Pipelines

Atlassian’s CI/CD solution for Bitbucket repositories, tightly integrated with other Atlassian tools.

Frequently Asked Questions

1. Which is better: Jenkins or GitHub Actions?

It depends on your use case. Jenkins is more flexible and customizable for complex CI/CD pipelines, while GitHub Actions is easier to set up and integrates seamlessly with GitHub repositories.

2. Is Jenkins outdated compared to GitHub Actions?

No, Jenkins is still widely used in production environments. However, GitHub Actions is gaining popularity due to its simplicity and native GitHub integration.

3. When should I use GitHub Actions instead of Jenkins?

Use GitHub Actions if you want:

Quick setup
Tight GitHub integration
Minimal maintenance
It’s ideal for small to medium projects.

4. When is Jenkins a better choice than GitHub Actions?

Jenkins is better when you need:

Advanced customization
Complex pipelines
On-premise CI/CD setup

Conclusion

Choosing the right CI/CD tool depends entirely on your team’s requirements and project needs. Both Jenkins and GitHub Actions have unique strengths—Jenkins offers unmatched control and customization, while GitHub Actions provides simplicity and speed, especially for GitHub-hosted projects.

Along with alternatives like GitLab CI/CD, Azure DevOps Pipelines, CircleCI, and Bitbucket Pipelines, there are plenty of options to fit various workflows.

At Kubenine, we provide services to help you set up infrastructure, automate CI/CD pipelines, and manage cloud-native environments.

Our mission is to handle these technical complexities so you can focus entirely on your product. Whether you need a Jenkins-based solution, GitHub Actions workflows, or support with other tools.

Read More from KubeBlogs

Run Streamlit Reliably in Production using Supervisor
Fix GCP 403 Permission Errors in Compute Engine VMs
Enhance Cloud Security Audits with Prowler (Step-by-Step Guide)

Lambda Execution Roles Are Quietly Breaking Your Least Privilege Policy

Who This Is For

If you are using AWS Lambda to build serverless applications and you have never stopped to look closely at the IAM roles attached to your functions, this blog is for you.

We are going to talk about what a Lambda execution role is, why the way most people set them up creates a security problem, and exactly what you should do instead. Every term will be explained along the way.

A Quick Refresher: What Is an Execution Role?

When a Lambda function runs, it needs permission to interact with other AWS services. For example, if your function reads data from a database or writes a file to S3 (AWS’s file storage service), AWS needs to know whether your function is allowed to do that.

This permission is controlled by something called an IAM execution role. IAM stands for Identity and Access Management. It is the system AWS uses to control who or what can access which resources.

Every Lambda function has an execution role attached to it. When the function runs, it automatically assumes that role and gets whatever permissions the role has. Think of it like a staff ID card. The card determines which rooms in the building you are allowed to enter.

What Is the Least Privilege Principle?

The principle of least privilege is a security concept that says: every user, system, or service should have only the minimum permissions it needs to do its job, and nothing more.

If a Lambda function only needs to read from one specific DynamoDB table (a type of AWS database), it should have permission to read from that one table. It should not have permission to read from all tables, write to tables, delete tables, or access any other AWS service.

This sounds obvious. But in practice, it is almost never what happens.

How Execution Roles Are Usually Set Up

When you create a Lambda function for the first time, AWS creates a basic execution role for you automatically. This default role usually includes permission to write logs to CloudWatch (AWS’s logging service), which is fine.

But here is where the problem starts.

As you build your function and it needs to access more services, the easiest thing to do is go to the role and add more permissions. Need to read from S3? Add s3:GetObject. Actually, to save time, just add s3:* which gives the function permission to do everything in S3. Need to write to DynamoDB? Add dynamodb:*. Need to send messages? Add sns:*.

Within a few iterations, your Lambda function has a role that can read, write, and delete across half your AWS account.

And then there is the even worse pattern: one shared role for all Lambda functions. Instead of creating a separate role for each function, many developers just reuse the same role across every function in the project. It is faster to set up. But now every single function has every permission that any function ever needed.

Why This Is a Real Problem

You might be thinking: my app is not a high value target, nobody is going to attack my Lambda function.

That thinking is what attackers rely on.

Lambda functions are often triggered by external events. An API Gateway request, an S3 file upload, an SNS message. Any of these entry points can potentially be exploited if there is a vulnerability in your code, a dependency with a known security issue, or even a misconfigured trigger.

If an attacker gains control of one Lambda function that has an overly permissive role, they do not just have access to what that function was supposed to do. They have access to everything that role allows. That could mean reading sensitive data from your database, writing files to your storage, sending messages to your users, or even modifying other parts of your infrastructure.

One compromised function becomes a key to your entire account.

The Three Most Common Mistakes

Mistake 1: Using wildcard permissions

A wildcard in IAM policy looks like this:

{
  "Effect": "Allow",
  "Action": "dynamodb:*",
  "Resource": "*"
}

The dynamodb:* means allow all DynamoDB actions. The "Resource": "*" means on all resources. So this one policy line gives your Lambda function full DynamoDB access across your entire account. If your function only needed to read from one table, this is massively over-permissioned.

Mistake 2: Sharing one role across multiple Lambda functions

Every function has different responsibilities. A function that sends a password reset email should not have the same permissions as a function that processes payments. When you share a role, you are taking the maximum permissions needed by any one function and giving them to all functions.

Mistake 3: Never revisiting the role after initial setup

During development, it is common to grant broad permissions just to get things working. The problem is that most developers never go back to tighten those permissions before going live. The overly permissive development role becomes the production role.

How to Fix It

Fix 1: One role per Lambda function

Each Lambda function should have its own dedicated execution role. Yes, this means more roles to manage. But it means a compromised function can only access what it specifically needs, not what any other function needs.

Fix 2: Scope permissions to specific actions and resources

Instead of dynamodb:* on *, write out exactly what the function needs:

{
  "Effect": "Allow",
  "Action": [
    "dynamodb:GetItem",
    "dynamodb:PutItem"
  ],
  "Resource": "arn:aws:dynamodb:us-east-1:123456789012:table/MySpecificTable"
}

This gives permission only to read and write items, and only on one specific table. Nothing more.

The arn in the resource field is a unique identifier for a specific AWS resource. Every resource in AWS has one. Using it in your policy means you are granting access to that one resource, not everything in the service.

Fix 3: Use IAM Access Analyzer to generate policies from actual usage

IAM Access Analyzer is a free AWS tool that can look at your CloudTrail logs (the record of every action taken in your AWS account) and tell you exactly which permissions your Lambda function actually used over a given time period.

Instead of guessing what permissions a function needs, you can run it for a while, then use Access Analyzer to generate a policy based on real usage. This is one of the most accurate ways to arrive at a least privilege policy.

To use it, go to IAM in the AWS console, find the role attached to your Lambda function, and look for the “Generate policy” option under Access Analyzer.

Fix 4: Use permission boundaries as a safety net

A permission boundary is a policy that sets a ceiling on what permissions a role can ever have. Even if someone attaches a broad policy to the role later, the boundary limits the effective permissions.

This is especially useful in team environments where multiple developers are creating and modifying Lambda functions. It acts as a guardrail so that even if someone makes a mistake, the damage is contained.

A Simple Checklist Before You Deploy

Before your Lambda function goes live, go through these:

Does this function have its own dedicated execution role, not shared with any other function?

Does the role use specific actions like dynamodb:GetItem instead of dynamodb:*?

Does the role point to specific resource ARNs instead of *?

Have you removed any permissions that were added during development and are no longer needed?

If you are working in a team, is there a permission boundary in place?

Conclusion

Least privilege is one of the most talked about security principles in cloud development. But it is also one of the most commonly ignored in practice, not because developers do not care, but because the default path leads away from it.

AWS makes it easy to create broad roles. It is faster to write dynamodb:* than to list out every specific action. It is more convenient to reuse one role across all your functions. But each of those shortcuts quietly widens the blast radius if something goes wrong.

Fixing this does not require rebuilding anything. It just requires going back to your Lambda functions one by one, looking at their execution roles, and asking: does this function actually need all of this?

Most of the time, the answer will be no.

Need Help?

If you want help auditing your Lambda execution roles or figuring out what permissions your functions actually need, feel free to reach out.

Email me at [email protected]

Building a Smarter Scheduler: Priority Queues and Layered Execution

Priority and Layered Scheduler

Recap

In the previous article, we explored the relationship between the Scheduler and the dependency Graph, and discussed the challenges of memory management and dependency management.

However, in real-world applications, not all tasks have the same level of urgency:

  • Some updates must take effect immediately, such as text input from the user.
  • Some updates can be deferred, such as animations or low-priority UI updates.

This is where Priority and Layered Scheduling become important.

Why Do We Need Priority?

Imagine this scenario: a user is typing into an input field through input.onChange, while a large background computation is also running, such as a chart re-render.

If both tasks are placed into the same queue without any priority control, the user input may get blocked, leading to a poor user experience.

The solution: allow high-priority tasks, such as input events, to be processed first, while lower-priority tasks are deferred.

Common Priority Levels

In modern frontend frameworks, scheduling systems usually define priority levels similar to the following:

  • Immediate / Sync

    • Examples: text updates in an input field, urgent error messages
    • These must respond immediately and should not be delayed.
  • High Priority

    • Main UI interactions, such as state updates triggered by button clicks.
  • Normal Priority

    • Most non-critical UI updates.
  • Low Priority / Idle

    • Background computation, performance statistics, prefetching, and other non-urgent work.

This ensures that the most important interactions for user experience are always handled first.

Layered Scheduling

Besides priority, another important concept is layering.

We can divide tasks into different layers, where each layer has its own queue, and the Scheduler coordinates the execution between them:

  • Computation Layer

    • Signal / Computed updates
  • UI Layer

    • DOM updates, Virtual DOM diffing
  • I/O Layer

    • Fetch requests, network operations, storage access
  • Idle Layer

    • Non-essential background tasks, such as log collection

This design is somewhat similar to an operating system’s CPU scheduler: different types of tasks are managed separately to prevent them from interfering with each other.

Example Architecture

Here is a simplified version of a Scheduler that supports both priority and layering:

type Priority = "immediate" | "high" | "normal" | "low";

interface Job {
  run(): void;
  priority: Priority;
  layer: "compute" | "ui" | "io" | "idle";
}

const queues: Record<Priority, Job[]> = {
  immediate: [],
  high: [],
  normal: [],
  low: [],
};

export function scheduleJob(job: Job) {
  queues[job.priority].push(job);
  requestFlush();
}

function requestFlush() {
  queueMicrotask(flushJobs);
}

function flushJobs() {
  // Execute jobs by priority
  runQueue(queues.immediate);
  runQueue(queues.high);
  runQueue(queues.normal);
  runQueue(queues.low);
}

function runQueue(queue: Job[]) {
  while (queue.length > 0) {
    const job = queue.shift()!;
    job.run();
  }
}

This is a “single-level priority” example.
If we want to introduce real layering, we can further split queues based on Job.layer.

Understanding the Execution Flow Through a Diagram

Priority and Layered Scheduler

Performance and Optimization Strategies

  • Batching

    • Tasks with the same priority can be merged to avoid duplicated computation.
  • Time-Slicing

    • Long-running tasks can be split into smaller chunks to avoid blocking the main thread.
    • React Concurrent Mode uses this kind of strategy.
  • Waterfall Execution

    • Run high-priority tasks first, then process lower-priority tasks if there is still enough time.
    • If time is insufficient, low-priority tasks can be deferred to the next tick.

Conclusion

Moving from a single queue to a Scheduler with priority and layering has one major goal:

Preserve interaction responsiveness while maximizing performance utilization.

This is why React introduced Concurrent Features, Vue uses a job queue, and signal-based systems are also starting to design more refined scheduling mechanisms.

In the next article, we will dive deeper into Time-Slicing and Cooperative Scheduling, and explore how a scheduler can keep interactions smooth even when handling expensive tasks.

The OAuth Tunnel Trap: Preventing Subdomain Hijacking in Local Development

IT
InstaTunnel Team
Published by our engineering team
The OAuth Tunnel Trap: Preventing Subdomain Hijacking in Local Development
Your local tunnel is closed, but your OAuth redirect is still active. Here’s how attackers hijack free-tier tunnel subdomains to steal authorization codes — and how to lock down your local auth flows before they do.

In the fast-paced ecosystem of modern software development, speed is everything. Developers are constantly spinning up ephemeral preview environments, testing webhook integrations, and configuring complex third-party authentication flows. To bridge the gap between isolated local environments and the public internet, developers rely heavily on localhost tunneling services. Platforms like ngrok, Localtunnel, and Cloudflare Tunnels have become absolute necessities.

However, as we move through 2026, the intersection of ephemeral infrastructure and rigid authentication protocols has birthed a highly exploitable blind spot. Security researchers are increasingly tracking a subtle but devastating vulnerability known as OAuth redirect hijacking. This attack doesn’t rely on zero-day exploits in the OAuth protocol itself — it preys on developer habits, the lifecycle of free-tier tunnel subdomains, and the lingering trust embedded in identity providers like Google, GitHub, and Stripe.

This is the OAuth Subdomain Trap — a critical localhost tunnel security failure that occurs when the convenience of temporary URLs collides with permanent access privileges.

The Anatomy of Localhost Tunneling
To understand the trap, we first must understand the tool.

When a developer is building an application on their laptop, it typically runs on a local port (e.g., http://localhost:3000). This is fine for isolated UI work, but the moment the application needs to interact with the outside world — receiving a Stripe payment webhook or completing a “Login with Google” OAuth flow — the public internet needs a way to route traffic back to that developer’s specific machine.

Tunneling services solve this by creating a secure connection between the local machine and a cloud gateway. When a developer runs a command like ngrok http 3000, the tunneling service provisions a public, publicly accessible URL (e.g., https://random-string-123.ngrok-free.app). Any traffic hitting that public URL is routed through the provider’s infrastructure, down the tunnel, and directly into the developer’s local port.

The problem lies in the ephemeral nature of these free-tier subdomains. They are designed to be temporary. The moment the developer terminates the process or closes their laptop, the tunnel collapses. Shortly after, the provider returns that random string back to the pool of available subdomains, ready to be issued to the next user who requests a tunnel.

The Eroding Free Tier Landscape
The tunneling market has matured significantly and the risk landscape has shifted alongside it. As of 2026, ngrok’s free tier offers 1 GB bandwidth/month, a single endpoint, and random (non-persistent) URLs. A paid personal plan starts at $8–10/month and unlocks custom subdomains — a critical security feature, not just a convenience. In February 2026, the DDEV open-source project publicly opened an issue to consider dropping ngrok as its default sharing provider entirely, citing increasingly restrictive free-tier constraints.

Meanwhile, Localtunnel — long the open-source darling — has suffered from classic maintenance neglect: no sustainable funding model, slowing updates, and frequent server downtime. Professional developers have largely moved on. This fragmentation matters because it pushes more teams toward unvetted free-tier alternatives with opaque subdomain recycling policies, widening the attack surface.

The OAuth 2.0 Authorization Code Flow
The second component of the trap is the OAuth 2.0 protocol itself, specifically the widely used Authorization Code grant flow.

When a user clicks “Login with Google” on your application, your app redirects the user’s browser to Google’s authentication servers. Included in this redirect is a parameter called the redirect_uri. This tells Google: “Once the user has successfully logged in and granted permission, send them back to this specific web address with an authorization code.”

To prevent attackers from arbitrarily changing the redirect_uri and stealing the authorization code, OAuth providers require developers to strictly pre-register their allowed callback URLs in a developer console. If the requested redirect_uri doesn’t match the pre-approved list, the provider throws an error and halts the flow.

During local development, a developer building a login system will spin up a tunnel, get their temporary URL (https://dev-app-abc.ngrok-free.app), and paste https://dev-app-abc.ngrok-free.app/api/auth/callback into their Google Cloud Console, Stripe Dashboard, or Slack API settings.

The application works perfectly. The developer tests the login, the identity provider sends the code to the tunnel, the tunnel routes it to localhost, and the developer successfully logs in.

Then, Friday afternoon arrives. The developer shuts down their tunnel and goes home.

But the redirect_uri remains whitelisted in the identity provider’s dashboard.

The Mechanics of the Trap: Subdomain Hijacking
The moment the developer closes their tunnel, a ticking time bomb is armed. The local endpoint is dead, but the cloud configuration still fully trusts the dead URL.

Threat actors understand that developers frequently abandon ephemeral subdomains while leaving them fully authorized in high-value third-party platforms. Exploiting this requires a methodical, automated approach.

Step 1: Reconnaissance and Scraping
Attackers do not blindly guess ngrok or Localtunnel subdomains. Instead, they run continuous, automated scraping operations across public data sources:

Public GitHub/GitLab Repositories: Developers often accidentally commit .env files or README.md documentation containing their temporary tunnel URLs.
Developer Forums and Issue Trackers: StackOverflow posts, GitHub issues, and Discord servers are goldmines where developers paste error logs containing their OAuth configuration details.
Certificate Transparency Logs: Depending on how the tunneling service provisions SSL/TLS certificates, the issuance of new subdomains can sometimes be tracked in real-time.
Step 2: The Squatting Phase
Once an attacker identifies an ephemeral tunnel URL associated with a target project, they periodically attempt to claim that exact subdomain. Some open-source tunneling services allow users to explicitly request a specific subdomain (e.g., lt –port 8000 –subdomain dev-app-abc). If the developer has released the subdomain, the attacker’s script successfully claims it. The attacker now controls the very endpoint that the victim’s identity provider explicitly trusts.

Step 3: Triggering the Exploit
With the subdomain secured, the attacker simply needs the victim — or a user of the victim’s application — to initiate an OAuth flow. If the application is still actively used in a staging environment, or if the attacker can trick a user into clicking a crafted login link, the OAuth provider will authenticate the user and faithfully redirect the browser — along with the highly sensitive authorization code — straight to the attacker’s squatted tunnel.

This attack pattern has been confirmed in real-world scenarios. In March 2026, Microsoft researchers revealed an active phishing campaign abusing OAuth authentication redirects to target government and public-sector organizations, redirecting users from trusted login pages to attacker-controlled infrastructure to serve malware or capture credentials. The OAuth authentication redirection mechanism — trusted and built into Microsoft, Google, and others — was the delivery vehicle.

Step 4: Code Interception and Token Exchange
The attacker’s listening server receives the HTTP request containing the ?code=XYZ123 parameter. Because OAuth authorization codes are short-lived, the attacker’s automated script immediately takes that code and exchanges it with the identity provider for a permanent Access Token.

The attacker now has full, authenticated access to the victim’s account — Google Workspace, GitHub repositories, Stripe financial data — without ever needing their username, password, or bypassing Two-Factor Authentication (2FA).

The 2026 Threat Landscape: AI Agents and CI/CD Compromise
While OAuth redirect hijacking has existed theoretically for years, 2026 has seen a massive escalation in its practical exploitation, driven by the explosion of Agentic AI workflows and automated CI pipelines.

The MCP + OAuth Attack Surface: CVE-2025-6514
The intersection of OAuth and AI agents is no longer theoretical. In July 2025, JFrog Security Research disclosed CVE-2025-6514 — a critical vulnerability (CVSS score 9.6–9.7) in mcp-remote, a widely used npm proxy that enables LLM hosts like Claude Desktop, Cursor, and Windsurf to communicate with remote MCP servers. The vulnerability affected versions 0.0.5 through 0.1.15 and had been downloaded nearly 559,000 times before disclosure.

The attack vector exploited a pattern baked into OAuth’s own design: dynamic discovery of authorization endpoints. When mcp-remote connected to a remote MCP server, it would ask: “Server, tell me where to authenticate.” A malicious server could respond with a crafted authorization_endpoint URL containing a PowerShell subexpression payload. Because mcp-remote passed this value unsanitized to an OS-level command (a browser launcher), the result was arbitrary OS command execution on the developer’s machine — the first documented case of full remote code execution achieved through the MCP infrastructure.

Exploitation required only one action from the victim: connecting to a malicious MCP server. No further interaction was needed. Organizations affected included those using Cloudflare, Hugging Face, and Auth0 integrations. The fix was released in mcp-remote v0.1.16, but the architectural lesson is stark: every OAuth integration in an agent system is a potential attack vector — not because OAuth is broken, but because its trust assumptions don’t match the autonomous nature of agentic AI.

AI Hallucination Squatting
Beyond CVE-2025-6514, the broader pattern of AI agent + tunnel + OAuth is dangerous. Developers routinely use ephemeral tunnels to expose local agent interfaces to cloud-based LLMs. If a developer abandons an OAuth-gated tunnel used by an AI agent, an attacker who squats the domain can serve malicious instructions. When the agent attempts to authenticate or fetch context from what it believes is its trusted local endpoint, the attacker can inject prompt-injection payloads or intercept the agent’s OAuth tokens, effectively gaining autonomous control over the developer’s environment.

The CI/CD Preview Environment Risk
Modern CI/CD platforms automatically spin up “Preview Environments” for every pull request, often utilizing free-tier tunnel services to expose the preview to the internet. These environments are frequently hooked into staging databases and OAuth providers for testing purposes.

When the pull request is merged, the tunnel is destroyed — but the OAuth whitelist entries are rarely scrubbed automatically. This is compounded by real-world supply chain risk: in January 2025, the largest known SaaS OAuth breach of that year began with a compromised third-party app. Attackers then exploited Salesloft-Drift OAuth tokens, gaining access to hundreds of downstream environments. Obsidian Security researchers noted the blast radius was ten times greater than previous incidents where attackers had targeted Salesforce directly.

The Business Impact of Localhost Vulnerabilities
The business impact of this class of localhost tunnel security failure cannot be overstated. Because OAuth is fundamentally a protocol of delegated authorization, the blast radius depends entirely on the scopes granted by the compromised application:

Source Code Theft: A hijacked redirect for a GitHub OAuth application with repo scope lets the attacker silently clone all private repositories of the authenticated user.
Financial Fraud: A compromised Stripe OAuth connection allows the attacker to view customer data, manipulate subscription plans, or initiate unauthorized refunds.
Shadow IT Persistence: Unlike a compromised password that can be reset, a stolen OAuth access token — or a newly minted refresh token — can provide attackers with persistent, silent access to cloud applications for months before being detected.
Furthermore, these attacks are incredibly difficult to detect in standard server logs. Because the identity provider sent the traffic to a legitimate, whitelisted domain, the transaction looks perfectly normal to Google or GitHub. Because the traffic hit the attacker’s tunnel instead of the developer’s local machine, the victim has no logs indicating a breach occurred.

An important real-world parallel comes from Azure. Secureworks researchers documented a class of redirect URI takeover vulnerabilities where an organization had lost control of a subdomain (because the underlying Azure resource group was deleted), yet the OAuth redirect URI remained registered. Threat actors could re-register the subdomain in their own Azure tenant and use it to steal authorization codes and ID tokens — all while appearing to be the legitimate application.

How to Lock Down Your Local Auth Flows
Preventing the OAuth Subdomain Trap requires a fundamental shift in how engineering teams view local development. The traditional mindset that “localhost is a safe sandbox” is obsolete. Local environments must be treated as hostile edge networks.

  1. Mandate Persistent, Custom Subdomains
    The root cause of this vulnerability is the high turnover of ephemeral subdomains. The most effective mitigation is to stop using randomized free-tier URLs for any flow involving authentication.

If your team uses ngrok or Cloudflare Tunnels, invest in plans that allow you to reserve permanent, custom subdomains or connect a subdomain on a domain your organization controls (e.g., alice-dev.yourcompany.com). Because your organization owns the root domain and controls the DNS, an attacker can never squat or claim the subdomain after the developer logs off.

  1. Implement PKCE (Proof Key for Code Exchange)
    Originally designed for mobile applications that couldn’t securely store client secrets, PKCE (RFC 7636) is now an industry-standard requirement — not a mere recommendation — for all OAuth 2.0 implementations.

In January 2025, the IETF published RFC 9700: Best Current Practice for OAuth 2.0 Security, updating and extending the threat model from the original OAuth 2.0 specifications first published in 2012. RFC 9700 explicitly recommends PKCE for all client types and codifies lessons learned from real-world breaches including Booking.com’s open redirect vulnerability and Google’s domain inheritance flaw. The forthcoming OAuth 2.1 draft goes further: it makes PKCE mandatory for all flows and deprecates the implicit grant entirely.

PKCE completely neuters the subdomain hijacking attack. The client application generates a cryptographically random code_verifier and sends a hashed version (code_challenge) with the initial authorization request. Even if an attacker hijacks the ephemeral tunnel and intercepts the authorization code, they cannot exchange it for an Access Token without the original code_verifier, which never left the developer’s local machine.

[Client] → code_challenge (hashed) → [Identity Provider]
[Identity Provider] → authorization_code → [Attacker’s squatted tunnel]
[Attacker] → tries to exchange code → [Identity Provider REJECTS: no code_verifier]

  1. Strict State Parameter Validation
    The OAuth state parameter is designed to prevent Cross-Site Request Forgery (CSRF), but it also serves as a critical defense-in-depth layer against hijacked redirects.

Before initiating the OAuth flow, the local application must generate a secure, unguessable state token and store it in a local session cookie. When the identity provider redirects the user back, it includes this state parameter. The application must verify that the state returned exactly matches the state stored in the cookie. RFC 9700 explicitly mandates this: clients must either rely on PKCE for CSRF protection (when the authorization server supports it) or use one-time CSRF tokens carried in the state parameter.

  1. Zero Trust and Edge Authentication
    In 2026, relying solely on secret URLs or IP whitelisting is insufficient. Modern localhost tunnel security requires enforcing identity at the edge, before traffic ever reaches the local machine.

Platforms like Cloudflare Access and the ngrok Traffic Policy engine allow developers to place an OpenID Connect (OIDC) or SAML authentication layer directly on the tunnel’s public endpoint. With edge authentication, even if an attacker successfully squats an abandoned tunnel URL, they cannot receive HTTP requests. The tunnel’s edge gateway intercepts any request and demands corporate IdP authentication. Because the attacker does not possess corporate credentials, the gateway drops the request — and the stolen authorization code never reaches the attacker’s server.

  1. Automated Hygiene and Cleanup Programs
    Organizations must treat third-party developer consoles as critical infrastructure. Security teams should use API integrations to periodically audit redirect_uri whitelists across all corporate OAuth applications — Google Workspace, GitHub, Slack, Stripe, and others.

Any URI pointing to a known ephemeral tunneling service (*.ngrok.io, *.ngrok-free.app, *.loca.lt, *.trycloudflare.com) should be flagged and automatically purged if it has not been actively justified within a defined timeframe (e.g., 7 days). Automation prevents the accumulation of “ghost” URIs that serve as permanent backdoors for opportunistic attackers.

  1. Enforce HTTPS-Only and Trusted Server Policies for AI Agents
    Given the lessons from CVE-2025-6514, any development workflow involving MCP agents or AI tool integrations must enforce a strict HTTPS-only, trusted-server connection policy. Teams should:

Audit all MCP server configurations and remove any insecure HTTP connections.
Maintain an allowlist of approved MCP server origins.
Update mcp-remote to v0.1.16 or later immediately if any prior version is in use.
Treat MCP server metadata (including authorization_endpoint responses) as untrusted input — never pass it directly to OS-level system calls.
A Summary of Controls
Threat Mitigation
Ephemeral subdomain squatting Persistent custom subdomains (paid tier / own domain)
Authorization code interception PKCE (RFC 7636), mandated by RFC 9700
CSRF and state forgery Strict state parameter validation
Attacker receives traffic on squatted URL Zero Trust edge authentication (OIDC/SAML)
Ghost redirect_uri in OAuth consoles Automated audit and cleanup pipelines
MCP agent OAuth endpoint injection (CVE-2025-6514) HTTPS-only MCP connections; mcp-remote ≥ v0.1.16
Conclusion: Securing the New Developer Edge
The era of trusting temporary infrastructure with permanent credentials is over. The OAuth Subdomain Trap perfectly illustrates how a minor convenience — using a free, randomized URL to test a login flow — can inadvertently expose an entire organization to catastrophic data breaches.

The attack surface has expanded dramatically. Microsoft documented active OAuth redirect abuse campaigns targeting government organizations in early 2026. JFrog disclosed a critical CVSS 9.6 RCE vulnerability in a tool used by nearly 560,000 developers, rooted entirely in how OAuth dynamic discovery was trusted. And the IETF codified a decade of hard-won lessons in RFC 9700, effectively declaring that the relaxed, flexible OAuth patterns of 2012 are no longer acceptable in 2025 and beyond.

An abandoned tunnel can be squatted and weaponized in minutes. To survive in this environment, engineering teams must abandon the illusion of the localhost sandbox. By enforcing persistent custom domains, mandating PKCE across all OAuth flows, deploying Zero Trust authentication at the tunnel edge, and treating AI agent OAuth discovery as untrusted input, organizations can confidently build and test complex integrations — without leaving the door wide open for the next wave of subdomain hijackers.

The security bar has moved. Development workflows must move with it.

Further reading: RFC 9700 – Best Current Practice for OAuth 2.0 Security · CVE-2025-6514 JFrog Advisory · Microsoft: OAuth Redirection Abuse · Secureworks: Azure Redirect URI Takeover

Related Topics

oauth redirect hijacking, localhost tunnel security, subdomain takeover 2026, oauth tunnel trap, ephemeral tunnel vulnerability, ngrok subdomain hijacking, local auth flow security, authorization code interception, secure local development, local reverse proxy exploit, redirect_uri allowlist vulnerability, dynamic dns hijacking, oidc redirect security, identity provider redirect trap, local tunnel hardening, oauth state validation, pkce localhost, open redirect vulnerability, third-party tunnel risks, dev server subdomain takeover, secure token exchange, automated botnet subdomain claiming, web app authentication security, cloudflared subdomain takeover, port forwarding security 2026, web security best practices, multi-tenant app vulnerability, intercepting authorization tokens, blocking oauth hijacking, developer environment hardening, custom dev domains, temporary tunnel exposure, local login security, api integration testing vulnerability, webauthn local testing, security auditing local tunnels, web application security 2026, threat vectors local proxies, devops local auth mitigation, preventing token leakage

How Spring does JWT verification based on RS256

RS256 JWT flow between two microservices, then how Spring actually validates it internally.

how Spring Security internally validates that JWT step by step.

Here’s what the actual code looks like in the Inventory Service (spring-boot-starter-oauth2-resource-server):
application.yml — tell Spring where to fetch the public key:


spring:
  security:
    oauth2:
      resourceserver:
        jwt:
          jwk-set-uri: http://auth-service/oauth2/jwks

SecurityConfig.java — configure the filter chain:


@Configuration
@EnableWebSecurity
public class SecurityConfig {

    @Bean
    public SecurityFilterChain filterChain(HttpSecurity http) throws Exception {
        http
          .authorizeHttpRequests(auth -> auth
           .requestMatchers("/api/inventory/reserve").hasRole("ORDER_SVC")
              .anyRequest().authenticated()
          )
          .oauth2ResourceServer(oauth2 -> oauth2
              .jwt(jwt -> jwt.jwtAuthenticationConverter(jwtAuthConverter()))
          );
        return http.build();
    }

    @Bean
    public JwtAuthenticationConverter jwtAuthConverter() {
        JwtGrantedAuthoritiesConverter converter = new JwtGrantedAuthoritiesConverter();
        converter.setAuthoritiesClaimName("roles");      // map "roles" claim → GrantedAuthority
        converter.setAuthorityPrefix("ROLE_");
        JwtAuthenticationConverter jwtConverter = new JwtAuthenticationConverter();
        jwtConverter.setJwtGrantedAuthoritiesConverter(converter);
        return jwtConverter;
    }
}

InventoryController.java — the endpoint is now protected:


@RestController
@RequestMapping("/api/inventory")
public class InventoryController {

    @PostMapping("/reserve")
    @PreAuthorize("hasRole('ORDER_SVC')")
    public ResponseEntity<String> reserveStock(
            @RequestBody ReserveRequest req,
            @AuthenticationPrincipal Jwt jwt) {   // inject the parsed JWT

        String callerService = jwt.getSubject();  // "order-service"
        // proceed with reservation...
        return ResponseEntity.ok("Reserved for " + callerService);
    }
}

What does BearerTokenAuthenticationFilter do exactly in Spring Security?

What BearerTokenAuthenticationFilter does
It is a OncePerRequestFilter — guaranteed to run exactly once per request, sitting early in Spring Security’s filter chain. Its entire job is to bridge the raw HTTP world (a string in a header) to Spring Security’s authentication world (a typed Authentication object in the SecurityContext).

Step 1 — Token extraction via DefaultBearerTokenResolver
It reads the Authorization header and strips Bearer from the front. It also optionally checks request parameters (access_token=…) if you configure allowFormEncodedBodyParameter or allowUriQueryParameter. If no token is found at all, it just calls chain.doFilter() — the request passes through unauthenticated, and a later filter or your controller will enforce access.

Step 2 — Wraps the raw token in BearerTokenAuthenticationToken
This is a lightweight container that holds the raw JWT string and is marked as not yet authenticated (isAuthenticated() = false). Think of it as the question — “here’s a token, can you validate it?”

Step 3 — Hands off to AuthenticationManager
The filter calls authenticationManager.authenticate(token). The manager routes this to JwtAuthenticationProvider, which calls NimbusJwtDecoder to do the actual RS256 verification, expiry check, issuer check, etc.

Step 4a — On success: populates SecurityContextHolder
If authentication succeeds, the provider returns a fully populated JwtAuthenticationToken (which is authenticated, carries the parsed claims, and has GrantedAuthority objects derived from your roles). The filter stores this in SecurityContextHolder.getContext().setAuthentication(…), then calls chain.doFilter() — the request proceeds to your controller, where @PreAuthorize and @AuthenticationPrincipal work because the context is populated.

Step 4b — On failure: delegates to AuthenticationEntryPoint
If the provider throws JwtValidationException (bad signature, expired, wrong issuer), the filter catches it, clears the SecurityContext (important — prevents stale auth from leaking), and calls authenticationEntryPoint.commence(…), which writes a 401 Unauthorized response with a WWW-Authenticate: Bearer error=”invalid_token” header.

Key things it does NOT do
It does not do authorization — that’s AuthorizationFilter further down the chain.
It doesn’t decode the JWT itself — that’s NimbusJwtDecoder.
It doesn’t map claims to roles — that’s JwtAuthenticationConverter.

The filter’s job is purely: extract → wrap → delegate → store or reject.

93 Agents. 2.6 Billion Tokens. One Working OS. And a Bill Under $1,000.

This is a submission for the Google I/O Writing Challenge

Google I/O 2026 had a lot of shiny objects. Gemini Omni simulating intuitive physics. Smart glasses built with Warby Parker. Gemini Spark acting as a 24/7 background concierge that handles your grocery shopping and your inbox while you sleep.

The consumer tech press is going to spend the next month writing about the glasses. I get it.

But if you actually build software for a living, the moment that should have stopped you cold had nothing to do with hardware. It happened during the Antigravity 2.0 demo, when Google gave an agent a single prompt:

“Build a working operating system from scratch.”

Here’s what happened over the next 12 hours:

  • 93 sub-agents worked in parallel
  • 15,000+ model requests fired
  • 2.6 billion tokens processed
  • The agents wrote a scheduler, memory management, and a file system
  • They wrote their own tests and audited their own code
  • It booted. It ran Doom.

And the total API cost?

Under $1,000.

That number is the real announcement of I/O 2026. Not the model name. Not the demo. The economics.

Why the $1,000 Number Changes Everything

We’ve spent the last three years treating token costs as the fundamental constraint on autonomous agents. The math was always the problem. An agent that gets stuck in a debugging loop burns through your monthly budget by Tuesday. That cost ceiling was why production agentic systems were conservative — short context, minimal tool use, human-in-the-loop at every expensive step.

2.6 billion tokens for an OS. Under $1,000.

Gemini 3.5 Flash is publicly stated to be 4x faster than comparable frontier models. Inside the Antigravity harness, Google co-optimized it to run at 12x speed. When intelligence drops in price by this magnitude, brute-force asynchronous generation isn’t a party trick anymore. It becomes a legitimate engineering strategy.

The ceiling that shaped how we designed agentic systems just moved.

Model Approx. cost for 2.6B tokens
GPT-4o (~$2.50/M input) ~$6,500
Claude 3.5 Sonnet (~$3/M input) ~$7,800
Gemini 3.5 Flash at I/O 2026 demo rates < $1,000

That’s a ballpark, not exact accounting — Google hasn’t published the precise per-token rate for the Antigravity harness. But the order-of-magnitude difference is real, and it’s structural, not a promo credit.

The Actual Primitive: What Managed Agents Gives You

Before I/O, building a production-grade agent meant assembling your own stack. Docker for the execution environment. Networking constraints so the agent doesn’t call APIs it shouldn’t. State serialization so a multi-hour task survives a process restart. Secret management so your API keys don’t end up in the agent’s context window. YAML for everything.

That was 2–3 weeks of DevOps before you wrote a single line of agent logic.

Google just killed that entire category of toil with Managed Agents in the Gemini API.

A single API call now gives you:

  • An agent that reasons, uses tools, and executes code
  • An isolated, ephemeral Linux sandbox hosted by Google
  • File management, web browsing, and shell access
  • Session continuity across calls via interaction_id and environment_id

Here’s what that API call actually looks like:

from google import genai

client = genai.Client(api_key="YOUR_API_KEY_HERE")

interaction = client.interactions.create(
    agent="antigravity-preview-05-2026",
    environment={"type": "remote"},
    input=(
        "Analyze the attached codebase for security vulnerabilities, "
        "write a detailed report, and output it as security-report.md"
    )
)

# The agent's final response
print(interaction.output_text)

# Every file the agent created in the sandbox
for file in interaction.files:
    client.files.download(file.id, destination=f"./{file.name}")

# Every step the agent took — reasoning, tool calls, code execution
for step in interaction.steps:
    print(f"[{step.type}] {step.content[:200]}")

I ran this on a standard Google AI account. Here’s what actually happened:

UserWarning: Interactions usage is experimental and may change in future versions.

google.genai._interactions.RateLimitError: Error code: 429
{'error': {'message': 'You do not have enough quota to make this request.'}}

Two things worth noting. First, the UserWarning is honest — this is preview software and Google is telling you that directly in the SDK. Second, the 429 is the real pushback I was already going to make anyway: the Managed Agents API is quota-gated. On a standard account, you hit the wall immediately. AI Ultra ($100/month) is the actual production gate for this feature, not just a suggestion buried in the pricing page.

The code is correct. The API is real. The ceiling is just lower than the keynote demo implies.

How the Architecture Actually Works

This is the part that’s easy to miss in the keynote framing. The Managed Agent API isn’t a hosted LangChain wrapper. There’s a specific design here worth understanding.

Your API call
      │
      ▼
┌──────────────────────────────────────┐
│  Interactions API                    │
│  (session management + routing)      │
└───────────────┬──────────────────────┘
                │
                ▼
┌──────────────────────────────────────┐
│  Antigravity Agent Harness           │
│  (reasoning loop + tool dispatch)    │
│                                      │
│  ┌──────────────────────────────┐    │
│  │  Gemini 3.5 Flash            │    │
│  │  (the reasoning engine)      │    │
│  └──────────────────────────────┘    │
└───────────────┬──────────────────────┘
                │
                ▼
┌──────────────────────────────────────┐
│  gVisor-Isolated Linux Sandbox       │
│  ├── Code execution                  │
│  ├── File system (ephemeral)         │
│  ├── Shell access                    │
│  └── Controlled web browsing         │
└──────────────────────────────────────┘

A month ago at Google Cloud NEXT ’26, I wrote that the real story wasn’t the Gemini Enterprise Agent Platform — it was GKE Agent Sandbox. Sub-second provisioning. gVisor isolation. 300 sandboxes per second. That was the infrastructure primitive being quietly shipped while everyone was focused on the rebrand.

Yesterday at I/O, we saw the developer API built directly on top of that primitive.

The GKE Agent Sandbox is what makes “single API call, isolated Linux environment” possible without a 30-second cold start. The Managed Agents API is the abstraction layer over it. Google has been shipping this stack in layers for months. I/O 2026 is when the top layer arrived.

The AGENTS.md and SKILL.md Pattern

Here’s the detail from the Managed Agents announcement that’s getting almost no coverage: agent behavior is defined in versionable Markdown files.

# AGENTS.md — defines agent identity and constraints

## Role
You are a security auditing agent. Your job is to analyze codebases
for vulnerabilities and produce structured reports.

## Constraints
- Never modify files in the /prod directory
- Only read from sources listed in environment.sources
- Always write output to /output/

## Tools available
- code_execution: run Python, Node, Bash
- web_search: look up CVE databases, documentation
- file_management: read/write within sandbox
# SKILL.md — reusable procedures the agent can invoke

## security_scan
1. Run static analysis with bandit (Python) or semgrep (multi-language)
2. Check dependencies against known CVE databases
3. Generate structured findings with severity levels
4. Output to /output/security-report.md

## dependency_audit
1. Parse package.json / requirements.txt / go.mod
2. Check each dependency against OSV database
3. Flag transitive vulnerabilities
4. Output upgrade recommendations

Logan’s quote from the Developer Keynote is accurate: “Honestly, it feels like the hottest new programming language is Markdown.”

The benefit isn’t syntax. It’s version control, code review, diffing, and auditability — applied to agent behavior for the first time. Your agent’s skill set lives in your git repo. PRs exist for it. Rollbacks exist for it. Your agent’s behavior has a commit history.

That’s what shifts this from a clever demo to a production primitive.

Where I’d Actually Push Back

I want to be honest about what the 93-agent OS demo doesn’t tell you.

Orchestrating 93 parallel agents introduces a terrifying class of state management problems. If Agent 42 is refactoring the memory scheduler while Agent 17 is updating the file system architecture and they introduce a race condition — how do you debug that? Chrome DevTools for Agents helps agents audit their own code. It doesn’t help you trace the interactions between dozens of asynchronous actors. That monitoring tooling doesn’t fully exist yet.

The sandbox security model has the same gap I flagged at NEXT. gVisor isolates syscalls. It doesn’t isolate intent. An agent with valid credentials that makes a destructive call to a production endpoint isn’t stopped by the execution sandbox. The answer is fine-grained IAM and network egress controls, but the integration story between sandbox-level networking and agent-level permission scoping is still evolving.

Gemini 3.5 Pro still isn’t here. The model designed to act as orchestrator for Flash subagents was delayed to next month. That’s the piece that makes the 93-parallel-agent pattern safe to build on. Until Pro ships, you’re orchestrating with Flash, which works — but isn’t the intended architecture.

And as I found out firsthand — the quota wall is real. Standard accounts hit 429 errors immediately. AI Ultra is the actual entry ticket for anything beyond a toy run.

None of these kill the announcement. They’re what you need to know before you plan a sprint around it.

What To Actually Do This Week

Get API access through Google AI Studio. Even if you hit the quota wall like I did, you’ll see the SDK structure, understand the step output format, and be ready the moment quota opens up.

When you do get through, start with something concrete — a task that would take you 30 minutes manually:

from google import genai

client = genai.Client(api_key="YOUR_API_KEY_HERE")

interaction = client.interactions.create(
    agent="antigravity-preview-05-2026",
    environment={"type": "remote"},
    input=(
        "Research the top 5 open-source vector databases by GitHub stars. "
        "Compare them on: license, language, query performance benchmarks, "
        "managed cloud options, and community activity. "
        "Output a comparison table and a one-paragraph recommendation "
        "as research-report.md"
    )
)

print(interaction.output_text)

# This is the part actually worth reading on your first run
for i, step in enumerate(interaction.steps):
    print(f"n[Step {i+1}] {step.type}")
    print(step.content[:300])

The agent will web search, compare, reason, write, and hand you a file. The point isn’t speed — it’s that you defined a task in plain English, provided zero infrastructure, and got a deliverable.

Read through interaction.steps carefully on your first few runs. Understanding how the agent breaks down tasks — and where it over-reasons — is how you learn to write better AGENTS.md constraints. The step output is where the actual engineering signal lives.

The Takeaway

I/O 2026 was the conference where the industry stopped building AI wrappers and started building AI infrastructure.

The consumer tech press will write about the glasses. Fine. But the developers who spend this week understanding how to call the Managed Agents API, define SKILL.md files for their domain, and instrument the step output are the ones who ship production agentic systems in June — while everyone else is still configuring Docker execution environments.

The barrier to deploying a stateful, sandboxed, multi-hour autonomous agent went from three weeks of DevOps to one API call and a Markdown file.

The quota wall is real. The preview label is honest. The primitive underneath it is not going away.

That’s the real headline.

Have you tried the Managed Agents API yet? And for anyone who’s shipped real agentic systems before — what’s the debugging story you’re most nervous about at 93-agent scale? Drop it in the comments.

Written by me after watching the I/O developer keynote and reading the official Managed Agents quickstart docs at [ai.google.dev]-huh! took a hell of a time but nonetheless i enjoyed it.(https://ai.google.dev/gemini-api/docs/managed-agents-quickstart). Code samples derived from official Google documentation. I ran the API myself — that 429 error is real.

Stop Getting ‘It Depends’ Answers About RAG Architecture

Ask five AI engineers which vector database to use for your RAG system. You’ll get five different answers, and they’ll all start with “it depends.”

It depends on your data volume. It depends on your query patterns. It depends on whether you need GDPR compliance. It depends on your team’s infra maturity. It depends on your budget. It depends on whether you’re doing hybrid search.

The “it depends” answer is technically correct and operationally useless. It turns an architecture decision into an unbounded research project.

I built RAG Readiness to make one specific recommendation per component — and explain why.

→ Full tool page

The Design Principle: Opinions, Not Options

Most RAG tooling and documentation presents you with a comparison table. Pinecone vs. Weaviate vs. Qdrant vs. Chroma. BM25 vs. dense vs. hybrid. ada-002 vs. text-embedding-3-large.

Comparison tables are useful if you already know which dimensions matter for your use case. They’re paralyzing if you don’t.

RAG Readiness is opinionated by design. You describe your use case, your data, your constraints. The tool returns one choice per component — with full reasoning.

If GDPR applies, managed cloud vector databases are eliminated from consideration before Claude is even called. That’s a rule, not an LLM judgment. The recommendation you receive is already constraint-filtered.

Six Modes, One Tool

Architecture Recommendation

The core mode. Answer a structured set of questions about your use case — document types, query patterns, scale, compliance requirements, team capabilities. Get back:

  • Vector database: one specific choice with rationale
  • Embedding model: one specific choice
  • Chunking strategy: one specific approach with parameters
  • Retrieval method: dense / BM25 / hybrid — one answer
  • Reranker: whether you need one and which
python main.py audit --interactive
# or from file:
python main.py audit --file examples/usecase_legal_contracts.json --with-cost

Architecture Diagnosis

You already have a RAG system. It’s not working. This mode takes your existing architecture and the problems you’re seeing, and returns a root-cause analysis per component with severity levels and one specific fix.

Not “improve your chunking” — “switch from fixed 512-token chunks to parent-child hierarchical chunking with 512-token child nodes. Your documents have multi-clause structure that fixed chunks split mid-sentence.”

python main.py diagnose --file examples/diagnosis_pinecone_fixed.json

Example output:

overall_severity: critical

chunking_strategy — critical
  "Fixed 512-token chunks split mid-clause in long legal documents"
  Fix: Parent-child hierarchical chunking, 512-token child nodes

retrieval_method — high
  "Dense-only misses exact terms like dollar amounts and clause references"
  Fix: Hybrid BM25 + dense with RRF fusion

quick_fix: Enable 10% token overlap today. Takes 20 minutes, reduces
           the worst failures while you implement the full fix.

Multi-Use-Case Session

Run up to 5 parallel audits in a single request — useful when you’re scoping a RAG platform that needs to serve multiple internal teams.

The output includes cross-cutting insights: which components can be shared across use cases, where requirements conflict (the legal team needs GDPR-compliant storage; the sales team wants managed cloud), and which use case to build first for the highest return on the shared infrastructure investment.

Implementation Bundle

Once you have an architecture you trust, generate a complete implementation starter kit:

python main.py bundle <session-id>

Output: a requirements.txt, docker-compose.yml, .env.example, and migration guide tailored to the recommended architecture. If you have an existing stack, you get ordered migration steps with rollback notes.

Cost Estimation

Rule-based monthly cost breakdown per component — no LLM call. Lookup tables for vector DB pricing tiers, embedding API costs, reranker inference, and LLM costs at your estimated query volume.

python main.py cost <session-id>

Returns a line-item breakdown, optimization tips (e.g., “switching to a self-hosted embedding model saves ~$800/month at this query volume”), and a hosting model classification (managed vs. self-hosted trade-off at your scale).

RAGAS Eval Dataset Generation

Generate evaluation questions grounded in your actual use case and query patterns — not generic retrieval questions.

python main.py eval-dataset <session-id> --num-questions 20

Output includes easy/medium/hard distribution, RAGAS metric mapping (which questions test faithfulness vs. answer relevancy vs. context precision), an annotation guide, and a time estimate for human review.

Session Persistence and Refinement

Every audit persists to SQLite. You can refine against new constraints:

python main.py refine <session-id> --feedback "Qdrant was too heavy for our infra team"

The tool re-runs with the feedback as an additional constraint. Refinement history is tracked — you can see how the recommendation evolved across iterations.

A Complete Quickstart

git clone https://github.com/swapnanil/rag-readiness
cd rag-readiness
cp .env.example .env  # add your ANTHROPIC_API_KEY
docker-compose up api

# New architecture audit (interactive)
python main.py audit --interactive

# Diagnose a broken stack
python main.py diagnose --interactive

# Multi-use-case session
python main.py multi-audit examples/multi_usecase_lexvault.json

# List sessions and refine
python main.py sessions
python main.py refine <session-id> --feedback "need self-hosted only"

# Cost breakdown and eval dataset
python main.py cost <session-id>
python main.py eval-dataset <session-id> --num-questions 20

The Pre-Scoring Layer

Before any LLM call, a rule-based pre-scorer computes a complexity score (1–10) from the use case inputs. This has two effects:

  1. It calibrates the LLM prompt — a complexity-1 use case gets a simpler, more direct recommendation; a complexity-9 use case gets a recommendation with more explicit trade-off reasoning.
  2. It runs conflict detection — if your inputs contain contradictory constraints (e.g., “GDPR compliant” + “use Pinecone”), the conflict is flagged before Claude is called, not discovered in the output.

Who This Is For

  • AI engineers starting a new RAG project who want a structured starting point rather than a blank page
  • Engineering leads who need to scope a RAG system for a business use case and justify the architecture choices to non-technical stakeholders
  • Teams with an existing RAG system that isn’t performing as expected and need a systematic diagnosis, not a hunch

The tool is open-source, runs locally, and persists everything to SQLite. Your use case details don’t leave your environment beyond the single Claude API call per audit.

→ View the full tool page, docs, and GitHub repo