Why I Walked Back from Next.js and RSC to a Plain SPA and a Separate Backend

I’ve been writing React for a long time, and I want to tell you a story about a round trip. It starts with me being a true believer in Next.js, runs through the era when the App Router and Server Components moved into my house and rearranged the furniture, passes through a couple of genuinely scary security incidents, and ends with me happily back on a boring, well-understood architecture: a single-page app and a separate backend that talk over a plain HTTP boundary.

This isn’t a “framework X is dead” hot take. It’s a description of how my own thinking changed, and why the thing I reach for in 2026 looks a lot like the thing I would have reached for in 2018… except smarter about the parts that actually matter.

When Next.js was genuinely great

I want to be fair to Next.js, because for a long stretch it earned its reputation.

The Pages Router era was a sweet spot. You had file-based routing that you could explain to a new hire in five minutes. You had getStaticProps and getServerSideProps – two functions, clearly named, with an obvious mental model: one runs at build time, the other runs per request, and everything else is just React. You got code splitting, image optimization, and a dev server that mostly worked. Deploying was a non-event.

The thing I appreciated most was that the boundary between server and client was legible. Data fetching happened in named lifecycle-ish functions at the top of a route. The component tree below them was ordinary client React. I could point at any line of code and tell you which machine it ran on. That legibility is worth more than people realized at the time, and we mostly only noticed it once it was gone.

So when I say I left, understand that I left something I used to love.

Then the App Router and Server Components moved in

The App Router and React Server Components were pitched as the next evolution, and on paper the pitch is seductive: render components on the server, ship less JavaScript, colocate data fetching with the component that needs it, stream HTML to the browser as it becomes ready. Who doesn’t want less JS and faster paint?

In practice, here is what I actually experienced.

The mental model fractured. Suddenly every file was either a Server Component or a Client Component, the distinction was load-bearing, and the boundary was declared with a "use client" string at the top of a file. That directive is viral in one direction and silent about it. A component that was fine yesterday breaks today because something three levels up crossed the boundary, and the error you get is rarely “you crossed a boundary”; it’s a serialization complaint, or a hydration mismatch, or a hook being called somewhere it can’t be.

“It works in dev” stopped meaning anything. Caching behavior between next dev, next build && next start, and the production edge deployment diverged enough that I stopped trusting local results. I had bugs that only existed in the production cache. I had stale data that no revalidate value seemed to fix. I learned more about the Next.js caching layers than I ever wanted to, and the reward for that knowledge was a permanent low-grade anxiety about whether any given page was actually fresh.

The server/client boundary stopped being legible. This is the one that really got me. The thing I loved most about the Pages era, being able to look at code and know where it ran, was exactly the thing RSC took away. Data fetching is now scattered through the tree. async components look like normal components but aren’t. The boundary is real and consequential but invisible at the call site.

None of these are unfixable in isolation. Together they meant I was spending a large fraction of my time fighting the framework’s model instead of building the product. That’s the signal I should have read sooner.

Then the security incidents made it concrete

Architectural friction is a judgment call. Security incidents are not, and a run of them turned my vague unease into a decision.

It started with CVE-2025-29927, the middleware authorization bypass disclosed in March 2025 at CVSS 9.1. The mechanism was almost embarrassingly simple: Next.js used the internal header x-middleware-subrequest to mark subrequests and prevent infinite middleware loops, but the header was never meant to be client-controlled, and by spoofing it, attackers could skip middleware entirely, auth and authorization included, and reach protected routes with one crafted curl.

If that had been a one-off, I’d have shrugged it off; every framework has bugs. But it wasn’t a one-off. The back half of 2025 and the start of 2026 brought a steady drumbeat, and the pattern is what mattered:

  • CVE-2025-55182 (December 2025) – a React Server Components flaw rated CVSS 10.0, the maximum. It sat in the react-server-dom-* packages and therefore affected every framework built on RSC & Next.js, React Router’s RSC APIs, Waku, Parcel’s RSC plugin, and the Vite RSC plugin. A perfect score is rare, and this one lived in the RSC machinery itself.
  • CVE-2026-23864 (January 2026, CVSS 7.5) – a denial-of-service flaw in React Server Components: a malicious payload sent to a Server Function endpoint triggers memory exhaustion or runaway CPU. Patched alongside two more medium-severity Next.js CVEs in the same release.
  • CVE-2026-23869 and CVE-2026-23870 (early 2026) – more DoS issues in Server Components, triggered by specially crafted HTTP requests to App Router Server Function endpoints that blow up CPU on deserialization. Affected Next.js 13.x through 16.x on the App Router.
  • CVE-2026-44578 (May 2026, CVSS 7.8) – a server-side request forgery in the self-hosted Next.js Node server: crafted WebSocket upgrade requests let an attacker proxy requests to arbitrary internal destinations, including cloud metadata endpoints.

Look at where these clusters are. A middleware bypass, then a string of Server Component and Server Function flaws, several of them triggered specifically on deserialization of a crafted request. This isn’t bad luck distributed randomly across a codebase. The vulnerable surface is the server-rendering and server-function machinery, the exact part of the stack that the App Router and RSC made central. The more your framework does on the server on every request, the more attack surface you have signed up for, and a 10.0 in the shared RSC packages means a single bug ripples across every framework that adopted the model.

What unsettled me wasn’t any single CVE… it was what the cluster implied about the architecture. Teams like mine had been quietly nudged to treat middleware as the authorization layer, because in the App Router model, auth-in-middleware is the path of least resistance. The level-headed takeaway in every writeup was the one that stung: middleware should supplement, not replace, security enforced closer to the data. So, I sat with a question: how much of my security posture do I want coupled to a rendering framework’s internal request plumbing? My answer was “as little as possible.”

The TanStack route – also not a free lunch

When developers get fed up with Next.js, a common next stop is the TanStack ecosystem – TanStack Router and TanStack Start. And I’ll be honest: TanStack Router is a genuinely nice piece of engineering. The type-safe routing is best-in-class, the search-param handling is thoughtful, and the data loading is well-considered. If you’d asked me purely about developer experience, I’d have said good things.

But “switch to TanStack” is not the escape hatch some people think it is, and recent history makes that point sharply.

In May 2026, the TanStack npm packages were hit by a supply chain attack. On 11 May 2026, a threat group ran a coordinated supply chain attack against the npm and PyPI ecosystems, compromising packages across multiple namespaces, including the @tanstack namespace, which contains @tanstack/react-router, one of the most widely-used routing libraries in the React ecosystem, with roughly 12 million weekly downloads. Between 19:20 and 19:26 UTC on a single Monday, the attacker published 84 malicious versions across 42 TanStack packages.

The payload was not subtle. It targeted CI/CD tokens, cloud credentials across AWS, GCP, and Azure, Kubernetes service accounts, Vault, and registry tokens, and it used stolen npm and GitHub Actions tokens to publish poisoned versions of more packages, functioning as a worm spreading through the npm ecosystem. It also installed a persistent daemon that polled GitHub every 60 seconds, and on detecting token revocation would attempt to run rm -rf on the user’s home directory. One detail makes this especially grim: the compromised packages carried valid SLSA Build Level 3 provenance attestations, making it the first documented npm worm to produce validly attested malicious packages because the malicious versions were published through the project’s own GitHub Actions release pipeline using hijacked OIDC tokens.

I want to be careful and fair here. This was not a flaw in TanStack Router’s code. The attackers got in by forking a TanStack repository on GitHub and submitting a malicious commit under a fabricated identity. The TanStack maintainers responded quickly and communicated well. This could have happened, and has happened, to almost anyone – 2025 saw significant growth in supply chain attacks, and the npm ecosystem, because of its popularity, absorbed a large share of them. The September 2025 Shai-Hulud worm was the first self-propagating worm in the npm ecosystem and affected over 500 packages.

So the lesson I drew from the TanStack incident isn’t “TanStack is unsafe.” It’s the opposite of tribal. The lesson is: no framework choice immunizes you from supply chain risk, and the more of your stack you concentrate into one heavyweight meta-framework, the larger and more attractive a single compromise becomes. Switching framework brand doesn’t fix that. Reducing surface area and dependency count does.

The deeper reason full-stack RSC was always going to be hard: serialization

Set the CVEs aside for a moment, because I think there’s a more fundamental issue, and it’s the one that finally settled my thinking.

The whole promise of Server Components, server actions, and streaming is that the server/client boundary should feel seamless… You just write components and call functions, and the framework figures out what runs where. But a function call across a network is not a function call. The boundary is real, and it is made of serialization.

Everything that crosses from server to client has to be serialized into the RSC payload, streamed, and deserialized. That constraint quietly shapes everything:

  • You can’t pass a function to a Client Component from a Server Component unless it’s a server action, because functions don’t serialize. So “just pass a callback”, the most ordinary thing in React, becomes a boundary decision.
  • Class instances, Date semantics, Map/Set, anything with methods or identity, all of it has to be flattened to plain data, or it doesn’t make the trip cleanly.
  • Errors that originate on the server are serialized before you see them on the client, so the stack trace you get is often a translation of the real problem rather than the problem itself.
  • Streaming adds time as a dimension. Components resolve out of order, Suspense boundaries flush independently, and now you’re reasoning about the partial states of a tree mid-stream, which is a genuinely harder mental model than “fetch, then render.”

This isn’t a bug anyone can patch. It’s intrinsic. The instant you let a UI tree straddle a network boundary, you have signed up for a distributed-systems problem dressed in component clothing, and serialization is where that problem leaks through. RSC’s seamlessness is, to a real degree, a leaky abstraction over an inherently unseamless thing. You can build impressive demos on it. Holding it stable across a large app, a team, and a year of changes is a different sport.

And notice the connection back to that CVE cluster. Several of those 2026 flaws, the Server Function DoS bugs, trigger on deserialization of a crafted request. That is not a coincidence. Deserializing untrusted input into a live program is one of the oldest, most dangerous operations in computing, and the RSC model puts a deserialization boundary on the hot path of ordinary feature work. The architecture didn’t just make my app harder to reason about; it made the framework itself a richer target. Serialization is both the ergonomic tax and the security surface, the same seam, charged twice.

Once I framed it that way, my decision basically made itself. I don’t want my UI framework and my data boundary fused. I want the network boundary to be explicit, visible, and boring, a place I deliberately walk up to, not a seam hidden inside my component tree.

The stack I actually use now

So here’s where I landed. None of it is exotic. That’s the point.

Frontend: React Router in framework mode, on Vite, mostly SPA

I use React Router in its framework mode with Vite. Framework mode gives me the things I genuinely missed from Next.js file-based-ish routing conventions, loaders and actions, nested layouts, type-safe params without forcing a server-rendering model on me.

The crucial part: I don’t run SSR. A handful of pages that are truly static marketing, docs, and the landing page get prerendered at build time, so they ship as fast static HTML and are friendly to crawlers. Everything else is a plain client-rendered SPA.

People will say, “But SPAs are slow/bad for SEO / out of fashion.” For an authenticated application, a dashboard, a tool, or a product behind a login, almost none of that critique applies. There’s nothing for Google to index behind the login wall. The first paint is a thin shell, the bundle is code-split per route, and from then on, navigation is instant because it’s all client-side. I get a build artifact that is just static files. I can put it on any CDN or object store. There is no server-rendering process to keep alive, patch, scale, or get a CVE in. The deployment story is “upload a folder,” and the security surface of the frontend collapses to almost nothing.

And critically: there is no serialization boundary inside my UI. The component tree runs entirely in the browser. It talks to the backend through fetch, against an API I designed on purpose. The boundary is visible in the code, at exactly the lines where it exists.

Here’s what that looks like in practice. A route loads its data in a clientLoader which, despite living in a framework-mode route file, runs entirely in the browser and just calls my API:

// app/routes/projects.tsx
import type { Route } from "./+types/projects";
import { api } from "~/lib/api-client";

export async function clientLoader({ params }: Route.ClientLoaderArgs) {
  // Runs in the browser. No server. Just an HTTP call to my backend.
  const projects = await api.projects.$get();
  if (!projects.ok) throw new Response("Failed to load", { status: 502 });
  return { projects: await projects.json() };
}

export default function Projects({ loaderData }: Route.ComponentProps) {
  return (
    <ul>
      {loaderData.projects.map((p) => (
        <li key={p.id}>{p.name}</li>
      ))}
    </ul>
  );
}

There’s no loader (server) here at all, only clientLoader. The seam is the api.projects.$get() call, and I can point at it. Auth is enforced the same way, with a clientMiddleware that runs before the loaders on protected routes:

// app/routes/dashboard.tsx - a protected layout route
import { redirect } from "react-router";
import type { Route } from "./+types/dashboard";
import { api } from "~/lib/api-client";

export const clientMiddleware: Route.ClientMiddlewareFunction[] = [
  async ({ context }) => {
    const res = await api.auth.me.$get();
    if (!res.ok) throw redirect("/login");
    context.set(userContext, await res.json());
  },
];

But notice what this middleware is not: it is not my security boundary. It’s a UX convenience; it bounces an unauthenticated user to the login screen so they don’t stare at a broken page. If someone skips it entirely, they gain nothing, because every API endpoint enforces auth itself, server-side, on every request. This is the whole lesson of CVE-2025-29927 applied: client-side middleware is for experience, never for enforcement. The frontend can’t bypass a check that the backend owns.

The backend side of that contract, in Hono, is explicit and inspectable:

// server/index.ts
import { Hono } from "hono";
import { cors } from "hono/cors";
import { csrf } from "hono/csrf";
import { authMiddleware } from "./auth";

const app = new Hono();

app.use("*", cors({ origin: ["https://app.example.com"], credentials: true }));
app.use("*", csrf({ origin: ["https://app.example.com"] }));

// Real enforcement: the API itself rejects unauthenticated requests.
const projects = new Hono()
  .use("*", authMiddleware)
  .get("/", async (c) => {
    const user = c.get("user"); // set by authMiddleware, trusted here
    return c.json(await db.projectsForUser(user.id));
  });

const routes = app.route("/projects", projects).route("/auth", authRoutes);
export type AppType = typeof routes; // <- exported for the frontend

That last line is the only reason I reach for Hono specifically. Exporting AppType lets the frontend build a fully typed client with no codegen step and no shared runtime:

// app/lib/api-client.ts
import { hc } from "hono/client";
import type { AppType } from "../../server";

// `api` is end-to-end typed against the backend routes.
export const api = hc<AppType>("/api", { init: { credentials: "include" } });

If the backend changes a route’s shape, the frontend stops compiling. That’s the type safety people credit good Next.js setups with, and I keep it without fusing the two halves into one runtime. Swap Hono for Go or Python, and I lose only this typed-client convenience; the architecture is unchanged, because the contract is just HTTP.

For data that loads after the initial render, a slow widget on an otherwise-ready page, I reach for Suspense and the use hook. This is the one genuinely good idea from the streaming era, and the nice part is it works perfectly well in a plain SPA, with no server rendering involved:

import { Suspense, use } from "react";
import { api } from "~/lib/api-client";

// Kick off the request; do NOT await it. `use` will suspend on the promise.
function ActivityFeed({ feedPromise }: { feedPromise: Promise<Activity[]> }) {
  const activity = use(feedPromise); // suspends until resolved
  return <Feed items={activity} />;
}

export default function Dashboard() {
  // Promise created during render, in the browser. No RSC payload.
  const feedPromise = useMemo(() => api.activity.$get().then((r) => r.json()), []);
  return (
    <>
      <Header />
      <Suspense fallback={<FeedSkeleton />}>
        <ActivityFeed feedPromise={feedPromise} />
      </Suspense>
    </>
  );
}

Same Suspense, same use, same streaming-feel UX of content arriving progressively, but the promise is an ordinary fetch resolving in the browser, not a chunk of a serialized server tree. There’s no out-of-order flush to reason about, no hydration boundary, no payload format. I got the ergonomic win of the streaming era and left behind the serialized-tree machinery that came bundled with it.

Backend: a separate service – Hono if I want TypeScript

The backend is its own thing, deployed, scaled, and reasoned about independently. Right now, I mostly reach for Hono, because it’s small, fast, runs anywhere from Node to workers to Bun, and lets me keep TypeScript end to end. With Hono, I can share types between client and server and even get a typed client, so I lose none of the type safety that good Next.js setups gave me.

But, and this matters the backend doesn’t have to be JavaScript at all. It could just as easily be Go or Python. The reason that’s now a free choice is precisely the serialization point from earlier: when your frontend is an SPA talking to an API over plain HTTP and JSON, there is no RSC payload, no server-action boundary, no shared-component-tree contract that forces both sides to be the same language. The contract is just HTTP. Go is fantastic for a backend. Python is fantastic for a backend. I use Hono specifically and only when I want the TypeScript type-sharing convenience; it’s a preference, not a requirement. The architecture itself is language-agnostic, and that flexibility is a feature I gave myself by removing the fused boundary.

Security lives in the backend, on purpose

This is the part I care about most, and it’s the direct lesson of CVE-2025-29927. Authorization and security are the backend’s job, enforced at the API layer, every request, no exceptions. Not in framework middleware. Not coupled to a renderer’s internal request plumbing. In the service that owns the data.

Concretely, on the backend, I run:

  • Authentication as a real, deliberate layer of sessions or tokens, validated server-side on every protected request. The server, which owns the database, decides what you can see. The frontend is never trusted to enforce this; it only reflects it.
  • CORS configured tightly – an explicit allowlist of origins, not a wildcard, so the browser only lets my actual frontend talk to the API.
  • CSRF protection – since a SPA-plus-API setup often uses cookies, I use proper anti-CSRF tokens and/or SameSite cookie attributes so a malicious site can’t ride a logged-in user’s session.
  • CAPTCHA on the abuse-prone endpoints, signup, login, password reset, public form submissions to keep bots and credential-stuffing out.
  • Plus the usual unglamorous hygiene: rate limiting, strict input validation at the API edge, security headers, secrets kept out of the client bundle, and least-privilege everywhere.

Every one of these is something I configure and can point at. There’s no invisible header that flips my auth off, because my auth was never a header; it’s a checked condition in the request handler that sits between the attacker and the database. If someone bypasses a routing layer, they hit the API, and the API still says no.

What I actually gained

Stepping back, here’s the trade I made and why I’m happy with it.

I gave up: server-rendered dynamic pages out of the box, and the “it’s all one project” convenience of a meta-framework.

I got back, in exchange:

  • A legible architecture. I can point at any line and say which machine it runs on. The network boundary is one explicit place where the API, instead of being smeared invisibly through a component tree.
  • No serialization tax. The UI tree lives entirely in the browser. No RSC payload, no server-action plumbing, no streaming-order puzzles.
  • A tiny frontend attack surface. Static files on a CDN. Nothing to keep running, nothing to patch, no Server Functions to send crafted payloads at, nothing to catch the next 10.0 in the RSC packages.
  • Security I can see. Auth, CORS, CSRF, CAPTCHA, and rate limiting all live in one service, enforced per request, decoupled from any renderer.
  • Backend freedom. Hono today for the TypeScript ergonomics; Go or Python tomorrow if a project wants them. The HTTP contract doesn’t care.
  • Smaller blast radius. Two modest, separately-updated pieces with fewer heavyweight dependencies, instead of one large meta-framework whose single compromise is a very attractive target.

So, is Next.js bad? Is TanStack bad?

No. I want to end honestly, because tribal blog posts age badly.

Next.js and TanStack are both serious, well-engineered projects built by talented people. The CVEs and the supply chain attack I described are real and worth knowing about, but the CVEs got patched, and the TanStack incident was an account-and-pipeline compromise that could have hit almost any popular package. If your product genuinely needs server rendering for SEO on dynamic content, or you have a content-heavy site where streaming pays for itself, a meta-framework can absolutely be the right call. Plenty of teams ship great things on exactly the stack I walked away from.

My point is narrower and more personal. For the apps I build, authenticated products where the UI is interactive and the data is the crown jewels, the full-stack RSC model added a serialization-shaped boundary I didn’t want, hid the seam I most needed to see, and nudged my security toward the framework’s plumbing instead of my own backend. A SPA plus a separate, well-secured backend gave me a smaller, more legible, more boring system. And in software, boring is usually a compliment.

That’s the round trip. I left, I looked around, and I came back to a plain SPA and a real backend, older ideas, held with sharper reasons.

NeuralPocket: Private On-Device AI with Gemma 4 — Android & Web

Text chat — fitness trainer persona on Gemma 4 E2B

This is a submission for the Gemma 4 Challenge: Build with Gemma 4

What I Built

NeuralPocket — a private multimodal AI assistant that runs entirely on your device. Available as both an Android app and a web app. No cloud, no subscription, no data leaving your hands.

Honest About My Motivation

I’ve participated in Google hackathons several times. Each time I built something real, put in the work — and each time walked away with just a participation badge 😄 This time I want to actually place, though I know there are plenty of strong projects out there!

So NeuralPocket is not a demo and not a proof-of-concept. It’s a full-featured app with real architecture that solves a real problem.

The problem: modern AI assistants are brilliant — until you lose Wi-Fi. On a plane, in the mountains, roaming abroad, they become useless icons. And every message you type, every photo you send, flies off to someone else’s servers.

Google gave me an extra push: the AI Edge Gallery app simply refused to install on my Android 9. Even though the phone has a 64-bit OS — which matters, since LiteRT-LM only runs on 64-bit. Instead of giving up, I figured it out myself. That became the starting point for NeuralPocket.

I wanted an assistant that:

  • works fully offline — always, everywhere
  • never sends your data anywhere
  • understands text, photos, and audio — in one chat
  • runs on both Android and in the browser

What NeuralPocket Can Do

  • 📷 Photo analysis — snap a menu in Japan → translation and context; photograph a broken part → repair advice; photograph a document → ask questions about it
  • 🎤 Voice input — record up to 30 seconds, converted to WAV, processed on-device
  • 💬 Multiple independent chats with different system prompts — “Translator”, “Tech Assistant”, “Personal Journal”
  • ⚙️ Configurable context memory — 0–5 conversation pairs to balance coherence and context window
  • 🎨 Markdown rendering — model responses display with full formatting: code, lists, emphasis

Demo

🎬 Android Demo Video (will come later…)

🌐 Web Version (live)

Code

Both projects are fully open source:

How I Used Gemma 4

Choosing the Model

I chose Gemma 4 E2B IT (2B parameters, ~2.6 GB) as the primary model for three reasons:

  • Native multimodal input — text, image, and audio in a single request, no workarounds needed
  • Compact size — fits on a mid-range Android phone with 4+ GB RAM
  • One model, two platforms — .litertlm for Android LiteRT-LM, .web.task for WebGPU in the browser

For devices with 6+ GB RAM, the app offers Gemma 4 E4B (~3.7 GB) as a more capable option. The 31B Dense model is overkill for on-device use cases for now.

Architecture: Two Platforms, One Model

┌─────────────────────────────────────────────────┐
│                  NeuralPocket                   │
├──────────────────────┬──────────────────────────┤
│     Android App      │        Web App           │
│       Kotlin         │  React 19 + TypeScript   │
├──────────────────────┼──────────────────────────┤
│   LiteRT-LM SDK      │  MediaPipe Tasks GenAI   │
│   (native runtime)   │  Web Worker + WebGPU     │
├──────────────────────┴──────────────────────────┤
│              Gemma 4 E2B IT / E4B IT            │
│            (running locally on device)          │
└─────────────────────────────────────────────────┘

Android: LiteRT-LM

Stack: Kotlin + Google AI Edge LiteRT-LM + CameraX + MVVM

The engine automatically selects the best available backend — GPU via Vulkan or OpenCL, falling back to CPU via XNNPack. Concurrent inference calls are serialized through a Mutex to prevent race conditions.

Key architectural decisions:

  • A single StateFlow<ChatUiState> as the source of truth — the UI only observes, never mutates directly
  • Chat history is written atomically via a temp file — no data loss on crash
  • The vision encoder loads only when an image is present — saves RAM
  • Preflight check on first launch: RAM, ABI, free storage — the app warns if the device doesn’t meet the minimum requirements

Performance:

  • GPU (Vulkan/OpenCL): ~15–30 tokens/sec
  • CPU-only (XNNPack): ~5–10 tokens/sec
  • Requirements: Android 8+, arm64, 4+ GB RAM

All three screenshots were taken in airplane mode — no network, everything running locally:

Text chat — fitness trainer persona on Gemma 4 E2B
Photo input — model analyzes an image
Voice input — transcription and response

Web: WebGPU Right in the Browser

Stack: React 19 + TypeScript + Vite + Tailwind CSS v4 + MediaPipe Tasks GenAI

All inference runs inside a Web Worker — generation never blocks the UI, keeping the interface responsive during streaming. Models are cached in OPFS (Origin Private File System): first launch downloads ~2.6 GB, every subsequent launch starts instantly without a network connection.

Three model presets are supported: Gemma 4 E2B, Gemma 4 E4B, and Gemma 3 Multimodal. You can also provide a custom model URL.

The web app is built as a PWA (Progressive Web App) — you can install it on your computer as a standalone app with one click from the browser, just like YouTube or other web services. Once installed, it appears in your app menu and opens in its own window without an address bar.

Installing NeuralPocket as a PWA

Web version in action (all computation happens locally in the browser via WebGPU):

Text chat in the web version

Image analysis in the web version

Audio processing in the web version

Honest caveat about offline: after the first launch the app works without a network. But it’s not fully autonomous out of the box: the MediaPipe runtime loads from jsDelivr, and fonts load from Google Fonts. For full offline you’d need to self-host those dependencies.

Honest caveat about multimodal in the web: at the time of development I couldn’t find web-optimized multimodal models for Gemma 4 — available versions only support text. However, I found a fully multimodal model from the previous generation — gemma-3n-E2B-it-int4-Web.litertlm — which supports displaying text, images and audio directly in the browser. That became the third preset in the web version.

A note on how fast things move. While building NeuralPocket, Google released Gemini 3.5 Flash — and first impressions suggest it’s a notable step up from 3.1. It handles complex multi-step tasks confidently: for example, it wrote a full test suite for the web version of NeuralPocket on the first try, something that used to take several iterations. It’s remarkable how fast this space evolves — the world changes while you’re still writing the article.

At this pace, in a year you might just need to download the latest Gemma and ask it to build the whole app itself. Probably. Maybe. 😄

Privacy as Architecture, Not Marketing

NeuralPocket sends nothing anywhere — not messages, not photos, not chat history, not analytics. This isn’t a setting you toggle. It’s a consequence of the architecture: there’s no server that could receive anything. Works in airplane mode. No account, no subscription.

Summary: Android vs Web

Two apps, one idea — but different trade-offs:

🤖 Android 🌐 Web
Installation APK (~36 MB) None — just open in browser
Install as app ✅ native ✅ PWA
Model Gemma 4 E2B / E4B Gemma 4 E2B / E4B
Text chat ✅ ✅
Photo input ✅ ⚠️ Gemma 3n only
Audio input ✅ ⚠️ Gemma 3n only
Offline ✅ after downloading ⚠️ after first launch
models and downloading models
Performance ~15–30 tok/s (GPU) depends on browser WebGPU
Requirements Android 8+, arm64 Chrome / Edge with WebGPU
Multiple chats ✅ ✅
Custom model ❌ ✅ by URL

Need maximum multimodality and full offline? Go Android. Want to try it right now without installing anything? Go Web.

🤖 Download APK

🌐 Web Version (live)

📦 Models: gemma-4-E2B-it-litert-lm · gemma-4-E4B-it-litert-lm on HuggingFace

Built with ❤️ on Gemma 4 + Google AI Edge LiteRT-LM

The first 30 seconds: why my AI extension lost users before the AI even ran

ExplainIT! in action — highlight a Wikipedia paragraph, click the Aa button, get a plain-words explanation

I built a Chrome extension that explains and translates selected text with AI. I use it every day – highlight a paragraph of some dense technical article, click a button, get it back in plain words. Works great for me.

Then I gave it to a friend to try. Ten seconds later he closed the tab. He never reached the feature. What he saw was a form asking him to paste an API key — and for a non-programmer, that was a wall.

This is the standard story of any BYOK tool (Bring Your Own Key — the user brings their own key from an AI provider). The tool works, the model responds, but the person never gets to the place where the AI actually runs. The barrier isn’t the model quality or the chat UI. The barrier is the first thirty seconds after the “Install” click.

This article is about how I fought that in ExplainIT! — which solutions worked, and which ones are still just plans.

What ExplainIt! is

I read a lot online in English, and it’s not my native language. Sometimes I want to highlight a paragraph and translate it. And when an article is technical and dense, I want it explained to me in simpler terms. ChatGPT-wrapper sidebar extensions are popular, but they’re mostly about chatting with an AI — not about quickly explaining one specific piece of text on the page.

That’s how ExplainIt! happened. Highlight text → a small button → an explanation or a translation.

ExplainIT! in action — highlight a Wikipedia paragraph, click the Aa button, get a plain-words explanation

I won’t say more about the product itself. This article isn’t about what ExplainIе! can do – it’s about the fact that users never reach those abilities, and what to do about it.

The BYOK dilemma

When you build an AI tool, the first question is: who pays for the tokens.

Free-for-everyone means every user request is your money going to the AI provider. One user – pennies. A hundred — tolerable. A thousand — and now it’s a subscription business: accounting, billing support. For a hobby project, that model doesn’t work.

So I went with BYOK. The user registers with an AI provider themselves (OpenAI, Anthropic, Google, Groq), gets an API key, pastes it into the extension. I don’t pay for anyone else’s AI. The user controls their own spending.

Sounds perfect — for the developer. And terrible — for the user.

Because BYOK hands the entire “get started” job to the user. Install the extension → figure out what an API key even is. Pick a provider. Register. Maybe add a card. Generate the key. Copy it. Go back to the extension. Paste. Only now — the feature.

In my last article (Snipsy) I wrote about the “first thirty seconds” — the moment when a user has just installed a tool and decides whether it’s worth continuing. For a keyboard extension, that’s an empty screen. For a BYOK tool, it’s a wall of terms and steps, and that wall is taller than any screen. And that’s the real problem of ExplainIt! Not the AI, not the UI, not the model — but how to reach the place where the AI can run at all.

I made a free key the default

Most BYOK tools I’ve seen do the same thing: they open a form with a dropdown of providers — OpenAI, Anthropic, Google — and an empty key field. The user decides what to pick. Every option needs registration and a card.

I dug around and found that Groq has free API access. No card, registration by email, the key takes a couple of minutes to generate. (Groq is an inference provider — not to be confused with Grok from xAI, one letter apart.) For the “highlight a piece, explain it” use case, the free limits are more than enough — Groq has rate limits on request frequency, but with the occasional request from an extension, hitting them is nearly impossible.

Before making Groq the default, I wanted to be sure of one thing: that the free tier wouldn’t disappear in six months. Defaulting to “free” and having the option vanish a season later is worse than an honest paid list up front. Here, Groq’s business structure gave me reason to think it won’t: their main product is their own hardware (LPU chips) for enterprises, and the free API works as a showcase for that hardware. It’s not a guarantee about the future, but it’s not a grant that runs out tomorrow either. As a developer picking a default, that was enough for me.

I made Groq the default provider. When the extension opens for the first time, Groq is already selected. This isn’t “I added Groq support.” This is “I removed the wall.”

The logic: let the person try it for free, right away. Register with Groq, copy the key, paste it — it works. If they like the feature and it becomes a habit, then it makes sense to connect a paid provider, for quality or speed. But the “do I even like this” decision now happens after the person has tried it, not before.

Onboarding — open the extension, Groq already selected, grab a free key, paste, and it works on the next selection

In code, it’s one line of default. In product terms, it’s the difference between “tried it” and “closed it.”

Trust through how it looks

A free key removes the first barrier. The second one is trust. An extension that looks unprofessional loses the user before they even reach the key form. A gray icon, a clumsy UI, store screenshots thrown together — and the person thinks: “this is some amateur product, I’m not bringing my API key here.”

I’m a backend developer with eight years of experience. I’d never done design. And to publish in the Chrome Web Store you need specific assets in specific formats:

  • store icon — 128×128 px;
  • screenshots — up to 5, 1280×800 or 640×400, JPEG or 24-bit PNG with no alpha channel;
  • small promo tile — 440×280, JPEG or 24-bit PNG with no alpha;
  • marquee promo tile — 1400×560, JPEG or 24-bit PNG with no alpha.

One note on “24-bit PNG with no alpha channel” — that’s a common trap: people upload a PNG with transparency, and the store rejects it.

I made the images themselves in claude.ai/design — an AI tool where you iterate on visuals through conversation. You describe what you want, it draws. You say “darker, and drop the gradient,” it redraws. It turned into a game of “client meets designer,” just without another person and without an invoice. I used to think “iterating on a visual” meant “ask for one picture and accept it.” Turns out it’s ten or twenty rounds of “not quite, try something else” — and that’s how it’s supposed to go.

The result: the extension, the icon, all the promo assets — in one style. This isn’t cosmetic. It’s part of the same fight for the first thirty seconds. When a user sees a professional icon and clean screenshots, they’re more likely to take the next step (paste the key). When they see something slapped together, they close the tab — even if the feature inside is excellent.

What I’d do differently — and what I deliberately won’t

What I’d do differently: text next to the button

My empty state already has a button that leads to the page for getting a free Groq key. That’s the minimum, and it works as is. But I’d go further — I’d add a line next to it explaining “it’s free, no card needed, takes a minute.” The button alone doesn’t cure not understanding why you’d go there. For a developer, “paste an API key” is a normal phrase. For a non-programmer, it’s a signal that “this is going to be hard,” and a button next to it doesn’t always change their mind.

What I deliberately won’t do: funnel analytics

This isn’t a “would finish later” item. This is a “could do, and consciously decide not to, and want to talk through why” item — because it’s the most painful of my tradeoffs in this project.

I don’t know how many people get from install to a first successful request. That’s the exact “first thirty seconds” funnel this whole article is about — and I have zero data on it. The obvious solution is to add analytics. But my Chrome Web Store listing clearly says “no analytics telemetry, no browsing history,” and that’s part of the positioning: I promised not to collect data. Any analytics, even the narrowest “onboarding analytics,” is technically no longer “no telemetry.” I’m leaning toward staying without data and making product decisions by feel. More honest, but it stings.

The takeaway is the same as Snipsy’s: in an indie AI tool, the hard part isn’t making it work — it’s surviving the first thirty seconds of the user getting to know it. AI quality matters — but it doesn’t matter at all if the person closed the tab before that AI ever ran.

How have you handled BYOK onboarding in your own tools? What worked, what didn’t?

Try it: Install ExplainIt! from the Chrome Web Store — free, no card, Groq key takes a minute.

Intersection Observer API : Understand in 3 Minutes

Problem Statement

The Intersection Observer API lets you efficiently detect when an element enters or leaves the viewport (or another parent element). You need this because the old way—listening to scroll events and manually calculating positions—is slow, janky, and wastes battery life on mobile devices. Every time you’ve built an infinite scroll, lazy-loaded images, or a “when do I animate this?” feature, you’ve probably either suffered scroll-performance pain or written hacky throttled code. The Intersection Observer gives you a clean, performant, browser-native solution.

Core Explanation

Think of it as a surveillance camera for your webpage. You give the camera (the observer) a target element and say, “Tell me the moment this box enters or leaves the screen (or any other container).” The browser handles the math for you—no manual scroll listeners, no getBoundingClientRect() in a loop.

Here’s how the core pieces fit together:

  • Observer: You create one instance of IntersectionObserver. It’s your watchtower.
  • Callback: You pass a function that fires every time the visibility of any observed element changes. The callback receives an array of IntersectionObserverEntry objects—one per observed element that changed.
  • Thresholds: You tell the observer how much of the element must be visible before it triggers. A single number like 0.5 means “fire when at least 50% of the element is visible.” You can also pass an array like [0, 0.25, 0.5, 0.75, 1] for multiple checkpoints.
  • Root: By default, the observer checks against the browser viewport. But you can set a custom root—any scrollable container—so you can track visibility inside a scrollable div.
  • Root Margin: Think of it as a buffer zone around the root. Use rootMargin: "100px" to trigger the callback when the element is 100 pixels outside the viewport—useful for pre-loading content before the user scrolls to it.

The magic? The browser runs this in a separate, optimized thread. No blocking main-thread work. Your callback fires only when the intersection state actually changes, not on every pixel scroll.

Practical Context

When to use the Intersection Observer API:

  • Lazy-loading images or iframes: Only fetch the resource when the element is close to entering the viewport. Combine with rootMargin to start loading early.
  • Infinite scrolling: Detect when a sentinel element (a small invisible div at the bottom of a list) becomes visible, then append more items. Much cleaner than scroll-event hacks.
  • Ads or analytics: Track how long an element was visible or when a user first saw an ad unit.
  • Animations on scroll: Trigger a CSS transition or class change when an element enters the viewport. Great for “scroll-triggered fade-ins.”
  • Sticky or fixed positioning: Know exactly when an element stops being visible and swap to a fixed position.

When NOT to use it:

  • If you need to know the element’s exact X/Y position (use getBoundingClientRect() or ResizeObserver). Intersection Observer only tells you “it’s intersecting” or “it’s not.”
  • If you’re building a parallax effect that needs pixel-level scroll offsets. The callback doesn’t fire continuously—only at threshold crossings. For smooth parallax, a scroll-based approach is still better (but use requestAnimationFrame to throttle).
  • If you need real-time tracking of visibility percentage (e.g., a progress bar showing how much of an article is read). You can approximate it with many thresholds, but it’s not a continuous stream.

Why should you care? Because it turns a notoriously expensive, error-prone task into a handful of lines that run in low overhead. Your users get smoother scrolling, your app uses less CPU, and your code becomes more declarative.

Quick Example

Here’s how to lazy-load an image when it enters the viewport:

const observer = new IntersectionObserver(
  (entries) => {
    entries.forEach((entry) => {
      if (entry.isIntersecting) {
        const img = entry.target;
        img.src = img.dataset.src;   // swap placeholder for real URL
        observer.unobserve(img);     // stop watching after load
      }
    });
  },
  { rootMargin: "200px" }           // start loading 200px before visible
);

document.querySelectorAll(".lazy-image").forEach((img) => observer.observe(img));

What’s happening? We create an observer that fires when a watched element intersects. Inside the callback, we check entry.isIntersecting. If true, we set the real src (stored in a data-src attribute) and then stop observing that element so we don’t re-trigger. The rootMargin gives us a head start so images load just before the user scrolls to them. No scroll listener, no getBoundingClientRect()—the browser does the heavy lifting.

Key Takeaway

Stop listening to scroll events for visibility checks—let the browser do it for you. The Intersection Observer API is the standard, performant way to know when an element appears or disappears from a container. For a deeper dive, read the MDN documentation on Intersection Observer.

How I Practice System Design with AI (URL Shortener Walkthrough)

I’ve been doing system design interviews for years – both as a candidate and as an interviewer. The hardest part to practice alone is not the knowledge. It’s the process: starting from requirements, running the numbers, evaluating multiple options before committing, and making explicit trade-off arguments at the end.

Reading about it helps. Actually working through it is different.

A few months ago I built a structured multi-step AI plan that walks through a complete system design session end-to-end. I’ve been using it to practice against different systems. This post shows exactly what it produces, using a URL shortener as the example.

The problem with single-prompt system design

The obvious move when practicing system design with AI is something like:

“You are a senior engineer. Design a URL shortener. Cover requirements, architecture, database schema, caching, and scalability.”

You get back something that looks thorough. Redis for caching. PostgreSQL for storage. Load balancers. CDN. The answer ticks the boxes.

But try pushing on it. Why Redis specifically and not Memcached? What QPS number drove that decision? Why 302 and not 301? Why that partitioning key?

The AI cannot answer because it did not derive these choices from anything – it pattern-matched from the thousands of URL shortener articles it has seen. The output sounds right because the training data sounds right.

The other problem: a single prompt collapses the entire design process into one shot. Real system design is sequential. You cannot choose an architecture before running the numbers. You cannot make a trade-off argument before evaluating the alternatives. Skipping the steps does not make the output wrong, it makes the reasoning invisible.

A different approach: chain the steps

System design interviews have a well-known format for good reason. You are expected to work through specific phases in order: clarify requirements, estimate scale, propose and compare architecture options, draw the high-level design, deep-dive into the critical components, and close with trade-offs. Skipping phases or doing them out of order is a signal that you do not have a structured approach.

The insight is that this format maps directly onto a multi-step AI workflow. Instead of one big prompt, you instruct the AI to follow the same interview structure, one phase at a time, where each phase builds on the output of the previous one.

I structured the workflow as 7 sequential steps that mirror the formal system design interview format:

Step Interview phase What it does
1 – Requirements Clarify requirements Clarifies and completes the requirements, fills in missing NFR defaults, states assumptions
2 – Back-of-envelope Estimate scale Derives traffic, storage, bandwidth, and cache estimates with arithmetic
3 – Architecture options Propose options Proposes 2-3 options with pros/cons, recommends one, produces a comparison diagram
4 – High-level design High-level design Component overview, data flow, full architecture diagram
5 – Deep-dive Deep-dive Data model, API design, scalability strategies, failure modes table
6 – Trade-offs Trade-offs Decision table, known limitations, future improvements
7 – Final doc – Assembles everything into a single coherent document

Each step prompt references prior outputs using {{step_id}} placeholders. By the time the failure modes table is written, the AI knows the exact QPS numbers, the dominant bottleneck, and which architecture was chosen – and why. Nothing is invented in isolation.

I built this using Askimo Plans which lets you define multi-step AI sessions in YAML. Here is a short demo of how the plan runs:

But the structure itself is what matters – you could implement the same chain in any tool that passes context between steps.

Walking through the URL shortener

I provided these inputs:

  • System: URL Shortener
  • Functional requirements: shorten URL, redirect to original, custom aliases, click analytics
  • Non-functional: 99.99% availability, redirect latency < 10ms p99
  • Scale hints: 500M users, 50M DAU. 200M new URLs/day (2,300 writes/sec avg)

The requirements step does not design anything. It restates what you gave it precisely, fills in missing non-functional defaults, and marks explicit assumptions. One thing worth noting from this run: my input just said “redirect.” The AI flagged that 301 is permanent – browsers cache it, so users only hit your service once and analytics stop working. It surfaced 302 as the correct choice. Small detail, real architectural consequence, and the right place to catch it.

The back-of-envelope step is the one most people skip in practice and get destroyed on in interviews. For this system: 35K peak redirect QPS, 915 GB for URL records, 365 TB for analytics over 5 years, 183 GB cache for hot URLs. That 365 TB number immediately rules out storing analytics in the same database as URLs. The 1000:1 read/write ratio flags this as read-heavy where almost everything depends on cache hit rate. These derived numbers drive every architecture decision that follows.

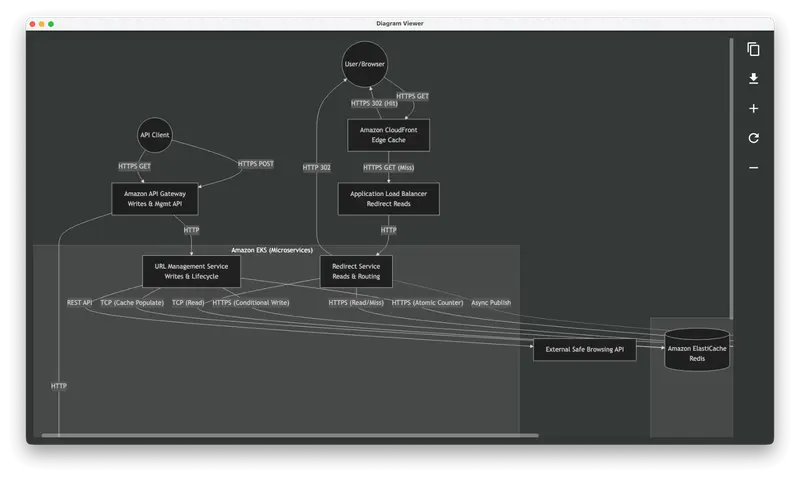
The architecture options step takes those numbers and proposes 2-3 distinct designs with pros/cons and a Mermaid comparison diagram. For this system it landed on a read/write split with async analytics: stateless redirect service backed by Redis and read replicas, separate write service, analytics into Kafka then ClickHouse. The recommendation is justified by the numbers, not by what sounds architecturally fashionable.

The high-level design, deep-dive, and trade-offs steps each build on what came before. Every sizing decision in the architecture diagram traces back to the estimates. The failure modes table references the bottlenecks identified two steps earlier. The trade-off table – the step most candidates skip – has every row traceable to a prior decision: 302 vs 301 from requirements, Redis over Memcached from the 183 GB cache estimate, Kafka over direct ClickHouse write from the < 10ms p99 redirect SLA.

The design is a starting point, not a dead end

Once the plan finishes, Askimo keeps the full context of the entire run in memory. You can keep the conversation going with follow-up questions and the AI already knows everything it produced.

For example, the high-level design above is deliberately cloud-agnostic. If you want to deploy it on AWS, you can ask:

“Map this architecture to AWS services”

And because the AI has the full context – the 35K peak QPS, the 183 GB Redis cluster, the Kafka pipeline, the ClickHouse analytics store – the response is not generic. It translates each specific component: ElastiCache for Redis, MSK for Kafka, ALB + ECS Fargate for the redirect service, RDS Aurora with read replicas for PostgreSQL, and suggests whether ClickHouse on EC2 or an alternative like Redshift makes more sense given the 365 TB analytics volume.

Same idea for other follow-ups:

  • “How would I run this on GCP?” – gets you Cloud Memorystore, Pub/Sub, Cloud Run, Cloud SQL
  • “What would a Kubernetes deployment look like for the redirect service?” – gets you HPA config, resource limits, liveness probes tuned to the latency SLA
  • “Estimate the monthly AWS cost for this design at 35K QPS” – gets you a rough cost breakdown per service

The context the plan built is what makes these answers useful. Without the prior chain, you get generic cloud mapping. With it, you get something specific to the system you actually designed.

Why the chained context matters

The trade-off table above is not invented. Every row traces back to a decision made in a previous step:

  • 302 vs 301 came from the requirements step, where the AI flagged that click analytics requires 302. A 301 causes browsers to cache the redirect and stop hitting your service, so analytics data stops flowing.
  • NoSQL over RDBMS follows from the back-of-envelope step. 50TB of URL mappings and 500K peak QPS rules out a manually sharded PostgreSQL cluster. The NoSQL choice is the direct consequence of those numbers, not a default assumption.
  • ALB over API Gateway for the read path follows from the back-of-envelope. At 10B redirects per day, API Gateway’s per-request billing becomes cost-prohibitive. The estimate made that visible before any architecture was drawn.
  • Async analytics via Kafka follows from the < 10ms p99 redirect SLA in requirements. Writing 115K click events per second synchronously on the redirect hot path would blow the latency budget. Kafka decouples the write so the redirect service returns immediately.
  • DynamoDB Atomic Counters for ID generation follows from the collision guarantee in requirements, combined with the NoSQL-only architecture chosen in the previous step. No ZooKeeper cluster required.

A single prompt cannot produce this because there is no prior context to reference. The AI just picks whatever sounds reasonable for a URL shortener. The multi-step approach forces the conclusions to be derived, not guessed.

The plan structure (for the curious)

Behind this session is a YAML file with 7 steps. Each step has a single clear goal and receives the outputs of all prior steps as context via {{step_id}} references.

Step Goal Key inputs
requirements Clarify, complete, and de-ambiguate the inputs Your functional/NFR/scale hints
back-of-envelope Derive traffic, storage, bandwidth, and cache estimates with arithmetic {{requirements}}
architecture-options Propose 2-3 distinct options with pros/cons and a Mermaid comparison diagram {{requirements}}, {{back-of-envelope}}
high-level Component overview, data flow, full architecture diagram {{requirements}}, {{back-of-envelope}}, {{architecture-options}}
deep-dive Data model, API design, failure modes table, sequence diagrams {{high-level}}
tradeoffs Decision table, known limitations, future improvements {{requirements}}, {{high-level}}, {{deep-dive}}
final Assemble all outputs into a single shareable document All prior steps

The {{step_id}} references are what make the chain work. The back-of-envelope step does not re-read your inputs — it reads the clarified requirements from step 1. The architecture options step does not guess — it sees the numbers from step 2 and the requirements from step 1. Each step does one thing.

The full YAML is on GitHub. You can copy it, load it into any Askimo instance, or use it as a template for your own plan variants.

Adapting it to other systems

I’ve run this against a few different systems now:

  • Real-time chat – the architecture options step centres on WebSocket vs SSE vs long-polling trade-offs; message ordering and delivery guarantees dominate the deep-dive
  • Ride-sharing platform – matching latency becomes the dominant constraint; the back-of-envelope gets interesting when you factor in geospatial indexing
  • Video streaming – storage and CDN costs utterly dominate everything; the trade-offs around pre-encoding vs adaptive bitrate streaming are where the depth is

The plan structure stays the same. The conclusions change based on what the numbers show.

Trying it yourself

The plan is built into Askimo if you want to run it as-is. You fill in system name, requirements, and scale hints, then step through the session with whatever AI provider you use (OpenAI, Claude, Gemini, or a local model via Ollama).

You can also adapt the YAML to add steps – a cost estimation step after back-of-envelope, a security review step, a migration plan step. The plan editor has an AI generator that writes the YAML from a plain-English description if you do not want to write it by hand.

The full source for the system design plan is available on GitHub. Contributions welcome.

Centralising Upsun Technical References with Meta-Upsun

Managing technical reference data is a grind when information for runtimes and services is scattered everywhere. It leads to inconsistent automation and inaccurate documentation.

We built Meta-Upsun to fix this. It is a read-only and versioned API that centralizes runtime, service, region, and PHP data into one public source.

Why it matters for your workflow:

  • Provides a single source of truth for consistency
  • Automates documentation to keep it accurate
  • Builds in reliability and validation from the start
  • Aligns registry status with upstream support

This shift improves the developer ecosystem and leverages agility for better automation.

Check out the full article here:


Centralising Upsun Technical References with Meta-Upsun – Upsun Developer

How Upsun centralised runtime, service, region, and PHP reference data into a single public API to improve consistency, automation, and documentation accuracy.

favicon
developer.upsun.com

NEXUS‑GAMES: Building a Free Retro & Arcade Hub — Looking for Collaborators


 I’ve been working on NEXUS‑GAMES 👉 https://nexus-games.onrender.com
Image description) — a free online hub for HTML5 and JS‑based retro and arcade experiences. The project is live, but I want to take it further with new features, better performance, and more community input.

Here’s what I’ve built so far:
1️⃣ HTML5 Canvas + JavaScript for nostalgic gameplay.
2️⃣ Responsive UI/UX design for smooth browser controls.
3️⃣ Deployment on Render with analytics tracking.
4️⃣ Open‑source repo available here: GitHub Project.

💡 I’m now looking for collaborators — developers, designers, or anyone passionate about browser games — to help expand the project. Whether it’s adding new titles, improving performance, or experimenting with multiplayer features, your contributions would be hugely valuable.

👉 Try the games at https://nexus-games.onrender.com

👉 Check out the code at GitHub https://github.com/bahati-sage

Why Gemma 4 Matters for Africa and Low-Connectivity Regions

Gemma4 unlocking healthcare, education and underserved communities

Why Gemma 4 Matters for Africa and Low-Connectivity Regions

This is a submission for the Gemma 4 Challenge: Write About Gemma 4

Exploring how Gemma 4 could unlock offline AI for education, healthcare, and underserved communities.

Gemma4 unlocking healthcare, education and underserved communities

What Happens When Frontier AI No Longer Requires Constant Internet?

For years, the AI revolution has largely belonged to places with fast internet, powerful cloud infrastructure, and organizations that can afford expensive API bills.

If you wanted advanced AI, the assumption was simple:

You needed the cloud.

But what if that assumption is starting to change?

With the release of Gemma 4, Google’s newest family of open models, we are entering a world where capable AI can run locally, on devices ranging from laptops and phones to Raspberry Pi setups and enterprise systems.

That shift matters everywhere.

But it may matter most in regions where internet access is expensive, inconsistent, or unavailable.

In places across Africa and other low-connectivity regions, Gemma 4 is more than another AI model release.

It represents a different possibility:

What if world-class AI could work even when the internet doesn’t?

The Hidden Problem with Modern AI

Most people interact with AI through cloud services.

You type a prompt.

Your request travels across the internet.

A remote server processes it.

Then a response comes back.

This works well — when infrastructure exists.

But many parts of the world face challenges that cloud-first AI quietly assumes away:

  • Expensive internet costs
  • Unstable connections
  • Power interruptions
  • Limited access to high-end cloud infrastructure
  • Schools and institutions operating under tight budgets

In many communities, connectivity is not always guaranteed.

And if AI only works online, access to intelligence becomes unequal.

This creates an uncomfortable question:

Does useful AI only belong to places with reliable internet?

Gemma 4 suggests a different answer.

Why Gemma 4 Feels Different

Gemma 4 stands out because it combines several things that rarely exist together:

✅ Open models

✅ Advanced reasoning

✅ Native multimodal capabilities

✅ 128K context window

✅ Ability to run on smaller hardware

Instead of forcing developers into expensive cloud-only systems, Gemma 4 offers something more flexible.

You can run it:

  • Locally on laptops
  • On edge devices
  • On phones
  • On Raspberry Pi systems
  • In large-scale deployments

This flexibility changes what becomes possible in environments with limited connectivity.

And that matters.

A lot.

1. Offline AI in Schools Could Change Education

Imagine a rural school with:

  • Limited internet
  • Few teachers
  • Outdated textbooks
  • Large classrooms

Now imagine students still having access to an intelligent tutor.

Not through expensive subscriptions.

Not through constant internet access.

But locally.

A Gemma 4-powered educational assistant could:

Explain difficult concepts

A student struggling with algebra or chemistry could ask questions repeatedly without fear of embarrassment.

Adapt explanations

Some students learn visually.

Some prefer examples.

Some need simpler explanations.

AI tutoring becomes personalized.

Work without internet

This may be the most important part.

Students should not lose access to learning because connectivity disappears.

In many places, educational inequality is partially an infrastructure problem.

Local AI changes that equation.

Instead of asking:

“How do we bring internet to every student first?”

We can also ask:

“How much education can we bring offline?”

That question becomes realistic with models like Gemma 4.

2. Rural Healthcare Could Benefit from Local Intelligence

Healthcare systems in many low-resource regions face major constraints:

  • Doctor shortages
  • Long travel distances
  • Limited specialist access
  • Connectivity issues

Of course, AI should never replace medical professionals.

But local AI can become a support tool.

Imagine healthcare assistants that can:

  • Summarize medical guidelines
  • Help interpret symptoms
  • Translate medical information
  • Assist with record organization
  • Support health education

Most importantly:

Sensitive medical data could remain local.

This matters for privacy.

Instead of constantly sending patient information to external cloud services, institutions may choose systems that process information closer to where care happens.

Imagine a healthcare worker in a rural clinic accessing medical explanations and educational support without depending on stable internet.

That possibility matters.

3. Low-Bandwidth Environments Deserve Better Technology

Many modern software experiences assume:

Fast Wi-Fi is normal.

But globally, that is not always reality.

Developers sometimes build products assuming unlimited bandwidth.

Reality says otherwise.

In low-bandwidth environments:

  • Pages fail to load
  • Cloud tools become unreliable
  • AI systems stop working entirely

This is where local models become powerful.

If intelligence exists directly on the device:

  • Latency drops
  • Costs fall
  • Dependence on connectivity decreases

The experience becomes more reliable.

And reliability matters more than flashy features.

Because in many underserved regions:

Technology that works consistently beats technology that only works under perfect conditions.

4. The Cost of Cloud AI Is a Bigger Problem Than We Admit

Cloud AI is powerful.

But it is also expensive.

Developers quickly run into:

  • API usage fees
  • Token costs
  • Scaling expenses
  • Infrastructure limitations

For startups, schools, NGOs, and small developers, these costs add up fast.

Gemma 4 introduces another option:

Run capable models locally.

That changes the economics.

Instead of paying continuously for every request, organizations can invest in hardware and run workloads closer to home.

For regions with tighter budgets, this matters tremendously.

Innovation should not belong only to organizations with large cloud budgets.

A small school, local startup, or nonprofit should still have access to advanced intelligence.

Gemma 4 helps make that possible.

5. Why Open Models Matter

There is another reason Gemma 4 feels important:

It is open.

That matters because developers can:

  • Experiment freely
  • Customize systems
  • Fine-tune for local needs
  • Adapt to local languages
  • Build domain-specific assistants

This becomes especially valuable in Africa.

Many local challenges are unique.

Languages are diverse.

Educational contexts differ.

Healthcare realities differ.

Agricultural advice differs.

An open model means developers can adapt intelligence to local problems instead of waiting for one-size-fits-all solutions.

Imagine localized AI assistants trained to support:

  • Farmers with crop advice
  • Students preparing for exams
  • Teachers managing classrooms
  • Small businesses learning digital skills
  • Communities accessing information in local languages

That is the real promise of open AI.

The Bigger Shift: From Cloud Dependence to Local Intelligence

For a long time, the future of AI looked centralized.

Massive servers.

Massive companies.

Massive compute.

But models like Gemma 4 hint at another future:

Distributed intelligence.

A future where capable AI exists:

  • In schools
  • In hospitals
  • On personal devices
  • In remote regions
  • Without permanent internet access

That future feels especially meaningful for underserved communities.

Because access to intelligence should not depend entirely on connectivity.

And perhaps the most exciting part is this:

Developers everywhere can now participate.

Not just large tech companies.

Not just well-funded startups.

But local builders solving local problems.

Final Thoughts

Gemma 4 is impressive because of its multimodal abilities, reasoning capabilities, and massive context window.

But what excites me most is something simpler:

Accessibility.

The ability to run powerful intelligence locally could reshape who benefits from AI.

For developers in Africa and other low-connectivity regions, the question is no longer:

“Can we participate in the AI future?”

The better question may be:

“What can we now build because frontier AI finally works closer to home?”

And that may be the most exciting shift of all.

If AI is going to shape the future, then that future should not belong only to places with perfect infrastructure.

It should belong to everyone.

Including the places that need it most.

Some parts of this Article was written by CHATGPT

Writing to an Apache Iceberg Table: How Commits and ACID Actually Work

The Iceberg write process from data file creation through the atomic catalog pointer swap

This is Part 6 of a 15-part Apache Iceberg Masterclass. Part 5 covered hidden partitioning. This article walks through the exact steps an engine takes when writing data to an Iceberg table, when the write becomes visible, and how concurrent writers are handled.

Understanding the write process is critical because it explains why Iceberg can provide ACID guarantees on top of object storage, something that seems impossible when you consider that S3, ADLS, and GCS have no built-in transaction support. The answer is that ACID lives entirely in the metadata layer, not in storage.

Table of Contents

  1. What Are Table Formats and Why Were They Needed?
  2. The Metadata Structure of Current Table Formats
  3. Performance and Apache Iceberg’s Metadata
  4. Technical Deep Dive on Partition Evolution
  5. Technical Deep Dive on Hidden Partitioning
  6. Writing to an Apache Iceberg Table
  7. What Are Lakehouse Catalogs?
  8. Embedded Catalogs: S3 Tables and MinIO AI Stor
  9. How Iceberg Table Storage Degrades Over Time
  10. Maintaining Apache Iceberg Tables
  11. Apache Iceberg Metadata Tables
  12. Using Iceberg with Python and MPP Engines
  13. Streaming Data into Apache Iceberg Tables
  14. Hands-On with Iceberg Using Dremio Cloud
  15. Migrating to Apache Iceberg

The Six Steps of a Write

The Iceberg write process from data file creation through the atomic catalog pointer swap

Every write operation (INSERT, DELETE, UPDATE, MERGE) follows the same six-step sequence:

Step 1: Write Data Files

The engine writes new Parquet (or ORC/Avro) files to object storage. These files are placed in the table’s data directory but are not yet referenced by any metadata. At this point, they are invisible to all readers. They are just orphan files sitting in storage.

Step 2: Create Manifest Entries

For each new data file, the engine creates a manifest entry containing the file path, file size, row count, partition values (computed using the table’s partition transforms), and column-level statistics (min, max, null count).

Step 3: Create or Update Manifest Files

The engine bundles manifest entries into Avro-format manifest files. If the write affects only a single partition, it may create one new manifest. If it touches many partitions, it may create multiple manifests. Existing manifests from previous snapshots that were not modified are carried forward by reference, not copied.

Step 4: Create a Manifest List

A new manifest list (Avro) is created that references all manifests for this snapshot: the new manifests from Step 3 plus the unchanged manifests inherited from the previous snapshot. This manifest list represents the complete state of the table after this write.

Step 5: Create New Metadata File

A new metadata.json file is written, containing the table schema, partition spec, properties, and the snapshot list. The new snapshot (pointing to the manifest list from Step 4) is appended to the list. The previous metadata.json remains in storage, unchanged.

Step 6: Atomic Commit (The Pointer Swap)

The engine asks the catalog to update its pointer from the old metadata.json to the new one. This is a compare-and-swap operation: the catalog checks that the current pointer matches what the engine expects, and only then updates it.

This is the exact moment the transaction commits. Before the swap, readers see the old snapshot. After the swap, readers see the new snapshot. There is no in-between state.

Why This Provides ACID Guarantees

How ACID works through the atomic metadata pointer swap

The pointer swap mechanism delivers all four ACID properties:

Atomicity. The entire write is visible or invisible. If the engine crashes after writing data files but before the pointer swap, the data files are orphans. They exist in storage but no metadata references them. Readers never see partial writes. A cleanup process (covered in Part 10) can remove these orphans later.

Consistency. The new metadata.json contains a valid schema, valid partition specs, and consistent statistics. The catalog only accepts the swap if the metadata file is well-formed.

Isolation. Readers load a specific snapshot and operate on it for the duration of their query. Even if a new snapshot is committed while they are reading, their query continues to see the snapshot they started with. This is snapshot isolation, and it happens naturally because each snapshot is immutable.

Durability. Once the catalog confirms the pointer swap, the new state is persisted. The metadata file and all data files are already in durable object storage. The catalog’s own persistence layer (a database for REST catalogs, a metastore for Hive) provides the durability guarantee for the pointer itself.

Concurrent Writes: Optimistic Concurrency Control

How two concurrent writers are resolved through optimistic concurrency with retry on conflict

When two engines write to the same table simultaneously, Iceberg uses optimistic concurrency control (OCC):

  1. Both writers read the current metadata (say v1.metadata.json) and begin their writes independently.

  2. Writer A finishes first and successfully swaps the catalog pointer from v1 to v2.

  3. Writer B attempts to commit by swapping from v1 to v3. The catalog detects that the current pointer is v2, not v1. The swap fails.

  4. Writer B retries. It reads v2.metadata.json and checks whether its changes conflict with Writer A’s changes:

  • No conflict (different partitions): Writer B’s new files affect partition region=west, and Writer A’s changes affected region=east. The changes are compatible. Writer B rebases its manifest list to include Writer A’s manifests and creates a new v3.metadata.json that reflects both writes. The swap from v2 to v3 succeeds.

  • Conflict (same files modified): Both writers modified the same data files (e.g., both deleted rows from the same file). The changes cannot be automatically merged. Writer B’s operation fails with a conflict error.

This model works well for append-heavy workloads (multiple jobs writing to different partitions), which is the dominant pattern in data lakes. Dremio handles concurrent writes and automatic retries through its engine, and its Open Catalog provides the atomic compare-and-swap through the REST catalog protocol.

Delete and Update Operations

Iceberg supports three strategies for modifying existing rows:

Copy-on-Write (COW)

The engine reads the affected data files, removes or modifies the target rows, and writes entirely new files containing the result. The old files are removed from the manifest (marked as deleted), and the new files are added. This is simple but expensive for large files when only a few rows change.

Merge-on-Read (MOR) with Position Delete Files

Instead of rewriting data files, the engine writes a small “position delete file” that lists the file path and row positions of deleted rows. At read time, the engine reads both the data file and the delete file, filtering out deleted rows during scan. This makes writes fast but adds read-time overhead.

Merge-on-Read with Deletion Vectors (Iceberg v2+)

Deletion vectors are a compact bitmap representation of deleted rows within a file. They are more storage-efficient than position delete files and faster to evaluate during reads. Engines like Dremio and Spark use deletion vectors for row-level updates in production.

Merge-on-Read with Deletion Vectors

What Happens to Old Data?

After a commit, the previous snapshot’s data files are not deleted. They remain in storage and are referenced by the old snapshot. This enables:

  • Time travel: Query the table as of any retained snapshot
  • Rollback: Revert the table to a previous snapshot if a bad write is detected
  • Incremental reads: Process only the files that changed between two snapshots

Eventually, old snapshots are expired (removed from the metadata) and their orphan files are cleaned up. This maintenance is covered in Part 10.

The Catalog’s Role in Commits

The catalog is the gatekeeper of consistency. Without a catalog providing atomic compare-and-swap, concurrent writers could overwrite each other’s commits. The choice of catalog affects write reliability:

  • REST catalogs (Dremio Open Catalog, Polaris) provide server-side CAS operations
  • Hive Metastore uses database-level locking for CAS
  • AWS Glue provides CAS through its API
  • Hadoop Filesystem catalogs use file-system rename atomicity (less reliable on object storage)

Part 7 covers the catalog landscape in detail.

Books to Go Deeper

Free Resources