Ruby is All You Need

There is a common assumption in the industry that if you want to build serious AI-powered applications, you need to abandon your current stack and go Python. Spin up FastAPI, learn LangChain, containerise everything in separate services, and suddenly your Rails monolith starts to feel like something you should be ashamed of.

Ruby — and Rails — already gives you what you need to build LLM powered features in production: background jobs, database persistence, a mature ORM, solid HTTP clients, and many years of patterns for building systems that actually work! You don’t need to rewrite everything. You need to think differently about how you use what you already have.

This series of articles are about that.

Part 1: Why your tests are letting you down

Most Rails projects I worked before reached for the same tools when it was time to write tests: RSpec, FactoryBot, some mocks, and the comfortable certainty that if you put the same input in, you get the same output out.

This worked well for a long time. But when you put an LLM inside your stack, this foundation starts to break in ways that are not immediately obvious — and your test suite will stay green while lying to your face.

The issue, as you probably already know, is non-determinism.

An LLM with the same input won’t always return the same output. Temperature configurations, model updates, small changes in context — all of this can produce responses that mean exactly the same thing but are written completely different. A test like:

expect(response).to eq("I cannot help with that") 

will fail when the model decides to say “That’s outside what I can assist with” — even though both are correct answers.

This is more than a small annoyance. It reveals a fundamental incompatibility between how we verify traditional software and how we need to verify LLM behaviour.

What breaks first

The first thing that dies is integration tests. Any test that makes assertions directly on LLM output content will become flaky by nature.

And the situation gets even worse when you start fine-tuning models.

How do you write a regression test to confirm that your fine-tuned model is actually better than the base model? You cannot use assert_equal for this. You need a completely different approach!

A better mental model: confidence!

Instead of asking “did the model return this exact string?”, we now focus on scores, thresholds, and confidence over a sample of responses. Measuring these attributes will make it possible to assert if the result is within the acceptable spectrum.

Some available options are:

  • Semantic similarity — you use embeddings to compare the response against a reference answer, measuring meaning rather than string matching.
  • LLM-as-judge — you use a second LLM call to evaluate the response against a rubric. This is how a lot of serious production eval pipelines work today.
  • Ragas-style metrics — Ragas is a Python library that defines a set of reference-free evaluation metrics specifically designed for LLM applications. We can’t use it directly in Ruby, but we can borrow the ideas and implement the same logic using the building blocks we already have — LLM calls and embeddings.

Before exploring them, here is a nice tip to consider: keep track of your past test results, so you can compare them over time!

class CreateEvalResults < ActiveRecord::Migration[8.0]
  def change
    enable_extension "vector" # only needed if you plan to use pgvector later

    create_table :eval_results do |t|
      t.text :prompt, null: false
      t.text :response, null: false
      t.text :reference
      t.string :evaluator_type, null: false
      t.float :score, null: false
      t.boolean :passed, null: false
      t.jsonb :details, default: {}
      t.vector :embedding, limit: 1536 # matches text-embedding-3-small, optional
      t.string :model_version
      t.timestamps
    end

    add_index :eval_results, :evaluator_type
    add_index :eval_results, :passed
    add_index :eval_results, :model_version
  end
end

The details column is jsonb because each evaluator returns different metadata. The model_version column is how you compare your fine-tuned model against the base model over time. The embedding column is optional for now — I will explain when it becomes useful.

Semantic similarity with pgvector

The idea is simple — embed both your reference answer and the model response, then measure the cosine distance between the two vectors. If they are close enough, the response is good.

# Gemfile
gem "neighbor"

# model
class EvalResult < ApplicationRecord
  has_neighbors :embedding
end

# helper
module EmbeddingHelper
  private

  def embed(text)
    result = @client.embeddings(
      parameters: { model: "text-embedding-3-small", input: text }
    )
    result.dig("data", 0, "embedding")
  end

  def cosine_similarity(a, b)
    dot = a.zip(b).sum { |x, y| x * y }
    dot / (Math.sqrt(a.sum { |x| x**2 }) * Math.sqrt(b.sum { |x| x**2 }))
  end
end

# evaluator
class SemanticSimilarityEvaluator
  include EmbeddingHelper
  SIMILARITY_THRESHOLD = 0.80 # MRL systematically produces lower absolute cosine similarity scores than older models like ada-002

  def initialize(openai_client)
    @client = openai_client
  end

  def evaluate(prompt:, response:, reference:, model_version:)
    response_embedding = embed(response)
    reference_embedding = embed(reference)
    similarity = cosine_similarity(response_embedding, reference_embedding)
    passed = similarity >= SIMILARITY_THRESHOLD

    EvalResult.create!(
      prompt: prompt,
      response: response,
      reference: reference,
      evaluator_type: "semantic_similarity",
      score: similarity,
      passed: passed,
      embedding: response_embedding,
      model_version: model_version,
      details: { similarity: similarity }
    )

    { score: similarity, passed: passed }
  end
end

The embedding column becomes useful later when you have thousands of eval results and want to query for semantically similar past responses — for example to debug why your model is regressing on certain inputs. For that you would add the neighbor gem and use pgvector’s nearest neighbour search. But do not worry about that until you actually need it.

LLM-as-judge

This one feels recursive at first — using a LLM to evaluate another LLM — but it works surprisingly well. You define a rubric and let a stronger model score the response:

class LlmJudgeEvaluator
  JUDGE_PROMPT = <<~PROMPT
    You are evaluating the quality of an AI assistant response.

    Original question: %{prompt}
    Response to evaluate: %{response}

    Score the response from 1 to 5 on each of these criteria:
    - Relevance: does it actually answer the question?
    - Accuracy: is the information correct?
    - Tone: is it appropriate and professional?

    Respond in JSON only: {"relevance": X, "accuracy": X, "tone": X, "reasoning": "..."}
  PROMPT

  def initialize(openai_client)
    @client = openai_client
  end

  def evaluate(prompt:, response:, model_version:)
    result = @client.chat(
      parameters: {
        model: model_version,
        response_format: { type: "json_object" },
        messages: [{
          role: "user",
          content: format(JUDGE_PROMPT, prompt: prompt, response: response)
        }]
      }
    )

    scores = JSON.parse(result.dig("choices", 0, "message", "content"))
    average = scores.slice("relevance", "accuracy", "tone").values.sum / 3.0
    passed = average >= 3.5

    EvalResult.create!(
      prompt: prompt,
      response: response,
      evaluator_type: "llm_judge",
      score: average,
      passed: passed,
      model_version: model_version,
      details: scores
    )

    scores.merge("average" => average, "passed" => passed)
  end
end


Ragas-style metrics

Ragas is a Python library that defines reference-free evaluation metrics for LLM applications. We can borrow its ideas and implement the same logic with what we already have.

Faithfulness — does the response stick to what the source context says, or is it hallucinating? It works by decomposing the response into individual claims and checking each one against the context:

class FaithfulnessEvaluator
  include EmbeddingHelper

  PROMPT = <<~PROMPT
    Given the following context and response, extract each factual claim
    from the response and determine if it can be inferred from the context.

    Context: %{context}
    Response: %{response}

    Respond in JSON only:
    {
      "claims": [
        {"claim": "...", "supported": true/false}
      ]
    }
  PROMPT

  # FaithfulnessEvaluator.new(client).evaluate(
  #   prompt: "What causes rain?",
  #   context: "Rain forms through condensation, where atmospheric water vapor cools and clings to tiny particles—such as dust, smoke, or sea salt—known as cloud condensation nuclei. These droplets accumulate to form clouds, merging into larger droplets until they are heavy enough to fall as rain, a key part of the water cycle.",
  #   response: "Rain is caused by water vapor condensing around dust particles to form droplets that fall from clouds.",
  #   model_version: "openai/gpt-4o"
  # )
  #
  # {score: 1.0,
  #  claims:
  #   [{"claim" => "Rain is caused by water vapor condensing around dust particles.", "supported" => true},
  #    {"claim" => "Droplets fall from clouds.", "supported" => true}],
  #  passed: true}

  def initialize(openai_client)
    @client = openai_client
  end

  def evaluate(prompt:, response:, context:, model_version:)
    result = @client.chat(
      parameters: {
        model: model_version,
        response_format: { type: "json_object" },
        messages: [{
          role: "user",
          content: format(PROMPT, context: context, response: response)
        }]
      }
    )

    claims = JSON.parse(result.dig("choices", 0, "message", "content"))["claims"]
    supported = claims.count { |c| c["supported"] }
    score = supported.to_f / claims.size
    passed = score >= 0.8

    EvalResult.create!(
      prompt: prompt,
      response: response,
      evaluator_type: "faithfulness",
      score: score,
      passed: passed,
      model_version: model_version,
      details: { claims: claims }
    )

    { score: score, claims: claims, passed: passed }
  end
end

Answer relevancy — instead of directly scoring relevance, it generates questions the response would answer well, then measures semantic similarity against the original question. A relevant response should produce questions that look like the original one:

class AnswerRelevancyEvaluator
  include EmbeddingHelper

  PROMPT = <<~PROMPT
    Given the following response, generate 3 questions that this
    response would be a good answer to.

    Response: %{response}

    Respond in JSON only: {"questions": ["...", "...", "..."]}
  PROMPT

  # AnswerRelevancyEvaluator.new(client).evaluate(
  #  prompt: "Why did the Byzantine Empire last longer than the Western Roman Empire?",
  #  response: "The Byzantine (Eastern Roman) Empire lasted roughly 1,000 years longer than the Western Roman Empire (ending in 1453 vs. 476 AD) due to its superior strategic location, stronger economy, and a more robust bureaucratic government.",
  #  model_version: "openai/gpt-4o")

  def initialize(openai_client)
    @client = openai_client
  end

  def evaluate(prompt:, response:, model_version:)
    result = @client.chat(
      parameters: {
        model: model_version,
        response_format: { type: "json_object" },
        messages: [{
          role: "user",
          content: format(PROMPT, response: response)
        }]
      }
    )

    generated_questions = JSON.parse(
      result.dig("choices", 0, "message", "content")
    )["questions"]

    original_embedding = embed(prompt)
    similarities = generated_questions.map { |q| cosine_similarity(original_embedding, embed(q)) }
    score = similarities.sum / similarities.size
    passed = score >= 0.8

    EvalResult.create!(
      prompt: prompt,
      response: response,
      evaluator_type: "answer_relevancy",
      score: score,
      passed: passed,
      model_version: model_version,
      details: { generated_questions: generated_questions, similarities: similarities }
    )

    { score: score, passed: passed }
  end
end

Context precision — checks whether the context chunks that actually contributed to the answer are ranked higher than the ones that did not. Useful when you are using RAG and want to know if your retrieval is doing its job:

class ContextPrecisionEvaluator
  PROMPT = <<~PROMPT
    Given the question and the following context chunk, did this chunk
    contribute useful information to answer the question?

    Question: %{question}
    Context chunk: %{chunk}

    Respond in JSON only: {"useful": true/false, "reasoning": "..."}
  PROMPT

# ContextPrecisionEvaluator.new(client).evaluate(
#   prompt: "What caused the 2008 financial crisis?",
#   response: "The 2008 financial crisis was caused by the collapse of the housing bubble, risky mortgage-backed securities, and excessive leverage in the banking system.",
#   context_chunks: [
#     "The 2008 financial crisis was triggered by a collapse in US housing prices and widespread defaults on subprime mortgages.",
#     "Mortgage-backed securities bundled risky loans and were sold to investors globally, spreading the risk throughout the financial system.",
#     "Banks were highly leveraged, meaning small losses in assets could wipe out their capital and trigger insolvency.",
#     "The collapse of Lehman Brothers in September 2008 accelerated the global financial panic."
#   ],
#   model_version: "openai/gpt-4o"
# )

  def initialize(openai_client)
    @client = openai_client
  end

  def evaluate(prompt:, response:, context_chunks:, model_version:)
    verdicts = context_chunks.each_with_index.map do |chunk, index|
      result = @client.chat(
        parameters: {
          model: model_version,
          response_format: { type: "json_object" },
          messages: [{
            role: "user",
            content: format(PROMPT, question: prompt, chunk: chunk)
          }]
        }
      )

      parsed = JSON.parse(result.dig("choices", 0, "message", "content"))
      { index: index, chunk: chunk }.merge(parsed)
    end

    useful_count = verdicts.count { |v| v["useful"] }
    score = useful_count.to_f / context_chunks.size
    passed = score >= 0.7

    EvalResult.create!(
      prompt: prompt,
      response: response,
      evaluator_type: "context_precision",
      score: score,
      passed: passed,
      model_version: model_version,
      details: { verdicts: verdicts }
    )

    { score: score, verdicts: verdicts, passed: passed }
  end
end

The next article goes deeper into how you wire all of this together into a proper eval pipeline — persisting results, tracking scores across model versions, and making confident decisions about when a fine-tuned model is actually ready for production.

Más allá del Chatbot: Arquitectura Modular para Agentic AI Corporativa y Escalable

Aurimas Markunas CTO Orquestación LangGraph

Cuando me preguntan en qué ando metido los fines de semana y les enseño los diagramas de mi arquitectura, la mayoría se echa las manos a la cabeza. 🤯

Para muchos, es una sobreingeniería innecesaria. Para los que llevamos años en las trincheras de los sistemas distribuidos, esto no es trabajo; es la evolución lógica del software, y es pasión pura.

¿Por qué tanta complejidad para algo que “ChatGPT ya hace”? Aquí es donde entra el problema real del mercado actual: Todo el mundo habla de Inteligencia Artificial, pero casi nadie habla de ARQUITECTURA y RENTABILIDAD.

Llevo más de 12 años diseñando sistemas Cloud escalables (AWS, Go, Python, Kubernetes) y lo que veo hoy en el ecosistema empresarial me asusta. El 90% de las empresas están gastando miles de euros en “chatbots mágicos” desconectados de su lógica de negocio. A la hora de la verdad, estos sistemas no escalan, alucinan y no impactan en la cuenta de resultados.

Automatizar el caos solo genera un caos más rápido. La verdadera IA corporativa no es un chat. Es una capa operativa. Es Agentic AI.

Para construir verdaderos “empleados digitales” que interactúen con ERPs, CRMs y tomen decisiones basadas en reglas estrictas, necesitamos dejar de hacer demos y empezar a construir infraestructura. Aquí desgloso los 4 pilares de la arquitectura que estoy construyendo:

1. Orquestación Cognitiva (Hyper-State)

Aurimas Markunas CTO Orquestación LangGraph

El “cerebro” de la operación. No dependemos de un solo LLM. Nuestra arquitectura implementa un núcleo de orquestación que gestiona el estado global de la conversación y planifica el contexto. Un aspecto clave es la Auto-corrección de Agentes: si un sub-agente comete un error, el núcleo orquestador lo detecta y lo redirige, garantizando la fiabilidad del flujo.

2. Malla de Datos Global & Memoria (pgvector + RAG)

Aurimas Markunas CTO Malla de Datos pgvector

La IA sin contexto es solo ruido. Implementamos una Malla de Datos (Data Mesh) heterogénea que permite a los agentes acceder a datos en tiempo real de fuentes críticas. Este pilar gestiona un almacenamiento vectorial jerárquico alimentando un sistema RAG (Retrieval-Augmented Generation) que proporciona memoria semántica a largo plazo, con estricta protección de información sensible.

3. Ejecución Resiliente Global (Temporal.io + K8s)

Aurimas Markunas CTO Ejecución Resiliente K8s

En entornos corporativos, “casi funciona” no es suficiente. Cuando un agente interactúa con una API externa o ejecuta una tarea larga, los fallos son inevitables. Usamos motores de flujos de trabajo duraderos y orquestación con Kubernetes para garantizar la ejecución asíncrona y la idempotencia. Ninguna tarea se pierde en el limbo.

4. Seguridad de Grado de Producción (Sandboxing)

Aurimas Markunas CTO Seguridad IA Agentes

El pilar más crítico. Un agente capaz de ejecutar acciones o navegar no puede correr en el mismo entorno que el core de negocio. Implementamos Sandboxing por agente utilizando microVMs, aislando completamente los entornos de ejecución y auditando el acceso a datos internos bajo estrictas políticas de uso.

Menos Hype, Más ROI

Llevo tiempo en “modo cueva” desarrollando este núcleo tecnológico para mis proyectos en PlusTecnologia y Vaiven. La Inteligencia Artificial solo tiene sentido si resuelve un problema de negocio de manera rentable, medible y segura.

👇 Abro debate: Viendo la adopción actual de LLMs, ¿cuál crees que es el mayor desafío a nivel de arquitectura (latencia, seguridad, estado) al integrar agentes autónomos en entornos de producción tradicionales? Os leo en los comentarios.

Sobre el autor:
Aurimas Markunas es CTO @ PlusTecnologia & Vaiven | Senior Cloud Architect especializado en sistemas distribuidos, Kubernetes, AWS, Go y Python. Conecta conmigo en LinkedIn o conoce más sobre mi trabajo en PlusTecnologia.

9 Hours Down Because of a Missing `import queue`: A Message Bus Postmortem

9 Hours Down Because of a Missing import queue: A Message Bus Postmortem

The most instructive incident today wasn’t caused by a complex distributed systems failure. It was a missing import statement.

At 06:49 on 03/27, a heartbeat check flagged that message-bus.service on the infra node had gone inactive (dead). Tracing the logs led to:

NameError: name 'queue' is not defined

at app.py line 604. Root cause: import queue was simply missing from the file.

The Fix

The recovery was straightforward:

  1. Add import queue to the top of app.py
  2. systemctl --user start message-bus.service
  3. systemctl --user enable message-bus.service — re-enable autostart
  4. curl /api/inbox/joe — verify endpoint response

Total downtime: ~9 hours (03/26 21:48 → 03/27 06:50).

The Real Lesson: Detection Matters More Than the Fix

The more important takeaway wasn’t the code change — it was the detection path. Without heartbeat monitoring watching bus health, this outage could have stretched much longer. In an always-on OpenClaw environment, serious failures don’t always announce themselves with loud exceptions. Sometimes a quiet diff just silently cuts off a critical path.

Don’t Stop at start — Always enable Too

When recovering a service, resist the urge to stop at systemctl start. That fixes the immediate symptom. Without re-running systemctl enable, the next reboot will reproduce the failure. A midnight re-incident of the same issue degrades operational confidence fast.

A Second Incident the Same Day: API Boundary Drift

A separate issue appeared while fixing Dashboard Lite. The frontend was calling /api/settings/auth, but the backend only had the old /api/auth route. The result: a 404 with an empty body, which res.json() then crashed on.

Both failures share the same shape: not a design mistake, but a boundary drift — small misalignments that accumulate quietly until something breaks. In real production environments, this category of failure is far more common than fundamental architectural errors.

Three Practices Worth Standardizing

  1. Minimum smoke test before service start — verify imports compile and key endpoints respond
  2. Extend heartbeat checks from “process alive” to “API responding”
  3. Recovery runbook template: start + enable + endpoint check — always all three

Flashy optimizations won’t stabilize a multi-agent infrastructure. Boring operational guardrails will. Today was a painful reminder of that.

用 Wokwi 模擬器即時測試你的 Arduino 電路 – 零成本硬體開發新方法

Arduino Uno 在 Wokwi 模擬器中運行

用 Wokwi 模擬器即時測試你的 Arduino 電路 – 零成本硬體開發新方法

你知道嗎?你可以在完全不需要購買任何硬體的情況下,在瀏覽器裡即時測試你的 Arduino 電路設計。

今天我要介紹的是 Wokwi——一個強大的雲端 Arduino 與 ESP32 模擬器。

Arduino Uno 在 Wokwi 模擬器中運行

什麼是 Wokwi?

Wokwi 是一個完全基於瀏覽器的 Arduino 模擬器。它讓你能夠:

  • 即時模擬 Arduino Uno、Nano、ESP32 等開發板
  • 搭配各種電子元件:LED、蜂鳴器、馬達、LCD 螢幕、超音波感測器等
  • 在瀏覽器中直接看到電路運作結果
  • 用類似 VS Code 的環境編寫與上傳程式

不需要安裝任何東西,只要有瀏覽器就能開始。

實測:Arduino + LED 電路

我實際用 Wokwi 模擬了一個最基礎的電路:Arduino Uno 控制 LED 閃爍。

需要的零件

零件 規格 數量
Arduino Uno R3 ATmega328P 開發板 1
LED 5mm 紅色 1
電阻 220Ω 1

接線方式

Arduino D13 (Pin 13)  →  LED 陽極(長腳)
Arduino GND           →  220Ω 電阻 → LED 陰極(短腳)

Arduino 程式碼

`cpp
void setup() {
pinMode(13, OUTPUT);
Serial.begin(9600);
Serial.println(“LED Test Starting”);
}

void loop() {
digitalWrite(13, HIGH);
Serial.println(“LED ON”);
delay(500);
digitalWrite(13, LOW);
Serial.println(“LED OFF”);
delay(500);
}
`

模擬結果

LED Test Starting
LED ON
LED OFF
LED ON
LED OFF
...

LED 每 500ms 切換一次狀態,完全符合預期!

為什麼推薦 Wokwi?

優點

  1. 零成本:完全免費使用
  2. 無需安裝:瀏覽器直接運行
  3. 即時反饋:修改程式碼後立刻看到結果
  4. 豐富元件庫:涵蓋大多數常用電子元件
  5. 支援序列阜監控:可以像真的 Arduino 一樣看 Serial Output

適合的使用情境

  • ✅ 學習 Arduino 程式設計
  • ✅ 測試電路設計想法
  • ✅ 快速原型開發
  • ✅ 在正式動手硬體之前驗證概念

Wokwi diagram.json 格式

Wokwi 使用 JSON 格式描述電路。以下是 LED 範例的 diagram.json:

json
{
"version": 1,
"author": "HF Studio",
"editor": "wokwi",
"parts": [
{
"id": "board",
"type": "wokwi-arduino-uno",
"left": 200,
"top": 50
},
{
"id": "led1",
"type": "wokwi-led",
"left": 80,
"top": 80,
"attrs": { "color": "red" }
}
],
"connections": [
["board:13", "led1:A", "green"],
["board:GND", "led1:C", "black"]
]
}

常見電子元件對照表

元件 Wokwi Type
超音波感測器 hc-sr04
LED wokwi-led
蜂鳴器 buzzer
按鍵 button
光敏電阻 photoresistor
溫度感測器 dht11
伺服馬達 servo
LCD 螢幕 lcd1602
ESP32 esp32dev

結論

Wokwi 為業餘 maker、學生和教師提供了一個極其方便的Arduino學習和測試環境。你可以先在模擬器中驗證你的想法,確認可行後再購買實際硬體——節省時間和金錢。

我的下一步計劃:陸續發布更多使用 Wokwi 模擬器的教學內容,包括:

  • 超音波距離感測器專題
  • ESP32 Wi-Fi 控制實驗
  • IoT 氣象站製作

如果你對這個主題有興趣,歡迎在留言區告訴我希望看到什麼樣的 Arduino 專題!

💡 想第一時間看到新文章?歡迎追蹤我的 DEV.to 主頁!

The Amnesia Tax: Why Stateless Agents Are Eating Your Margins

The Amnesia Tax: Why Stateless Agents Are Eating Your Margins

Every time your AI agent forgets a conversation, someone pays for it. Usually you.

The viral post making the rounds—your agent can think. it can’t remember.—gets the diagnosis right. But it misses the economics.

Memory isn’t a feature. It’s infrastructure. And right now, most teams are running production workloads on infrastructure that forgets everything every session.

Here’s what that actually costs.

The Hidden Tax Rate

When an agent can’t remember:

  • Every task starts from zero. No accumulated context about your codebase, your preferences, your quirks.
  • Every correction is paid twice. You re-explain the same constraints, the same gotchas, the same “don’t do X” rules.
  • Every debugging session is archaeological. You reconstruct what the agent would have known if it had memory.

I watched a team spend 45 minutes debugging why their agent kept making the same mistake. The agent had no memory of the previous 12 corrections. Each session, they were essentially paying the onboarding cost again.

That’s not inefficiency. That’s a subscription to repeating yourself.

Why This Is Different From “Bad Prompts”

The usual response to agent quality issues is “write better prompts.”

But prompts can’t solve amnesia.

A perfectly crafted prompt that teaches your agent about your architecture, your coding standards, your deployment rituals—that prompt is useless the moment the session ends. The agent treats every conversation like it’s meeting you for the first time.

You’re not fighting prompt quality. You’re fighting statelessness by design.

The Three Memory Gaps

Most agent conversations focus on one gap: conversation history. But there are actually three:

1. Session Memory (what happened in this chat)

This is partially solved by context windows. But context windows aren’t memory—they’re buffers. They overflow. They’re expensive. And they reset.

2. Workflow Memory (what patterns does this user prefer)

Does your agent know you prefer inline comments over docstrings? That you like verbose logging? That you hate nested ternaries?

If not, it’s guessing. Every. Single. Time.

3. System Memory (what’s true about this codebase)

Your agent should know the architectural decisions, the intentional tech debt, the “don’t touch” modules. Without this, it’s a tourist in your codebase.

The Architecture Shift

The fix isn’t bigger context windows. It’s persistent memory architecture.

This means:

  • MCP (Model Context Protocol) servers that persist context across sessions
  • Memory files that store workflow preferences and architectural decisions
  • Project-level configuration (like CLAUDE.md) that teaches the agent the rules once

The teams getting real productivity gains aren’t using smarter models. They’re building systems that remember.

The Business Case

Here’s the calculation most teams miss:

If your agent saves you 2 hours per day but forgets everything overnight, you’re paying a re-onboarding tax every morning. That might be 15 minutes. It might be an hour.

If it’s 30 minutes daily, that’s 10% of your agent productivity vanishing into amnesia.

The teams I’ve seen solve memory aren’t seeing incremental gains. They’re seeing step functions. Because the agent stops wasting cycles relearning what it already knew.

What To Do Monday Morning

  1. Audit your amnesia. How much context do you re-enter every session? Time it for a week.

  2. Check your infrastructure. Are you using MCP servers? Persistent memory files? Or just hoping the context window holds?

  3. Write the rules once. If you find yourself typing the same instructions repeatedly, that’s a memory file waiting to happen.

The agent memory conversation has been stuck on can they? The real question is what does it cost if they can’t?

Your margins know the answer.

Beyond the Cloud: Why the “Edge” is the New Frontier for Engineering

In the last decade, we were told that the “Cloud” was the final destination for all data. But as we move through 2026, a new shift is happening. For us as engineering students, the real magic isn’t happening in a distant data center—it’s happening right in our pockets, on our wrists, and in our local sensors.
1.⁠ ⁠The Latency Problem
Imagine an autonomous drone or a smart medical monitor. If these devices have to send data to a server thousands of kilometers away just to make a decision, the delay (latency) could be catastrophic. Edge Computing solves this by processing data right where it’s generated.
2.⁠ ⁠AI Gets Local (Agentic AI)
We are seeing the rise of Agentic AI—models that don’t just answer questions but take actions. In 2026, the goal is “On-Device AI.” By running smaller, optimized versions of LLMs locally, we achieve:

  • Privacy: Your data never leaves your device.
  • Speed: Instantaneous response times.
  • Reliability: The system works even without an internet connection.
    3.⁠ ⁠Sustainability & “Green Code”
    Processing everything in massive data centers consumes a staggering amount of energy. As future engineers, we have a responsibility toward Sustainable Tech. Edge computing reduces the “data traffic” on global networks, leading to a smaller carbon footprint for our applications.
    The Bottom Line
    The “Cloud” isn’t going away, but it is becoming the brain for long-term memory, while the “Edge” becomes the nervous system for real-time action. For those of us building the next generation of software, mastering Edge-Native development isn’t just an advantage—it’s a necessity.

Comment j’onboarde automatiquement les thérapeutes sur mon SaaS

Séquence d

Séquence d'emails sur un écran d'ordinateur

Un thérapeute reçoit un cold mail. Il clique sur “Oui”. Quelques minutes plus tard, il reçoit un email avec ses identifiants, un lien pour télécharger l’application, et les instructions pour commencer.

Je n’ai rien fait. Je n’ai même pas été impliqué.

C’est ça la vraie valeur ajoutée — pas juste la séquence de relance, mais le fait que tout le cycle, du cold mail à l’utilisateur actif, est automatisé de bout en bout. Je reçois une notification à la fin. C’est tout.

Le contexte : un POC en phase fermée

Nuance est une application Android de colonnes de Beck interactives, pensée comme un prolongement des séances TCC. Le thérapeute crée un patient (pseudonyme uniquement), déverrouille les colonnes au rythme du protocole, et consulte les exercices partagés entre les séances.

L’accès est fermé et contrôlé — pas de self-service public. Ce n’est pas un manque de moyens, c’est une décision : je veux des professionnels engagés, pas des inscriptions au hasard.

Étape 1 — Identifier les bons praticiens

Je n’attends pas que les thérapeutes viennent à moi. Je vais les chercher.

L’AFTCC (Association Française de Thérapie Cognitive et Comportementale) publie un annuaire de ses membres — des praticiens certifiés, formés à la TCC, qui utilisent les colonnes de Beck dans leur pratique quotidienne. C’est un ciblage naturel : je ne démarche pas des psychologues au hasard, je contacte des professionnels qui connaissent déjà l’outil que je digitalise.

Je récupère les contacts, je nettoie la liste, et j’envoie un cold mail court avec une question simple et deux boutons.

Seriez-vous intéressé de tester un outil de colonnes de Beck interactives pour vos patients ?

[Oui, je veux tester] · [Non merci]

Pas de pitch. Pas de liste de features. Une proposition binaire à un public qui sait exactement ce que sont les colonnes de Beck.

Le bouton “Non merci” redirige vers un formulaire de refus — raison, commentaire, option de désinscription. Je collecte de la donnée même sur les non.

Étape 2 — Le clic déclenche tout

Quand un thérapeute clique sur “Oui”, il tombe directement sur une page de bienvenue personnalisée avec son prénom — que j’ai déjà récupéré sur l’annuaire AFTCC. Pas de formulaire, pas de saisie. Juste :

“Ravi de vous compter parmi les premiers testeurs, [Prénom]. Je génère actuellement vos accès personnels. Vous recevrez vos codes de connexion par email d’ici 5 à 10 minutes.”

Ce clic déclenche en cascade, sans aucune intervention de ma part :

1. Création du compte

Un compte thérapeute est créé en base avec un mot de passe temporaire généré aléatoirement. Le flag must_change_password est activé — à la première connexion, l’app force le changement.

$tempPassword = bin2hex(random_bytes(8)); // 16 caractères hex
$passwordHash = password_hash($tempPassword, PASSWORD_BCRYPT);

insert('users', [
    'email'                => $email,
    'name'                 => $name,
    'password_hash'        => $passwordHash,
    'must_change_password' => 1,
    'is_active'            => 1,
]);

2. Création du patient personnel

Un patient virtuel “Mes exercices” est automatiquement créé avec le flag is_therapist_self = 1. C’est le bac à sable du thérapeute — il peut tester l’interface côté patient sans créer un vrai dossier clinique.

3. Génération d’un code de téléchargement

L’APK n’est pas public. Un code à usage unique est généré et associé au compte. Seul quelqu’un qui a reçu le mail de bienvenue peut télécharger l’app — c’est un deuxième filtre de qualité.

4. Mise en file d’attente du mail de bienvenue

Le mail ne part pas instantanément. Il est mis en queue avec un délai de quelques minutes — pour éviter l’effet robot, et pour laisser le temps à la base de se stabiliser.

insert('pending_welcome_emails', [
    'user_id'       => $userId,
    'email'         => $email,
    'name'          => $name,
    'temp_password' => $encryptedPassword, // chiffré en base
    'send_after'    => date('Y-m-d H:i:s', strtotime('+5 minutes')),
]);

5. Notification admin

Je reçois un email de synthèse : nom, email, heure d’inscription. C’est tout ce que je fais dans ce flow — lire une notification.

Étape 3 — Le mail de bienvenue

Quelques minutes après le clic, le thérapeute reçoit un email complet avec :

  • Ses identifiants (email + mot de passe temporaire)
  • Son code de téléchargement APK
  • Un bouton pour accéder au dashboard web
  • Les 5 étapes pour démarrer, dans l’ordre

Tout est personnalisé, tout est fonctionnel. Aucune pièce du puzzle n’attend une action de ma part.

Étape 4 — La séquence de relance automatique

Un mail de bienvenue bien fichu ne suffit pas. Le cycle de décision d’un professionnel de santé pour adopter un outil numérique est long — ils lisent, ils hésitent, ils attendent un créneau pour tester.

J’ai construit deux séquences parallèles de 3 emails, espacés de 7 jours, qui tournent via un cron nocturne.

Séquence 1 — Compte non activé

Pour les thérapeutes qui n’ont pas encore ouvert l’application. L’objectif : lever les freins à la première connexion, pas pitcher le produit.

Step Sujet Angle
1 “Vos accès pour tester Nuance (rappel)” Un espace personnel vous attend déjà
2 “Moins de papier, plus de clinique ?” Le gain de temps concret
3 “Un souci pour accéder à votre espace ?” La main tendue, dernier message

Le step 3 est délibérément humain — “c’est mon dernier message”. Pas d’urgence artificielle. Juste une invitation à répondre directement si quelque chose bloque.

Séquence 2 — Compte activé, pas encore de patient réel

Pour ceux qui se sont connectés mais n’ont pas encore intégré l’outil dans leur pratique. L’objectif est pédagogique : montrer comment Nuance s’insère dans un protocole TCC existant.

Step Sujet Angle
1 “Un premier pas avec vos patients sur Nuance ?” Le patient virtuel ‘Mes exercices’
2 “Le saviez-vous ? (Colonnes interactives)” Les colonnes déverrouillables
3 “Dernier petit conseil pour votre pratique” La note ‘à chaud’ sur mobile

Chaque email enseigne une seule chose. Une. C’est suffisant pour déclencher une action.

La condition de sortie : créer un vrai patient

Les deux séquences s’arrêtent dès qu’un thérapeute crée son premier vrai patient (hors espace personnel). La requête SQL vérifie ça à chaque passage du cron :

SELECT u.*, s.last_step, s.last_sent_at,
(SELECT COUNT(*) FROM patients p
 WHERE p.therapist_id = u.id
 AND p.is_therapist_self = 0) as real_patient_count
FROM users u
LEFT JOIN user_onboarding_sequence s ON u.id = s.user_id
WHERE (
    s.last_step IS NULL
    OR (s.last_step < 3 AND (s.last_sent_at IS NULL
        OR s.last_sent_at <= DATE_SUB(NOW(), INTERVAL 7 DAY)))
)
AND u.created_at <= DATE_SUB(NOW(), INTERVAL 2 DAY)
AND u.unsubscribed_at IS NULL

Dès que real_patient_count > 0, l’utilisateur sort de la sélection. Les emails s’arrêtent. Pas de relance sur quelqu’un qui est déjà actif.

L’unsubscribe : non négociable

Chaque email contient un lien de désinscription. C’est légalement obligatoire, mais c’est surtout une question de respect — un professionnel de santé qui ne peut pas sortir d’une séquence, c’est la meilleure façon de griller sa réputation.

Le token est regénéré dans le bloc try, juste avant l’envoi. Pas avant. Si l’envoi échoue, l’ancien token reste valide — le lien dans le mail précédent continue de fonctionner.

try {
    $unsubToken = bin2hex(random_bytes(16));
    dbExecute(
        "UPDATE users SET unsubscribe_token = ? WHERE id = ?",
        [$unsubToken, $user['id']]
    );
    // génération du mail + envoi
    // mise à jour de la séquence seulement si succès
}

Petit détail, vraie conséquence si on l’oublie.

La stack

  • PHP — backend, création de compte, génération des tokens, templates email
  • PHP CLI + Crontab — séquence de relance, 0 8 * * *
  • MySQL — users, pending_welcome_emails, user_onboarding_sequence
  • PHPMailer — envoi SMTP

Rien d’exotique. Pas de queue manager, pas de worker asynchrone. Un cron, quelques tables, et une logique de ciblage bien pensée. Le tout tourne sur un hébergement mutualisé standard.

Le principe est simple : chaque étape du parcours utilisateur doit pouvoir se dérouler sans moi. Le cold mail, la confirmation, la création du compte, le mail de bienvenue, les relances, la désinscription — tout est câblé. Je reçois des notifications, je lis des stats. C’est tout.

Ce n’est pas de la flemme. C’est une décision de conception.

Je suis développeur avant d’être commercial. Ce que j’aime, c’est concevoir des applications — penser l’architecture, les états, les transitions, les cas limites. Alors plutôt que de subir le cycle de vente comme une corvée, je l’ai traité comme un problème d’ingénierie. Ce flow d’onboarding est une application : elle a des entrées (le cold mail), des états (inscrit, activé, patient créé), des transitions (les emails de relance), et une condition de sortie (l’utilisateur actif).

Le résultat : je passe mon temps à ce pour quoi je suis fait. Le reste tourne tout seul.

Why Claude Code Ignores Your CLAUDE.md (And How to Fix It)

If you’ve ever noticed Claude Code ignoring rules you carefully wrote in
your CLAUDE.md, you’re not imagining it.

I spent hours adding instructions to my config file, only to watch Claude
keep doing the exact things I told it not to. After digging into how
Claude Code actually processes CLAUDE.md, I found four specific reasons
this happens.

1. Your file is too long

Claude Code starts selectively ignoring content after around 80 lines.

This isn’t a bug — it’s a fundamental limitation of how LLMs process
instructions. Frontier models can reliably follow approximately 150
instructions. Once you exceed that, the model starts making judgment
calls about what to pay attention to.

Most CLAUDE.md files I’ve seen are 100-200+ lines. Mine was 140 lines.
I had no idea this was a problem.

Fix: Keep your CLAUDE.md under 80 lines. Every line should answer
the question: “Would removing this cause Claude to make mistakes?”
If not, cut it.

2. You have contradicting instructions

This one is subtle. If your file says “use tabs for indentation” in one
section and “use 2-space indentation” in another, Claude can’t follow
both — so it often ignores both.

These contradictions are hard to spot manually, especially in longer files
that have been edited over time by multiple people.

Fix: Audit your file for conflicting rules. Pay special attention to
code style, testing requirements, and workflow instructions.

3. You’re wasting tokens on personality lines

Lines like these are extremely common:

You are a senior software engineer.
Be concise, helpful, and professional.
Think step by step carefully.
Always write clean, high-quality code.

These do almost nothing. Claude Code already has strong system-level
instructions baked in. Personality lines waste tokens without changing
behavior — and worse, they push your actual important instructions
further down the file.

Fix: Delete every line that doesn’t give Claude specific, actionable
information about your project.

4. You’re using @file references wrong

Writing @docs/architecture.md in your CLAUDE.md embeds that entire
file into every single session. This bloats your context window
immediately and leaves less room for actual work.

Fix: Instead of embedding files, tell Claude when to read them:

For architecture questions, see docs/architecture.md
For API integration issues, see docs/stripe-guide.md

How bad is your CLAUDE.md?

I scored mine after learning all this: 34/100. Grade F.

I had 4 errors and 11 warnings in a file I thought was fine.

After fixing everything: 91/100. Grade A. Claude’s behavior
noticeably changed — it stopped ignoring my testing requirements and
started following my workflow instructions consistently.

I built a CLI tool to automate this analysis:

pip install agentlint-dev
agentlint score CLAUDE.md

Output:

Score: 34/100  Grade: F — Critical Issues

  Length & Density   0/25
  Specificity       19/25
  Structure         10/25
  Completeness       5/25

It catches contradictions, token waste, duplicate rules, missing
commands, @file abuse, and more. Works with CLAUDE.md, AGENTS.md,
and Cursor rules.

→ agentlint.carrd.co

The minimal CLAUDE.md template

If you want to start fresh, here’s the structure that scores highest:

# Project
[2-3 sentences: what this project does]

# Stack  
[language, framework, key libraries]

# Commands
- Test: npm test
- Build: npm run build
- Lint: npm run lint

# Rules
- [specific rule 1]
- [specific rule 2]

# Never
- [thing Claude should never do]

# Verify
After changes, run tests and confirm they pass before marking done.

Under 80 lines. No personality instructions. Specific commands.
Clear rules. This is what a 90+ score looks like.

What does your CLAUDE.md score? Run agentlint and let me know in
the comments.

Steam: “Fiyat dönüştürme verilerimizi dünya genelindeki güncel pazar koşullarını daha iyi yansıtacak şekilde güncelledik.”

Steam LOG Tasarım

Steam LOG TasarımSteam, fiyat dönüştürme verilerini dünya genelindeki güncel pazar koşullarını daha iyi yansıtacak şekilde güncellediklerini duyurdu. Bu konuda yaptığı açıklamada “Veriler güncellendi ve iki yeni dönüştürme yöntemi eklendi” diyen şirket, satın alma gücüne bağlı fiyatlandırma sistemi için ek olarak şunları söyledi: “Steam, oyununuzu dünya çapındaki müşterilere satabilmeniz için 35 farklı para biriminde ve 4 farklı bölge grubunda fiyatlandırmayı destekler. Her zaman olduğu gibi, oyun fiyatınızı belirlemek tamamen sizin tasarrufunuzdadır. Birçok geliştiricinin tüm bu para birimlerine ve her birinin kaç haneli olması gerektiğine hakim olmadığını biliyoruz ve sunduğumuz bu araçların size dünya çapındaki çeşitli pazarların beklentilerine uygun fiyatlar belirlemede yardımcı olacağını düşünüyoruz. Piyasa koşulları zamanla değiştiğinden, geliştiricilerin Steam’deki ürünlerini uygun fiyatlarda tutmasına yardımcı olmak için fiyatlandırma verileri de aralıklarla güncellenmektedir. Yeni değerler ve bazı ilave seçenekler bugün yayınlandı. Bunların detaylarını aşağıda bulabilirsiniz.” ifadelerini kullanan şirket, geliştiricilere artık üç farklı dönüştürme yöntemi sunuyor. Bu konuda şunlar aktarılıyor: “Döviz Kuruyla Dönüştürme: Bu yöntem, sayfada […]
Steam: “Fiyat dönüştürme verilerimizi dünya genelindeki güncel pazar koşullarını daha iyi yansıtacak şekilde güncelledik.” yazısı ilk olarak Teknoloji haberleri – LOG üzerinde yayınlandı.

Sextant: Making Claude Code Read Your Code Before Changing It

!(https://dev-to-uploads.s3.amazonaws.com/uploads/articles/mbmjeg2peb497j1m593e.png)

An architecture-aware engineering principles framework for Claude Code, built for real work on existing codebases: bug fixes, feature work, refactoring, code review, migration, and more. Instead of treating every request the same way, Sextant routes work by task type, applies rules that match the size of the change, and makes principle conflicts explicit instead of leaving them to guesswork.

1. Why Sextant Exists

If you have used Claude Code on anything more serious than a toy project, you have probably seen the same patterns.

Sometimes it starts editing too early. It reads the error trace, opens one nearby function, and jumps into a fix before it has actually located the root cause.

Sometimes it ignores the shape of the existing system. You ask for a feature, and instead of extending the pattern that is already there, it invents a new one.

And sometimes it applies the wrong amount of process. A tiny local change gets treated like an architecture exercise, while a cross-module change gets handled as if it were just a one-file patch.

Sextant is built around a simple idea: first establish a safe baseline, then figure out what kind of task this is, and then apply the rules that make sense for that kind of change. The goal is not to add ceremony. The goal is to help Claude Code make better decisions before it starts modifying code.

2. Task-Type Routing Instead of One Generic Workflow

Sextant is not one monolithic prompt. It is a set of specialized sub-skills, and Claude Code automatically matches the user’s request to the most relevant one.

That matters because a bug fix should not behave like a migration, and a code review should not behave like a feature implementation.

Here is the structure at a high level:

Task Type Sub-Skill Key Behavior
Bug Fix sextant:fix-bug Disambiguation gate → surgical minimal-change fix → confirmation gate
New Feature sextant:add-feature Architecture research → integration strategy → optional TDD
Modify/Refactor sextant:modify-feature Disambiguation gate → impact analysis → confirmation gate
Code Review sextant:review-code Declare review mode → multi-dimension review → classified output
Debug sextant:debug Bisection protocol → hypothesis limit gate → handoff to fix-bug
Security Audit sextant:security Input validation, auth/authZ, sensitive data, and dependency review
Migration sextant:migrate Leaf-first migration sequence → per-module validation
Sprint Planning sextant:plan Dependency-ordered task list → execution pipeline entry
Ship/PR Prep sextant:ship Pre-ship checklist → PR description generation
Write Tests sextant:write-tests Bug reproduction test entry → boundary matrix design
Requirements sextant:refine-requirements Eliminate ambiguity → feasibility assessment → task breakdown
General Coding sextant Lightweight tasks and exempt scenarios

One detail I like here is the disambiguation step. For example, the bug-fix skill first asks whether the issue is actually broken behavior or whether the requirement changed. If it is the latter, Sextant redirects the work to modify-feature instead of pretending it is a bug. That is a small design choice, but it prevents a lot of wasted motion.

3. Different Task Sizes Activate Different Rules

Another thing Sextant does explicitly is treat small and large changes differently.

The same fix-bug skill does not always run with the same rule depth. Instead, the rules that get activated depend on the task size:

  • Lightweight: single-function tweaks, config changes, and other narrow edits. These use the baseline rules, anti-pattern detection, and direct execution.
  • Medium: module-internal changes or work that introduces new functions or classes. These add checks like SRP, DRY, and interface contract review.
  • Large: cross-module changes or public interface changes. These bring in broader checks such as impact analysis and architecture compliance review.

This is not left to vibes. Sextant defines a five-factor Impact Radius Scorecard based on things like files changed, public interface changes, dependency direction changes, data structure changes, and downstream blast radius. That score determines whether the work is treated as lightweight, medium, large, or architectural.

What matters here is not the labels themselves. It is that the rule activation is explicit. Small tasks stay small. Bigger tasks do not get to pretend they are small just because the initial diff looks simple.

4. Principle Conflicts Are Handled as Decisions, Not Vibes

A lot of engineering advice sounds reasonable in isolation.

Keep things DRY. Avoid overengineering. Respect boundaries. Minimize change. Prefer secure choices.

The hard part is when those principles collide.

Sextant makes that collision explicit. Instead of vaguely saying “balance the tradeoffs,” it defines arbitration rules for common conflicts.

A few examples:

  • DRY vs YAGNI: if shared logic has only one caller, YAGNI wins.
  • OCP vs YAGNI: if an interface has only one implementation, ship the concrete class directly.
  • DRY vs Layer Boundaries: if deduplication would cut across boundaries, the boundary wins.
  • Baseline vs Minimal Change: if you are fixing a bug and notice nearby baseline issues, minimal change usually wins.
  • Security vs Convenience: security wins.

That matters more than it sounds. A lot of AI-generated changes go off track not because the code is syntactically wrong, but because the model does not know which principle should take priority in context. Sextant’s approach is to reduce that ambiguity.

5. Where Sextant Fits Compared with Superpowers and gstack

In the Claude Code skills ecosystem, Superpowers (by Jesse Vincent / obra) and gstack (by Garry Tan) are two well-known frameworks. The comparison is not really about which one is “best.” It is about what kind of work each one is optimized for.

Design Philosophy at a Glance

Dimension Superpowers gstack Sextant
Core idea Process-driven: brainstorm → plan → implement, TDD-first Role-driven: CEO / Designer / Eng Manager / QA role-playing Architecture-aware: route by task type, scale rules by task size
Trigger mechanism Slash commands (/brainstorm, /execute-plan) Slash commands (/office-hours, /ship, /qa) Auto-matching (Claude Code selects sub-skill based on prompt content)
TDD approach Mandatory: code written before tests gets deleted Part of /ship workflow Configurable: .sextant.yaml supports tdd: off / default_on / enforce
Architecture principles Mentions YAGNI and DRY but no systematic principle framework Does not cover code-level architecture principles Full SOLID + DRY/YAGNI + architecture constraints + principle conflict arbitration
Paradigm adaptation No explicit paradigm detection No explicit paradigm detection 8 paradigms auto-detected (backend layered, frontend component tree, CLI, FP, monorepo, event-driven, serverless, AI/ML pipeline)
Scale adaptation Indirect via task decomposition (2–5 min micro-tasks) Not addressed Explicit 3-tier scaling + Impact Radius Scorecard
Sub-agents Core feature: subagent execution + two-stage code review Supports parallel sessions via Conductor No sub-agent dependency; completes within a single session
External dependencies None (pure Markdown skills) Requires Bun runtime + compile step Requires Python 3 (only for strip_frontmatter.py)
MCP dependency No core MCP dependency; optional extensions (e.g., superpowers-chrome) /browse and /qa require a custom browser automation toolchain; integrates Greptile for PR review No core MCP dependency; GitNexus MCP tools conditionally injected when .gitnexus/ detected — optional, not a prerequisite
Project config None ~/.gstack/config.yaml .sextant.yaml (TDD mode, principle weight overrides, predefined profiles)

A table like this can make the differences look cleaner than they feel in real use, but it does help anchor the comparison.

One practical difference is how you get into a workflow. Superpowers and gstack both lean on explicit slash commands, so the user chooses the mode up front. Sextant leans the other way: you describe the task in natural language, and Claude Code matches it to a sub-skill. Neither model is universally better. One gives you more explicit control; the other asks you to remember less while you are already in the middle of debugging or implementation.

The TDD row shows a similar difference in philosophy. Superpowers is prescriptive about test-first development. Sextant treats it as a project-level setting. That is less a question of capability than of taste: should the framework enforce a working style, or adapt to the one the project already uses?

Where Each Framework Shines

This is where the comparison becomes more useful than the feature list. Superpowers makes the most sense when the team wants a structured loop for new work: brainstorm, plan, implement, and keep TDD front and center. gstack is more helpful when the missing piece is not code structure but role coverage — product questions, design feedback, QA flows, and the kind of prompts a solo builder or small team would otherwise have to simulate manually.

Sextant is aimed at a different problem: everyday engineering work inside an existing system. When the codebase already has architecture, module boundaries, compatibility constraints, and a lot of history, what matters most is not brainstorming or role-play. You need the AI to understand the code it is about to change, route the task correctly, and apply checks that match the scope of the change. That is Sextant’s center of gravity.

What Stands Out in Practice

What makes Sextant stand out is not that it tries to do everything. It is that a few decisions are made explicit instead of being left implicit: task-type routing, principle conflict arbitration, confirmation before riskier edits, visible progress during multi-step work, and optional GitNexus acceleration. The architecture-paradigm support is part of the same pattern. A layer violation does not look the same in a backend service, a frontend component tree, or a monorepo, so the framework tries to judge the same principle in context rather than as a flat rule.

6. Why GitNexus Changes the Workflow

One of the more practical parts of Sextant is how well it lines up with GitNexus.

Claude Code fundamentally operates at the text level. It reads files, searches symbols, and traces call chains one hop at a time. That is fine in smaller projects, but it becomes expensive and incomplete in larger codebases.

Three bottlenecks show up quickly:

  • grep finds text matches, not relationships
  • call-chain tracing becomes hop-by-hop manual exploration
  • “what breaks if I change this?” becomes difficult without a global view

GitNexus addresses that by indexing the codebase as a knowledge graph. It parses ASTs, extracts relationships such as calls, imports, and inheritance, stores them in a queryable graph, and exposes tools through MCP. That means the agent can ask relationship-oriented questions directly instead of reconstructing everything from text search.

Just as importantly, the integration is optional.

Sextant checks whether a .gitnexus/ directory exists. If it does, the GitNexus tool guidance is injected. If not, the same workflow falls back to grep and file reading. In other words, GitNexus is an accelerator, not a requirement.

7. What GitNexus Looks Like in Practice

The difference becomes clearer in actual workflows.

Bug Fixing

Without GitNexus, locating root cause means grepping for error keywords, opening files one by one, tracing callers manually, and estimating impact as you go.

With GitNexus, the same step can use graph queries to locate relevant symbols, inspect caller/callee context, trace the execution path, and enumerate affected upstream callers.

The workflow is the same. What changes is how expensive each step is.

New Feature Work

When adding a feature, Sextant wants to understand the existing architecture and find the most relevant reference module.

Without GitNexus, that means browsing directories and inferring from filenames and code.

With GitNexus, the agent can search for semantically related modules, inspect a module’s dependency relationships, and look for existing extension points like strategies, factories, registries, or plugins. That makes the integration decision less speculative.

Migration

For migrations, the job is not just to find direct references to an old API, but to understand the impact scope and migration order.

Without GitNexus, that is mostly grep.

With GitNexus, the agent can query upstream impact and detect circular dependencies that affect sequencing. That lines up directly with Sextant’s leaf-first migration principle.

8. A Real Example: Two Bugs in a C++ Orchestrator

The strongest part of the story is the execution example, because it shows how these ideas play out in an actual bug-fix flow.

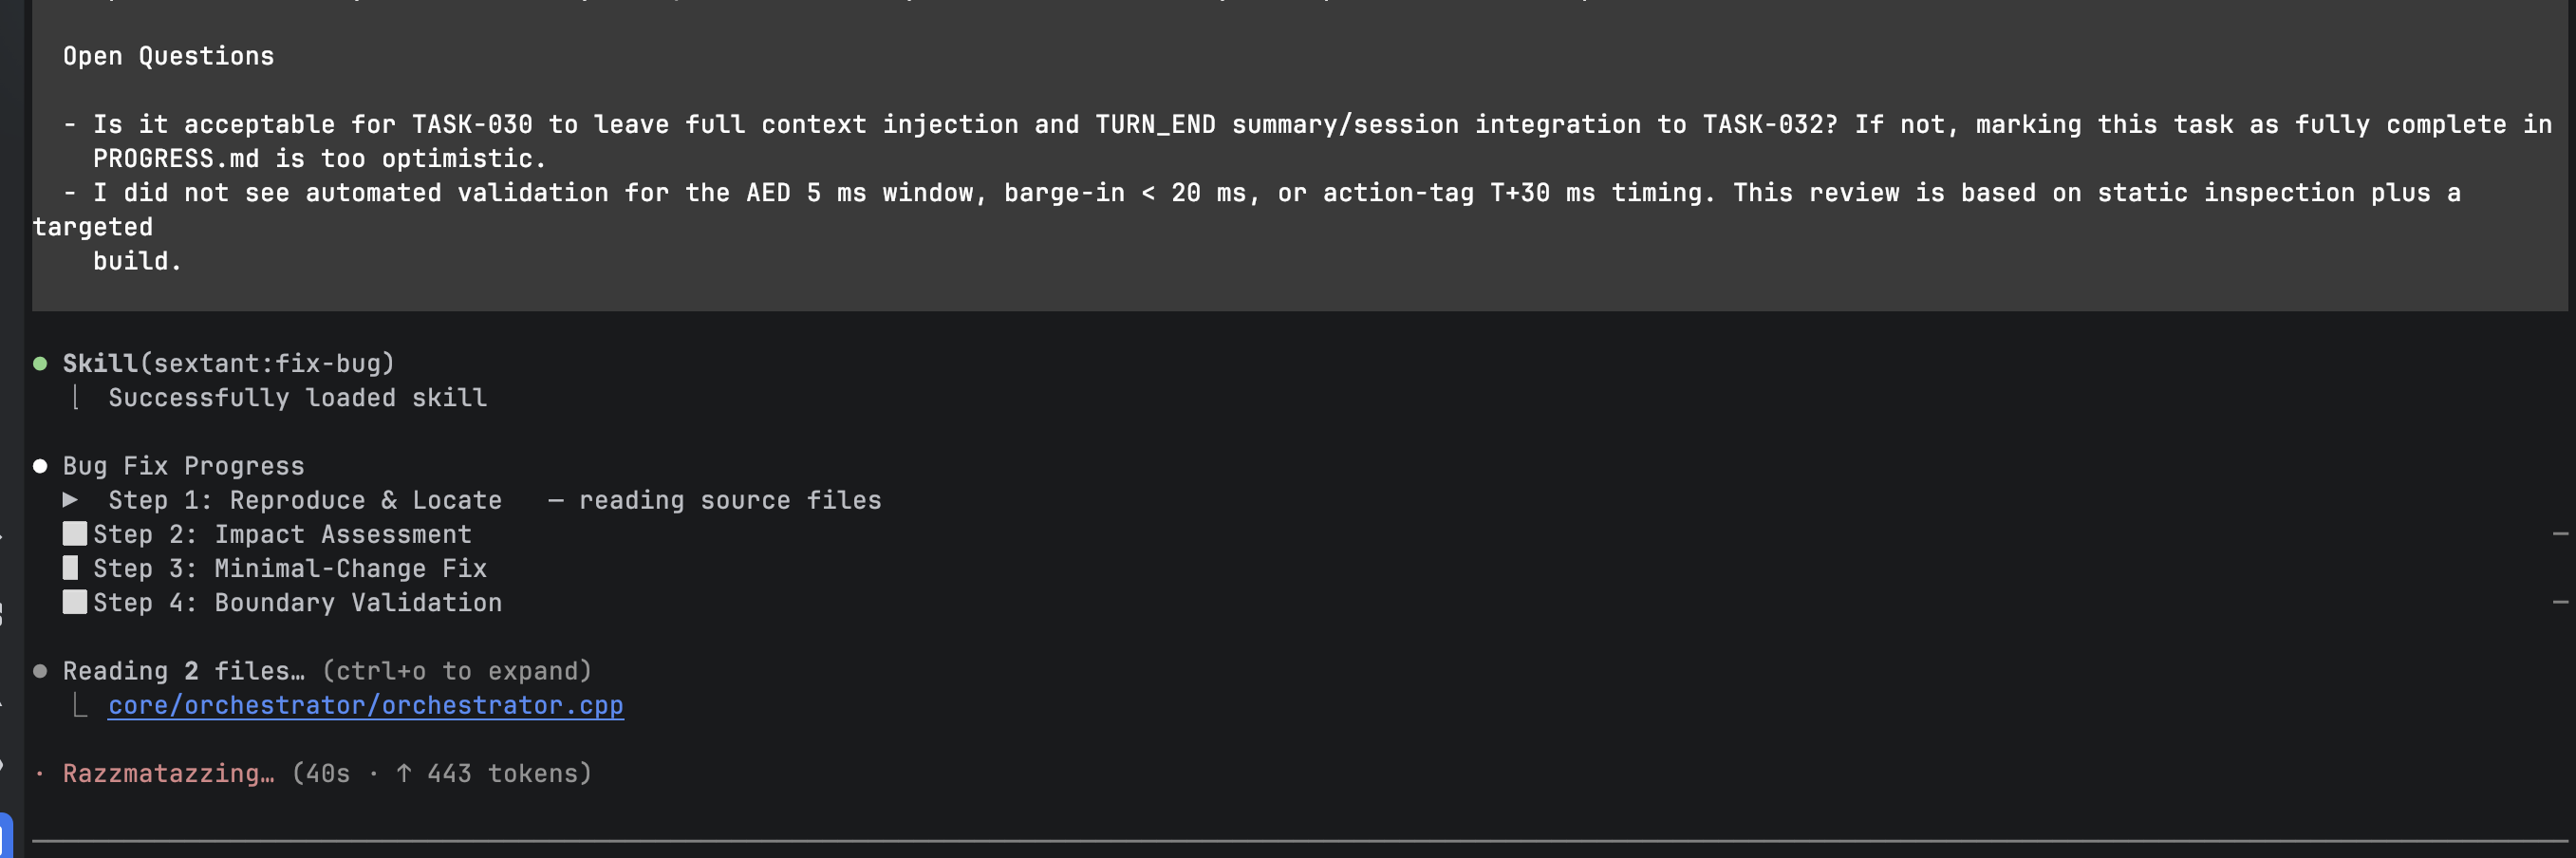
The project is a C++ orchestrator for a voice interaction system involving VAD, ASR, TTC, and related components. The user reported multiple issues in orchestrator.cpp, which triggered Sextant’s fix-bug skill.

Step 1: Read First, Then Diagnose

!(https://dev-to-uploads.s3.amazonaws.com/uploads/articles/4yqgw86i0443t0pep5jh.png)

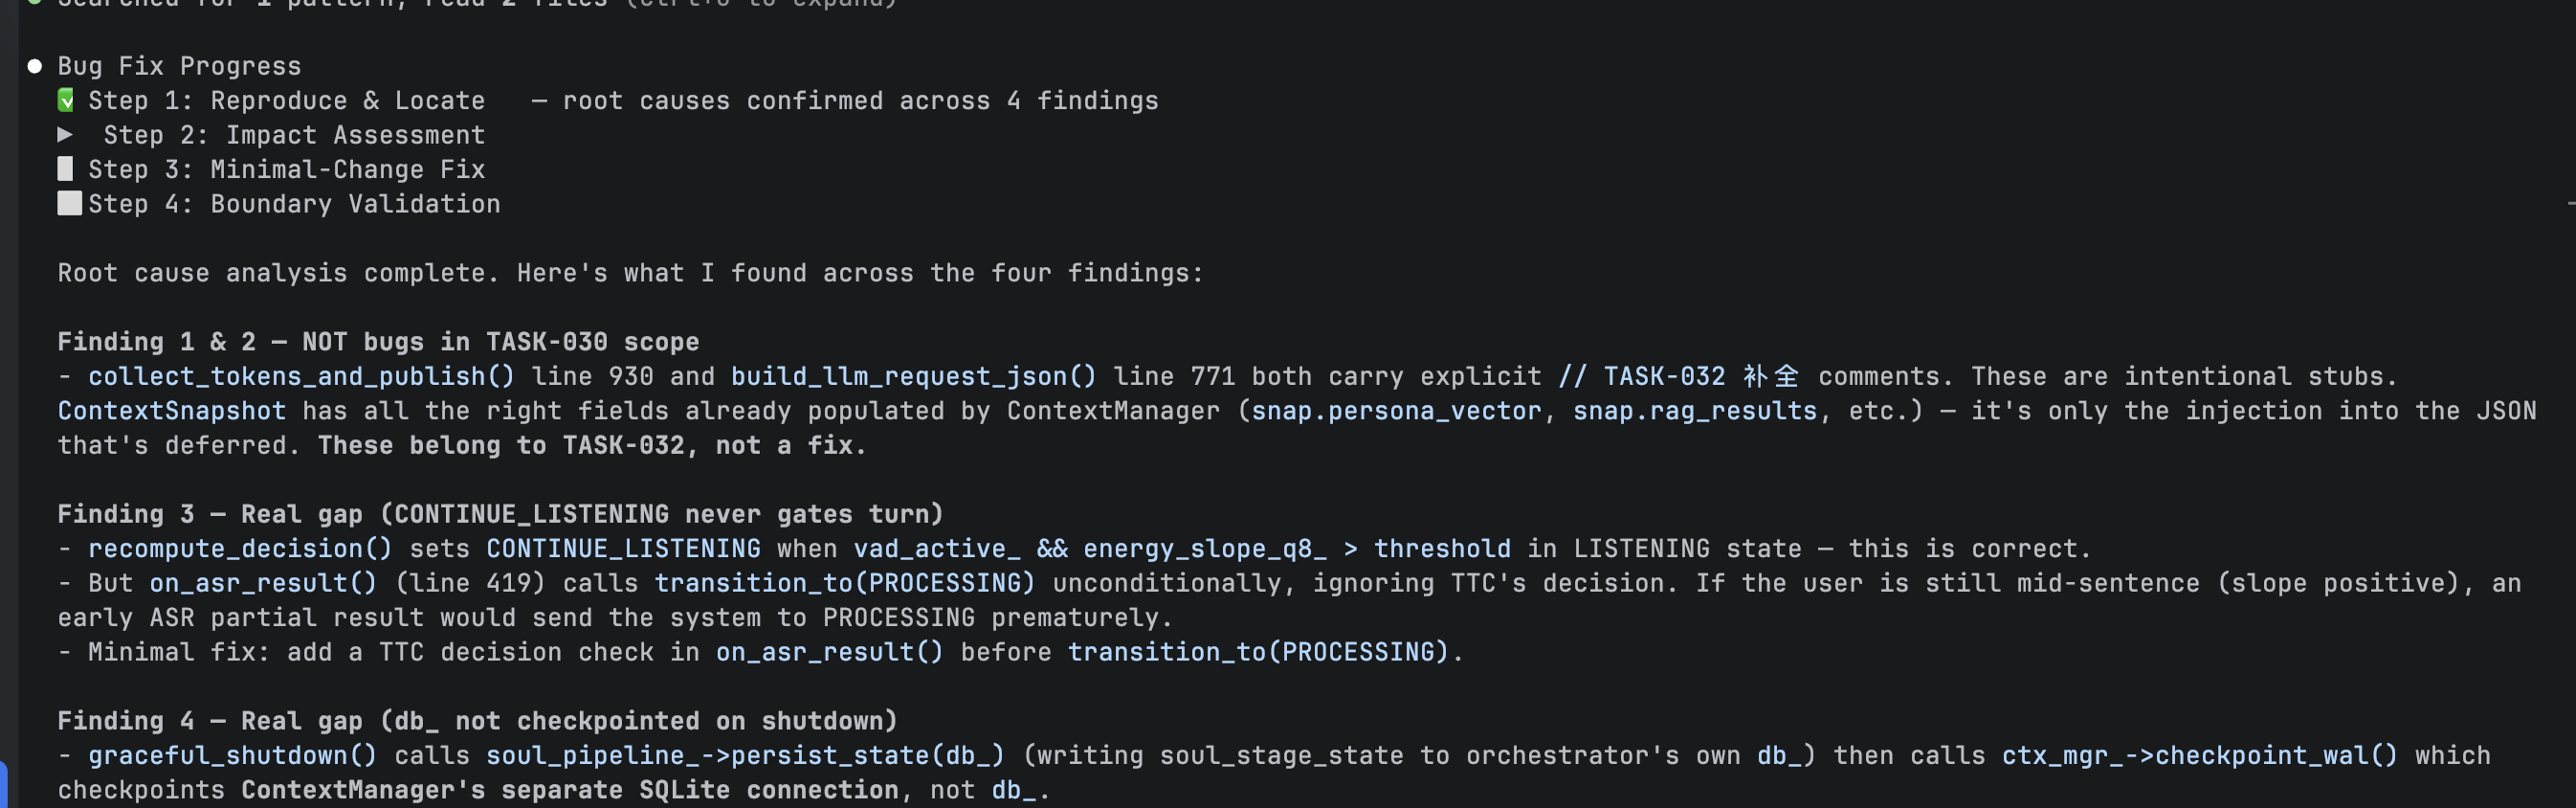
Sextant starts by loading the skill, showing the progress block, and reading the relevant file.

!(https://dev-to-uploads.s3.amazonaws.com/uploads/articles/y6wvojm5e23atmblig0u.png)

After analysis, it produces four findings. Two of them are explicitly judged to be not bugs in scope because they are intentional stubs marked for a later task. The other two are treated as real gaps:

  • on_asr_result() can transition to PROCESSING even when TTC still indicates CONTINUE_LISTENING
  • graceful_shutdown() persists state to the orchestrator’s own database connection, but checkpoints a different SQLite connection instead

That first distinction matters. It shows the system is not simply treating unfinished-looking code as broken code.

Step 2 and Step 3: Ask Before Editing

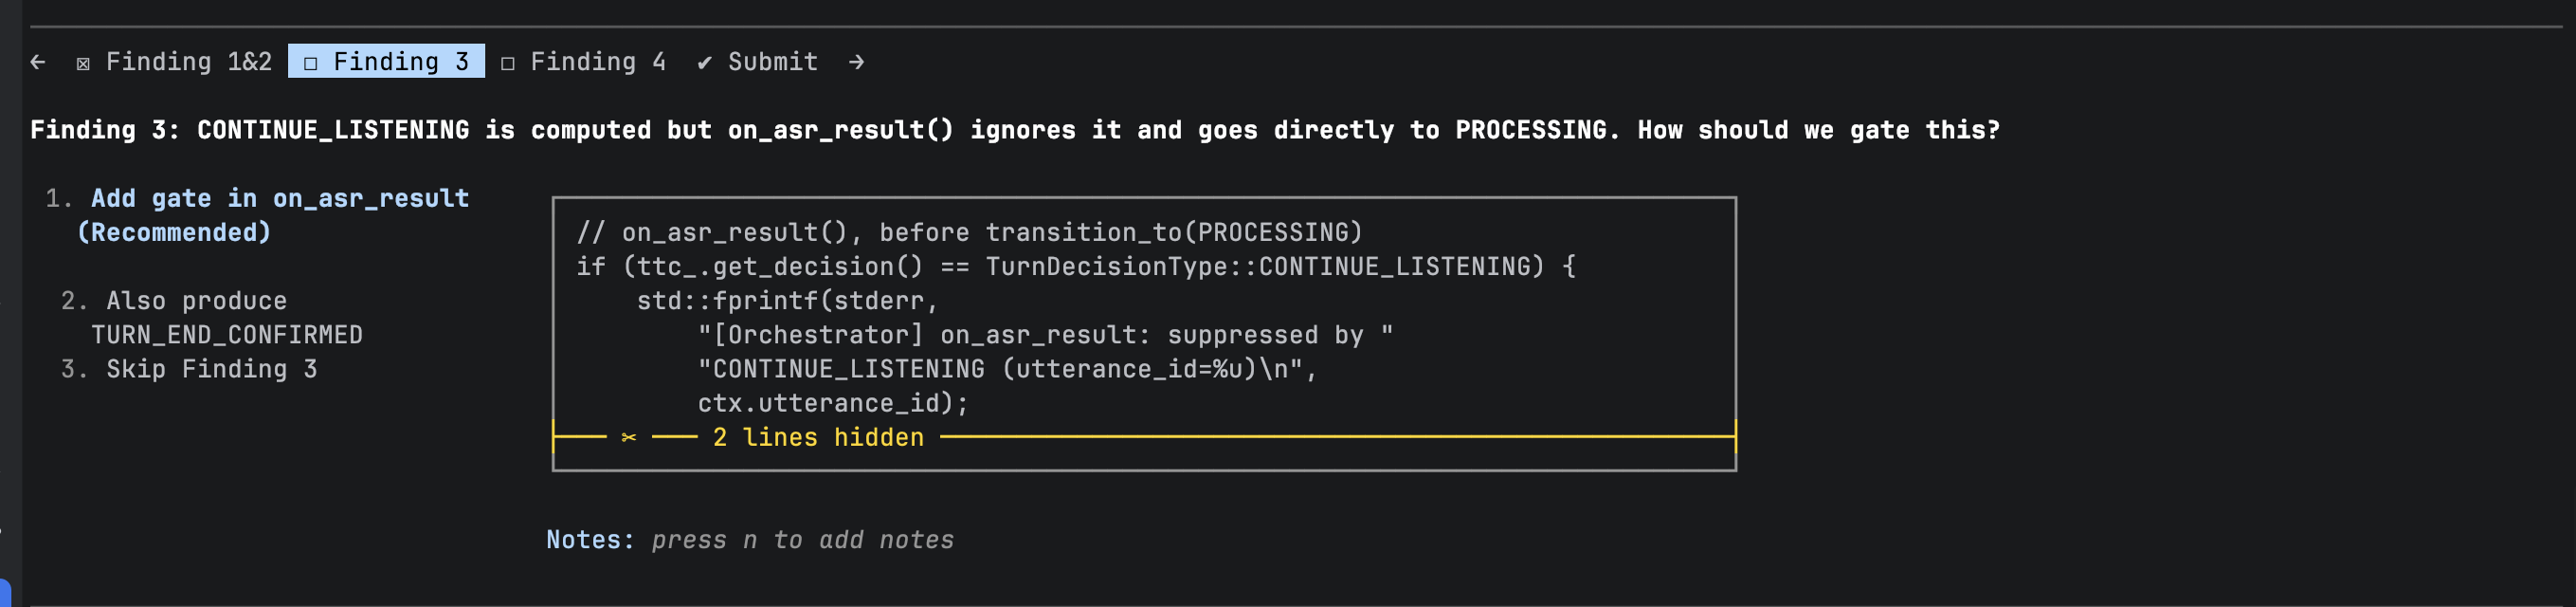
!(https://dev-to-uploads.s3.amazonaws.com/uploads/articles/rubgmgokfual04p6ry1z.png)

For the TTC-related issue, Sextant presents several repair options to the user through an interactive UI, including a recommended option to gate on_asr_result() on the CONTINUE_LISTENING decision.

The important point here is not the exact UI. It is that the fix plan is surfaced before code changes happen. The user sees the root cause, the proposed change shape, and the risk, then confirms the direction. That is the confirmation gate in action.

Step 4: Verify and Report Limits

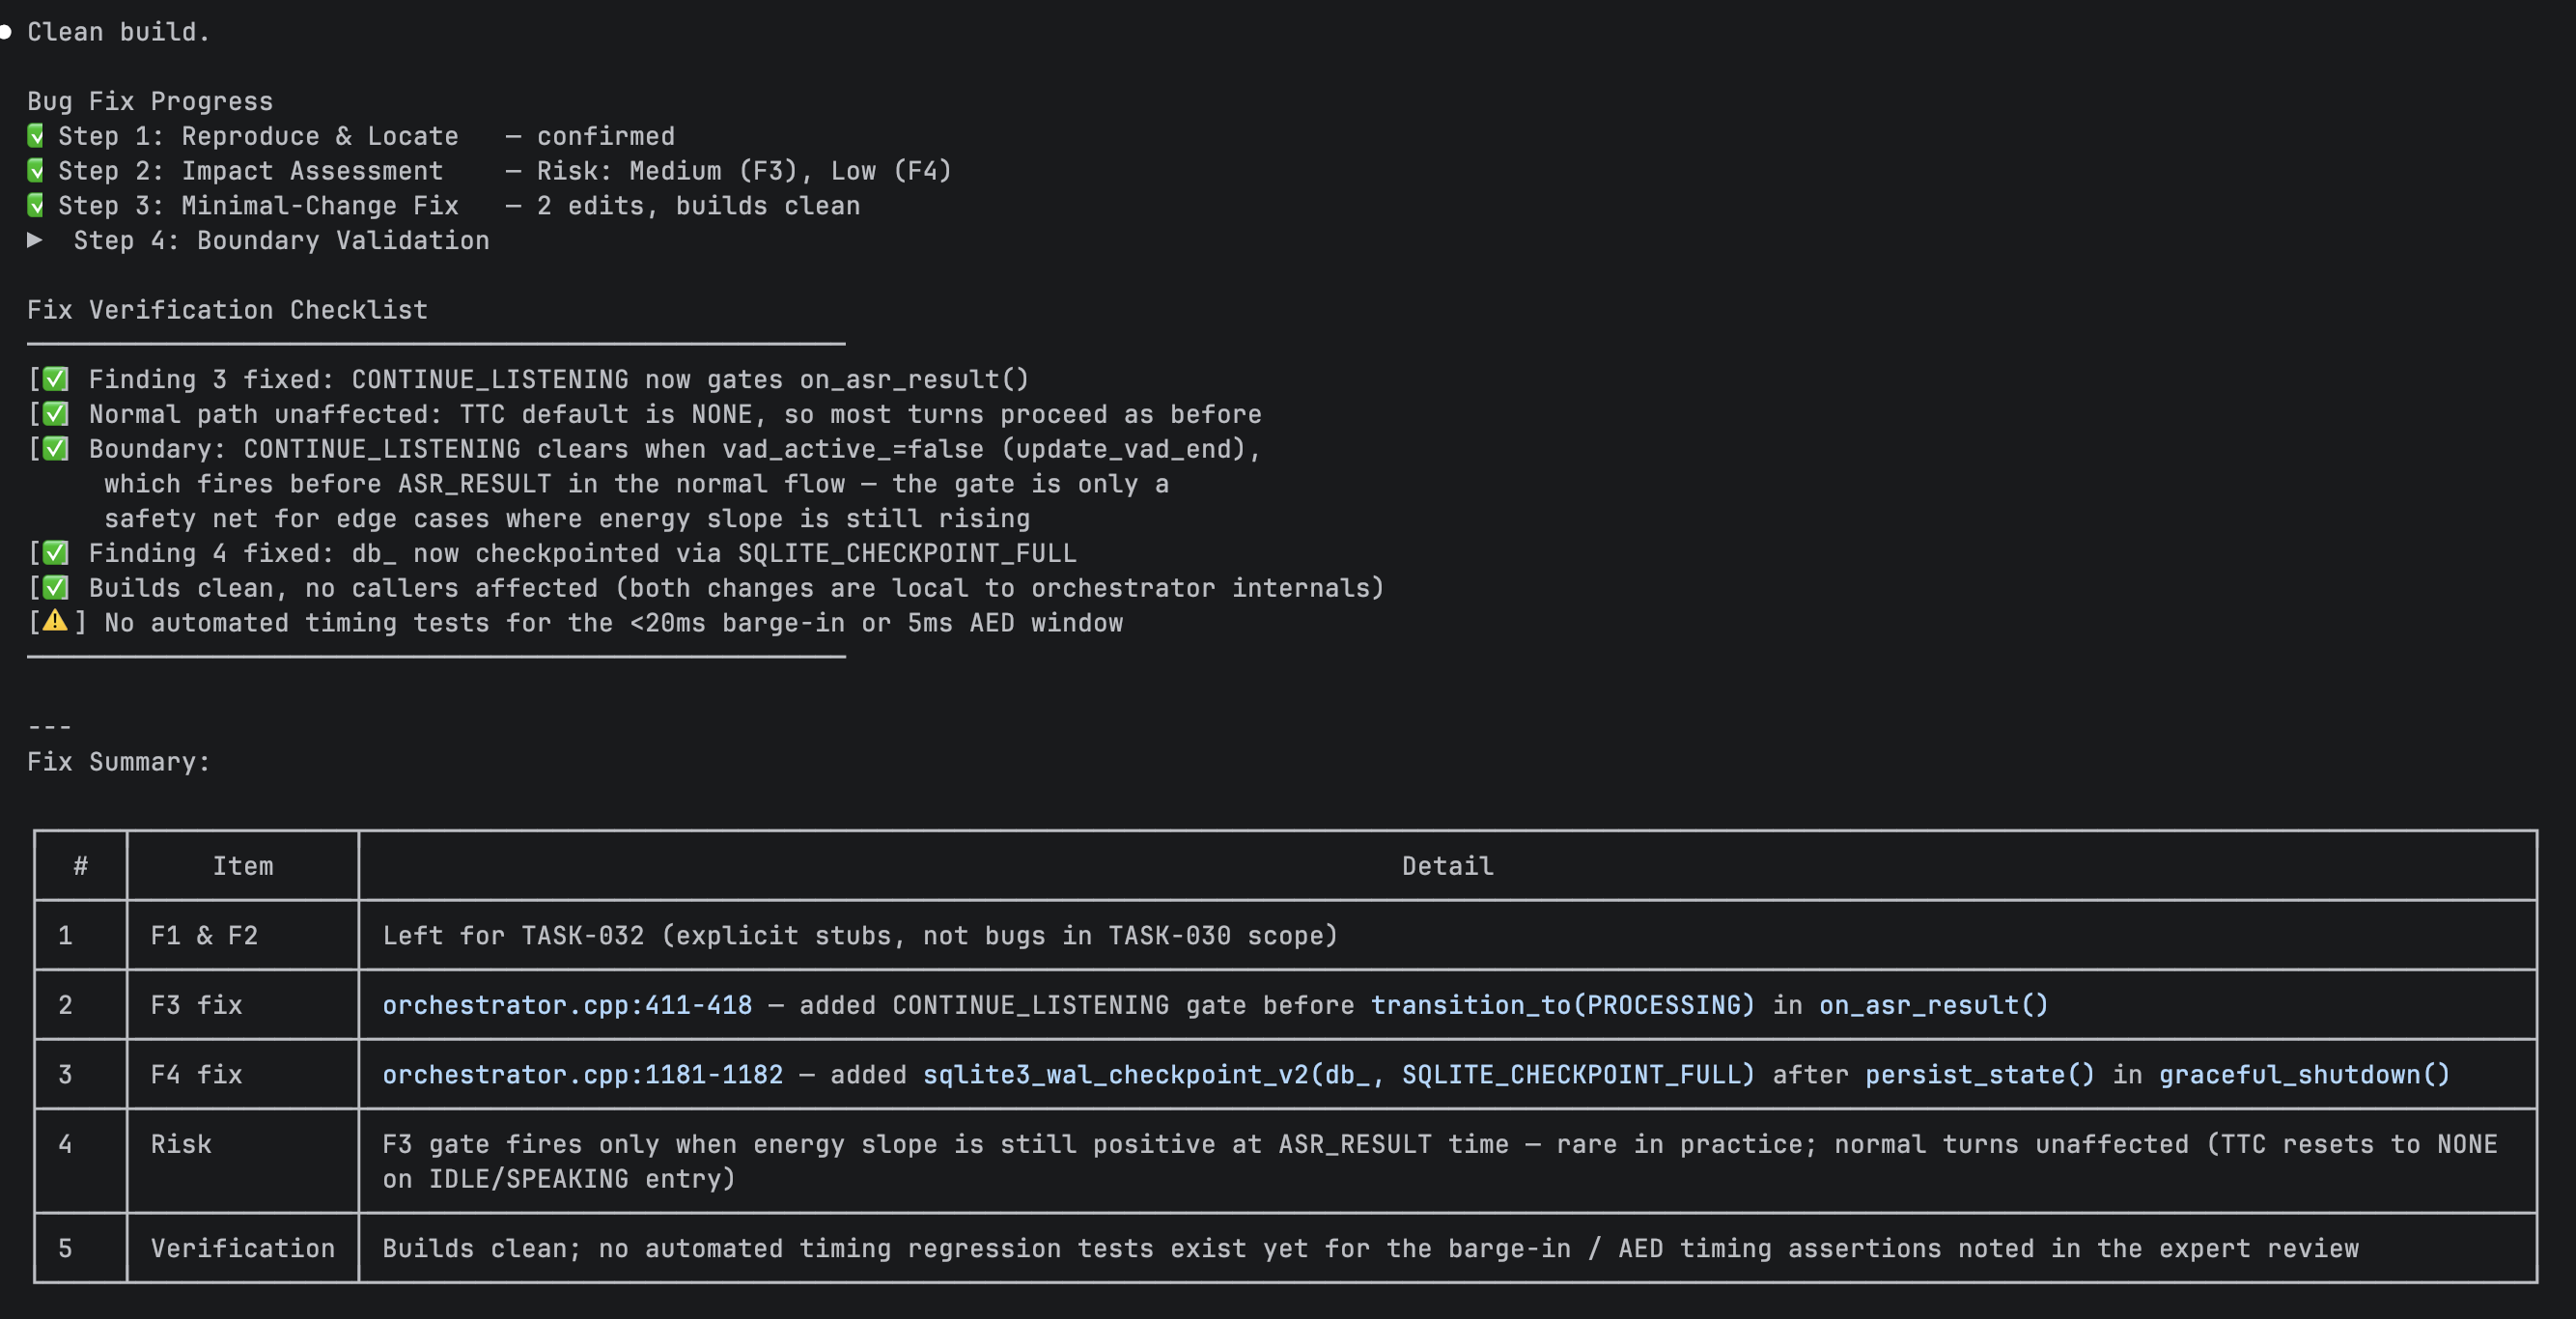
!(https://dev-to-uploads.s3.amazonaws.com/uploads/articles/dpwmvi8aota4mfhvxhav.png)
After the fixes, Sextant runs boundary validation and summarizes what was verified:

  • the TTC gating issue is fixed
  • the normal path is unaffected
  • the gate acts as a safety net for edge cases
  • the correct database is now checkpointed
  • the build is clean and no callers are affected

It also explicitly notes what was not covered by automated timing tests, including the <20ms barge-in path and the 5ms AED window.

That kind of verification summary is one of the clearest parts of the example. It is not just “fixed.” It is “fixed, here is what we checked, and here is what still needs real testing.”

9. What the Example Actually Shows

The orchestrator example ends up making the point more clearly than any feature list could.

It shows that Sextant is trying to produce a particular kind of behavior:

  1. Read before acting

    Do not jump from symptom to edit.

  2. Keep bug fixes small when they should stay small

    In the example, the final changes are narrow and local.

  3. Ask before applying non-trivial fixes

    The user sees the plan before the patch lands.

  4. Make execution visible

    Progress blocks show what step the workflow is in.

  5. Be honest about verification

    Risks and untested edges are called out explicitly.

That is really the best summary of what Sextant is for. It is less about “AI that writes code faster” and more about “AI that changes code with better judgment.”

Installation

# Option 1: Official Claude marketplace
/plugin install sextant@claude-plugins-official

# Option 2: Via GitHub marketplace
/plugin marketplace add hellotern/sextant
/plugin install sextant@mohist-plugins

# Option 3: Team configuration (commit to repo, team gets it on checkout)
# Configure in .claude/settings.json

See the GitHub repository for full installation instructions and documentation.

Closing Thought

Sextant is not presented as a replacement for every other Claude Code framework. Superpowers and gstack solve different problems.

What Sextant is trying to do is narrower and, to me, more grounded: help Claude Code work more reliably inside existing codebases, where architecture, task shape, change scope, and principle conflicts all matter before the first edit is made.

Principles are tools, not chains. The goal is not more process for its own sake. The goal is to make better changes with lower long-term maintenance cost.