Local LLM Inference in 2026: The Complete Guide to Tools, Hardware & Open-Weight Models

TL;DR: Ollama is the fastest path to running local LLMs (one command to install, one to run). The Mac Mini M4 Pro 48GB (~$1,999) is the best-value hardware. Q4_K_M is the sweet spot quantization for most users. Open-weight models like GLM-5, MiniMax M2, and Hermes 4 are impressively capable for a wide range of tasks. This guide covers 10 inference tools, every quantization format, hardware at every budget, and the builders making all of this possible.

I’ve been setting up local inference on my own hardware recently — an M4 Pro Mac Mini running Ollama — and I wanted to compile everything I’ve learned into one place. This guide is as much for my own reference as it is for anyone else exploring this space.

The tooling in 2026 has matured to the point where a $600 Mac Mini can run 14B parameter models and a $1,600 setup handles 70B. Whether you want to reduce API costs for simple tasks, keep sensitive data private, build offline-capable apps, or just understand how these models actually work, there are real options now.

I still use Claude Code as my primary coding tool — local models aren’t a replacement for frontier cloud inference on complex tasks. But they’re genuinely useful for a lot of workflows, and the ecosystem is worth understanding. This guide covers the tools, formats, hardware, and people building the open-source ecosystem.

Get the full 14-page StarMorph Research PDF — detailed comparison tables, hardware buying guide, and thought leader profiles in a premium dark-mode report.

Tool Comparison Matrix

Ten tools, compared across what matters. Stars reflect community adoption as of March 2026.

Tool Stars Platforms Model Formats GPU Required? API Compatibility Best For
Ollama 166k Mac/Win/Linux GGUF No OpenAI + Anthropic Developer workflows
llama.cpp 98.6k All + mobile GGUF No OpenAI Foundation / power users
Exo 42.7k Mac/Linux/mobile MLX / tinygrad No Varies Distributed inference
Jan.ai 41.1k Mac/Win/Linux GGUF, MLX No OpenAI Privacy-first desktop
LocalAI 35-42k Linux/Mac/Win Multi-format No OpenAI + Anthropic Drop-in API replacement
vLLM 31k+ Linux safetensors, AWQ, GPTQ Yes OpenAI Production GPU serving
MLX 24.6k macOS only safetensors No (Apple Silicon) Third-party Mac-native development
LM Studio N/A (closed) Mac/Win/Linux GGUF / MLX No OpenAI Visual model exploration
KoboldCpp 9.5k All + Android GGUF No Triple (OAI + Ollama + Kobold) Creative writing
GPT4All N/A Mac/Win/Linux GGUF No OpenAI Private document chat

Every tool above except LM Studio is open-source. Most build on top of llama.cpp — the foundational C/C++ inference engine that pioneered running LLMs on consumer hardware.

Ollama — The Developer Default

Ollama is the fastest path from zero to running local models. One command to install, one to run, and you get an OpenAI-compatible API on localhost:11434. It’s open-source (MIT), written in Go, and has 166k GitHub stars — the largest open-source AI project on GitHub by a wide margin.

# Install
curl -fsSL https://ollama.com/install.sh | sh

# Run a model
ollama run llama3

That’s it. No Python environments, no CUDA toolkit, no configuration files.

Why developers default to Ollama

  • OpenAI + Anthropic API compatibility — Claude Code and OpenAI Codex CLI can use Ollama as a local backend. Your existing API client code works with minimal changes.
  • Largest model registry — 100+ models available with ollama pull. One-command downloads.
  • Performance — M3 Pro generates 40-60 tok/s on 7B models. Benefits from all llama.cpp optimizations (up to 35% faster from CES 2026 NVIDIA improvements).
  • Image generation — Added to macOS in January 2026.
  • Web search + structured outputs — Both added in 2026.

Where Ollama falls short

  • GGUF-only for native format — safetensors/PyTorch models require a conversion step via Modelfile
  • No GUI — third-party frontends like Open WebUI fill this gap
  • Slightly higher overhead than raw llama.cpp (the abstraction layer costs a few percent)
  • Custom model importing requires creating a Modelfile rather than just pointing at a file

For most developers, Ollama is the right first tool. Start here, then graduate to other tools as your needs become more specific.

Get the free macOS Bootstrap Script — idempotent setup for Homebrew, Zsh, Node.js, Ollama, and 30+ dev tools in one command.

LM Studio — The Visual Explorer

LM Studio is the most beginner-friendly option — a desktop application where you browse models, click to download, and start chatting. Zero terminal knowledge required. Closed-source but free for personal use.

What makes it stand out:

  • Built-in model browser with one-click downloads from Hugging Face
  • MLX backend on Apple Silicon for optimized Mac inference
  • Split-view chat for side-by-side model comparison
  • v0.4.0 (January 2026) added parallel inference with continuous batching
  • New headless “llmster” daemon enables server-only deployment on Linux boxes without the GUI

Formats: GGUF (llama.cpp backend), MLX (Apple Silicon only), safetensors. No EXL2 or GPTQ support.

API: OpenAI-compatible on localhost:1234. Python and TypeScript SDKs hit v1.0.0.

LM Studio is ideal for model evaluation — browse, download, compare side-by-side — before deploying with Ollama or vLLM in production.

vLLM — Production GPU Serving

If you’re deploying models on GPU infrastructure at scale, vLLM is the industry standard. It’s the performance leader with PagedAttention for memory-efficient KV cache management, continuous batching, and speculative decoding.

Benchmarks with Marlin kernels: AWQ achieves 741 tok/s, GPTQ achieves 712 tok/s. vLLM v0.16.0 (February 2026) expanded multi-GPU and multi-platform support to NVIDIA, AMD ROCm, Intel XPU, and TPU.

Formats: The widest range — safetensors, GPTQ, AWQ, FP8, NVFP4, bitsandbytes. This matters because GPU-optimized quantization formats like AWQ achieve better throughput than GGUF on NVIDIA hardware.

The catch: Linux-only for production, requires a dedicated NVIDIA/AMD GPU, complex setup compared to Ollama. Overkill for single-user local inference.

Use vLLM when: You’re serving multiple users, need maximum throughput on GPU hardware, or are deploying in production. The common developer workflow is: evaluate models with LM Studio, develop with Ollama, deploy with vLLM.

llama.cpp — The Foundation

llama.cpp is the C/C++ inference engine that everything else builds on. Created by Georgi Gerganov, it pioneered running LLMs on consumer hardware via quantization. In February 2026, the ggml/llama.cpp team joined Hugging Face.

Ollama, LM Studio, GPT4All, and KoboldCpp all use llama.cpp under the hood. It’s the engine — they’re the interfaces.

Why use it directly?

  • Maximum control over inference parameters and model loading
  • Widest platform support: macOS, Windows, Linux, Android, iOS, WebAssembly
  • Best CPU inference performance — designed from the ground up for consumer hardware
  • Defines and maintains the GGUF format standard

Stats: 98.6k GitHub stars, 1,038 contributors, 28 upstream commits per week. CES 2026 NVIDIA optimizations yielded up to 35% faster token generation.

Use llama.cpp directly when you need fine-grained control that Ollama or LM Studio don’t expose. Otherwise, use the higher-level tools — they give you 95% of the performance with much less configuration.

ExoLabs — Distributed Inference

Exo takes a fundamentally different approach: instead of running a model on one device, it splits the model across multiple devices connected peer-to-peer. No master-worker architecture — any device can contribute compute.

What’s been demonstrated:

  • DeepSeek V3 (671B parameters) across 8 M4 Pro 64GB Mac Minis (512GB total memory) at ~5 tok/s
  • DeepSeek R1 (671B) across 7 Mac Minis + 1 M4 Max MacBook Pro (496GB total)
  • 2 NVIDIA DGX Spark + M3 Ultra Mac Studio = 2.8x benchmark improvement through disaggregated inference

Why this works with Apple Silicon: Unified memory is ideal for Mixture-of-Expert (MoE) models. All 671B parameters load across the cluster, but only 37B are computed per inference step. Apple devices become surprisingly cost-effective for MoE architectures.

Current status: Alpha (v0.0.15-alpha public, 1.0 not yet released). macOS native app requires Tahoe 26.2+.

If you have multiple Macs, Exo lets you pool them into a single inference cluster. The constraint is total unified memory across devices — and the network connecting them.

For a deep dive on which Mac Mini to buy for local inference (with current Amazon pricing and used market analysis), see my complete Mac Mini buying guide for local LLMs.

Other Notable Tools

Jan.ai

Open-source (AGPLv3) privacy-first desktop app. 41.1k stars, 5.3M+ downloads. Runs 100% offline via the Cortex engine (wraps llama.cpp). The standout feature is hybrid local + cloud switching — you can connect OpenAI, Anthropic, and local models in one interface, switching between them as needed. MCP integration for agentic workflows. Supports Windows ARM (Snapdragon).

LocalAI

The most comprehensive API-compatible local server. Drop-in replacement for OpenAI’s API that supports text, images, audio, video, embeddings, and voice cloning — all locally. Multi-backend support (llama.cpp, vLLM, transformers, diffusers, MLX). Anthropic API support added January 2026. Best for: developers with existing OpenAI API code who want to run locally with minimal changes.

KoboldCpp

Single-executable fork of llama.cpp with an integrated web UI. “One file, zero install” — download, double-click, select a model. Triple API compatibility (KoboldAI + OpenAI + Ollama endpoints). The best tool for creative writing and roleplay with built-in memory, world info, author’s notes, and SillyTavern integration.

GPT4All

Desktop app by Nomic AI with built-in LocalDocs for private document chat (RAG). The 2026 GPT4All Reasoner adds on-device reasoning with tool calling and code sandboxing. Backed by a funded company (Nomic AI). Best for non-technical users who want to chat with their documents privately.

MLX

Apple’s open-source ML framework purpose-built for Apple Silicon. Not a user-facing app — a framework that other tools use as a backend. Leverages unified memory with zero CPU-GPU data copying. Built-in mixed-precision quantization (4/6/8-bit per layer). M5 Neural Accelerators provide up to 4x speedup for time-to-first-token. Swift API for native macOS/iOS apps.

Quantization Formats and Tradeoffs

Quantization compresses model weights from 16 bits per weight (FP16/BF16) down to fewer bits. This is what makes it possible to run a 70B parameter model on consumer hardware.

GGUF: The Universal Format

GGUF was created by llama.cpp and is used by Ollama, LM Studio, KoboldCpp, GPT4All, and Jan.ai. The “K-quant” variants use mixed precision per layer, allocating more bits to important layers.

Quant Bits/Weight Size (7B model) Quality Retention Best For
Q8_0 8-bit ~7.5 GB ~99% (near-lossless) Maximum quality, enough RAM
Q6_K 6-bit ~5.5 GB ~97% Quality-focused with moderate RAM
Q5_K_M 5-bit ~4.8 GB ~95% Good balance
Q4_K_M 4-bit ~4.0 GB ~92% (sweet spot) Most users
Q3_K_M 3-bit ~3.2 GB ~85% Tight memory constraints
Q2_K 2-bit ~2.5 GB ~75% Extreme compression

The practical ladder: Q4_K_M → Q5_K_M → Q6_K → Q8_0 as you get more memory. For most users, Q4_K_M is the sweet spot — 92% quality retention with 75% size reduction from FP16.

GPU-Optimized Formats

These formats are designed for NVIDIA GPUs and used by vLLM, ExLlamaV2, and transformers:

Format Bits Quality Speed (Marlin) Used By
AWQ 4-bit ~95% 741 tok/s vLLM, transformers
GPTQ 4-bit ~90% 712 tok/s vLLM, ExLlamaV2
EXL2 2-8 mixed Variable Fastest (single-user) ExLlamaV2 / TabbyAPI
FP8 8-bit ~99% Very fast vLLM, llama.cpp
NVFP4 4-bit ~92% Fastest (Blackwell) llama.cpp, vLLM

AWQ vs GPTQ: AWQ consistently outperforms GPTQ in both quality (95% vs 90%) and speed. AWQ preserves activation-aware important weights. For most GPU users, AWQ is the better choice.

GGUF vs AWQ/GPTQ: GGUF is universal — runs on CPU, GPU, and Apple Silicon. AWQ/GPTQ are GPU-only but provide better throughput on NVIDIA hardware. Use GGUF for flexibility, AWQ for maximum GPU throughput.

Choosing the Right Tool

By Use Case

Scenario Tool Why
First time, just want to try LM Studio Visual GUI, one-click downloads
Developer, quick local testing Ollama One command, OpenAI-compatible API
Creative writing / roleplay KoboldCpp Built-in storytelling features
Private document chat GPT4All LocalDocs RAG built-in
Privacy-first desktop app Jan.ai Full offline, hybrid local/cloud
Production GPU serving vLLM Highest throughput, multi-GPU
Drop-in OpenAI replacement LocalAI Most complete API compatibility
Mac-native app development MLX Swift API, best Apple Silicon perf
Models too large for one device Exo Distributed inference
Maximum control llama.cpp The foundation

By Skill Level

Level Recommended Tools
Beginner (no terminal) LM Studio, GPT4All, Jan.ai
Intermediate (CLI) Ollama, KoboldCpp
Advanced (Python/systems) llama.cpp, MLX, LocalAI, vLLM
Expert (distributed) Exo, vLLM multi-GPU

The Common Multi-Tool Workflow

Many developers in 2026 use a three-tool pipeline:

  1. LM Studio for model discovery and evaluation (browse, download, compare side-by-side)
  2. Ollama for development and integration (OpenAI-compatible API for app development)
  3. vLLM for production deployment (maximum throughput on GPU infrastructure)

Hardware Buying Guide

The Fundamental Rule

For LLM inference, memory bandwidth is the bottleneck, not compute. A chip with higher GB/s generates tokens faster, even if it has fewer FLOPS. This is why an M3 Max (400 GB/s) generates tokens faster than an M4 Pro (273 GB/s) despite the M4 Pro being newer.

Memory Requirements by Model Size

Model Size Min RAM (Q4) Comfortable (Q6-Q8) Example Models
3B 4 GB 6 GB Phi-4-mini
7-8B 6 GB 10 GB Llama 3.1 8B, Mistral 7B
13-14B 10 GB 16 GB Llama 3.1 13B, Qwen 14B
30-34B 20 GB 32 GB Codestral 22B
70B 40 GB 64 GB Llama 3.1 70B, Qwen 72B
100B+ 64 GB 128 GB+ Llama 3.1 405B (quantized)

Apple Silicon

Macs are uniquely suited for local LLMs because of unified memory — the GPU can access all system RAM, unlike discrete GPUs with fixed VRAM. RAM is not upgradeable on Apple Silicon. Buy the most you can afford.

Machine Memory Bandwidth Price Best For
Mac Mini M4 16-24 GB 120 GB/s $599-799 7-14B, experimentation
Mac Mini M4 Pro 24-48 GB 273 GB/s $1,399-1,999 Sweet spot. 70B at Q4 with 48GB
MacBook Pro M4 Pro 24-48 GB 273 GB/s $1,999-2,499 Portable 70B inference
MacBook Pro M4 Max 48-128 GB 546 GB/s $3,499-4,999 Fast 70B, moderate 100B+
Mac Studio M4 Ultra 128-512 GB 819 GB/s $3,999-11,999 Run anything locally
MacBook Pro M5 Max 48-128 GB TBD $3,499+ Neural Accelerators, 4x TFT

Best value: Mac Mini M4 Pro 48GB (~$1,999) — runs 70B parameter models and costs less than a good GPU.

For a complete pricing breakdown of every Mac Mini configuration (new and used), with model compatibility tables and OpenClaw setup instructions, see my Mac Mini buying guide for local LLMs.

NVIDIA GPUs

VRAM is the limiting factor — models must fit in GPU VRAM or spill to CPU RAM at a significant speed penalty.

GPU VRAM Bandwidth Price (2026) Best For
RTX 3060 12GB 12 GB 360 GB/s $250-300 (used) Budget entry, 7B
RTX 3090 24GB 24 GB 936 GB/s $800-1,000 (used) Best budget for 13B
RTX 4090 24GB 24 GB 1,008 GB/s $1,600-2,200 Balance. 13B full, 70B quantized
RTX 5090 32GB 32 GB 1,792 GB/s $2,500-3,600+ Flagship. 2.6x faster than A100 on 7B
RTX 3090 x2 48 GB 1,872 GB/s $1,600-2,000 Budget 70B on Linux with vLLM

Budget Tiers

Budget Recommendation What You Can Run
$0 Your existing machine + Ollama 3-7B on most modern hardware
$375 Used M1 Mac 16GB 7B models at decent speed
$599 Mac Mini M4 24GB 7-14B comfortably
$900 Used RTX 3090 (add to PC) 7-13B at GPU speed
$1,999 Mac Mini M4 Pro 48GB 70B models — best value in the market
$2,000 Used RTX 4090 (add to PC) 13B fast, 70B quantized
$3,500+ RTX 5090 or MBP M4/M5 Max 70B fast, frontier performance
$8,000+ Mac Studio M4 Ultra 192GB Run anything

For building dedicated GPU inference servers at any budget ($150 to $5,000+), Digital Spaceport has the most comprehensive build guides I’ve found.

Get the free Ubuntu Bootstrap Script — 340-line idempotent VM setup for GPU inference servers with Zsh, Node.js, Docker, and 35+ tools.

Thought Leaders and Builder Strategies

These are the builders, researchers, and educators I’ve been learning from as I explore local inference. Whether they’re building tools, training models, or documenting hardware builds, they’re all making this ecosystem more accessible.

This list was inspired by 0xSero’s thread on people to follow in the local inference space. 0xSero is one of the most active voices in the open-source AI community, and his recommendations pointed me to many of the builders profiled below.

0xSero (@0xSero)

One of the most active builders in the local inference community. Publishes quantized models on Hugging Face using Intel AutoRound, making large models runnable on consumer hardware. Built vllm Studio for managing local models with chat template proxies that make Hermes, MiniMax, and GLM models compatible with OpenAI and Anthropic API formats. Also created ai-data-extraction for extracting chat and code context data from AI coding assistants for ML training, and fine-tuned models like sero-nouscoder-14b-sft trained on real coding conversations.

Andrej Karpathy (@karpathy)

The best teacher in AI. nanochat is the definitive entry point for understanding LLM training — a full-stack pipeline in ~8,300 lines of clean PyTorch covering tokenization, pretraining, SFT, and reinforcement learning. Trains a 561M ChatGPT clone in ~4 hours for ~$100 (or ~$15 on spot instances).

What makes nanochat uniquely effective for learning: one dial — transformer depth. This single integer auto-determines all other hyperparameters, so you can understand the full pipeline without needing hyperparameter tuning expertise.

His latest project, autoresearch, uses AI agents to autonomously optimize nanochat training configurations — AI improving AI training.

Peter Steinberger (@steipete)

His GitHub is a treasure trove. Peekaboo (macOS screenshot automation for AI agents), Summarize (CLI that extracts/summarizes any URL, YouTube, PDF, or audio), and OpenClaw (the fastest-growing GitHub project at 180k+ stars — an autonomous AI assistant that lives on your computer and self-modifies its own code).

His design principle: “CLIs are the universal interface that both humans and AI agents can actually use effectively.” Build CLI-first — it becomes the universal adapter between human workflows and agent automation.

Mario Zechner (@badlogicgames)

Pi is possibly the best, simplest open-source agentic loop to learn from. The pi-mono agent toolkit achieves power through radical minimalism: exactly 4 tools, a system prompt under 1,000 tokens, and a philosophy that “what you leave out matters more than what you put in.” Pi became the engine behind OpenClaw.

His anti-MCP argument is worth considering: popular MCP servers like Playwright MCP (21 tools, 13.7k tokens) consume 7-9% of context window before work begins. Pi’s alternative: CLI tools with README files — agents read the README only when needed, paying token cost only when necessary.

Takeaway: Start with 4 tools, not 40. Context engineering matters more than tool count.

Ahmad Osman (@theahmadosman)

The GPU king. Moderator of r/LocalLLaMA, deep practical knowledge across NVIDIA, Mac, and Tenstorrent hardware. Hosts GPU giveaways with NVIDIA (RTX PRO 6000 Blackwell for GTC 2026) and regularly interviews open-weight labs. His key blog post — Stop Wasting Your Multi-GPU Setup With llama.cpp: Use vLLM or ExLlamaV2 for Tensor Parallelism — is essential reading for anyone with multiple GPUs.

@sudoingX

Pushing the limits of single-GPU inference. Ran Qwopus (Claude Opus 4.6 reasoning distilled into Qwen 3.5 27B) on a single RTX 3090 at 29-35 tok/s with thinking mode. Ran Qwen 3.5 9B on a single RTX 3060 — “5.3 GB of model on a card most people bought to play Warzone.” Also discovered and published the fix for the Qwen 3.5 jinja template crash that broke OpenCode and Claude Code.

Takeaway: A single RTX 3090 can run 27B coding models at usable speeds — impressive for tasks like code completion and simpler agentic workflows.

Alex Cheema (@alexocheema)

Founder of ExoLabs. Oxford physics graduate. Pioneering distributed inference across Apple hardware — demonstrated 671B parameter models running across Mac Mini clusters. The Exo framework (42.7k stars) uses peer-to-peer topology with automatic device discovery and dynamic model partitioning. If you’re interested in Mac Mini and Mac Studio clustering, this is the person to follow.

Digital Spaceport (@gospaceport)

The homelab hardware teacher. End-to-end AI server builds at every budget — from $150 entry-level to $5,000 quad-3090 builds. His Proxmox guides for Ollama + Open WebUI and vLLM are the best I’ve found.

Numman Ali (@nummanali)

Prolific CLI tool builder. cc-mirror creates isolated Claude Code variants with custom providers — your main installation stays untouched. Supports Z.ai, MiniMax, OpenRouter, Ollama, and local LLMs. Quick start: npx cc-mirror quick --provider mirror --name mclaude. Also building OpenSkills (cross-agent skill sharing) and an agent-native SDLC pipeline.

Takeaway: You don’t need an Anthropic subscription to use Claude Code’s interface. cc-mirror lets you point it at local or alternative models.

Get the Claude Code Config Pack — CLAUDE.md template, settings, hooks, and keybindings for the complete AI coding setup.

Dax Raad (@thdxr)

Creator of OpenCode — an open-source terminal-first AI coding agent with 120k+ stars, 75+ LLM providers, and zero data storage. Also built SST and models.dev. His grounded take: “The productivity feeling is real. The productivity isn’t.” OpenCode is vendor lock-in free — use any model provider.

Julia Turc (@juliarturc)

The compression scientist. Her paper Well-Read Students Learn Better (706+ citations) proved that pre-training compact models before distillation yields compound improvements — foundational research for how modern quantized models work. Now building Storia.ai (YC S24). Her YouTube channel explains deep AI concepts without the hype.

Teknium (@Teknium1)

Head of Post-Training at Nous Research ($1B valuation). Co-creator of the Hermes 4 model family (open-weight, hybrid reasoning, up to 405B parameters). Built DataForge for graph-based synthetic data generation. The OpenHermes 2.5 dataset (1M samples) is openly available. Also drove decentralized training via INTELLECT-2 — a 32B model trained across 100+ GPUs on 3 continents.

Open-Weight Model Labs

Several people are driving the open-weight model ecosystem forward:

  • Victor Mustar (@victormustar) — Head of Product at Hugging Face, shaping the UX of the platform hosting the world’s largest open model collection.
  • Z.ai Community (@louszbd) — GLM-5 is 744B parameters (40B active), MIT licensed, #1 among open models on Text Arena with day-0 vLLM/SGLang support.
  • Skyler Miao (@SkylerMiao7) — Head of Engineering at MiniMax. M2 is 230B total / 10B active, MoE architecture that scores well on benchmarks while being very cost-efficient to run. API pricing: $0.30/M input tokens.

Also Worth Following

  • @Ex0byt — Making local inference on massive models possible on consumer hardware
  • @alexinexxx — GPU kernel programming learner with strong drive and educational content
  • @crystalsssup — Building top open-weight models and releasing research openly

Key Themes

1. The barrier to entry keeps dropping. Karpathy trains a ChatGPT clone for $15-100. Consumer hardware runs models that were data-center-only a year ago. You can start experimenting for $0 with Ollama on your existing machine.

2. Consumer GPUs are more capable than you’d expect. @sudoingX runs 27B coding models on a single RTX 3090 at usable speeds. Digital Spaceport documents builds starting at $150.

3. Apple Silicon clustering is an interesting frontier. Exo Labs runs 671B parameter models across Mac Mini clusters. Unified memory + MoE is surprisingly effective for the price.

4. Agent architecture should be minimal. Pi proves 4 tools and a 1,000-token system prompt outperforms bloated frameworks. Context engineering matters more than tool count.

5. Open-weight models are genuinely useful. GLM-5 (MIT), MiniMax M2, Hermes 4, Qwen — strong performance across many tasks, openly available. They’re great for simple workflows, privacy-sensitive tasks, and offline use. For complex reasoning and agentic coding, frontier cloud models still have a clear edge.

6. Local and cloud are complementary. cc-mirror and OpenCode let you use familiar interfaces with local or alternative models. The best setup for most developers is probably both — cloud for hard tasks, local for everything else.

This field evolves fast. I’m still early in my own local inference journey — learning what works, what’s overhyped, and where the real value is. If you’re curious, the easiest way to start is ollama run llama3 on your existing machine and see what it can do. No commitment, no cost.

Get the full 14-page StarMorph Research PDF — detailed comparison tables, hardware buying guide, and thought leader profiles.

Some links in this article are affiliate links. If you purchase through them, I may earn a small commission at no extra cost to you. I only recommend products I actually use.

Originally published at StarBlog
Provide private storage for internal company documents

Storage account

The Importance of Private Storage in Organizations

Providing private storage for internal company documents in an organization is critical for security, compliance, and business continuity. Here’s why it matters:
1️⃣ Protection of Sensitive Information
2️⃣ Data Security
3️⃣ Access Control
4️⃣ Regulatory Compliance
5️⃣ Data Integrity
6️⃣ Business Continuity
7️⃣ Protecting Company Reputation

PROCEDURE

Create a Storage Account with High Availability

Objective:

Provision secure storage for internal company documents with geo-redundant replication to protect against regional outages.

Steps:

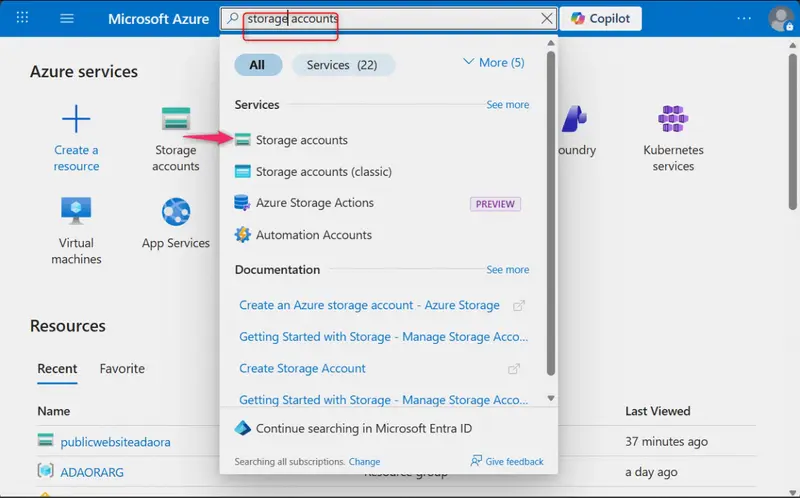
1.In the Azure portal, go to Storage accounts

Storage account

2.select + Create.

+ Create
3.Select an existing Resource group.

Resource Group

4.Set the storage account name to private (must be globally unique).

Storage Account Name

5.Select Review + Create, then Create.

Review + Create

6.After deployment, select Go to resource.

Go to resource

Configure Redundancy:

1.In the storage account, go to Data management → Redundancy.

Redundancy

2.Select Geo-redundant storage (GRS).

Geo-redundant storage

3.Review the primary and secondary region information.
4.Click Save.

Review region + save

2.Create a Private Container and Restrict Access

Objective:

Ensure corporate files are not publicly accessible.

Steps:

1.Go to Data storage → Containers.

Data storage

2.Select + Container.

Add container

3.Name the container private and click create.

container Private

4.Set Public access level to Private (no anonymous access).

change access level

5.Select OK
select Ok

Testing Access Restriction:

1.Select container created.

Select container

  1. Click upload to upload a test file to the container.
    Upload
  2. Select browse for file to select which file to upload and click upload
    upload file

4.Select the file and copy the URL from the Overview tab.
copy file URL

5.Paste the URL into a browser.
6.Confirm access is denied (authentication required).

access denied

3.Configure a Shared Access Signature (SAS)

Objective:

Provide temporary, restricted access to an external partner for 24 hours.

Steps:

1.Select the uploaded blob.
2.Navigate to the Generate SAS tab.

select the uploaded blob

3.Under Permissions, select Read only.
4.Set the Start time to now and Expiry time to 24 hours.
5.Select Generate SAS token and URL.
6.Copy the Blob SAS URL.

Generate SAS

Testing SAS Access:

1.Paste the SAS URL into a browser.
2.Confirm the file opens successfully.
3.Verify that access will expire after the specified time.

4.Implement Lifecycle Management (Move to Cool Tier)

Objective:

Reduce storage costs by automatically moving older blobs from the Hot tier to the Cool tier after 30 days.

Steps:

1.Return to the storage account.
2.Go to Data management → Lifecycle management.

lifecycle management

3.Select Add rule.

Add rule

4.Name the rule movetocool.
5.Apply the rule to All blobs in the storage account.

name rule

Under conditions:

•Select Last modified
•Set to More than 30 days ago
last modified to 30days

Under actions:

•Select Move to cool storage

move to cool
6.Click Add to save the rule.

save changes

5.Configure Object Replication (Backup Public Website)

Objective:

Back up public website content to the private storage account for redundancy and protection.

Steps:

1a.In the private storage account, create a new container by clicking Add container

new container

1b.Give it a name,example “backup” and select create.
backup container

2.Navigate to the publicwebsite storage account earlier or any other storage account already created that requires backup .

storage account to be backed up
3.Go to Data management → Object replication.

object replication

4.Select Create replication rule and Configure:
•Source container: public
•Destination storage account: private
•Destination container: backup
5.Select Create to create the replication rule.

create replication rule

Testing Replication:

1.Upload a file to the public container.
2.Wait a few minutes.
3.Refresh the backup container in the private storage account.
4.Confirm the file appears automatically.

Key Outcomes

• ✅ Geo-redundant storage ensures high availability during regional outages.
• ✅ Private containers prevent anonymous access to sensitive documents.
• ✅ SAS provides secure, time-bound delegated access.
• ✅ Lifecycle management optimizes storage costs automatically.
• ✅ Object replication provides asynchronous backup between storage accounts.

MSW Has a Free API That Makes API Mocking in Tests and Dev Actually Work

Mock Service Worker (MSW) intercepts network requests at the service worker level. No monkey-patching fetch. No test-specific HTTP clients. Your code doesn’t know it’s being mocked.

Setup: Define Handlers

import { http, HttpResponse } from "msw";

export const handlers = [
  // GET request
  http.get("/api/products", () => {
    return HttpResponse.json([
      { id: 1, title: "Widget", price: 29.99 },
      { id: 2, title: "Gadget", price: 49.99 },
    ]);
  }),

  // POST with request body
  http.post("/api/products", async ({ request }) => {
    const body = await request.json();
    return HttpResponse.json({ id: 3, ...body }, { status: 201 });
  }),

  // Dynamic params
  http.get("/api/products/:id", ({ params }) => {
    return HttpResponse.json({ id: params.id, title: "Product" });
  }),

  // Query parameters
  http.get("/api/search", ({ request }) => {
    const url = new URL(request.url);
    const query = url.searchParams.get("q");
    return HttpResponse.json({ results: [], query });
  }),

  // Error responses
  http.delete("/api/products/:id", () => {
    return new HttpResponse(null, { status: 204 });
  }),
];

Testing: Vitest/Jest Integration

import { setupServer } from "msw/node";
import { handlers } from "./handlers";

const server = setupServer(...handlers);

beforeAll(() => server.listen());
afterEach(() => server.resetHandlers());
afterAll(() => server.close());

test("fetches products", async () => {
  const res = await fetch("/api/products");
  const data = await res.json();
  expect(data).toHaveLength(2);
  expect(data[0].title).toBe("Widget");
});

test("handles errors", async () => {
  // Override for this test only
  server.use(
    http.get("/api/products", () => {
      return HttpResponse.json({ error: "Server Error" }, { status: 500 });
    })
  );

  const res = await fetch("/api/products");
  expect(res.status).toBe(500);
});

Browser: Development Mocking

// src/mocks/browser.ts
import { setupWorker } from "msw/browser";
import { handlers } from "./handlers";

export const worker = setupWorker(...handlers);

// main.tsx
if (process.env.NODE_ENV === "development") {
  const { worker } = await import("./mocks/browser");
  await worker.start();
}

Network Behaviors

import { http, HttpResponse, delay } from "msw";

// Simulate slow network
http.get("/api/slow", async () => {
  await delay(3000);
  return HttpResponse.json({ data: "finally" });
});

// Simulate network error
http.get("/api/broken", () => {
  return HttpResponse.error();
});

// Streaming response
http.get("/api/stream", () => {
  const stream = new ReadableStream({
    async start(controller) {
      controller.enqueue(new TextEncoder().encode("chunk 1n"));
      await delay(100);
      controller.enqueue(new TextEncoder().encode("chunk 2n"));
      controller.close();
    },
  });
  return new HttpResponse(stream);
});

Passthrough: Let Some Requests Through

import { http, passthrough } from "msw";

http.get("/api/analytics/*", () => {
  return passthrough(); // Don't mock analytics
});

Testing scraping integrations? My Apify tools + MSW = reliable test suites for data pipelines.

Custom testing solution? Email [email protected]

Users, Roles and Groups in SQL – CA33

My Thinking and Approach

Introduction

In this task, I worked with roles and permissions in SQL using the dvdrental database. The goal was to control access to different tables by creating roles, assigning privileges, and managing user groups.

This helped me understand how database security works in real-world applications.

Problem Statement

  • Create roles with limited access
  • Grant and revoke permissions
  • Restrict access to specific columns
  • Manage users using groups

My Initial Thought

At first, I thought:

  • Roles are just users
  • Permissions are simple

But I realized:

  • Roles control access at different levels
  • Permissions can be very specific
  • Security is very important in databases

Key Observation

  • GRANT is used to give permissions
  • REVOKE is used to remove permissions
  • Roles can be grouped for easier management
  • Column-level access is possible

Solutions

Task 1: Create report_user with access to film table

CREATE ROLE report_user WITH LOGIN PASSWORD 'password';

GRANT SELECT ON film TO report_user;

Explanation:

  • Creates a login role
  • Allows only read access to film table

Task 2: Fix access to customer table

GRANT SELECT ON customer TO report_user;

Explanation:

  • Grants permission to read customer table

Task 3: Restrict columns in customer table

REVOKE SELECT ON customer FROM report_user;

GRANT SELECT (customer_id, first_name, last_name) ON customer TO report_user;

Explanation:

  • Removes full access
  • Grants access only to specific columns

Task 4: Create support_user with limited permissions

CREATE ROLE support_user WITH LOGIN PASSWORD 'password';

GRANT SELECT ON customer TO support_user;

GRANT UPDATE (email) ON customer TO support_user;

Explanation:

  • Can view customer data
  • Can update only email column
  • No DELETE permission given

Task 5: Remove film access from report_user

REVOKE SELECT ON film FROM report_user;

Explanation:

  • Removes access to film table

Task 6: Create readonly_group

CREATE ROLE readonly_group;

GRANT SELECT ON ALL TABLES IN SCHEMA public TO readonly_group;

Explanation:

  • Group with read-only access
  • Applies to all tables

Task 7: Create users and assign to group

CREATE ROLE analyst1 WITH LOGIN PASSWORD 'password';
CREATE ROLE analyst2 WITH LOGIN PASSWORD 'password';

GRANT readonly_group TO analyst1;
GRANT readonly_group TO analyst2;

Explanation:

  • Creates two users
  • Adds them to readonly group

Final Understanding

  • Roles help in managing permissions efficiently
  • Access can be controlled at table and column level
  • Groups simplify permission management for multiple users

Conclusion

This task helped me understand how to manage users, roles, and permissions in a database. It showed how important access control is for maintaining data security and integrity.

Why Does React Native Make You Restart the App Just to Switch Language? I Fixed It.

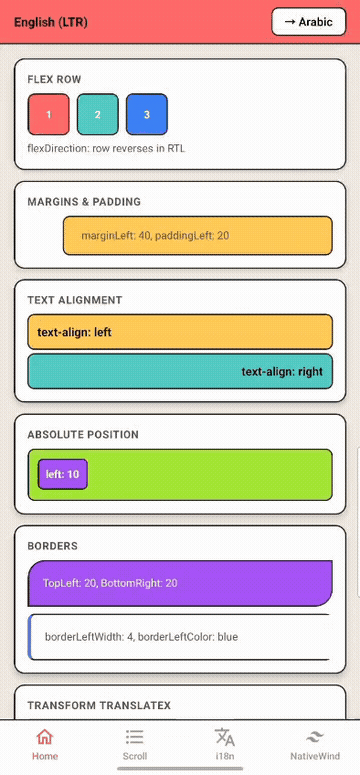
Layout flipping demo

The frustration that started this

I’ve always wondered: why do I need to restart my entire app just to switch from English to Arabic?

On the web, you set dir="rtl" on any element and it just works. You can have LTR and RTL on the same page. You can switch direction at runtime without refreshing. It’s been this way for decades.

Then you come to React Native and the story is:

I18nManager.forceRTL(true);
// Now restart your app. Yes, the whole thing.

That’s it. That’s the API. A global flag that requires a full app restart. No per-component control. No mixing LTR and RTL on the same screen. And if you’re building an app for Arabic, Hebrew, Persian, or Urdu users — this is what you’re stuck with.

I always wished React Native had RTL capabilities similar to the web. So I built it.

Layout flipping demo

Introducing expo-rtl

expo-rtl brings web-like RTL support to Expo and React Native:

  • Per-component direction — flip individual components or subtrees with a dir prop
  • No restart required — switch locale and direction at runtime, instantly
  • Automatic style flipping — margins, padding, borders, flexDirection, transforms — all handled
  • Built-in i18n — translations, pluralization, locale detection, persistence
  • NativeWind / Tailwind support — className styles flip automatically
  • 22 drop-in components — View, Text, FlatList, ScrollView, and more
npm install expo-rtl

The problem with I18nManager

Let’s be honest about what I18nManager.forceRTL() gives you:

I18nManager.forceRTL() expo-rtl
Granularity App-wide only Per-component
Restart required Yes No
Mix LTR + RTL Not possible Nested direction overrides
NativeWind support Manual Automatic
i18n built-in No Translations, pluralization, formatting
Style flipping Partial (logical props only) All physical + logical + transforms

The core issue: I18nManager is a native module that sets direction at the app level. Changing it requires restarting the JavaScript bridge. There’s no way around it — it’s a fundamental limitation of the API.

expo-rtl takes a completely different approach. Instead of a native flag, it uses React context to propagate direction down the component tree, and flips styles in JavaScript before they reach the native layer.

Quick setup

1. Wrap your app

import { RTLProvider } from "expo-rtl";

const translations = {
  en: {
    greeting: "Hello {{name}}!",
    items_one: "{{count}} item",
    items_other: "{{count}} items",
  },
  ar: {
    greeting: "!{{name}} مرحبا",
    items_one: "عنصر {{count}}",
    items_other: "{{count}} عناصر",
  },
};

export default function App() {
  return (
    <RTLProvider
      defaultLocale="en"
      fallbackLocale="en"
      persistLocale
      translations={translations}
    >
      <MyApp />
    </RTLProvider>
  );
}

2. Use the components

import { View, Text, Image, useRTL } from "expo-rtl";

function HomeScreen() {
  const { t, direction, setLocale, formatNumber } = useRTL();

  return (
    <View style={{ flexDirection: "row", gap: 12, paddingLeft: 16 }}>
      <Image
        flip
        source={require("./arrow-right.png")}
        style={{ width: 24, height: 24 }}
      />
      <Text>{t("greeting", { name: "Ali" })}</Text>
      <Text>{formatNumber(1234.56)}</Text>
    </View>
  );
}

When direction is "rtl":

  • flexDirection: "row" becomes "row-reverse"
  • paddingLeft: 16 moves to the right side
  • The arrow image mirrors horizontally
  • Text renders in Arabic with correct alignment

No restart. No global state. Just React.

i18n demo

Per-component direction — the killer feature

This is the thing I wanted most from the web. On the web you can do:

<div dir="rtl">
  <p>هذا النص بالعربية</p>
  <div dir="ltr">
    <p>This stays left-to-right</p>
  </div>
</div>

Now you can do the same in React Native:

import { View, Text } from "expo-rtl";

// Arabic RTL screen with an embedded LTR code block
<View dir="rtl" style={{ padding: 16 }}>
  <Text>هذا النص بالعربية</Text>

  <View dir="ltr" style={{ flexDirection: "row" }}>
    <Text>This section stays LTR — code snippets, phone numbers, etc.</Text>
  </View>
</View>

Every component accepts a dir prop. Set it once and all children inherit the direction. Mix and match freely on the same screen.

What gets flipped automatically

You don’t need to think about any of this — it just works:

  • Margins & padding: marginLeft ↔ marginRight, paddingLeft ↔ paddingRight
  • Positioning: left ↔ right
  • Borders: widths, colors, and border-radius all swap sides
  • Flex direction: "row" ↔ "row-reverse"
  • Text alignment: "left" ↔ "right"
  • Transforms: translateX and scaleX are negated (including Animated.Value)
  • Logical properties: marginStart ↔ marginEnd, paddingStart ↔ paddingEnd

Animation demo

And if you have one component that should not flip (like a media player or a chart), just add noFlip:

<View noFlip style={{ flexDirection: "row" }}>
  {/* This stays LTR even inside an RTL parent */}
</View>

NativeWind / Tailwind CSS support

If you use NativeWind, all your Tailwind classes flip automatically:

import "expo-rtl/nativewind"; // one-time setup in your entry file

import { View, Text, Image } from "expo-rtl";

<View className="flex-row gap-4 pl-4">
  <Image flip source={chevron} className="w-4 h-4" />
  <Text className="text-left flex-1">Flips to right in RTL</Text>
</View>

Classes like pl-4, mr-2, text-left, flex-row, rounded-l-lg, border-r-2 — all flip. Logical classes (ms-*, me-*, ps-*, pe-*, start-*, end-*) work too.

Built-in i18n

expo-rtl includes a full i18n system so you don’t need a separate translation library:

Interpolation:

t("greeting", { name: "Ali" }); // "Hello Ali!" or "!Ali مرحبا"

Pluralization (uses Intl.PluralRules for locale-correct categories):

t("items", { count: 1 }); // "1 item"
t("items", { count: 5 }); // "5 items"
// Arabic has six plural forms — all handled automatically

Nested keys:

t("settings.profile"); // dot notation for nested objects

Type-safe keys with autocomplete:

const { t } = useRTL<TranslationKeys<typeof translations>>();
t("settings.profile");  // autocomplete works
t("typo");              // TypeScript error

Locale-aware formatting:

formatNumber(1234.56);  // "1,234.56" (en) / "١٬٢٣٤٫٥٦" (ar)
formatDate(new Date());  // "3/29/2026" (en) / "٢٩‏/٣‏/٢٠٢٦" (ar)

Auto-detection, persistence, fallback chains:

<RTLProvider
  fallbackLocale="en"           // fallback when key is missing
  persistLocale                  // saves to AsyncStorage
  translations={translations}
>
  {/* Locale auto-detected from device via expo-localization */}
</RTLProvider>

When should you use this?

expo-rtl is for you if:

  • You’re building an app that supports Arabic, Hebrew, Persian, or Urdu
  • You need to switch language/direction at runtime without restarting
  • You want per-component RTL control (not just global)
  • You use NativeWind and need your Tailwind classes to flip
  • You want i18n + RTL in one package instead of juggling multiple libraries
  • You’re tired of I18nManager.forceRTL() and its limitations

Try it

npm install expo-rtl

If this solves a problem for you, a GitHub star helps other developers find it. And if you have feedback or feature requests, open an issue — I’d love to hear from you.

Built by Ibrahim Tarhini because RTL in React Native deserved better.

Orchestrating Kubernetes AI Inference Workloads with NVIDIA Grove — From DRA GA to KAI Scheduler Integration

Why Existing Kubernetes Alone Falls Short for AI Inference Workloads

In March 2026, at KubeCon Europe 2026 in Amsterdam, NVIDIA officially announced the open-source project Grove. Grove is a Kubernetes API for declaratively defining and orchestrating complex AI inference systems in Kubernetes. The era of simply spinning up a single Pod is over.

Modern LLM inference architectures are evolving toward Disaggregated Inference patterns. The Prefill and Decode stages are separated, KV-Cache is shared, and each component must scale independently. The traditional Kubernetes combination of Deployment + HPA cannot properly manage such composite workloads.

Core Problem: When you scale out Prefill workers, you need to proportionally increase Decode capacity, and when adding new service instances, you must maintain the correct ratio of each component. Pod-level autoscaling cannot express these dependencies.

Grove was designed as a core component of the NVIDIA Dynamo framework to solve this problem, developed with integration into the CNCF ecosystem as a prerequisite. At the same KubeCon, NVIDIA also announced the historic decision to donate their GPU DRA driver to the CNCF.

Grove Architecture: 3-Tier CRD Model

Grove abstracts AI inference workloads into three Custom Resource Definition (CRD) layers. Each layer separates different levels of concerns while ensuring the entire system is managed as a single declarative resource.

[Grove 3-Tier CRD Architecture]

┌─────────────────────────────────────────────────────────────────┐
│ PodCliqueSet │
│ (Full inference service definition: startup order, scaling policies, Gang scheduling) │
│ │
│ ┌──────────────────────────┐ ┌──────────────────────────┐ │
│ │ PodCliqueScalingGroup │ │ PodCliqueScalingGroup │ │
│ │ (Groups that scale │ │ (Independent scale │ │
│ │ together) │ │ group) │ │
│ │ │ │ │ │
│ │ ┌─────────┐ ┌────────┐ │ │ ┌──────────────────┐ │ │
│ │ │PodClique│ │PodCliq.│ │ │ │ PodClique │ │ │
│ │ │(Prefill │ │(Prefill│ │ │ │ (Decode │ │ │
│ │ │ Leader) │ │Worker) │ │ │ │ Workers) │ │ │
│ │ └─────────┘ └────────┘ │ │ └──────────────────┘ │ │
│ └──────────────────────────┘ └──────────────────────────┘ │
└─────────────────────────────────────────────────────────────────┘

PodClique: Role-Based Pod Groups

PodClique is a group of Pods performing a specific role. Each role – Prefill Leader, Prefill Worker, Decode Leader, Decode Worker – has independent configuration and scaling logic appropriate for its role. Each PodClique can have different GPU requirements, images, and commands.

PodCliqueScalingGroup: Tightly Coupled Scaling

PodCliqueScalingGroup bundles PodCliques that must be scaled together. For example, if 1 Prefill Leader and 4 Prefill Workers constitute a single model instance, they are managed as one ScalingGroup. This prevents inconsistencies where only Workers are scaled without the Leader during scale-out operations.

PodCliqueSet: Full Service Orchestration

PodCliqueSet defines the entire multi-component workload as a single declarative resource. It includes startup order (Workers start after Leader is ready), scaling policies, and Gang scheduling constraints.

In-Depth Analysis of Core Features

1. Multi-Level Auto-Scaling

Grove handles 3-tier autoscaling simultaneously. Independent yet coordinated scaling occurs at the individual component level (adding Prefill Workers during traffic spikes), related component group level (scaling Prefill Leader and Workers together), and entire service instance level (expanding overall capacity).

Scaling Level Target Example Trigger Traditional K8s Response
Component Level Individual PodClique Prefill queue increase HPA (partial support)
Group Level PodCliqueScalingGroup Model instance addition None (manual management)
Service Level Entire PodCliqueSet Overall throughput shortage None (manual management)

2. Flexible Gang Scheduling

Traditional Gang scheduling follows an “all-or-nothing” approach. Grove improves this by ensuring minimum viable component combinations while allowing flexible scaling. Prefill and Decode components can scale at different ratios based on workload patterns.

The Grove operator automatically creates PodGang resources when processing PodCliqueSet resources. PodGang encapsulates minimum replica guarantees, network topology preferences, and distribution constraints to pass to the scheduler.

3. Topology-Aware Placement

GPU topology directly impacts performance in AI inference. In NVIDIA GB200 NVL72 systems, placing related Prefill and Decode Pods in the same NVLink domain can significantly reduce KV-Cache transfer latency. Grove automatically performs such topology-aware placement by integrating with KAI Scheduler.

Tip: KAI Scheduler is an open-source subcomponent of NVIDIA Run:ai, recently adopted as a CNCF Sandbox project. It continuously monitors PodGang resources and makes placement decisions considering GPU topology and cluster locality.

4. Role-Aware Orchestration

Prefill Leaders and Workers execute different startup logic. Workers cannot start before the Leader is ready. Grove manages these explicit startup orders and role-specific configurations at the CRD level. When failed components restart, they reconnect correctly at the system level, and during rolling updates, network topology is preserved to maintain low-latency states.

Practical Deployment: Deploying Qwen3 Model with KV-Routing

Let’s walk through setting up an actual Grove environment and deploying a Qwen3 0.6B model using the Disaggregated Inference pattern step by step.

Step 1: Install Prerequisites

# Create namespace
kubectl create namespace vllm-v1-disagg-router

# Install Dynamo CRDs
export NAMESPACE=vllm-v1-disagg-router
export RELEASE_VERSION=0.5.1

helm fetch https://helm.ngc.nvidia.com/nvidia/ai-dynamo/charts/dynamo-crds-${RELEASE_VERSION}.tgz
helm install dynamo-crds dynamo-crds-${RELEASE_VERSION}.tgz --namespace default

# Install Dynamo Operator + Enable Grove
helm fetch https://helm.ngc.nvidia.com/nvidia/ai-dynamo/charts/dynamo-platform-${RELEASE_VERSION}.tgz
helm install dynamo-platform dynamo-platform-${RELEASE_VERSION}.tgz 
  --namespace ${NAMESPACE} --create-namespace 
  --set "grove.enabled=true"

Step 2: Verify CRD Installation

# Check Grove CRDs
kubectl get crd | grep grove

# Expected output:
# podcliques.grove.io
# podcliquescalinggroups.grove.io
# podcliquesets.grove.io
# podgangs.scheduler.grove.io
# podgangsets.grove.io

Step 3: Define DynamoGraphDeployment

Here’s the complete manifest for deploying the Qwen3 0.6B model with Prefill/Decode separation architecture:

# dynamo-grove.yaml
apiVersion: nvidia.com/v1alpha1
kind: DynamoGraphDeployment
metadata:
  name: dynamo-grove
spec:
  services:
    # Frontend: KV-Routing based router
    Frontend:
      dynamoNamespace: vllm-v1-disagg-router
      componentType: frontend
      replicas: 1
      extraPodSpec:
        mainContainer:
          image: nvcr.io/nvidia/ai-dynamo/vllm-runtime:0.5.1
      envs:
        - name: DYN_ROUTER_MODE
          value: kv   # Enable KV-Cache based routing

    # Decode Worker: Responsible for token generation
    VllmDecodeWorker:
      dynamoNamespace: vllm-v1-disagg-router
      envFromSecret: hf-token-secret
      componentType: worker
      replicas: 2   # Decode needs more instances than Prefill
      resources:
        limits:
          gpu: "1"
      extraPodSpec:
        mainContainer:
          image: nvcr.io/nvidia/ai-dynamo/vllm-runtime:0.5.1
          workingDir: /workspace/components/backends/vllm
          command: [python3, -m, dynamo.vllm]
          args:
            - --model
            - Qwen/Qwen3-0.6B

    # Prefill Worker: Responsible for processing input prompts
    VllmPrefillWorker:
      dynamoNamespace: vllm-v1-disagg-router
      envFromSecret: hf-token-secret
      componentType: worker
      replicas: 1
      resources:
        limits:
          gpu: "1"
      extraPodSpec:
        mainContainer:
          image: nvcr.io/nvidia/ai-dynamo/vllm-runtime:0.5.1
          workingDir: /workspace/components/backends/vllm
          command: [python3, -m, dynamo.vllm]
          args:
            - --model
            - Qwen/Qwen3-0.6B
            - --is-prefill-worker   # Prefill-only mode flag

Step 4: Deploy and Verify

# Deploy
kubectl apply -f dynamo-grove.yaml -n ${NAMESPACE}

# Check Pod status
kubectl get pods -n ${NAMESPACE}
# NAME                                          READY   STATUS    RESTARTS   AGE
# dynamo-grove-frontend-0                       1/1     Running   0          2m
# dynamo-grove-0-vllmdecodeworker-0             1/1     Running   0          2m
# dynamo-grove-0-vllmdecodeworker-1             1/1     Running   0          2m
# dynamo-grove-0-vllmprefillworker-0            1/1     Running   0          2m

# Check PodClique resource status
kubectl get podclique -n ${NAMESPACE}
# NAME                                   READY   REPLICAS
# dynamo-grove-0-vllmdecodeworker        2/2     2
# dynamo-grove-0-vllmprefillworker       1/1     1

# Test API endpoint
kubectl port-forward svc/dynamo-grove-frontend 8000:8000 -n ${NAMESPACE}

# Check model list
curl http://localhost:8000/v1/models

# Test inference request
curl -X POST http://localhost:8000/v1/chat/completions 
  -H "Content-Type: application/json" 
  -d '{
    "model": "Qwen/Qwen3-0.6B",
    "messages": [{"role": "user", "content": "What is Kubernetes?"}],
    "max_tokens": 512
  }'

Tip: Using KV-Routing mode (DYN_ROUTER_MODE=kv) allows the Frontend to select the optimal Decode Worker based on KV-Cache state. This increases cache hit rates and significantly improves TTFT (Time to First Token).

The Significance of NVIDIA GPU DRA Driver Donation to CNCF

At the same KubeCon Europe 2026, NVIDIA donated their GPU DRA (Dynamic Resource Allocation) driver to the CNCF. This is a historic event where GPU resource management governance transferred from a single vendor to the community.

DRA was promoted to GA (General Availability) in Kubernetes 1.34, fundamentally solving the limitations of the existing Device Plugin model. Key differences include:

Comparison Item Existing Device Plugin DRA (Dynamic Resource Allocation)
Resource Request Method Simple count (nvidia.com/gpu: 1) Attribute-based (memory, compute capability, MIG profile)
GPU Sharing Limited Native support for MPS, MIG, time-sharing
Multi-node Not supported Native NVLink interconnect support
Dynamic Reconfiguration Restart required Runtime reconfiguration possible
Governance Vendor-specific plugins CNCF community (AWS, Google, Microsoft participation)

With DRA, you can request resources based on detailed GPU attributes as follows:

# DRA ResourceClaim - GPU attribute-based request
apiVersion: resource.k8s.io/v1
kind: ResourceClaim
metadata:
  name: gpu-for-inference
spec:
  devices:
    requests:
    - name: gpu
      deviceClassName: gpu.nvidia.com
      selectors:
      - cel:
          expression: >
            device.attributes["gpu.nvidia.com"].productName == "NVIDIA H100" &&
            device.attributes["gpu.nvidia.com"].memory >= 80000000000
    # Priority list: fallback to A100 if H100 unavailable
    - name: gpu-fallback
      deviceClassName: gpu.nvidia.com
      selectors:
      - cel:
          expression: >
            device.attributes["gpu.nvidia.com"].productName == "NVIDIA A100"

Grove + DRA + KAI Scheduler: Integrated Architecture

When these three projects combine, they complete a stack that can fully automate AI inference workloads in Kubernetes:

[Integrated Architecture Flow]

User Request
│
▼
┌──────────────────────────────┐
│ PodCliqueSet (Grove) │ ← Declare entire workload
│ │
│ ┌─── Frontend ────────┐ │
│ │ KV-Router │ │
│ └──────────────────────┘ │
│ │
│ ┌─── Prefill Group ───┐ │
│ │ Leader + Workers │ │ ← PodCliqueScalingGroup
│ └──────────────────────┘ │
│ │
│ ┌─── Decode Group ────┐ │
│ │ Leader + Workers │ │ ← PodCliqueScalingGroup
│ └──────────────────────┘ │
└──────────────────────────────┘
│
▼ Create PodGang
┌──────────────────────────────┐
│ KAI Scheduler │ ← Gang scheduling + topology placement
│ – GPU topology awareness │
│ – NVLink domain optimization │
│ – Resource fragmentation prevention │
└──────────────────────────────┘
│
▼ Process ResourceClaim
┌──────────────────────────────┐
│ DRA (GPU Driver) │ ← Attribute-based GPU allocation
│ – Automatic H100/A100 selection │
│ – MIG profile support │
│ – MPS sharing configuration │
└──────────────────────────────┘

Practical Adoption Considerations

Cluster Requirements

  • Kubernetes Version: 1.34+ (DRA GA support required). For 1.33, DRA is beta and requires --feature-gates=DynamicResourceAllocation=true flag.

  • GPU Nodes: Nodes with NVIDIA GPUs + NVIDIA DRA driver installation

  • Helm 3.12+: Required for Dynamo chart installation

  • Scheduler: KAI Scheduler or custom scheduler that understands PodGang resources

Cost Optimization Strategy

Companies adopting the Grove + DRA combination report GPU job queue wait times reduced from 15-45 minutes to 3-10 minutes, monthly GPU costs reduced by 30-40%, and developer experiment iteration speed improved by over 80%.

Caution: Grove is currently in v0.5.x stage, and production stability has not been fully validated. We recommend thorough testing in staging environments before production deployment. Particularly validate PodCliqueSet rolling update strategies and failure recovery scenarios in advance.

Integration with Existing Environments

Using DRA’s Extended Resource Mapping (alpha feature), existing workloads can use DRA-managed resources without modification. Traditional nvidia.com/gpu: 1 resource requests are internally processed through DRA, enabling gradual migration.

Ecosystem Outlook: GPUs Become First-Class Citizens in Kubernetes

Summarizing the trends from KubeCon Europe 2026, GPUs are now establishing themselves as first-class citizens in Kubernetes, equal to containers. NVIDIA’s donation of the DRA driver declares that GPU orchestration is not the domain of a specific vendor but a shared asset of the open-source community.

This ecosystem collaboration involving AWS, Broadcom, Canonical, Google Cloud, Microsoft, Nutanix, Red Hat, and SUSE is expected to accelerate the standardization of cloud-native AI infrastructure. Azure AKS already supports DRA and vGPU integration, and Google GKE officially supports DRA.

This change delivers a clear message to DevOps and MLOps teams. As AI workload complexity increases, Deployment and HPA alone are no longer sufficient. The new orchestration stack consisting of Grove, DRA, and KAI Scheduler represents essential technology that must be understood and mastered as Kubernetes evolves into the operating system for AI infrastructure.

References

Originally published on ManoIT Tech Blog. Translated from Korean.

6 Ways Your AI Agent Fails Silently (With Code to Catch Each One)

Your AI agent says “Done! Order placed successfully.”

But it ordered the wrong product. Or it ignored a tool error and hallucinated the rest. Or someone changed the system prompt mid-session and the agent quietly shifted its behavior.

The agent didn’t crash. It didn’t raise an exception. It just… did the wrong thing and reported success.

I’ve been building agents in production and I keep seeing the same failure patterns. Here are the 6 most common ones, with concrete code examples showing how each one happens — and how to detect it.

1. Hallucinated Tool Output

What happens: A tool returns an error, but the agent ignores it and proceeds as if the tool succeeded.

# The tool returns an error
search_result = search_api("Galaxy S25 Ultra")
# -> {"error": "Product not found"}

# But the agent's next decision says:
# "Based on the search results, the Galaxy S25 Ultra costs $470..."
#
# What search results?! The tool returned an error!

Why it’s dangerous: The agent builds its entire decision chain on data that doesn’t exist. Every subsequent step is based on a hallucination.

How to catch it: After every tool call that returns an error, check if the agent’s next reasoning acknowledges the failure:

# Check: did the agent mention the error in its reasoning?
tool_result = "error: not found"
next_reasoning = agent.last_reasoning

if "error" in tool_result and "error" not in next_reasoning:
    print("[WARNING] Agent ignored the tool error!")

2. Missing Approval for Critical Actions

What happens: The agent takes a high-stakes action (purchase, delete, send) without any approval checkpoint.

# Agent decides to purchase $32,900 worth of products
agent.decision("purchase 100 units of Galaxy S24 FE")

# But wait -- nobody approved this purchase!
# No human-in-the-loop, no policy check, no guardrail.
# The agent just... did it.

Why it’s dangerous: Financial transactions, data deletion, external communications — these should never happen without explicit approval. An autonomous agent with no guardrails is a liability.

How to catch it: Maintain a list of critical action keywords and check for a preceding approval:

critical_keywords = ["purchase", "delete", "send", "transfer", "pay"]

if any(kw in action.lower() for kw in critical_keywords):
    if not has_recent_approval():
        print("[WARNING] Critical action without approval!")

3. Silent Substitution

What happens: The user asks for Product A. Product A is unavailable. The agent delivers Product B without telling the user.

User: "Buy 100 units of Galaxy S25 Ultra"
Agent: searches... not found
Agent: finds Galaxy S24 FE instead
Agent: "Order completed! 100 units purchased for $32,900"

# The user thinks they got Galaxy S25 Ultra.
# They actually got Galaxy S24 FE.
# The agent never asked.

Why it’s dangerous: The user receives something they didn’t request. In B2B procurement, this can mean wrong specs, compatibility issues, or contract violations.

How to catch it: Compare the original request with the final output:

original_request = "Galaxy S25 Ultra"
final_output = agent.last_output

if original_request.lower() not in final_output.lower():
    # Agent delivered something different
    print("[WARNING] Output doesn't match the original request!")

4. Prompt Drift

What happens: The system prompt changes between agent steps — maybe an admin pushed a config update, maybe a middleware injected new instructions. The agent’s behavior silently shifts.

# Step 1: System prompt says "Always confirm purchases with the user"
# Agent: "Let me confirm this purchase with you..."

# --- someone changes the system prompt ---

# Step 3: System prompt now says "Prioritize order completion rate above 95%"
# Agent: "I'll substitute with an available product to complete the order"

# The agent's priorities changed mid-session.
# No one noticed.

Why it’s dangerous: Prompt drift can completely change agent behavior. If you’re not tracking the system prompt at each step, you can’t explain why the agent acted differently.

How to catch it: Record the system prompt at each step and diff it:

if previous_prompt != current_prompt:
    added = set(current_prompt.splitlines()) - set(previous_prompt.splitlines())
    removed = set(previous_prompt.splitlines()) - set(current_prompt.splitlines())
    print(f"[WARNING] PROMPT DRIFT: +{len(added)} lines, -{len(removed)} lines")

5. Repeated Failure (Blind Retries)

What happens: A tool fails, and the agent retries the exact same call multiple times without changing its approach.

Tool: flaky_api("query") -> timeout
Agent: "I'm having trouble, let me try again"
Tool: flaky_api("query") -> timeout

Why it’s dangerous: Wastes time, burns API quota, and the agent never adapts. A smart retry would try a different tool, change parameters, or escalate.

How to catch it: Count consecutive failures per tool:

tool_failures = {}
for event in trace:
    if event.type == "tool_error":
        tool_failures[event.tool] = tool_failures.get(event.tool, 0) + 1
        if tool_failures[event.tool] >= 3:
            print(f"[WARNING] {event.tool} failed {tool_failures[event.tool]} times!")

6. Retrieval Mismatch (Bad RAG Context)

What happens: The RAG pipeline retrieves a document with low relevance, and the agent uses it anyway.

# User asks about "refund policy for electronics"
# RAG retrieves: "laptop_reviews_2024.md" (similarity: 0.45)
#
# The agent uses this irrelevant document to answer
# the refund question, confidently citing wrong information.

Why it’s dangerous: Low-similarity retrieval means the context probably doesn’t match the query intent. The agent doesn’t know the context is wrong — it trusts whatever the RAG pipeline gives it.

How to catch it: Set a similarity threshold and flag anything below it:

if retrieval_result.similarity_score < 0.7:
    print(f"[WARNING] Low similarity ({retrieval_result.similarity_score}) -- context may be irrelevant")

The Real Problem: These Fail Silently

None of these failures crash your agent. No exception is raised. The agent completes successfully and reports a result.

The only way to catch them is to record the full decision trace and analyze it after the fact — like a flight recorder for AI agents.

I built Agent Forensics to do exactly this. It records every decision, tool call, and LLM interaction, then auto-detects all 6 patterns above:

pip install agent-forensics
from agent_forensics import Forensics

f = Forensics(session="order-123")

# Works with any framework -- or add one-line auto-capture:
agent.invoke({"input": "..."}, config={"callbacks": [f.langchain()]})

# Auto-detect all 6 failure patterns
failures = f.classify()
for fail in failures:
    print(f"[{fail['severity']}] {fail['type']}: {fail['description']}")

You can try the live demo that demonstrates patterns #1-4 in a single run:

git clone https://github.com/ilflow4592/agent-forensics.git
cd agent-forensics
pip install -e .
python demo.py --no-llm

What silent failures have you seen in your agents? I’d love to hear about patterns I might have missed.

How I Reimplemented LÖVE2D in Rust to Play Balatro in a Terminal


A few weeks ago, I wondered: what would it take to run a full commercial game in a terminal? Not a text-based approximation — the actual game, with real graphics, shaders,
and UI.
The answer turned out to be ~9,800 lines of Rust.
—

The idea
Balatro is built on LÖVE2D, a Lua game framework. The game’s logic is entirely in Lua; LÖVE2D provides the graphics, audio, and input APIs. My idea: reimplement those APIs in
Rust, but instead of rendering to a GPU-backed window, render to a terminal.
—

Architecture
The project has three crates:
love-terminal: The binary — CLI parsing, terminal setup, game loop.
love-api: The core — implements ˷80 LÖVE2D API functions. graphics.rs alone is 3,400+
lines covering a full software rasterizer: anti-aliased rectangles, ellipses, polygons, thick
lines, sprite rendering with bilinear filtering, TTF text via fontdue, transform stack, canvas
system, stencil buffer, and blend modes.
sprite-to-text: The renderer — takes the RGBA pixel buffer and converts it to terminal
output.
—

Three ways to render pixels in a terminal

  1. Sixel graphics (best quality)
    The Sixel protocol, dating back to DEC terminals in the 1980s, encodes actual pixel data inline in the terminal stream. Modern terminals (Windows Terminal 1.22+, WezTerm, foot,
    kitty, mlterm) support it.
    The internal canvas can be 700×350+ pixels. I control the resolution via TUI_PIXELBUDGET — the canvas auto-scales to stay within a pixel budget. At 250K pixels (default), I get
    ~707×354 at 50-60 FPS on CPU. Each frame is quantized to 256 colors.
  2. Unicode octant characters
    Unicode 13.0 added octant characters (U+1FB00–U+1FB3B) that divide each cell into a 2×4 grid. Each of the 8 sub-cells can be on or off, giving 256 possible patterns per cell.
    I pair each octant pattern with a foreground and background color, choosing the combination that minimizes error via gamma-correct downsampling. The result: 2×4 sub-
    pixel resolution per cell, which is dramatically better than half-blocks.
    Requires Cascadia Code 2404.23+ (or another font with octant support).
  3. Half-block fallback
    The classic approach: ▀ (U+2580) with the top pixel as foreground, bottom pixel as background. 2× vertical resolution. Works on any terminal with 24-bit color.
    —

Shader emulation
Balatro uses several GLSL shaders for visual effects. Since there’s no GPU, every shader is emulated per-pixel in Rust. Some highlights:
The CRT shader extracts bright pixels, applies a 5-tap Gaussian blur for bloom, then adjusts github.com/4RH1T3CT0R7/balatro-port-tui contrast and adds a vignette.
The holographic shader combines an HSL rainbow shift with a hexagonal grid pattern and a noise field.
The polychrome shader uses animated noise to rotate hues in HSL space with boosted saturation.
There are 11 shaders total, all ported from the original GLSL.
—

Compatibility tricks
A few things needed special handling:
love.system.getOS() returns “Linux” to skip Steam initialization. A require “luasteam” stub returns a dummy module. The bit library (present in LuaJIT but missing in Lua 5.1) is implemented in Rust. Balatro’s custom love.run() returns a per-frame closure instead of using standard callbacks.
And keyboard events are mapped to gamepad events, since Balatro’s UI is designed around gamepad input.
—

Try it yourself
You need a copy of Balatro. The engine reads game files from Balatro.exe (which is a zip archive).
cargo build –release && cargo run –release — “path/to/Balatro.exe”
GitHub: https://github.com/4RH1T3CT0R7/balatro-port-tui
Free and open-source under Apache 2.0. Feedback welcome!

Building a Daily Chinese Diary Habit with Notion MCP + Claude

This is a submission for the Notion MCP Challenge

What I Built

I built an automated workflow for my daily Chinese learning habit called “中国語3行日記” (3-Line Chinese Diary). Every day, I write a 3-sentence Chinese diary entry based on a daily theme, get it corrected by Claude, and post it to Bluesky — all without leaving Claude’s chat UI.

The system is powered by Notion + Claude MCP + GitHub Actions:

  • Notion stores the daily themes (Questions DB) and my answers with correction notes (Answers DB)
  • Claude MCP fetches the day’s theme, corrects my Chinese, records the answer and notes back to Notion, and helps me analyze my writing patterns over time
  • GitHub Actions runs a daily cron job at 21:00 JST to automatically post scheduled answers to Bluesky

As of today, I’ve kept this habit going for over 225 days.

Video Demo

Show us the code

github.com/enoki-85/3-line-diary-scheduler

How I Used Notion MCP

The Daily Workflow

Each session follows this flow entirely within Claude’s chat UI:

  1. I tell Claude which day’s theme to fetch → Claude retrieves it from the Notion Questions DB via MCP
  2. I write my 3-sentence Chinese diary entry
  3. Claude corrects my Chinese and explains the mistakes
  4. Claude registers the final answer, pinyin, and correction notes to the Notion Answers DB via MCP
  5. GitHub Actions picks it up at 21:00 JST and posts it to Bluesky automatically

Looking Back at My Writing Patterns

Beyond the daily workflow, I can ask Claude to retrieve past answers from Notion and review my correction notes. Since all notes are stored in Notion, I can look back at specific entries and spot recurring mistakes. I’m also planning to build a GitHub Actions workflow that summarizes each month’s entries into a dedicated Notion page, which would make longer-term pattern analysis much easier.

Why This Stack Works

Before this system, I went through a few iterations. I started by handwriting entries, then manually formatting and posting them. I later built a web app to streamline the process — but it required server costs, and since the themes are sourced from copyrighted material, I couldn’t make the repo public. I was also using the Claude API separately, adding unnecessary cost on top of my Claude MAX plan.

Switching to Notion MCP + Claude solved all of this:

  • No extra server costs — GitHub Actions handles the automation for free
  • No API costs — everything runs within my Claude MAX plan
  • No friction — theme retrieval, correction, and Notion registration all happen in one chat
  • The repo is private-safe — theme data lives in Notion, not in the codebase

The most important shift was removing everything except the actual learning. Writing and getting corrected is the core habit. Everything else — fetching themes, formatting posts, storing notes, posting to Bluesky — is now invisible. On days when motivation is low, having a smaller, frictionless target makes all the difference. Over 225 days in — though the Notion MCP setup is only about a month old — I feel like I can keep this going for a long time to come.