genkode — Random ID & String Generator for Node.js

Generating random strings comes up constantly in backend work — session tokens, invoice numbers, API keys, temporary codes, test data. Most of the time you end up copy-pasting the same Math.random().toString(36) snippet or reaching for a heavy library when you only need one function.

I built genkode to fix that for myself, and after using it across a few projects I cleaned it up and published it. Zero dependencies, full TypeScript support, and a small focused API that handles the cases I kept running into.

Here’s what it does and how I built it.

Installation

npm install genkode

The basics

The main export is generateCode. At its simplest:

import { generateCode } from 'genkode';

generateCode({ length: 12 });
// → 'rqfvYxJRWfoP'  (alpha by default)

generateCode({ length: 12, type: "alphanumeric" });
// → 'aZ8kL2pQ9xW1'

generateCode({ length: 12, type: "numeric" });
// → '362128126198'

Three types: alpha, numeric, alphanumeric. That covers most cases without any configuration overhead.

Cryptographically secure mode

By default the library uses Math.random — fast, but not suitable for anything security-sensitive. Set secure: true and it switches to crypto.getRandomValues from the Web Crypto API:

generateCode({ length: 32, type: "alphanumeric", secure: true });
// → 'Tz3mW8qA1nXpKj7rBv2cYs9dLf4mNe6h'

There’s an important subtlety here though: naively doing byte % charsetLength introduces modulo bias — characters at the start of your charset get picked slightly more often than characters at the end when 256 doesn’t divide evenly by your charset size.

genkode uses rejection sampling to eliminate this. Any random byte that would cause bias is discarded and a new one is fetched. The result is a perfectly uniform distribution across the charset.

// Internal logic (simplified)
const threshold = Math.floor(256 / max) * max;
if (byte < threshold) {
  result.push(charset[byte % max]);
}
// Otherwise discard and try again

Performance: buffered generation

Both standard and secure modes use buffered byte generation rather than calling crypto.getRandomValues once per character. The buffer is sized to the request (capped at 65,536 bytes, which is Node’s hard limit for a single getRandomValues call) and refilled in chunks as needed.

For most use cases this is invisible, but for high-volume batch generation it makes a meaningful difference.

Prefix and suffix

A pattern I kept needing: codes with a static prefix that identify their type at a glance — INV- for invoices, USR- for users, TKN- for tokens.

generateCode({ length: 8, prefix: "INV-" });
// → 'INV-rqfvYxJR'

generateCode({ length: 8, prefix: "ORD-", suffix: "-2025" });
// → 'ORD-rqfvYxJR-2025'

The length always refers to the generated segment — not the total string length including affixes. So INV- + 8 chars = 12 characters total.

Batch generation

Pass count and you get an array back instead of a single string. The return type is overloaded in TypeScript so you get correct inference automatically:

generateCode({ length: 10, count: 5 });
// → ['rqfvYxJRWf', 'TzAmW8qAnX', 'pLkQmNbVcD', 'HgFsJwKyRt', 'MnPxZuCvBe']

Add unique: true and the library guarantees no duplicates in the batch. If you ask for more unique codes than the charset and length combination can produce, it throws a KodeError upfront rather than looping forever:

generateCode({ length: 10, count: 1000, unique: true });
// → string[] with 1000 guaranteed-unique codes

generateCode({ length: 1, type: "numeric", count: 11, unique: true });
// → throws KodeError: cannot generate 11 unique codes from charset of size 10

Short ID mode

The shortId flag switches to a reduced charset that strips visually ambiguous characters — 0, O, 1, l, I. These are the characters that cause support tickets when users misread a code from a screen or printout.

generateCode({ length: 12, shortId: true });
// → '3Ks9mBx4nPqR'  — no 0/O/1/l/I

The charset is 23456789abcdefghjkmnpqrstuvwxyzABCDEFGHJKMNPQRSTUVWXYZ — 54 characters, still high entropy, fully URL-safe.

Case control

Sometimes you need all uppercase (licence keys, voucher codes) or all lowercase (slugs, usernames). The case option handles this at the charset level rather than post-processing:

generateCode({ length: 12, case: "upper" });
// → 'RQFVYXJRWFOP'

generateCode({ length: 12, case: "lower" });
// → 'rqfvyxjrwfop'

generateCode({ length: 12, type: "alphanumeric", case: "upper" });
// → 'AZ8KL2PQ9XW1'

It composes cleanly with everything else:

// Human-readable voucher code: no ambiguous chars, all caps
generateCode({ length: 8, shortId: true, case: "upper", prefix: "SALE-" });
// → 'SALE-3KS9MBXN'

Error handling

Rather than silently producing garbage for invalid inputs, genkode throws a typed KodeError:

import { generateCode, KodeError } from 'genkode';

try {
  generateCode({ length: 0 });
} catch (err) {
  if (err instanceof KodeError) {
    console.error(err.message);
    // → 'length must be at least 1, got: 0'
  }
}

It validates that length and count are integers, that length is between 1 and 100,000, and that unique batch requests are actually satisfiable.

Quick reference

Option Type Default Description
length number — Required. Length of the generated segment (1–100,000)
type "alpha" "numeric" "alphanumeric"
case "upper" "lower" —
secure boolean false Cryptographically secure output
prefix string "" Static prefix
suffix string "" Static suffix
count number — Batch size — returns string[]
unique boolean false Guarantee uniqueness within batch
shortId boolean false Exclude ambiguous characters

Real-world examples

// API key
generateCode({ length: 32, type: "alphanumeric", secure: true, prefix: "sk_live_" });
// → 'sk_live_Tz3mW8qA1nXpKj7rBv2cYs9dLf4m'

// Invoice number
generateCode({ length: 8, type: "numeric", prefix: "INV-" });
// → 'INV-36212812'

// Voucher code (human-readable, no ambiguous chars)
generateCode({ length: 8, shortId: true, case: "upper", prefix: "SALE-" });
// → 'SALE-3KS9MBXN'

// Seed 100 unique test user IDs
generateCode({ length: 12, count: 100, unique: true, prefix: "user_" });
// → ['user_rqfvYxJRWfoP', ...]

// Short session token
generateCode({ length: 24, type: "alphanumeric", secure: true });
// → 'Tz3mW8qA1nXpKj7rBv2cYs9d'

Links

If you find it useful or have a feature in mind, feedback is welcome. Happy to discuss the rejection sampling approach or the buffering strategy in the comments too.

How we Built a Free, Anonymous Survey & Quiz Tool — No Login, No Tracking

Getting honest feedback is harder than it looks.

Most survey tools ask users to log in, verify an email, or accept some form of identity tracking. The moment people feel identifiable, they self-censor. You don’t get real answers — you get polished ones.

A few months ago, my friend and I ran into this exact problem in college. We needed a fast, anonymous way to collect feedback and run quick quizzes. Every tool we tried was either too complex, required an account, or took forever to set up.

So we built our own.

That’s how SurveyZen was born.

🧘 What Is SurveyZen?

SurveyZen is a lightweight platform built around two focused use cases:

🔒 Anonymous Surveys

Collect genuine feedback without requiring login or any personal information from respondents.

⚡ Quick Quizzes

Create simple quizzes in minutes — great for practice sessions, events, or assessments.

🚀 How It Works

  1. Create a survey or quiz
  2. Add your questions
  3. Generate a shareable link
  4. Start collecting responses

That’s it. No account needed. No friction.

🎥 Demo

Creating a Quiz

Creating a Survey

🛠️ Tech Stack

Layer Technology
Frontend React
Backend Node.js + Express.js
Database MongoDB

🏗️ System Design

Dynamic Question Model

Every survey or quiz is stored using a flexible schema:

{
  "title": "Sample Quiz",
  "questions": [
    {
      "question": "What is 2 + 2?",
      "type": "mcq",
      "options": ["2", "3", "4", "5"]
    }
  ]
}

Each survey gets a unique, shareable link:
surveyzen.live/survey/{id}

🔐 Ensuring Anonymity

Anonymity wasn’t an afterthought — it’s a core design principle.

  • ✅ No login required
  • ✅ No email collected
  • ✅ No personal identifiers stored

Only the response data itself is saved:

{
  "surveyId": "...",
  "answers": [...],
  "submittedAt": "..."
}

⚙️ Dynamic Rendering

The frontend renders questions dynamically using reusable components:

  • Text input — for open-ended responses
  • Multiple choice — for MCQ surveys
  • Quiz options — for scored quizzes

This keeps the UI flexible without bloating the codebase.

🧩 Challenges We Faced

1. Flexible Data Modeling

Surveys and quizzes vary significantly in structure. MongoDB’s schema-less design was a natural fit — it let us iterate quickly without migration headaches.

2. Dynamic Form Rendering

Supporting multiple question types required careful component architecture. We focused on keeping components composable and reusable.

3. Maintaining Simplicity

Every feature request got filtered through one question: does this make the experience faster or slower? We said no a lot. That discipline kept the product focused.

💡 Key Takeaways

Simple products solve real problems effectively.

  • Shipping early gives you better feedback than over-engineering ever will
  • Building from a genuine personal pain point sharpens your product thinking
  • Saying no to features is just as important as building them

🗺️ Roadmap

  • [ ] Response analytics and visualizations
  • [ ] Quiz scoring system
  • [ ] Public templates library
  • [ ] Improved creator dashboard

🔗 Try It Out

👉 https://surveyzen.live

No sign-up. No tracking. Just create and share.

If you’re building something — start with a real problem, ship early, and iterate. That’s the whole playbook.

Would love to hear what you think! Drop feedback in the comments or reach out directly. 🙌

Stop Paying Crypto Gateway Fees: Introducing Self-Hosted Solana Payments for Django Framework

I have built a library for the Django framework that simplifies the process of accepting crypto payments for your e-commerce (and other) applications.

django-solana-payments is an open-source Django library for accepting self-hosted Solana payments with automated on-chain verification.

GitHub logo

Artemooon
/
django-solana-payments

A plug-and-play Django library for accepting online payments via the Solana blockchain

Django Solana Payments

Documentation Status
Coverage Status
PyPI version
Python versions
License

A Django library for integrating Solana payments into your project. This library provides a flexible and customizable way to accept Solana payments with support for customizable models, an easy-to-use API, and management commands for processing online payments using the Solana blockchain.

Key Features

  • Transaction verification and automatic payment confirmation: Monitors the Solana blockchain, verifies incoming transactions, and automatically confirms payments when the expected amount is received.
  • Multi-token support (SOL and SPL tokens): Configure a list of active payment tokens (for example, SOL and USDC) and the library will use them for pricing and verification flows.
  • Flexibility and customization: Use your own custom models for payments and tokens to fit your project’s needs. Add custom logic using signals or callabacks.
  • Ease of integration: Provides ready-to-use endpoints that can be used in existing DRF applications, or ready-to-use methods for Django applications that are not part…

Table of Contents

  1. Main Benefits
  2. Package Features
  3. Quick Start
  4. How It Works and Tech Stack
  5. Development Process and Takeaways

It was inspired by libraries such as django-payments, but designed specifically for Solana-based payments and for teams that want a self-hosted, flexible integration.

Main Benefits

Package Features

This package is aimed at developers and companies who want a robust, ready-to-use solution for safely accepting Solana payments inside their own Django infrastructure.

  • Ready-to-use DRF endpoints: For payment initiation, transfer verification, and payment details.
  • Customizable models: Integrate with your existing domain models easily.
  • Signals (Hooks/Callbacks): For processing post-payment business logic.
  • Management commands: For reconciliation, fund consolidation, and reclaiming rent from token accounts.
  • Security: Built-in encryption for one-time wallet private keys.

Quick Start

To get started, install the package via pip:

Get Started

pip install django-solana-payments

Then, add it to your INSTALLED_APPS and configure your Solana RPC node in your settings.

See more in the README

How It Works and Tech Stack

The library is built with Python and Django and is packaged as a reusable Django app.

Main technologies used:

  • Django for the application framework, ORM integration, admin support, management commands, and extension points such as signals
  • Django REST Framework as an optional extra for ready-to-use API endpoints
  • solana and solders for blockchain interaction, transaction parsing, wallet/keypair handling, and signature/status checks
  • httpx for RPC communication
  • stamina for more resilient retry behavior around network-dependent operations
  • cryptography for encrypting one-time wallet private keys before storing them

How It Works Internally

The core idea is simple: each payment gets its own one-time wallet.

The flow looks like this:

  • create a dedicated one-time wallet for a payment
  • calculate the expected amount for the selected token
  • watch blockchain activity for that wallet
  • verify that the received amount matches the expected payment
  • check the transaction confirmation level
  • update the payment status in Django
  • optionally move funds from the one-time wallet to the main wallet
  • emit Django signals so the host application can react

After a payment is processed, it emits Django signals so you can run your own business logic (like marking an order as paid) directly inside your application.

Development Process and Takeaways

This is my first open source library, and shipping it was a very different experience from building internal product features.

The hardest part was not writing the code itself, but turning a specific implementation into a reusable package that other developers can install, understand, and trust. That meant spending much more time on API boundaries, documentation, examples, contributor experience, test coverage, release flow, and long-term maintainability.

It took real effort to get this project into a shape that feels production-ready. There were many details to think through: payment lifecycle design, one-time wallet handling, blockchain verification flow, extension points with signals and callbacks, safe defaults, and a developer experience that still feels familiar to Django users.

Building it pushed me to apply a more disciplined open source mindset around packaging, documentation quality, compatibility, and public interfaces. That process was challenging, but very valuable.

If you try the library, I would genuinely appreciate your feedback. If something is unclear, missing, or could be improved, I would like to hear it.

And if you want to support the project, please give it a star on GitHub. It helps more people discover the library. Thanks!

View on GitHub and Start Building

Hack-Me Challenge

Kirbus Hackathon Challenge!!

I have started a literal Hackathon challenge. I have started a “secure” server on the Kirbus registry. There are some significant attack vectors open. If you can hack into the hack-me server, I’ll send you $100 (I know it’s not a lot, I’m not a rich guy…) but you also get bragging rights. I will acknowledge that you hacked Kirbus here and on LinkedIn. Couple of rules:

  1. Do your worst…
  2. You have to tell me how you did it.
  3. You have to tell me the magic passphrase [FLAG] when you get it.

All the source code is freely available here: https://lnkd.in/eVg_t3Nz

To start you can clone the source or simply use pip:

$ pip install kirbus
$ kirbus –handle

Good luck and have fun hacking!

Modernizing the Angular Quality Stack: Moving to Vite+

This didn’t start as a tooling migration—it started with my own curiosity.

Oxlint and Oxfmt were suddenly everywhere. People were claiming massive speed improvements and near-instant TypeScript linting. That sounded great, but most benchmarks were tiny demo projects. I wanted to see what happens in a real Angular codebase.

There was also a real problem underneath the curiosity. ESLint + Prettier had slowly become friction. Linting was slow enough that I noticed developers (including myself) stopped running it locally. Checks moved to pre-commit. Pre-commit got slow enough that --no-verify became the norm. That’s usually the point where tooling stops helping and starts getting in the way.

So I tried replacing ESLint + Prettier with Oxlint + Oxfmt using Vite+. Here’s what actually happened.

First Important Clarification

I did not replace Angular CLI. Angular CLI still handles:

  • ng serve
  • ng build
  • ng test

What I replaced was only the quality tooling layer:

  • ESLint (mostly)
  • Prettier
  • Most of the old JS/TS linting path

Vite+ became the runner for linting and staged file checks, while Oxfmt handled formatting.

Why Not Biome?

Biome came up immediately. Biome is great, especially for greenfield JS or React projects.

But Angular has one big requirement: @angular-eslint rules. Biome doesn’t support Angular ESLint plugins. Oxlint doesn’t fully support Angular either, but it allows Angular TypeScript rules via plugins, which made it usable for Angular projects.

The Angular Limitation

Oxlint cannot lint Angular templates yet. Templates require a custom parser, so ESLint is still required for .html files. However, Angular TypeScript rules can now run inside Oxlint, meaning ESLint is only needed for templates.

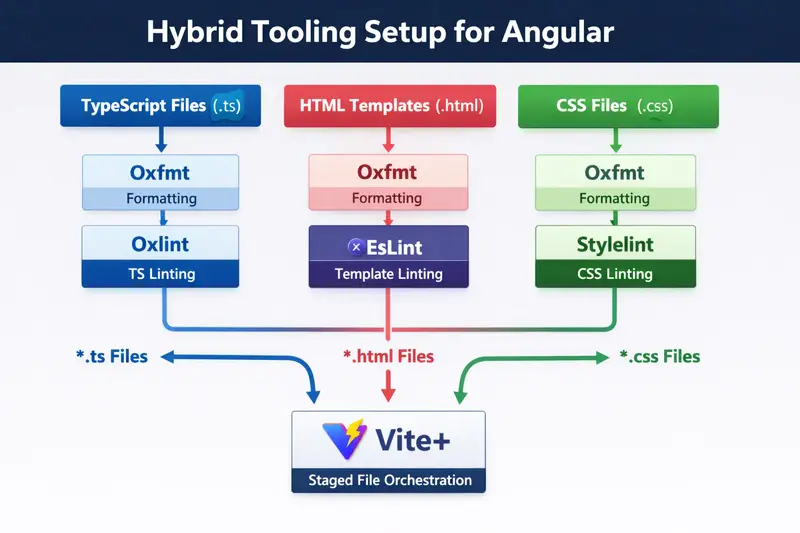
Final Tool Responsibility Split

File Type Formatting Linting
.ts Oxfmt Oxlint + Angular TS rules
.html Oxfmt ESLint (Angular template rules)
.css / .scss Oxfmt Stylelint (rules only)
  • Oxfmt handles formatting everywhere.
  • ESLint only handles Angular templates.
  • Stylelint only handles CSS rules and property order.
  • Oxlint handles all TypeScript linting.

Once I understood this split, the setup actually felt simpler than before.


Core Idea of the Setup

What this really means is… Vite+ acts as a high-speed traffic controller. Instead of running a heavy ESLint process on every file, it routes each file type to the fastest tool that can handle it correctly.

The orchestration lives in the Vite+ config:

// vite.config.js
import { defineConfig } from 'vite-plus';

export default defineConfig({
  ignorePatterns: ['dist/**', '.angular/**', 'node_modules/**'],

  staged: {
    '*.ts': 'vp lint --fix',
    '*.{json,html}': 'vp fmt',
    '*.html': 'eslint --fix',
    '*.{css,scss}': ['vp fmt', 'stylelint --fix'],
  },
});

Formatting rules live separately in .oxfmtrc.json:

{
  "$schema": "./node_modules/oxfmt/configuration_schema.json",
  "singleQuote": true,
  "semi": true,
  "printWidth": 100,
  "tabWidth": 2,
  "trailingComma": "all"
}

That detail matters. In this setup, keeping Oxfmt rules in .oxfmtrc.json turned out to be more reliable than nesting them inside vite.config.js.

That split ended up being the more maintainable option: runner config in vite.config.js, tool rules in tool-specific files.

Step-by-Step Setup for Your Angular Project

1. Install dependencies

npm install --save-dev vite-plus stylelint stylelint-config-standard stylelint-order stylelint-config-recess-order @angular-eslint/eslint-plugin @angular-eslint/template-parser @angular-eslint/eslint-plugin-template

2. Configure Oxlint (.oxlintrc.json)

{
  "jsPlugins": ["@angular-eslint/eslint-plugin"],
  "ignorePatterns": ["dist/**", ".angular/**", "node_modules/**"],
  "rules": {
    "no-debugger": "error",
    "no-var": "error",
    "prefer-const": "error",
    "@typescript-eslint/no-unused-vars": "warn",
    "@angular-eslint/no-output-native": "error",
    "@angular-eslint/use-lifecycle-interface": "warn",
    "@angular-eslint/component-selector": [
      "error",
      { "type": "element", "prefix": "app", "style": "kebab-case" }
    ]
  }
}

3. Configure Oxfmt (.oxfmtrc.json)

{
  "$schema": "./node_modules/oxfmt/configuration_schema.json",
  "singleQuote": true,
  "semi": true,
  "printWidth": 100,
  "tabWidth": 2,
  "trailingComma": "all"
}

4. Configure ESLint for Templates (eslint.config.js)

import templateParser from '@angular-eslint/template-parser';
import templatePlugin from '@angular-eslint/eslint-plugin-template';

export default [
  {
    files: ['**/*.html'],
    languageOptions: {
      parser: templateParser,
    },
    plugins: {
      '@angular-eslint/template': templatePlugin,
    },
    rules: {
      '@angular-eslint/template/button-has-type': 'error',
      '@angular-eslint/template/no-negated-async': 'warn',
      '@angular-eslint/template/alt-text': 'error',
    },
  },
];

5. Configure Stylelint (.stylelintrc.json)

{
  "extends": ["stylelint-config-standard", "stylelint-config-recess-order"],
  "ignoreFiles": ["dist/**", "node_modules/**", ".angular/**"],
  "rules": {
    "color-no-invalid-hex": true,
    "unit-no-unknown": true,
    "property-no-unknown": true,
    "declaration-block-no-duplicate-properties": true,
    "color-named": "never",
    "no-empty-source": null
  }
}

6. Update package.json scripts

"scripts": {
    "ng": "ng",
    "start": "ng serve",
    "build": "ng build",
    "test": "ng test",
    "lint": "vp lint",
    "lint:fix": "vp lint --fix",
    "lint:html": "eslint "src/**/*.html"",
    "lint:styles": "stylelint "src/**/*.{css,scss}"",
    "lint:styles:fix": "stylelint "src/**/*.{css,scss}" --fix",
    "format": "vp fmt --check",
    "format:fix": "vp fmt"
  },


Before vs After Tooling

Before After
ESLint (TS + HTML) Oxlint (TypeScript)
Prettier ESLint (HTML templates only)
Stylelint Stylelint (CSS rules only)
Manual formatting drift Oxfmt (formatting everywhere)
One big lint pipeline Vite+ orchestrating specialized tools

Biggest Improvement

Yes, Oxlint is faster than ESLint. But the biggest win was the workflow:

  • Before: Pre-commit was slow → After: Pre-commit fast again.
  • Before: Developers skipped lint locally → After: Developers run lint locally.
  • Before: Lint ran mostly in CI → After: Faster feedback loops.

Things to Watch Out For

  • Oxlint auto-fix is more limited than ESLint.
  • ESLint is still required for Angular templates.
  • You will still maintain multiple config files: This is a trade-off for speed.
  • Keep rules separate from orchestration: For larger apps, don’t force everything into vite.config.js.

Who Should Consider This?

Good fit if:

  • You have a large Angular project where ESLint runs are noticeably slow.
  • Your team is starting to bypass pre-commit hooks.

Not necessary if:

  • Your project is small and ESLint is already fast.
  • Your team prefers standard, non-hybrid tooling only.

Final Thoughts

For Angular projects today, the best setup might not be replacing ESLint completely, but splitting responsibilities. Using Oxlint for TS, ESLint for templates, Stylelint for styles, and Vite+ as the orchestrator creates a stack that is faster and easier to reason about. Most importantly, it’s a setup that actually gets used.

🚀 Full boilerplate and working config: angular-viteplus

From Web Developer to Robotics Programmer: My Journey with Matrix 🤖

If you had told me a few months ago that I would write code to control a real robot, I probably wouldn’t have believed you.

I’m a web developer.
HTML, CSS, JavaScript, PHP… that’s my world.

And yet, here I am today, writing Java code to control a robot in one of the most demanding competitions I’ve ever experienced: FIRST Robotics Competition (FRC), with my team Matrix.

Stepping Out of My Comfort Zone

Everything started when I joined the FRC adventure with Matrix.

At the beginning, I had zero experience in robotics.

No knowledge of motors.
No idea how sensors work.
No understanding of how hardware and software interact in real-time systems.

What I did have was:

A strong foundation in programming logic
Curiosity
And the willingness to learn fast

And honestly… that was enough to start.

The First Challenge: Understanding a New World

Robotics is very different from web development.

In web dev:

You refresh a page → you see the result
Errors are usually visible and easy to debug

In robotics:

You write code → upload → test on a real robot
And if something goes wrong… the robot just doesn’t move 😅

I had to learn:

How motors are controlled
How joysticks send inputs
How to use WPILib (Java)
How to structure code for a robot (Command-based programming)

At first, everything felt complex and overwhelming.

But step by step, things started making sense.

The Moment Everything Changed

There is one moment I will never forget.

After hours of coding, testing, fixing errors…
I finally wrote the first piece of code that made the robot move using a joystick.

And when the robot actually responded…

That feeling was something else.

It wasn’t just about making something work.
It was about realizing:

“I just controlled a real machine with code I wrote.”

For a web developer, that’s a completely different level of impact.

More Than Just Code

FRC is not just about programming.

It’s about:

Working under pressure
Collaborating with a team
Solving real-world problems
Adapting quickly

And sometimes… debugging for hours just to fix one small issue.

But that’s where the real learning happens.

What I Learned

This experience taught me lessons that go beyond robotics:

You don’t need to be ready to start
Your skills are transferable, even across completely different domains
Growth happens when you leave your comfort zone
Building real things beats just learning theory
Final Thoughts

I started this journey as a web developer.

Today, I’m still a web developer.
But now, I’m also someone who can:

Understand robotic systems
Write control logic in Java
And bring a machine to life through code

And this is just the beginning.

If you’re hesitating to try something new because “it’s not your field”…

Just start.

You might surprise yourself.

CA 29 – Setup a DNS hosted zone in Route53 in AWS.

Today I learned how to create a DNS hosted zone in AWS. It’s not that hard once you understand the steps.

First, I went to AWS and opened Route 53. Then I clicked on Hosted Zones and selected Create Hosted Zone.

Next, I entered my domain name (like mywebsite.com) and selected Public Hosted Zone. Then I clicked create.

After creating, AWS automatically gave me some NS (Name Server) records and SOA record. These are important.

Now the main step – I went to my domain registrar (where I bought the domain) and updated the nameservers with the ones AWS gave.

After that, I came back to Route 53 and created a record:

Click Create Record
Choose type A record
Add value (like IP address of my server)

Now I saved it.

After some time (DNS takes a little time), I opened my domain in the browser… and it worked