createthings — A Creative System Built on Notion MCP
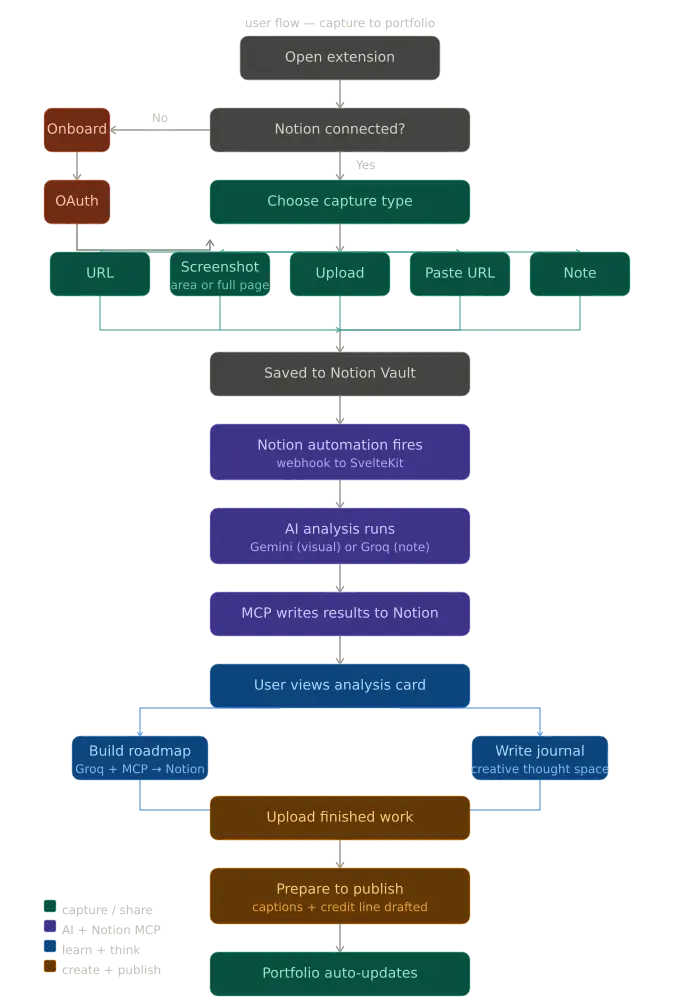
User Flow

This is a submission for the Notion MCP Challenge

What I Built

There is a folder on almost every creative’s computer.

Sometimes it is a bookmark list. Sometimes it is a Pinterest board, a Notion page, a camera roll full of screenshots, or a browser tab that has been open for six weeks. The contents are always the same: things they loved when they found them and have not touched since. Landing pages to be studied. Threads that made them stop scrolling. Interfaces they meant to reverse-engineer. Designs they were going to recreate on the weekend.

The weekend never comes.

I built createthings because I got tired of my own inspiration graveyards.

Also, the more I talked to designers, developers, and content creators, who are my friends and colleagues, the more I realized the graveyard was not the core problem. The core problem was that saving something and acting on it had no connection. There was no bridge between the moment of being inspired and the moment of doing something about it. No thread between the thing that excited you and the work that came out of it. No record of the journey from one to the other.

What I built

createthings is a creative system for designers, developers, and content creators. It lives across two surfaces: a browser extension that captures inspiration from anywhere on the web, and a web app where that inspiration gets analyzed, understood, acted on, and shared with the world.

The core loop is straightforward to describe:

Capture what excites you — a screenshot, a URL, an uploaded image, or even a typed note when the inspiration is more feeling than visual. Analyze it with AI — not just what it looks like but what makes it work, what you can learn from it, what skills it requires. Think through your process in a creative journal tied to every project. Create your own version with an AI-generated brief as your starting point. Publish it to your connected social platforms directly from the app with platform-specific captions and proper credit to the original creator. Share your full creative journey via an auto-generated public portfolio page.

Notion is the backbone of all of it.

I made a deliberate decision early in the build. I did not want Notion to be a sync target or a convenient place to dump data. I wanted it to be the actual brain of the system, the place where everything lives, where the AI pipeline is triggered, where results are written, where the publish queue is managed, and where the portfolio reads from. Every piece of inspiration lives in Notion.

Video Demo

User Flow

Show us the code

sv

Everything you need to build a Svelte project, powered by sv.

Creating a project

If you’re seeing this, you’ve probably already done this step. Congrats!

# create a new project
npx sv create my-app

To recreate this project with the same configuration:

# recreate this project
npx [email protected] create --template minimal --types ts --add prettier eslint vitest="usages:unit,component" playwright tailwindcss="plugins:none" sveltekit-adapter="adapter:auto" mcp="ide:vscode+setup:remote" --install npm ./

Developing

Once you’ve created a project and installed dependencies with npm install (or pnpm install or yarn), start a development server:

npm run dev

# or start the server and open the app in a new browser tab
npm run dev -- --open

Building

To create a production version of your app:

npm run build

You can preview the production build with npm run preview.

To deploy your app, you…

Who It Is For

createthings is built for three types of creators, and the experience adapts to each:

Designers can get a color palette extraction, typography identification, layout and composition breakdown, component analysis, and a Figma export that sends any captured screenshot directly to their Figma workspace as a named frame.

Developers get UI architecture hints, pattern recognition, likely tech stack indicators, and component structure breakdown, the things you want to know when you see an interface you admire and want to understand how it was built.

Content creators get hook analysis, tone breakdown, narrative structure identification, and an explanation of why a piece likely performed well — the things that turn a saved post into a teachable moment.

These three types of creators serve as the starting point, as i still intend to expand to different types of creatives, allowing it to be useful to everyone and anyone

The Feature Set

The Feature Set

Feature What It Does
Browser extension Captures via URL, screenshot (full page or selected area), image upload, URL paste, or typed note
AI analysis Visual and content breakdown — colors, typography, layout, mood, components, attribution
Learning roadmap AI-generated skill path from the analysis — what you need to learn to build something like this
Creative journal Per-project thought space with AI reflection prompts
Publish queue Platform-specific captions drafted by AI — direct share to Twitter/X, LinkedIn, Reddit; one-click copy for Instagram
Remix tagging Inspired by / Remixed from / Recreated — ethical attribution built into every publish
Figma export Sends captured screenshots to Figma as named frames
Portfolio page Auto-generated public page from Notion data, shareable via single link
Stale reminders Smart nudges for inspiration that has been sitting untouched past a threshold
Weekly digest Summary of what was saved, created, published, and learned

The Technical Architecture

Stack: SvelteKit + Svelte 5 (web app + API), Manifest V3 browser extension (Chrome/Firefox/Edge/Safari), Notion as the database layer (six linked databases), Uploadcare for image uploads.

AI: Gemini 2.0 Flash for visual analysis with a fallback chain (→ gemini-2.0-flash-lite → gemini-1.5-flash-8b → OpenRouter free vision → Groq text-only). Groq (llama-3.3-70b-versatile) handles all text generation, roadmaps, captions, and note analysis.

Data flow:

Extension saves a new entry to Notion (status: Pending) — that’s all it does.
A Notion database automation fires a webhook to /api/webhook/notion.
The server routes by capture type: images/URLs go to Gemini (with node-vibrant extracting colors first); notes go straight to Groq.
Results are written back to Notion via the MCP adapter; status updates to Ready.

AI Pipeline

For publishing: captions surface in the Publish Queue. Twitter/LinkedIn/Reddit open compose URLs pre-filled; Instagram copies to clipboard. Clicking Mark Published updates the Notion entry.

Publish Pipeline

The Six Databases

On first connect, all 6 Notion databases are created in one pass to get their IDs, then a second pass links the relations between them — because you can’t create a relation to a database that doesn’t exist yet.

Database Purpose
Inspiration Vault Every saved piece — the source of truth
Analysis Results AI breakdown linked to each inspiration
Roadmaps Learning paths generated from analyses
Projects Work created — linked to inspirations
Publish Queue Drafted and approved social posts
User Profile Preferences, platform connections, Creative DNA

Technology Choices

AI: Gemini 2.0 Flash for vision (generous free tier, reliable structured output) with a 4-model fallback chain so the pipeline survives rate limits. Groq for all text generation because speed matters llama-3.3-70b-versatile keeps roadmap generation under 15 seconds.

Social publishing: Compose URLs instead of OAuth integrations — Twitter, LinkedIn, and Reddit accept pre-filled content as URL params, no API approval needed. Instagram has no compose URL so it falls back to clipboard copy. Ship with what works now, add direct API integrations when you have approvals.

How I Used Notion MCP

I made a rule early in the build: Notion should be the brain of the system, not a sync target. Every intelligent write-back goes through an MCP adapter layer — a set of functions in src/lib/server/notion/mcp.ts that wrap the Notion SDK calls for all agent actions.

The distinction between the REST API layer and the MCP layer is intentional. The REST API handles database operations: creating structure, querying records, and managing schemas. The MCP layer handles agent actions: an AI system reading context from a workspace and writing back purposefully — the same pattern a person working inside Notion would follow.

The Specific Operations

writeAnalysisResults — called after every analysis completes. Creates a page in the Analysis Results database with the full breakdown — color palette, typography notes, layout analysis, mood tags, component identification, attribution — and links it back to the source inspiration entry.

createRoadmap — called when a user requests a roadmap. Creates a structured Notion page in the Roadmaps database — not just a database row, but a full page with sections, skill descriptions, milestone checkboxes, and resource links. The page is created with the correct parent relation to the source inspiration, so the connection is permanent and navigable.

writePublishDrafts — called by the caption generation pipeline. Writes platform-specific captions to the Publish Queue entry — Twitter, LinkedIn, Instagram, Reddit — all with the credit line assembled from the stored attribution data.

updateInspirationStatus — moves entries through their lifecycle: Pending → Ready → Active → Stale → Archived.

Why a Dedicated MCP Layer

This is the question worth answering directly.

When the AI system writes results back to Notion, it is not inserting records — it is making decisions: what to name the page, how to structure the sections, which properties to set, what relations to create, how to format the skill descriptions so they are useful when the user opens the page later. That is an agent action. The MCP layer is the right abstraction for it. The REST API would require pre-specifying every structural decision in code. The MCP layer lets those decisions happen in context.

Having a clean adapter layer also makes the path to the hosted Notion MCP remote server straightforward. Every call goes through one place. The connection is established once per user session with their OAuth token and reused across all operations.

What I Learned

The hardest part was not the AI integration. It was the database setup order.

Notion relations between databases require both databases to exist before you can create the relation. That sounds obvious until you are writing the setup script at 1am and realize you cannot add the relation from Inspiration Vault to Analysis Results until Analysis Results exists — but you also cannot add it to a database you have not created yet. The solution was simple once I saw it: create all six databases first, collect their IDs, then make a second pass to patch the relations in. Two API calls where I wanted one. Not elegant but reliable.

The social API reality was the other hard lesson. I knew Instagram Graph API required Facebook app approval. I knew Twitter/X v2 could take time. What I underestimated was how much value there is in the compose URL approach first — x.com/intent/post, linkedin.com/shareArticle, reddit.com/submit. The user sees exactly what they are about to post. There is no abstraction between the caption and the publish. Add the server-side API integrations when you have time and approvals; start with the compose URLs and let the user be in control.

The thing that surprised me most was the note capture.

I almost cut it three separate times. It felt like scope creep. A text input in a browser extension — what problem does that solve that a notes app does not? I kept it because the use case would not leave me alone: what do you do when the inspiration is not a URL or an image? What do you do when you are in a meeting and you think “I want to make something that feels like the opposite of corporate” and you want to capture that before the meeting ends and you forget?

I also learned that the creative journal resonates more with experienced creators than with beginners. Beginners want to capture and analyze. Experienced creators want to document their process because they know the process is the portfolio, not just the output. That insight is shaping how I think about onboarding — meeting users where they are rather than assuming everyone is ready for the same features at the same time.
Navigating the Future: The Insights from the First American AI Jobs Risk Index

The dawn of artificial intelligence was marked by excitement and trepidation, a dichotomy that continues to frame discussions around technology’s impact on labor markets. As AI capabilities have evolved from the rudimentary algorithms of the past to the sophisticated machine learning applications we see today, the potential disruption of job landscapes cannot be overstated. In an era where automation is increasingly integrated into our daily lives and workplaces, understanding the risk AI poses to American jobs is paramount. Enter Tufts University’s groundbreaking initiative: the first-ever American AI Jobs Risk Index.

This pioneering index offers a quantitative approach to assessing how susceptible various occupations are to the encroaching influence of artificial intelligence. By evaluating factors such as job tasks, skills, and industry dynamics, the Index seeks not just to predict job displacement but also to illuminate the nature of jobs that AI may augment rather than replace. As we analyze the findings and implications of this index, we embark on a journey through the historical evolution of technology’s impact on employment, exploring where we are heading in an increasingly automated world.

The Historical Context of Technology and Employment

A Brief Timeline of Technological Disruption

To understand the current moment, it’s useful to reflect on the historical context of technological disruption. The industrial revolution marked one of the first significant shifts in labor dynamics, with mechanization replacing numerous manual jobs. The introduction of steam power enabled industries to increase production capacity dramatically, resulting in considerable job loss for artisans and craftsmen. Fast forward to the late 20th century, and we see the rise of computers and the Internet fundamentally altering job descriptions across sectors.

“History teaches us that every technological revolution comes with both opportunities and challenges for the labor market.”

The introduction of sophisticated algorithms in recent years represents a new chapter in this long-standing narrative. By processing massive datasets and learning from them, AI systems can now perform tasks previously deemed exclusive to human intelligence. From driving cars to conducting financial audits, the range of functions AI can undertake is expanding rapidly.

The Employment Landscape Pre-AI

Before AI emerged as a dominant force, the labor market was already in flux due to globalization and outsourcing. Many American jobs shifted overseas, leading to an annual decline in manufacturing roles. However, the rise of technology also cultivated new sectors, ushering in jobs in IT, data analysis, and digital marketing. Thus, while certain jobs became obsolete, many new opportunities were created within an evolving landscape.

The Key Insights from the American AI Jobs Risk Index

Overview of the AI Jobs Risk Index

In September 2023, Tufts University released the American AI Jobs Risk Index, a tool designed to quantify the potential impact of artificial intelligence across various industries. The Index evaluates over 800 different occupations, assessing how susceptible each job is to AI-driven automation based on job responsibilities, required skills, and the potential for task augmentation. The findings are particularly enlightening as they reveal not only the jobs at risk but also those that could thrive in an AI-enhanced environment.

Methodology Behind the Index

The methodology employed by Tufts integrates an extensive analysis of labor market data with advanced machine learning techniques. By leveraging data from sources like the Bureau of Labor Statistics and integrating expert input from various fields, the Index classifies jobs based on several criteria:

  • Task Automation Potential: The likelihood that specific tasks within a job can be automated.
  • Skill Requirements: The complexity and nature of skills required for each job function.
  • Industry Adaptability: How adaptable a specific sector is to integrating AI technologies.

This comprehensive approach not only highlights the risks but also sparks discussions on how we can prepare the workforce for an AI-infused future.

“Understanding the risks associated with AI is the first step in adapting our workforce and education systems.”

Findings of the Index

The results of the Index are indeed revealing. Jobs such as data entry clerks, telemarketers, and retail salespersons rank as highly vulnerable to AI-driven automation. Conversely, roles that require complex human interaction—such as healthcare professionals and specialized technicians—demonstrate resilience due to the intricate skills and emotional intelligence required.

Practical Examples: Risk and Resilience

To contextualize these findings, consider the roles of a bank teller vs. a financial consultant. Traditional bank tellers may find their roles diminished as AI-powered kiosks and mobile banking solutions take over routine transactions. Fintech companies are already using AI to streamline customer service interactions, allowing users to complete tasks via chatbots or smart applications without human intervention.

In stark contrast, financial consultants benefit from AI integration. They can leverage predictive analytics to provide clients with personalized investment strategies, thus enhancing the advisory role rather than replacing it. Here, AI serves to augment human capabilities, enabling workers to focus on higher-level analytical tasks rather than mundane processing.

Implications for Education and Workforce Development

Evolving Skillsets for the Future

The historical evolution of labor markets reveals a common theme: adaptation. As AI technologies reshape job functions, it becomes increasingly vital for educational institutions to pivot their curricula toward skills that emphasize creativity, empathy, and critical thinking. The American AI Jobs Risk Index serves as a roadmap for identifying which skills will be in demand, allowing educational frameworks to adapt accordingly.

For instance, vocational training programs may begin to emphasize competencies in data analytics and basic machine learning principles. Similarly, colleges and universities can integrate interdisciplinary studies to foster a blend of technical prowess and soft skills, preparing graduates for the hybrid roles of the future.

“Educational institutions are at a crossroads, tasked with redefining curricula to meet the challenges posed by AI.”

Reassessing Workforce Policies

The findings of the Index also urge policymakers to reassess workforce initiatives. As AI’s presence grows, government programs must facilitate transitions for displaced workers. This could involve investing in retraining programs focused on high-demand skills or supporting industries poised for growth in the face of technological disruption.

The Trade Adjustment Assistance Program, for example, serves as a model for how to assist workers navigating these changes. By building on this foundation, we can create robust support systems that empower displaced individuals to transition into new roles and industries.

The Ethical Considerations of AI in the Workforce

Addressing Bias and Inequality

While the American AI Jobs Risk Index provides a sobering look at the risks posed by automation, it also raises ethical questions. One of the core challenges lies in ensuring that AI technologies are designed and implemented equitably. Disparities in access to education and technology can exacerbate existing inequalities, particularly for marginalized groups who may be more vulnerable to job displacement.

“The deployment of AI must be accompanied by a commitment to equity and justice in the workforce.”

Addressing these biases requires a concerted effort among corporations, policymakers, and educators. Without conscious intent to incorporate diverse perspectives in AI development, we risk entrenching existing societal inequalities and creating new barriers for upward mobility.

The Need for Collaboration

The evolution of the workforce demands collaboration among various stakeholders—business leaders, educators, researchers, and policymakers. By working together, all parties can identify emerging trends, anticipate necessary adjustments to skill requirements, and craft policies that not only mitigate job loss but also foster job creation.

Conclusions

As we stand on the precipice of an AI-driven future, the American AI Jobs Risk Index provides a crucial lens through which to view the evolving workforce landscape. By grasping the historical context of technological disruption and understanding the Index’s findings, we can navigate the complex implications of AI’s rise in the labor market.

The journey ahead will undoubtedly require proactive measures to ensure that workers are equipped with the necessary skills, that education systems adapt swiftly, and that policies are developed to support those most at risk. The Index serves as a call to action—a reminder that while technological advancement can be disruptive, it can also herald opportunities if approached with foresight and intentionality.

As we forge ahead into this new epoch, let us remember that the future of work is not predetermined by technology but shaped by the choices we make today. By engaging in thoughtful dialogue, embracing change, and prioritizing equitable solutions, we can create a workforce prepared not just to survive in the age of AI but to thrive.

How We Made Our Supabase RLS Migrations Idempotent (And Why You Should Too)

The Problem

You write a Supabase migration, it runs fine locally. You push to staging — fine. Then you need to re-apply it (rollback test, fresh CI environment, or a teammate cloning the repo) and suddenly:

ERROR: policy "Users can view own stitched exports" for table "stitched_exports" already exists

PostgreSQL’s CREATE POLICY (and CREATE INDEX) doesn’t have an IF NOT EXISTS guard. So if your migration runs twice, it blows up.

This hit us in ClipCrafter when working on a new stitched_exports table. Here’s the before:

CREATE INDEX stitched_exports_project_id_idx ON stitched_exports(project_id);

ALTER TABLE stitched_exports ENABLE ROW LEVEL SECURITY;

CREATE POLICY "Users can view own stitched exports"
  ON stitched_exports FOR SELECT
  USING (
    EXISTS (
      SELECT 1 FROM projects
      WHERE projects.id = stitched_exports.project_id
        AND projects.user_id = auth.uid()
    )
  );

CREATE POLICY "Service role full access to stitched_exports"
  ON stitched_exports FOR ALL
  USING (auth.role() = 'service_role')
  WITH CHECK (auth.role() = 'service_role');

Running this twice errors out on both the index and both policies.

The Fix: IF NOT EXISTS and DO $$ BEGIN Blocks

For the index, PostgreSQL 9.5+ supports IF NOT EXISTS natively:

CREATE INDEX IF NOT EXISTS stitched_exports_project_id_idx ON stitched_exports(project_id);

For RLS policies, there’s no IF NOT EXISTS syntax — but you can use a DO block to query pg_policies first:

DO $$ BEGIN
  IF NOT EXISTS (
    SELECT 1 FROM pg_policies
    WHERE tablename = 'stitched_exports'
      AND policyname = 'Users can view own stitched exports'
  ) THEN
    CREATE POLICY "Users can view own stitched exports"
      ON stitched_exports FOR SELECT
      USING (
        EXISTS (
          SELECT 1 FROM projects
          WHERE projects.id = stitched_exports.project_id
            AND projects.user_id = auth.uid()
        )
      );
  END IF;
END $$;

DO $$ BEGIN
  IF NOT EXISTS (
    SELECT 1 FROM pg_policies
    WHERE tablename = 'stitched_exports'
      AND policyname = 'Service role full access to stitched_exports'
  ) THEN
    CREATE POLICY "Service role full access to stitched_exports"
      ON stitched_exports FOR ALL
      USING (auth.role() = 'service_role')
      WITH CHECK (auth.role() = 'service_role');
  END IF;
END $$;

Now the migration is safe to run multiple times — idempotent.

Why This Matters More Than You Think

Supabase migrations are applied sequentially and each migration file is tracked in supabase_migrations.schema_migrations. If a migration was never tracked (maybe it was applied manually during a late-night debug session), running supabase db push will try to apply it again and fail mid-way.

Idempotency makes your migration resilient to:

  • CI from a clean state — fresh Supabase project for every PR preview
  • Manual hotfixes — you applied a fix directly in prod SQL editor, then later git pull tries to run it again
  • Team member onboarding — new dev clones the repo, runs supabase db reset, it should just work
  • Rollback + re-apply — especially common in pre-launch projects that are still iterating on schema

The General Pattern

Here’s a reusable template for idempotent RLS policy creation:

-- Tables
CREATE TABLE IF NOT EXISTS your_table (...);

-- Indexes
CREATE INDEX IF NOT EXISTS your_index_name ON your_table(column);

-- RLS
ALTER TABLE your_table ENABLE ROW LEVEL SECURITY;

-- Policies (wrap each in a DO block)
DO $$ BEGIN
  IF NOT EXISTS (
    SELECT 1 FROM pg_policies
    WHERE tablename = 'your_table' AND policyname = 'Your Policy Name'
  ) THEN
    CREATE POLICY "Your Policy Name"
      ON your_table FOR SELECT
      USING (user_id = auth.uid());
  END IF;
END $$;

One More Tip: CREATE TABLE IF NOT EXISTS + ALTER TABLE

If your migration also runs ALTER TABLE to add columns, use IF NOT EXISTS there too (PostgreSQL 9.6+):

ALTER TABLE your_table ADD COLUMN IF NOT EXISTS new_column TEXT;

This covers the case where someone manually ALTER-ed the table in production before the migration was tracked.

Takeaway

Make every migration idempotent from day one. The cost is a few extra lines per policy; the benefit is never having a broken CI or a tense production deploy because a migration ran twice. In Supabase specifically, wrapping CREATE POLICY in DO $$ BEGIN ... IF NOT EXISTS ... END $$; blocks is the only way to get this guarantee.

It’s a small discipline that saves a lot of pain.

Durablity

Durability means once a transaction is successfully committed, its changes are permanently saved in the database. Yes, even when the system crashes, power failure or any other and this relaiblity in transaction is possible in databases like postgresql by WAL( Write Ahead Logs) where Before making actual changes, they first record the transaction in a log file. This way even if the system crashes before executing, the queries can be retrieved to execute them

In case of Wallet systems
Once money is transferred and confirmed, it will always be reflected and there is No risk of losing completed transactions and records for the user

BEGIN;

UPDATE accounts 
SET balance = balance - 100 
WHERE name = 'Alice';

COMMIT;

i was burning a ton of tokens on silly stuff

has anyone else noticed they’re chewing through claude tokens way faster than they should be? anthropic just announced they’re tightening the 5-hour session limits during peak hours and it made me actually look at where my tokens were going.

turns out most of it was waste. claude was reading files it had no reason to read like lock files, build artifacts, node_modules, coverage reports, media files. every time it explored the codebase it was burning tokens on stuff that would never help it write better code.

i added a .claudeignore file:

# Dependencies
node_modules/
.pnp.*

# Build artifacts
.next/
out/
build/
dist/

# Lock files (huge, no value to read)
package-lock.json
pnpm-lock.yaml
yarn.lock

# Minified bundles
*.min.js
*.min.css

# Generated code
next-env.d.ts
*.tsbuildinfo

# Caches
.cache/
__pycache__/
coverage/

# Environment / secrets
.env*
.vercel/

# Large non-code files
*.gif
*.mov
*.mp4
*.png
*.jpg

it works like .gitignore but for claude’s file exploration. claude won’t read or search anything that matches.

the other thing that helps is keeping CLAUDE.md lean. mine is about 145 lines with architecture essentials, key conventions, common gotchas. not a novel. every line of CLAUDE.md gets loaded into context at the start of every conversation, so bloat there costs you tokens on every single interaction.

i’m still seeing how much this helps. they’re obviously just clamping down.

if you’re on the Max plan and it still feels like you’re burning through it, check what claude is actually reading. you might be feeding it your pnpm-lock.yaml on every exploration.

markdown edited in ginsberg.ai

How I built a browser-based n8n workflow generator using Gemini AI

I kept hitting the same friction point while working
with n8n — every time I had a quick workflow idea,
I had to open my n8n instance, hunt for the right
nodes, wire them up manually, just to prototype
something that might not even work.

So I built a small tool to fix that.

What it does

A single HTML file that runs entirely in your browser.
You paste your free Gemini API key, describe your
workflow in plain English, and it generates n8n-
compatible workflow JSON you can import directly.

No server. No backend. No n8n instance needed to
generate the workflow.

How it works

The tool sends your plain English prompt to the
Gemini API with a system prompt engineered to output
valid n8n workflow JSON — correct node types,
parameters structure, and connections format.

The key challenge was getting Gemini to output JSON
that n8n actually accepts on import. n8n’s workflow
JSON has a specific structure — nodes need correct
typeVersion, position arrays, and the connections
object needs to map node names exactly.

After several iterations the output imports cleanly
with nodes and connections intact. Credentials are
intentionally excluded — n8n never stores credentials
in workflow JSON anyway, so users connect their own
after import as usual.

What’s included

  • The HTML generator tool (BYOK Gemini API)
  • 5 ready-to-import workflow JSON files:
    • Slack → Google Sheets logging
    • Gmail → Drive attachment backup
    • RSS → Twitter/X auto-post
    • Typeform webhook router
    • Notion → email digest

Try it

If you’re an n8n user who wants a faster prototyping
experience outside your instance, the pack is
available here: https://gum.new/gum/cmnbl4rwm000a04jicqkiatrf

This post was written with AI assistance.

I got tired of Googling Docker commands, so I built an interactive cheatsheet

Let me paint you a picture.

It’s late. You’re writing a Dockerfile. You’re in the zone — the kind of focus where you’re actually moving fast and everything is clicking. You type HEALTHCHECK and your fingers pause.

Is it --interval or --period? And what’s the timeout default again? Is there a --start-period flag or did you make that up?

You open a new tab.

You type “dockerfile healthcheck options” into Google.

The first result is a Stack Overflow answer from 2017. The accepted answer is wrong. The second answer is right but references a flag that was renamed. You scroll past three more answers, open the official Docker docs, find the right section, get your answer, close five tabs, and try to remember where the hell you were.

Three minutes gone. Flow state: destroyed.

I’ve been doing this for years. And I finally got annoyed enough to do something about it.

What I built

Docker Hub is a free, open-source interactive cheatsheet for all 18 Dockerfile instructions. It lives in your browser, works offline, needs no login, and exists for one reason: so you never have to leave your editor to look up a Docker command again.

Here’s the layout — three panels, all visible at once:

┌──────────────┬──────────────────────────┬──────────────┐
│  Cheatsheet  │   Interactive Dockerfile  │  Deep Dive   │
│   + search   │    (hover any keyword)    │  Reference   │
└──────────────┴──────────────────────────┴──────────────┘

Left panel — the cheatsheet

All 18 instructions, grouped by category, with a real-time search bar and category filter pills. Hover any instruction card and you get an instant tooltip summary. Click it and the right panel updates.

Center panel — the interesting part

This is what I actually wanted to exist. It’s a realistic, multi-stage Node.js production Dockerfile rendered with token-level syntax highlighting. Every instruction keyword — FROM, RUN, COPY, HEALTHCHECK, all of them — is a hoverable, clickable span.

Hover HEALTHCHECK and you get a popover right there:

  • What it does
  • All its options (--interval, --timeout, --start-period, --retries)
  • A live code example
  • A link to the full reference

No new tab. No context switch.

Right panel — the full reference

Click any keyword and the right panel shows you everything:

  • Full description in readable prose
  • All syntax variants
  • A parameter table (type, required, default, and a BuildKit badge for flags that need it)
  • Multiple copy-ready code examples
  • A layer info strip (creates a layer? persists in image? runtime override flag?)
  • Related instructions you can jump to directly

The tech (keeping it boring on purpose)

This is a Next.js app with Tailwind CSS. That’s basically it.

There’s no backend. No database. No external API calls. The entire knowledge base is a single well-structured DATA.json file that gets imported at build time.

// lib/data.ts
import data from '../DATA.json'

export function getInstructionById(id: string): Instruction | undefined {
  return data.instructions.find(i => i.id === id)
}

export function searchInstructions(query: string): Instruction[] {
  const q = query.toLowerCase()
  return data.instructions.filter(i =>
    i.name.toLowerCase().includes(q) ||
    i.summary.toLowerCase().includes(q) ||
    i.tags.some(t => t.includes(q))
  )
}

The center panel’s syntax highlighting is a custom tokenizer — not Prism, not Shiki, not any heavy library. Just a function that splits each Dockerfile line into typed tokens:

type TokenType = 'keyword' | 'flag' | 'string' | 'comment' | 'path' | 'plain'

interface Token {
  type: TokenType
  value: string
  instructionId?: string  // links keywords to DATA.json
}

function tokenizeLine(line: string): Token[] {
  if (line.trim().startsWith('#')) {
    return [{ type: 'comment', value: line }]
  }
  // first word = keyword if it matches a known instruction
  // --word = flag
  // /word or ./word = path
  // "word" = string
  // everything else = plain
}

Simple, fast, zero dependencies. Perfect for what we need.

The DATA.json schema — the real project

I want to talk about this because it’s where most of the work actually went.

Each instruction in the JSON has a full semantic schema:

{
  "id": "healthcheck",
  "name": "HEALTHCHECK",
  "summary": "Defines a command to test container health",
  "description": "Full prose description...",
  "deprecated": false,
  "syntax": [
    "HEALTHCHECK [OPTIONS] CMD <command>",
    "HEALTHCHECK NONE"
  ],
  "layer": {
    "createsLayer": false,
    "persistsInImage": true,
    "overridableAtRuntime": true,
    "runtimeFlag": "--health-cmd, --health-interval"
  },
  "parameters": [
    {
      "name": "--interval",
      "type": "duration",
      "required": false,
      "default": "30s",
      "buildkitOnly": false,
      "description": "Time between health checks"
    }
  ],
  "examples": [
    {
      "id": "healthcheck-http",
      "title": "HTTP endpoint check",
      "description": "Check a health endpoint with curl",
      "code": "HEALTHCHECK --interval=30s --timeout=10s --start-period=5s --retries=3 \n    CMD curl -f http://localhost:8080/health || exit 1"
    }
  ],
  "relatedInstructions": ["CMD", "ENTRYPOINT", "EXPOSE"],
  "tags": ["health", "monitoring", "check", "liveness"],
  "category": "runtime"
}

This schema is the reason the whole app is easy to contribute to. If you find a wrong example, a missing parameter, or a flag I forgot — you literally just edit the JSON and open a PR. You don’t need to understand Next.js, React, or anything about the app. Just find the instruction, fix the data, ship it.

That was an intentional design decision. I wanted the knowledge base to be community-maintained without requiring any contributors to touch application code.

Things I learned building this

1. Token-level interactivity is a surprisingly underused pattern.

Most syntax highlighters treat code as display-only. Making each token interactive — hoverable, clickable, state-driving — forced me to think about the rendering differently. Instead of a <pre> tag, each line is an array of <span> elements with event handlers. Feels obvious in retrospect.

2. A JSON schema is a product decision, not a technical one.

I spent more time thinking about the shape of DATA.json than I did writing component code. Getting the schema right — deciding what fields an Example needs, how parameters should be typed, how to represent the CMD+ENTRYPOINT interaction matrix — was the hard part. The React components were almost mechanical after that.

3. Tooltip positioning is an unsolved problem and I respect Floating UI more now.

My first tooltip implementation overflowed the viewport constantly. The second one flickered. The third one used getBoundingClientRect() + a viewport-edge detection check and finally worked. I should’ve just used Floating UI from the start.

4. “No backend” is a feature, not a constraint.

Every time I was tempted to add a server route (“for search”, “for analytics”, “for saving custom Dockerfiles”), I asked myself: can this be done in the client with the static data? The answer was always yes. Keeping it fully static means it deploys anywhere, works offline, and has zero ongoing infrastructure cost.

What’s next

A few things I want to add:

  • Custom Dockerfile input — paste your own Dockerfile and get it syntax-highlighted interactively with the same hover system
  • Docker Compose reference — same format, for docker-compose.yml keys
  • BuildKit toggle — hide/show BuildKit-only parameters to reduce noise for people on older Docker versions
  • Print export — a single-page PDF cheatsheet you can pin above your monitor

If any of those sound interesting to you, contributions are very welcome.

Try it / contribute

🐳 Live site: dockerhub
📦 GitHub: github.com/iakashpattnaik/docker_hub

The fastest way to contribute is to open DATA.json, find an instruction you know well, and improve its description, examples, or tags. That alone is enormously valuable.

If you find a bug, spot a wrong parameter, or think an instruction needs a better example — please open an issue or just send a PR directly. The bar is intentionally low.

And if this saves you even one “dockerfile COPY –chown syntax” Google search — that’s the whole point.

Happy shipping. 🚀

CA 31 – Select Queries from DVD Rental database

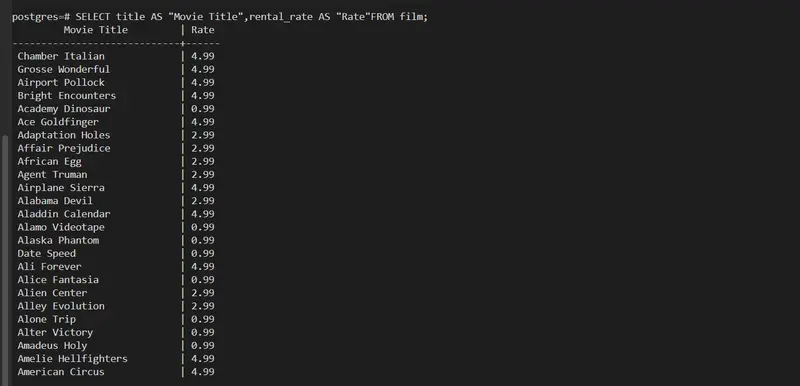
Retrieve film titles and their rental rates. Use column aliases to rename title as “Movie Title” and rental_rate as “Rate”.

SELECT title AS “Movie Title”,rental_rate AS “Rate”FROM film;

Here,title is renamed into Movie Title amd rental_rate is renamed into Rate from film table and to show the output.

List customer names and their email addresses. Alias first_name and last_name as “First Name” and “Last Name”.

SELECT first_name AS “First Name”,last_name AS “Last Name”,email FROM customer;

Here, first_name is ranamed into First Name and last_name as Last Name and fetch the email from the customer table.

Get a list of films sorted by rental rate in descending order. If two films have the same rental rate, sort them alphabetically by title.

SELECT title,rental_rate FROM film ORDER BY rental_rate DESC,title ASC;

Here, title and rental_rate to be fetch from film table and to order the rental_rate to descending order and title as ascending order.

Retrieve actor names sorted by last name, then first name.

SELECT first_name,last_nameFROM actor ORDER BY last_name ASC,first_name ASC;

Here, the first_name and last_name to be fetch from actor table and to order the last name and first name in asccending order.

List all unique replacement costs from the film table.

SELECT DISTINCT replacement_cost FROM film;

Here, the we need to fetch the unique replacement_cost from the film table so we used DISTINCT in the query.

List all films’ title and length in minutes. Alias length as “Duration (min)”.

SELECT title,length AS “Duration (min)”FROM film;

Here, from film table the title and the length data to be fetch and to rename the length as Duration(min) so we use length AS “Duration (min)”.

Retrieve customer first and last names along with their active status. Alias active as “Is Active”.

SELECT first_name,last_name,active AS “Is Active” FROM customer;

Here,the first_name, last_name and active from customer table and to rename the active to Is Active so we use active AS “Is Active”.

Retrieve the list of film categories sorted alphabetically.

SELECT name from category order by name ASC;

Here, to take the list of film name from caregory and to sort the film name in ascending order.

List films by length, sorted in descending order. Include only the title and length.

SELECT title lenght FROM film ORDER BY title DESC,length DESC;

Here, list all the title and length from film and to order the title and lenght by descending order.

Retrieve all actor names, sorted by their first name in descending order.

SELECT first_name FROM actor ORDER BY first_name DESC;

Here,from actor table the first_name to be fetch and to order it by descending order.

List all unique ratings available in the film table.

SELECT DISTINCT rating FROM film;

Here,for the unique rating we are using DISTINCT to get unique rating from film table.

Find all unique rental durations from the film table.

SELECT DISTINCT rental_duration FROM film;

Here,for the unique rental_duation we are using DISTINCT to get unique rental_duration from film table.

Retrieve the first unique customer ID based on active status. Include the customer_id and active columns, and order by customer_id.

SELECT DISTINCT ON (active)customer_id,active FROM customer ORDER BY active,customer_id;

Here,we are fetching the data from customer which must give unique customer_id which must be active that means this query gives the customer_id which are in active.

List the earliest rental date for each customer. Include customer_id and rental_date, and order by customer_id.

SELECT customer_id,MIN(rental_date) AS rental_date FROM rental GROUP BY customer_id ORDER BY customer_id;

Here, we need to fetch the earliest rental data so we are using MIN(rental_date) and also including the customer_id and rental_date which must be in the order of customer_id from rental table.

List the 10 shortest films by length. Include the title and length.

SELECT title,length FROM film LIMIT 10;

Here, we need to fetch the title, length from the film table and it should be shortest of 10 films so using LIMIt 10.

Retrieve all unique values of store_id from the inventory table.

SELECT DISTINCT store_id FROM inventory;

Here, we need to fetch unique store_id from inventory table so we are using DISTINCT store_id.

Find all unique replacement_cost values in the film table. Sort the results in ascending order.

SELECT DISTINCT replacement_cost FROM film ORDER BY replacement_cost ASC;

Here, we need to select unique replacement_cost from film table and that cost should be in ascending order, for unique replacement_cost we are usihg DISTINCT replacement_cost in the query.

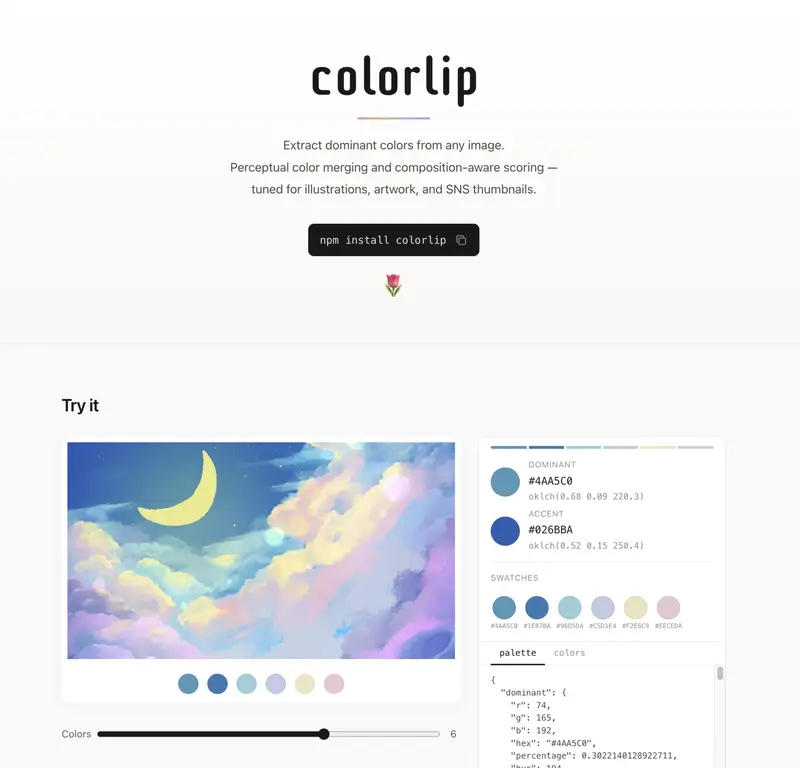
colorlip: A JavaScript library for extracting perceptually representative colors from illustrations and photos

try colorlip

Hey everyone, I’m nazunya!

A while ago, I was building a local service for collecting illustrations and reference images. At that time, I created a color extraction feature to obtain colors that represent those illustrations and photos. It turned out surprisingly well, so I decided to extract it into a library.

I have released v1.0.0 as an npm package called colorlip, and I’d like to share it with you!

Quick Overview!

  • A lightweight library available for browsers and Node.js that extracts representative colors and palettes based on human perception.

  • Tuned for illustrations and product photos, making it ideal for creator-focused services, social media, and e-commerce sites.

  • In addition to Hex and RGB, it outputs HSL, Lab, oklch, and more, which is convenient for post-processing and browser-based usage.

Try it out right now:
https://na-zu-nya.github.io/colorlip/

GitHub:
https://github.com/na-zu-nya/colorlip

try colorlip

Motivation

While building a service to organize illustrations and other media, I was developing a mechanism to extract representative colors so that users could collect images with similar color schemes.

I tried using the average color and existing well-known libraries like Color Thief and node-vibrant, but I ran into the following issues:

  • The background color had too much influence.
  • It would pick up unexpected colors.
  • The results did not match the perceived atmosphere of the colors.

Since existing solutions are designed to be general-purpose, they felt a bit lacking when applied to illustrations and artwork.

I decided to create a library that is tailored to anime and manga-style illustrations, one that can accurately output the colors that perceptually define an illustration, while also being reasonably fast.

How color extraction works

If you’re curious about the nitty-gritty, here’s a breakdown!

In short, it works by downsampling the image to get a feel for its features first. Then, it quantizes the pixels into RGB and groups them in Lab color space. After that, it scores the colors based on things like whether they’re toward the center, the edges, or spread out, to build a palette. Finally, it picks the representative and accent colors from that palette.

How color extraction works (click to expand)

  • Resize the image to 150×150.
    • If using core, raw pixels can be used directly.
  • Perform stride sampling to estimate the median and spread of overall saturation, and whether edges are concentrated in the center or distributed throughout the image.
    • We infer that images with distributed edges are likely photographs or motifs extending to the periphery, while those with edges concentrated in the center likely have the subject in the middle.
    • This information is used in subsequent steps to adjust the weighting of central versus peripheral colors.
  • Filter by truncating alpha values below 0.5, and by applying lower bounds for saturation and a specific range of lightness.
    • This removes noise and white background colors.
  • Quantize pixels and apply weights that incorporate centrality, edge intensity, saturation, and alpha.
  • Merge similar colors in Lab space to create clusters.
    • We use Lab space, which is closer to human perception, because grouping in RGB space tends to merge colors that are perceptually distant.
    • Also, since converting all pixels to Lab space is computationally expensive, we perform quantization in RGB first.
  • Score these clusters based on the weights.
    • Using only occurrence frequency tends to favor colors spread across the entire image, so we utilize the weights calculated in the previous steps.
    • We determine the score by building on those previous weights and applying factors for centrality ratio, peripheral ratio, center of gravity, variance, and accent suitability.
  • Merge similar colors by checking color differences.
    • This prevents the palette from consisting only of similar shades of a specific color.
  • Finally, pick dominant and accent colors to create a palette.
    • For dominant colors, we reference the scores and re-evaluate the top candidates based on their original scores, weights, and whether they stand out in the OKLCH color space.
    • For accent colors, we select candidates that are sufficiently distant from the dominant colors and likely to be visually appealing.

How’s this different from other libraries?

Most existing libraries rely on standard quantization algorithms to pick representative colors based on their frequency. A lot of them use MMCQ, which reduces color counts to find a palette. At its core, MMCQ is a straightforward compression and summarization tool—it gathers colors, chunks them into boxes in RGB space, and picks the winners.

colorlip takes a more practical, hands-on approach:

  • It analyzes the image’s composition and edge distribution.
  • It figures out which parts of the image are focal points versus the background.
  • It clears out colors that look like noise.
  • It groups together colors that actually look similar to the human eye.
  • It rates colors based on which ones dominate the scene and which ones act as accents.

Instead of just summarizing data, it’s more like it’s “curating” the colors. It’s a bit more heuristic and goes a step beyond typical image processing. While that makes it a little less “one-size-fits-all” than generic libraries, I think it’s reached a point where it’s genuinely useful for real-world tasks.

It should work great for things like:

  • Character art and illustrations
  • Product thumbnails
  • Extracting UI themes
  • Images where the subject is clearly distinct from the background

If you’re working with these kinds of images, colorlip should be a solid choice.

Comparison

I’ve compared the speed and color extraction results of this library in comparison to other well-known ones.
Please note that each library has different uses and purposes, so take this as a rough comparison rather than a definitive benchmark.
I hope this will serve as a reference for your library selection.

First, here are the comparison results for photos.

Comparison of landscape photos

Comparison of snapshots

While there isn’t a massive difference, by picking up dominant and accent colors, I believe it captures the general impression quite well.

Next are the illustrations. I’m using my own artwork here since I couldn’t find freely available sample illustrations. I have tested it with various illustrations for verification, and the results have been generally positive.

Comparison of illustrations

There are also benefits in terms of speed; if semantic colors are not required, colorlip shows almost no difference in execution time compared to other lightweight libraries, and I believe it provides better results.
It can be used for batch processing on the server side as well as for quickly picking colors in the browser, which means smoother UX in the browser.

Summary

Please give it a try! I hope you like the library. 🌷

I’m also working on a web app called paletty.cc — it’s a palette manager built on colorlip, currently in beta.

https://paletty.cc

Thanks for reading!