
7 Mistakes Developers Make When Integrating DEX Swaps

DEX swap volume crossed $250 billion per month in early 2026, and more of that volume is being routed programmatically through aggregator APIs. But integrating a swap API is not the same as calling a REST endpoint that returns JSON. The response contains raw transaction calldata destined for an on-chain router contract, and every field matters. Mishandle one and your transaction reverts, your user loses gas, or worse — they get a terrible price.

These 7 mistakes show up repeatedly in production codebases. Each one has caused real on-chain losses, and each one is straightforward to fix.

1. Not Checking priceImpact Before Executing

The swap API returns a priceImpact field as a decimal. A value of -0.0012 means -0.12% — a normal cost of trading. A value of -0.15 means -15% — your user is about to lose 15% of their trade to thin liquidity.

Chainalysis estimated that price impact losses exceeded $900 million across DeFi in 2025, largely from automated systems executing swaps without checking this field.

const res = await fetch("https://api.swapapi.dev/v1/swap/1?tokenIn=0xEeeeeEeeeEeEeeEeEeEeeEEEeeeeEeeeeeeeEEeE&tokenOut=0xA0b86991c6218b36c1d19D4a2e9Eb0cE3606eB48&amount=1000000000000000000&sender=0xYourAddress");
const { data } = await res.json();
if (data.priceImpact < -0.05) throw new Error("Price impact too high");

Set a threshold. For most applications, rejecting swaps with priceImpact worse than -5% is a reasonable default. For large trades, tighten it to -1%.

2. Ignoring the Partial Status

A swap API returning HTTP 200 does not mean you got a full fill. The response can have three status values: Successful, Partial, and NoRoute. All three return HTTP 200.

A Partial status means only part of your requested amount can be filled. The amountIn and expectedAmountOut in the response reflect the partial amount, not what you originally asked for. If you blindly execute without checking, you swap less than intended and may leave your application in an inconsistent state.

if (data.status === "NoRoute") throw new Error("No route found");
if (data.status === "Partial") {
    const filled = BigInt(data.amountIn);
    const requested = BigInt("1000000000000000000");
    console.log(`Partial fill: ${(filled * 100n) / requested}%`);
}

When you get a Partial response, you have three options: execute the partial swap as-is, reduce your amount to match and re-request, or try a different token pair. Do not retry the same amount in a loop — the liquidity cap will not change.

3. Hardcoding Gas Limits

Etherscan data shows that roughly 12% of failed transactions on Ethereum in 2025 ran out of gas. Multi-hop swap routes use significantly more gas than simple transfers. A direct ETH-to-USDC swap might use 150,000 gas, while a three-hop route through intermediate pools can exceed 500,000.

The swap API response does not include a gasLimit field — intentionally. Gas requirements vary by route complexity, network congestion, and contract state. You must estimate it yourself.

const gasEstimate = await provider.estimateGas(data.tx);
const gasLimit = (gasEstimate * 120n) / 100n;

Always call eth_estimateGas with the transaction object and add a 20% buffer. If eth_estimateGas fails, the swap would revert on-chain. Do not submit the transaction.

4. Skipping eth_estimateGas and eth_call Pre-flight

This is related to the gas mistake above but goes further. Many developers skip pre-flight simulation entirely and submit the transaction directly. When it reverts, the user pays gas for nothing.

A 2025 Blocknative study found that 8.4% of DEX transactions on Ethereum reverted, costing users over $42 million in wasted gas fees in a single quarter. Most of these reverts were detectable before submission.

The fix is a two-step simulation using eth_estimateGas and eth_call:

const estimate = await provider.estimateGas(data.tx);
const result = await provider.call(data.tx);

eth_estimateGas tells you whether the transaction will run out of gas. eth_call simulates the full execution and catches reverts from insufficient balance, missing approvals, or expired deadlines. Both calls are free — they consume no gas. If either fails, do not submit.

5. Not Handling ERC-20 Approvals

When swapping native ETH, no approval is needed — the value is sent directly with the transaction. But when swapping an ERC-20 token, the sender must first approve the router contract to spend the input tokens. Skip this step and the transaction reverts immediately.

The router address to approve is data.tx.to from the swap response. The amount must be at least amountIn.

const tokenContract = new ethers.Contract(tokenIn, ["function approve(address,uint256)"], signer);
await tokenContract.approve(data.tx.to, data.amountIn);

Two critical details developers miss. First, USDT on Ethereum requires setting the allowance to 0 before setting a new non-zero allowance — a quirk of its contract implementation. Second, you must wait for the approval transaction to be confirmed before fetching a fresh swap quote. The calldata is time-sensitive (30 seconds), so reuse of a stale quote after a slow approval confirmation will cause a revert.

6. Using Stale Calldata Past the Deadline

Swap calldata includes an on-chain deadline, typically 30 seconds from the time the quote was generated. After that window, the router contract rejects the transaction. This is a safety mechanism — prices shift, and executing a stale quote could mean a worse fill.

Research from Flashbots showed that the median Ethereum block time is 12 seconds, meaning a 30-second deadline gives you roughly 2-3 blocks. In practice, if your application fetches a quote, waits for user confirmation in a UI, then submits, you can easily exceed this window.

The fix is simple: fetch the quote as late as possible in your flow.

const freshQuote = await fetch(`https://api.swapapi.dev/v1/swap/1?tokenIn=0xEeeeeEeeeEeEeeEeEeEeeEEEeeeeEeeeeeeeEEeE&tokenOut=0xA0b86991c6218b36c1d19D4a2e9Eb0cE3606eB48&amount=1000000000000000000&sender=0xYourAddress`);
const { data } = await freshQuote.json();
await signer.sendTransaction(data.tx);

If you have a multi-step flow (approval, then swap), fetch a new quote after the approval confirms rather than reusing the original. For automated systems, always re-fetch immediately before submission.

7. Using Wrong Token Decimals for Amount Calculation

This is the most common mistake for developers new to DeFi. Different tokens use different decimal precision. ETH uses 18 decimals, USDC uses 6 on Ethereum, and USDT uses 18 on BSC but 6 on Ethereum. Getting this wrong means you swap 1,000,000x more or less than intended.

The amount parameter in the API expects the raw amount in the token’s smallest unit. To swap 1 ETH, you pass 1000000000000000000 (1 * 10^18). To swap 100 USDC on Ethereum, you pass 100000000 (100 * 10^6).

const decimals = 6;
const humanAmount = 100;
const rawAmount = BigInt(humanAmount) * 10n ** BigInt(decimals);

The swap API response includes tokenFrom.decimals and tokenTo.decimals, so you can always verify. Use these response fields to convert expectedAmountOut back to a human-readable number: divide by 10^decimals.

Mistake vs. Fix: Quick Reference

Mistake What Goes Wrong Fix
Ignoring priceImpact User loses 10%+ on thin liquidity Reject if priceImpact < -0.05
Not checking Partial status Swap less than intended Check data.status before executing
Hardcoding gas limits Out-of-gas revert, user pays gas for nothing eth_estimateGas + 20% buffer
Skipping pre-flight simulation Revert on-chain, wasted gas eth_estimateGas + eth_call before submit
Missing ERC-20 approval Immediate revert Approve data.tx.to for amountIn first
Stale calldata Deadline expired, transaction rejected Re-fetch quote within 30s of submission
Wrong decimals Swap wrong amount by orders of magnitude Use token’s decimals field for conversion

FAQ

What slippage should I set for DEX swaps?
The default 0.5% (maxSlippage=0.005) works for most liquid pairs. For low-liquidity or fee-on-transfer tokens, increase to 1-3%. The minAmountOut in the response is calculated as expectedAmountOut * (1 - maxSlippage) — the transaction reverts if the actual output falls below this.

How do I know if a token needs approval?
If tokenIn is the native gas token (0xEeeeeEeeeEeEeeEeEeEeeEEEeeeeEeeeeeeeEEeE), no approval is needed. For any ERC-20 token, check the current allowance with allowance(sender, data.tx.to) on the token contract. If it is less than amountIn, an approval transaction is required.

What do I do when the API returns NoRoute?
NoRoute means no swap path exists for this token pair at the requested amount. Try a smaller amount, a different token pair, or check if the token contract address is correct. Some tokens have very limited liquidity on certain chains.

How do I handle USDT approvals on Ethereum?
USDT’s contract requires setting the allowance to 0 before setting a new non-zero value. Call approve(spender, 0) first, wait for confirmation, then call approve(spender, amount).

Get Started

Swap API is free, requires no API key, and supports 46 EVM chains. A single GET request returns executable swap calldata with price impact, slippage protection, and recommended RPCs included.

curl "https://api.swapapi.dev/v1/swap/1?tokenIn=0xEeeeeEeeeEeEeeEeEeEeeEEEeeeeEeeeeeeeEEeE&tokenOut=0xA0b86991c6218b36c1d19D4a2e9Eb0cE3606eB48&amount=1000000000000000000&sender=0xd8dA6BF26964aF9D7eEd9e03E53415D37aA96045"

Read the full API documentation or explore the OpenAPI spec.
How to Build a DCA Bot with a Swap API

Dollar-cost averaging (DCA) is the practice of investing a fixed amount at regular intervals regardless of price. It is one of the most studied strategies in both traditional and crypto markets. A Vanguard analysis of rolling 10-year periods found that DCA reduced maximum drawdown by 30-40% compared to lump-sum entries. In crypto specifically, a Bitcoin DCA strategy of $100/week from January 2019 through December 2024 turned $31,400 in contributions into approximately $150,000 — a 378% return — despite buying through two major bear markets. According to CoinDCA data, investors who DCA’d through the 2022 crash saw their cost basis drop 45% below the eventual recovery price, turning paper losses into outsized gains. A Bitwise study showed that 83% of investors who attempted to time the crypto market underperformed a simple weekly DCA over any three-year window. Meanwhile, the global crypto trading bot market reached $2.1 billion in 2025, growing at 12% annually as more traders automate execution.

The problem: most DCA tools are custodial platforms that hold your keys, charge 1-2% fees per trade, and support limited tokens. Building your own DCA bot gives you full custody, zero platform fees, and the ability to DCA into any token on any chain.

This guide shows you how to build a non-custodial DCA bot in TypeScript that executes recurring swaps using swapapi.dev — a free API that returns executable swap calldata from a single GET request across 46 EVM chains, with no API key required.

What You’ll Need

  • Node.js 18+ or Bun runtime
  • ethers.js v6 for wallet and transaction management
  • A wallet with a private key (use a dedicated bot wallet, not your main wallet)
  • Native gas tokens on your target chain (ETH, MATIC, BNB, etc.)
  • No API keys — swapapi.dev is free and keyless

Install the dependency:

bun add ethers

Step 1: Configure Your DCA Parameters

Create a file called dca-bot.ts. Start by defining the configuration that controls what your bot buys, how often, and how much.

const CONFIG = {
  chainId: 1,
  tokenIn: "0xEeeeeEeeeEeEeeEeEeEeeEEEeeeeEeeeeeeeEEeE",
  tokenOut: "0xA0b86991c6218b36c1d19D4a2e9Eb0cE3606eB48",
  amountPerSwap: "10000000000000000",
  intervalMs: 24 * 60 * 60 * 1000,
  rpcUrl: "https://cloudflare-eth.com",
  maxSlippage: 0.01,
};

This configuration buys USDC with 0.01 ETH every 24 hours on Ethereum mainnet. The amountPerSwap is in wei (the token’s smallest unit) — 10000000000000000 equals 0.01 ETH.

To DCA on a different chain, change chainId and the token addresses. For example, to DCA into WETH on Arbitrum, set chainId: 42161 and use the Arbitrum WETH address.

Step 2: Fetch a Swap Quote

The core of the bot is a function that calls the swap API to get executable calldata. The API returns a complete transaction object ready to submit on-chain.

async function fetchSwap(sender: string) {
  const url = `https://api.swapapi.dev/v1/swap/${CONFIG.chainId}?tokenIn=${CONFIG.tokenIn}&tokenOut=${CONFIG.tokenOut}&amount=${CONFIG.amountPerSwap}&sender=${sender}&maxSlippage=${CONFIG.maxSlippage}`;
  const res = await fetch(url);
  return res.json();
}

That single GET request returns the swap route, expected output amount, price impact, and a ready-to-execute transaction. No SDK installation, no authentication, no complex multi-step flows.

Step 3: Validate the Response

Before executing any swap, your bot needs to verify the response and check for unfavorable conditions. The API returns three possible statuses: Successful, Partial, and NoRoute.

function validateSwap(data: any): boolean {
  if (data.status === "NoRoute") return false;
  if (data.status === "Partial") return false;
  if (data.priceImpact < -0.05) return false;
  return true;
}

Rejecting swaps with price impact worse than -5% protects your bot from executing during low-liquidity conditions. For a DCA bot, skipping one interval is better than taking a bad fill.

Step 4: Execute the Swap Transaction

With a validated quote, submit the transaction on-chain using ethers.js. The API response includes the complete tx object — your bot just forwards it.

import { ethers } from "ethers";

async function executeSwap(wallet: ethers.Wallet, tx: any) {
  const gasEstimate = await wallet.estimateGas({
    to: tx.to,
    data: tx.data,
    value: tx.value,
  });

  const receipt = await wallet.sendTransaction({
    to: tx.to,
    data: tx.data,
    value: tx.value,
    gasLimit: gasEstimate * 12n / 10n,
  });

  return receipt.wait();
}

The gas estimate is multiplied by 1.2 (using BigInt arithmetic: * 12n / 10n) to add a 20% buffer. This prevents out-of-gas reverts on complex multi-hop routes. The API’s gasPrice field is omitted intentionally — ethers.js automatically uses EIP-1559 pricing on supported chains.

Step 5: Wire Up the DCA Loop

Combine everything into a loop that runs on your configured interval.

async function runDCA() {
  const provider = new ethers.JsonRpcProvider(CONFIG.rpcUrl);
  const wallet = new ethers.Wallet(process.env.PRIVATE_KEY!, provider);
  const sender = wallet.address;

  console.log(`DCA bot started for ${sender}`);

  async function executeCycle() {
    const quote = await fetchSwap(sender);

    if (!quote.success) {
      console.log(`API error: ${quote.error.message}`);
      return;
    }

    if (!validateSwap(quote.data)) {
      console.log(`Skipping: status=${quote.data.status}`);
      return;
    }

    const amountOut = Number(quote.data.expectedAmountOut) / 10 ** quote.data.tokenTo.decimals;
    console.log(`Swapping for ~${amountOut} ${quote.data.tokenTo.symbol}`);

    const receipt = await executeSwap(wallet, quote.data.tx);
    console.log(`TX confirmed: ${receipt.hash}`);
  }

  await executeCycle();
  setInterval(executeCycle, CONFIG.intervalMs);
}

runDCA();

Run the bot with your private key as an environment variable:

PRIVATE_KEY=0xYOUR_KEY bun dca-bot.ts

The bot executes the first swap immediately, then repeats every 24 hours.

Step 6: Add Error Handling and Retries

Production DCA bots need to handle transient failures gracefully. Network issues, RPC downtime, and temporary API unavailability should not crash the bot.

async function executeCycleWithRetry(sender: string, wallet: ethers.Wallet) {
  for (let attempt = 1; attempt <= 3; attempt++) {
    try {
      const quote = await fetchSwap(sender);

      if (!quote.success && quote.error?.code === "RATE_LIMITED") {
        await new Promise((r) => setTimeout(r, 10000 * attempt));
        continue;
      }

      if (!quote.success || !validateSwap(quote.data)) return;

      const receipt = await executeSwap(wallet, quote.data.tx);
      console.log(`TX confirmed: ${receipt.hash}`);
      return;
    } catch (err) {
      console.log(`Attempt ${attempt} failed: ${err}`);
      if (attempt < 3) await new Promise((r) => setTimeout(r, 5000 * attempt));
    }
  }
}

This retry logic handles RATE_LIMITED responses with exponential backoff (10s, 20s, 30s) and catches network errors with a separate backoff (5s, 10s). After three failures, the cycle is skipped — the next interval will try again.

Step 7: Support ERC-20 to ERC-20 DCA

The examples above use native ETH as the input token. If you want to DCA from a stablecoin (e.g., USDC) into ETH or another token, you need to handle ERC-20 approvals first.

async function ensureApproval(wallet: ethers.Wallet, token: string, spender: string, amount: string) {
  const erc20 = new ethers.Contract(token, [
    "function allowance(address,address) view returns (uint256)",
    "function approve(address,uint256) returns (bool)",
  ], wallet);

  const current = await erc20.allowance(wallet.address, spender);
  if (current >= BigInt(amount)) return;

  const tx = await erc20.approve(spender, ethers.MaxUint256);
  await tx.wait();
}

Call ensureApproval before each swap when your tokenIn is not the native gas token. The function checks the current allowance and only sends an approval transaction if needed. Using MaxUint256 for the approval amount means you only need to approve once per token-spender pair.

After approval confirms, fetch a fresh quote before executing — the API’s calldata includes a 30-second deadline, so stale quotes will revert.

Step 8: Deploy and Run Continuously

For a DCA bot, uptime matters. A missed interval is a missed buy. Here are practical deployment options:

Systemd service (Linux VPS): Create a service file that auto-restarts on failure. A $5/month VPS is sufficient.

Cron job approach: Instead of a long-running process, schedule execution via cron. This eliminates memory leaks and process management concerns.

0 9 * * * cd /path/to/bot && PRIVATE_KEY=0xKEY bun dca-bot.ts --once

Add a --once flag to your bot that executes a single cycle and exits. Cron handles the scheduling.

Docker: Containerize the bot for portable deployment across cloud providers.

Adapting for Other Chains

One advantage of building on swapapi.dev is that switching chains requires changing only three values in your config. The API covers 46 EVM chains with the same endpoint format.

To DCA into WETH on Base:

const CONFIG = {
  chainId: 8453,
  tokenIn: "0xEeeeeEeeeEeEeeEeEeEeeEEEeeeeEeeeeeeeEEeE",
  tokenOut: "0x4200000000000000000000000000000000000006",
  amountPerSwap: "10000000000000000",
  intervalMs: 24 * 60 * 60 * 1000,
  rpcUrl: "https://mainnet.base.org",
  maxSlippage: 0.01,
};

The native token address (0xEeee...EeE) works on every chain. Only tokenOut, chainId, and rpcUrl change. The API response even includes recommended RPCs in the rpcUrls field, so you can use those instead of hardcoding one.

FAQ

How much does the swap API cost?
Nothing. swapapi.dev is completely free with no API key required. The rate limit is approximately 30 requests per minute per IP, which is more than enough for a DCA bot running hourly or daily intervals.

Is this bot custodial?
No. Your private key never leaves your machine. The API returns transaction calldata that your local wallet signs and submits. swapapi.dev never has access to your funds.

What happens if the bot misses an interval?
It simply executes on the next interval. DCA’s effectiveness comes from consistency over months and years — missing a single buy has negligible impact on long-term returns.

Can I DCA on multiple chains simultaneously?
Yes. Run multiple instances with different configs, or modify the bot to iterate over an array of chain configurations in each cycle.

How do I handle the USDT approval quirk?
USDT on Ethereum requires setting the allowance to zero before setting a new value. If your tokenIn is USDT on Ethereum, call approve(spender, 0) before approve(spender, MaxUint256).

What if the API returns a Partial status?
The bot’s validation function rejects partial fills. For a DCA bot, this is the safest approach — partial fills indicate low liquidity, and it is better to retry on the next interval when conditions may improve.

Get Started

The complete DCA bot is under 100 lines of TypeScript. Clone the pattern, adjust the config for your target chain and token pair, and deploy. swapapi.dev handles the routing complexity — your bot just needs to call one endpoint and submit the transaction.

Start building at swapapi.dev.

Top 10 EVM Chains for Token Swaps in 2026

Choosing the right EVM chain for token swaps depends on three things: liquidity depth, transaction costs, and settlement speed. With DEX monthly volume averaging over $400 billion and total DeFi TVL exceeding $190 billion across EVM networks, the landscape has matured well beyond Ethereum mainnet. Layer 2 rollups now handle the majority of daily swap transactions, and newer chains like Base and Sonic are capturing meaningful market share.

This guide ranks the 10 best EVM chains for token swaps based on TVL, DEX volume, and developer accessibility. Each entry includes the chain ID, real token addresses, and a working curl example using swapapi.dev — a free DEX aggregator API that supports 46 EVM chains with no API key required.

Every example below uses a single GET request to api.swapapi.dev and returns executable swap calldata ready to submit on-chain.

1. Ethereum

Ethereum remains the highest-TVL chain in DeFi with over $110 billion locked across protocols. It hosts the deepest liquidity pools for major token pairs, making it the default choice for large swaps where price impact matters most. The trade-off is gas costs — swap transactions typically cost $5-30 depending on network congestion.

Chain ID: 1
Native token: ETH
Key tokens: USDC (0xA0b86991c6218b36c1d19D4a2e9Eb0cE3606eB48, 6 decimals), USDT (0xdAC17F958D2ee523a2206206994597C13D831ec7, 6 decimals), DAI (0x6B175474E89094C44Da98b954EedeAC495271d0F, 18 decimals)

curl "https://api.swapapi.dev/v1/swap/1?tokenIn=0xEeeeeEeeeEeEeeEeEeEeeEEEeeeeEeeeeeeeEEeE&tokenOut=0xA0b86991c6218b36c1d19D4a2e9Eb0cE3606eB48&amount=1000000000000000000&sender=0xd8dA6BF26964aF9D7eEd9e03E53415D37aA96045"

2. Arbitrum

Arbitrum is the largest Layer 2 by TVL with over $16 billion locked. It settles transactions on Ethereum with sub-second confirmation times and gas fees under $0.10. Arbitrum consistently ranks in the top 3 chains by DEX volume, processing over $1 billion in daily swaps during high-activity periods.

Chain ID: 42161
Native token: ETH
Key tokens: USDC (0xaf88d065e77c8cC2239327C5EDb3A432268e5831, 6 decimals), USDT (0xFd086bC7CD5C481DCC9C85ebE478A1C0b69FCbb9, 6 decimals), DAI (0xDA10009cBd5D07dd0CeCc66161FC93D7c9000da1, 18 decimals)

curl "https://api.swapapi.dev/v1/swap/42161?tokenIn=0xEeeeeEeeeEeEeeEeEeEeeEEEeeeeEeeeeeeeEEeE&tokenOut=0xaf88d065e77c8cC2239327C5EDb3A432268e5831&amount=1000000000000000000&sender=0xd8dA6BF26964aF9D7eEd9e03E53415D37aA96045"

3. Base

Base has grown into one of the top 3 EVM chains by DEX volume since launching in 2023. Backed by Coinbase, it benefits from direct fiat on-ramp integrations and a growing ecosystem of consumer-facing dApps. Gas fees are consistently under $0.01, making it ideal for high-frequency swap strategies.

Chain ID: 8453
Native token: ETH
Key tokens: USDC (0x833589fCD6eDb6E08f4c7C32D4f71b54bdA02913, 6 decimals), USDT (0xfde4C96c8593536E31F229EA8f37b2ADa2699bb2, 6 decimals), DAI (0x50c5725949A6F0c72E6C4a641F24049A917DB0Cb, 18 decimals)

curl "https://api.swapapi.dev/v1/swap/8453?tokenIn=0xEeeeeEeeeEeEeeEeEeEeeEEEeeeeEeeeeeeeEEeE&tokenOut=0x833589fCD6eDb6E08f4c7C32D4f71b54bdA02913&amount=1000000000000000000&sender=0xd8dA6BF26964aF9D7eEd9e03E53415D37aA96045"

4. BNB Smart Chain (BSC)

BSC consistently processes $1-3 billion in daily DEX volume and holds over $5 billion in TVL. It is the dominant chain for memecoins and high-frequency retail trading in Asia-Pacific markets. Gas fees are under $0.05.

One critical detail for developers: stablecoins on BSC use 18 decimals, not 6. USDC and USDT are both 18-decimal tokens on BSC, unlike their 6-decimal counterparts on Ethereum. This is the most common integration bug when adding BSC support.

Chain ID: 56
Native token: BNB
Key tokens: USDC (0x8AC76a51cc950d9822D68b83fE1Ad97B32Cd580d, 18 decimals), USDT (0x55d398326f99059fF775485246999027B3197955, 18 decimals), DAI (0x1AF3F329e8BE154074D8769D1FFa4eE058B1DBc3, 18 decimals)

curl "https://api.swapapi.dev/v1/swap/56?tokenIn=0xEeeeeEeeeEeEeeEeEeEeeEEEeeeeEeeeeeeeEEeE&tokenOut=0x55d398326f99059fF775485246999027B3197955&amount=1000000000000000000&sender=0xd8dA6BF26964aF9D7eEd9e03E53415D37aA96045"

5. Polygon

Polygon (formerly Matic) holds over $3 billion in TVL and remains a popular choice for gaming, NFT, and micropayment applications due to sub-cent transaction costs. Its POL token replaced MATIC as the native gas token in 2024.

Chain ID: 137
Native token: POL
Key tokens: USDC (0x3c499c542cEF5E3811e1192ce70d8cC03d5c3359, 6 decimals), USDT (0xc2132D05D31c914a87C6611C10748AEb04B58e8F, 6 decimals), DAI (0x8f3Cf7ad23Cd3CaDbD9735AFf958023239c6A063, 18 decimals)

curl "https://api.swapapi.dev/v1/swap/137?tokenIn=0xEeeeeEeeeEeEeeEeEeEeeEEEeeeeEeeeeeeeEEeE&tokenOut=0x3c499c542cEF5E3811e1192ce70d8cC03d5c3359&amount=1000000000000000000&sender=0xd8dA6BF26964aF9D7eEd9e03E53415D37aA96045"

6. Optimism

Optimism is the second-largest Optimistic Rollup by TVL with over $6 billion locked. As the origin of the OP Stack (which also powers Base, Mode, and other chains), Optimism benefits from a shared ecosystem of tooling and bridged liquidity. Gas fees are comparable to Base at under $0.01.

Chain ID: 10
Native token: ETH
Key tokens: USDC (0x0b2C639c533813f4Aa9D7837CAf62653d097Ff85, 6 decimals), USDT (0x94b008aA00579c1307B0EF2c499aD98a8ce58e58, 6 decimals), DAI (0xDA10009cBd5D07dd0CeCc66161FC93D7c9000da1, 18 decimals)

curl "https://api.swapapi.dev/v1/swap/10?tokenIn=0xEeeeeEeeeEeEeeEeEeEeeEEEeeeeEeeeeeeeEEeE&tokenOut=0x0b2C639c533813f4Aa9D7837CAf62653d097Ff85&amount=1000000000000000000&sender=0xd8dA6BF26964aF9D7eEd9e03E53415D37aA96045"

7. Avalanche

Avalanche holds over $1.5 billion in TVL and differentiates with sub-second finality through its Snowman consensus mechanism. It is popular for institutional DeFi applications and has native integrations with several stablecoin issuers. Gas fees are typically $0.02-0.10.

Chain ID: 43114
Native token: AVAX
Key tokens: USDC (0xB97EF9Ef8734C71904D8002F8b6Bc66Dd9c48a6E, 6 decimals), USDT (0x9702230A8Ea53601f5cD2dc00fDBc13d4dF4A8c7, 6 decimals), DAI (0xd586E7F844cEa2F87f50152665BCbc2C279D8d70, 18 decimals)

curl "https://api.swapapi.dev/v1/swap/43114?tokenIn=0xEeeeeEeeeEeEeeEeEeEeeEEEeeeeEeeeeeeeEEeE&tokenOut=0xB97EF9Ef8734C71904D8002F8b6Bc66Dd9c48a6E&amount=1000000000000000000&sender=0xd8dA6BF26964aF9D7eEd9e03E53415D37aA96045"

8. Sonic

Sonic (the rebranded Fantom) launched in late 2024 with 10,000 TPS throughput and sub-second finality. Its aggressive incentive programs have attracted DeFi protocols rapidly, and the chain has already accumulated meaningful DEX liquidity. Gas fees are negligible.

Chain ID: 146
Native token: S
Key tokens: USDC (0x29219dd400f2Bf60E5a23d13Be72B486D4038894, 6 decimals), USDT (0x6047828dc181963ba44974801ff68e538da5eaf9, 6 decimals)

curl "https://api.swapapi.dev/v1/swap/146?tokenIn=0xEeeeeEeeeEeEeeEeEeEeeEEEeeeeEeeeeeeeEEeE&tokenOut=0x29219dd400f2Bf60E5a23d13Be72B486D4038894&amount=1000000000000000000&sender=0xd8dA6BF26964aF9D7eEd9e03E53415D37aA96045"

9. Linea

Linea is a zkEVM rollup backed by Consensys (the company behind MetaMask). Its direct MetaMask integration gives it a built-in distribution channel of over 30 million wallets. Linea has grown its TVL past $1 billion, with gas fees under $0.05.

Chain ID: 59144
Native token: ETH
Key tokens: USDC (0x176211869cA2b568f2A7D4EE941E073a821EE1ff, 6 decimals), USDT (0xA219439258ca9da29E9Cc4cE5596924745e12B93, 6 decimals), DAI (0x4AF15ec2A0BD43Db75dd04E62FAA3B8EF36b00d5, 18 decimals)

curl "https://api.swapapi.dev/v1/swap/59144?tokenIn=0xEeeeeEeeeEeEeeEeEeEeeEEEeeeeEeeeeeeeEEeE&tokenOut=0x176211869cA2b568f2A7D4EE941E073a821EE1ff&amount=1000000000000000000&sender=0xd8dA6BF26964aF9D7eEd9e03E53415D37aA96045"

10. Berachain

Berachain is the newest chain on this list, launching its mainnet in early 2025. Its Proof of Liquidity consensus mechanism rewards validators for providing DEX liquidity, which creates unusually deep pools relative to the chain’s age. Early TVL growth has been rapid, crossing $2 billion within months of launch.

Chain ID: 80094
Native token: BERA
Key tokens: USDC (0x549943e04f40284185054145c6E4e9568C1D3241, 6 decimals), USDT (0x779Ded0c9e1022225f8e0630b35a9b54bE713736, 6 decimals)

curl "https://api.swapapi.dev/v1/swap/80094?tokenIn=0xEeeeeEeeeEeEeeEeEeEeeEEEeeeeEeeeeeeeEEeE&tokenOut=0x549943e04f40284185054145c6E4e9568C1D3241&amount=1000000000000000000&sender=0xd8dA6BF26964aF9D7eEd9e03E53415D37aA96045"

Comparison Table

Chain Chain ID Native Token Gas Cost TVL USDC Decimals
Ethereum 1 ETH $5-30 $110B+ 6
Arbitrum 42161 ETH <$0.10 $16B+ 6
Base 8453 ETH <$0.01 $10B+ 6
BSC 56 BNB <$0.05 $5B+ 18
Polygon 137 POL <$0.01 $3B+ 6
Optimism 10 ETH <$0.01 $6B+ 6
Avalanche 43114 AVAX $0.02-0.10 $1.5B+ 6
Sonic 146 S <$0.01 $500M+ 6
Linea 59144 ETH <$0.05 $1B+ 6
Berachain 80094 BERA <$0.01 $2B+ 6

Frequently Asked Questions

Which EVM chain has the lowest swap fees?

Base, Optimism, and Sonic all offer sub-cent gas fees for token swaps. Base benefits from Ethereum’s security while keeping transaction costs under $0.01, making it the best option for high-frequency swap strategies.

Why does BSC use 18 decimals for USDC and USDT?

The BSC versions of USDC and USDT were deployed with 18 decimals instead of the 6 decimals used on Ethereum, Arbitrum, and most other chains. When constructing swap amounts for BSC, multiply by 10^18 instead of 10^6. This is the most common source of integration bugs when adding multi-chain swap support.

How do I swap tokens on any EVM chain with one API?

Swap API supports 46 EVM chains through a single GET endpoint. Pass the chainId as a path parameter along with tokenIn, tokenOut, amount, and sender to get executable calldata. No API key or registration required.

What is the native token address for EVM swaps?

Use 0xEeeeeEeeeEeEeeEeEeEeeEEEeeeeEeeeeeeeEEeE as the tokenIn or tokenOut address to represent the native gas token (ETH, BNB, AVAX, POL, etc.) on any EVM chain. This convention is supported across all 46 chains on Swap API.

Can I build a trading bot that swaps across multiple chains?

Yes. Since Swap API uses a consistent endpoint format across all chains, you can loop through chain IDs and execute swaps programmatically. The API returns a complete transaction object (to, data, value, gasPrice) that your bot submits on-chain with any wallet library.

Get Started

Swap API is free, requires no API key, and covers 46 EVM chains with a single GET endpoint. Start swapping tokens on any chain listed above in under a minute.

Browse the OpenAPI spec to generate typed clients, or test interactively with the Swagger UI.

curl "https://api.swapapi.dev/v1/swap/42161?tokenIn=0xEeeeeEeeeEeEeeEeEeEeeEEEeeeeEeeeeeeeEEeE&tokenOut=0xaf88d065e77c8cC2239327C5EDb3A432268e5831&amount=1000000000000000000&sender=0xd8dA6BF26964aF9D7eEd9e03E53415D37aA96045"

From RAG to a “memory layer”: what building an AI assistant taught us

About a year and a half ago, we were building a proactive AI assistant.

Not just a chatbot, but something that could actually act on your behalf.

It could reply to emails in your tone, move calendar events, organize your inbox, and surface information based on what you actually care about.

The goal was simple:

build something that feels like an extension of how you think.

The part we didn’t expect

To make that work, we started with what most people use today: RAG.

And to be fair – RAG works.

You can go pretty far with chunking, embeddings, and retrieval.
You can build systems that feel smart.

But as the assistant got more complex, something started to break.

Not in an obvious way.

It was more subtle.

The system could retrieve relevant information,
but it didn’t really understand how things were connected.

Everything was based on similarity.

And similarity is not structure.

Building a “brain”

To move forward, we needed something else.

We started building what we internally called a “brain”.

A layer responsible for:

  • extracting meaning from data
  • connecting concepts together
  • maintaining a consistent structure over time

At the beginning, it was just a supporting component for the assistant.

But the deeper we went, the more it became clear:

this was the real problem.

About 7 months ago, we made a decision:
we stopped focusing on the assistant itself
and went all-in on this layer.

That became BrainAPI.

From retrieval to structure

The shift can be summarized like this.

Typical RAG pipeline:
chunk -> embed -> retrieve -> generate

What we moved toward:
ingest -> extract -> connect -> graph -> query

Instead of treating data as independent chunks,
we process it into a structured representation of entities and relationships.

In practice:

  • documents are parsed into concepts
  • relationships are extracted and normalized
  • everything is stored in a graph + vector layer

Vectors are still useful,
but they are no longer the primary abstraction.

The graph is.

What changes in practice

This changes how you interact with data.

Instead of asking:

“what text is similar to this query?”

You can ask:

  • what entities are involved?
  • how are they connected?
  • what paths exist between concepts?
  • what else is related in this context?

Retrieval becomes navigation.

Where this approach helps

We found this particularly useful when:

  • context spans across multiple sources and time
  • relationships matter more than keywords
  • consistency is important (not just relevance)

Some practical use cases:

  • recommendation systems (ecommerce, social)
  • search systems that go beyond keyword matching
  • persistent memory for agents and chatbots
  • more reliable RAG setups in complex domains

Exploring “polarities”

One interesting direction we’ve been exploring is something we call polarities.

Instead of returning a single “best” answer,
the system can surface a range of possible solutions around a problem,
based on how concepts relate in the graph.

It’s less about ranking results,
and more about exploring a solution space.

Why this matters

At Lumen Labs (our startup), this direction came from a broader observation.

AI systems today are powerful,
but they are also fragile in how they represent knowledge.

They retrieve well.
They generate well.

But they don’t really ground information in a consistent structure.

And that’s where a lot of issues come from,
especially when accuracy actually matters.

If we want systems that people can rely on,
we need something closer to a structured memory layer.

Open sourcing it

We’ve been using this approach in production for a few B2B use cases,
but never exposed it publicly.

Now we’re opening it up.

  • the core is open source
  • it can run fully locally (we’ve tested it with Ollama + offline setups)
  • or be deployed as managed instances in the cloud
  • it’s extensible via a plugin system

Closing thoughts

We don’t think this replaces RAG.

But it feels like RAG is one component of a bigger system,
not the system itself.

After spending the last year and a half building on top of AI systems,
this “memory layer” is the piece that felt missing.

Curious to hear how others are approaching this,
especially if you’ve hit similar limitations with chunk-based retrieval.

Links

Stop Wasting Tokens: Building Deterministic Custom Agents with Google ADK [GDE]

Email Agent Workflow

In the world of AI orchestration, it’s tempting to use a Large Language Model (LLM) for every step of a workflow. However, as applications scale, the “LLM-first” approach can introduce unnecessary latency, costs, and unpredictability. The Google Agent Development Kit (ADK) provides a powerful alternative: the BaseAgent.

This post explores how to create a custom, programmatic agent—specifically an Email Agent—that handles deterministic tasks while still participating seamlessly in an AI-driven ecosystem.

Why is the Email Agent a Custom Agent?

The agent is 100% deterministic and relies on external APIs to format text and send emails.

It uses the marked library to convert a Markdown string into HTML and the nodemailer library to send mail to an SMTP server.

On the contrary, if I created a LlmAgent, the instruction, tool, and structured output would introduce LLM latency, input, and output tokens.

The Benefits of Programmatic Execution

Using a custom agent instead of an LLM-wrapped prompt offers several critical advantages:

Agent Type Llm Agent Custom Agent
Latency Time-intensive (generation delay) Low-latency (direct execution)
Cost Pay for tokens consumed Zero cost
Determinism Probabilistic and hallucinate when agent does not follow the instruction or the instruction is unclear 100% deterministic and does not require AI capabilities
Testability Incorrect result when the model hallucinates Test results are predictable
Integration Delegate responsibility to tools Call libraries directly in the class

Demo Overview

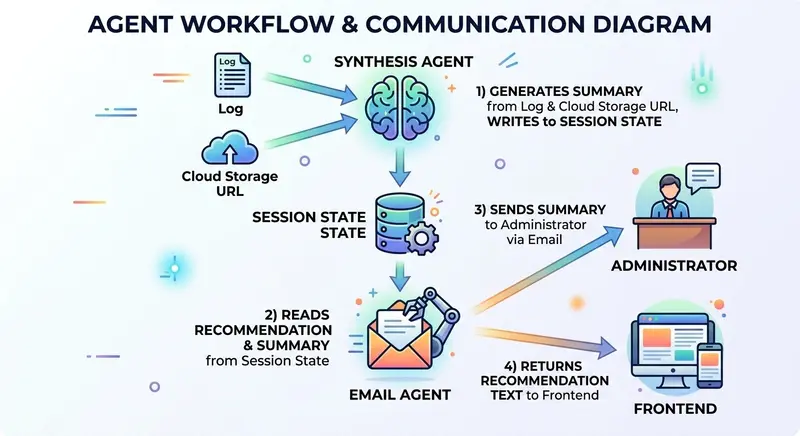
The EmailAgent is the final subagent of the Decision Tree multi-agent system. The Decision Tree agent evaluates the feasibility of applying an agent architecture to a project. It starts with a project description, determines whether an agent architecture should be used, generates a recommendation, returns the recommendation to the client, and sends an email to the administrator as a side effect.

The EmailAgent retrieves the recommendation and summary from the session state, returns the recommendation text to the frontend, and sends both to the administrator’s email address.

The agent does not require an LLM or tool use; therefore, an LlmAgent is overkill. My solution was to use a custom agent to handle email to save time and cost.

Architecture

Email Agent Workflow

LLM and Custom Agents in the Mult-agent system

The project, anti-patterns, decision, recommendation, and synthesis agents are LLM agents. These agents require Gemini to reason and generate text responses.

The Audit Trail, Cloud Storage, and Email agents integrate with external APIs or resources that trigger deterministic actions.

Prerequisites

Requirements

  • TypeScript 5.9.3 or later
  • Node.js 24.13.0 or later
  • npm 11.8.0 or later
  • Docker (For running MailHog locally)
  • Google ADK (For building the custom agent)
  • Gemini in Vertex AI (to call the model in LLM agents, although not required for the custom agent)

Note: I used Gemini in Vertex AI for authentication due to regional availability. Gemini is blocked in Hong Kong currently, so I used Gemini in Vertex AI instead.

Install npm dependencies

npm i --save-exact @google/adk
npm i --save-dev --save-exact @google/adk-devtools
npm i --save-exact nodemailer
npm i --save-dev --save-exact @types/nodemailer rimraf
npm i --save-exact marked
npm i --save-exact zod

I installed the required dependencies for building ADK agents, converting Markdown string to HTML and sending emails to MailHog in local testing.

Pinned dependencies ensure the versioning is the same in development and production environments for enterprise-level applications.

Environment variables

Copy .env.example to .env and fill in the credentials:

GEMINI_MODEL_NAME="gemini-3-flash-preview"
GOOGLE_CLOUD_PROJECT="<Google Cloud Project ID>"
GOOGLE_CLOUD_LOCATION="global" 
GOOGLE_GENAI_USE_VERTEXAI=TRUE

# SMTP Settings (MailHog)
SMTP_HOST="localhost"
SMTP_PORT=1025
SMTP_USER=""
SMTP_PASS=""
SMTP_FROM="[email protected]"
ADMIN_EMAIL="[email protected]"

SMTP_HOST, SMTP_PORT, SMTP_USER, SMTP_PASS, are required to set up MailHog for local email testing.

SMTP_FROM is a from email address that can be any string in local testing.

ADMIN_EMAIL is an administrator email address receiving emails that the EmailAgent sends. It is an environment variable in my use case because it is the only recipient. If another scenario requires sending emails to customers, the environment variable should be removed.

Environment Setup

I pulled the latest version of the MailHog docker image from Docker Hub and started it locally to receive test emails and display them in the Web UI. The docker-compose.yml file contains the setup configuration.

services:
  mailhog:
    image: mailhog/mailhog
    container_name: mailhog
    ports:
      - "1025:1025" # SMTP port
      - "8025:8025" # HTTP (Web UI) port
    restart: always
    networks:
      - decision-tree-agent-network

networks:
  decision-tree-agent-network:

The SMTP port is 1025 and the URL of the Web UI port is http://localhost:8025.

docker compose up -d

Start MailHog in Docker.

ADK Multi-Agent Architecture

process.loadEnvFile();

const model = process.env.GEMINI_MODEL_NAME || '';
if (!model) {
  throw new Error('GEMINI_MODEL_NAME is not set');
}

The model variable specifies the gemini-3-flash-preview model. If model is undefined, an error is thrown.

The demo uses Node 20+, so the process.loadEnvFile() is provided to load variables from the environment file. Otherwise, developers should consider using dotenv to load environment variables.

export const RECOMMENDATION_KEY = 'recommendation';
export const MERGED_RESULTS_KEY = 'mergedResults';
export const PROJECT_DESCRIPTION_KEY = 'project_description';
import { FunctionTool, LlmAgent, SequentialAgent } from '@google/adk';
import { z } from 'zod';
import { initWorkflowAgent } from './init.js';
import {
  MERGED_RESULTS_KEY,
  PROJECT_DESCRIPTION_KEY,
  VALIDATION_ATTEMPTS_KEY,
} from './sub-agents/output-keys.js';

const prepareEvaluationTool = new FunctionTool({
  name: 'prepare_evaluation',
  parameters: z.object({
    description: z.string()
  }),
  execute: async ({ description }, context) => {
    if (!context || !context.state) {
      return { status: 'ERROR', message: 'No session state found.' };
    }

    const state = context.state;

    // Clear all previous evaluation data
    state.set(MERGED_RESULTS_KEY, null);
    state.set(VALIDATION_ATTEMPTS_KEY, 0);

    // Set the new description 
    state.set(PROJECT_DESCRIPTION_KEY, description);

    return { status: 'SUCCESS', message: 'State reset and description updated.' };
  },
});

export const SequentialEvaluationAgent = new SequentialAgent({
  name: 'SequentialEvaluationAgent',
  subAgents: initWorkflowAgent(model),
});

prepareEvaluationTool is a tool that reset the variables in the session state before the agent starts the project evaluation.

SequentialEvaluationAgent is a sequential agent that consists of subagents.

export function initWorkflowAgent(model: string) {
  return [
    createMergerAgent(model),
    createEmailAgent(),
  ];
}

The initWorkflowAgent calls createMergerAgent and createEmailAgent factory functions to return the merger agent and the email agent. The merger agent is a LlmAgent because it requires Gemini to generate a summary whereas the email agent is a custom agent that does not require Gemini.

export const rootAgent = new LlmAgent({
  name: 'ProjectEvaluationAgent',
  model,
  instruction: `... instruction...`,
  tools: [prepareEvaluationTool],
  subAgents: [SequentialEvaluationAgent],
});

The rootAgent is an orchestrator that routes the project description to SequentialEvaluationAgent to evaluate.

Email Agent Factory Function

export type SmtpConfig = {
  host: string;
  port: number;
  user?: string;
  pass?: string;
  from: string;
  email: string;
};
export function createEmailAgent(): BaseAgent {
  const email = process.env.ADMIN_EMAIL || '[email protected]';
  const host = process.env.SMTP_HOST || 'localhost';
  const port = parseInt(process.env.SMTP_PORT || '1025');
  const user = process.env.SMTP_USER || '';
  const pass = process.env.SMTP_PASS || '';
  const from = process.env.SMTP_FROM || '[email protected]';

  const smtpConfig: SmtpConfig = {
    host,
    port,
    user,
    pass,
    from,
    email,
  };

  return new EmailAgent(smtpConfig);
}

The createEmailAgent function retrieves the host, port, user, password, sender email, and administrator email from the environment variables to construct an instance of SmtpConfig.

Pass the SmtpConfig object to the constructor of the EmailAgent class to construct a custom agent. Finally, the function returns the email agent to become the last subagent of SequentialEvaluationAgent.

Implementing the Email Agent

Let’s look at the core structure of the EmailAgent.

1. The Class Definition and State

The EmailAgent has a readonly SmtpConfig instance member that is initialized in the constructor. The constructor calls super to initialize its name and description.

class EmailAgent extends BaseAgent {
  readonly smtpConfig: SmtpConfig;

  constructor(smtpConfig: SmtpConfig) {
    super({
      name: 'EmailAgent',
      description: 'Send a recommendation and summary email to the administrator.',
    });

    this.smtpConfig = smtpConfig;
  }
}

2. Accessing the Context

import { z } from 'zod';

export const recommendationSchema = z.object({
  text: z.string(),
});

export type Recommendation = z.infer<typeof recommendationSchema>;

export const mergerSchema = z.object({
  summary: z.string(),
});

export type Merger = z.infer<typeof mergerSchema>;

The text property stores the recommendation of the Recommendation type. Similarly, the summary property of the Merger type stores the summary.

export function getEvaluationContext(context: ReadonlyContext | undefined) {
  if (!context || !context.state) {
    return {
      recommendation: null,
    };
  }

  const state = context.state;
  return {
    recommendation: state.get<Recommendation>(RECOMMENDATION_KEY) ?? null,
  };
}

export function getMergerContext(context: ReadonlyContext | undefined) {
  if (!context || !context.state) {
    return {
      merger: null,
    };
  }

  const state = context.state;
  return {
    merger: state.get<Merger>(MERGED_RESULTS_KEY) ?? null,
  };
}

getEvaluationContext and getMergerContext are helper functions to obtain recommendation and summary from the session state.

3. Implement the Concrete Methods

The EmailAgent extends the BaseAgent and all subclasses must implement two abstract methods: runAsyncImpl and runLiveImpl.

  protected async *runAsyncImpl(context: InvocationContext): AsyncGenerator<Event, void, void> {
    for await (const event of this.runLiveImpl(context)) {
      yield event;
    }
  }

Implement runAsyncImpl by wrapping runLiveImpl. It invokes a for-await loop to iterate this.runLiveImpl(context) and yields each event.

protected async *runLiveImpl(context: InvocationContext): AsyncGenerator<Event, void, void> {
    const readonlyCtx = new ReadonlyContext(context);
    const { merger } = getMergerContext(readonlyCtx);
    const { recommendation } = getEvaluationContext(readonlyCtx);
    const recommendationText = recommendation?.text || 'No recommendation available.';

    const emit = (status: 'success' | 'error', author: string) =>
      createEmailStatusEvent({
        author,
        context,
        status,
        recommendationText,
      });

    if (!merger) {
      yield emit('error', this.name);
      return;
    }

    try {
      const emailContent = `${recommendation?.text || ''}nn## Summarynn${merger.summary}`;
      await sendEmail(this.smtpConfig, 'Project Evaluation Results', emailContent);
      yield emit('success', this.name);
    } catch (e) {
      console.error(e);
      yield emit('error', this.name);
    }
  }

The runLiveImpl method handles three cases: an undefined merger, a successful email dispatch, and an email dispatch failure. When email dispatch is successful, the inner emit arrow function yields a success event. Otherwise, the catch block logs the error and yields an error event.

import { marked } from 'marked';
import nodemailer from 'nodemailer';

export async function sendEmail(smtpConfig: SmtpConfig, subject: string, text: string) {
  const { host, port, user, pass, from, email: to } = smtpConfig;
  const transporter = nodemailer.createTransport({
    host,
    port,
    auth: user && pass ? { user, pass } : undefined,
    secure: false,
  });

  const html = await marked.parse(text);
  const mailOptions = {
    from,
    to,
    subject,
    text,
    html,
  };
  return transporter.sendMail(mailOptions);
}

The sendEmail function uses the nodemailer to create a transporter using the SMTP host, port, user, and password. The marked library parses the Markdown text and converts it to HTML. The transporter has a sendMail method that accepts mail options to send an email to the to email address in both text and html formats.

4. Returning Data in the Output

Next, implement createEmailStatusEvent to return an email status event.

export type EmailStatusOptions = {
  author: string;
  context: InvocationContext;
  status: 'success' | 'error';
  recommendationText: string;
};

export function createEmailStatusEvent(options: EmailStatusOptions): Event {
  return createEvent({
    invocationId: options.context.invocationId,
    author: options.author,
    branch: options.context.branch || '',
    content: {
      role: 'model',
      parts: [
        {
          text: JSON.stringify({
            status: options.status,
            recommendationText: options.recommendationText,
            sessionId: options.context.session.id,
            invocationId: options.context.invocationId,
          }),
        },
      ],
    },
  });
}

The EmailStatusOptions provide the invocation ID, branch, author (the agent name), status, and recommendation text.

The createEmailStatusEvent function reuses the createEvent function to return the invocation ID, branch, author, and a JSON-stringified object consisting of the status, session ID, invocation ID, and recommendation text.

The client can examine the status to determine whether or not to display the recommendation text.

Returning both session and invocation IDs to the client is recommended. The client can reuse the session ID to call the agent in a conversational flow to seek evaluations for additional project descriptions. The invocation ID allows querying an error-tracking service like Datadog to identify the server status.

Testing

Add scripts to package.json to build and start the ADK web interface.

  "scripts": {
    "prebuild": "rimraf dist",
    "build": "npx tsc --project tsconfig.json",
    "web": "npm run build && npx @google/adk-devtools web --host 127.0.0.1 dist/agent.js"
  },
  • Open a terminal and type npm run web to start the API server.
  • Open a new browser tab and type http://localhost:8000.
  • Paste the following into the message box:
One of my favorite tech influencers just tweeted about a 'breakthrough in solid-state batteries.' Find which public company they might be referring to, check that company’s recent patent filings to see if it’s true, and then check their stock price to see if the market has already 'priced it in'.
  • Ensure the root agent executes and halts when the email agent terminates.

Email Agent

  • Open another tab and navigate to http://localhost:8025 to open the MailHog web UI

Email Testing

  • The MailHog Web UI displays the recommendation and summary that summarizes the decision, any clear anti-patterns, and the URL of the cloud storage.

Conclusion

Custom agents are essential components of an ADK application. While ADK offers sequential, parallel, loop, and LLM agents, these agents may not meet the requirements in some occasions. BaseAgent is the generic Agent class that enables developers to write their logic and design their agentic workflow.

The takeaway: avoid using an LLM-based agent for tasks that do not require probabilistic reasoning, tool calling, or response generation.

Resources

QuestBoard: Turn Your Notion Workspace Into a Full RPG

This is a submission for the Notion MCP Challenge

See the generated workspace:
QuestBoard Notion

What I Built

QuestBoard turns a Notion page into a playable RPG-style productivity system.

Instead of giving you another flat task list, it creates a workspace where:

  • real tasks become quests
  • neglected areas become new quest targets
  • completed work turns into XP, levels, streaks, and achievements
  • bigger pressure points can become boss battles
  • weekly progress becomes a recap page written like a story chapter

The important part is that this is not just themed copy pasted into Notion. QuestBoard is MCP-native from end to end. It uses Notion MCP to create the workspace, create and update records, build hosted views, sync progression, log automation runs, and support review/correction loops.

Why It Is Useful

The core problem I wanted to solve was this: most productivity systems are good at storing work, but weak at making progress felt.

QuestBoard tries to make motivation, pressure, and momentum visible inside a workspace people already use:

  • weak skill areas are easier to spot
  • small wins still feel meaningful because they award progression
  • recurring inconsistency shows up as stale quests, not invisible drift
  • a user can review and correct generated content instead of treating AI output as automatically trusted

It also works beyond the canned showcase flow. A real user can onboard with:

  • a real goal
  • what success looks like
  • a real time budget
  • preferred pacing
  • constraints
  • motivation
  • optional domain context for niche tools or jargon

That profile is saved into Notion and used to shape future quests.

How A User Actually Gets Value

The real-user loop is:

  1. Connect hosted Notion MCP and point QuestBoard at a blank Notion page.
  2. Run guided onboarding so QuestBoard captures the user’s real goal, time budget, focus area, constraints, and motivation.
  3. QuestBoard creates the full workspace in Notion.
  4. The user works mostly in Notion: reviewing quests, moving them through status, and watching progression update.
  5. QuestBoard syncs XP, levels, streaks, skills, achievements, run logs, and review state.
  6. Weekly recaps and review workflows turn the workspace from “AI generated pages” into an operating system the user can keep using.

For ambiguous or niche goals, onboarding can optionally use Exa or Perplexity to ground the saved context before the first quests are generated.

What The Hosted MCP Path Creates

On the hosted path, QuestBoard creates 8 databases and 14 named views across 8 hosted view types.

Core databases:

  • Player Profile
  • Quest Board
  • Skill Trees
  • Achievement Log
  • Hero Roster
  • Adventure Recaps
  • Runs
  • Review Queue

Hosted views:

  • Hero Dashboard
  • Quest Ledger
  • Quest Map
  • Quest Calendar
  • Quest Timeline
  • Quest Cards
  • XP Progress
  • Skill Focus
  • Skill Board
  • Trophy Case
  • Hero Roster
  • Story Archive
  • Run Center
  • Review Queue

That is what makes the product feel like a real Notion system instead of a terminal tool that happens to write pages.

Video Demo

The video focuses on the strongest hosted path:

  • create the workspace on a blank Notion page
  • Questboard generated views and structure
  • Questboard do quest generation and progression
  • QuestBoard syncs Notion changes back into the game state

Show Us The Code

QuestBoard

Turn your Notion workspace into an RPG. QuestBoard is a Python app that uses Notion MCP to create and operate a gamified workspace with quests, boss battles, skill trees, XP, recaps, runtime automation, and human review workflows.

What It Does

  • Creates a full QuestBoard workspace inside Notion
  • Guides first-time setup with questboard onboard so a real goal, time budget, motivation, and constraints shape the workspace
  • Generates quests from your focus areas and skill gaps
  • Creates boss battles for neglected skills or habits
  • Tracks XP, leveling, streaks, and achievements
  • Writes weekly recaps with AI or deterministic fallbacks
  • Can optionally ground ambiguous goals with Exa or Perplexity before the first quests are generated
  • Logs automation runs in Runs
  • Routes generated output through a Review Queue
  • Supports revision loops for reviewed quests and recaps
  • Runs a policy-based runtime loop with questboard runtime and questboard watch

Notion MCP Integration

QuestBoard is MCP-native. Notion…

Key files:

File What it does
src/cli.py User-facing commands for setup, onboarding, doctor, sync, runtime, review, revision, and demo flows
src/setup_workspace.py Builds the Notion workspace, schemas, hosted views, and seed data
src/mcp_client.py MCP wrapper for hosted vs self-hosted Notion operations
src/onboarding.py Goal grounding, optional research, and context-brief generation
src/engines/quest_generator.py Quest generation, boss generation, JSON repair, and fallback templates
src/engines/xp_engine.py XP, leveling, streaks, achievements, and progression reconciliation
src/engines/recap_writer.py Weekly recap generation and stale quest patrol
src/runtime.py Policy-based runtime planning, watch mode, and recurring control-loop behavior
src/operations.py Review Queue operations and review-surface reconciliation
src/revision.py Correction-loop revision from review notes

Local validation for the release snapshot reached 130 passed.

How I Used Notion MCP

QuestBoard is built around Notion MCP, not lightly assisted by it.

Every important operation goes through MCP:

MCP capability How QuestBoard uses it
Create database Builds the full multi-database workspace
Create pages Creates quests, boss battles, recaps, player records, run logs, and review items
Update page Syncs quest status, XP, levels, streaks, and review state
Create view Builds the hosted product surfaces like Quest Map, XP Progress, Hero Dashboard, Run Center, and Review Queue
Search Finds player, quest, skill, run, and review records across the workspace
Fetch Reads schema and page state to drive generation, sync, and runtime decisions
Create comment Adds progression flavor, warnings, and operational commentary
Move pages Supports archival and organization flows

I also intentionally supported both hosted and self-hosted MCP paths:

  • hosted MCP is the strongest product/demo path because it can create the richer view suite
  • self-hosted MCP is still valuable for local validation and token-based setup

Reliability And Hardening

I spent a large part of the build on making the project less fragile:

  • questboard doctor provides a read-only workspace health check
  • questboard hosted-login makes the hosted OAuth path usable without hand-building tokens
  • setup accepts full Notion URLs, not just raw IDs
  • rerunning setup can repair an older saved workspace instead of blindly trusting stale local metadata
  • QuestBoard has deterministic fallback generation when model output is malformed or unavailable
  • generated content is reviewable, correctable, and revision-friendly through Review Queue and revision flows
  • Run Center records operational history instead of hiding it

That matters because an MCP project should not just generate a cool first page. It should keep behaving coherently once the workspace is alive.

Closing

QuestBoard is my attempt to make Notion feel less like a storage layer and more like a playable progression system.

The goal was not only to make something flashy. The goal was to make a workspace where motivation, progress, governance, and automation all become visible inside Notion itself.

Agentic Architectures — Article 2: Advanced Coordination and Reasoning Patterns

Solving the “Stochastic Parrot” Problem with Structured Logic

There’s a criticism of large language models that has stuck around since 2021, and it still stings a little: the “stochastic parrot” argument. The idea is that LLMs are sophisticated pattern-matchers that produce statistically plausible text without any genuine understanding behind it. They’re parroting, not reasoning.

I’m not here to settle that philosophical debate. What I am here to tell you is this: if your agentic system behaves like a stochastic parrot — confidently producing plausible-sounding but wrong answers, failing to backtrack when it hits a dead end, unable to break a hard problem into manageable pieces — the fix is almost never the model. It’s the architecture.

The difference between an agent that looks intelligent in a demo and one that stays intelligent in production comes down to coordination and reasoning patterns. How does your agent plan? How does it check its own work? How do multiple agents share what they know without drowning each other in JSON?

That’s what this article is about.

Dynamic Planning: From Static Chains to Hierarchical Thinking

The first generation of “agentic” products were really just dressed-up chains. You’d define a fixed sequence of LLM calls — summarize, then classify, then respond — and call it a pipeline. It worked for simple, predictable tasks. It fell apart the moment the real world showed up.

Real tasks are rarely linear. A user asking “research our top three competitors and draft a positioning document” doesn’t map cleanly to a fixed sequence of steps. The number of competitors might be two or five. Each competitor might require a different depth of research. The positioning document might need a complete rewrite after the research reveals something unexpected.

What you need is Hierarchical Planning  — a “Manager” agent that treats the task as a problem to be decomposed, not a script to be executed.

The pattern works like this:

User Task
    └── Manager Agent (Planner)
            ├── Sub-task A → Worker Agent 1
            ├── Sub-task B → Worker Agent 2
            └── Sub-task C → Worker Agent 3
                    └── Sub-sub-task C1 → Worker Agent 3a

The Manager receives the top-level goal and produces a structured plan — a list of sub-tasks with dependencies, assigned roles, and success criteria. Worker agents execute their assigned sub-tasks and report results back. The Manager synthesizes the results, evaluates whether the goal has been met, and either delivers the final output or replans if something went wrong.

The critical implementation detail that most tutorials skip: the plan must be a living document, not a frozen spec. If Worker Agent 2 comes back with an unexpected result — say, a competitor has already pivoted out of your market — the Manager needs to update the plan in response. A Manager that rigidly executes the original plan in the face of new information isn’t planning; it’s just executing a slightly fancier chain.

In practice, this means storing the plan in a mutable shared state that the Manager can read and rewrite between steps. LangGraph handles this elegantly with its state graph model. CrewAI has a more opinionated take with its hierarchical process mode. Both work — the choice depends on how much control you want over the graph structure (more on that shortly).

Fractal Chain-of-Thought: Reasoning That Zooms In

Standard Chain-of-Thought prompting — “think step by step before answering” — is one of the most reliable techniques for improving LLM reasoning quality. But it has a ceiling. For deeply complex problems, a flat sequence of reasoning steps runs out of resolution. The model is reasoning about the right things at the wrong granularity.

Fractal Chain-of-Thought (FCoT) addresses this by making reasoning recursive. When an agent encounters a sub-problem that is itself complex enough to warrant multi-step reasoning, it spawns a nested reasoning process rather than trying to resolve it in a single step.

Think of it like a zoom function. The top-level reasoning operates at the problem level:

Problem: Optimize our database query performance
  Step 1: Identify the slow queries
  Step 2: Analyze the execution plans
  Step 3: Propose index changes
  Step 4: Estimate performance impact

But Step 2 — “analyze the execution plans” — is itself a multi-step reasoning problem that deserves its own chain:

Sub-problem: Analyze execution plan for Query #7
  Step 2.1: Identify full table scans
  Step 2.2: Check join order efficiency
  Step 2.3: Evaluate predicate pushdown opportunities
  Step 2.4: Flag missing statistics

And Step 2.3 might zoom in further still.

The implementation is cleaner than it sounds. You give the agent a tool called something like deep_reason(sub_problem: str) -> str that recursively invokes the same reasoning architecture on the sub-problem. The result gets folded back into the parent reasoning chain. You set a maximum recursion depth (3-4 levels is usually plenty) to prevent infinite descent.

The payoff is significant for domains with nested complexity — legal analysis, systems debugging, financial modeling. The cost is proportionally higher token usage. FCoT is a targeted tool, not a default setting.

The Reflection Pattern: Building a Critic That Actually Criticizes

Here’s a failure mode that bites almost every team eventually: you implement a self-review step where the same model that generated an output also reviews it. The model gives itself a pass. Every time. The “reflection” becomes a rubber stamp.

This happens because LLMs are, to put it charitably, optimistic about their own work. The same statistical patterns that produced the original output will evaluate it favorably. You’ve built a conflict of interest into your architecture.

The fix is the Critic Pattern , and the key design principle is model diversity.

Generator (Model A) → Output → Critic (Model B) → Feedback → Generator → Revised Output

Using a different model for the critic role — Claude reviewing GPT-4o output, or Gemini reviewing Claude output — introduces genuine perspective diversity. Each model has different training data emphases, different failure modes, and different stylistic biases. A cross-model critic is far more likely to catch errors that the generator is systematically blind to.

The Critic agent should be given a structured evaluation rubric, not a vague “review this” prompt. A good rubric for a code-generating agent might look like:

  • Correctness : Does the code do what the spec requires?
  • Edge cases : Are null inputs, empty collections, and boundary values handled?
  • Security : Are there injection vectors, exposed secrets, or unsafe deserialization?
  • Readability : Would a mid-level engineer understand this without comments?
  • Test coverage : Are the happy path and at least two failure paths tested?

The Critic returns a structured response — pass/fail per criterion, plus specific feedback for each failure. The Generator receives this structured feedback and revises. This continues until all criteria pass or the maximum iteration count is reached.

One underrated implementation detail: give the Critic explicit permission to fail things. If your Critic prompt says “review this and suggest improvements,” you’ll get suggestions. If it says “your job is to find reasons this should not ship — be adversarial,” you’ll get a real review.

State Machines vs. DAGs: Choosing Your Control Flow Model

This is the question that causes more architecture debates than almost any other in the multi-agent space, and the answer is genuinely context-dependent.

Directed Acyclic Graphs (DAGs) model workflows that flow in one direction without cycles. Task A feeds into Task B and Task C; B and C feed into Task D; done. This is the natural model for pipelines where each step produces input for the next and you never need to revisit a completed step.

CrewAI’s sequential and hierarchical processes are essentially DAG-based. Temporal workflows are explicitly DAG-structured. They’re excellent for deterministic, well-understood workflows where the shape of the computation is known in advance.

Cyclic graphs (State Machines) allow loops — the ability to return to a previous state based on new information. This is what LangGraph was purpose-built for, and it’s the right model for any agent that needs to:

  • Retry a failed tool call with modified parameters
  • Return to a planning step after discovering the current plan won’t work
  • Run a reflection loop until quality criteria are met
  • Wait for human approval before proceeding

The decision rule I’ve converged on after shipping several production systems:

Does your agent ever need to go backwards?
                           / 
                         YES NO
                          | |
                     LangGraph CrewAI / Temporal
                  (cyclic graph) (DAG model)

“Going backwards” means any scenario where the correct next step depends on the outcome of a previous step in a way that might require revisiting earlier work. Reflection loops go backwards. Replanning goes backwards. Waiting for a human to approve and then resuming goes backwards.

If your workflow is genuinely linear — always the same steps, always in the same order, with no branching based on intermediate results — a DAG model is simpler and easier to reason about. But be honest with yourself about whether your workflow is actually linear or whether you’re just assuming it will be.

The infrastructure implications differ significantly:

                  DAG Model Cyclic / State Machine
-----------------------------------------------------------------------------------------------
Execution model Step functions / pipelines Long-running stateful process
State management Passed between steps Persisted in graph state store
Debugging Linear trace, easy to follow Requires full state inspection per node
Scalability Each step independently Entire graph runs in one execution context
Failure recovery Retry from last step Checkpoint and resume from last stable state
Cost predictability High (bounded steps) Lower (loop count is variable)

Shared Epistemic Memory: The Blackboard Architecture

Here’s a scaling problem that hits every team that gets beyond three or four agents: how do agents share what they know?

The naive approach is to pass everything as function arguments — the output of Agent A becomes the input to Agent B as a large JSON blob. This works until it doesn’t. The blob grows. Context windows fill up. You start seeing agents with 80% of their context window consumed by state they don’t actually need for their specific sub-task.

The sophisticated approach is the Blackboard Architecture  — a pattern borrowed from classical AI and distributed systems that is experiencing a quiet renaissance in the agentic era.

The concept is simple: instead of passing state between agents directly, all agents read from and write to a shared “blackboard” — a structured, queryable state store that sits outside any individual agent.

                        ┌─────────────────┐
                        │ BLACKBOARD │
                        │ (Shared State) │
                        └────────┬────────┘
                    ┌────────────┼────────────┐
                    ↓ ↓ ↓
              Agent A Agent B Agent C
            (reads/writes) (reads/writes) (reads/writes)

Each agent reads only the sections of the blackboard relevant to its current task. Each agent writes its outputs back to designated sections. No agent needs to know what other agents are doing — it just needs to know the schema of the blackboard.

In practice, the blackboard is typically implemented as:

  • A structured document in a database (DynamoDB, Redis, or Postgres with JSONB) for fast key-based access to specific state sections
  • A vector store for semantic retrieval when agents need to find relevant context without knowing the exact key
  • A message log for ordered history that agents can replay or summarize

The schema design of your blackboard is one of the most important architectural decisions you’ll make. Too flat and agents can’t find what they need without reading everything. Too nested and updates become complex. A layered approach works well: top-level sections for task metadata, agent outputs, shared knowledge, and execution history.

One design principle worth emphasizing: write provenance into every blackboard entry. Every piece of information written to the shared state should include which agent wrote it, when, and with what confidence level. When a downstream agent reads a fact and makes a decision based on it, you want to be able to trace that decision back to its source when something goes wrong.

Production Reality Check

The patterns in this article are genuinely powerful. They’re also genuinely expensive, and the cost compounds in ways that aren’t obvious until you’re staring at a cloud bill.

Let’s put some real numbers on it.

A Reflection loop that runs an average of 2 iterations doubles your model call count. If your base cost is $0.05 per task, reflection takes it to $0.10. That sounds manageable — until you’re handling 50,000 tasks per day, at which point reflection alone adds $2,500/day in model costs.

Fractal Chain-of-Thought with 3 levels of recursion and an average of 4 steps per level generates roughly 64 reasoning steps (⁴³) for a single complex query. At even modest token counts per step, this can push a single query cost into the $0.50–$2.00 range. Reserve it for problems that actually need that depth.

Cross-model Critic patterns (e.g., Claude reviewing GPT-4o) introduce a second API dependency with its own latency, rate limits, and cost curve. Budget for both. More importantly, test what happens when the Critic’s API goes down — your system should degrade gracefully, not grind to a halt.

The honest question to ask before adding any coordination pattern is: what’s the quality delta, and what’s it worth?

Reflection improving accuracy from 78% to 91% on a customer-facing recommendation engine that drives revenue? Worth the cost. Reflection improving accuracy from 94% to 96% on an internal summarization tool that saves analysts 10 minutes a day? Probably not.

Measure first. Add complexity second.

What Comes Next

In Article 3, we shift from how agents think to how agents fail — and more importantly, how you detect and recover from those failures before your users do.

AgentOps is the unglamorous but absolutely essential discipline of treating your AI system like the distributed system it actually is: with observability, guardrails, eval pipelines, and human checkpoints baked in from the start. Not bolted on after the first production incident.

Because there will be a production incident. There always is.

                  L1: Stateless L2: Tool-Augmented L3: Autonomous L4: Multi-Agent L5: Self-Correcting
------------------------------------------------------------------------------------------------------------------------------------------------------
Execution Serverless / Edge Serverless + integr. Long-running container Distributed orchestrator Distributed + feedback loops
State None None Short + long-term memory Shared state across agents State + mutation history
Latency profile Predictable Slightly variable Variable (loop-dependent) High, parallelizable Highest, bounded by budget
Cost model Linear (tokens) Linear + tool costs Nonlinear (calls per task) Nonlinear × agent count Nonlinear × iteration count
Primary failure Bad retrieval Tool hallucination Context overflow Cascade failures Runaway loops
Observability Basic logging Tool call tracing Full trace per loop Cross-agent tracing Cost + quality dashboards

Included for reference from Article 1 — the coordination patterns in this article map primarily to L3, L4, and L5.

This is Article 2 of a 4-part series on Agentic AI Architectures. Ready for Article 3 — AgentOps — whenever you are.

Stop Copying Skills Between Claude Code, Cursor, and Codex

This is part five in a series about wrangling the growing pile of skills, scripts, and context that AI coding agents depend on. In part one, I covered why progressive disclosure beats dumping everything into context. Part two showed how akm unifies your local assets across platforms into one searchable stash. Part three added remote context via OpenViking for teams. And part four plugged in community knowledge through Context Hub.

All of that assumed you were picking one tool. But you’re probably not. You’ve got Claude Code at work, Codex for side projects, Cursor for quick edits. Each one has its own skills directory — ~/.claude/skills/, ~/.codex/skills/, .cursor/rules/ — and none of them can see each other.

So you rebuild the same deploy skill twice. You forget where the good version of your testing scaffold lives. You copy files between directories and they drift within a week. You end up grepping across three different paths trying to find the one that handled database migrations correctly.

This isn’t a tooling problem. It’s a discovery problem. And in the past week alone, three separate products launched to fix it — a macOS GUI for browsing skill files, a web-based editor for organizing them, a designer’s viral Medium post about layered architecture for skills. People are clearly hurting here.

But every one of those solutions wants you to move your files somewhere. Copy them into a central location. Sync them between directories. Maintain one source of truth that you manually keep updated.

There’s a better approach: don’t move anything. Just make everything searchable.

Copy and Sync (The Obvious Way)

Pick a canonical directory, copy everything into it, keep it updated. Tools like ClaudeMDEditor make this easier with a GUI, and symlinks can automate some of it.

Works great — until it doesn’t. You update the original and forget to sync. The copy drifts. You end up with two versions of the same skill, slightly different, and no way to tell which is current. The maintenance overhead scales linearly with every new skill and every new platform.

GUI Discovery (The Pretty Way)

Tools like Chops give you a nice interface for browsing your skill files. You can see what’s where, organize them visually, tag them.

But your agent can’t use a GUI. When Claude Code is mid-task and needs a deployment skill, it can’t open an Electron app and browse around. It needs something it can call — a programmatic interface that returns results without human intervention.

Index in Place (The akm Way)

This is the approach akm takes. Don’t move your files. Don’t copy them. Don’t sync them. Just point at them and build an index.

Your skills stay exactly where each tool expects them. Claude Code still finds its skills in ~/.claude/skills/. Cursor still reads .cursor/rules/. Nothing breaks. But now there’s a single search layer across all of them.

When your agent needs something, it searches once and gets results from every source. When you update a skill in its original location, the index picks up the change. No sync step. No drift.

Five Commands and You’re Done

Here’s the full setup. Takes about 30 seconds.

# Install
curl -fsSL https://raw.githubusercontent.com/itlackey/akm/main/install.sh | bash

# Initialize
akm setup

# Point at your existing skill directories
akm add ~/.claude/skills
akm add ~/.codex/skills
akm add .cursor/rules

# Search across all of them
akm search "deploy"

That last command returns results from every source, ranked by relevance. Each result shows the asset type, name, source, and a snippet. Your agent — or you — can load the full content:

akm show skill:deploy-to-production

Only the skill you need gets loaded into context. Everything else stays out.

Tell Your Agent About It

Here’s the part that ties it all together. Drop this into your AGENTS.md, CLAUDE.md, or system prompt:

## Resources & Capabilities

Search for skills, commands, and knowledge using `akm search <query>`.
View full details with `akm show <ref>`.

That’s the entire integration. No plugins, no SDKs, no integration code. Any model that can run shell commands can use akm. Claude Code, Codex, Cursor — if it has a terminal, it works.

The agent runs akm search to find what it needs, akm show to load the content, and gets to work. Everything else stays out of context. Progressive disclosure — the agent discovers what exists, then activates only what it needs. If that pattern sounds familiar, I covered the architecture behind it in part one.

What’s Next

This post covered the individual developer workflow — one person, multiple tools, skills everywhere. But what happens when a team of five developers each has their own skills across three platforms? That’s where things get interesting, and where akm’s source model, Git integration, and private registry support come into play.

For now: install akm, point it at your directories, and run akm search. You’ll be surprised how many skills you already have.

Give it a look at github.com/itlackey/akm. If you’ve got agent assets scattered across platforms, give it a shot and let me know what breaks.

Agentic Architectures — Article 1: The Agentic AI Maturity Model

From “Just Call the API” to Self-Evolving Ecosystems

There’s a conversation I keep having with engineering teams. Someone has just shipped a feature that calls GPT-4o or Claude, the demo looks impressive, and then a product manager walks in and asks: “So when do we make it fully autonomous?”

The room goes quiet.

The problem isn’t ambition — it’s vocabulary. “Autonomous” means five completely different things depending on who’s in the room. To the CTO, it means cost savings. To the ML engineer, it means ReAct loops and tool-calling. To the backend team, it means a distributed system they’re going to have to debug at 2am.

What we need is a shared language. A maturity model.

I’ve spent the last two years building production AI systems — RAG pipelines, multi-agent orchestrators, agentic workflows running on cloud runtimes — and I’ve come to believe that every system you build sits at one of five levels. Knowing which level you’re on is the single most important thing you can do before making architectural decisions.

Let’s walk through all five.

Level 1: Prompt-Based — The Stateless

The signature move: You write a prompt. The model responds. Done.

This is where every team starts, and there’s no shame in it. A well-engineered Level 1 system — think basic RAG with a vector database, or a single-turn LLM call wrapped in a clean API — can handle an enormous amount of real business value. Customer FAQ bots, document summarization, code explanation tools: these are Level 1, and they work.

The architecture is simple because the state is zero. Each request is born and dies in a single HTTP round-trip. There’s no memory between turns, no planning, no tool use. The LLM is a sophisticated function: input goes in, text comes out.

User Query → [Context Retrieval] → Prompt → LLM → Response

Infrastructure fingerprint: A single serverless function (Lambda, Cloud Run) is often enough. Latency is predictable because you’re making exactly one model call. Cost is linear and easy to forecast. The main failure mode is retrieval quality — garbage in, garbage out — not the agent layer, because there is no agent layer.

Where it breaks: The moment a user wants the system to do something with the answer. “Summarize this contract” is Level 1. “Summarize this contract and then send the action items to our Jira board” is not.

Level 2: Tool-Augmented — The Doer

The signature move: The model decides which function to call, and your infrastructure executes it.

This is where things get genuinely interesting — and where a surprising number of teams stop, thinking they’ve “done AI.” Function calling (or “tool use” in Anthropic’s terminology) fundamentally changes the mental model. The LLM is no longer just generating text; it’s generating intent.

You define a set of tools — an OpenAPI spec, a Python function schema, a list of MCP-compatible endpoints — and the model figures out which ones to invoke based on the user’s request. Your code handles the execution and feeds the result back.

User Query → LLM (reasoning) → Tool Call → Execution → LLM (synthesis) → Response

What makes Level 2 non-trivial in production is error handling. Models hallucinate tool names. They pass arguments with wrong types. They call a write endpoint when they should have called a read one. A robust Level 2 system needs:

  • Input validation on every tool call before execution
  • Graceful fallbacks when a tool returns an error (don’t just crash — tell the model what went wrong and let it retry)
  • Idempotency checks on any tool that mutates state

The OpenAPI spec integration story is particularly powerful here. If you describe your internal APIs in OpenAPI format, you can essentially give the model a self-describing interface to your entire backend. This is the beating heart of products like Copilot for enterprise apps.

Infrastructure fingerprint: You’re now managing tool execution latency in addition to model latency. Two or three tool calls in sequence, each taking 200–500ms, can make a “fast” response feel slow. Start thinking about parallelizing independent tool calls. Cost starts to diverge from simple per-token math — a tool that calls a third-party API has its own cost curve.

Where it breaks: When the task requires multi-step reasoning across interdependent actions. The model can call tools, but it can’t hold a plan in its head across a long sequence of them. For that, you need state.

Level 3: Autonomous Agents — The Planner

The signature move: The ReAct loop. Reason, Act, Observe, repeat.

This is the architecture that the word “agent” was coined for. Introduced in the landmark 2022 paper ReAct: Synergizing Reasoning and Acting in Language Models, the core idea is elegantly simple: instead of a single prompt-response cycle, you give the model a loop.

Thought → Action → Observation → Thought → Action → Observation → ... → Final Answer

At each step, the model articulates its reasoning (“I need to check the user’s account balance before proceeding”), selects a tool, observes the result, and decides what to do next. The loop continues until the model decides it has enough information to respond.

What makes Level 3 qualitatively different from Level 2 is memory management. A ReAct agent needs to track what it’s done, what it’s learned, and what it still needs to do. This splits into two distinct concerns:

Short-term memory is the conversation context — the running thread of thoughts, actions, and observations that constitutes the current task. In practice, this is the LLM’s context window, and it’s finite. Naive implementations stuff everything into the context until it overflows. Sophisticated ones implement sliding windows, summarization, or structured scratchpads.

Long-term memory is everything the agent needs to remember across tasks — user preferences, learned facts, past decisions. This typically lives outside the model entirely: a vector database for semantic retrieval, a key-value store for structured facts, or a graph database for relational knowledge.

The combination of a reasoning loop and dual-layer memory is what gives Level 3 agents their apparent intelligence. They can decompose problems, backtrack when a tool call fails, and accumulate knowledge over a session in ways that feel remarkably human.

Infrastructure fingerprint: Now you’re operating a stateful, long-running process. Serverless functions with 30-second timeouts don’t cut it anymore. You need persistent execution environments — containerized long-running services, step function orchestrators, or purpose-built agent runtimes (AWS Bedrock AgentCore, Azure AI Foundry Agent Service). Token costs are no longer linear: a complex reasoning chain might make 8–12 model calls to answer one user query. Build cost monitoring from day one.

Where it breaks: A single agent with access to all tools is a single point of failure — and a single point of security exposure. When the task requires genuine parallelism or specialist expertise, one planner isn’t enough.

Level 4: Multi-Agent Orchestration — The Team

The signature move: Specialized agents with defined roles, coordinated by an orchestrator.

The intuition here maps cleanly to how human teams work. You don’t hire one person who is simultaneously a senior engineer, a QA lead, a security auditor, and a product manager. You build a team. Level 4 applies the same logic to AI.

A canonical software engineering multi-agent system might look like this:

  • Orchestrator Agent : Receives the task, breaks it into sub-tasks, routes work, and assembles the final output.
  • Coder Agent : Writes code given a spec. Has access to file system tools and a code execution sandbox.
  • Reviewer Agent : Reads code, applies a checklist, and returns structured feedback. Possibly runs on a different model for perspective diversity.
  • Tester Agent : Generates test cases, runs them against the code, and reports pass/fail.
  • Security Agent : Scans for common vulnerabilities (injection, exposed secrets) before the code is merged.

Each agent operates within a narrow, well-defined context. This matters for three reasons:

Reduced hallucination: A focused prompt with a specific role and limited tool access produces more reliable output than a general-purpose agent trying to do everything.

Parallelism: Independent sub-tasks can run concurrently. The Reviewer and Tester can work in parallel on the same code diff.

Accountability: When something goes wrong (and it will), you can isolate which agent in the pipeline failed and why. This is far easier than debugging a single monolithic agent’s 40-step reasoning trace.

The coordination layer is where the real engineering lives. You need to decide how agents communicate — direct calls, a message queue, a shared state store — and how to handle failures in one agent without cascading across the whole system. (More on this in Article 2.)

Infrastructure fingerprint: You are now running a distributed system. All of the distributed systems problems apply: network partitions, partial failures, ordering guarantees, idempotency. Your observability stack needs to trace requests across agents, not just within one. Tools like LangSmith or Arize Phoenix become essential, not optional. Compute costs grow non-linearly with agent count — a four-agent pipeline that each makes 5 model calls generates 20 model calls per user request.

Where it breaks: Quality drift. Multi-agent systems can converge on confidently wrong answers because each agent assumes the previous one got it right. No one is questioning the chain. That’s the job of Level 5.

Level 5: Self-Correcting Systems — The Optimizer

The signature move: Agents that critique their own output and update their own behavior.

This is the frontier — and the most misunderstood level. “Self-correcting” doesn’t mean the AI is rewriting its own weights (that’s training, not inference). It means the system has architectural mechanisms to catch its own errors and improve its outputs within a deployment.

The foundational pattern is Reflection. After an agent produces an output, a separate “Critic” agent (or a second pass of the same model with a different prompt) evaluates it against a rubric:

  • Does this answer the original question?
  • Are there factual claims that need verification?
  • Does the code actually compile and pass tests?
  • Is the tone appropriate for the context?

If the critic finds problems, the output goes back to the generator with structured feedback. The generator revises. The critic reviews again. This loop runs until the output passes — or until a maximum iteration count is hit (always set one; an infinite reflection loop is a runaway cost event).

The more advanced form of this is prompt mutation  — when an agent not only fixes its current output but also updates the prompt template that produced it, so future calls start from a better baseline. This is where you start to see systems that genuinely improve over time without retraining.

Generator → Output → Critic → [Pass] → Deliver
                             → [Fail] → Feedback → Generator (repeat)

Some teams implement this with dedicated frameworks (DSPy’s prompt optimization is a notable example). Others build it manually by storing “lessons learned” in long-term memory that gets injected into future prompts.

Infrastructure fingerprint: The cost profile becomes unpredictable in a way that requires active management. A single reflection loop doubles your model calls. Two loops quadruples them. You need circuit breakers — hard limits on loop iterations, cost caps per request, and alerting when a task is taking 3x the expected token budget. The compute requirement is also asymmetric: reflection runs well on smaller models (you don’t need GPT-4o to critique a GPT-4o output; Claude 3.5 Haiku reviewing a Sonnet output can work remarkably well and costs a fraction of the alternative).

Mapping Levels to Infrastructure

A quick reference for the architectural decisions that change at each level:

                  L1: Stateless L2: Tool-Augmented L3: Autonomous L4: Multi-Agent L5: Self-Correcting
------------------------------------------------------------------------------------------------------------------------------------------------------
Execution Serverless / Edge Serverless + integr. Long-running container Distributed orchestrator Distributed + feedback loops
State None None Short + long-term memory Shared state across agents State + mutation history
Latency profile Predictable Slightly variable Variable (loop-dependent) High, parallelizable Highest, bounded by budget
Cost model Linear (tokens) Linear + tool costs Nonlinear (calls per task) Nonlinear × agent count Nonlinear × iteration count
Primary failure Bad retrieval Tool hallucination Context overflow Cascade failures Runaway loops
Observability Basic logging Tool call tracing Full trace per loop Cross-agent tracing Cost + quality dashboards

Production Reality Check

Here’s the honest conversation you need to have before choosing a level: most production systems should be Level 2 or 3, and that’s not a failure.

I’ve seen teams build Level 4 multi-agent systems because it felt more impressive, only to discover that a well-engineered Level 2 system with good tool design would have answered 80% of the queries faster, cheaper, and with fewer failure modes.

The maturity model isn’t a ladder you’re supposed to climb as fast as possible. It’s a map. The right level is the one where the complexity you’re adding is justified by the capability you’re gaining.

Some honest benchmarks from production:

  • A Level 3 ReAct agent making 8 model calls to answer a single query costs roughly 8–15x more than a Level 1 RAG call. The accuracy improvement is real — but measure it against your actual use case, not a benchmark.
  • Adding a reflection loop (Level 5 element) to a Level 3 agent typically improves output quality by 15–30% on complex reasoning tasks. It also doubles latency and cost. For a customer-facing product with a 3-second SLA expectation, that tradeoff often doesn’t pass.
  • Multi-agent systems (Level 4) have an operational overhead that is consistently underestimated. Plan for it to take 3–4x longer to debug a failure in a 4-agent pipeline than in a single agent — not because the problem is harder, but because the trace is longer and the failure point is further from where the error surfaces.

What Comes Next

In the next article, we’ll go deeper into the coordination and reasoning patterns that make Level 3 and Level 4 systems actually work in practice — hierarchical planning, the Critic architecture, and the surprisingly important question of whether you should use a cyclic graph or a DAG to model your agent’s workflow.

The short answer is: it depends on whether your agent ever needs to go backwards. And the answer is almost always yes.

This is Article 1 of a 4-part series on Agentic AI Architectures. The series covers the Maturity Model, Coordination & Reasoning Patterns, AgentOps, and Agentic Protocols (MCP & A2A).

Reimagining Creativity: Inside IdeaForge

_In an era where the “blank page” is the biggest hurdle to innovation, the tools we use to brainstorm, organize, and refine our thoughts matter more than ever. Enter IdeaForge—a modern, full-stack solution designed to take ideas from a fleeting thought to a structured reality.

Whether you are a developer looking for inspiration, a writer battling blocks, or a strategist mapping out a new project, IdeaForge provides the “arena” to forge raw concepts into polished gems._

What is IdeaForge?

At its core, IdeaForge is an AI-powered content and idea management platform. Hosted at ideaforge-arena.vercel.app, it serves as a centralized hub where users can generate, store, and refine prompts and concepts.

The project aims to solve the problem of “context switching.” Instead of jumping between a notes app, an AI chat interface, and a document editor, IdeaForge integrates these workflows into a single, intuitive dashboard.

Key Features

1. AI-Powered Prompting

IdeaForge isn’t just a digital notebook. It leverages advanced AI models to help users craft high-quality, engaging prompts. By using the “Arena,” creators can explore imaginative prompts that are tailored for modern creative needs—be it for social media, coding, or storytelling.

2. The Content Vault

One of the most significant pain points for creators is losing track of a great idea. IdeaForge includes a robust “vault” system where you can save drafts, organize your thoughts, and keep your best prompts ready for deployment at any time.

3. Modern UI/UX

The first thing you’ll notice when visiting the live site is the sleek, responsive interface. Built with TypeScript and Tailwind CSS, the platform offers a “dark-mode” friendly, accessible experience that stays out of your way and lets your creativity take center stage.

4. Collaborative Sharing

Innovation rarely happens in a vacuum. IdeaForge is designed for the modern world, allowing users to not just create, but also share their imaginative prompts with a wider community, fostering a culture of collaborative growth.

The Tech Stack Behind the Magic

For the developers out there, the GitHub repository reveals a sophisticated architecture built for speed and scalability:

  • Frontend: Built with Next.js and React, ensuring fast load times and SEO-friendly pages.
  • Styling: Tailwind CSS provides a modular and beautiful design system.
  • Language: TypeScript is used throughout to ensure type safety and a more reliable codebase.
  • Deployment: The project is seamlessly hosted on Vercel, taking advantage of edge computing for global performance.

Why it Matters

The barrier to entry for content creation is lower than ever, but the noise is louder. Tools like IdeaForge are essential because they focus on quality and organization. By helping users “forge” better prompts, the resulting output—be it an article, a piece of code, or a marketing campaign—becomes significantly more effective.

Get Started

Ready to level up your creative workflow?

  • Try the App: Head over to IdeaForge Arena and start crafting.
  • Explore the Code: Check out the source code, contribute, or star the project on GitHub.

IdeaForge is more than just a tool; it’s a workspace for the next generation of thinkers. It’s time to stop scattered thinking and start forging.