Multi-Tenant SaaS Architecture: What Nobody Tells You Before You Build

Multi-tenancy is one of those decisions that looks simple on a whiteboard and complicated in production. Choosing the wrong isolation model at the start — or not consciously choosing at all — creates a class of problems that are genuinely hard to undo later. Here’s what you should know before you write the first migration.

The Three Isolation Models (and the Trade-offs Nobody Leads With)

Every multi-tenant SaaS sits somewhere on a spectrum between full isolation and full shared infrastructure. There are three canonical patterns:

1. Separate databases per tenant

Each tenant gets their own database instance. Full data isolation, no risk of cross-tenant data leakage, clean tenant offboarding, and trivial per-tenant backup and restore.

The trade-offs: provisioning time increases, connection pool management gets complicated fast, schema migrations need to run across N databases, and cost scales linearly with tenant count. This model makes sense when you have strong compliance requirements, enterprise clients who mandate data isolation, or when per-tenant customisation of the data model is a real product requirement.

2. Separate schemas, shared database

One database server, but each tenant gets their own schema. This is Postgres-native and is a reasonable middle ground: you get logical separation without the operational overhead of separate database instances.

The catch: connection pooling tools like PgBouncer work at the connection level, not the schema level. You’ll need to set the search_path correctly per request, and some ORMs handle this gracefully and some don’t. Schema migrations still need to be coordinated across all tenants.

3. Shared schema, shared database (row-level tenancy)

Every table has a tenant_id column. All tenants share the same tables. This is the cheapest to operate, the simplest to migrate, and the easiest to onboard new tenants into.

The risk is the one that bites teams most: if you forget to filter by tenant_id anywhere in your application, a tenant can see another tenant’s data. This is not a theoretical risk — it has caused real security incidents. The mitigation is row-level security (RLS) at the database layer.

Row-Level Security: Use It, Don’t Trust the Application Layer Alone

If you go with the shared schema approach, Postgres RLS is not optional — it’s the last line of defence.

-- Enable RLS on the projects table
ALTER TABLE projects ENABLE ROW LEVEL SECURITY;

-- Create a policy that restricts reads to the current tenant
CREATE POLICY tenant_isolation ON projects
  USING (tenant_id = current_setting('app.current_tenant_id')::uuid);

Then in your application, set the tenant context at the start of each request:

SET app.current_tenant_id = '{{tenant_uuid}}';

This means that even if your application code has a bug and omits the tenant_id WHERE clause, the database enforces the boundary. Defence in depth.

The cost: current_setting() calls add marginal overhead per query. In practice this is negligible for most workloads, but benchmark it if you’re operating at very high query rates.

The Tenant Resolution Problem

How does your application know which tenant a request belongs to? There are three common approaches, each with real implications for your routing and infrastructure:

Subdomain-based: acme.yourapp.com → resolve acme to a tenant.
Clean for end users. Requires wildcard TLS, and your CDN/load balancer needs to handle arbitrary subdomains. Custom domains (where a tenant uses app.acmecorp.com) add another layer of complexity: you need to map arbitrary domains to tenant IDs at the edge.

Path-based: yourapp.com/t/acme/dashboard
Simpler infrastructure. Less ergonomic for users. Works everywhere including native apps. Good for internal tooling or B2B products where users don’t care about the URL.

Token-based: tenant encoded in the JWT or session token.
Common for API-first products. Tenant context is explicit in every request. No DNS dependency. Slightly more complex auth middleware.

Most teams mix approaches: subdomain for the main app, token-based for the API.

Schema Migrations at Scale

This is the operational burden that takes teams by surprise. In a single-tenant app, a migration runs once. In a multi-tenant app with separate databases or schemas, it runs N times.

For shared-schema tenancy, this is not a problem — migrations run once. For schema-per-tenant or database-per-tenant, you need a migration runner that can:

  1. Track migration state per tenant
  2. Run migrations in parallel (with configurable concurrency)
  3. Handle failures gracefully — partial rollouts should not leave some tenants on schema version 7 and others on version 8 invisibly

A pattern that works well: maintain a tenant_migrations table in your management database that records the current migration version for each tenant. Your deployment pipeline queries this table, identifies tenants not at the current version, and runs migrations in batches.

Tenant Onboarding: Provisioning New Tenants Efficiently

In a shared-schema model, onboarding a new tenant is simply inserting a row into a tenants table and using the generated ID as the tenant_id in all subsequent writes. It’s fast, it’s atomic, and it doesn’t require any infrastructure changes.

In a schema-per-tenant model, onboarding requires creating a new schema and running the baseline migrations against it. This adds latency to the signup flow — typically seconds for small schemas, potentially minutes for large ones. The standard approach is to provision the tenant schema asynchronously and show a “getting your workspace ready” state to the user while it completes.

In a database-per-tenant model, provisioning is the most expensive: create a new database instance, configure access, run migrations, and update the routing table. This is typically a background job that takes minutes, and the user experience must be designed to accommodate it.

Plan your onboarding UX around your provisioning model. Don’t discover the mismatch after you’ve shipped.

Don’t Confuse Multi-Tenancy with Multi-Instance

One thing worth saying explicitly: multi-tenancy is a data architecture and application design concern, not an infrastructure concern. You can run a multi-tenant application on a single server or across hundreds. You can run a single-tenant application in Kubernetes with 50 replicas.

The isolation model lives in your data layer and your application logic. Infrastructure decisions about scaling, availability, and deployment are separate — important, but separate.

For a deeper look at the specific patterns and when to apply each, the Actinode guide on multi-tenant SaaS architecture covers the full decision matrix including compliance considerations and per-pattern migration strategies.

Summary

Model Isolation Cost Migration complexity Best for
Separate databases Full High High Enterprise, regulated industries
Separate schemas Logical Medium Medium Mid-market SaaS
Shared schema + RLS Row-level Low Low High-volume B2B, most startups

The choice you make here will be with you for years. Make it deliberately.

A Note on Testing Your Isolation Model

Whatever model you choose, write explicit tests that verify your tenant isolation holds. Not just unit tests for the query logic — integration tests that simulate cross-tenant access attempts and verify they fail at the database layer.

A test suite that catches isolation failures looks like this:

  1. Create two test tenants with separate datasets
  2. Authenticate as tenant A
  3. Attempt to read tenant B’s records via your application’s own API routes
  4. Assert the response contains zero tenant B records

This test should run in your CI pipeline on every merge. Tenant isolation failures are the kind of bug that makes the news, and the cost of catching them in CI is trivially low compared to the cost of discovering them in production.

The same principle applies to your RLS policies: write a test that connects to Postgres with the RLS policy active, sets app.current_tenant_id to tenant A’s ID, and attempts to SELECT tenant B’s rows directly. If RLS is working correctly, the query returns zero rows. If it returns any rows, your policy has a gap.

Isolation is a correctness property, not just a design preference. Test it like one.
I built a flashcard app after burning out on Anki — here’s what I learned

I used Anki for a long time.

It made sense back then. You had a word list,
you needed to memorize it, you drilled it
until it stuck. Simple. Effective enough.

But it’s 2026. And I think we need to have
an honest conversation about why Anki is
starting to feel like a fax machine in a
world of instant messaging.

The uncomfortable truth about flashcards

I was memorizing words. Not learning them.

There’s a difference — and it took me embarrassingly long to see it.

When you drill “ephemeral → short-lived” a hundred times, your brain stores a weak, isolated link. It knows the definition. It does not know the word.

But when you read “the beauty of cherry blossoms is ephemeral — they last only one week” — something different happens. Your brain attaches the word to a scene, an emotion, a moment. That’s the kind of memory that survives a real conversation.

This is called contextual encoding. It’s not a new idea — memory researchers have known this for decades. And yet almost every flashcard app ignores it completely.

I got frustrated enough to build
MindDory — an app
that uses AI to wrap your target vocabulary
in short contextual stories instead of
isolated cards.

So I built MindDory

The idea was simple: what if instead of isolated cards, an AI generated short stories around exactly the words you need to learn?

You read the story. The words appear in context. Your brain does what it’s actually designed to do.

I also added memory cues — smart keyword associations for the words that just refuse to stick — and spaced repetition to handle the review timing automatically.

Honestly? It felt like cheating compared to my old Anki routine.

Three things building this taught me

The hardest part had nothing to do with code.

I spent weeks just trying to understand why people fail at language learning. Reading research papers at midnight. Talking to strangers on Reddit about their Anki burnout. Watching where the drop-off happens.

The answer was always the same: isolation. Words learned without context don’t transfer to real life. Full stop.

My first version was too clever.

I stuffed it with features I thought were cool. Users opened the app, got confused, and left. So I stripped everything back to the core loop: encounter a word → see it in a story → review it later. That’s it. Everything else is noise.

Distribution is genuinely harder than building.

I’m a builder. I like building. But getting MindDory in front of people who actually need it? That’s a completely different skill set — and honestly the thing I’m still figuring out.

If you’ve shipped something and cracked distribution, I’d love to know how. Drop it in the comments. I mean it.

Where things stand

MindDory is live on the App Store. Free to try. English, French, Korean, Chinese and more.

If you’ve ever felt like Anki was grinding you down without actually making you fluent — that’s exactly who I built this for.

And if you have thoughts on contextual learning, memory science, or just want to tell me I’m wrong about something — please do. That’s the kind of conversation I’m here for.

If you’re curious what contextual learning
looks like in practice, I built MindDory
around this idea — minddory.com

5 MVP Development Mistakes That Kill Startups Before Launch

Most startups don’t fail after launch — they fail because of decisions made before a single line of production code was written. After seeing the same patterns repeat across dozens of early-stage builds, I want to document five of the most common MVP development mistakes and what they actually cost you.

Mistake 1: Treating the MVP as a Smaller Version of the Full Product

This is the most expensive mindset error you can make.

An MVP is not a product with features removed. It is a hypothesis with a delivery mechanism. The question is not “what’s the minimum we can ship?” — it is “what is the fastest way to learn whether this problem is real and whether our solution addresses it?”

When teams approach an MVP as a stripped-down full product, they still make the same architectural decisions, the same data model choices, and the same tech stack trade-offs they’d make for a mature system. The result: a system that takes 6 months to build and 3 months to change after you learn you got the core assumption wrong.

The fix: Start with user stories, not feature lists. Every piece of the MVP should be traceable to a specific assumption you need to validate. If you can’t name the assumption a feature is testing, cut the feature.

Mistake 2: Optimising for Scale Before You Have Users

Premature scalability is the startup equivalent of building a 10-lane highway before anyone has applied for a driving licence.

Multi-region deployments, event-driven microservices, database sharding strategies — these decisions have real costs: complexity, slower development, harder debugging, and more expensive infrastructure. They make sense when you have the load to justify them. In an MVP, they are often just risk without corresponding reward.

The default starting point for most web applications — a single server, a relational database, a simple monolith — will comfortably handle the traffic of the vast majority of early-stage products. The systems that fail at early-stage aren’t failing because the architecture wasn’t distributed enough; they’re failing because the product wasn’t validated enough.

Scale for the users you have plus a reasonable buffer. Save the architecture work for when you actually have the problem.

Mistake 3: Skipping Auth and Permissions “Until Later”

Authentication and authorisation are never “later” problems. They’re day-one problems, and retrofitting them into an existing system is disproportionately expensive.

The reason this mistake happens is understandable. Auth feels like plumbing. You want to build features. And in the very earliest prototype — a Figma walkthrough, a Typeform, a manual demo — you don’t need auth at all. But once you have real users interacting with a real system, the risk of skipping this is not theoretical. You’re one shared session cookie away from a user seeing another user’s data.

Modern auth libraries (Clerk, Auth0, NextAuth, Supabase Auth) have dramatically reduced the cost of getting this right from the start. There is no good reason to skip it.

Mistake 4: Building Without a Feedback Loop Mechanism

An MVP without feedback infrastructure is just software. The whole point is to learn, and learning requires a structured way to capture what users do and what they say.

This doesn’t mean building a full analytics platform. It means, at minimum:

  • Event tracking on the actions that matter (sign up, core feature use, upgrade, churn trigger)
  • A way for users to tell you something is broken or confusing (even a Typeform link)
  • Some form of session context so you can replay what happened before a support request

Many early teams ship without any of this, then try to diagnose growth problems by asking users in one-on-one calls. One-on-one calls are valuable, but they don’t scale and they’re subject to recall bias. Instrument your product from the start.

Mistake 5: Changing the Scope Mid-Build Without Updating the Timeline

Scope creep is normal. The decision to add a feature mid-sprint is sometimes the right one — you learn something that changes priorities. The problem is doing it without honest reckoning on what it costs.

Every new feature in an MVP build is not additive. It delays launch, adds surface area for bugs, and often introduces coupling that makes future changes harder. When scope changes happen without timeline adjustment, the team compensates by cutting quality: less testing, rushed implementation, deferred refactoring.

The discipline is simple but hard: when you add scope, remove an equivalent amount of scope or explicitly extend the timeline. Make the trade visible. Don’t absorb it invisibly into “we’ll just work harder.”

What an MVP Actually Needs to Succeed

Beyond avoiding these five mistakes, there are a few things that actively drive MVP success that don’t get talked about enough.

A clear definition of “validated.” Before building, write down the specific signal that would tell you the hypothesis is true. Not “people seem interested” — a concrete metric: 30 users completed the core flow, 10 paid, 5 renewed. Without a pre-defined threshold, confirmation bias fills the vacuum and teams convince themselves the signal is there when it isn’t.

Fast feedback cycles, not perfect execution. The goal of an MVP sprint is to reach a learning checkpoint as fast as possible. A good MVP process prioritises shippability and measurability over technical polish. You’re building the minimum surface area needed to generate a signal — then iterating based on what you learn, not on what you assumed.

Documented assumptions before you start. Write down what you believe to be true before you build. Not just the product assumptions — the market assumptions, the pricing assumptions, the onboarding assumptions. When you get data back, you’ll know what changed and what held. Teams that skip this step have no reliable way to learn from their own MVP results.

If you’re currently planning an MVP build, the roadmap matters as much as the stack. The Actinode guide on building from zero to your first 1,000 users walks through the phased approach in detail — what to build in each stage and what to deliberately leave out.

The common thread in all five mistakes above is the same: treating MVP development as a compression of product development, rather than a distinct discipline with its own goals and constraints. The two are not the same, and conflating them is expensive.

One More Thing: Define “Done” Before You Start

A final practical note that doesn’t fit neatly into any of the five mistakes but underpins all of them: define what “done” means for your MVP before you build it.

Not done as in “features shipped” — done as in “we’ve answered the question we set out to answer.” Write down the specific signal that would tell you your core hypothesis is true. A number of users, a conversion rate, a retention metric, a willingness-to-pay threshold. If you can’t write it down before you build, you won’t be able to read it accurately after you ship.

This definition protects you from two failure modes. The first is the MVP that ships but never generates a decision — you collect some signal, it’s ambiguous, and you keep iterating without ever committing to a direction. The second is the MVP that gets declared a success based on vanity metrics — pageviews, signups, demo requests — that feel like progress but don’t validate whether the core assumption holds.

Every good MVP has a clear question it’s trying to answer. That question should be written down before the first commit is made.

I Tried the Notion MCP Challenge — Can I Control My AI Agent?” ⭐

This is a submission for the Notion MCP Challenge

What I Built

I built a Governed MCP-Based AI Agent System where real-world actions are executed through tools — but always under strict policy control.

Instead of focusing only on what agents can do, this system enforces what they are allowed to do — and what must be blocked.

Core Idea

Use MCP as the capability layer and Actra as the governance layer:

  • MCP exposes real tools (Notion workspace actions)
  • The AI agent selects and invokes these tools
  • Actra evaluates every tool call before execution

This creates a system where:

Capability is separated from control.

How It Works (in practice)

In the demo:

  1. The agent connects to Notion via MCP
  2. It discovers available tools:
   notion-search
   notion-get-users
   notion-create-pages
  1. The agent attempts to execute actions

Step 1 — Uncontrolled Agent (Baseline)

No policy enforcement ❌
Agent executes tools freely
  • search works
  • user data can be accessed
  • write operations are possible

The agent has full power — with no guardrails.

Step 2 — Actra-Governed Agent

Actra is introduced as an in-process policy engine.
Every tool call is evaluated before execution.

What Gets Enforced

1. Input validation

Empty search →  Blocked
Rule: block_empty_search

2. Context-based control

safe_mode = true → Block writes
Rule: block_writes_in_safe_mode

The agent still knows about the tool — but cannot execute it.

What Makes This Different

Most AI systems:

  • rely on prompts or heuristics
  • enforce rules inconsistently
  • lack clear visibility into decisions

This system:

  • enforces policies deterministically at runtime
  • separates decision-making from control
  • provides explicit reasoning for every block

What This Enables

  • Safe AI agents for real-world workflows
  • Controlled access to sensitive operations
  • Clear auditability of decisions
  • Policy-driven execution instead of implicit behavior

Core Insight

MCP gives agents capability.
Actra decides whether that capability can be used.

This transforms AI agents from:

“systems that can act”

into:

systems that can act — safely, predictably, and under control.

What Makes This Different

Instead of blindly executing AI actions, every decision is evaluated against policies like:

  • ❌ Block sending sensitive data externally
  • ❌ Restrict unsafe API calls
  • ❌ Prevent unauthorized actions
  • ✅ Allow only whitelisted operations

This turns Notion + AI from a productivity tool into a safe execution environment for real-world workflows.

Video Demo

Show us the code

https://github.com/getactra/notion-mcp-governed-agent

Repo Structure

.
├── LICENSE
│   └── Project license

├── auth
│   ├── callback.ts
│   │   └── Handles OAuth redirect/callback after user authentication
│   ├── exchange.ts
│   │   └── Exchanges authorization code for access/refresh tokens
│   ├── metadata.ts
│   │   └── Fetches auth provider metadata (endpoints, configs)
│   ├── pkce.ts
│   │   └── Implements PKCE (Proof Key for Code Exchange) helpers
│   ├── register.ts
│   │   └── Actra MCP client registration with auth provider (client_id, etc.)
│   ├── state.ts
│   │   └── Save OAuth state
│   └── url.ts
│       └── Builds authorization URLs for login flow

├── mcp
│   └── client.ts
│       └── MCP (Model Context Protocol) client wrapper
│           handles communication with MCP server/service

├── package.json
│   └── Project dependencies, scripts, and metadata

├── test-step1.ts
│   └── Initial test/setup (MCP connection)

├── test-step2.ts
│   └── Next step test 

├── test-step3.ts
│   └── Intermediate flow test

├── test-step4.ts
│   └── Loads Notion MCP tools

├── test-step5-unsafe-agent.ts
│   └── Demonstrates an agent without safeguards
│       (To show risks accessing Notion without safeguards)

└── test-step6-actra-governed-agent.ts
    └── Agent with ACTRA governance layer
        (adds rules, constraints, or safety controls)```


### Example Policy


```yaml
version: 1

rules:
  # Block writes in safe mode
  - id: block_writes_in_safe_mode
    scope:
      action: notion-create-pages
    when:
      subject:
        domain: snapshot
        field: safe_mode
      operator: equals
      value:
        literal: true
    effect: block

  # Block empty search
  - id: block_empty_search
    scope:
      action: notion-search
    when:
      subject:
        domain: action
        field: query
      operator: equals
      value:
        literal: ""
    effect: block

How I Used Notion MCP

Notion MCP acts as the execution layer between an AI agent and real-world actions.

Instead of just reading data, the agent can:

  • discover available tools
  • execute operations (search, fetch, create, update)
  • interact with a live Notion workspace

Role of MCP in this system

In my setup, MCP is responsible for:

  • Tool discovery
  notion-search
  notion-get-users
  notion-create-pages
  • Tool execution
  client.callTool({ name, arguments })
  • Standardizing agent capabilities
    → every action becomes a structured tool call

What This Enables (and Why It’s Risky)

With MCP alone:

  • the agent can read workspace data
  • the agent can modify content
  • the agent can access users and metadata

In Step 5 (uncontrolled agent):

No policy enforcement ❌
Agent executes tools freely

This means:

The agent has full capability, but no control

Adding Actra (What Changes)

With Actra layered on top:

  • every tool call becomes a policy-evaluated action
  • execution is conditionally allowed or blocked
  • decisions are deterministic and explainable

In Step 6 (governed agent):

❌ Blocked by Actra
Rule: block_get_users

The agent still has capability — but no longer has unrestricted power

What This Unlocks

Without MCP:

  • Notion is just a UI or database

With MCP:

  • Notion becomes a programmable execution surface

With MCP + Actra:

  • It becomes a governed AI system
  • Actions are:

    • validated
    • controlled
    • auditable

Architecture

Notion (Workspace / Tools)
        ↓
     MCP Layer
   (Tool Discovery + Execution)
        ↓
     AI Agent
        ↓
   Actra Runtime
 (Policy Evaluation Engine)
        ↓
 Allowed / Blocked 
        ↓
   Tool Execution (or Denied)

Key Insight

MCP gives agents power.
Actra decides how that power is used.

Why This Matters

As AI agents become more powerful, governance becomes critical.

This project shows that:

  • you don’t need heavy infra
  • you don’t need external policy services

You can enforce deterministic, auditable control directly inside your application.

Future Work

  • Role-based policies (team / org level)
  • Policy simulation + testing UI inside Notion
  • Full MCP-native agent orchestration
  • Audit logs and explainability dashboards

Closing Thought

Everyone is building AI agents.

Very few are thinking about control, safety, and governance.

This project is a step toward making AI systems not just powerful — but trustworthy.

Developers Think AI Makes Them 24% Faster. It Actually Makes Them 19% Slower.

Developers using AI coding tools believe they’re 24% faster. Measured objectively, they’re actually 19% slower. That’s a 43-point perception gap, and it explains a lot about why AI tool adoption keeps rising while trust keeps falling.

The data comes from the METR study, which measured experienced open-source developers working on their own repositories with tasks they selected themselves. This wasn’t a lab experiment with toy problems. These were real developers doing real work, and the AI made them measurably less productive while making them feel more productive.

Here’s what’s actually happening, and why it matters for how you use these tools.

The perception gap is the finding

The headline “AI makes you slower” is catchy but misses the point. The real finding is that developers can’t tell whether AI is helping them or not.

The study found that developers consistently overestimated the time savings from AI assistance. They reported feeling faster, more confident, and more productive. The clock said otherwise. The gap came from time spent on activities that feel productive but aren’t: reviewing AI suggestions, debugging AI-generated code, re-prompting after bad outputs, and context-switching between their own thinking and the AI’s suggestions.

This matches what the Stack Overflow 2025 Developer Survey found at scale: trust in AI accuracy dropped to 29%, down from 40% the year before. 46% of developers actively distrust AI tool accuracy. Developers are using the tools more while trusting them less, which is a strange place to be.

Where AI actually helps (and where it doesn’t)

The METR study doesn’t say AI is useless. It says AI on familiar codebases with experienced developers doesn’t save time on average. That’s a specific finding about a specific context.

Other data tells a more nuanced story. The CodeRabbit analysis of 470 GitHub repositories found AI-authored code has 1.7x more issues than human-written code. But the distribution matters:

Task type AI advantage AI disadvantage
Boilerplate generation High (repetitive, low-context) Low
Bug fixing on unfamiliar code Medium (broad knowledge) Medium (misses local context)
Architecture decisions Low (needs full project context) High (hallucinates patterns)
Security-sensitive code Very low Very high (2.74x more XSS vulns)
Code explanation High (good at summarizing) Low
Refactoring existing code Low (METR finding) High (19% slower)

The pattern: AI excels at tasks where broad training data matters more than local project context. It struggles where deep understanding of a specific codebase is required. Refactoring your own code on a project you know well is the worst case for AI assistance because you already have the context the AI lacks.

Why experienced developers get less benefit

This is counterintuitive. You’d expect experienced developers to get more from AI tools because they can better evaluate and direct the output. Google Chrome engineering lead Addy Osmani made this argument and it’s partly right: experts do use AI more effectively than beginners.

But the METR study suggests a ceiling effect. When you already know a codebase well, the AI’s contribution is marginal. You can write the code yourself about as fast as you can prompt, review, then correct the AI’s attempt. The overhead of the human-AI collaboration loop (prompt, wait, read, evaluate, accept/reject, fix) eats the time savings from not typing the code yourself.

For beginners or developers working on unfamiliar codebases, the calculus is different. The AI brings knowledge the developer doesn’t have. But the GDC 2026 report found that among game developers who use AI, 81% use it for research and brainstorming, 47% for code assistance, and only 35% for prototyping. Most developers have already figured out that AI works better for exploration than execution.

What to actually do with this information

The METR study doesn’t mean you should stop using AI tools. It means you should be more intentional about when you use them.

Use AI for code you don’t know. Exploring a new library, understanding an unfamiliar codebase, generating boilerplate for a framework you’ve used twice. These are contexts where the AI’s broad training data genuinely helps.

Don’t use AI for code you know well. If you’ve written similar code 50 times, your fingers are faster than the prompt-review-fix loop. The METR study specifically found that experienced developers on familiar repositories were the ones who got slower.

Watch for the perception trap. If you feel like AI is making you faster, check the data. Track how long tasks actually take with and without AI. The 43-point perception gap means your intuition about AI productivity is probably wrong.

Treat AI output like a junior developer’s PR. Review it with the same scrutiny. The CodeRabbit data shows AI code has 1.75x more logic errors and 8x more excessive I/O operations. A quick skim is not sufficient review.

Use AI for understanding, not generation. “Explain this function” and “What does this error mean” are consistently the highest-value AI use cases across every study and survey. The generation use case gets all the marketing attention, but the comprehension use case delivers more actual value.

The productivity question is the wrong question

The deeper issue with the METR study is that “does AI make developers faster?” might be the wrong question. Speed is one metric. Code quality, security, maintainability, developer satisfaction are others.

The Cortex 2026 Engineering Benchmark found incidents per pull request increased 23.5% and change failure rates rose ~30% across engineering teams adopting AI tools. Developers are shipping more code, but the code is causing more problems.

If AI makes you feel 24% faster while actually making you 19% slower and producing 1.7x more bugs, the net effect on your project is significantly negative. The teams that figure this out and use AI selectively (for comprehension and exploration) rather than universally (for all code generation) will outperform those that don’t.

The tools will get better. The models will improve. But the perception gap will persist as long as developers rely on how AI-assisted coding feels rather than measuring what it produces.

Understanding Data Modeling in Power BI: Joins, Relationships, and Schemas Explained Using Kenya Crops Data

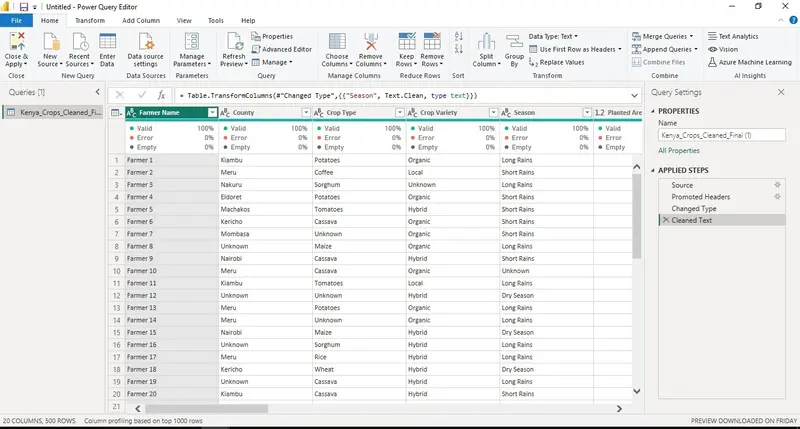
Power query showing facts table after transformation

Data modeling is the foundation of building accurate and high-performing reports in Power BI. It helps organize raw data into structured tables, define relationships, and ensure that calculations, filtering, and aggregations are correct. Using the Kenya_Crops dataset, we can explore joins, relationships, schemas, and common modeling practices in a practical, real-world scenario.

1. What is Data Modeling?

Definition: Data modeling is the process of designing how data is structured, connected, and used for analysis.
Purpose: Ensures efficient reporting, accurate calculations, and easy data maintenance.
Power BI components: Fact tables, dimension tables, relationships, calculated columns, measures, and hierarchies.

Example: In Kenya crops data:

Power Query showing fact table after transformation

Power query showing facts table after transformation

2. Fact vs Dimension Tables

Fact Tables: Contain numeric, transactional data. In Kenya crops:
Kenya_Crops_Cleaned_Final with metrics: Yield (kg) and Price (KES).
Contains foreign keys: CountyID, CropID.
Dimension Tables: Contain descriptive attributes for slicing facts.
County → CountyID, CountyName
Crop → CropID, CropName, Category

Use Case: To analyze total crop yield by county or crop category.

3. SQL Joins in Power BI (Power Query)

Power BI allows SQL-like joins via Merge Queries:

INNER JOIN: Keeps only matching rows. Example: counties that have crops recorded.
LEFT JOIN: Keeps all counties, even those without crops.
RIGHT JOIN: Keeps all crops, even if not grown in a county.
FULL OUTER JOIN: Keeps all counties and crops, filling gaps with NULLs.
LEFT ANTI JOIN: Finds counties with no crops recorded.
RIGHT ANTI JOIN: Finds crops not grown in any county.

4. Power BI Relationships

One-to-Many (1:M): County → multiple rows in Kenya_Crops data.
Many-to-Many (M:M): Rare, but can occur if crops belong to multiple categories.
One-to-One (1:1): Each CropID in Crop table matches a unique row in fact table.
Active vs Inactive relationships: Only one relationship can be active per pair; use DAX (USERELATIONSHIP) for the inactive one.
Cross-filter direction:
Single: Filters flow from dimension to fact (default).
Both: Filters flow both ways; useful in M:M but may reduce performance.

5. Difference Between Joins and Relationships

Joins: Combine tables into a single table during data load in Power Query.
Relationships: Keep tables separate but connected for dynamic filtering in visuals and calculations.
Practical Advice: Use joins for data cleaning or enrichment; use relationships for reporting and slicing.

6. Data Schemas

Star Schema: Fact table (Kenya_Crops_Cleaned_Final) at center, dimensions (County, Crop, Region) surrounding it. Simple, fast, easy to understand.
Snowflake Schema: Dimension tables normalized. Example: County → Region → Zone. Less redundancy but more complex.
Flat Table / DLAT: All data in one table. Simple, but large datasets may slow refresh and reporting.

7. Role-Playing Dimensions

Scenario: Using a Date dimension for both PlantingDate and HarvestDate.

8. Common Data Modeling Issues

  • Circular relationships between tables.
  • Mismatched keys in merges → missing data.
  • Too many M:M relationships → slow performance.
  • Ignoring inactive relationships → incorrect totals.
  • Overly denormalized tables → heavy dataset, slow refresh.

9. Step-by-Step Power BI Workflow with Kenya Crops

  • Import Data: Get Data → load Kenya_Crops, County, Crop.
  • Transform Data in Power Query: Clean missing values, merge tables using LEFT JOIN.
  • Define Relationships: Model View → Manage Relationships → set cardinality, active/inactive, and, cross-filter direction.
  • Create Calculations: Measures like Total Yield = SUM(Kenya_Crops_Cleaned_Final[Yield])
  • Check Model: Look for orphan tables, circular references, and inactive relationships.
  • Visualize: Use slicers, maps, and, bar charts to analyze yields by county, crop, or region.

Conclusion
In short, building a clean and well-structured data model in Power BI turns raw data into meaningful insights. With the right fact and dimension tables, joins, relationships, and schema design, you can create dashboards that are accurate, fast, and easy to understand, helping you make smarter decisions with your data.

String Polyfills & Common Interview Methods in JavaScript

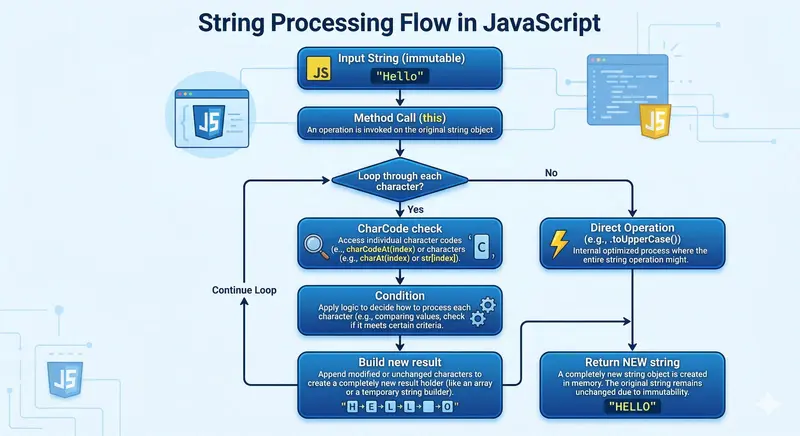
Processing flow

Introduction: Why String Manipulation Still Matters

Imagine this: You’re in a high-stakes JavaScript interview. The interviewer leans in and says, “Implement trim(), replaceAll(), and split() from scratch — no built-ins allowed.” Your pulse quickens… but then you smile. Because you’ve already read my blog, so no worries at all!

String methods are like everyday-needs of JavaScript. They power form validation, data cleaning, URL parsing, and almost every dynamic UI you’ve ever built. Yet most developers treat them as magic.

In this complete guide, we’ll break them down completely: what string methods really are, why polyfills are essential, a full deep-dive into all 15 string polyfills I personally wrote (available in my Polyfills Library on GitHub), the most common interview problems, and — most importantly — the exact logic behind every built-in so you can think like the JavaScript engine itself.

Let’s turn “it just works” into “I know exactly how it works.”

What Are String Methods in JavaScript?

String methods are functions that are attached to String.prototype. When you call "ritam".toUpperCase(), JavaScript is secretly doing:

String.prototype.toUpperCase = function() { /* native optimized code */ };

Key concepts every developer should internalize:

  • Strings in JavaScript are immutable — every method returns a new string.
  • Most methods loop through characters (or use fast native shortcuts).
  • They operate on this (the current string instance).
  • Common categories: inspection (includes, indexOf), transformation (trim, replace), extraction (slice, substring), and utility (repeat, padStart).

Understanding this flow is your foundation for writing perfect polyfills.

Processing flow

Why Developers Write Polyfills

Polyfills are pure gold for three reasons:

  1. Backward compatibility — older browsers or restricted environments might not have replaceAll, at(), etc.
  2. Deep learning — writing a polyfill forces you to understand the exact algorithm the browser uses. It builds thought process of every developers.
  3. Interview dominance — interviewers specifically ask you to implement these from scratch to test real understanding.

Polyfills turn you from a user of JavaScript into an engineer who knows the language inside-out.

Implementing All String Utilities – My Complete Polyfill Library

Here are all 15 polyfills exactly as I wrote them, with detailed explanations of the logic, how they mimic built-in behavior, and why the implementation matters for interviews.

1. firstCap() – Capitalize first letter using ASCII math

String.prototype.firstCap = function() {
    let charCode = this.charCodeAt(0);
    if(charCode >= 97 && charCode <= 122) {
        return String.fromCharCode(charCode - 32) + this.slice(1);
    }
    return this;
};

Logic & Interview Insight: Pure ASCII manipulation. Lowercase letters are 97-122; subtract 32 to get uppercase. No toUpperCase() used — shows you understand character encoding. The String.fromCharCode() static method returns a string created from the specified sequence of UTF-16 code units. Perfect for “capitalize without built-ins” questions.

2. lastCap() – Capitalize last letter

String.prototype.lastCap = function() {
    let charCode = this.charCodeAt(this.length - 1);
    if(charCode >= 97 && charCode <= 122) {
        return this.slice(0, this.length - 1) + String.fromCharCode(charCode - 32);
    }
    return this;
};

Logic: Same ASCII trick but targets the final character. Teaches precise index handling.

3. padBetween() – Insert separator between every character

String.prototype.padBetween = function(pad) {
    let result = "";
    for(let i=0; i<this.length; i++) {
        result = result + this[i] + (i<this.length-1 ? pad : "");
    }
    return result;
};

Logic: Builds a new string while adding the pad only between characters. Great interview question for “insert separator without split + join”.

4. reverse() – Classic reversal

String.prototype.reverse = function() {
    let newString = "";
    for(let i=this.length-1; i>=0; i--) {
        newString = newString + this[i];
    }
    return newString;
};

Logic: Backward iteration + concatenation. Interviewers expect this exact pattern (or two-pointer in-place for arrays).

5. remove() – Remove all occurrences of a character

String.prototype.remove = function(removeThis) {
    let newString = "";
    for(let i=0; i<this.length; i++) {
        if(this[i] !== removeThis) {
            newString = newString + this[i];
        }
    }
    return newString;
};

Logic: Skip matching characters while building new string. Direct O(n) solution.

6. replaceBy() – Custom replace

String.prototype.replaceBy = function(search, replace) {
    let newString = "";
    let searchLength = search.length;
    for(let i=0; i<this.length; i++) {
        if(this.slice(i, i+searchLength) === search) {
            newString = newString + replace;
            i = i + searchLength - 1;
        } else {
            newString = newString + this[i];
        }
    }
    return newString;
};

Logic: Sliding window comparison using slice. Foundation for understanding replaceAll.

7. include() – Custom includes()

String.prototype.include = function(search) {
    for(let i=0; i<this.length; i++) {
        if(this.slice(i, i+search.length) === search) {
            return true;
        }
    }
    return false;
};

Logic: Exact substring matching loop. Early return on match.

8. concatinate() – Safe concatenation

String.prototype.concatinate = function(separator, newStr) {
    return this + separator + newStr;
};

Logic: Simple but demonstrates chaining with other polyfills (see example in repo).

9. repeatString() – Custom repeat()

String.prototype.repeatString = function(count) {
    let result = "";
    for(let i=0; i<count; i++) {
        result = result + this;
    }
    return result;
};

Logic: Loop-based repetition. Shows why repeat() is O(n × count).

10. subString() – Custom substring()

String.prototype.subString = function(start, end){
    let result = "";
    while(start < end && start < this.length) {
        result = result + this[start];
        start++;
    }
    return result;
};

Logic: Boundary-safe extraction with manual loop.

11. sliceUp() – Custom slice() with optional delete + insert

String.prototype.sliceUp = function(start, deleteCount, insertStr) {
    let result = "";
    for(let i=0; i<start; i++) {
        result += this[i];
    }
    for(let i=0; i<insertStr.length; i++) {
        result += insertStr[i];
    }
    for(let i=start+deleteCount; i<this.length; i++) {
        result += this[i];
    }
    return result;
};

Logic: Three-phase build: prefix + insert + suffix. Extremely useful in interview “edit string at index” problems.

12. splitUp() – Full custom split()

String.prototype.splitUp = function(separator) {
    let result = [];
    if(separator === "")
        return Array.from(this);
    else{
        if(!this.include(separator)) {
            result.push(this);
        } else {
            let targetIndex = this.indexOf(separator);
            let item = "";
            for(let i=0; i<this.length; i++) {
                if(i === targetIndex) {
                    result.push(item);
                    item = "";
                    targetIndex = this.indexOf(separator, targetIndex+1);
                } else {
                    item += this[i];
                }
            }
            result.push(item);
        }
    }
    return result;
}

Logic: Handles empty separator + multiple occurrences using include() and index tracking.

13. joinUp() – Custom join() on Array.prototype

Array.prototype.joinUp = function(separator) {
    if(this.length === 0) return this.toString();
    let result = "";
    for(let i=0; i<this.length; i++) {
        result += (this[i] + (i<this.length-1 ? separator : ""));
    }
    return result;
};

Logic: Pairs perfectly with splitUp — the classic interview combo.

14. trimmer() – Custom trim()

String.prototype.trimmer = function() {
    let start = 0, end = this.length-1;
    while(this[start] === " ") start++;
    while(this[end] === " ") end--;
    return this.slice(start, end+1);
};

Logic: Two-pointer inward scan. Most elegant O(n) trim implementation.

15. toUpper() – Custom toUpperCase()

String.prototype.toUpper = function() {
    let result = "";
    for(let i=0; i<this.length; i++) {
        let charCode = this.charCodeAt(i);
        if(charCode >= 97 && charCode <= 122) {
            result += String.fromCharCode(charCode - 32);
        } else {
            result += this[i];
        }
    }
    return result;
};

Logic: Full ASCII conversion for every character. Complete understanding of case conversion.

Common Interview String Problems (Solved with These Polyfills)

  • Reverse a string → reverse()
  • Trim whitespace → trimmer()
  • Replace all occurrences → replaceBy() + loop
  • Split and join custom → splitUp() + joinUp()
  • Capitalize first/last → firstCap() / lastCap()
  • Remove characters → remove()
  • Check substring → include()
  • Insert between chars → padBetween()

Always mention time complexity (usually O(n)) and immutability in your explanation.

Importance of Understanding Built-in Behavior

When you’ve written these 15 polyfills, you no longer guess — you know. You debug faster, write more efficient code, and impress interviewers by explaining the exact algorithm the browser uses.

Conclusion: Level Up Your JavaScript Game Today

These polyfills aren’t just code — they’re a complete mindset shift. They transform you from someone who uses JavaScript into someone who masters it.

Start today: pick any one from the full GitHub library, understand every line, then try extending it. The next time an interviewer says “implement this without built-ins,” you’ll walk in confident.

You’ve got this.

Happy coding, and may your strings always be perfectly processed! 🚀

Star the repo if these helped you crush an interview. I’d love to hear which polyfill you used first!
~ Written by Ritam – turning complex JS concepts into crystal-clear understanding.

I Gave My Notion Workspace a Brain — Here’s What Happened

This is a submission for the Notion MCP Challenge

I spent a weekend building an AI that autonomously operates inside Notion. You type one sentence. It searches your workspace, reasons about what to do, creates pages, spins up databases, populates tasks — and you watch every single step happen in real time. Here’s how I built it and why it might be the most useful thing I’ve ever made.

The Frustration That Started This

I’ve been a Notion user. My workspace is a sprawling mess of half-finished project pages, meeting notes that never got followed up on, and goals I set in January that I haven’t looked at since.

The problem isn’t Notion. Notion is incredible. The problem is that Notion is entirely passive. It sits there, waiting. It does nothing unless you tell it exactly what to do, how to structure it, and where to put it.

I kept thinking: what if Notion could just… think? What if I could say “set up a Q2 OKR tracking system” and it would actually do it — build the database, create the objectives, set up the weekly check-in templates, write the guidelines page — without me having to architect every single piece?

That’s Apex.

What I Built

Apex is a full-stack AI command center that gives Llama 3.3 70B (via Groq) complete autonomous access to your Notion workspace. You chat with it naturally. It reasons, plans, and executes — using 10 Notion MCP tools in sequence — while you watch every operation happen live on screen.

It’s not a chatbot that tells you how to use Notion. It’s an agent that uses Notion for you.

Why Groq? Groq’s free tier gives you 14,400 requests/day with no credit card required. Llama 3.3 70B handles tool calling excellently — and it’s genuinely fast. Zero cost to run.

7 Intelligent Modes

Each mode has a deeply engineered system prompt that makes the AI behave like a domain specialist:

Mode What It Does
💬 Chat Natural language Q&A — ask anything about your workspace
🏗️ Project Blueprint One sentence → hub page + task database + timeline + risk log
🧠 Brain Dump Raw chaos → organized, searchable Notion knowledge base
📋 Meeting Intelligence Paste notes → decisions, action items, owners, follow-ups
📊 Weekly Review AI scans entire workspace → CEO-level intelligence report
🎯 OKR Tracker Define goals → complete OKR system with check-in templates
📅 Content Calendar Describe strategy → 20+ content ideas across all channels

The Feature I’m Most Proud Of: Live Tool Use Visualization

Most AI tools are black boxes. You ask, you wait, you get an answer. You have no idea what happened in between.

Apex flips this. As the AI works, you see every single Notion operation as it happens — animated cards streaming in, showing you exactly what the AI is doing and why:

🌐  Scanning Workspace...                          ✓ 12 pages, 3 databases
🔍  Searching Notion...     "Q2 goals"             ✓ Found 2 related pages
📄  Creating Page...        "🎯 Q2 Goals Hub"      ✓ Created
🗄️  Building OKR Database.. "Q2 OKR Tracker"       ✓ Created with 8 fields
➕  Adding Record...        "Grow MRR by 40%"      ✓ Objective added
➕  Adding Record...        "Key Result: MRR > $50k"✓ KR added
📄  Creating Page...        "📋 Weekly Check-in"   ✓ Template created
📄  Creating Page...        "🏆 Wins & Learnings"  ✓ Log created

Eight Notion operations, chained intelligently, executed autonomously. The whole OKR system is live in your workspace before you’ve finished reading the output.

This transparency is what makes it feel like a genuine AI colleague rather than a magic trick.

Video Demo

Technical Deep Dive

Stack

  • Frontend: Next.js 14 (App Router) + TypeScript
  • Styling: Tailwind CSS with glassmorphism, animated ambient orbs, dot-grid background
  • AI: Llama 3.3 70B via Groq SDK — streaming + multi-turn tool use
  • Notion: @notionhq/client — 10 MCP-compatible tools
  • Transport: Server-Sent Events for real-time streaming

The 10 Notion MCP Tools

const NOTION_TOOLS = [
  "search_notion",           // Full-text search across workspace
  "create_notion_page",      // Create pages with rich markdown → block conversion
  "get_page_content",        // Read any page's full content
  "update_notion_page",      // Append structured content to existing pages
  "create_project_database", // Task DB: Status, Priority, Due Date, Assignee, Tags
  "query_database",          // Retrieve records with optional filters
  "get_workspace_overview",  // Scan recent pages and databases
  "add_database_item",       // Insert rows with proper property types
  "create_goals_tracker",    // OKR DB: Objective/KR, Progress %, Owner, Quarter
  "create_content_calendar", // Editorial DB: Channel, Type, Status, Publish Date
]

Tools are defined in OpenAI-compatible format (which Groq uses), so each tool looks like:

{
  type: "function",
  function: {
    name: "create_notion_page",
    description: "Create a new page in Notion with rich content...",
    parameters: {
      type: "object",
      properties: {
        title: { type: "string", description: "Title of the new page" },
        content: { type: "string", description: "Page content in markdown format..." },
        icon: { type: "string", description: "Emoji icon for the page" },
      },
      required: ["title", "content"],
    },
  },
}

The Multi-Turn Streaming Loop

This is the core of the whole thing. The AI doesn’t just make one tool call — it chains as many as needed, reasoning about results before deciding what to do next:

const groq = new Groq({ apiKey: process.env.GROQ_API_KEY });

// Keep looping until the model stops using tools
while (true) {
  const streamResponse = await groq.chat.completions.create({
    model: "llama-3.3-70b-versatile",
    tools: NOTION_TOOLS,
    messages: conversationHistory,
    stream: true,
  });

  // Accumulate streamed tool call fragments
  const toolCallsMap: Record<number, { id: string; name: string; arguments: string }> = {};

  for await (const chunk of streamResponse) {
    const delta = chunk.choices[0]?.delta;

    if (delta?.content) {
      // Stream text chunks to the frontend in real-time
      sendSSE({ type: "text", content: delta.content });
    }

    if (delta?.tool_calls) {
      for (const tc of delta.tool_calls) {
        // Accumulate streamed JSON fragments per tool call index
        if (!toolCallsMap[tc.index]) toolCallsMap[tc.index] = { id: "", name: "", arguments: "" };
        if (tc.id) toolCallsMap[tc.index].id = tc.id;
        if (tc.function?.name) toolCallsMap[tc.index].name = tc.function.name;
        if (tc.function?.arguments) toolCallsMap[tc.index].arguments += tc.function.arguments;
      }
    }
  }

  const toolCalls = Object.values(toolCallsMap);
  if (toolCalls.length === 0) break; // No more tool calls — done

  // Notify frontend each tool is starting
  for (const tc of toolCalls) {
    sendSSE({ type: "tool_start", name: tc.name, input: JSON.parse(tc.arguments) });
  }

  // Add assistant message with tool_calls to history
  conversationHistory.push({
    role: "assistant",
    tool_calls: toolCalls.map(tc => ({
      id: tc.id, type: "function",
      function: { name: tc.name, arguments: tc.arguments },
    })),
  });

  // Execute each tool against the Notion API
  for (const tc of toolCalls) {
    const result = await executeTool(tc.name, JSON.parse(tc.arguments));
    sendSSE({ type: "tool_result", name: tc.name, result });

    // Feed result back as a tool message for the next reasoning step
    conversationHistory.push({ role: "tool", tool_call_id: tc.id, content: JSON.stringify(result) });
  }
}

The key insight: the AI sees the result of each Notion operation before deciding what to do next. It’s not blindly firing off a pre-planned list — it’s actually reading what it created and adapting.

Markdown → Notion Blocks

One of the trickier engineering challenges: Notion’s API doesn’t accept markdown. Every page has to be structured as typed block objects. I wrote a full converter that handles 8 block types:

function markdownToBlocks(markdown: string): NotionBlock[] {
  return lines.flatMap(line => {
    if (line.startsWith("# "))   return [heading1Block(line.slice(2))]
    if (line.startsWith("## "))  return [heading2Block(line.slice(3))]
    if (line.startsWith("### ")) return [heading3Block(line.slice(4))]
    if (line.startsWith("- "))   return [bulletBlock(line.slice(2))]
    if (/^d+. /.test(line))    return [numberedBlock(line.replace(/^d+. /, ""))]
    if (line.startsWith("> "))   return [quoteBlock(line.slice(2))]
    if (line === "---")          return [dividerBlock()]
    if (line.trim())             return [paragraphBlock(line)]
    return []
  })
}

Headings, bullets, numbered lists, quotes, dividers, paragraphs — all properly typed and sent to Notion’s API.

OKR Database Schema

When you say “set up my Q2 OKRs”, Apex builds a database with exactly the right schema:

const okrSchema = {
  Name:     { title: {} },
  Type:     { select: { options: ["Objective", "Key Result"] } },
  Status:   { select: { options: ["Not Started", "On Track", "At Risk", "Behind", "Complete"] } },
  Progress: { number: { format: "percent" } },
  Owner:    { rich_text: {} },
  "Due Date": { date: {} },
  Quarter:  { select: { options: [period] } },
  Notes:    { rich_text: {} },
}

Not a generic template. A purpose-built structure that matches how real OKR systems work.

Features That Make the UX Sing

Beyond the core AI functionality, I obsessed over the interface:

⌘K Command Palette — Hit Cmd+K to open a searchable command palette. Switch modes, fire quick actions, export your conversation, clear the session — all without touching the mouse.

Slash Commands — Type /project, /goals, /meeting directly in the chat input to instantly switch modes. Feels like a native app.

Voice Input — Click the mic button and just talk. Web Speech API converts your speech to text in real time, with animated pulse rings showing it’s listening. Perfect for actual brain dumps.

Smart Follow-Up Suggestions — After every AI response, three contextual next-step prompts appear. Click any to instantly continue. It’s like the AI is guiding you toward the next useful thing.

Session Stats Bar — A live counter in the top bar shows pages created, databases built, and total Notion operations performed this session. It’s a small thing but makes the productivity feel visceral.

Floating Success Toasts — Every time a Notion page or database is created, a beautiful animated toast slides up: “Page created: Q2 OKR Tracker — saved to Notion”. Instant feedback, no hunting through your workspace.

Export Conversation — Download your entire session as a formatted markdown file. Great for sharing what you built.

Workspace Dashboard — A separate /dashboard route showing live workspace stats, recent pages and databases, a full capability showcase, and a visual “How Apex Works” flow diagram.

Real-World Demo: OKR Mode in Action

What I typed:

“Set up Q2 OKRs — grow MRR by 40%, improve activation rate to 60%, ship mobile v1, and reduce churn below 3%”

What Apex did (30 seconds):

  1. Scanned workspace for existing goal-related pages
  2. Created a 🎯 Goals Hub page with vision statement and OKR methodology explained
  3. Built the Q2 OKR Tracker database with 8 properly typed fields
  4. Added each of the 4 objectives as database records (Type: Objective)
  5. Added 3 key results per objective (Type: Key Result, with measurable targets)
  6. Created a 📋 Weekly Check-in Template page — duplicate this every Monday
  7. Created a 🏆 Wins & Learnings Log for retrospectives

What I had to do: Type one sentence.

That’s the whole thing.

What’s Next

  • Scheduled Reports — Auto-run weekly review every Monday morning via cron
  • Notion Webhooks — React to workspace changes in real time
  • Multi-workspace — Switch between different Notion accounts
  • Template Library — Pre-built prompts for 20+ common use cases

Setup in 3 Minutes

git clone https://github.com/Aryakoste/apex-notion
cd apex-notion-ai
npm install
cp .env.local.example .env.local

Edit .env.local:

GROQ_API_KEY=gsk_...
NOTION_API_KEY=secret_...
npm run dev
# Open http://localhost:3000

Getting your Groq API key (free):

  1. Go to console.groq.com → sign up (no credit card)
  2. API Keys → Create API Key → copy it

Getting your Notion API key:

  1. notion.so/my-integrations → New integration → copy the secret
  2. On each Notion page: ... menu → Add connections → select your integration

That’s it. Everything else is handled by Apex.

Why This Matters Beyond the Demo

The reason I’m excited about this isn’t the cool UI or the streaming animations — it’s what it represents for how we use tools.

Notion has always required you to be the architect. You had to know what a good project page looks like. You had to remember to run your weekly review. You had to structure your OKRs correctly.

With MCP, the AI can be the architect. You just have to know what you want. The gap between intention and implementation collapses from hours to seconds.

I think this is the future of productivity software. Not AI that suggests. AI that does.

GitHub

Full source code: [https://github.com/Aryakoste/apex-notion]

#notionmcp #ai #nextjs #typescript #groq #llama #productivity #buildinpublic