Why Every AI Tool You Use Forgets You (And How I Fixed It)

Open Claude Desktop. Explain your preferences. Switch to Cursor. Explain them again. Open a new chat tomorrow. Start from zero. Again.

Every AI tool today treats you like a stranger. Not because the models can’t remember – because nothing connects them. There’s no shared memory, no persistent identity, no accumulated context. Each session is a blank slate.

I kept running into this while using AI coding assistants and desktop clients across my workflow. The tools are powerful individually, but collectively they have amnesia. The same questions, the same corrections, the same context-setting ritual, every single time.

So I built GroundMemory.

What it is

GroundMemory is a persistent memory layer for AI agents. It runs as an MCP server (or Python library) that any MCP-compatible tool can connect to – Claude Desktop, Cursor, Cline, Windsurf, Claude Code, Open WebUI, n8n, and more.

Once connected, your agent has:

  • Long-term memory (MEMORY.md) – facts, preferences, decisions that survive forever
  • A user profile (USER.md) – who you are, how you work, what you care about
  • Agent instructions (AGENTS.md) – how the AI should behave with you
  • An entity relationship graph (RELATIONS.md) – people, projects, teams, and how they connect
  • Daily logs (daily/YYYY-MM-DD.md) – session-by-session context

At every session start, all of this is injected into the agent’s context. Between sessions, the agent can search across everything using hybrid BM25 + vector search.

The key insight: one identity, every tool

The part that changed things for me wasn’t just “memory for one assistant.” It was connecting multiple tools to the same GroundMemory server.

Claude Desktop knows my communication preferences. Cursor knows my tech stack and architectural decisions. Cline knows the tasks I’m working on this week. And they all share that knowledge because they all read from and write to the same workspace.

You stop being a stranger every time you open a different tool.

Zero-setup, local-first

GroundMemory runs entirely on SQLite with FTS5 in its default mode. No API key, no GPU, no cloud service, no external dependencies. Install and run:

pip install groundmemory && groundmemory-mcp

Connect any MCP client to http://127.0.0.1:4242/mcp and you’re done.

Want vector search? Plug in any OpenAI-compatible embedding endpoint (OpenAI, Ollama, LM Studio) or use local sentence-transformers. The BM25-only mode always works as a fallback.

Everything is Markdown

All memory is stored as human-readable Markdown files in a local directory. You can browse them, edit them manually, version them with Git. Nothing is opaque. If the agent writes something wrong, you open the file and fix it.

How it compares

I looked at every major memory solution in this space before building this. Mem0, Letta, memsearch, Zep – they all solve parts of the problem, but none of them hit the combination I needed:

  • Zero-setup (no API key to get started)
  • Local-first and offline-capable
  • Human-readable Markdown storage
  • Structured memory tiers (not a flat semantic store)
  • MCP-native (not SDK-first with MCP bolted on)
  • Framework-agnostic (just infrastructure, not a framework)

There’s a detailed comparison table in the repo README.

Try it

It’s MIT licensed, has 449 tests, and the full docs cover everything from embedding providers to workspace isolation to the Python API.

I’d genuinely love feedback – especially from people using multiple MCP tools in their workflow. What would you want your AI to remember?

From Requirement to git push : UC-TeamSpace x UC-TaskManager Work Pipeline Automation Demo

Why I Built This

The reason I created a sub-agent called uc-taskmanager was simple: when I just gave instructions and handed off requirements, the only thing left after development was the code itself. There was no trace of what was analyzed, what decisions were made, or what was modified. Nothing was recorded.

So I built a sub-agent that runs inside Claude Code, broke the process into stages, and made each stage produce deliverables as output.

Then I realized — if this workflow only runs through the Claude Code CLI, it wouldn’t be accessible to most people. So I thought: what if you could just enter a requirement, review it, approve it, and hit execute — and the sub-agent would run automatically, with all results recorded? That’s how UC TeamSpace was born.

There’s still a long road ahead. I’ve already added a Specifier agent to uc-taskmanager that takes requirements written in plain human language and turns them into detailed specifications for review. But I haven’t integrated that into UC TeamSpace yet.

I’m the kind of person who wants to be lazy. But every time I save some time by building something like this, I end up thinking of the next thing to build. When will I finally get to be lazy? When I’m in the grave, maybe?

Register a single requirement, and AI agents automatically handle analysis → planning → implementation → verification.
This post walks through the entire process of handling REQ-133 in a live UC TeamSpace instance, with screenshots.

Background: Why This Pipeline Exists

The most time-consuming phase in software development is the transition from “interpreting requirements → design → implementation.” Reading requirement documents, identifying the scope of impact, decomposing work, and writing code demands significant time and focus — even from senior developers.

UC TaskManager automates this transition with a 6-Agent SDD (Spec-Driven Development) pipeline:

Specifier → Planner → Scheduler → Builder → Verifier → Committer

UC TeamSpace integrates this pipeline with a web-based requirements management system, enabling the entire lifecycle — from requirement registration to code commit — to be managed within a single UI.

In this post, we’ll show how a single functional requirement (REQ-133) flows from registration to completed implementation, illustrated with 10 screenshots.

Demo Target: REQ-133

Field Value
REQ ID REQ-133
Title Added individual REQ execution timeout settings and unlimited options
Project DX Common
Priority P1
Category Functional requirements
Author UC Jung
Date written 2026-03-23

Requirement summary: Currently, execution timeouts can only be set at the CliProfile level (default 30 minutes), and it is not possible to specify different timeouts per individual REQ or run them indefinitely. For large-scale WORKs such as KPI calculations, execution cannot complete within 30 minutes, causing repeated timeout failures.

Step 1. Requirement Registration — Draft

REQ-133 is authored in the Requirements Management screen. The status is Draft.

The requirement body is written in a structured markdown format:

  • Outline: Overall summary
  • Current problem: Current issues (4 specific problems listed)
  • Requirements: 3 concrete requirements

    1. Individual REQ Timeout Settings — Add a timeoutMinutes field per REQ
    2. Unlimited Option — Execute without timeout when timeoutMinutes = 0 or null
    3. Priority System — REQ individual setting > CliProfile setting > Default (30 min)

This structured requirement becomes the direct input for the AI agents. The quality of the requirement directly determines the quality of the auto-generated code.

Step 2. Managing Requirements in the List View

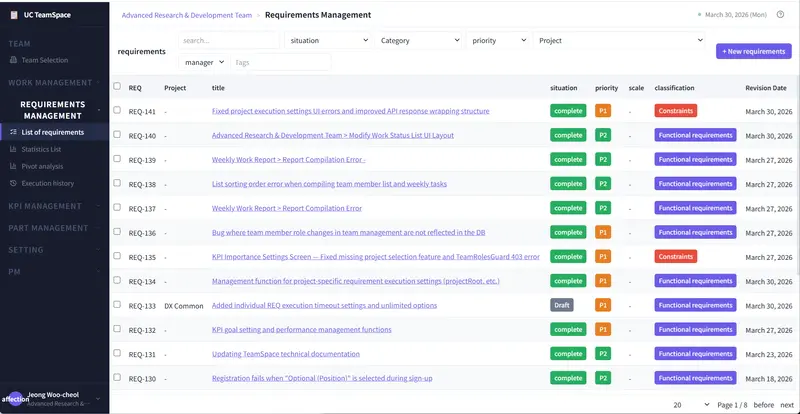
This is the requirements list screen. Requirements from REQ-141 to REQ-130 are displayed, with each item’s status (situation), priority, and classification visible at a glance.

REQ-133 is currently in Draft status, assigned to the “DX Common” project. Most other REQs are already in complete status — items that have been processed through this pipeline.

Step 3. Review Request and Approval — Waiting for Execution → Approved

From the Draft state, submitting a Request for review transitions the status to Waiting for execution. A reviewer checks the completeness and feasibility of the requirement.

Once the review passes, the status changes to Approved, and the ▶ Execution Request button becomes active in the top bar. The requirement is now ready for AI pipeline execution.

Step 4. Execution Settings — Specifying the Project Root Path

Clicking the ▶ Execution Request button opens the execution settings dialog.

The key setting is the Project root path. This path (/home/pntadmin/rnd/uc-teamspace) points to the actual project directory where Claude Code CLI will operate. All pipeline agents read, analyze, and modify source code relative to this path.

Clicking ▶ Execution Request starts the pipeline.

Step 5. Pipeline Execution — Execution Monitor

5-1. Start: SPECIFIER Phase

The Execution Monitor displays the pipeline progress in real time.

0000 [2026-03-30 13:39:51] CLAIM START
0001 [RUNNER] Start Claude Code auto-run

The system claims the requirement, and Claude Code begins auto-execution. The [RUNNER] Delivery prompt includes the full requirement body, list of files to modify, execution environment info, and callback API details.

The Execution Information section at the bottom shows execution metadata:

  • Execution ID: cmncp8juo000...
  • Performer: UC Jung
  • Start time: March 30, 2026, 1:39:51 PM
  • Project path: /home/---------/rnd/uc-teamspace
  • Maximum turns: 50
  • Timeout: 180 minutes

5-2. Progress: SPECIFIER DONE → PLANNER START

Once the SPECIFIER finishes analyzing the requirement (SPECIFIER DONE), the PLANNER phase starts automatically.

0005 [2026-03-30 13:43:16] [SPECIFIER][REQ-133] DONE
0006 PLANNER REQ-133 START

At each stage transition, progress is reported back to UC TeamSpace in real time via the callback API:

POST http://192.168.0.101/api/v1/cli-executions/{id}/callback

SCHEDULER → BUILDER → VERIFIER → COMMITTER then execute sequentially, with each agent receiving the previous agent’s output as input.

Step 6. Execution Results — Result Document

When the pipeline completes, the Result document tab displays all deliverables.

The right panel shows the result document tree:

WORK-148 (2026. 3. 30. 1:51:30 PM)
├── PLAN.md
├── TASK-00 (Plan) / TASK-00 (Result)
├── TASK-01 (Plan) / TASK-01 (Result)
└── TASK-02 (Plan) / TASK-02 (Result)

The current view shows the details of TASK-01: Modify Backend Logic:

Scope:

  1. DTO modification — Add timeoutMinutes field to CreateRequirementDto / UpdateRequirementDto
  2. Execution service logic — Apply REQ > DTO > CliProfile > default (30 min) priority in cli-execution.service.ts
  3. Cleanup Service — Exclude executions with timeoutMinutes=0 from stuck checks in execution-cleanup.service.ts
  4. Runner — Skip timer registration when timeoutMinutes=0 in runner.ts, null-safe clearTimeout handling

The Files table shows each target file with its action (MODIFY) and description in a structured format. The AI agents automatically modify code according to this plan, verify it, and commit the changes.

Step 7. Result Review — Awaiting Review

After pipeline execution completes, the status transitions to Awaiting review. Three action buttons appear at the top:

  • Review rejected — Reject if the deliverables are insufficient
  • Review and approval — Approve the review, authorize code merge
  • Forced completion — Force-complete the process

The reviewer examines the PLAN and each TASK Result in the Result document, reviews the actual code changes, and decides to approve or reject.

REQ-133 also appears as Awaiting review in the requirements list, giving the entire team visibility into its progress.

When Review and approval is selected, the corresponding WORK automatically performs a git push and its status transitions to COMPLETED. In other words, a single approval from the reviewer pushes the code to the repository and finalizes the work.

Complete Workflow Summary

[Draft] → [Request for Review] → [Waiting for Execution]
                                         ↓
                                    [Approved]
                                         ↓
                                  [Execution Request]
                                         ↓
                              ┌─── Execution Monitor ───┐
                              │  SPECIFIER → PLANNER     │
                              │  → SCHEDULER → BUILDER   │
                              │  → VERIFIER → COMMITTER  │
                              └──────────────────────────┘
                                         ↓
                              [Awaiting Review]
                                    ↓           ↓
                            [Approved]    [Rejected]
                                ↓
                           [Complete]

Key Takeaways

1. The Requirement IS the Design Document

Structured requirements registered in UC TeamSpace become the direct input for AI agents. There is no need for separate design documents or manual work decomposition. Since the clarity of the requirement directly determines the quality of the output, writing a good requirement becomes the most important development activity.

2. Real-Time Monitoring with Callback-Based Tracking

The Execution Monitor lets you see the start/completion of each agent phase in real time. Callback APIs enable integration with external systems. If execution stalls or something goes wrong, you can immediately identify it and halt with Stop execution.

3. Structured Deliverables with Full Traceability

All pipeline deliverables (PLAN.md, per-TASK Plan/Result) are stored linked to their originating requirement. You get complete traceability: who, when, for which requirement, and what code changes were made.

4. Human Judgment Where It Matters

The pipeline automates “analysis → planning → implementation → verification,” but final approval remains a human decision. The Awaiting review stage, where a reviewer checks the code and decides to approve or reject, maintains the balance between AI automation and human judgment.

Results by the Numbers (It’s guessing.)

Metric Before (Manual) After (Pipeline) Improvement
Team size 3 people 1 (senior) 67% reduction
Duration 2.5–3.5 weeks 3–5 days 80%+ shorter
Cost ~11.9M KRW ~1.9M KRW 84% reduction
M/M Baseline — 90% reduction

Based on senior developer rate premium of 1.5–1.8×, including 3–5 verification cycles

Closing Thoughts

What this demo shows is not just automated code generation. It’s the automation of the entire development lifecycle: requirement management → AI pipeline execution → code review → approval.

UC TeamSpace manages “what to build,” and UC TaskManager executes “how to build it.” Developers focus on improving the quality of requirements, and AI faithfully implements them.

Vibe Coding is fast and intuitive, but it has fundamental limitations: no artifact management, skipped quality verification, and zero reproducibility. UC TeamSpace × UC TaskManager addresses these problems head-on. On top of an automated development process, anyone can perform development through a web service alone — without ever knowing Claude Code CLI — and every development artifact is stored without exception, linked to its originating requirement.

Found errors in the results? Test during the review stage, register the discovered issues as new requirements, and run the pipeline again. Sure, complex requirements may produce many errors in a single execution. But the same thing happens when human developers do it too. The difference is that in this pipeline, bug fixes follow the exact same automated process, and even that process is recorded as deliverables.

Do you really need to learn Claude CLI or the terminal? Just a browser — write a requirement, click a button, review the results. What do you think?

UC TeamSpace is currently in use internally but has not been open-sourced yet. There are still rough edges from all the experimental development, so it needs more polish. I plan to open-source it once things are more settled.

UC TaskManager: GitHub | npm

Author: UC Jung ([email protected])

A New Way to Look at “Failures”

Pursuing Correctness as Developers

As developers, we are trained from school to prioritize correctness. We focus on logic, clean architecture, and passing tests because, in code, being “right” leads to success while being “wrong” leads to failure. Over time, this conditioning causes us to tie our self-worth to being correct, which can become a major hurdle when we transition into building products for the real world.

When we start creating content or apps, the predictable link between effort and results often disappears. We might build something technically perfect that nobody uses, or write something insightful that nobody reads. This feels like a failure in the traditional sense, but in the market, “errors” aren’t signs of being wrong—they are simply data points.

A World with no Predefinded Correctness

High-performing developers often fall into a trap where they view a lack of traction as a personal flaw. In programming, a bug is a mistake to be fixed, but in entrepreneurship, being wrong is the primary way you learn. It is important to shift our mindset from “I failed” to “That experiment didn’t land,” recognizing that frequent failure is a necessary part of the process.

This requires a new definition of confidence. True confidence isn’t the belief that you will always succeed; it’s being okay regardless of the outcome. While developers are used to seeing output as validation, we must learn to see it as an experiment. You can care deeply about the work without letting the market’s reaction judge your personal worth.

A Billion Dollar Product Emerges from Failures

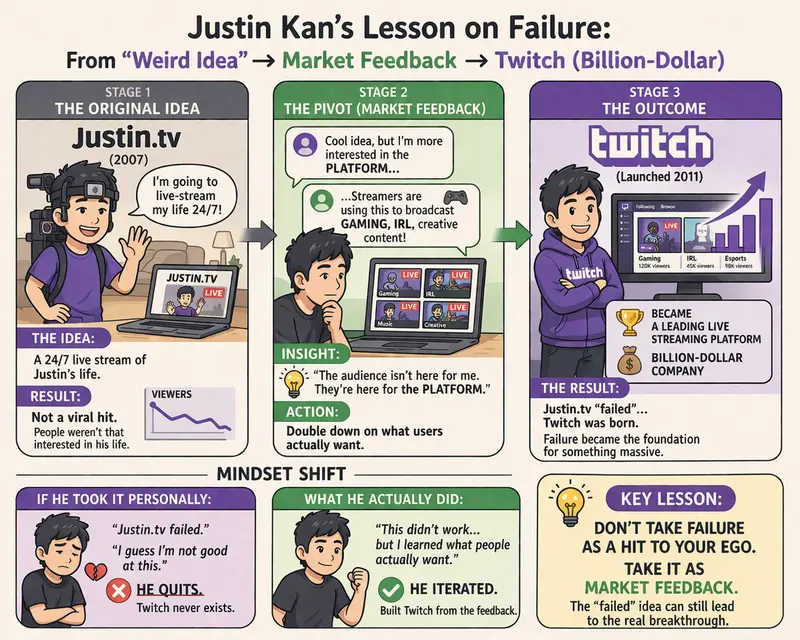
A classic example of this is the origin of Twitch. Justin Kan initially launched Justin.tv to stream his life 24/7, which didn’t succeed as a mainstream concept. However, instead of taking it as a personal failure, he noticed users were interested in the streaming technology itself—specifically for gaming. By viewing the “failed” project as market feedback rather than a dead end, he was able to pivot into a billion-dollar company.

Mindset Shift

Ultimately, we must undergo an identity shift: we are no longer someone who proves value by being right, but someone who creates value by running experiments. This means shipping imperfect things and accepting that we will be ignored or wrong often. By launching/publishing often and observing, we turn failures into data points that fuel long-term growth.

Introduction to RAG (Retrieval-Augmented Generation)

I’ve been diving into Generative AI lately, and one thing is clear: if you’ve spent any time with LLMs, you’ve probably run into their limitations. You ask an LLM a highly specific question about a new software library, your company’s internal documents, or breaking news, and it either politely declines to answer or confidently makes up a complete lie.

The LLMs don’t know about the recent information because they are limited to knowledge available till the time they were trained. And they don’t know about your company’s internal info or documents because they were never trained on them and it is not safe because anyone with access to that model can get your internal information.

So, if you want the LLM to answer the questions based on information or data you provide to it without making it available publicly, how will you do it? Well there are plenty of ways by which you can make this possible. The ways are:

  1. Fine-tuning: With the fine-tuning you can train the existing AI model on your private data and users can then ask questions based on that data. It is a high computation task, time consuming and is very costly.

  2. Large Context Window Prompting: You provide all the information in your prompt and tell the LLM to answer based on your provided data only.

Although these methods can work they have their own limitations. Fine-tuning the LLM on your data is very costly and it requires high resources for computation and if your information is updated you have to fine-tune again which makes it an even more expensive approach. The LLMs have limited context window and when you query a LLM, you are not only sending a query to the user, you also send other stuff like system prompt and chat history along with your query. So, if you give large no. of information or data in prompt, you might hit the context window limit

Now, we need a solution which is cost and computation efficient and you can easily update your information without hitting the context window limit. This is where RAG comes into the picture.

What is RAG?

Retrieval-Augmented Generation (RAG) is an AI framework that improves LLM accuracy by fetching relevant, up-to-date information from external, trusted sources (like databases or company documents) before generating a response. It prevents misinformation (“hallucinations”) by grounding the answer in verified data rather than relying solely on training data.

The RAG is implemented in two phases:

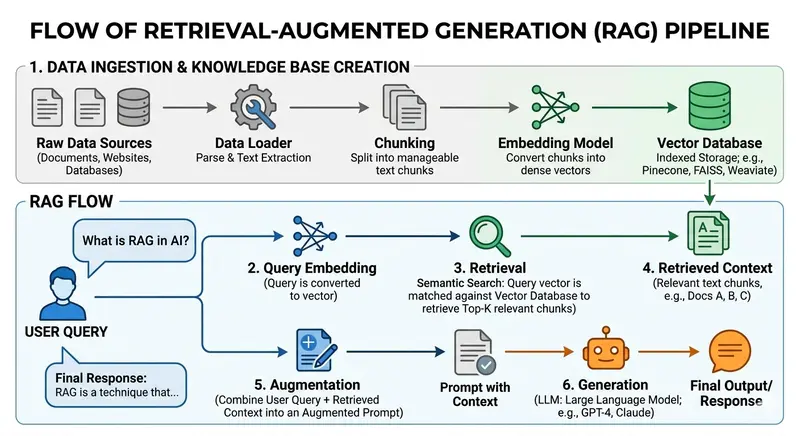
  1. Indexing Phase: Indexing phase involves gathering the information or documents, generating embeddings and storing it in vector stores or vector DB.

  2. Retrieval Phase: This phase involves retrieving the relevant information from vector store or DB and providing it to LLM for generating response based on the user’s query.

Imagine you are hosting a major award show and you have a massive script that contains every single detail. This script includes the names of all the winners, the order of every performance, and every word you need to say. The problem is that the script is far too long for you to memorize entirely, and carrying the whole book on stage is too clumsy when you need to find a specific name quickly.

To solve this, you go through the script and pick out the most important facts to write on small cue cards. Each card contains just one specific piece of information, like the winner of a single category. You keep these cards organized in a small box so you can grab the right one at the right moment. When it is time to announce the Best Actor award, you don’t flip through the whole script. You simply pull out the specific cue card for that award, read the name, and announce it to the crowd.

This process is exactly how RAG works. The long script represents your massive collection of data or documents. The difficulty of memorizing that script is the same as the limit on how much information an AI can “remember” or process at once. Breaking the script down into small cue cards is the same as turning your documents into small chunks. Storing those cards in a box is like putting those chunks into a vector store. Finally, finding the right card and reading the winner’s name is the same as the AI finding the most relevant piece of information and using it to give you a perfect answer.

Components of RAG

A RAG pipeline consists of various components which makes the implementation of indexing phase and retrieval phase possible.

Document Ingestion & Indexing: This is responsible for gathering the information or documents from various sources and loading them.

Text Splitters: This is a crucial part of a RAG pipeline because this is responsible for dividing your large documents into smaller and manageable chunks. If we don’t convert large documents into small chunks it will not give us good results at the time of retrieval.

Vector Embeddings: This phase involves converting these small chunks into vector embeddings with the help of embedding models. This will help us to capture the semantic meaning of our texts.

Vector Stores & VectorDB: Stores embeddings and enables similarity search for fast information retrieval.

Retriever: Finds and returns the most relevant chunks from the database based on query similarity.

Prompt Augmentation Layer: Combines retrieved chunks with the user’s query to provide context to the LLM.

The Output: The LLM reads the context and provides highly accurate, hallucination-free answers.

Disadvantages of RAG

From the above discussions the advantages of RAG is clear but everything has its own limitations and disadvantages, and so does RAG. Here are some key disadvantages of RAG:

  • Retrieval Dependency and Quality: RAG depends entirely on the retriever component. If the retriever fetches irrelevant, outdated, or incomplete data, the LLM will generate poor-quality, inaccurate, or “hallucinated” answers.

  • Performance and Latency Bottlenecks: The extra step of searching a database (vector retrieval + generation) increases latency, making it unsuitable for some real-time applications.

  • System Complexity and Maintenance: Implementing and maintaining a RAG system involves managing databases, embedding models, and retrieval techniques. Updating knowledge bases requires complex re-indexing and re-embedding.

  • Data Security and Privacy Risks: RAG systems may expose sensitive or proprietary internal data to unauthorized users if access controls are not robustly implemented.

  • Contextual Understanding Failures: RAG systems can struggle with complex, interdisciplinary queries or connecting disparate pieces of retrieved information, leading to incoherent outputs.

  • Cost: Running RAG systems can be expensive, requiring both vector storage infrastructure and increased compute for the retrieval and generation processes

  • Chunking Errors: Improperly splitting documents can cause vital information to be missing or disjointed.

  • Debugging Difficulties: Due to the multiple moving parts (retriever + LLM), identifying the root cause of a poor answer is complex.

Conclusion

In short, RAG is a practical way to make AI smarter and more useful for your specific needs. Instead of spending a lot of time and money trying to “teach” an AI everything from scratch, RAG simply gives the AI the ability to look up facts from your own private documents before it answers a question, much like taking an open-book test.

Announcing LightningChart .NET 12.5.1

LightningChart-.NET-12.5.1-Refined-LegendBoxes

In this release, we focused on improving current features, including LegendBox and PrintPreview, adding new properties to ViewXY, improving .NET Trader’s behavior, and more.

Read the full release note

LegendBox

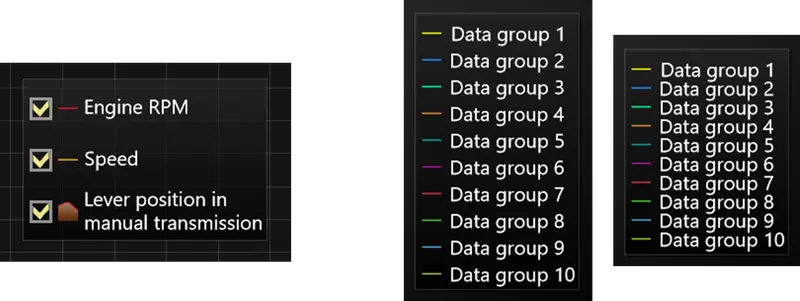
We are introducing a refined LegendBox rendering that harmonizes all XY, 3D, Polar, Pie3D, and Smith views. We have added new features for LegendBox, including the new VerticalTitlesGap property to control the minimum gap between titles. Furthermore, LegendBox now supports titles with multiple lines, and the mouse events over the LegendBox have more detailed information.

Below is an example of LegendBoxes with multiple line titles, and a normal versus a reduced vertical gap.

LightningChart-.NET-12.5.1-Refined-LegendBoxes

Printing and PrintPreview

Now in WinForms, the PrintPreview dialog is available in several languages, including English, German, and Finnish. We have also slightly changed the printing dialogue UI, and users can now control which items to show and which default values are set. Below is an example of the improved PrintPreview dialog window:

LightningChart-.NET-12.5.1-PrintPreview

ViewXY: new AutoPadding property

We are introducing the new AutoPadding property for ViewXY, which is the padding for PXs that controls edges, such as outer edges or the rim of a chart, which encloses ViewXY margins.

AutoPadding can be used when Margins are auto-adjusted (AxisLayout.AutoAdjustMargins is enabled). Chart objects like Annotations and LegendBoxes can be placed in the padded area. AutoPadding is a padding structure in WinForms and a thickness structure in WPF. Below is a simple ViewXY.AutoPadding example where the padded area is pseudo-colored differently (in grey) for clarity (with Annotation help).

LightningChart-.NET-12.5.1-AutoPadding

Other improvements

  • Improved .NET Trader behavior: Band’s border now has an inner, outer, and none BorderType property
  • Added support for 24-bit and 32-bit WAV audio files
  • Improved handling of D3DImage failure

Get Started with LightningChart .NET

clean code

clean code  cover

clean code  cover

The Power of Clean Code: Unlocking the Secrets to Better Software Development

As a developer, you’ve probably heard the phrase “clean code” thrown around, but what does it really mean? Simply put, clean code is code that is easy to read, maintain, and extend. It’s the foundation of good software development, and it’s essential for creating high-quality applications that stand the test of time. In this post, we’ll dive into the world of clean code and explore the best practices that’ll take your coding skills to the next level.

clean code  As a developer, you've probably heard th

Why Clean Code Matters

Clean code is not just a nicety; it’s a necessity. When your code is clean, it’s easier to debug, test, and maintain. This means you’ll spend less time tracking down bugs and more time adding new features and functionality to your application. Clean code also makes it easier for other developers to understand and work with your code, which is especially important in team environments. By following best practices, you’ll be able to write code that is modular, scalable, and efficient.

Best Practices for Writing Clean Code

So, how do you write clean code? Here are some best practices to get you started:

clean code  So, how do you write clean code? Here ar

  1. Keep it Simple: Avoid complex, convoluted code that’s hard to understand. Instead, opt for simple, straightforward solutions that get the job done.
  2. Use Meaningful Names: Use descriptive variable and function names that clearly indicate what they do. This will make your code easier to read and understand.
  3. Avoid Duplicate Code: Don’t repeat yourself. If you find yourself writing the same code over and over, consider creating a function or module that can be reused.
  4. Use Comments: Comments are essential for explaining what your code does and why. Use them to provide context and clarify any complex sections of code.
  5. Test Your Code: Testing is essential for ensuring your code works as expected. Write unit tests and integration tests to catch any bugs or errors.
  6. Refactor Mercilessly: Don’t be afraid to refactor your code to make it better. This means simplifying complex sections, removing unnecessary code, and improving performance.

The Benefits of Clean Code

By following these best practices, you’ll be able to write clean code that is maintainable, efficient, and easy to understand. The benefits of clean code are numerous, including:

  • Reduced Debugging Time: With clean code, you’ll spend less time tracking down bugs and more time adding new features.
  • Improved Collaboration: Clean code makes it easier for other developers to understand and work with your code.
  • Increased Productivity: By writing clean code, you’ll be able to work more efficiently and get more done in less time.
  • Better Performance: Clean code is often more efficient and scalable, which means your application will perform better and handle more users.

clean code  * **Reduced Debugging Time**: With clean

Conclusion

Clean code is not just a buzzword; it’s a way of life. By following best practices and writing clean, maintainable code, you’ll be able to create high-quality applications that stand the test of time. Remember, clean code is not just about writing code that works; it’s about writing code that is easy to read, understand, and maintain. So, take the time to learn about clean code and start writing better code today. Your future self (and your colleagues) will thank you.