If cache is faster than database, why not store everything in cache?

We should all have had this question,

why not just use cache everywhere if cache is faster than a database?

I want to quantify and show the difference to you today.

You are thinking, ok this read is going to be a waste of time, I am just gonna say Cache is volatile and move on to doomscroll, or vibe code or watch the latest Ai slop VC drama. Lets fix that, you have a non volatile cache and you dont have to worry about the money to make it non volatile. Can you still use Redis as your DB ?

Volatility means the cache lives on RAM, when you switch it off, all the data is gone.
Whereas DB lives on the disk, and it will survive restart.

We can make it volatile by doing snapshot of the data to a disk, or replicating data across servers.

So now that you have decided to think, can you actually make Redis your DB, given it is not volatile anymore?

Problem 1: Lets talk about the easy reasoning here – COST

Lets assume you own a bank, and it has the following things:

  • 10 million total users
  • 1 million Daily active users
  • each active user does 20 reads/ day and 2 writes/ day

DynamoDBs Pricing:
$0.125 per million reads
$0.625 per million writes
$0.25 per GB month for storage

With 1 million active users you are doing:

  • 20 million reads per day
  • 2 million writes per day

So that will cost you:

  • $1.25 per day for reads
  • $1.25 per day for writes
  • 50 GB storage about $0.42 per day

Total:

  • $1065 per year

Now lets compare to what that will cost us if we use Cache which is REDIS
Redis does not charge us per read the way DynamoDB does
Instead we pay for the cluster capacity to exist all the time.

So for our situation we need 2 shards, 1 replica per shard and 4 total nodes
That will Cost:
$1.729 per hour
$41.50 per day
$15,147 per year

So we are paying ~15x more for REDIS.
But you know what, lets say money aint a problem, can you still use Redis as your DB ?

Now comes – Eviction pressure

What does it mean ?
When Redis runs out of memory, it must remove some data to make space
Redis commonly uses LRU – Least Recently Used
Which means : delete the data that hasnt been used recently

Example : User A logs in every day, then it will stay in Redis
User B hasnt logged in for a while, it gets removed from memory

So now if Redis was your source of truth, user’s account details or balance could vanish.

Ok then lets disable eviction and scale infinitely to have all the RAM.
Well yea then you can do it, by spending ton of money just because you went in a rabbit hole of experimenting with the wrong tool for the job.

But you know what, rabbit holes like this are totally worth the millions of dollars.

  • Hari.

Why Most Developers Reach for a Vector Database Too Soon.

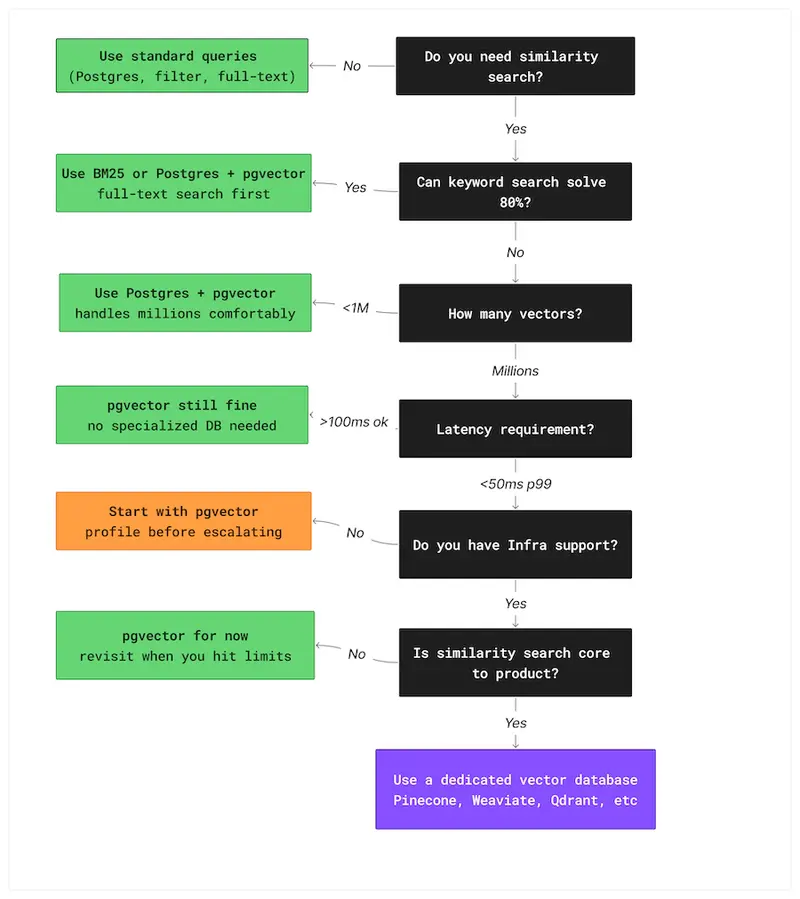
Decision flowchart for choosing between keyword search, pgvector, and a vector database based on scale and requirements

Most semantic search tutorials start the same way: add a vector database.

The feature request sounded simple: type question, get the right internal doc back.

A few hundred documents. Support notes and wiki pages.

Nothing exotic. The kind of thing that should take a week, maybe less.

They did what most of us would do today.

They watched a couple of LangChain tutorials, skimmed the OpenAI docs, and followed the same architecture every example seemed to use.

Documents were chunked, embeddings generated, and everything went into a hosted vector database.

An ingestion pipeline kept the index in sync.

Queries hit the vector store first, then the app database.

It looked like the modern, correct way to build search.

Three weeks later, the feature worked — technically.

But updating a single document meant re-running the embedding pipeline.

The vector index and the app database could drift out of sync silently.

API keys just to run the thing locally.

Every deployment waited on background indexing to finish before results were reliable.

The system was fragile in ways that would keep compounding.

A Postgres full-text search would have solved the original problem in an afternoon.

The vector database wasn’t wrong. It was just answering a question nobody had asked yet.

This article is about how to ask the right question before you start building — and what the answer looks like in practice.

What a Vector Database Is Actually For

Most developers working with embeddings already know what a vector database does.

Fewer stop to ask whether that specific capability is what their problem actually requires.

Before arguing when not to reach for one, it’s worth being precise about what the tool is actually built for.

When you generate embeddings for text, images, or other data, you end up with arrays of floating-point numbers.

Finding the most similar item means comparing one vector against many others.

For small datasets, you can do this with a simple scan.

As the number of vectors grows, brute-force comparison becomes too slow, and you need specialized indexes designed for approximate nearest neighbor search.

That’s the problem vector databases are optimized to solve.

Under the hood, most of them rely on approximate nearest neighbour algorithms.

HNSW for graph-based search.

IVF for cluster-based partitioning.

They trade a small amount of recall accuracy for dramatically faster queries.

For semantic search, that trade-off is almost always acceptable — you don’t need the single most similar document, you need several good ones, fast.

pgvector exposes this same choice directly in SQL — the query is identical with or without the index:

-- Without IVFFlat - PostgreSQL scans every row

SELECT content,
       embedding <=> query_vector AS distance
FROM documents
ORDER BY distance
LIMIT 5;
-- with IVFFlat — PostgreSQL searches only relevant clusters
-- same query, dramatically different performance at scale
SELECT content,
       embedding <=> query_vector AS distance
FROM documents
ORDER BY distance
LIMIT 5;

The query looks identical — the difference is entirely in the index. This is the performance decision pgvector hands back to you.

Everything else people associate with vector databases — metadata filtering, hybrid search, multi-tenant indexes, reranking — sits on top of that core capability.

Here’s where the confusion starts.

The term “vector database” bundles several distinct concerns — storing embeddings, searching them, filtering results, and running the infrastructure — into what looks like a single decision.

The tooling reinforces it.

When every tutorial wires all four together in the same five lines of code, it stops looking like a choice and starts looking like a requirement.

As soon as a project involves embeddings, it can seem like a dedicated vector database is the only correct design.

It isn’t.

Embeddings are just data.

They can live in Postgres, SQLite, or even memory.

A vector database becomes the right tool when approximate nearest neighbor search is the bottleneck — not when embeddings first appear in the architecture.

Until that point, it’s often extra complexity you don’t need.

Why Developers Reach for It Too Early

1. Tutorial monoculture

Most examples of semantic search, RAG, or LLM-powered features follow the same pattern: chunk documents, generate embeddings, store them in a vector database, query with similarity search.

LangChain demos do it. LlamaIndex demos do it. OpenAI examples do it.

2. The scalability trap

Once embeddings enter the design, it’s easy to assume the system will eventually need fast similarity search at scale, so the vector database gets added early to avoid rewriting things later.

This is the same instinct that leads teams to introduce Kafka for a service that sends ten emails a day. The future problem might be real.

But solving it before it exists adds complexity immediately, with no corresponding benefit.

3. Tooling and marketing

Modern vector databases have excellent documentation, polished SDKs, and tutorials that get you from zero to similarity search in under an hour.

That ease of setup is genuinely impressive — and it’s also exactly what makes the tool feel mandatory before you’ve decided whether you need it.

Great onboarding has a way of skipping the step where you ask whether you should be onboarding at all.

Developers don’t reach for vector databases too early because they don’t understand the technology.

They do it because the ecosystem makes it look like the obvious first step.

At some point, the vector database became the new Redis of the AI stack – added by default, before anyone confirmed it was actually needed.

The result isn’t broken systems. It’s systems that are harder to run, slower to change, and more expensive to maintain than the problem ever required. The complexity arrives on day one. The scale that would justify it may never come.

The Simpler Stack You’re Ignoring

Two tools get overlooked almost every time: pgvector, which runs inside the Postgres instance you already have, and plain keyword search, which still solves more problems than people want to admit.

1. pgvector — When Your Database Is Already Postgres

If your application already runs on PostgreSQL — and most do — adding pgvector gives you similarity search without introducing a new service.

No new deployment. No additional failure mode.

pgvector adds a VECTOR column type and similarity operators directly to PostgreSQL.

Embeddings live alongside the rest of your data, queryable with SQL, inside the same transactional system your application already depends on.

No new monitoring, no separate backups, no second system to explain to the next engineer on the team.

The setup starts with enabling the extension and creating the table:

CREATE EXTENSION IF NOT EXISTS vector;

CREATE TABLE documents (
    id                   BIGSERIAL PRIMARY KEY,
    title                TEXT NOT NULL,
    content              TEXT NOT NULL,
    metadata             JSONB,
    embedding            VECTOR(1536),
    status               TEXT NOT NULL DEFAULT 'READY',
    embedding_error      TEXT,
    embedding_updated_at TIMESTAMPTZ,
    created_at           TIMESTAMPTZ NOT NULL DEFAULT now(),
    updated_at           TIMESTAMPTZ NOT NULL DEFAULT now()
);

The status column is worth noting.

Because embedding is an external API call that can fail, documents move through a lifecycle — PENDING when first saved, READY once the embedding succeeds, FAILED if the API returns an error.

This means a failed embedding never silently corrupts search results. The status is always visible in the database.

For similarity search to scale beyond a few thousand documents, pgvector needs an index. The IVFFlat index is what makes this production-ready:

CREATE INDEX documents_embedding_ivfflat_idx 
    ON documents USING ivfflat (embedding vector_cosine_ops) 
    WITH (lists = 100);

This is a single SQL query that combines vector similarity search with lifecycle filtering and metadata filtering simultaneously.

A dedicated vector database handles each of those concerns separately — often requiring application-level joins or multiple round trips to combine them.

Here, everything runs inside one query, in one database, with full ACID guarantees.

The <=> operator is pgvector’s cosine distance operator. It returns a value between 0 and 2 — lower means more similar. Results are ordered ascending so the closest matches come first.

For most products, this goes further than people expect. pgvector handles millions of vectors without meaningful performance degradation for typical query patterns.

If you’re building an internal tool, a document search API, or a RAG feature for a product that isn’t at serious scale yet, you’re almost certainly in that range.

There are real limits. pgvector won’t give you distributed indexing, automatic sharding, or sub-10ms latency under very high query volume.

If you’re storing tens of millions of vectors and serving high-QPS queries, a dedicated vector database will outperform it.

But by the time you reach that point, you’ll know exactly why you’re making the switch — because you’ll have measured the problem, not imagined it.

The full implementation — including all three Flyway migrations, the IVFFlat index configuration, lifecycle tracking, and metadata filtering — is available on GitHub.

You don’t need a new database to add semantic search. You need pgvector and a migration file.

2. BM25 and Keyword Search — The Tool Nobody Wants to Admit Still Works

Before you generate a single embedding, it’s worth asking whether your users actually need semantic search — or whether they just need search that works.

A lot of features labeled “AI search” are really just keyword lookup with better marketing.

If your users know the words they’re looking for, traditional full-text search is often faster, simpler, and more predictable than embeddings.

BM25-based search — the ranking algorithm used by most full-text engines — is extremely good at matching short, precise queries.

-- standard PostgreSQL full-text search — no new infrastructure needed
SELECT title, content,
       ts_rank(to_tsvector('english', content),
               plainto_tsquery('english', 'reset password')) AS rank
FROM documents
WHERE to_tsvector('english', content)
      @@ plainto_tsquery('english', 'reset password')
ORDER BY rank DESC
LIMIT 5;

This runs inside the same PostgreSQL instance as your pgvector queries — no new service, no new failure mode.

Searches like “reset password”, “invoice template”, or a specific error message often perform better with keyword scoring than with vector similarity.

In domains with strict terminology — legal references, product codes, medical terms — exact matches matter more than semantic closeness.

Embeddings shine when meaning matters more than wording. If users are asking “show me something like this” or “what document explains this idea”, vector search makes sense.

If they’re typing the name of the thing they want, it usually doesn’t.

You also don’t have to choose one or the other. Postgres supports full-text search, pgvector supports similarity search, and combining the two often gives better results than either alone.

A hybrid query looks like this — no new infrastructure, no new service:

SELECT id, title, content, 
        embedding <=> ?::vector AS cosine_distance, 
        ts_rank( 
            to_tsvector('english', content), 
            plainto_tsquery('english', ?) 
        ) AS text_rank 
FROM documents 
WHERE status = 'READY' 
    AND embedding IS NOT NULL 
ORDER BY 
    (embedding <=> ?::vector) * 0.7 
    - ts_rank( 
        to_tsvector('english', content), 
        plainto_tsquery('english', ?) 
) * 0.3 
ASC 
LIMIT 10;

A simple hybrid query can rank by keyword match first and semantic distance second, without adding any new infrastructure.

Before adding a vector database, answer a simpler question first: can keyword search solve 80% of this?

If the answer is yes, start there. You can always add embeddings later. You can’t easily remove infrastructure you didn’t need.

When You Actually Need a Vector Database

Vector databases aren’t the villain here. They’re the right tool when similarity search becomes a real, measured performance problem — not a projected one. The question is how to recognize that moment before you’ve already over-built.

These are the thresholds where teams consistently start feeling the limits of a general-purpose setup:

Signal Typical threshold
Vector count Millions of embeddings
Query latency Sub-50 ms p99
Filtering complexity Multi-tenant filters
Query volume High QPS
Infrastructure maturity Dedicated team
Use case Recommendation, RAG, personalization

The numbers aren’t rules. They’re patterns. The real signal is when the simple approach stops being simple.

If your search feature is core to the product and needs predictable latency under load, the tradeoffs of a dedicated vector database start to make sense.

You know you need a vector database when brute-force similarity becomes your actual bottleneck — not your imagined one.

A Simple Decision Flowchart

Most projects don’t need a new datastore. They need a clear decision process.

If you’re starting a new feature and asking whether a vector database belongs in the design, the flowchart below maps the decision from ‘I need search‘ to the right tool for your current scale.

A simple way to think about the decision:

Decision flowchart for choosing between keyword search, pgvector, and a vector database based on scale and requirements

The flowchart won’t cover every edge case — no decision tool does.

But if your design jumps straight to a managed vector database before working through these questions, you’re probably solving a scaling problem you don’t have yet.

The cost of that mistake shows up slowly, in complexity that compounds before the scale ever arrives.

Architecture Should Follow the Problem

The best architecture isn’t the most modern one.

It’s the one that matches the problem you actually have, at the scale you’re actually at — maintained by the team you actually have, not the one you might hire later.

Vector databases are powerful tools, but they come with real operational cost — another service to run, another datastore to keep in sync, another place where performance and correctness can drift apart.

That cost only makes sense when the problem demands it. Before that point, simpler designs are usually easier to build, easier to reason about, and easier to change when requirements shift.

Starting with pgvector or full-text search doesn’t lock you in. If you outgrow it, the path to a dedicated vector database is well understood. The reverse is harder.

Removing infrastructure you didn’t need is almost always more work than adding it later.

The full pgvector implementation, including schemas, index configuration, and the search query shown above, is available on GitHub .

Most systems don’t fail because they chose the wrong tool. They fail because they chose the right tool too early.

The real skill isn’t knowing how to use a vector database. It’s knowing when not to.

How to compare translation APIs without rewriting your workflow

How to compare translation APIs without rewriting your workflow

Draft

Comparing translation APIs sounds simple until you try to do it in a real workflow.

On paper, you are just swapping one provider for another.
In practice, you end up touching request formats, auth handling, retries, fallback logic, content-type handling, and often parts of the app that were never meant to know anything about translation providers in the first place.

That means the real cost of testing or switching translation APIs is usually not the API bill.
It is workflow friction.

The hidden cost is not the translation call

Most teams start with a simple assumption:

  • pick one provider
  • wire it in
  • call the API
  • ship

That works at the beginning.

The problem starts later, when one of these things happens:

  • you want to compare quality across providers
  • you want fallback if one provider is slow or unavailable
  • pricing changes and you want to test alternatives
  • certain content types work better with different providers
  • one team wants better quality, another wants lower cost, and a third wants less operational complexity

At that point, you discover that “trying another API” is not a one-line change.

It often means revisiting:

  • auth and key management
  • request and response normalization
  • retry strategy
  • batch handling
  • timeout behavior
  • logging and observability
  • downstream assumptions in your app or content pipeline

The provider call is only one small part of the real workflow.

Why translation API comparisons become expensive

The mistake is usually architectural, not just operational.

A lot of systems let provider-specific details leak into places they should never reach.

For example:

  • the CMS pipeline assumes a specific request shape
  • the subtitle workflow expects one provider’s metadata format
  • the docs job uses special logic that only works with one API
  • the app stores translation results in a way that is tightly coupled to one provider

Once that happens, comparing providers is no longer a product decision.
It becomes a mini-refactor.

That creates two problems:

  1. You compare providers less often than you should.
  2. You become more locked in than you intended.

This is why many teams stay with a provider they no longer fully like.
Switching feels more expensive than absorbing the downsides.

What developers actually need

The useful abstraction is not “one wrapper for one translation API.”

The useful abstraction is:

  • one workflow input
  • one consistent job model
  • one place for provider routing decisions
  • one place for fallback logic
  • one way to compare results and cost

In other words, the problem is not only translation quality.
It is workflow portability.

If you want to compare providers without rewriting your flow every time, you need a structure where:

  • job input is normalized
  • provider adapters are isolated
  • content type is explicit
  • fallback behavior is configurable
  • result storage is consistent

That does not remove the differences between providers.
It stops those differences from leaking everywhere.

Real workflow examples

This shows up in more places than people expect.

JSON locale files

A team translating app strings may want:

  • one provider for fast baseline translation
  • another for specific languages
  • a separate review or QA path for critical UI copy

If the translation logic is scattered through the build or deployment pipeline, every provider experiment becomes risky.

Multilingual docs

Docs often have different tradeoffs than UI strings.

You may care more about:

  • structure preservation
  • glossary consistency
  • markdown safety
  • cost at scale

The best provider for docs may not be the best provider for product UI.

CMS or marketing content

Marketing content is usually more sensitive to tone and nuance.
That changes the evaluation criteria again.

Subtitles and media-related text

Subtitle workflows often care about:

  • segmentation
  • timing alignment
  • batch throughput
  • formatting integrity

Again, this is not just a translation-output question.
It is a workflow question.

A better way to evaluate translation APIs

Most comparisons are too narrow.
They focus on output quality and price only.

A more useful evaluation framework includes:

  • output quality
  • language coverage
  • pricing
  • latency
  • throughput and batching
  • reliability
  • fallback readiness
  • integration cost
  • workflow disruption cost

That last one is the most overlooked.

If changing providers forces you to touch too many layers, then the comparison process itself is broken.

What a lower-friction workflow looks like

A healthier setup usually has these properties:

1. Job input is normalized

The rest of the app should speak in terms of translation jobs, not provider-specific payloads.

2. Provider-specific logic lives in adapters

Differences between APIs are real.
They should exist in one place, not throughout your app.

3. Fallback is a workflow decision

Fallback should be explicit.
It should not be improvised ad hoc inside page code, build scripts, or CMS hooks.

4. Content types are first-class

UI copy, docs, subtitles, and CMS content do not behave the same way.
Treating them as identical often creates hidden quality and workflow problems.

5. Comparison is operationally cheap

You should be able to compare providers without feeling like you are reopening your architecture.

Why I care about this problem

This is the exact problem I have been exploring while building multiapitranslator.com.

The interesting part to me is not wrapping one API.
It is making provider comparison, fallback, and workflow routing less painful for developers who already know that “just call the API” is not the whole story.

I think the market talks a lot about translation quality and token cost, but not enough about workflow cost.

And in real projects, workflow cost is often what decides whether a team can adapt or gets stuck.

Final thought

If your team wants to compare translation providers, the first question should not be:

  • which API is best?

It should be:

  • how expensive is our workflow when we need to compare, switch, or fall back?

If the answer is “very expensive,” then your provider integration is already doing too much damage to the rest of the system.

That is the real lock-in.

If you already deal with this in production, I would be interested in what your current setup looks like and where the friction actually shows up:

  • provider comparison
  • fallback
  • docs translation
  • subtitle or content workflows
  • localization QA

That feedback is exactly the kind of input I am looking for while shaping the next step of multiapitranslator.com.

Why Subscription DevOps Could Save Your Startup $250K/Year (The Math)

Most startups hit the same wall: infrastructure is falling apart, your CTO is doing DevOps at 2am, and hiring a full-time DevOps engineer feels impossible.

Let’s run the actual numbers on your options.

The Real Cost of Hiring Full-Time

According to Glassdoor and Levels.fyi data for 2026:

Cost Category Annual Amount
Senior DevOps salary $180,000 – $250,000
Benefits & taxes (30%) $54,000 – $75,000
Recruiting fees (15-25%) $27,000 – $62,500
Equipment & tools $5,000 – $10,000
Management overhead $10,000 – $15,000
Total Year 1 $276,000 – $412,500

And that’s assuming you can actually find someone. Average time-to-hire for senior DevOps: 3-6 months.

The Subscription Alternative

Cost Category Annual Amount
Monthly subscription $36,000 – $60,000/year
Setup fee $0
Recruiting cost $0
Time to first deliverable 48 hours
Total Year 1 $36,000 – $60,000

That’s a 5-10x cost difference.

What You Actually Get

Subscription DevOps typically covers:

  • AWS infrastructure setup and management
  • Kubernetes clusters and container orchestration
  • CI/CD pipelines (GitHub Actions, GitLab CI, Jenkins)
  • Terraform/IaC for reproducible infrastructure
  • Monitoring and alerting (Datadog, Prometheus, Grafana)
  • Security hardening and compliance
  • Cost optimization (30-60% AWS savings is common)

Flat monthly fee. No hourly billing. No surprise invoices.

The Honest Downsides

  • Not on-site — remote-only
  • Queue-based — requests handled in order
  • Shared attention — not their only client
  • No on-call — need a full-time hire for 24/7 incident response

When Each Makes Sense

Subscription: Pre-Series B, 5-30 engineers, need breadth, can’t wait 6 months to hire.

Full-time: 50+ engineers, constant daily infra work, need on-call rotation, $300K+ budget.

Hybrid: One in-house DevOps lead plus subscription for overflow. Best of both worlds.

What’s your setup? Subscription, full-time, or hybrid? Drop a comment.

AI Coding Agents Are Great, but They Suck at RTL. Here’s How I Fixed It

RTLify CLI demo showing the init and check commands in a terminal

RTLify CLI demo showing the init and check commands in a terminal

I build products for Hebrew-speaking users. Every time I ask an AI to generate a component, I get the same broken output — margin-left instead of margin-inline-start, ml-4 instead of ms-4, arrows pointing the wrong way, and order numbers jumping around inside RTL sentences.

I fix it. I ask for the next component. Same bugs. The AI doesn’t learn — it’s trained on LTR codebases and has zero awareness that RTL exists.

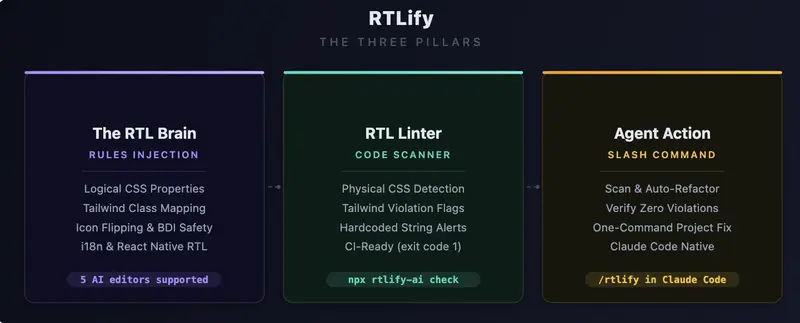
After months of manually fixing the same 5-6 patterns in every single component, I built RTLify — a CLI that teaches your AI editor the rules once, so you never fix them again.

npx rtlify-ai init

One command. Works with Claude Code, Cursor, Windsurf, Cline, GitHub Copilot, Gemini CLI, and Codex CLI.

The Bugs AI Keeps Making

Let me show you exactly what goes wrong. If you’ve built anything in Hebrew, Arabic, Persian, or Urdu — you’ll recognize every single one.

1. Physical CSS Instead of Logical

AI writes:

.sidebar {
  margin-left: 16px;
  padding-right: 8px;
  border-left: 1px solid #ccc;
  left: 0;
}

In RTL, “left” is “right”. The layout mirrors, but these properties don’t. The correct version:

.sidebar {
  margin-inline-start: 16px;
  padding-inline-end: 8px;
  border-inline-start: 1px solid #ccc;
  inset-inline-start: 0;
}

Logical properties work in both LTR and RTL. AI never uses them unless you tell it to.

2. Wrong Tailwind Classes

This is the most common one. AI writes:

<div className="ml-4 pr-6 text-left border-l-2 rounded-tl-lg">

Every single class here is wrong for RTL. The correct version:

<div className="ms-4 pe-6 text-start border-s-2 rounded-ss-lg">

RTLify includes a full mapping table with 20+ conversions — ml → ms, pr → pe, text-left → text-start, float-right → float-end, rounded-tl → rounded-ss, and more.

3. Numbers Jumping Around (Bidi Text)

This is the sneaky one. Look at this Hebrew sentence:

<p>ההזמנה שלך #12345 אושרה בהצלחה</p>

Looks fine in your code editor. Open it in a browser with dir="rtl" — the number #12345 visually jumps to a completely wrong position. The sentence becomes unreadable.

The fix is a <bdi> tag:

<p>ההזמנה שלך <bdi>#12345</bdi> אושרה בהצלחה</p>

Same applies to phone numbers, dates, English brand names — any LTR content inside an RTL sentence needs <bdi> wrapping. AI never does this.

4. Icons Pointing the Wrong Way

In an RTL interface, a “next” arrow should point left, not right. But AI always generates:

<ChevronRight className="w-5 h-5" />

The fix:

<ChevronRight className="w-5 h-5 rtl:-scale-x-100" />

Non-directional icons (home, settings, search) should NOT be flipped. AI doesn’t know the difference — RTLify teaches it which ones to flip.

5. Currency and Dates

AI formats prices like this:

const price = `₪${amount}`;  // Wrong — symbol on wrong side

The correct way:

const price = new Intl.NumberFormat('he-IL', {
  style: 'currency',
  currency: 'ILS',
}).format(amount);
// → "42.90 ₪" — symbol on correct side, RTL mark included

Same for dates — AI defaults to MM/DD/YYYY instead of DD/MM/YYYY with Intl.DateTimeFormat.

6. React Native Gets It Even Worse

On mobile, the same problems exist but with different APIs:

// AI writes:
paddingLeft: 16
left: 0
textAlign: 'left'

// Should be:
paddingStart: 16
start: 0
writingDirection: 'rtl'

Plus you need I18nManager.isRTL for conditional checks and transform: [{ scaleX: I18nManager.isRTL ? -1 : 1 }] for icon flipping.

How RTLify Works

There’s no magic and no runtime dependency. Here’s what happens when you run npx rtlify-ai init:

  1. It writes .rtlify-rules.md — a markdown file containing 8 RTL architecture rules with concrete “do this / not that” code examples. This is the full ruleset the AI will follow.

  2. It adds a 3-line pointer to your editor’s config file (CLAUDE.md, .cursorrules, .windsurfrules, etc.) that tells the AI: “read .rtlify-rules.md before generating any UI code.”

  3. For Claude Code users — it installs a global /rtlify slash command that scans your project and auto-fixes violations.

That’s it. The AI reads the rules on every conversation. No extra prompting needed.

You can open .rtlify-rules.md and read exactly what the AI sees. Full transparency — it’s just a markdown file.

The Linter

RTLify also ships with a scanner that catches violations in existing code:

npx rtlify-ai check
  src/components/Sidebar.tsx
       3 Tailwind Physical
         Use logical classes (ms-*, me-*, ps-*, pe-*)
         <div className="ml-4 pl-6 text-left">

  src/components/OrderCard.tsx
       8 Tailwind Physical
         Use text-start / text-end
         <h2 className="text-left text-xl">פרטי הזמנה</h2>

  2 violations across 2 files

Exits with code 1 — plug it into your CI pipeline to catch RTL violations on every PR.

The Fix Command

For editors that don’t support slash commands, RTLify generates a ready-to-paste prompt:

npx rtlify-ai fix

It copies a prompt to your clipboard that tells your AI editor to scan, fix, and verify all violations. Works with any AI editor.

The 8 Rules

# Rule What the AI Learns
1 Logical CSS margin-inline-start not margin-left
2 Tailwind Mapping 20+ class conversions (ml-* → ms-*)
3 Icon Flipping rtl:-scale-x-100 on directional icons only
4 BDI Safety <bdi> tags for numbers/English in RTL text
5 Localized Formats Intl.NumberFormat('he-IL') for currency & dates
6 Safe i18n Respects your i18n setup or lack of it
7 Complex Components Carousels, charts, sliders with dir="rtl"
8 React Native I18nManager.isRTL, paddingStart, writingDirection

Try It

npx rtlify-ai init

Then ask your AI to “build a checkout form in Hebrew” or “create a settings screen in Arabic”. You’ll see the difference immediately.

GitHub: github.com/idanlevi1/rtlify
NPM: npmjs.com/package/rtlify-ai

If you’re building for RTL markets — what’s the most annoying RTL bug an AI has generated for you? I’d love to hear in the comments.

NVIDIA Proved Evolutionary Code Search Beats Humans — Here’s What an Open Protocol for It Looks Like

NVIDIA just published a paper that should make every software engineer pause. Their system — called AVO (Agentic Variation Operators) — ran autonomously for 7 days on a Blackwell B200 GPU, optimizing attention kernels with zero human intervention. The result: it outperformed NVIDIA’s own cuDNN library by 3.5% and FlashAttention-4 by 10.5%.

The researchers call their philosophy “blind coding.” Bing Xu, one of the lead authors, puts it bluntly: “Blind coding is the future of software engineering. Human cognitive ability is the bottleneck.”

This is not the first time evolutionary code search has beaten humans. Google’s AlphaEvolve did it for matrix multiplication and Ramsey number bounds last year. But AVO pushes the paradigm further — and both systems share a structural limitation that matters deeply for the future of this field.

The Pattern: AlphaEvolve → AVO

AlphaEvolve (2025) and AVO (2026) follow the same evolutionary template:

  1. Represent code as evolvable units — candidate solutions that can be mutated
  2. Define a fitness function — an automated way to measure “better”
  3. Apply selection pressure — keep the best, discard the rest
  4. Iterate — repeat for hours, days, or weeks without human intervention

The difference is in how they handle the variation step. AlphaEvolve uses an LLM as a candidate generator — it proposes code modifications one at a time. AVO promotes the agent to a variation operator — it doesn’t just generate candidates; it runs a full autonomous loop of proposing, repairing, self-critiquing, and verifying before submitting a candidate to the population.

This is a meaningful architectural evolution. AVO’s agent consults the full lineage of previous solutions, reads hardware documentation, analyzes profiler output, and iterates independently. The variation step itself becomes an intelligent process, not a single-shot generation.

The results speak for themselves: AVO discovered micro-architectural optimizations (register rebalancing, branchless accumulator rescaling, instruction pipeline overlap) that human GPU experts had not attempted. And when pointed at a related problem (grouped-query attention), the agent adapted its MHA optimizations in just 30 minutes.

The Structural Limitation: Both Are Closed

AlphaEvolve and AVO share a constraint that limits their impact: they are closed systems.

  • Every candidate solution is generated, evaluated, and consumed by the same team
  • The fitness function is built into the framework, not replaceable
  • Discoveries don’t propagate — an optimization found for attention kernels stays in NVIDIA’s codebase
  • No external developer can submit a competing search strategy or a better evaluator

This is not a criticism — it’s a design choice that makes sense for internal optimization. But it means the evolutionary dynamics are limited to a single population, a single evaluator, and a single environment.

What would happen if you opened all of this up?

The Open Protocol Pattern

An open protocol for evolutionary code search would look something like this:

Component Closed (AVO/AlphaEvolve) Open Protocol
Code units Internal candidates Publishable, versioned, typed modules (like genes)
Fitness evaluation Built-in profiler Replaceable evaluator modules — anyone can build a better one
Selection mechanism Internal ranking Public arena with transparent rankings and anti-manipulation rules
Knowledge transfer Stays in one codebase Discoveries propagate across developers, domains, and environments
Lineage tracking Implicit (git history) Explicit derivation graph with attribution incentives
Diversity protection None (winner-take-all) Frequency-dependent selection to prevent monoculture

This is, roughly, the architecture of the Rotifer Protocol.

In Rotifer, code units are called Genes — self-contained, typed, fitness-evaluable modules. They compete in a public Arena where a dual-metric system (fitness F(g) for utility, verification V(g) for safety) determines survival. The Arena applies selection pressure, but a diversity factor prevents any single gene from monopolizing its domain. Optimizations that work in one environment propagate to others through Horizontal Logic Transfer (HLT) — the protocol-level mechanism for cross-agent, cross-domain knowledge migration.

The evaluator is not built in. Rotifer defines a concept called Judge Genes — meta-genes whose job is to evaluate other genes. Judge Genes compete in their own Arena, so the quality of evaluation itself evolves over time. This is the key difference: in AVO, NVIDIA decides what “better” means. In an open protocol, the community builds and improves the evaluators.

What AVO Validates

AVO’s results are significant for anyone building evolutionary code infrastructure — not because of the specific numbers (3.5% over cuDNN is impressive but domain-specific), but because of three structural validations:

1. Autonomous evolution can exceed human expertise. AVO didn’t just match human performance — it surpassed every expert-engineered implementation on NVIDIA’s most advanced hardware. This validates the core thesis that evolutionary search with autonomous agents can discover optimizations that human engineers cannot.

2. Lineage matters. AVO’s agent consults the full evolutionary history before each variation step. This is not just record-keeping — it’s an active input to the search process. Lineage-guided variation produces better candidates than blind mutation.

3. Cross-task transfer works. The 30-minute MHA→GQA adaptation demonstrates that evolutionary discoveries are not domain-locked. With the right protocol infrastructure, optimizations found in one domain can seed search in another.

These three findings — superhuman performance, lineage-guided variation, cross-task transfer — are independent of the specific domain. They apply to any system where code units compete, evolve, and propagate.

The Timeline

Evolutionary code search is accelerating:

  • 2024: FunSearch (DeepMind) — LLM + evolutionary search discovers new mathematical constructions
  • 2025: AlphaEvolve (DeepMind) — breaks Strassen’s 56-year record in matrix multiplication
  • 2026: AVO (NVIDIA) — autonomous agent exceeds all human GPU experts in kernel optimization

Each step pushes the same direction: from using AI as a tool within a human-designed process, to making AI the operator of the evolutionary process itself.

The missing piece is the protocol layer — the infrastructure that makes these capabilities open, composable, and collectively improvable. That’s what we’re building.

Rotifer Protocol is an open-source evolution framework for autonomous software agents. The protocol specification, CLI, and SDK are available at rotifer.dev. The AVO paper is available at arXiv:2603.24517.

Your CI/CD Pipeline Is a Security Risk – Here’s How I Fixed Mine

Most CI/CD pipelines are one compromised dependency away from a production takeover.

I learned that the hard way after the Codecov breach.

I spent a couple of weeks hacking on a PoC to see what actually holds up when the goal is simple: stop someone from nuking your prod environment.

Here’s what I ended up with and where it hurt.

Branch protection is table stakes, but it’s very easy to get wrong.

I forced signed commits and mandatory approvals, even for admins. Yeah, it slows things down during fast iterations. But without it, a compromised runner can just rewrite your main history and push whatever it wants.

Let me paint the scenario that kept me up at night:

A compromised GitHub Action runs in your pipeline.
It reads your AWS_ACCESS_KEY_ID and AWS_SECRET_ACCESS_KEY.

Sends them to an external server.

A few seconds later, someone else is deploying to your production account.

Game over.

Static secrets had to die – so I killed them

I replaced every AWS_ACCESS_KEY_ID with OIDC (OpenID Connect).

Now the runner requests a short-lived JWT, and AWS STS exchanges it for temporary credentials. No long-lived secrets sitting in GitHub anymore.

Setting this up was a nightmare. The first error I got was an AccessDenied that lasted 4 hours until I realized the Trust Policy wasn’t accepting GitHub’s audience. AWS documentation on OIDC feels like it was written by someone who’s never debugged a 403 in their life.

But once it works, it removes an entire class of problems. Even if a job gets compromised, the creds expire fast enough to limit the blast radius.

permissions:
  id-token: write
  contents: read

jobs:
  deploy:
    runs-on: ubuntu-latest
    steps:
      - name: Checkout
        uses: actions/checkout@v4

      - name: Configure AWS credentials via OIDC
        uses: aws-actions/configure-aws-credentials@v4
        with:
          role-to-assume: arn:aws:iam::123456789012:role/GitHubOIDCRole
          aws-region: us-east-1

Tip: if you get “Access Denied”,
99% of the time it’s your IAM Trust Policy not accepting
GitHub’s audience. I lost 3 hours on this.

SBOMs were the easy part.

Syft generates SPDX/CycloneDX without much friction.

Keyless signing with Cosign took more effort. The Sigstore flow isn’t hard once it clicks, but it’s definitely not obvious the first time. I had to re-read the docs three times to understand where the “key” even comes from.

Still, it beats GPG key management hell. No private key to rotate, no “who has the signing key” questions.

The GitHub OIDC identity handles everything, and verification is just:

cosign verify 
  --certificate-identity-regexp="^https://github.com/.*$" 
  your-registry/image:tag

If verification fails with “no matching signatures”,
your identity is probably not mapped in the policy.

gVisor: the container escape killer (but it comes with baggage)

I didn’t fully trust Docker isolation, so I tried running builds with gVisor (runsc).

This part was painful. Self-hosted runner setup, cgroup issues, random “unsupported runtime” errors… I lost a few nights here.

What broke:

  • Volume mounts with specific configurations
  • Anything touching /proc too aggressively
  • Builds depending on uncommon syscalls

Debugging inside gVisor isn’t fun either. When something fails, you’re staring at cryptic errors that don’t tell you whether it’s your code or the sandbox.

Performance takes a noticeable hit. I haven’t benchmarked properly, but builds are slower enough that you feel it during iteration.

Here’s my honest take: if your team is small and you’re just deploying a simple Node.js API, this whole setup is overkill. The engineering hours you’ll spend maintaining gVisor + Falco + Cosign might cost more than the actual risk.

Use this if you run third-party code in CI, or if the data you handle is sensitive enough that standard GitHub Actions isolation doesn’t cut it.

Falco for runtime visibility

Isolation alone didn’t feel sufficient, so I added Falco for runtime monitoring.

Default rules are noisy as hell. I’m still tuning them. But it already paid off.

Seeing a Slack alert fire instantly when I poked at the Docker socket from inside a container was… reassuring.

At least now I’m not completely blind if something weird happens.

Security is always a tradeoff.

OIDC removes the biggest footgun. Keyless signing makes provenance usable without key management hell.

gVisor adds real isolation.

But you pay for it in complexity and performance.

This setup is far from perfect. It adds friction. It breaks things. It forces you to actually understand your pipeline.

But here’s the thing: if your CI/CD pipeline still depends on long-lived secrets, you don’t have automation.

You have a liability.

And honestly? The next breach is going to happen anyway.

The question is:
will your credentials still be valid when it does?

AI Agents on Polymarket: Automated Prediction Market Trading

You’re building a trading bot that needs to make swaps, borrow against positions, and bet on election outcomes. But every protocol has its own API, quirks, and authentication flow. Jupiter uses one format, Aave another, and Polymarket requires USDC.B on Polygon with specific signatures. Your code becomes a mess of adapters and edge cases.

This fragmentation slows development and creates bugs. One protocol changes their API, your bot breaks. Gas estimation works differently on each one. Error handling is inconsistent. You spend more time on protocol integration than trading logic.

WAIaaS solves this by providing one unified API for 14 DeFi protocols across EVM and Solana. Your bot makes the same REST call whether it’s swapping on Jupiter, lending on Aave, or betting on Polymarket. The system handles gas, signatures, error handling, and protocol-specific quirks automatically.

One API, 14 Protocols

WAIaaS integrates 14 DeFi protocol providers: aave-v3, across, dcent-swap, drift, erc8004, hyperliquid, jito-staking, jupiter-swap, kamino, lido-staking, lifi, pendle, polymarket, zerox-swap. Each provider follows the same action-based pattern.

Instead of learning each protocol’s SDK, you make standardized calls:

# Jupiter swap (Solana)
curl -X POST http://127.0.0.1:3100/v1/actions/jupiter-swap/swap 
  -H "Content-Type: application/json" 
  -H "Authorization: Bearer wai_sess_<token>" 
  -d '{
    "inputMint": "So11111111111111111111111111111111111111112",
    "outputMint": "EPjFWdd5AufqSSqeM2qN1xzybapC8G4wEGGkZwyTDt1v",
    "amount": "1000000000"
  }'

The same pattern works for every protocol. Lend on Aave:

curl -X POST http://127.0.0.1:3100/v1/actions/aave-v3/supply 
  -H "Authorization: Bearer wai_sess_<token>" 
  -d '{"asset": "USDC", "amount": "1000"}'

Bet on Polymarket:

curl -X POST http://127.0.0.1:3100/v1/actions/polymarket/buy 
  -H "Authorization: Bearer wai_sess_<token>" 
  -d '{"market": "presidential-election-2024", "outcome": "yes", "amount": "100"}'

Cross-Chain Made Simple

Your strategy needs to bridge assets between chains, swap on the best DEX, and lend where rates are highest. WAIaaS handles the complexity through cross-chain bridging via LI.FI and Across protocols.

Bridge USDC from Ethereum to Solana, then swap to SOL and stake with Jito — all through the same API interface. No manual bridge monitoring or transaction sequencing.

Real-Time Position Monitoring

Trading strategies need to track positions across multiple protocols. WAIaaS provides a unified positions endpoint:

curl http://127.0.0.1:3100/v1/wallet/defi-positions 
  -H "Authorization: Bearer wai_sess_<token>"

This returns your lending positions on Aave, liquid staking on Lido, perpetual futures on Hyperliquid, and prediction market bets on Polymarket — all in one response. No need to query each protocol separately and normalize the data.

Risk Management Built In

DeFi strategies can blow up quickly. WAIaaS includes a policy engine with 21 policy types to prevent disasters. Set maximum leverage for perpetual futures, limit loan-to-value ratios for lending, or restrict which markets your bot can trade:

curl -X POST http://127.0.0.1:3100/v1/policies 
  -H "Content-Type: application/json" 
  -H "X-Master-Password: my-secret-password" 
  -d '{
    "walletId": "<wallet-uuid>",
    "type": "PERP_MAX_LEVERAGE",
    "rules": {"maxLeverage": 5.0}
  }'

The system enforces these limits automatically. Your bot can’t accidentally open a 50x position or lend volatile assets as collateral.

Simulation Before Execution

DeFi transactions can fail for many reasons — insufficient liquidity, slippage, gas estimation errors. WAIaaS includes dry-run simulation for all transactions:

curl -X POST http://127.0.0.1:3100/v1/transactions/send 
  -H "Content-Type: application/json" 
  -H "Authorization: Bearer wai_sess_<token>" 
  -d '{
    "type": "TRANSFER",
    "to": "recipient-address",
    "amount": "0.1",
    "dryRun": true
  }'

This simulates the transaction without executing it, showing you gas costs, slippage, and potential failures before you commit real funds.

TypeScript SDK

For TypeScript applications, the SDK provides a clean interface:

import { WAIaaSClient } from '@waiaas/sdk';

const client = new WAIaaSClient({
  baseUrl: 'http://127.0.0.1:3100',
  sessionToken: process.env.WAIAAS_SESSION_TOKEN,
});

// Execute DeFi action across any protocol
const result = await client.executeAction('jupiter-swap', 'swap', {
  inputMint: 'So11111111111111111111111111111111111111112',
  outputMint: 'EPjFWdd5AufqSSqeM2qN1xzybapC8G4wEGGkZwyTDt1v',
  amount: '1000000000'
});

// Monitor positions across all protocols
const positions = await client.getDeFiPositions();
console.log('Total value locked:', positions.totalValueUsd);

The SDK handles authentication, retries, and error handling automatically. Your application code focuses on strategy logic, not protocol plumbing.

Production Deployment

WAIaaS runs as a self-hosted daemon, giving you full control over your trading infrastructure. Deploy with Docker:

git clone https://github.com/minhoyoo-iotrust/WAIaaS.git
cd WAIaaS
docker compose up -d

The Docker deployment includes auto-provision with secure defaults, healthchecks, and persistent data storage. Your trading system stays online even through restarts.

Quick Start: Multi-Protocol Trading Bot

Here’s how to build a cross-protocol arbitrage bot in 5 steps:

  1. Deploy WAIaaS: docker compose up -d

  2. Create wallets: Use the CLI to set up EVM and Solana wallets with session tokens

  3. Set policies: Configure spending limits and allowed protocols to prevent runaway trades

  4. Monitor prices: Query multiple DEXs through the unified API to find arbitrage opportunities

  5. Execute trades: Make simultaneous swaps across protocols when spreads are profitable

The unified API means your arbitrage logic works the same whether you’re trading Ethereum/Polygon via 0x or Solana via Jupiter.

What’s Next

This gives you the foundation for sophisticated DeFi strategies without protocol integration headaches. The 39 REST API routes cover everything from basic swaps to complex derivatives trading.

Ready to simplify your DeFi development? Check out the full documentation and examples at https://github.com/minhoyoo-iotrust/WAIaaS, or visit https://waiaas.ai to see all supported protocols and features.

From Pixels to Payload Part 2: DLL Search Order Hijacking via explorer.exe

procmon

After messing around with in-memory payloads hidden in images (LSB), I wanted to try something more native – getting code to run just by dropping a DLL. So I started looking into DLL search order hijacking, and explorer.exe turned out to be a solid target.

Goal

Inject a custom DLL that gets loaded by explorer.exe at startup, without any UAC prompt, and without using any EXE dropper or direct process injection.

Step 1: Find a Missing DLL

Using Procmon, I filtered for:

  • Process Name is explorer.exe
  • Result is NAME NOT FOUND

I was looking for DLLs that Windows tries (and fails) to load, especially from C:Windows, C:WindowsSystem32, and the working directory.

This revealed several missing DLLs:

procmon

But I couldn’t find a consistently missing DLL that actually worked when hijacked – most of them either existed or didn’t get loaded even if I dropped a fake one.

So I took a step back and did some research. That’s when I came across cscapi.dll – a DLL that’s often referenced in hijacking examples. It turns out:

  • It was historically used for Offline Files (Client Side Caching), a feature that’s either disabled or not used on most systems today.
  • Even if it’s missing, Windows and explorer.exe don’t care – they try to load it, fail silently, and move on.

So it’s a perfect candidate. I didn’t need to overwrite an active system file, and I knew explorer.exe would try to load it automatically.

Step 2: Create the Hijack DLL

A basic C-style DLL with DllMain was enough to verify execution:

BOOL WINAPI DllMain(HINSTANCE hinstDLL, DWORD fdwReason, LPVOID lpvReserved) {
    if (fdwReason == DLL_PROCESS_ATTACH) {
        MessageBoxA(NULL, "DLL Loaded!", "Hijack", MB_OK);
    }
    return TRUE;
}

Compiled as a 64-bit DLL (since explorer.exe is x64), named it cscapi.dll.

Step 3: Drop into System32

Because explorer.exe only looks in System32, I needed to place my DLL directly into C:WindowsSystem32cscapi.dll.

To do that:

  • Took ownership with takeown /f
  • Granted full permissions with icacls
  • Moved the old DLL or renamed it as backup

MovingDLL

  • Moved our own DLL into the System32 folder

system32

Step 4: Restart explorer.exe

With the hijack in place:

taskkill /f /im explorer.exe
start explorer.exe

The messagebox popped. The DLL was successfully hijacked and executed as part of a trusted Windows process.

proof

Why This Works

  • explorer.exe tries to load cscapi.dll (missing on most systems)
  • Windows falls back to the search order (current dir -> system dirs)
  • Our malicious DLL is right where it’s looking
  • No UAC prompt, no EXE – just native DLL loading

Coming Up in Part 3…

So far we’ve done:

  • Stealthy payload delivery via image LSBs (Part 1)
  • Native execution via DLL hijacking (Part 2)

Next up: What happens when we combine them?

In Part 3, I’ll chain the steganographic image loader from Part 1 with the DLL hijack from Part 2 – an image hides the payload, the payload gets extracted and executed, all triggered natively via explorer.exe without touching EXEs or triggering UAC.

How I Got 149 Pages Indexed in 27 Days With a New Domain

When I launched RelahConvert — a free browser-based image toolkit — I had one big SEO concern: would Google even bother indexing a brand new domain with hundreds of pages?

27 days later, 149 pages are indexed with 816 still pending.
Here’s exactly what I did and what I learned.

The Site Structure

RelahConvert has 37 image tools across 25 languages. That’s
theoretically 925 pages total. Getting Google to find and
index all of them quickly required being intentional about
a few things.

1. Submit a Sitemap Immediately

The first thing I did after launching was submit a sitemap
to Google Search Console. This tells Google exactly which
pages exist and where to find them.

In Vite, generating a sitemap is straightforward with
vite-plugin-sitemap:

import sitemap from 'vite-plugin-sitemap'

export default {
  plugins: [
    sitemap({
      hostname: 'https://relahconvert.com'
    })
  ]
}

Submit it in GSC under Sitemaps and Google will start
crawling within days.

2. Strong Internal Linking

Every tool page on RelahConvert links to related tools
through the navbar, footer, and a “What’s Next” section
after each conversion. This means Googlebot can crawl
from any page to every other page easily.

GSC confirmed 531 internal links across the site. That’s
Googlebot’s roadmap.

3. Request Indexing for Priority Pages

For your most important pages don’t just wait — request
indexing manually in GSC using the URL Inspection tool.

Enter the URL → click “Request Indexing” → Google
prioritizes crawling that page.

I did this for my core tool pages and they showed up in
results within days.

4. FAQ Structured Data

Every tool page has FAQ schema markup. Within 27 days
GSC showed 48 valid FAQ rich results with zero errors.

This doesn’t directly cause indexing but it signals to
Google that your pages are well structured and trustworthy.

5. Be Patient With Multilingual Pages

With 25 languages, most of my non-English pages are still
in the “Discovered — not yet indexed” queue (964 pages).
Google indexes the primary language first then works
through translations.

Make sure your hreflang tags are correct so Google
understands the relationship between language versions.

What’s Actually Indexed After 27 Days

  • 149 pages indexed
  • 964 discovered but pending
  • 1,140 impressions in 28 days
  • Position 76 average (still early)

The indexing is happening. The rankings take longer.

The Honest Reality

Getting pages indexed quickly is the easy part. Getting
them to rank is the slow part that requires backlinks,
time, and domain authority that a 27 day old site simply
doesn’t have yet.

But you can’t rank what isn’t indexed. Step one is done.

37 free image tools at RelahConvert