Understanding Reinforcement Learning with Neural Networks Part 6: Completing the Reinforcement Learning Process

In the previous article we covered the basics of training, and how rewards, derivatives and step-size were used to acheive it.

In this article, we will finish the training process for the model.

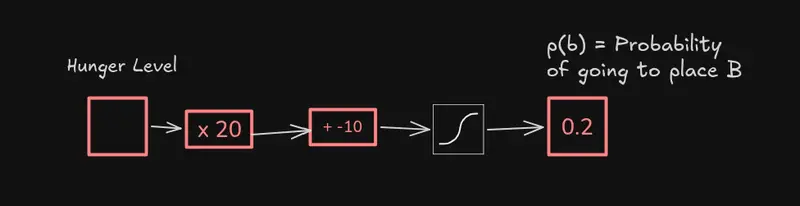
To fully train the model, we need to use different input values between 0 and 1 as inputs to the neural network.

This allows the model to learn how to behave under different hunger levels.

Training Over Time

After many updates using a wide range of inputs between 0 and 1, the value of the bias starts to hover around -10.

The fact that the bias stabilizes around a certain value suggests that the model has finished training.

What Happens When We Are Not Hungry?

Now, let us test the model.

When we are not hungry and the input is 0.0, the probability of going to Place B becomes 0.

This means that when hunger is low, the model will always choose Place A.

What Happens When We Are Hungry?

In contrast, when we are very hungry and the input value is 1.0, the probability of going to Place B becomes 1.

This means that when hunger is high, the model will always choose Place B.

Summary of Reinforcement Learning

In summary, reinforcement learning allows us to optimize a neural network even when we do not know the correct outputs in advance.

The process works like this:

  1. The neural network decides what action to take
  2. We assume that the chosen action was the correct decision
    • For example, if we go to Place B, we temporarily assume that Place B was the best choice, even if we later discover that Place A would have been better
  3. We calculate the derivative with respect to the parameter we want to optimize
  4. We determine the reward associated with the decision
  5. We multiply the derivative by the reward to correct mistakes
  6. This gives us the updated derivative
  7. We use the updated derivative in gradient descent to optimize the neural network

That wraps up this article.

In the next article, we will explore Reinforcement Learning with Human Feedback (RLHF).

Looking for an easier way to install tools, libraries, or entire repositories?
Try Installerpedia: a community-driven, structured installation platform that lets you install almost anything with minimal hassle and clear, reliable guidance.

Just run:

ipm install repo-name

… and you’re done! 🚀

Installerpedia Screenshot

🔗 Explore Installerpedia here

SMM Turbo: Hybrid AI Instagram Editor via Gemma 4

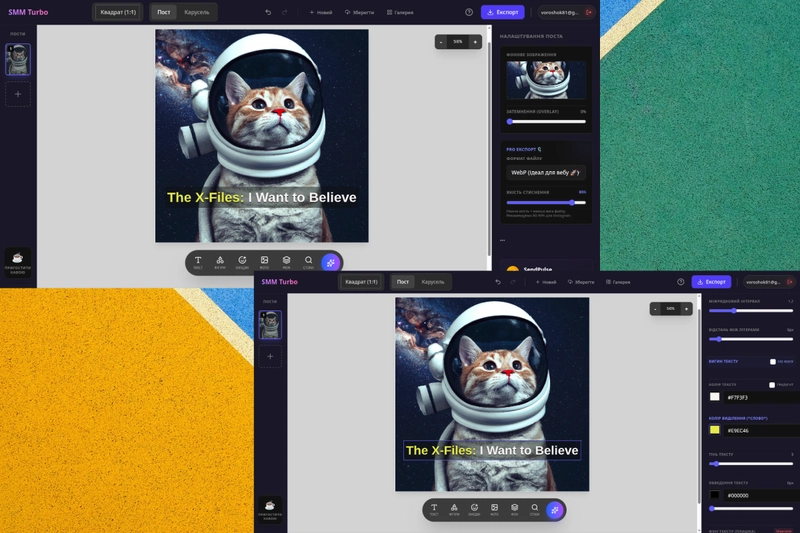
SMM Turbo editor interface with tools

This is a submission for the Gemma 4 Challenge: Build with Gemma 4

What I Built

I developed SMM Turbo – a blazing-fast, completely free graphic editor for creating Instagram carousels that works directly in the browser.

Instead of traditional <canvas>, SMM Turbo uses a DOM-based architecture with Svelte 5 runes for state management. But its real superpower is the Hybrid AI Co-Pilot, which combines local in-browser neural networks (for background removal) and cloud-based LLMs to completely automate the SMM workflow.

Demo

Live Project: https://smm.shcho-i-yak.pp.ua

Code

GitHub Repository: https://github.com/bodikinf/smm-turbo-open (Make sure to open it!)

How I Used Gemma 4

To create a truly intelligent “SMM Strategist”, I integrated the Gemma 4 31B model via the Google Generative Language API.

Why Gemma 4 31B? Generating a cohesive, conversion-focused 5-slide marketing carousel (Hook, Pain, Solution, Proof, CTA) requires deep reasoning and high context retention. Smaller models often lose the marketing context, but the 31B model handles complex instructional prompts flawlessly, delivering ready-to-publish strategies.

Technical Challenge Overcome:
Because the 31B model takes around 12-15 seconds to generate a highly detailed marketing structure, it consistently hit the strict 10-second serverless timeout limit on my hosting (resulting in 502 Bad Gateway errors).

To solve this, I bypassed heavy official SDKs and implemented a native fetch request within an Edge Function (runtime: 'edge'). This extended the timeout limit to 30 seconds and drastically reduced the memory footprint, allowing the Gemma 4 31B model to unleash its full reasoning capabilities without timeouts.

But let’s start from the beginning. Here is the full story of how SMM Turbo was born and how it works under the hood…

Hello. 👋 If you work in marketing, run your own business, or develop your personal brand, you know how much time creating visual content takes. Photoshop is too “heavy”, expensive, and complicated for daily tasks. And popular online services like Canva are becoming increasingly overloaded with unnecessary features and require a paid subscription for the simplest tools.

That’s why I decided to take matters into my own hands. I developed my own graphic editor for creating Instagram carousels, which works directly in the browser, uses the power of artificial intelligence, and is completely free.

Today, I’ll tell you the story of creating SMM Turbo. We’ll take a look “under the hood”, explore the magic of the latest Svelte 5, break down in-browser artificial intelligence, and learn how to create a cool tool for SMM specialists from scratch. Let’s go. 🚀

🛠 Why I decided to write my own graphic editor for creating Instagram carousels?

Creating carousels for Instagram is a very specific task. You need to keep the overall visual style in mind, seamlessly move elements between slides, and quickly export everything in the correct format with optimized weight.

Most existing solutions didn’t give me the speed I needed. So, I formed three main requirements for my future product:

  1. Lightning-fast speed. No long uploads or lags when dragging layers. The interface must respond instantly.
  2. AI assistant at hand. I wanted AI to not just be “for show”, but really help generate ideas, texts, and cut out the background right on the canvas.
  3. Free and accessible. The tool must work in any browser without installing “heavy” software on a PC.

To implement this ambitious plan, I chose the SvelteKit framework (with the latest Svelte 5). Its compiled nature and new reactive “runes” allowed me to create an extremely complex interface without losing productivity.

We also recommend reading: Overview of the Svelte 5 ecosystem: What’s new and why you should switch

🏗 Architecture: DOM instead of Canvas

If you’ve ever been interested in developing graphic editors, you know that the standard approach is to use HTML5 <canvas> or special libraries like Fabric.js or Konva. But I took a different, somewhat rebellious path 🐧.

In SMM Turbo, the working area is ordinary HTML elements (<div>, <span>, <img>) that are positioned absolutely using x and y coordinates.

Why so? Because CSS is a superpower! 🦸‍♂️

Rendering through DOM allowed me to implement incredibly complex typography in just a few lines of code, instead of writing complex math for drawing pixels on Canvas.

Here’s what regular CSS gives you:

  • Gradient text: Using -webkit-background-clip: text.
  • Stroke (outline): Works through -webkit-text-stroke.
  • Shadows and glow: Elementary drop-shadow and text-shadow.
  • Text bending along a circle: Implemented by breaking the text into separate <span> elements using transform: rotate(...) translateY(...).

But how do you save the finished picture then? That’s where the html-to-image library comes in.

Here’s what my script for exporting to +page.svelte looks like, which takes a “screenshot” of the DOM node, packs the slides into an archive using JSZip, and converts them “on the fly”:

const options = { 
    width: editor.canvasWidth, 
    height: editor.canvasHeight, 
    style: { transform: 'scale(1)', transformOrigin: 'top left' }, 
    pixelRatio: 1, 
    cacheBust: true 
};

// Draw Canvas from DOM
const canvas = await toCanvas(node, options);
// Save in the selected format (WebP/JPEG) with the desired quality
const dataUrl = canvas.toDataURL(editor.exportFormat, qualityDecimal);

capturedImages.push(dataUrl);

// Pack all slides into a ZIP archive
const zip = new JSZip();
capturedImages.forEach((img, i) => {
    const base64Data = img.split(',')[1];
    zip.file(`smm-slide-${i + 1}.webp`, base64Data, {base64: true});
});
const content = await zip.generateAsync({type: "blob"});

Thanks to this, we get perfect text quality, flexibility of CSS filters, and fast export of the entire carousel.

SMM Turbo editor interface with tools

🌍 Multilingualism with Runes: On-the-Fly Localization

As the project expanded, there was a need to add an English version of the interface and landing page to attract an international audience. In the React or Vue ecosystem, you’d typically install heavy libraries like i18next for this. But in Svelte 5, we can do it much more elegantly thanks to “runes”.

I created a simple localization service based on the reactive $state, which instantly repaints the entire interface when the language changes, without resetting any unsaved changes on the carousel canvas:

// src/lib/i18n/i18n.svelte.ts
class I18nService {
    locale = $state('uk'); // Reactive language state

    t(key: string) {
        return translations[this.locale][key] || key;
    }

    setLocale(newLocale: string) {
        this.locale = newLocale;
        localStorage.setItem('smm_lang', newLocale);
    }
}
export const i18n = new I18nService();

Because locale is a $state, any component using i18n.t('key') will instantly update as soon as the language changes. This also made it painless to set up automatic language detection: if a person enters the editor from an English or German browser, the script immediately reads navigator.language and automatically turns on the English version of the interface.

Svelte 5 localization service code

🪄 AI Magic: In-Browser background removal

A cool graphic editor for creating Instagram carousels in 2026 can’t exist without built-in artificial intelligence.

Usually, services ask for money for background removal, because they send your photo to remote powerful servers with GPU. I decided to make this process local and free!

I used the incredible @imgly/background-removal library. This is a real revolution! The neural network is loaded in WebAssembly (WASM) format directly into your browser.

async function handleRemoveBackground() {
    isRemovingBg = true;
    try {
        const imgly = await import('@imgly/background-removal');
        const removeBg = imgly.removeBackground;

        // AI works directly on the user's device
        const imageBlob = await removeBg(selected.content);
        const url = URL.createObjectURL(imageBlob);

        selected.content = url;
        editor.saveState();
    } catch (error) {
        alert("Failed to remove background.");
    } finally {
        isRemovingBg = false;
    }
}

You just select a photo, click the “Remove Background” button, and your computer perfectly cuts out the main object in a couple of seconds. No limits, subscriptions, or transferring confidential photos to third-party servers.

We also recommend reading: How to integrate AI into your web application using Groq API

🤖 Hybrid AI Co-Pilot: Combining Gemma 4 and Llama 3.1

In addition to working with images, I added a powerful text AI assistant. But during development, I faced a classic problem: quick tasks (like idea generation) require minimal latency, while deep analytics (strategy development) require powerful “heavy” models that take longer to think.

Therefore, I created a Hybrid Engine that automatically routes requests:

Hybrid AI Co-Pilot interface

  1. 🧙‍♂️ Alchemist, 🎨 Artist, and 💬 To Canvas (Cloud Fast Mode) run through the ultra-fast API from Groq powered by the Llama 3.1 8B model. This model is perfect for micro-tasks. You ask for a clickbait headline, the AI instantly gives you 3 options, and you add the text directly to the current slide with one click.

Fast generation by Llama 3.1

  1. 🧠 SMM Strategist (Cloud Reasoning Mode) is our “heavy artillery”. It works directly through the Google API powered by the cutting-edge Gemma 4 31B model. This mode conducts a deep analysis of the topic and provides a ready-made 5-slide carousel structure (Hook, Pain, Solution, Proof, CTA).

SMM Strategist result

Bypassing Free Server Limits (Edge Functions)

To give the “Strategist” enough time to think so the Netlify server wouldn’t drop the connection due to the standard 10-second timeout (the infamous 502 Bad Gateway error), I moved this API route to the Edge architecture, which allows up to 30 seconds for execution. I also completely abandoned the “heavy” official SDKs in favor of native fetch.

Here is the real backend code (src/routes/api/ai/+server.ts) that drives this hybrid magic:

import { json } from '@sveltejs/kit';
import { GROQ_API_KEY, GOOGLE_AI_API_KEY } from '$env/static/private'; 

// Switching to Edge runtime to bypass Netlify's 10-second limit
export const config = { runtime: 'edge' };

export async function POST({ request }) {
    try {
        const { prompt, mode, locale } = await request.json();

        // ==========================================
        // 🧠 STRATEGIST MODE: Direct call to Gemma 4 31B
        // ==========================================
        if (mode === 'strategist') {
            const systemInstruction = locale === 'en'
                ? `You are a Senior SMM Strategist. Create a detailed 5-slide Instagram carousel structure based on the user's topic: "${prompt}".nFormat:nSlide 1 (Hook): [Headline & Visual]nSlide 2 (Pain): [Problem]nSlide 3 (Solution): [How to solve]nSlide 4 (Proof): [Benefits]nSlide 5 (CTA): [Action]nLanguage: English. Be concise.`
                : `Ти — Senior SMM-стратег. Розроби структуру Instagram-каруселі на 5 слайдів для теми: "${prompt}".nФормат:nСлайд 1 (Гачок): [Заголовок та візуал]nСлайд 2 (Біль): [Проблема]nСлайд 3 (Рішення): [Як вирішити]nСлайд 4 (Докази/Користь): [Переваги]nСлайд 5 (Заклик): [Дія]nВідповідай ВИКЛЮЧНО українською. Будь лаконічним.`;

            const googleRes = await fetch(`https://generativelanguage.googleapis.com/v1beta/models/gemma-4-31b-it:generateContent?key=${GOOGLE_AI_API_KEY}`, {
                method: 'POST',
                headers: { 'Content-Type': 'application/json' },
                body: JSON.stringify({
                    contents: [{ role: "user", parts: [{ text: systemInstruction }] }],
                    generationConfig: { temperature: 0.7, maxOutputTokens: 1024 }
                })
            });

            if (!googleRes.ok) throw new Error(`Google API Error: ${googleRes.status}`);
            const googleData = await googleRes.json();
            return json({ result: googleData.candidates?.[0]?.content?.parts?.[0]?.text || '' });
        }

        // ==========================================
        // ⚡ FAST MODES: Lightning-fast Llama 3.1 via Groq
        // ==========================================
        let systemMessage = "";

        if (mode === 'canvas') {
            systemMessage = locale === 'en'
                ? `You are a creative copywriter. Generate exactly 3 short text options. Start each with 🔹. No intro! Language: English.`
                : `Надай рівно 3 коротких варіанти тексту. Кожен починається з 🔹. Без вступних слів! Мова: українська.`;
        } 
        // ... (additional configurations for other modes)

        const groqRes = await fetch('[https://api.groq.com/openai/v1/chat/completions](https://api.groq.com/openai/v1/chat/completions)', {
            method: 'POST',
            headers: {
                'Authorization': `Bearer ${GROQ_API_KEY}`,
                'Content-Type': 'application/json'
            },
            body: JSON.stringify({
                model: 'llama-3.1-8b-instant',
                messages: [
                    { role: 'system', content: systemMessage },
                    { role: 'user', content: prompt }
                ],
                temperature: 0.7,
                max_tokens: 1024
            })
        });

        if (!groqRes.ok) throw new Error(`Groq API Error: ${groqRes.status}`);
        const groqData = await groqRes.json();
        return json({ result: groqData.choices?.[0]?.message?.content || '' });

    } catch (error: any) {
        return json({ error: error.message || 'Failed to generate response.' }, { status: 500 });
    }
}

Additionally, the editor has a convenient help section that transparently explains to users how this hybrid system works, and how they can activate Edge AI (local execution) for maximum privacy:

Hybrid intelligence help

🔄 State Management: Svelte 5 Magic

One of the biggest challenges in developing a graphic editor is state management (State Management). We need to store the position of each element, manage the active slide, and implement the undo/redo function.

Thanks to the new runes in Svelte 5 ($state), creating such a global storage has become incredibly elegant. I created a state.svelte.ts file, where I described the editor object:

function createEditorState() {
    let state = $state({
        mode: 'carousel',
        canvasFormat: '1:1',
        currentSlides: [{ id: Date.now().toString(), elements: [], backgroundOverlay: 0 }],
        activeSlideIndex: 0,
        selectedId: null,
        history: [],
        historyIndex: -1,

        get activeSlide() {
            return state.currentSlides[state.activeSlideIndex];
        },

        saveState() {
            // Logic for saving steps for Undo/Redo
            if (state.historyIndex < state.history.length - 1) {
                state.history = state.history.slice(0, state.historyIndex + 1);
            }
            state.history.push(JSON.stringify(state.currentSlides));
            state.historyIndex++;
        },

        undo() {
            if (state.historyIndex > 0) {
                state.historyIndex--;
                state.currentSlides = JSON.parse(state.history[state.historyIndex]);
            }
        }
    });
    return state;
}
export const editor = createEditorState();

Every time an element’s coordinates change (Drag & Drop), editor.saveState() is called, which adds a new snapshot of the data to the history array. Now the user can safely press Ctrl+Z, and the system will instantly revert the changes.

📦 Storage and Integration with Stocks

So that users don’t lose their masterpieces after closing the tab, I connected a backend based on Supabase (PostgreSQL + Auth + Storage).

Authorization takes a few seconds. After that, all your projects are automatically saved to the cloud database. To upload your own images, I use Supabase Storage, generating unique file names so they don’t overwrite each other.

I also integrated the free photo stock Pixabay. The user can directly in the editor enter a search query in English (e.g., dark space, aesthetic coffee), get a grid of results through the Pixabay API, and with one click set the image as the slide background or add it as a separate element.

We also recommend reading: Full design control on WordPress.com: Global Styles and custom CSS

🏁 Conclusion

Creating your own technical product is always a challenge, but it’s an incredible experience. SMM Turbo grew from a simple idea for personal needs into a full-fledged graphic editor for creating Instagram carousels, capable of closing 90% of a marketer’s or developer’s daily tasks.

A lightning-fast interface on Svelte 5, powerful artificial intelligence “under the hood”, seamless background removal, and complete freedom of action (without annoying watermarks or limits) make it a great alternative to paid monopolists.

🔥 Want to try this magic for yourself? My editor is completely free and already available for testing. Go to the platform and create your first conversion carousels faster than AI!

And if you want to support the project, you can always treat me to a coffee through the link in the editor itself. 😉

🚀 Try SMM Turbo right now

No subscriptions, payments, or hidden fees. Experience the speed of Svelte 5 and the intelligence of Gemma 4.

👉 Open SMM Turbo Editor

Capacitor Live Updates: A Complete Guide to OTA Updates

Shipping a fix used to mean a bundled binary, an app store review, and a few days of hoping users would tap “update”. With Capacitor Live Updates that loop shrinks to minutes. You push a new web bundle, devices pick it up on the next launch, and the next version of your app is already in users’ hands.

This is the long version of how that works. We’ll walk through what live updates actually are, the three choices every team has to make when setting them up, the security model, the production patterns that keep you out of trouble, and a real-world end-to-end example.

Cross-posted from the Capawesome docs blog.

What Are Live Updates?

A Capacitor app has two layers. The native layer is the compiled binary installed from the App Store or Google Play — the WebView, the native plugins, and the platform glue. The web layer is everything inside that WebView: your HTML, CSS, JavaScript, and static assets.

Capacitor App Layers

A live update is an Over-the-Air (OTA) update of the web layer only. The native binary stays untouched. Instead of pushing a new build to the stores, you upload a new web bundle to a delivery service, and the Live Update plugin downloads it, swaps it in, and reloads.

The constraint is also the feature: because nothing native changes, you don’t need an app store review and you don’t need users to take any action.

Why teams use them

  • Hotfixes in minutes, not days. A critical bug — broken login, wrong API URL, regression in checkout — can be patched before most users notice.
  • Faster feature iteration. Ship small improvements as soon as they’re ready instead of batching them into a monthly native release.
  • Staged rollouts and A/B testing. Roll a new bundle out to 5% of users, watch the dashboards, then expand.
  • Smaller user friction. Users don’t have to manually tap “update” in the store.

Binary-Compatible vs. Non-Binary-Compatible Changes

The single most important rule: you can only update what already exists in the native binary. Changes that don’t touch native code are binary-compatible. Anything else needs a real app store release.

Change Binary-compatible?
HTML, CSS, JavaScript Yes
Images, fonts, JSON, web-only assets Yes
Web framework upgrade Yes
Plugin added/removed or major version bump No
Native code (Java/Kotlin/Swift/Objective-C) No
AndroidManifest.xml, Info.plist, entitlements No
App icon, splash screen No

A useful mental model: if your change only modifies files inside your web project — your src/, your build output — and doesn’t add, remove, or upgrade a Capacitor plugin or any native code or config, it’s binary-compatible.

App Store Compliance

Both Apple and Google explicitly allow downloading and executing code inside a WebView. Apple’s App Store Review Guidelines (3.3.2) allow interpreted code as long as it doesn’t change the primary purpose of the app, doesn’t create a storefront for other code, and doesn’t bypass the system’s signing or sandbox. Google Play carves out an explicit exception for “code that is interpreted in a virtual machine or runtime (like JavaScript in a webview or browser).”

In short: app stores draw the line at native self-modification. Live updates only touch the web layer, so they stay safely on the right side of that line.

Wiring It Up

npm install @capawesome/capacitor-live-update
npx cap sync

Create an app in Capawesome Cloud (the CLI prints the app ID):

npx @capawesome/cli apps:create

Then add the plugin to your Capacitor config:

const config: CapacitorConfig = {
  plugins: {
    LiveUpdate: {
      appId: '00000000-0000-0000-0000-000000000000',
      autoUpdateStrategy: 'background',
      autoBlockRolledBackBundles: true,
      readyTimeout: 10000
    }
  }
};

For full setup instructions, see the Live Updates setup guide.

Three Choices to Make

Decision 1: Update Strategy

The strategy decides when an update is downloaded, when it’s applied, and whether the user is involved. It’s as much a UX decision as a technical one.

Strategy User-visible delay Use case
Background Next cold start Silent updates between sessions
Always Latest (recommended) One prompt after download User informed and chooses when to apply
Force Update Blocks app start Apps where stale code is genuinely unsafe
Instant Fires on push Critical hotfixes for a live incident

Background is the simplest — set it once in your config and the plugin checks on app start, downloads in the background, and applies on the next cold start. The tradeoff is invisibility: users won’t know a new version exists.

Always Latest (our recommendation) is background plus a prompt. You listen for nextBundleSet and ask the user to apply the update once it’s already downloaded:

import { LiveUpdate } from '@capawesome/capacitor-live-update';

LiveUpdate.addListener('nextBundleSet', async ({ bundleId }) => {
  if (!bundleId) return;
  const shouldReload = confirm('A new version is available. Install it now?');
  if (shouldReload) {
    await LiveUpdate.reload();
  }
});

The download happens in the background, so there’s no waiting on the network when the user taps “install”.

Force Update keeps the splash screen visible while the app syncs at startup — guarantees freshness, costs UX on slow connections. Instant uses a silent push notification to tell devices to sync immediately — meant for critical hotfixes, not everyday flows.

Decision 2: Versioning Strategy

This is the decision that prevents the most common production failure: shipping a web bundle that doesn’t match the installed native binary.

Picture a user with version 5 of your native app. You ship a new web bundle that calls a method on a plugin you only added in version 6. If that bundle reaches the v5 user, their app crashes on launch.

You prevent this by binding each web bundle to the range of native versions it’s compatible with. Two approaches:

  • Versioned bundles — attach min/max version ranges on each upload. Simple but error-prone.
  • Versioned channels (recommended) — one channel per native version (e.g. production-10, production-11).

The cleanest way to wire versioned channels is at build time, in the native config:

// android/app/build.gradle
android {
    defaultConfig {
        versionCode 60003
        resValue "string", "capawesome_live_update_default_channel",
                 "production-" + defaultConfig.versionCode
    }
}

CapawesomeLiveUpdateDefaultChannel
production-$(CURRENT_PROJECT_VERSION)

Every native release ships pinned to its own channel. Bumping the native version automatically opens a new channel for compatible web bundles. No JavaScript-side state to manage.

The real win is safety. Every deployment is addressed to a specific native version by name, so it’s much harder to accidentally ship a bundle to a binary that can’t run it.

Decision 3: Update Delivery Method

How is the bundle packaged for transport?

  • Zip (recommended) — the whole web folder is compressed into one .zip. Compression typically halves the size; the download is a single HTTP request; it works regardless of how your build tool names files.
  • Manifest (delta) — each file is uploaded individually, and the device only downloads changed files based on hashes.

In theory delta is great. In practice, modern bundlers (Vite, Angular CLI, Webpack 5+, Nuxt) all use content-hashed filenames like chunk-3a7f2b.js. Filenames change whenever content changes, which defeats delta comparison: every file looks new, so every file gets downloaded, and you lose the single-zip compression on top.

One team we know had a 20 MB bundle on manifest and 9 MB on zip for the exact same web output. Start with zip — only consider manifest if you have specific stable-named large static assets.

Security: Code Signing

Live updates run on the same trust model as your native binary: whatever code you ship will execute in your app’s context. If someone can replace a bundle in transit, they get code execution inside your app. Even though the Cloud uses HTTPS, defense in depth matters.

Code signing closes the gap with two guarantees:

  • Authenticity — the bundle was produced by someone holding your signing key.
  • Integrity — the bundle wasn’t modified between upload and install.

The mechanism is a standard RSA keypair. The private key signs each bundle on upload; the public key is embedded in your app config and used to verify every downloaded bundle before it’s applied.

# Generate keypair
npx @capawesome/cli apps:liveupdates:generatesigningkey

# Sign every upload
npx @capawesome/cli apps:liveupdates:upload --private-key private.pem

Paste the public key into your Capacitor config and your app will refuse to apply anything not signed by your private key. We strongly recommend enabling this in production.

Best Practices

Automatic Rollbacks

The single most important safety net. Tell the plugin to roll back to the previous bundle if the new one fails to start, and not to retry a bundle that’s already failed:

{
  "plugins": {
    "LiveUpdate": {
      "readyTimeout": 10000,
      "autoBlockRolledBackBundles": true
    }
  }
}

If your app doesn’t call LiveUpdate.ready() within readyTimeout milliseconds of starting, the plugin reverts to the previous bundle on the next launch. Call ready() as early as you can — in your root component’s initialization, before anything else can fail.

Bundle Size Optimization

Three optimizations cover most of the wins:

  1. Drop source maps. Often 75% of bundle size. Set build.sourcemap: false in Vite, --source-map=false in Angular. Upload to Sentry separately if needed.
  2. Stick with zip. Unless you have evidence delta will work, zip is smaller in practice.
  3. Move heavy static assets out of the bundle. Hero images, marketing media — host on a CDN and load on demand.

Reasonable Update Checks

Don’t poll:

// Don't do this.
setInterval(() => {
  LiveUpdate.sync();
}, 60_000);

autoUpdateStrategy: 'background' already does the right thing — it checks on app start and on resume with a 15-minute minimum between checks. If you genuinely need a faster update path, use Instant with a silent push.

Gradual Rollouts

You don’t have to release to 100% of users at once:

npx @capawesome/cli apps:liveupdates:upload --rollout-percentage 10

That bundle reaches 10% of devices. Watch your error tracking, your crash dashboards, and bump it up when things look good.

A Real-World Example

A real Capacitor app shipping to thousands of users — the DHBW VS app — runs the full recommended stack: Always Latest + versioned channels via native config + zip delivery + automatic rollback + code signing.

The version-sync part is handled by commit-and-tag-version (bumps package.json from conventional commits) and Capver (mirrors that version into Android and iOS). A release tagged 6.0.3 becomes Android versionCode 60003 and iOS CURRENT_PROJECT_VERSION 60003 — three two-digit groups for major/minor/patch. That deterministic mapping is what makes build-time channel pinning work without manual bookkeeping.

At startup, the root component calls ready() and registers the nextBundleSet listener:

private initializeLiveUpdate(): void {
  if (!Capacitor.isNativePlatform()) {
    return;
  }
  void LiveUpdate.ready();
  LiveUpdate.addListener('nextBundleSet', async event => {
    if (!event.bundleId) return;
    const confirmed = confirm('A new version is available. Install it now?');
    if (confirmed) {
      await LiveUpdate.reload();
    }
  });
}

The GitHub Actions workflow takes a channel name as input and runs two CLI commands: create the channel (idempotent with --ignore-errors) and build/deploy the web bundle in the cloud. To deploy a live update for native version 60003, the team triggers the workflow with production-60003 as the channel. Devices on that native version pick it up on their next launch.

Wrapping Up

Live updates are the difference between releasing fixes in minutes and releasing them in days. The recommended path is the same for almost every team:

  • Always Latest strategy so users are informed when an update is ready
  • Versioned channels configured natively so version compatibility is automatic
  • Zip delivery for predictable bundle sizes
  • Automatic rollback so a broken bundle is self-healing
  • Code signing when you ship to production

Everything else — rollouts, force updates, push-driven hotfixes, self-hosting — sits on top of that core.

For the full version with more depth on every section, see the original post on the Capawesome docs blog.

Questions or feedback? Drop into the Capawesome Discord or hit me up in the comments.

ASP .NET Core Bootstrap toast

Introduction

Bootstrap toasts are lightweight notifications that mimic the push notifications popularized by mobile and desktop operating systems.

Learn how to merge C# code into toast to make toast flexible.

Source code net10

Get coding

Toast options for demonstration are read from appsettings.json, while toast options may be hard-coded in code.

{
  "Logging": {
    "LogLevel": {
      "Default": "Information",
      "Microsoft.AspNetCore": "Warning"
    }
  },
  "AllowedHosts": "*",
  "ToastOptions": {
    "DatabaseError": {
      "ToastMessage": "Failed to open database!",
      "ToastTitle": "Error",
      "ToastDelay": 10000
    }
  }
}

In the above ToastOptions has DatabaseError item which allows you to have multiple toast configurations.

These classes are used to parse the json above.

public class ToastOptions
{
    public ToastMessageOptions DatabaseError { get; set; } = new();
}

public class ToastMessageOptions
{
    public string ToastMessage { get; set; } = string.Empty;
    public string ToastTitle { get; set; } = string.Empty;
    public int ToastDelay { get; set; }
}

Program.cs code using dependency injection to read settings.

public class Program
{
    public static void Main(string[] args)
    {
        var builder = WebApplication.CreateBuilder(args);

        // Add services to the container.
        builder.Services.AddRazorPages();

        // Configure ToastOptions using the appsettings.json configuration section  
        builder.Services.Configure<ToastOptions>(
            builder.Configuration.GetSection(nameof(ToastOptions)));

        // Register the ReadToastConfiguration service for dependency injection
        builder.Services.AddScoped<ReadToastConfiguration>();

        var app = builder.Build();

        ...

Razor page front-end

  • The top section is where the business code resides. Here is a button to trigger the toast
  • asp-page-handler=”ShowToast” relates to the following post event public IActionResult OnPostShowToast()
  • The bottom section is the toast which uses model properties to configure the toast
@page
@model IndexModel
@{
    ViewData["Title"] = "Bootstrap Toast Demo";
}

<div class="container mt-5">

    <h1 class="mb-4 fs-4 text-center">Bootstrap 5 Toast from C#</h1>

    <main>
        <form method="post" asp-page-handler="ShowToast" class="text-center">
            <button type="submit" class="btn btn-danger">
                Show error Toast
            </button>
        </form>
    </main>

</div>

@if (!string.IsNullOrWhiteSpace(Model.ToastMessage))
{
    <div class="toast-container position-fixed bottom-0 end-0 p-3">
        <div id="serverToast"
             class="toast text-bg-danger border-0"
             role="alert"
             aria-live="assertive"
             data-bs-delay="@Model.ToastDelay"
             aria-atomic="true">

            <div class="toast-header">
                <span class="me-2">
                    <img src="images/databasex.svg" alt=""/>
                </span>
                <strong class="me-auto">@Model.ToastTitle</strong>
                <small>@DateTime.Now.ToShortTimeString()</small>
                <button type="button"class="btn-close" data-bs-dismiss="toast" aria-label="Close"></button>
            </div>

            <div class="toast-body">
                @Model.ToastMessage
            </div>
        </div>
    </div>
}

@section Scripts {
    @if (!string.IsNullOrWhiteSpace(Model.ToastMessage))
    {
        <script>
            document.addEventListener("DOMContentLoaded", function () {
                const toastElement = document.getElementById("serverToast");

                if (toastElement) {
                    const toast = new bootstrap.Toast(toastElement, {
                        autohide: true
                    });

                    toast.show();
                }
            });
        </script>
    }
}

Razor page back-end

  • Primary constructor for ReadToastConfiguration setup in Program.cs
  • Post to set toast options
public class IndexModel(ReadToastConfiguration readToast) : PageModel
{
    [TempData]
    public string? ToastMessage { get; set; }

    [TempData]
    public string? ToastTitle { get; set; }

    [TempData]
    public int ToastDelay { get; set; }

    public void OnGet()
    {
    }

    public IActionResult OnPostShowToast()
    {
        var options = readToast.GetToastOptions();

        ToastTitle = options.DatabaseError.ToastTitle;
        ToastMessage = options.DatabaseError.ToastMessage;
        ToastDelay = options.DatabaseError.ToastDelay;

        return RedirectToPage();

    }
}

Summary

In this article, developers are shown how to create a Bootstrap toast efficiently, with JavaScript needed only to set up one event to show the toast.

See also

Node.js End-of-Life Dates – Official EOL Schedule for Every Version

Complete Node.js EOL Schedule

Node.js releases even-numbered versions as Long-Term Support (LTS). Odd-numbered versions are short-lived and never reach LTS.

Version LTS Start End of Life Status EOL Risk Score™
Node.js 10 Oct 2018 Apr 30, 2021 🔴 EOL 95 Critical
Node.js 12 Oct 2019 Apr 30, 2022 🔴 EOL 92 Critical
Node.js 14 Oct 2020 Apr 30, 2023 🔴 EOL 90 Critical
Node.js 16 Oct 2021 Sep 11, 2023 🔴 EOL 90 Critical
Node.js 18 Oct 2022 Apr 30, 2025 🔴 EOL 85 Critical
Node.js 20 Oct 2023 Apr 30, 2026 🔴 EOL 78 Critical
Node.js 22 Oct 2024 Apr 30, 2027 ✅ Active LTS 50 Medium
Node.js 24 Oct 2025 Apr 30, 2028 ✅ Current 20 Low

⚠️ Node.js 20 reached EOL on April 30, 2026. If you’re running Node.js 18 or 20 in production today, you’re running an unpatched runtime. New CVEs will never receive an official fix for those versions.

Node.js 14 — End of Life April 30, 2023

Node.js 14 entered LTS in October 2020 and reached its official end-of-life date on April 30, 2023. It has now been unsupported for over three years.

Node.js 14 was the last version to ship with OpenSSL 1.1.1, which itself reached end of life in September 2023. Teams still running Node.js 14 are carrying two compounding EOL risks: the runtime and its bundled cryptography library are both unsupported.

Why teams are still on it: dependency lock-in. Node.js 14 was the last version to support certain native addons and older npm packages — node-sass, older bcrypt builds, native modules compiled against Node.js 14’s V8 ABI. The migration work is real but manageable.

Migration path:

  • Target Node.js 22 directly — skip 16, 18, and 20 which are all EOL
  • Replace node-sass with sass (pure JS, no native compilation needed)
  • Run npx @npmcli/arborist ls --all to audit native dependencies
  • Check node.green for ES2022+ compatibility gaps

→ Node.js 14 EOL Risk Score Card

Node.js 16 — End of Life September 11, 2023

Here’s one most teams didn’t see coming: Node.js 16 was cut short by seven months.

Originally scheduled to reach EOL in April 2024, the Node.js Release Working Group accelerated its end-of-life to September 11, 2023 because OpenSSL 1.1.1 — the cryptography library bundled in Node.js 16 — was reaching its own EOL the same month.

Many pipelines that had Node.js 16 pinned assumed they had until mid-2024. The real deadline was six months earlier.

This is exactly why pinning a version without monitoring its lifecycle is dangerous. Vendor timelines change. Sometimes they change in your favour. Sometimes they don’t.

→ Node.js 16 EOL Risk Score Card

Node.js 18 — End of Life April 30, 2025

Node.js 18 reached end of life on April 30, 2025 — over a year ago now.

It was widely adopted as the “safe” production version throughout 2023 and 2024. Native fetch(), the first stable node:test module, V8 10.2. Many teams upgraded to 18 for these features and then stayed there.

Key breaking changes moving from Node.js 18 → 22:

  • url.parse() now emits a deprecation warning — migrate to new URL()
  • fs.rmdir(recursive) removed — use fs.rm(path, { recursive: true })
  • V8 updated to 12.4 — some native addons may need recompilation
  • --experimental-fetch flag no longer needed — fetch is stable

→ Node.js 18 EOL Risk Score Card

Node.js 20 — End of Life April 30, 2026

Node.js 20 reached end of life on April 30, 2026 — weeks ago.

Teams that were on Node.js 20 thinking they had more runway are now in the same position as Node.js 18 teams were a year ago: running a version that will never receive another security patch.

The upgrade path from 20 to 22 is the shortest and lowest-risk jump in the current release cycle. Most codebases need only dependency updates and a build pipeline change.

If you’re running Node.js 20 in production, upgrade to Node.js 22 within 30 days. Start with staging, monitor for 24 hours, promote to production.

→ Node.js 20 EOL Risk Score Card

Node.js 22 — Current LTS, Supported Until April 30, 2027

Node.js 22 is where every production deployment should be today.

It entered LTS in October 2024 and is supported until April 30, 2027. It ships with V8 12.4, a stable node:sqlite module, improved require(esm) support, and native --run for package.json scripts.

Node.js 24 is the current “Current” release for teams that want the latest. It will enter LTS in October 2025 and is supported until April 2028. For most production deployments, Node.js 22 is the right choice today.

→ Node.js 22 EOL Risk Score Card

What the EOL Risk Score™ Means

Every Node.js version page on endoflife.ai carries an EOL Risk Score™ — a 0–100 score measuring the actual security and operational risk of running that version in production.

Four factors:

  • EOL Recency (40pts) — how long since the version lost support
  • Attack Surface (30pts) — Node.js processes HTTP, executes JS, handles file I/O. CVEs in EOL versions are never patched.
  • CISA KEV Exposure (20pts) — whether known exploited vulnerabilities exist in the CISA catalog
  • Extended Support Availability (10pts) — whether commercial extended support options reduce urgency

Score reference:

Version Score Band
Node.js 14 90 🔴 Critical
Node.js 16 90 🔴 Critical
Node.js 18 85 🔴 Critical
Node.js 20 78 🔴 Critical
Node.js 22 50 🟡 Medium
Node.js 24 20 🟢 Low

How to Migrate Safely — 5 Steps

Step 1 — Audit dependencies first
Run npm outdated and npm audit before touching your Node.js version. A clean dependency tree makes the runtime upgrade significantly easier.

Step 2 — Check for native addons
Run npm ls --depth=0 and check each package for Node.js 22 compatibility. node-gyp, nan, and napi modules may need recompilation.

Step 3 — Update CI first
Change your CI runner to Node.js 22 before touching production. If your test suite passes on 22, production will follow cleanly. Pin with .nvmrc or .node-version.

Step 4 — Canary deploy
Deploy Node.js 22 to staging with real traffic before full rollout. Monitor error rates, memory, and response times for 24 hours.

Step 5 — Regenerate lockfiles
After upgrading, regenerate package-lock.json or yarn.lock. Some packages resolve differently across Node.js versions.

Check Your Full Stack

Node.js runtime EOL is one piece of the puzzle. Your npm packages, frameworks, and OS runtime each have their own end-of-life dates.

Use the free EOL Checker or Stack Scanner at endoflife.ai to audit your entire dependency tree — no account required.

This article is part of The EOL Intelligence Report series on DEV.to. EOL dates sourced from endoflife.date, Node.js Release Working Group, and CISA KEV Catalog.

Stop letting npm install run untrusted code on your machine — meet np-audit

npm install

You type it dozens of times a day. You probably typed it this morning. And every time you did, you handed arbitrary code execution to every maintainer in your dependency tree — and every attacker who has phished one of them.

Over the last eight months, attackers have noticed. The Shai-Hulud family of worms has compromised hundreds of npm packages, created tens of thousands of malicious GitHub repos, and harvested thousands of developer secrets. The November 2025 wave alone hit 700+ packages, 27,000 malicious repos, and ~14,000 exposed secrets across 487 organizations — in under 48 hours.

I got tired of waiting for npm to fix this, so I built np-audit — a zero-dependency CLI that statically analyzes install scripts before npm executes them. This post is partly about why you need it, and mostly about how to use it.

The attack that keeps working

Every Shai-Hulud variant relies on the same three lines:

{
  "scripts": {
    "preinstall": "node setup.mjs"
  }
}

That’s it. The second npm install resolves a compromised version, setup.mjs runs before your code, before your tests, before any human looks at anything. Same user, same env vars, same network access as you.

The payload is always some flavor of the same recipe:

  1. Download a second runtime (Bun is the current favorite — bypasses Node-pattern detection).
  2. Run an obfuscated harvester that scans for GitHub tokens, npm credentials, AWS/Azure/GCP keys, Kubernetes service account tokens, Vault creds, browser-saved passwords, and CI runner secrets.
  3. Encrypt and exfiltrate by pushing to public GitHub repos via the GraphQL API — looks like normal git activity from the outside.
  4. Use any stolen GitHub PAT to inject malicious workflows into other repos the victim can write to. One dev becomes patient zero for their entire org.

A nice touch from the Mini Shai-Hulud variant:

if (locale.startsWith('ru') || lang.startsWith('ru')) {
  process.exit(0); // do nothing
}

The same Russian-locale guardrail appears in three separate campaigns now attributed to TeamPCP.

This is not a vulnerability. This is the feature.

There is no CVE to patch here. npm preinstall, install, and postinstall scripts run automatically by design — that’s how packages compile native addons, fetch platform binaries, set up build tooling. It’s documented, intentional, and useful.

It’s also a loaded gun in every Node project on Earth, and it has been getting fired regularly since 2018: event-stream, ua-parser-js, node-ipc, colors, faker, the Bitwarden CLI in April. The attackers aren’t getting more sophisticated. They don’t need to.

--ignore-scripts is the official advice. It also breaks bcrypt, node-sass, puppeteer, sharp, and half your toolchain. Nobody actually runs it in CI.

So we live with the gun pointed at us. Or we look at what the scripts actually do before we let them run.

Meet np-audit (npa)

np-audit is a static analyzer for npm lifecycle scripts. It downloads the tarballs npm is about to install, reads every preinstall / install / postinstall script, and flags the patterns that every documented supply chain attack has used:

  • eval() and new Function() calls
  • Obfuscator.io-style mangling (var _0x3f2a = [...])
  • High-entropy strings (encrypted/compressed payloads)
  • Hex escape density and String.fromCharCode() chains
  • Buffer.from(x, 'base64') followed by eval
  • Shell spawning via child_process
  • process.env access combined with outbound network calls

Each signal contributes to a score. Anything over a configurable threshold blocks the install. Zero runtime dependencies, pure Node built-ins, and — obviously — no install scripts of its own. The whole point of a supply chain auditor is that you can audit it in an afternoon.

Install

npm install -g np-audit

Daily use

Just swap the verb:

npa install   # audit, then npm install
npa ci        # audit, then npm ci
npa scan      # audit only, no install

If a package is suspicious, you get a clean report and a non-zero exit code — drop-in safe for CI:

✗ [email protected]  postinstall: install.js  DANGER (score: 9)

Interactive review for the paranoid

npa i --review

Drops you into a TUI listing every install script in your tree. You decide one by one which ones get to run. Under the hood it’s npm install --ignore-scripts followed by manual execution of only the scripts you approved — basically informed consent for lifecycle scripts.

Set and forget

npa alias --install

Installs a shell hook so every npm install and npm ci you type is scanned first. Clean tree, npm proceeds. Suspicious tree, npm never runs.

$ npm install lodash
[npa] Scanning dependencies before npm install...
✔ No packages with install scripts found.
[npa] Scan passed. Running npm install...

CI example

GitHub Actions:

- name: Install dependencies (audited)
  run: |
    npm install -g np-audit
    npa ci

If a transitive dep gets compromised between your last green build and this one, the job fails before the malicious script touches your runner’s env vars.

What it doesn’t do

np-audit is not magic. A determined attacker writing clean, readable, plain-JavaScript malware can slip past a static heuristic check — that’s a fundamental limit of static analysis.

The point isn’t to be perfect. The point is to raise the cost from “drop in a preinstall and harvest 14,000 secrets in a weekend” to something that requires real effort. Every Shai-Hulud variant so far has leaned on heavy obfuscation precisely because the maintainers were trying to slip past human review. np-audit is human review at machine speed.

TL;DR

  • npm install runs untrusted code on your machine. This is by design.
  • The Shai-Hulud worms are exploiting that design at industrial scale and getting away with it.
  • --ignore-scripts breaks too much to be realistic.
  • np-audit looks at install scripts before they run, scores them, and blocks the obviously malicious ones.
npm install -g np-audit
npa ci

Issues, PRs, and stars welcome: github.com/KoblerS/np-audit

Stay safe out there. And maybe read the next preinstall script before you let it read your ~/.aws/credentials.

Why I Stopped Building Features and Started Shipping Experiments

An honest post about perfectionism, unfinished projects, and why my portfolio is named after a vegetable

The worst advice I ever got about building projects

“You should know it all before you start.”

You won’t. You never do. And waiting until you do is just a more socially acceptable way of never starting.

I have a graveyard.

An Android SDK for image processing that never saw light. A logistics platform that got about 80% done before I move to different things. An e-commerce thing. Some indie apps I built sitting in a private repository.

I’m a full-time software engineer. I know how to build things. So why couldn’t I finish any of them?

The answer, if I’m honest, is that I kept building the wrong version. Not wrong in the technical sense but rather wrong in the scope sense. Every project became the version that would handle every edge case and look perfect doing it. I never admitted that. But just kept building like that was the goal.

It wasn’t perfectionism in the classic sense. It was perfectionism disguised as engineering. “I’ll ship it when the architecture is right.” Meanwhile nothing shipped.

Then my wife suggested I call it 감자랩 as in PotatoLab

I laughed. Then I thought about it.

Potatoes are not glamorous. They’re lumpy, inconsistent, yet nobody ignores them. But if you know what you’re doing with them, they turn into something completely different. Something good. The raw form doesn’t matter; what matters is that you actually cook them.

So I made a rule for myself

A project that goes into the lab. It has to meet a small, specific set of requirements I define upfront not a roadmap, not a backlog, just: what does this need to do to be real? When it hits that bar, it ships. Not when it’s perfect. Not when it scales. When it works well enough to be true.

Shipped doesn’t mean finished. It means fulfilled. A small promise, kept.

The experiments on PotatoLab aren’t impressive in scope. None of them are perfect. But they exist outside my laptop, which is more than I can say for the SDK that was going to change mobile image processing.

Start lumpy. Ship weird. Cook the potato.

In Part 2, I’ll get into more details, and I don’t know what I am going to write about but here we are…

Organise Before You Stage: Changelists for Git

git-cl demo: creating changelists, viewing status, and branching

Real development is rarely linear. You’re mid-feature when you spot a typo in the README, or a stray debug statement left over from last week. Before long your working directory is a pile of loosely related edits, and the staging area gives you exactly one place to put them.

I ran into this problem when my team migrated from Subversion to Git. SVN had changelists: named groups of files you could organise before committing. I had changelists like ready_to_commit and do_not_commit, and the clarity they gave me was something I immediately missed in Git.

So I built git-cl, a Git subcommand that adds changelists to your workflow.

What’s a changelist, exactly?

Think of changelists as sticky notes for your working directory. You group modified files under a name before deciding what to stage or commit. Nothing is staged until you say so, and you can have as many changelists as you like, all at once.

git-cl demo: creating changelists, viewing status, and branching

Changelists sit between your working directory and Git’s staging area. They don’t touch Git’s index or history until you explicitly stage or commit. They’re stored locally in .git/cl.json, private to your workspace and never committed.

Install with:

pip install git-changelists

Workflow 1: Named staging areas

Git gives you one staging area. Everything you git add lands there together, waiting for a single commit. That works fine when your changes all belong together, but less well when you’re mid-feature and notice something unrelated that needs fixing.

Say you’re implementing a feature and notice a typo in the README along the way:

git cl add feature src/core.py src/helpers.py tests/test_core.py
git cl add typo-fix README.md

git cl status shows you what’s grouped where:

feature:
  [ M] src/core.py
  [ M] src/helpers.py
  [ M] tests/test_core.py

typo-fix:
  [ M] README.md

All of it lives in your working directory at once. You can run tests, keep editing, see the full picture. When you’re ready, commit one changelist at a time:

git cl commit feature -m "Implement core feature"
git cl commit typo-fix -m "Fix typo in README"

Two focused commits, clean history, without ever touching a branch or juggling the staging area manually.

Workflow 2: Changelists as review stages

Here’s where it gets more interesting. Changelists don’t have to represent what you changed; they can represent where each file is in your review process.

Instead of grouping by feature, you group by stage. Start by putting all modified files into an initial changelist:

git cl add to_review src/core.py src/utils.py tests/test_core.py

Run your linter. Files that pass move forward:

git cl add linted src/core.py

Moving a file to a new changelist removes it from the old one automatically. git cl status becomes a dashboard of your review pipeline:

to_review:
  [ M] src/utils.py

linted:
  [ M] tests/test_core.py

ready:
  [ M] src/core.py

You decide what the stages mean: numbered (review_1, review_2), named after what’s been checked (linted, tested, profiled), or named after approvals (self_review_ok, ai_review_ok, ready_to_commit). The pattern is the same: changelists as a lightweight state machine, with git cl status as the dashboard.

Workflow 3: Late-binding branching

Branches are Git’s model for isolating parallel work, but they ask you to decide upfront. In practice, you often don’t know something needs its own branch until you’re already deep into it.

git cl branch lets you defer that decision. Say you’ve been improving a numerical solver alongside other unrelated work:

git cl add solver-opt src/solver.f90 src/utils_math.f90
git cl add config-fix config.yaml

At some point the solver work has grown beyond the scope of your current branch. Rather than committing half-finished work, you promote it:

git cl branch solver-opt

git-cl stashes all active changelists, creates and checks out a new branch named solver-opt, then restores only the solver-opt changelist. Your other changelists stay stashed and can be recovered with git cl unstash.

The result: you’re on a dedicated feature branch with your changelist intact, ready to pick up exactly where you left off. The branch decision followed the code, not the other way around.

Quick start

pip install git-changelists

# Inside any Git repo:
git cl add my-feature file1.py file2.py
git cl status
git cl commit my-feature -m "Add feature"

Full documentation and a step-by-step tutorial are at github.com/BHFock/git-cl.

Changelists aren’t a replacement for branches. They’re a layer that sits before them, a way to organise intent while work is still in motion. If your working directory often feels like a pile of loosely related edits, they might be worth a try.

Start with NvChad

Originally published on Web Warrior Toolbox

NvChad is a code editor that is light weight and can be used from terminal screens. It has a system of add-ons (e.g. lazy vim) that lets you add functionalities found in GUI like editors. If you have a server that has only CLI and you want a rich feature editor, use this. NvChad can also be practicall when you have a dev-pc that will run heavy loads while you need to use an editor at same time(serving a heavy app locally while running Figma, youtube someone?). Anyway give it a try so you have another editor that you can use in these scenarios or other that you think it could be worth it.

How to install (Linux PC)

the process to install has these parts

Install git. You will need to clone a git repo after that.

sudo apt update
sudo apt install git
git --version // check version

Install Neovim. you need version 0.10 or higher

sudo apt update
sudo apt install neovim
nvim --version // check version

install nerdfonts

mkdir -p ~/.local/share/fonts
cd ~/.local/share/fonts
wget https://github.com/ryanoasis/nerd-fonts/releases/latest/download/JetBrainsMono.zip
unzip JetBrainsMono.zip
fc-cache -fv

⚠️ Then set the font in your terminal emulator.

Clone the NvChad repo:

git clone https://github.com/NvChad/starter ~/.config/nvim

start nvchad

nvim

now when you access NvChad you can look at the file tree using space e to open it. Here some more commands to use with the tree

tab // expand/collapse a folder
E // expand folder and subfolder
CC // collapse folder and subfolders
H // show/hide hidden folders

and to move between panel use these commands

ctrl+w // window mode
ctrl+<direction_key> // use hjkl

To open and close terminal window use

alt + h // toggles horizontal terminal.

Tab > Window > Buffer

nvchad has these 3 elements to organize what is shown on screen

A buffer is a file loaded in memory. when you press enter on a file in file tree you open a buffer. Remember these commands.

in normal mode
:bd // close buffer (buffer delete)
:ls // get a list of buffers and its numbers
:b <N> // opens buffer with number N (space can be ommited)
tab // go to next buffer
shifht+tab // previous buffer

Windows and Tabs

A windows is an element that shows 1 buffer. use :q to close a window (you will also close the buffer it contains). Use :qa to close all windows (this closes nvchad)

A tab is an element that shows multiple windows. Here are some commands to manage them

:tabnew // create tab
:split // split with horizontal window
:vsplit // vertical split
:tabs // lists all tabs and windows

Be patient and keep practicing to develop your skills and muscle memory 💪🥘

Ubuntu Embraces Local AI Instead of Cloud-First OS Integration

Ubuntu has outlined its AI strategy, describing it as a deliberate departure from industry trends towards cloud-centric, AI-first operating systems. Instead, the company says, Ubuntu will focus future releases on local intelligence, modular design, and strict user control.

By Sergio De Simone