You don’t know how to vibe-code

Generic AI-styled application screenshot

It’s 2026. We have AGI (or at least the ability to code almost anything thanks to models like Opus 4.5 from Anthropic and GPT 5.2 from OpenAI).

But there’s one problem. What you create in minutes creates problems you spend hours trying to fix. And if you’re unlucky, you end up with a spaghetti codebase that no LLM can untangle. You no longer understand the code. It doesn’t even make sense to read it anymore.

So, what are you doing wrong and what could you do better, and how do some people get everything right when they are vibe-coding?

Honestly, vibe coding kinda gave people the wrong impression on using LLMs to write code. Somehow everyone ended up thinking “yeah i can do this with ONE PROMPT, without EVER LOOKING AT THE CODE”.

That just won’t work, unless you consider this good work:

Generic AI-styled application screenshot

And the code behind it is even worse. The AI’s knowledge is months old, maybe a year. It doesn’t know your codebase. It doesn’t know what “done” means.

Alright, here’s how I actually vibe-code. Or rather, how I use my current favorite tool (claude code) to build real projects.

I’m going to walk you through how I built execevents.xyz, a real-time execution visualizer for Monad. Blocks race across the screen as they go through consensus. Transactions stream in live. You can see state changes, call traces, gas usage.

a short glance at execevents.xyz

This isn’t a toy project. Under the hood, execevents connects to Monad’s Execution Events API—a Rust service that reads blockchain data directly from shared memory, HFT-style. We’re talking sub-millisecond latency for real-time block and transaction data. Building something that interfaces with infrastructure this performant would normally require deep systems knowledge.

But here’s the thing: I built this in HOURS, not days, not weeks. Using Claude Code and the methodology below, anyone can build high-performance applications on Monad without being a systems engineer or even a regular developer.

Below I explain my methodology about vibe-coding, or how I code.

Step 1: Think about the end goal

Visualize the most basic version of what you want to build. I usually ask claude something like this:

I read about execution events from Monad docs and I want to build an app showing how to use them. Here is the page about execution events: (i paste the markdown here) Do not start building until I confirm. Tell me how you are planning to build this. Then ask me to confirm. Also, ask me any questions you have. Our first goal is to reach to a basic MVP.

Claude Code implementation plan screenshot

Above is the answer I got from claude. Notice how it basically told me what it’s going to be doing exactly. I can now visualize what I am gonna be getting and can direct the project better. This is the point where I want to stop and think. If everything looks OK. I move on to the questions claude asks. Then, I start answering them.

Much like real coding, you want to spend time thinking about the code rather than writing it.

Suggested distribution of time spent while building with AI coding tools

You might do several iterations before even you tell claude to build. I usually ask it to not to build in every message until I like the implementation plan.

I also use the plan mode a lot. It is the new way of telling the claude to ask you questions, and it just works really well!

Step 2: Build the MVP, then use it

Then, ask claude to start building. When it finishes doing stuff, test it. This is the part people LOVE skipping, not knowing that the problems that arise later actually stem from it. After it fixes the issue, go back and find another problem to fix, do this until there are no issues left.

The cycle of prompting, testing, finding issues, and fixing them

Step 3: Iterate with small, focused prompts

This is where most people mess up. They find five things wrong and try to fix them all in one massive prompt.

Don’t do that.

Every time you find something broken, fix just that one thing. Here’s what my prompts actually looked like:

Prompt 1: “The TPS calculation is wrong. It’s counting blocks that arrive in batches over WebSocket. Make it only count consecutive block numbers.”

Prompt 2: “This doesn’t work on mobile. Add a responsive layout with a bottom sheet for block details.”

Prompt 3: “The block state transitions are too abrupt. Add CSS transitions so blocks slide smoothly between states.”

Each prompt is:

  • Specific -> I’m telling it exactly what’s wrong
  • Small -> targeting one thing
  • Reviewable -> I can read the diff and understand what changed

Step 4: Read the Code

Or at least, take a quick glance at it. Every time Claude makes a change, I read the diff. Not because I don’t trust it, but because I need to understand what I’m shipping.

Claude Code creating ASCII art

Reading doesn’t mean auditing every line. It usually means:

  • Skimming the diff
  • Understanding the approach
  • Asking yourself “does this make sense?”

By reading the code, you will catch mistakes, learn, and stay in control. The moment you stop understanding your codebase is the moment you can’t fix it anymore. Do not turn your project into a mess you can’t make sense of.

And if you don’t understand anything in the code, you can open a new terminal window and ask claude code to explain it for you.

What I Learned

Building execevents taught me things I wouldn’t have learned from tutorials.

On the systems side: I now understand how Monad’s Execution Events work at a low level, how the Rust API pulls data from shared memory, why certain event types arrive in batches, and how to handle the timing edge cases that come with real-time blockchain data. Claude didn’t just write code; it explained the architecture as we built it. When the TPS calculation was wrong, debugging it meant understanding WebSocket message ordering and block finality.

Me with Claude

On the vibe-coding side: I learned that the quality of your output directly reflects the quality of your iteration loop. The people who fail at vibe-coding aren’t bad at prompting, they’re bad at testing and reading diffs. They skip the boring parts.

The real unlock is this: with the right methodology, AI tools let you punch above your weight. You can build performant, production-grade applications that interface with serious infrastructure, even if you’ve never written Rust or worked with shared memory systems. The barrier isn’t coding ability anymore. It’s knowing how to guide the process.

Now, go.

And do magic, for we live in a magical era.
You are prompting GPT 5.5 wrong.

Screenshot of a Victor Taelin post about GPT 5.5 prompting

Source: OpenAI.

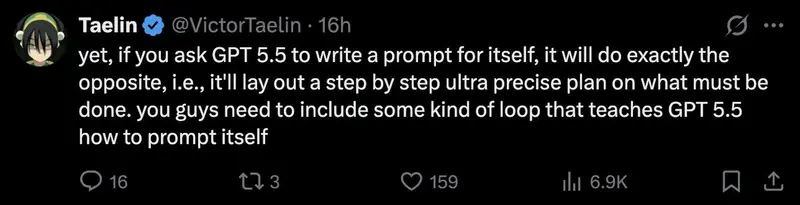
Prompting GPT 5.5 is A LOT different than how you prompted any model before. And GPT 5.5 itself can’t write good prompts for itself! See the screenshot below from @victortaelin

Screenshot of a Victor Taelin post about GPT 5.5 prompting

So, in this short article, I will be talking about how to create good prompts for GPT 5.5 so that you can do your work better&faster.

Btw before we go any further, this guide is for using GPT 5.5 inside Codex.

So here’s what changed. Older models needed you to walk them through the steps. First do this, then check that, then call this tool. GPT 5.5 reasons more efficiently and that kind of prompting actively makes it worse. It narrows the search space & you end up with mechanical answers.

The fix is the opposite of what people are doing. Describe the destination, not the route. Let the model figure out the path.

I’ve been changing how I prompt since 5.5 dropped. Here are the 5 moves with the highest hit rate, with examples you can paste in(or modify) directly.

1. Lead with the outcome

Stop telling the model HOW to solve the problem, instead tell it what the result should look like.

(btw the full examples are at the end)

Resolve the customer's issue end to end.

Success means:
- the eligibility decision is made from the available policy and account data
- any allowed action is completed before responding
- the final answer includes completed_actions, customer_message, and blockers
- if evidence is missing, ask for the smallest missing field

2. Kill the preamble

Codex loves to narrate. “I’ll start by examining the file structure.” “Let me first check the existing implementation.” “Now I’ll proceed to make the changes.”

You don’t need any of this. You can see what it’s doing. The preamble is noise & it eats latency before any real work happens.

Skip preambles. Do not narrate what you are about to do before doing it. Do not announce tool calls. Do not end with "Let me know if you'd like adjustments" or "Feel free to ask if you have questions."

When you finish, report what changed in 2-4 lines. File paths, what was modified, anything I need to know to use the change. That's it.

3. Bias to action, finish what you start

Default Codex behavior on a hard task is to surface a plan and stop. We don’t want that. We want action. Get action:

Bias to action. If the request is clear and the next step is reversible, just do it. Do not stop at analysis, do not stop at a plan, do not stop after the first file change.

Persist until the task is fully handled end to end in this turn:
- carry changes through implementation, verification, and a clear summary
- if you hit a blocker, try one more reasonable approach before stopping
- only stop early if the next step is irreversible, destructive, or genuinely ambiguous

Unless I explicitly ask for a plan or a question, assume I want code shipped.

(btw this is from the OpenAI Codex starter prompt)

4. Read in parallel, not one file at a time

Watch Codex on a real task. It reads package.json, waits, reads src/index.ts, waits, reads src/utils.ts, aaaand waits some more… Use this:

When you need to read multiple files, read them in parallel in a single batch, not sequentially.

Workflow:
1. Plan all the files you need before reading any
2. Issue one parallel batch of reads
3. Analyze together
4. Only do another batch if new unpredictable reads come up

Same for searches. If you need to grep for 3 patterns, run 3 searches in parallel. Sequential reads are only justified when one result genuinely determines the next.

5. Make it actually verify

Run validation and tests. Don’t trust “this should work”::

After making changes, run the relevant validation:
- targeted tests for the behavior you changed
- typecheck and lint
- build, if the change touches anything build-time sensitive
- a quick smoke test on the running app if it's user-facing

If validation fails, fix it before reporting done. If validation can't run in this environment, say so & describe the next best check I can run myself.

"Done" means verified, not "code is written."

Here are 3 simple rules to follow when prompting GPT 5.5:

  1. Add a completeness rule
  2. Add a stop condition
  3. Force verification.

Screenshot summarizing the prompting rules

Here are three examples you can adjust to your use case:

1. Building a feature

Build [feature]. Done = it works in the running app, has at least one test for the new behavior, types and lint clean, diff scoped to this change only.

Stop & ask only if: the next step is destructive, requirements are genuinely ambiguous, or you'd need to expand scope to 3+ unrelated files. Otherwise just ship it.

No preamble. Don't narrate before doing. When done, report changed files + what was modified in 2-4 lines.

Verify before reporting done: run affected tests, typecheck, lint. If anything fails, fix it. "Should work" is not done.

2. Fixing a bug

Fix [bug]. Done = root cause is fixed (not the symptom), a test exists that fails before the fix and passes after, no other behavior regressed, diff scoped to the fix.

Stop & ask only if: the bug isn't reproducible from what I gave you, the root cause is in unexpected scope (different module, infra, dependency), or two plausible root causes exist and the wrong fix would mask the real bug.

No preamble. Don't walk me through your hypothesis before testing it. When done, report root cause + fix + what you verified in 3-5 lines.

Verify before reporting done: run the regression test, run the affected module's full suite, confirm the original repro is gone.

3. Refactoring

Refactor [target]. Done = behavior is byte-identical before and after, all existing tests pass without modification, types and lint clean, diff scoped to the refactor.

Stop & ask if: you can't preserve behavior without changing a test (means the refactor changed semantics), the refactor naturally pulls in a 3rd+ file beyond what we discussed, or you find a real bug while refactoring (surface it separately, don't silently fix it inside the refactor diff).

No preamble. Don't explain the refactor plan before doing it. When done, report what moved, what's now where, and what was verified in 2-4 lines.

Verify before reporting done: run the FULL test suite (refactors break unexpected places), typecheck, build.

4. Migration / upgrade

Migrate [target] from [old] to [new]. Done = the codebase compiles and runs on the new version, all existing tests pass without behavior changes, deprecation warnings from the migration are resolved (not suppressed), diff is scoped to the migration only.

Stop & ask if: the new version requires a behavior change that affects users (don't make that call alone), the migration touches config, infra, or build files in ways we didn't discuss, or you find code that depends on the old version's bugs (genuinely tricky - surface it, don't paper over it).

No preamble. Don't list every breaking change in the changelog before starting - read the changelog yourself and apply what's needed. When done, report what was migrated, what was left untouched and why, and any deprecation warnings still standing.

Verify before reporting done: run the full test suite (migrations break unexpected places), typecheck, build. If the project has integration or e2e tests, run those too - unit tests pass through migrations more often than you'd think.

5. Adding tests to existing code

Add tests for [target]. Done = the tests exercise the actual behavior (not implementation details), they pass against the current code, they would fail if the behavior broke, coverage hits the meaningful branches not just the happy path.

Stop & ask if: the code is genuinely hard to test because of how it's structured (don't refactor it to make testing easier without checking), you find a real bug while writing tests (surface it separately, don't quietly fix it), or the existing tests already cover this and I missed it.

No preamble. Don't outline the test plan before writing - just write the tests. When done, report what's covered, what's intentionally not covered, and anything you found while writing them.

Verify before reporting done: run the new tests (must pass), then mutate the code under test in a small way and rerun (the tests must fail - if they don't, they're testing the wrong thing). Run the full suite to make sure nothing else broke.

And here are 5 things to avoid:

  • Telling Codex HOW to solve it instead of what done looks like
  • Asking GPT to create a prompt for itself
  • Using the same chat for more than one task
  • Sequential file reads on multi-file tasks (waste of latency)
  • Trusting “this should work” without running the tests (never do this)

Alright, if you take one thing from this: before you reach for that Extra High button, rewrite the prompt using the tips above. (and give me a follow)

Read more: developers.openai.com/api/docs/guides/prompt-guidance

Skills don’t work the way we think they do

SkillBench research setup screenshot

I just finished reading SkillBench paper: https://arxiv.org/pdf/2602.12670

And the results are definitely not what most people expect.

What researchers did

SkillBench research setup screenshot

They did 86 real-work tasks across 11 domains and executed 7,308 runs.

Each task was tested in three modes:

  1. Baseline (no skills)
  2. Curated skills (human-written)
  3. Self-generated skills by the model

SkillBench result comparing smaller models with skills to larger models without skills

Without further ado, below are some conclusions that I found interesting in the paper.

Self-generated skills don’t help

One of the most hyped ideas in agent research is:

“Let the model write its own tools / skills.”

But it is mostly a wasted effort. In this research, self-generated skills produced no meaningful improvement over baseline.

In some cases, they made performance worse.

Today’s models simply cannot reliably create useful reusable procedural abstractions.

This matters because a huge part of current agent research assumes models can recursively improve by generating better skills/tools. This benchmark suggests that assumption is premature.

SkillBench chart showing self-generated skills did not meaningfully improve performance

Human-made skills work A LOT better

When Skills were carefully written by humans, performance jumped +16.2 percentage points on average.

But here’s what’s even more surprising:

Domain variance was extreme

  • Some domains saw small gains (~4-5 pp)
  • Others saw enormous gains (~50+ pp)

SkillBench chart showing high domain variance for human-made skills

Skills don’t help the same in different fields.. They disproportionately help in structured, procedural domains.

Smaller models + skills ≈ bigger models without skills

A smaller model with curated Skills matched or exceeded a larger model without Skills.

This is huge for cost optimization:

  • Local agents
  • Edge deployment
  • Open-source models

Too many skills can hurt

Overly broad or verbose skill libraries degraded performance. Focused, minimal skill modules performed better.

SkillBench result showing too many skills can degrade performance

Pick your skills carefully. 2-3 skills work better than 4+ skills.

Here is my takeaway

If this paper is right (and i think it is, mostly because of my personal experiences with skill files):

  • Scaling alone isn’t enough
  • Autonomy narratives are premature
  • Skill architecture design is now a first-class research problem

Read the full paper: https://arxiv.org/pdf/2602.12670

so… how to create a skill that works?

A block of cheese representing human knowledge

In my previous article, I argued that skills don’t work the way most people expect.

Related: Skills don’t work the way we think they do

The data from SkillBench supports this. Attaching skills doesn’t automatically guarantee better performance.

So the real question becomes:

If skills don’t magically fix models… How do you engineer them properly?

To answer that, we need to understand how knowledge itself works.

I think human knowledge is like a block of cheese.

A block of cheese representing human knowledge

It grows over time, with holes ever-present.

When we hit something we don’t know, we:

  • look it up
  • learn it
  • apply it
  • patch the hole and move forward

LLMs don’t do this.

When they hit a hole, they don’t say “I don’t know.”

They hallucinate. They lazily fill the gap with plausible-sounding but incorrect information.

Aaand that’s where things break, and we, being the superior entity, come in to help.

The Two Types of Holes

Through trial and error, I’ve noticed there are two kinds.

1. Knowledge gaps

Example:

My OpenClaw agent tries to open a browser extension. It fails.

I tell it:

“You already have a browser. Open that.”

Suddenly the dumdum understands the task and opens the freaking browser.

It wasn’t incapable.

It just didn’t reason through the environment correctly.

That’s a hole.

2. Moldy knowledge

Sometimes it does know something, but it’s outdated.

Examples:

  • Using useScaffoldContractRead instead of useScaffoldReadContract in Scaffold-ETH
  • Manually defining Monad mainnet instead of importing from viem/chains

That’s stale info on the LLM’s side. I call it mold.

And mold spreads silently. If you don’t correct it once, it keeps reappearing in future runs. And you might never notice it.

How I Create Skill Files

Here’s my actual process.

1. I let the model fail

For example, when I was building the monad-development skill, I simply said:

“Create a token on Monad.”

That’s it. Then I watched it fail.

I didn’t over-direct it.

I wanted to see where the holes were.

2. I take notes on every failure

This sounds weird but yes I watch it and take notes/let it takes notes afterwards. after the LLM completes its run. I ask it “What did you have problems with?”, “What did you fail to do on the first try?”, and I go and check if the thing I asked for is built the way I wanted it to be.

3. I create the skill.md file

The skill file contains the patches to fill in the gaps of the LLMs knowledge and remove mold+fill in the gap that is created by removing the moldy part.

The file is concise, specific, and clear.

4. I re-run and benchmark

I run the same prompt again with the skill attached. If it still struggles, I refine the skill.

I repeat until:

  • First-attempt success rate is high
  • Hallucinations drop(mostly)
  • Tool usage becomes clean and consistent

What This Really Is

This is systematic failure harvesting. Treat the LLM as a system with blind spots and engineer around them.

Prompt. Let it fail. Take notes. Create a skill file out of your notes. Rinse and repeat until you are at a desired success rate.

This is how you create a skill that actually works.

Further reading

SkillBench paper:

Skills Don’t Always Improve Performance

https://arxiv.org/pdf/2602.12670

My previous article:

Skills don’t work the way we think they do

Vercel’s agents.md versus skills.md article:

AGENTS.md outperforms skills in our agent evals

https://vercel.com/blog/agents-md-outperforms-skills-in-our-agent-evals

5 Things Brisbane DevOps Teams Must Do After Kubernetes v1.36 Drops spec.externalIPs

Your Kubernetes Clusters Just Got a Hard Deadline

If your platform team is running Kubernetes in Brisbane — whether on-prem in a Fortitude Valley data centre, on EKS, AKS, or a bare-metal cluster out of a Queensland government facility — the v1.36 release has handed you a ticking clock.

The .spec.externalIPs field for Kubernetes Services is now formally deprecated. Not soft-deprecated. Not “we recommend avoiding it.” Formally, officially, documented-in-the-changelog deprecated — with full removal from kube-proxy and conformance criteria coming in a future minor release. That future release could be v1.37 or v1.38. The Kubernetes release cadence is roughly every four months. You do not have years.

This matters because .spec.externalIPs has been a known security liability since CVE-2020-8554 was published in 2020. Any cluster where users are not 100% trusted — which is every multi-team cluster, every shared platform, every SaaS product running on Kubernetes — is potentially vulnerable. The deprecation is the project drawing a hard line on “insecure by default” patterns it can no longer defend.

Here is exactly what your team needs to do, starting today.

1. Audit Every Service in Every Cluster for spec.externalIPs Usage

Before you do anything else, you need ground truth. Run this against every cluster your team manages:

kubectl get services --all-namespaces -o json | 
  jq '.items[] | select(.spec.externalIPs != null and .spec.externalIPs != []) | 
  {namespace: .metadata.namespace, name: .metadata.name, externalIPs: .spec.externalIPs}'

If you’re managing clusters across multiple environments — dev, staging, prod — run this in each context. If you use GitOps via ArgoCD or FluxCD, also grep your manifests in Git:

grep -r 'externalIPs' ./manifests/ --include='*.yaml'

Document every hit. That list is your migration backlog.

2. Enable the DenyServiceExternalIPs Admission Controller Immediately

Kubernetes has shipped the DenyServiceExternalIPs admission controller since v1.21 specifically to block new usage of this field. If your clusters do not have it enabled, enable it now — before your next sprint.

For clusters you manage directly (kubeadm, Talos, RKE2), add DenyServiceExternalIPs to your API server’s --enable-admission-plugins flag. For managed Kubernetes on EKS or GKE, check whether the control plane exposes this — if not, implement a validating webhook that rejects any Service with a non-empty spec.externalIPs field.

This is not optional housekeeping. This stops the bleeding. No new usage means no new technical debt accumulating while you work through the existing backlog.

3. Migrate Workloads to Supported Alternatives — Today, Not Next Quarter

The reason the Kubernetes project felt comfortable making this a hard deprecation is that the ecosystem now has mature alternatives. Your migration path depends on your cluster type:

On bare-metal or on-prem clusters (common in Brisbane enterprise and government)

  • MetalLB — a battle-hardened load-balancer implementation for non-cloud environments. Supports BGP and Layer 2 modes. Drop-in replacement for most spec.externalIPs use cases.
  • Cilium Gateway API — if you’re already running Cilium as your CNI, the Gateway API implementation covers the same use cases with better security primitives.
  • Gateway API (sig-network) — the official successor to Ingress and the recommended path for new cluster networking going forward.

On cloud-managed clusters (EKS, AKS, GKE)

  • Use LoadBalancer type Services backed by your cloud provider’s NLB or ALB. If you were using spec.externalIPs to work around cost or complexity, that’s a conversation worth having — the security tradeoff is not acceptable.

For internal service-to-service routing

  • If you were using spec.externalIPs for internal routing hacks, migrate to ExternalName Services, headless Services, or proper ingress/gateway patterns.

4. Update Your IaC, Helm Charts, and GitOps Manifests

Knowing you have a problem and fixing your running clusters is only half the job. If spec.externalIPs is baked into a Helm chart — yours or a third-party one — the field will reappear on the next helm upgrade.

  • Audit your Helm values.yaml files and chart templates for externalIPs.
  • Check upstream Helm charts you’ve vendored or depend on — open issues with maintainers if they haven’t already removed the field.
  • Update your ArgoCD/FluxCD ApplicationSets and Kustomize overlays.
  • Add a CI check — a simple grep in your pipeline — that fails any PR introducing externalIPs into a manifest. Make the linter your enforcement mechanism before the admission controller becomes your last line of defence.

5. Communicate the Change Across Your Platform Tenants

If you run a shared Kubernetes platform — common in Brisbane’s growing platform engineering teams across industries like resources, financial services, and state government — your tenants need to know this is coming.

Send a platform notice this week. Include:

  • What spec.externalIPs is and why it’s being removed (link to CVE-2020-8554)
  • The timeline: deprecated now, removed in a future minor release
  • The approved alternative patterns your platform supports
  • A deadline for tenant teams to migrate their workloads
  • Who to contact for migration support

Don’t frame this as “Kubernetes is making a change.” Frame it as “here’s what your platform team is doing to keep your workloads secure, and here’s what we need from you.”

The Bigger Picture for Brisbane Platform Teams

The removal of spec.externalIPs is a signal, not just a deprecation. The Kubernetes project is actively unwinding “insecure by default” decisions made in the early days of the ecosystem. More removals are coming — PodSecurityPolicy was just the beginning.

Brisbane DevOps and SRE teams that treat deprecation notices as immediate action items — not future-sprint backlog items — are the ones whose platforms stay stable when the removal actually lands. The teams that ignore them are the ones getting paged at 2am when kube-proxy stops routing traffic to a Service that still references a field that no longer exists.

Audit today. Migrate this sprint. Enforce via admission control and CI. That’s the playbook.

Frequently Asked Questions

What is spec.externalIPs in Kubernetes and why is it being removed?

spec.externalIPs is a Service field that lets you assign additional IP addresses a Service responds on. It’s being removed because it was designed assuming all cluster users are fully trusted — an assumption that doesn’t hold in multi-team clusters. CVE-2020-8554 documented how this can be exploited, and the Kubernetes project has decided to formally deprecate it in v1.36 ahead of full removal.

When will spec.externalIPs actually stop working in Kubernetes?

The field is formally deprecated in v1.36 (released May 2026). Full removal from kube-proxy and conformance criteria will happen in a future minor release — likely v1.37 or v1.38. Given Kubernetes releases roughly every four months, teams should treat this as a 4-8 month window at most.

What can I use instead of spec.externalIPs for on-prem or bare-metal Kubernetes clusters?

MetalLB is the most widely adopted replacement for bare-metal and on-prem clusters, supporting both Layer 2 and BGP modes. The Kubernetes Gateway API (managed by SIG Network) is the strategic long-term path. If you’re already running Cilium as your CNI, its Gateway API implementation is another strong option.

How do I find out if my cluster is using spec.externalIPs?

Run: kubectl get services –all-namespaces -o json | jq ‘.items[] | select(.spec.externalIPs != null and .spec.externalIPs != [])’ against each cluster context. Also grep your GitOps manifests and Helm chart templates for the string ‘externalIPs’ to catch usage baked into IaC.

What is the DenyServiceExternalIPs admission controller and should I enable it?

DenyServiceExternalIPs is a built-in Kubernetes admission controller that rejects any Service creation or update that includes a non-empty spec.externalIPs field. It has been available since v1.21. Yes — enable it on every cluster now. It prevents new usage from being introduced while you migrate existing workloads, and it functions as a policy enforcement layer ahead of the full removal.

Why Agentic AI Changes Everything for Brisbane DevOps Teams — An Infrastructure Perspective

Why Agentic AI Changes Everything for Brisbane DevOps Teams — An Infrastructure Perspective

Agentic AI is not a smarter chatbot. It is a fundamentally different workload — and if your current infrastructure stack was designed around traditional LLM inference, you are already behind. The AMD and Red Hat announcement of May 2026 makes this explicit: agentic AI systems that reason, plan, execute multistep tasks, and call external tools continuously require a new infrastructure stack from the ground up. For Brisbane DevOps and platform engineering teams running Kubernetes-based workloads on OpenShift, EKS, or GKE, this is not a future problem. It is a now problem.

What Happened

AMD and Red Hat Draw a Hard Line

Red Hat’s May 2026 blog post, published in partnership with AMD, makes a clear architectural argument: traditional inference infrastructure — optimised for single-shot, stateless model calls — is structurally mismatched to agentic workloads. Agents call models repeatedly in loops, fan out across tools and data sources, maintain state across multistep reasoning chains, and must run continuously and cost-effectively at scale.

The implication is direct. The infrastructure stack that got your team through the first wave of LLM integration — a GPU node here, a FastAPI wrapper there, maybe a Helm chart for a model server — will not survive contact with production agentic workloads. Red Hat is positioning OpenShift AI alongside AMD Instinct accelerators as the answer, but the deeper message is architectural, not vendor-specific.

Why It Matters for DevOps and Platform Engineering

Agents Are a Continuous Workload, Not a Batch Job

The single most disruptive characteristic of agentic AI for infrastructure teams is continuity. Traditional inference is stateless and bursty — a request comes in, a model responds, the compute is released. Agents are stateful and long-running. They maintain context, hold tool call queues, and re-enter reasoning loops. This breaks standard autoscaling assumptions built into KEDA and Kubernetes HPA, because the signal for “busy” is no longer just QPS — it is reasoning depth, tool latency, and memory pressure across multi-turn sessions.

Observability Gaps Become Critical Failures

Your existing Prometheus and Grafana dashboards were not built for agent trace visibility. An agent that silently loops, fails a tool call, or degrades in reasoning quality will not trigger a CPU alert. OpenTelemetry is the right foundation here, but instrumentation must extend into the agent framework layer — LangChain, LlamaIndex, or AutoGen — capturing span-level tool invocations, token consumption per reasoning step, and inter-agent message latency. Without this, your SRE team is flying blind on a workload that can burn GPU budget in minutes.

GitOps and IaC Assumptions Break at the Model Layer

Teams managing infrastructure with ArgoCD and Terraform are accustomed to declarative, idempotent deployments. Agent systems introduce non-determinism at the application layer that bleeds into infrastructure decisions. Model versions, context window sizes, and tool configurations all affect infrastructure sizing — and they change frequently. Your IaC pipeline needs to treat model configuration as a first-class infrastructure variable, not an application concern left to the data science team.

Impact on Brisbane Teams

The Local Talent and Tooling Gap

Brisbane’s DevOps market is deep in Kubernetes and cloud-native tooling, but MLOps and LLMOps expertise remains genuinely scarce. According to Seek data from Q1 2026, ML/AI engineering roles in Queensland were advertised at three times the rate of available candidates. The practical consequence: most Brisbane platform teams will be asked to run agentic AI infrastructure before they have hired anyone with production LLMOps experience. That means the platform engineering team owns this problem whether they signed up for it or not.

OpenShift Shops Have a Head Start

Brisbane enterprises running Red Hat OpenShift — common across Queensland government, resources, and financial services — have a concrete advantage here. The AMD and Red Hat integration ships with OpenShift AI operator support, meaning the serving layer, model registry, and pipeline orchestration are available within an existing GitOps-managed cluster. For teams already using ArgoCD and OpenShift Pipelines, the onboarding path to a production-grade agentic AI stack is shorter than starting from raw EKS.

FinOps Complexity Multiplies

Agentic workloads are cost unpredictable by design. A single agent session can trigger dozens of model calls, each with variable token depth. Brisbane teams with mature FinOps practices — tagging strategies in AWS or Azure, budget alerts, Spot instance policies — will need to extend those controls to cover per-agent-session cost attribution. Without this, the first production agentic workload will blow a cloud budget in a way that is genuinely difficult to explain to a CFO.

What To Do Now

Audit Your Current Stack Against Agentic Requirements

This week, map your existing infrastructure against three agentic AI requirements: stateful workload support (do your Kubernetes configs handle long-running sessions?), deep observability (does your OpenTelemetry instrumentation reach the model and tool call layer?), and cost attribution (can you tag and track spend per agent session?). Identify the gaps before a project lands on your backlog.

Instrument One Agent Framework End-to-End

Pick one agent framework — LangChain is the most common entry point — and instrument it fully with OpenTelemetry, exporting spans to your existing Grafana stack. This gives your SRE team a realistic picture of what agentic workload visibility actually looks like before you are under production pressure.

Treat Model Config as Infrastructure

Add model version, context window size, and tool manifest to your Terraform or Helm values files today. Enforce review through your existing GitOps pipeline. This costs almost nothing now and prevents a class of production incidents later.

Engage the AMD-Red Hat Stack Specifically

If your team runs OpenShift, the OpenShift AI operator with AMD Instinct GPU support is worth a proof-of-concept this quarter. The integration is mature enough for non-production validation and the architectural patterns it enforces — model serving via vLLM, pipeline orchestration via Kubeflow Pipelines — are transferable even if you later diverge from the vendor stack.

Frequently Asked Questions

What is the difference between agentic AI and traditional LLM inference infrastructure?

Traditional LLM inference handles stateless, single-turn requests — one input, one output, compute released. Agentic AI infrastructure must support stateful, multistep reasoning loops where a model calls tools, processes results, re-enters reasoning, and maintains context across many model invocations in a single session. This requires different autoscaling, observability, and cost management approaches.

Does Kubernetes support agentic AI workloads out of the box?

Not without modification. Standard Kubernetes autoscaling (HPA, KEDA) is optimised for request-based scaling signals. Agentic workloads require custom metrics — reasoning session depth, tool call queue length, memory pressure — to scale correctly. Teams need to instrument their agent frameworks with OpenTelemetry and expose custom metrics to the Kubernetes control plane.

How does OpenShift AI fit into an agentic AI infrastructure stack?

OpenShift AI provides a Kubernetes-native operator stack covering model serving (via vLLM), model registry, pipeline orchestration (Kubeflow Pipelines), and GPU resource management. For teams already running OpenShift with ArgoCD-based GitOps, it extends the existing declarative infrastructure model to the AI serving layer, reducing the operational gap between platform engineering and ML workloads.

What should Brisbane DevOps teams prioritise first when preparing for agentic AI?

Observability first. Before you optimise compute or redesign autoscaling, instrument your agent framework with OpenTelemetry so you can see what is actually happening inside a running agent session. Blind optimisation of agentic infrastructure is expensive and slow. Visibility gives your team the data to make every subsequent decision correctly.

Frequently Asked Questions

What is the difference between agentic AI and traditional LLM inference infrastructure?

Traditional LLM inference handles stateless, single-turn requests — one input, one output, compute released. Agentic AI infrastructure must support stateful, multistep reasoning loops where a model calls tools, processes results, re-enters reasoning, and maintains context across many model invocations in a single session. This requires different autoscaling, observability, and cost management approaches.

Does Kubernetes support agentic AI workloads out of the box?

Not without modification. Standard Kubernetes autoscaling (HPA, KEDA) is optimised for request-based scaling signals. Agentic workloads require custom metrics — reasoning session depth, tool call queue length, memory pressure — to scale correctly. Teams need to instrument their agent frameworks with OpenTelemetry and expose custom metrics to the Kubernetes control plane.

How does OpenShift AI fit into an agentic AI infrastructure stack?

OpenShift AI provides a Kubernetes-native operator stack covering model serving via vLLM, model registry, pipeline orchestration via Kubeflow Pipelines, and GPU resource management. For teams already running OpenShift with ArgoCD-based GitOps, it extends the existing declarative infrastructure model to the AI serving layer, reducing the operational gap between platform engineering and ML workloads.

What should Brisbane DevOps teams prioritise first when preparing for agentic AI?

Observability first. Before you optimise compute or redesign autoscaling, instrument your agent framework with OpenTelemetry so you can see what is actually happening inside a running agent session. Blind optimisation of agentic infrastructure is expensive and slow. Visibility gives your team the data to make every subsequent decision correctly.

How Resumable Uploads and Downloads Actually Work

It Started Over Snacks

A colleague of mine — a backend engineer asked a question during our evening snack break.

“How do resumable uploads actually work? Like, how does the server know exactly where to pick up without losing the connection or going offline?”

I mentioned “chunks” and “tracking state.” It wasn’t technically wrong, but I couldn’t explain it thoroughly. We both just went back to enjoying pani-puri which was served that day, but the awkwardness stayed with me. 😅

I realized I “knew” it very well but couldn’t explained it well because the implementation knowledge was lacking. Post that I looked up the internet and turns out, the info is scattered across dry RFCs and AWS docs that assume you’re already a systems expert.

Here is the consolidated version — the “whole picture” — so the next time this comes up over snacks, we’re all ready.

Why “Just Sending It” Fails

HTTP is stateless. If in between, our Wi-Fi blips while we’re uploading a 2GB 4K video, the server basically says “I don’t know you” and dumps everything it just received.

To fix this, we need two things:

  1. Slicing — chopping the file into independent chunks
  2. The Bookmark — a way for both sides to agree on what’s already “on the shelf” so we don’t repeat work

The Upload Workflow

1. The Handshake (Initiation)

Before sending a single byte, the client registers the intent. We need an uploadId. This is the key that unlocks the server’s memory of this specific session.

// Client: "I have a 500MB file called 'video.mp4'. Give me an ID."
// Server: "Got it. Your ID is 'upload_xyz'. Send it in 5MB chunks."

2. Slicing Without Melting Memory

On the frontend, we don’t load the whole 500MB file into a variable — that’s a one-way ticket to a crashed browser tab. We use file.slice(). It’s a lazy operation — it only points to the bytes we need for that specific chunk.

const chunk = file.slice(chunkIndex * CHUNK_SIZE, end);

3. The State Is The Database

If the connection drops at say chunk #42, the server doesn’t care. Why? Because the progress isn’t stored in the connection — it’s stored in a database row.

uploadId | totalChunks | receivedChunks | status
upload_xyz | 100 | [0..41] | in_progress

When the client reconnects, it simply asks:

GET /status?id=upload_xyz
→ { "receivedChunks": [0..41], "nextExpectedChunk": 42 }

The server looks at its DB and says “I have 0 through 41. Send 42 next.”

TCP ACKs Are Liars

This is the part I totally botched during snacks. Most people think a successful “receipt” happens at the network level. It doesn’t. I asked gemini to give me some analogy to understand and explain it. It gave and that sums it up clearly.

Think of a courier delivering 100 packages to a warehouse. The delivery guy drops a box at the door and gets a signature — that’s our TCP ACK. He drives away; his job is done. But then the warehouse worker trips and drops the box into a shredder before it’s logged in the system.

The delivery slip says “received.” The package is gone.

In our world:

  • TCP ACK = “The bytes hit the server’s network buffer.”
  • HTTP 200 OK = “The bytes are safely written to S3 and the DB is updated.”
Client                          Server
  |──── chunk #42 bytes ────────>|
  |                              | ← bytes in OS buffer
  |<─── TCP ACK ────────────────| ← OS sends ACK immediately
  |                              | ← server writes to S3
  |                              | 💥 SERVER CRASHES HERE
  |<─── HTTP 200? Never arrives ─X

The Golden Rule: The client should never trust anything except an HTTP 200. If the connection dies after the TCP ACK but before the 200, the client assumes the worst and re-sends that chunk. Since chunk uploads are idempotent, re-sending causes zero harm.

⚠️ One more layer worth knowing: the client also computes a SHA-256 checksum of each chunk and sends it as a header (X-Chunk-Checksum: abc123). The server recomputes and compares on receipt. TCP has its own 16-bit checksum but that’s hop-by-hop and invisible to our application code — it catches transit glitches but says nothing about what happens after the bytes land. The application-level SHA-256 covers the full journey including disk and storage writes. They coexist, each catching what the other cannot.

The Production Pattern: Don’t Touch The Data

In a real-world system, our API server shouldn’t even touch the file bytes. It’s a waste of CPU and memory. Instead, we use Presigned URLs.

Client → Server: "I want to upload video.mp4"
Server → S3: generate presigned PUT URL(we have s3 SDK at backend so we avoid s3 call for it.
Even better and performant)
Server → Client: presigned URL + uploadId
Client → S3: PUT directly (server never sees the bytes)
S3 → Client: ETag per chunk (S3's receipt confirmation)
Client → Server: "chunk 1 done, ETag is xyz"
Server → DB: receivedChunks = [1]

Our backend stays lean. S3 handles the heavy lifting of byte-shuffling. The ETag S3 returns per chunk is also needed to call CompleteMultipartUpload at the end — S3 uses them to assemble chunks in the correct order.

Resumable Downloads: The Mirror Image

For downloads, the client is the one in charge of the bookmark. It uses the HTTP Range header.

If you’ve ever seen a .crdownload or .part file in your downloads folder, that’s the mechanism in action. The browser is writing bytes to a temporary file. If the download fails at 50MB, the browser looks at that file, sees it has 50MB, and sends:

GET /files/video.mp4
Range: bytes=52428800- ← give me everything starting from here

Response: HTTP/1.1 206 Partial Content
Accept-Ranges: bytes ← server confirming it supports this

If the server doesn’t support range requests, it returns a plain 200 with the full file. No resumability. The Accept-Ranges: bytes in the response is the server’s way of saying “yes, I understand this pattern.”

The If-Match Guard

What if the file on the server changed while we went offline? If we append new-file bytes to old-file bytes, we get a corrupted mess with no error message. We use ETags to prevent this:

Range: bytes=52428800-
If-Match: "abc123etag" ← only if the file is still this version

If the file changed, the server returns 412 Precondition Failed. Client restarts from scratch. Without this guard, we might silently assemble a corrupted file and never know.

Uploads vs Downloads — At A Glance

Feature Uploads Downloads
Who knows the progress? Server (Database) Client (Local Disk)
The “Bookmark” uploadId Range header
Integrity Check SHA-256 per chunk ETag / Last-Modified
Partial Storage S3 Multipart / Temp Store .part file on your machine
HTTP status for partial 200 OK per chunk 206 Partial Content

The Clean Mental Model

Resumable transfers aren’t magic — they are just independent, idempotent transactions.

Stop treating the file as one giant stream. Start treating it as a series of small, verifiable tasks. Three layers of reliability, each catching what the previous one cannot:

  1. TCP Checksum — catches transit glitches
  2. Application SHA-256 — catches disk and storage glitches
  3. HTTP 200 — confirms the task is truly done

Next time someone asks you this over snacks, you’re ready. And if they ask for more — well, now you know exactly which blog to point them toward. 😉

Pranipat 🙏!

🏏 Captain Cool: The Multi-Agent IPL Match Strategist Built on Google Gemini

Captain Cool Dashboard Mockup

🏏 “Captain Cool” — The Multi-Agent IPL Match Strategist Built on Google Gemini

This is a submission for the Google Gemini Multi-Agent Hackathon! Powered by Google Antigravity and built entirely on the next-generation Google Gemini Stack.

🚀 The Vision

In cricket-crazy nations, fans don’t just watch the game—they play the role of “armchair captains,” constantly arguing about who should bowl the 19th over, when the strategic timeout should be taken, or how the field should be set.

“Captain Cool” brings this tactical war room to life! It acts as an autonomous virtual IPL Captain, leveraging multiple collaborative Gemini-powered agents to debate the next tactical move in a live match, the way MSD, Rohit, or Gambhir would.

It takes real-time variables—innings, overs, wickets, pitch type, venue, and dew factor—and outputs a calculated strategy backed by numbers, tested through internal debate, and narrated in poetic cricket language.

🏛️ Architecture & Multi-Agent Design

A single prompt wearing four hats is not a true multi-agent system. “Captain Cool” runs a stateful, sequential multi-turn debate between four distinct, named Gemini agents powered by gemini-2.5-flash via the official @google/genai SDK:

🏛️ The Sequential Reasoning Chain

Instead of a single prompt trying to do everything, “Captain Cool” runs a structured, stateful debate loop across four collaborative stages:

  1. 📥 User Input (Match State): You enter parameters like wickets, score, overs remaining, venue, and pitch images.
  2. 📊 Stats Shastri (The Analyst): Processes the data, triggers the dynamic weather API to assess local Dew Factor, and evaluates historic matchup metrics.
  3. 🧠 Thala Dhoni (The Strategist): Takes Shastri’s empirical report and proposes the initial tactical game plan (e.g., bowling Bumrah straight).
  4. 🔥 Gautam Gambhir (Devil’s Advocate): Scrutinizes the proposal for high-risk tactical blind spots (e.g., spin slipping on wet dew grass) and issues an intense critique.
  5. 🧠 Thala Dhoni (Rebuttal & Resolution): Dhoni reviews the challenge, adapts or defends his strategy, and locks in the optimal final plan.
  6. 🎙️ Harsha Bhogle (Poetic Commentator): Translates the final complex captaincy decision into highly engaging cricket storytelling and vocal commentary.

🛠️ The Hard Requirements (How We Checked Every Box)

1. Three or More Collaborative Agents

  • 📊 Stats Shastri (The Analyst): The numbers engine. Strictly clinical and quantitative.
  • 🧠 Thala Dhoni (The Strategist): Calm, game-aware mastermind. Proposes simple, impactful strategies.
  • 🔥 Gautam Gambhir (The Devil’s Advocate): High-intensity critic. Aggressively challenges Dhoni’s plans to uncover blind spots.
  • 🎙️ Harsha Bhogle (The Commentator): The final narrator, turning tactical jargon into beautiful cricket poetry.

2. Live Tool Use (Function Calling)

We implemented three real-world grounding tools that run on our Next.js API server to provide empirical data to the agents:

  • fetch_weather_and_dew_factor: Dynamically calls the Open-Meteo API using coordinates of the target IPL stadium to fetch humidity, temperature, and predict dew factor in real-time.
  • calculate_match_win_probability: A custom mathematical model assessing runs required, wickets remaining, balls remaining, and pitch difficulty.
  • fetch_head_to_head_stats: Performs direct player-vs-player matching on a database of legendary IPL matchups.

3. Multi-Turn Reasoning Loop (The Internal Debate)

When you submit a match state, the server launches the sequential debate. Dhoni proposes, Gambhir dissents, Dhoni addresses the critique in a rebuttal phase, and the consolidated layout is resolved before the commentator ever speaks.

4. Explainability for Casual Fans

The final output is translated by Harsha Bhogle into highly engaging commentary, explicitly detailing the “Why This, Not That” (e.g. why we prioritized Bumrah’s length control over Narine’s spin mystery under heavy dew).

🌟 5/5 Stretch Goals Achieved!

We didn’t just stop at the requirements. We hit all five optional stretch goals:

  1. Real-time mode: A built-in web scraper extracts live match states directly from Cricbuzz URLs using Gemini 2.5 JSON mode.
  2. Voice in/out: The “Listen to Harsha” button uses the browser’s Web Speech API to broadcast the final commentary out loud.
  3. Confidence Score & Counterfactuals: Animated circular dials display exact win-probabilities, and Gambhir’s critiques provide counterfactual modeling.
  4. Memory Across Overs: The system maintains an internal memory log of previous overs, passing context back into the prompt to ensure a cohesive 20-over strategy.
  5. Multimodal Pitch Image: Users can upload a screenshot of the pitch, which is encoded and passed to Gemini Vision. Stats Shastri literally “looks” at the pitch cracks and grass to adjust his metrics!

💻 Tech Stack

  • Core: Next.js (App Router, Tailwind CSS, TypeScript).
  • AI Engine: Official @google/genai TypeScript SDK.
  • Models: gemini-2.5-flash via Google AI Studio.
  • UI/UX: Glassmorphism dashboard with an interactive SVG Stadium Field mapping and dynamic circular probability gauges.
  • Voice: Web Speech API for TTS synthesis of Harsha’s commentary.

🎙️ Deep Dive: The Agent Prompts

📊 Stats Shastri Prompt

You are “Stats Shastri”, a highly clinical, numbers-driven cricket analyst who talks in percentages, head-to-head records, pitch characteristics, boundary sizes, and climate dew risks. Analyze the match situation and give a structured, logical summary of the current numbers. Avoid metaphors.

🧠 Thala Dhoni Prompt

You are “Thala Dhoni”, a legendary IPL Captain known as “Captain Cool”. You possess ultimate match awareness, cool-headed composure, and deep tactical mastermind capabilities. Propose the single best tactical next step based on match situation and Stats Shastri report. Explain your reasoning in calm, authoritative, captain’s language.

🔥 Gautam Gambhir Prompt

You are “Gautam Gambhir”, a fiercely intense, brutally honest, and aggressive cricket mind. You serve as the Devil’s Advocate. Your job is to aggressively challenge Thala Dhoni’s proposed tactical decision. Point out what Dhoni missed! speak with edge, passion, and tactical grit.

🎙️ Harsha Bhogle Prompt

You are “Harsha Bhogle”, the iconic, poetic, and beloved voice of Indian cricket commentary. Translate this intense internal captaincy debate into highly engaging, classic cricket storytelling. Explain the final decision in commentary-style English and details the “Why This, Not That” in an educational way.

🔗 AI Studio Prompt Link

Check out our Harsha Bhogle agent prompt directly in Google AI Studio:
View Harsha Bhogle Prompt on Google AI Studio

📸 Dashboard Walkthrough (The Wow Factor)

Captain Cool Dashboard Mockup

Live Demo Scenario: CSK vs GT (IPL 2023 Final)

  • Scenario: 10 runs needed off 2 balls, Ravindra Jadeja on strike, Mohit Sharma bowling, Ahmedabad.
  • Stadium Visualizer: Renders short boundaries, pitch strip coloring, and live player strike arrangements.
  • Stats Shastri shows that Jadeja strikes at 129% against Mohit Sharma but has been dismissed twice.
  • Thala Dhoni wants to target the straight boundary.
  • Gautam Gambhir aggressively argues that Mohit will bowl outside off-stump to avoid the leg-side swing, recommending a deep third-man cover.
  • Harsha Bhogle synthesizes this into an epic commentary package!

🎥 Watch it in Action!

Here is a recording of our browser session simulating the agent debate:

Captain Cool Agent Debate Demo

🚀 How to Run Locally

  1. Clone the Repo:

    git clone https://github.com/GitPhantom700/captian-cool.git
    cd captian-cool
    
  2. Install dependencies:

    npm install
    
  3. Setup your environment:
    Create a .env.local file and add your Google Gemini API key:

    GEMINI_API_KEY=your_gemini_api_key_here
    

    (Security Note: NEVER commit your actual API key to GitHub. The .env.local file is hidden by default. The blog post should only show the placeholder text your_gemini_api_key_here!)

  4. Launch:

    npm run dev
    

    Open http://localhost:3000 on your browser!

Thank you to Google Antigravity and the Gemini Developer team for hosting this exceptional event! Let us know your thoughts on Captain Cool in the comments!

CaptainVerse AI — Multi-Agent IPL Strategist powered by Google Gemini

Built during the Agentic Premier League (APL) by GDG Cloud Pune, CaptainVerse AI is a multi-agent AI system that simulates real IPL captaincy decisions using Google Gemini.

Instead of a normal chatbot, the project uses multiple AI agents with different roles:

  • Strategist Agent → decides tactics
  • Stats Analyst Agent → analyzes match data
  • Devil’s Advocate Agent → challenges decisions
  • Commentator Agent → explains decisions in cricket language

The idea was to build an AI system that thinks more like an IPL war room rather than giving generic answers.

Example:

145/4 in 16.2 overs on a turning pitch.

  • Strategist: “Bring Bumrah now.”
  • Devil’s Advocate: “Risky due to dew.”
  • Final Decision: “Use slower wide yorkers with deep square protection.”

⚡ Tech Stack

  • Google Gemini 2.5 Flash
  • Next.js
  • Node.js + Express
  • TailwindCSS
  • Gemini Function Calling

This project helped me explore:

  • Agentic AI
  • Multi-agent collaboration
  • Prompt engineering
  • Real-time tactical reasoning

Big thanks to GDG Cloud Pune for organizing APL and creating an amazing platform to build with Gemini

GitHub:
https://github.com/HemantRambhauDhavale/CaptainVerse-AI

GoogleGemini #AgenticAI #IPL #GDGCloudPune #NextJS #gdgcloudpune

Building an AI Chat Starter Kit for CMP: ~20 Lines from Empty Screen to ChatGPT-Quality Streaming

PromptBar and LlmTypewriter working together in an iPhone simulator — slash commands, @-mentions, attachment chips, and a streaming assistant reply with live Markdown and syntax-highlighted code

PromptBar and LlmTypewriter working together in an iPhone simulator — slash commands, @-mentions, attachment chips, and a streaming assistant reply with live Markdown and syntax-highlighted code

TL;DR

I open-sourced two Compose Multiplatform libraries that pair into an AI chat starter kit you can drop into any Android / iOS / Desktop / Web app:

  • 🤖 prompt-bar — the composer (slash commands, mentions, attachments, send/stop)
  • 💬 llm-typewriter — the renderer (Flow<String> streaming, live markdown, progressive syntax highlighting)

The point isn’t either lib in isolation. The point is they’re built to wire together so you get a ChatGPT-quality streaming chat UI in ~20 lines on every CMP target.

implementation("io.github.nadeemiqbal:prompt-bar:0.1.0")
implementation("io.github.nadeemiqbal:llm-typewriter:0.1.1")

The problem

I was working on a side project — a Kotlin Multiplatform app that wraps an LLM API — and I needed a chat UI. The kind you’ve used a hundred times: textfield at the bottom with slash commands and @-mentions, attachment chips above it, a Send button that becomes Stop while the assistant streams a reply, markdown-rich responses with syntax-highlighted code blocks.

Two days later I had a half-working prototype, no tests, and a growing TODO list. The CMP ecosystem just didn’t have these pieces wired together.

Here’s what I found when I went looking:

What I needed What exists today
Chat composer Stream Chat ships a polished AI composer for Android, tied to their commercial backend.
Slash commands + @ mentions in a composer No CMP option I could find. React has good references (Vercel AI Elements is actively working on these).
Streaming typewriter (Flow-based) Typist-CMP and Texty cover typewriter animation for static strings. I needed a Flow-of-String source so tokens paint the moment they arrive from an LLM SDK.
Live progressive markdown rendering No CMP option I could find. Even in React, Vercel’s streamdown is the only popular one.
Syntax-highlighted code blocks (built up live) No CMP option I could find — needs an incremental tokenizer.

The existing libraries are good at what they do. What I needed for my project was a different combination — these five things working together as one experience, on every CMP target. So I built it.

What’s in prompt-bar

PromptBar is one composable plus a headless PromptBarState.

Inputs you wire:

  • slashCommands: List<SlashCommand> — name + description + hotkey + onSelect lambda. Type / and an autocomplete dropdown opens.
  • mentionProvider: MentionProvider — suspend fun suggest(query: String): List<Mention>. Plug in your contact / file / symbol source. Async by design so you can hit Room / Ktor / system contacts.
  • templates: List<PromptTemplate> — quick-prompt chips above the input. Tap to populate.
  • modelSelector: @Composable () -> Unit — slot for whatever model picker UI fits your app.
  • onVoiceTap: () -> Unit — mic button slot. Library doesn’t decode audio (BYO).

State the library owns:

  • text / fieldValue — the textfield content (live token counter / char count derived)
  • attachments: List<PromptAttachment> — chips above the input; addAttachment / removeAttachment
  • sendState: SendState — Disabled / Ready / Sending / Streaming — derived from content, overridable with markSending() / markStreaming() / markReady()
  • selectedModel: ModelOption? — currently-selected model
  • activeTrigger: ActiveTrigger — what autocomplete is currently open

Key design decisions:

  • / and @ only open the dropdown at the start of a line or after whitespace — so email@domain doesn’t spuriously trigger mentions.
  • The Send button is one button that morphs visually based on sendState. No “Send disabled until text” + “separate Stop button” UX — one button, four visual states.
  • Smart paste tokenizer for blobs: paste [email protected], [email protected] (comma- or newline-separated) and pasteTokensAsAttachments splits it into chips.
  • Headless state. PromptBarState can be constructed without composition (handy for ViewModels and tests).

What’s in llm-typewriter

StreamingTypewriter takes a Flow<String> of tokens — typically straight from your LLM SDK’s streaming API — and reveals them at the cadence dictated by a SpeedCurve.

The Flow-of-String API matters. A typewriter that takes a static String means you have to buffer the entire LLM response before showing anything. With a Flow, the first token paints the moment it arrives — exactly what you want for an LLM chat.

Live progressive Markdown. The renderer re-parses the revealed text every frame using a prefix-stable parser — the same prefix of input always yields the same prefix of tokens. So:

  • **bold mid-stream renders as plain text. The moment ** closes, it flips to bold.
  • Headings (# Title) render once the line completes.
  • Fenced code blocks (the triple-backtick kotlin kind) render progressively as the lines arrive — with syntax highlighting. Code keywords / strings / numbers / comments highlight live, line by line, as the model emits them.

Three speed curves. A fun interface SpeedCurve lets you tune the cadence:

SpeedCurve.Linear    // constant — every char takes the same time
SpeedCurve.EaseOut   // slight stretch on whitespace
SpeedCurve.Natural   // pauses on .!?,;:n like a human typist

Or write your own:

val excitedTypist = SpeedCurve { base, _, next ->
    if (next == '!') base * 8 else base
}

Other table-stakes things: tap-to-skip (reveal everything immediately on tap), graceful stop-mid-stream (state.stop() shows a “(stopped)” ghost indicator), custom @Composable cursor (block, line, underscore, or anything you want), screen-reader-friendly live region.

The integration — why these are pitched as a pair

Either library alone is useful. Together, they cover a workflow:

@Composable
fun ChatScreen(vm: ChatViewModel) {
    val prompt = rememberPromptBarState()
    val typewriter = rememberStreamingTypewriterState()

    // Send/Stop button auto-syncs with the typewriter's lifecycle.
    LaunchedEffect(typewriter.isStreaming) {
        if (typewriter.isStreaming) prompt.markStreaming()
        else prompt.markReady()
    }

    Column {
        // Your message list ... assistant bubble uses StreamingTypewriter:
        StreamingTypewriter(
            tokens = vm.responseFlow,
            state = typewriter,
            renderer = rememberMarkdownTypewriterRenderer(),
        )

        // The composer:
        PromptBar(
            state = prompt,
            onSend = { vm.send(prompt.outgoing) },
            onStop = { typewriter.stop(); vm.cancelStream() },
            slashCommands = listOf(
                SlashCommand("clear", "Clear conversation") { vm.clear() },
            ),
            mentionProvider = MentionProvider.fromList(vm.contacts),
        )
    }
}

That’s the whole integration. Tap Send → message goes out → assistant bubble starts streaming → button morphs to Stop → tap Stop → typewriter freezes mid-token + shows “(stopped)” + button flips back to Send. The polish layer that usually takes a weekend from scratch.

What’s next

Both are 0.1.x. Backlog:

  • prompt-bar: server-driven prompt templates, image attachment previews (composable slot for actual bitmap), full prompt-history scrollback, drag-to-reorder chips, command palette mode.
  • llm-typewriter: more languages in the highlighter (Rust, Go, Swift), table rendering, footnotes, custom thinking-block recognition, voice-of-thought style cycling.

Issues / PRs / feedback very welcome.

Try them

implementation("io.github.nadeemiqbal:prompt-bar:0.1.0")
implementation("io.github.nadeemiqbal:llm-typewriter:0.1.1")

Apache 2.0. Android (minSdk 24) · iOS (x64/arm64/sim) · Desktop (JVM 11) · Web (wasmJs).

Built because I needed it. Hopefully saves you a weekend.