What Are Buffers?

Buffers are temporary memory spaces used to hold data while it is being moved from one place to another.

Think of it like eating rice.

You cannot move the entire plate of rice into your stomach at once.
So you use a spoon.

The spoon temporarily holds a small piece of rice,
moves it,
Then it gets filled again.

In computers, buffers work similarly.

Instead of moving huge amounts of data all at once, computers usually move data in smaller chunks.

A buffer temporarily stores those chunks while data is being:

  • copied
  • read
  • written
  • uploaded
  • downloaded
  • streamed

For example:

  • while reading a file
  • while streaming a video
  • while receiving internet packets
  • while copying data between memory and disk

Buffers help data move smoothly and efficiently.

What Is a Buffer Technically?

<Buffer 4C A1 33 00 00 ...>

A buffer is a block of raw binary data stored in memory.

You can think of it as a list of very small memory units called bytes.

Each item inside a buffer:

  • has exactly 8 bits (1 byte)
  • stores a small piece of data
  • can be read, changed, copied, or written

For example:

4C A1 33 00

Each pair represents one byte of data written in **hexadecimal **format.

Why and What Is Hexadecimal?

We will learn more about hexadecimal later, but for now, here is the basic idea.
Computers internally work with binary numbers:

01001100 01001100 01001100 01001100

But binary is difficult for humans to read and understand quickly.

Imagine looking at thousands of bytes written only with 0s and 1s.
It becomes confusing very fast.

So programmers use hexadecimal instead.

Hexadecimal is simply a shorter and cleaner way to represent binary data.

For example, instead of writing:

01001100

we can write:

4C

Both represent the same data.

Simple Mental Model

Think of a buffer like this:

[ byte ][ byte ][ byte ][ byte ]

Each box:

  • contains 8 bits
  • stores a tiny piece of data
  • together forms larger information

That is the core idea behind buffers.

Build AI Agents with Hot Dev

The Hot Chat web UI showing a streaming reply from the Team Mode agent with the Personal/Team mode toggle visible in the toolbar

Learn how to build AI chat agents with two kinds of memory: one that follows a user across devices, and one shared by everyone in a channel.

Hot Chat is a web chat demo you can clone and start in about 15 minutes, with two AI agents side by side: a Personal Mode agent whose memory is keyed to the user, and a Team Mode agent whose memory is keyed to the channel.

The UI is a Next.js + TypeScript app that talks to Hot through @hot-dev/sdk. The agent layer is built on hot.dev/hot-ai-agent, a reusable Hot package for transports, commands, runtime stores, rendering, streaming, and MCP helpers. Hot Dev itself is open source under Apache 2.0, so everything you see in this post runs on code you can read.

Try It

Before running the demo, install Hot if you don’t already have the hot CLI.

git clone https://github.com/hot-dev/hot-demos
cd hot-demos/hot-chat
hot dev --open                  # terminal 1: both agents
cp .env.example .env            # terminal 2: the UI
# Hot App -> Service Keys -> New Key; paste it into HOT_API_KEY.
# Then add your ANTHROPIC_API_KEY (https://console.anthropic.com/) to .env.
npm install && npm run dev

Open http://localhost:3000. The toolbar switches between the two agents live, no restart needed.

Set ANTHROPIC_API_KEY in .env to get the real, streamed, memory-grounded replies the demo is built around. Without it the UI still loads, but assistant replies fall back to a stub that just says the LLM is disabled. The harness sits on hot-ai, so you can wire a different provider in your own app.

The full walkthrough is at hot.dev/docs/demos/hot-chat.

Two Agents, One Project

Hot Chat ships two agents in one Hot project. They look nearly identical on the surface: same chat UI, same slash commands, same streaming replies.

The difference is how each one scopes memory.

Personal Mode is identity-first. Whatever you tell the agent follows you across sessions, tabs, and devices. Type /remember I prefer launch updates that start with blockers, close the tab, come back tomorrow on a different device, ask /recall, and the same notes are still there.

This is the pattern for assistants, journaling apps, per-user copilots, and anything where memory belongs to the person rather than the conversation.

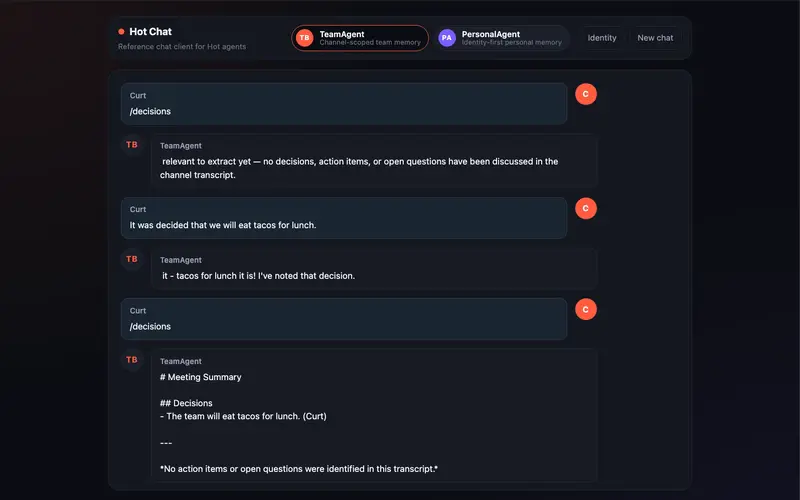
Team Mode is session-first. Memory is keyed to the channel, so two people chatting in the same room share one view, and two channels stay independent. Type “we decided to ship docs before launch”, then “CI is the only blocker”, then /ask what is blocking launch?, and the reply cites the matching records with attribution.

This is the pattern for team chat bots, support inboxes, and shared workspaces.

Concept Team Mode Personal Mode
Session the channel or thread a scratch context per person
Identity the person who posted the durable memory owner
Memory scoped to the session scoped to the user

The Hot Chat web UI showing a streaming reply from the Team Mode agent with the Personal/Team mode toggle visible in the toolbar

Hot Chat, mid-conversation. The toolbar switches between Personal and Team mode live.

Inside the UI

The Hot Chat UI is intentionally generic. It looks like a chat product, not a framework demo. That’s because the experience is the point:

  • Quick-prompt chips help you explore each mode without learning a syntax first. Try Recall preferences, Daily brief, Decisions, or Ask the team.
  • Streaming replies render as the agent generates them. Slash-command replies stream too, identically to LLM responses, so the UI doesn’t have to know which path produced the message.
  • File attachments let you drag in a small notes.md file or screenshot. The agent stores the file name and type as metadata and could be extended to parse contents.
  • Identity controls show the exact session_id and user_id the agent receives, in the same format a Slack or Telegram adapter would generate.
  • Agent Graph in the Hot Dev App shows each slash command as its own typed event handler, so you can see the agent structure without digging through a central dispatch function.

The Hot Dev Agent Graph view for the PersonalAgent demo showing each slash command as its own event handler node connected to the streaming reply outputs

One event handler per command, no central dispatch.

What hot-ai-agent Brings

If you’ve built an AI chat agent before, you’ve probably written some version of this stack:

  • a slash-command parser
  • a way to thread LLM calls through retrieval-augmented memory
  • a streaming reply mechanism
  • per-agent stores for state and stats
  • per-request session and identity bindings so tools know who’s talking

Most chat agents end up reinventing these pieces.

hot-ai-agent extracts that layer. Concretely, it gives you:

  • Typed transport messages: a single IncomingMessage shape that adapters for web, Slack, Telegram, or anything else can translate into. The agent never branches on transport.
  • Slash-command parsing: /ask@MyBot what's up? becomes {name: "ask", arg: "what's up?"}, with the Telegram-style @MyBot suffix stripped.
  • The memory-grounded chat turn: the canonical recall -> persist user -> bind request -> stream -> persist assistant lifecycle in one function call. The order matters; getting it wrong can cause the user’s fresh message to contaminate their own retrieval.
  • Stable streaming events: every agent emits <agent>:reply:start, :delta, and :end events at a stable, agent-scoped label.
  • Per-request session binding: when an LLM tool runs mid-turn, the resolved session and identity are bound to the current agent request.
  • Per-agent stores and a session registry: each agent gets state, stats, errors, and a notification ledger. Scheduled jobs can fan out per session with error isolation.
  • MCP plumbing: expose any agent function as an MCP tool with one annotation, so Claude Desktop, Cursor, and other MCP clients can call into the agent directly.

What it deliberately doesn’t include: transport vendor packages. No Slack, Telegram, or Discord packages are baked in. Those live in the application and translate to the neutral types, which keeps the harness portable and the dependency tree small.

Under the Hood, in One Snippet

When all the harness pieces are in place, an entire chat-style event handler in Hot looks like this:

remember-message
meta {
    agent: PersonalAgent,
    on-event: "personal-agent:remember",
}
fn (event) {
    d        event.data
    sender   identity-from-data(d)
    session  session-from-data(d, sender)
    input    base-input(d, session, sender, Str(or(d.text, "")))
    ::chat-turn/run-chat-turn(turn-cfg, input)
}

That’s the whole handler. Resolve who’s talking, package up the input, and hand off to run-chat-turn.

RAG, persistence, ordering, streaming, request binding, tool dispatch, and error handling sit behind that one call.

Adding a new slash command in your own agent follows the same pattern: one more function, one more on-event annotation.

Where to Go Next

Clone Hot Chat and try swapping the LLM provider, adding a slash command, or wiring a second adapter on top of the same agent. Everything below is open source and free to read.

The Client Onboarding Checklist That Prevents 90% of Project Problems

Most freelance project problems are visible before the project starts.

The wrong clients, unclear scope, missing access credentials, the stakeholder who was not in the initial conversation – all of these create problems later. Most could be caught in the first week with a proper onboarding process.

Before work starts

Signed contract. No exceptions. Nothing starts without one.

Deposit paid. If your terms include a deposit, payment clears before work begins.

Kickoff call scheduled. Not to start work – to confirm alignment.

The kickoff call agenda

Five things to cover:

Who is the final decision-maker? Not who you have been talking to – who has final authority on design decisions, feature priorities, and delivery acceptance. Get this confirmed explicitly.

What does success look like? Ask them to describe the project when it is done and they are happy. Their answer tells you if expectations match scope.

What are the non-negotiables? Specific deadlines? Technologies they cannot use? Things previous developers did that they definitely do not want repeated?

How do they prefer to communicate? Async email, Slack, scheduled calls? Settle this early.

What could make this project harder than expected? Ask directly. Clients often know about complications – internal approvals, data issues, unreliable third-party dependencies – that they forgot to mention.

Post-kickoff: the onboarding document

Send a one-page summary: what we agreed the project is, key milestones, what I need from you and when, my communication schedule, how to reach me.

This confirms alignment and gives both sides a reference if memory differs later.

The access checklist

Before starting technical work, confirm you have:

  • All logins and credentials needed
  • Codebase access if working on existing code
  • Staging/development environment access
  • Design files, brand guidelines, or content if in scope

Discovering on day three that you lack critical access delays projects and frustrates clients.

The one thing that prevents most problems

Most freelance project problems come from mismatched expectations that existed from the beginning and were never surfaced.

The onboarding process surfaces them early, when they are easy to address, rather than late, when they create conflict.

Two hours at the start saves ten hours of conflict management later.

The Freelance Command Center includes a complete client onboarding template and checklist. EUR 17.

Scalable Treasure Hunts Are a Myth, But We Almost Made One

The Problem We Were Actually Solving

As it turns out, we weren’t really solving the problem of scaling our server infrastructure, but rather the problem of our own internal architecture. Our team had designed the system to be modular, with various components communicating with each other over a complex network of message queues and HTTP requests. It was an attempt to apply the microservices pattern to a very specific problem, but ultimately, it just wasn’t working out as planned. The more we tried to scale, the more our performance metrics started to slip. We saw our average 95th percentile latency creep up to 400ms, and our CPU utilization on the web server started to top out at 80%.

What We Tried First (And Why It Failed)

Our first instinct was to try and optimize the database queries on our server. We knew that the database was a major bottleneck, so we went in and started tweaking query plans, indexes, and caching strategies. We even went so far as to rewrite some of the queries from scratch, but it didn’t really make a dent. Our latency started to come down, but only by a few milliseconds, and our CPU utilization kept creeping up. It was clear that the database was just the tip of the iceberg, and that our real problem lay deeper in the system.

The Architecture Decision

It was then that we took a step back and re-evaluated our architecture. We realized that our modular system was actually a hindrance to performance, rather than a help. We were creating unnecessary overhead with all the inter-component communication, and our system was starting to resemble a distributed monolith. We decided to take a different approach – we chose to use a single-threaded, in-memory cache to store our game state, and then use a message queue to handle updates asynchronously. It was a much simpler design, but it turned out to be the key to our performance problem.

What The Numbers Said After

After implementing the new design, we saw a huge improvement in performance. Our average 95th percentile latency dropped to 50ms, and our CPU utilization on the web server came down to 30%. We were able to handle thousands of concurrent users with ease, and our system became much more responsive. We also saw a significant reduction in our allocation count, which was a major pain point for us. Our application was no longer constantly thrashing the CPU and memory, and we were able to remove a bunch of unnecessary caching and queuing code.

What I Would Do Differently

In hindsight, I would have taken a more radical approach to our system design from the start. We were trying to reinvent the wheel with our modular system, when in fact, a simpler design would have been much more effective. I would have also focused on performance testing much earlier in the development cycle, rather than waiting until the last minute. Finally, I would have been more careful about our choice of programming language and runtime. We chose to use Python, which, while a great language, was not the best choice for a system that needed to be highly concurrent. We ended up constantly fighting memory safety issues and performance bottlenecks, which made our life much harder than it needed to be.

Gemini 3.5 Flash Has a 1M Token Context Window. Here’s What You Can Actually Build With It.

This is a submission for the Google I/O Writing Challenge

“1 million token context window” sits in every I/O recap summary. Then people move on.

It sounds like a spec-sheet number — impressive in the abstract, like a car rated for 700 horsepower. Sure. But what road are you actually driving on?

I want to make it concrete. Gemini 3.5 Flash shipped GA at Google I/O 2026. Here’s what 1M context actually unlocks, with working code and one real experiment I ran.

What Shipped

Gemini 3.5 Flash is the first generally available model in the 3.5 series. GA on day one — no preview suffix, stable, ready for production.

Feature Value
Context window 1,000,000 tokens
Max output 65,000 tokens
Thinking Built-in
Speed ~4x faster than frontier models
Pricing $1.50 / 1M input · $9 / 1M output

The benchmark story: 3.5 Flash outperforms Gemini 3.1 Pro across almost all benchmarks, at 4x the speed. That’s the classic Flash bet — you trade some ceiling on niche hard tasks for speed and cost everywhere else.

In my testing: requests that took 8–10 seconds on 3.1 Pro land in 2–3 seconds on 3.5 Flash. At scale, that’s the difference between an interactive tool and a batch job.

Get Started in 3 Minutes

pip install google-genai

Grab a free API key from AI Studio — no billing required to test.

from google import genai

client = genai.Client(api_key="YOUR_API_KEY")

response = client.models.generate_content(
    model="gemini-3.5-flash",
    contents="What's the most underrated pattern in async Python?",
)

print(response.text)

That’s the baseline. Now the part that matters.

What 1M Tokens Actually Lets You Do

One million tokens is roughly 750,000 words. That’s:

  • The entire source code of a medium-sized web app
  • Six months of Slack export from a busy engineering channel
  • A 300-page legal agreement plus all its referenced attachments
  • A full year of support tickets

Previously, reasoning over a full codebase meant chunking it, embedding it, retrieving relevant pieces, and hoping retrieval didn’t miss the thing that mattered.

With 1M context, you just send it. One call. The model sees everything simultaneously.

Bold opinion: Most “RAG pipeline” complexity is a workaround for insufficient context window. 1M tokens doesn’t eliminate RAG entirely, but it eliminates a huge class of retrieval problems for the applications most developers are actually building.

Tutorial: Whole-Codebase Code Review

Here’s a real use case: feed your entire project to Gemini 3.5 Flash and get a structured security review.

import os
from pathlib import Path
from google import genai

client = genai.Client(api_key=os.environ["GEMINI_API_KEY"])

def load_codebase(root: str, extensions: list[str] = [".py", ".ts", ".js"]) -> str:
    parts = []
    for path in sorted(Path(root).rglob("*")):
        if path.suffix in extensions and ".git" not in path.parts:
            parts.append(f"nn### FILE: {path}n")
            parts.append(path.read_text(errors="ignore"))
    return "".join(parts)

codebase = load_codebase("./src")

response = client.models.generate_content(
    model="gemini-3.5-flash",
    contents=f"""You are a security-focused code reviewer.

Review this entire codebase for:
1. SQL injection vulnerabilities
2. Unvalidated user input in system calls
3. Hardcoded secrets or credentials
4. Insecure direct object references
5. Missing authentication checks

For each issue: file path, severity (critical/high/medium/low), what's wrong, suggested fix.

Codebase:
{codebase}""",
)

print(response.text)

One API call. No chunking, no retrieval pipeline, no missed cross-file context.

The model sees api/routes.py and middleware/auth.py simultaneously — it’ll catch a vulnerability that’s only exploitable because a check is missing in auth.py, which chunk-based retrieval would likely miss.

I Tried It: Security Review on UXRay

I ran this on my own project — UXRay, a ~3,000-line Next.js + TypeScript app.

The whole codebase fit in a single call with room to spare. Gemini 3.5 Flash returned:

  • 2 high-severity issues: missing rate limiting on the Playwright screenshot endpoint; base64 image data not sanitized before passing to the subprocess
  • 1 medium: API key readable from client-side bundle under certain Next.js config
  • 3 informational: minor input validation gaps, non-exhaustive error handling

The rate-limiting issue was real and I hadn’t caught it. The client-side key issue was a valid config warning specific to my setup.

Total time: 14 seconds. For a codebase security review I’d normally spend an hour on.

Thinking Mode

Gemini 3.5 Flash has built-in thinking — the model reasons through a problem before producing its answer.

from google import genai
from google.genai import types

client = genai.Client(api_key=os.environ["GEMINI_API_KEY"])

response = client.models.generate_content(
    model="gemini-3.5-flash",
    contents="Design a database schema for a multi-tenant SaaS with row-level security.",
    config=types.GenerateContentConfig(
        thinking_config=types.ThinkingConfig(
            thinking_budget=8192
        )
    ),
)

print(response.text)

The Migration Gotcha Nobody Mentions

If you’re coming from gemini-3-flash-preview, there’s a silent behavior change.

The preview model’s thinking defaulted to high. The GA model defaults to medium. Migrate without setting thinking_budget explicitly and the model quietly uses fewer thinking tokens — faster and cheaper, but less thorough on complex tasks.

Set it explicitly:

# Equivalent to old default (high)
thinking_config=types.ThinkingConfig(thinking_budget=16384)

# Faster/cheaper (new GA default)
thinking_config=types.ThinkingConfig(thinking_budget=4096)

Don’t leave this implicit in production. You will notice the output quality difference on anything that requires multi-step reasoning.

Structured Output (Machine-Readable Results)

The API supports constrained JSON output via response schema. The model outputs valid JSON matching your spec — no parsing heuristics, no regex, no retries.

import json
from google import genai
from google.genai import types

schema = {
    "type": "object",
    "properties": {
        "summary": {"type": "string"},
        "issues": {
            "type": "array",
            "items": {
                "type": "object",
                "properties": {
                    "file": {"type": "string"},
                    "severity": {
                        "type": "string",
                        "enum": ["critical", "high", "medium", "low"]
                    },
                    "description": {"type": "string"},
                    "fix": {"type": "string"},
                },
                "required": ["file", "severity", "description", "fix"]
            }
        },
        "risk_score": {"type": "integer", "minimum": 0, "maximum": 100}
    },
    "required": ["summary", "issues", "risk_score"]
}

response = client.models.generate_content(
    model="gemini-3.5-flash",
    contents=f"Security review:nn{codebase}",
    config=types.GenerateContentConfig(
        response_mime_type="application/json",
        response_schema=schema,
    ),
)

result = json.loads(response.text)
print(f"Risk score: {result['risk_score']}/100")
for issue in result["issues"]:
    print(f"[{issue['severity'].upper()}] {issue['file']}: {issue['description']}")

Validate with Zod, Pydantic, or any schema library and you can render the output directly in a UI without post-processing.

What You Can Actually Build Now

The 1M context + structured output + thinking combination makes a category of applications practical that weren’t before:

Whole-codebase refactoring advisor. Ask for a prioritized list of refactors with cross-file impact analysis. No chunking.

Full contract analysis. A 300-page agreement fits easily. Ask for all clauses that limit liability, conflict with your agreements, or require notice periods — across the entire document at once.

Support ticket patterns. Six months of tickets in one prompt. “What are the top 5 root causes of customer friction?” across all of them.

End-to-end PR review. Send the full diff and the codebase it applies to. The model evaluates whether the change breaks invariants elsewhere, not just whether the diff is internally correct.

Bold opinion: The PR review use case alone justifies integrating Gemini 3.5 Flash into CI. A model that can see the full codebase context when reviewing a diff will catch things that diff-only review structurally cannot — and at 14 seconds, it’s fast enough to be a non-blocking CI step.

Get the API Key

AI Studio → sign in → API Keys → Create. Free tier, no billing required to test.

Model ID: gemini-3.5-flash. No suffix, no preview. That’s the GA signal.

Gemini 3.5 Flash docs at ai.google.dev. Quickstart at Google AI for Developers.

Tags: googleio gemini ai python tutorial

I built a ultra-polished developer portfolio template using React & Tailwind v4 (with zero-JSX configuration)

Hey everyone! 👋

I spent the last couple of days engineering a minimal, premium dark-mode portfolio template for developers who want a high-end web presence (similar to the aesthetic of companies like Stripe or Linear) without spending weeks designing it from scratch.

I wanted to push performance to the absolute limit, so I built it using the latest frontend stack.

⚙️ The Technical Stack

  • Framework: React 18 (Modular Component Architecture)
  • Build Tool: Vite (For instant local hot reloading)
  • Styling: Tailwind CSS v4 (Leveraging the brand-new native lightning compiler plugin)
  • Animations: Framer Motion (Hand-tuned for fluid layouts)

🚀 Check it out!

I’d love to get your feedback on the layout performance, the Framer Motion animation timings, or the Tailwind v4 compilation speeds.

Let me know what you think in the comments below! If you have any questions about upgrading a project to Tailwind v4, drop them here and I’ll help out.

Gemini CLI Is Dead. Here’s the Better Thing That Replaced It

This is a submission for the Google I/O Writing Challenge

I opened my terminal on May 20th, ran gemini, and got a deprecation notice.

Google shipped Antigravity CLI at I/O 2026 — and killed Gemini CLI the same day. If you use Gemini CLI in your workflow, this already affects you. If you’ve never touched either, stick around anyway. The mental model shift here is worth understanding before you need it.

Why Replace Gemini CLI at All?

Gemini CLI was a prompt interface. You send a prompt, you get a response. That’s the whole model.

Antigravity CLI is an agent harness. The primitive isn’t a prompt — it’s a running agent that can spawn sub-tasks, use tools, and keep working while you do something else.

That’s not a rename. That’s a different abstraction.

The migration is clean though: everything that mattered in Gemini CLI carries over. Skills, Hooks, Subagents — all preserved. Extensions are now called Antigravity Plugins, but the concept is identical. If you had Gemini CLI workflows, the port is mechanical.

Install in 30 Seconds

curl -fsSL https://antigravity.google/cli/install.sh | bash
agy --version

No API key prompt during install. Auth happens the first time you invoke an agent. If you have an existing ~/.gemini/ directory, the CLI detects it and imports your Skills automatically.

First Command: agy inspect

Before you run anything, run this:

agy inspect

It shows you everything the CLI sees — config files loaded, Skills available (global and workspace), Hooks wired up, plugins installed. Think of it as git status for your agent environment.

Antigravity CLI v2.0.1

Configuration
  Global config:    ~/.antigravity/config.json
  Workspace config: .agents/config.json (not found)

Skills (global)
  code-review        ~/.antigravity/skills/code-review.md
  commit-message     ~/.antigravity/skills/commit-message.md

Skills (workspace)
  None

Hooks
  None configured

Run it first in any new project. It’ll save you 20 minutes of debugging why a Skill isn’t loading.

Skills: Saved Agent Roles

A Skill is a markdown file that gives the agent a role, tool access, and task framing. A saved system prompt, with metadata.

Create a workspace Skill:

mkdir -p .agents/skills
<!-- .agents/skills/ux-review.md -->
---
name: ux-review
description: Reviews a UI screenshot against Nielsen's heuristics
tools: [read_file]
---

You are a UX analyst. Analyze any UI screenshot against:
- Nielsen's 10 Usability Heuristics
- WCAG 2.1 accessibility guidelines
- Cognitive load principles

Return structured findings: what's working, what's broken, and the specific heuristic being violated.

Invoke it:

agy run --skill ux-review "Review the checkout flow in checkout.png"

Skills in .agents/skills/ travel with the project. Skills in ~/.antigravity/skills/ are global. The community Antigravity Awesome Skills repo has 1,400+ pre-built ones if you’d rather not start from scratch.

Bold opinion: The community Skills library is actually the most underrated thing about this ecosystem. You can drop in a production-grade code-review workflow in 90 seconds. Most people skip it and hand-write prompts forever.

Hooks: Intercept the Agent Loop

Hooks let you fire shell commands at lifecycle moments. Config is JSON:

// .agents/config.json
{
  "hooks": {
    "before_tool_call": [
      { "command": "echo '$TOOL_NAME' >> .agents/tool-log.txt" }
    ],
    "on_loop_stop": [
      { "command": "node scripts/notify.js" }
    ]
  }
}

Available hook points: before_tool_call, after_model_call, on_loop_stop, on_error.

The pattern I use on every project: on_loop_stop writes a summary to a log file, before_tool_call audits tool use so I can see what the agent actually did. Thirty lines of config, total.

Subagents: The Part Gemini CLI Couldn’t Do

This is the actual upgrade.

Gemini CLI was synchronous. You waited. The agent finished. You moved on. Antigravity CLI ships async subagents — dispatch a long-running task to a background agent and keep prompting in the foreground, same session.

From inside the TUI:

> Refactor the auth module to use the new token schema.
  [Dispatching to subagent...]

> While that runs — write a changelog entry for the last 10 commits.

Both run in parallel. The subagent reports back when it’s done.

From the CLI:

# Dispatch a background agent
agy dispatch "Run the full test suite and write a summary to test-report.md"

# Check active subagents
agy agents list

# Pull output from a specific agent
agy agents output <agent-id>

I Tried It: Parallelizing a Real Refactor

Here’s what I actually tested. I had a Next.js project with a type refactor that touched ~40 files.

I dispatched the refactor to a background subagent, then used the foreground agent to write the PR description and update the changelog — simultaneously.

The refactor completed in about 4 minutes. The PR description and changelog were ready before the refactor finished. Total wall-clock time: 4 minutes instead of 8–10 in sequence.

That’s not a benchmark. That’s just what parallel async agents feel like in practice.

Managed Agents: Serverless Version

Don’t want the CLI? There’s an API:

import google.generativeai as genai

genai.configure(api_key="YOUR_API_KEY")

agent = genai.create_agent(
    model="gemini-3.5-flash",
    instructions="You are a code reviewer. Review the diff for correctness and security issues.",
    tools=["code_execution"],
)

result = agent.run("Review this diff:n" + open("changes.diff").read())
print(result.output)

Same agent harness. Same Gemini 3.5 Flash intelligence. Zero local setup. The agent runs in an isolated Linux environment on Google’s infrastructure.

Migration Cheat Sheet

Gemini CLI Antigravity CLI
gemini run agy run
~/.gemini/skills/ ~/.antigravity/skills/
Extensions Plugins (same concept)
gemini inspect agy inspect
Synchronous only agy dispatch for async

Skills files don’t need to change. The biggest behavioral win: agy is built in Go. Startup is noticeably faster than the old CLI.

Bold opinion: The deprecation of Gemini CLI felt abrupt. But Google made the right call — maintaining two separate CLIs with diverging capability models would have been worse for the ecosystem than a clean cut.

What This Is Really About

Gemini CLI was a terminal wrapper around a language model.

Antigravity CLI is a terminal interface for an agent harness. The Skills/Hooks/Plugins model is also cross-compatible with Claude Code, Cursor, and Codex CLI — a Skill you write here works elsewhere.

The transition was abrupt. The thing that replaced it is better.

Antigravity CLI at antigravity.google. Codelabs at codelabs.developers.google.com.

Tags: googleio ai productivity devtools

Post-quantum cryptography for embedded and IoT: secure boot, TLS and OTA

Post-quantum cryptography is no longer just a research topic. It is starting to affect the way embedded teams design TLS, secure boot, OTA, firmware signing, device identity and long-term product maintenance.

NIST has finalized the first post-quantum standards. OpenSSL 3.5 now includes ML-KEM, ML-DSA and SLH-DSA support. The European roadmap points toward a coordinated transition, and embedded vendors are already moving PQC into MCU and firmware workflows.

For connected products that may stay in the field for 10, 15 or 20 years, this is not abstract security theater. It is architecture.

Why embedded teams should care

Embedded products freeze cryptographic choices earlier than many teams expect:

  • bootloader verification logic
  • firmware image and manifest formats
  • OTA package signatures
  • device certificates
  • production PKI
  • secure elements and trust anchors
  • TLS or VPN libraries in Linux gateways
  • update and rollback policies

Once the device is deployed, changing those choices becomes expensive. Sometimes it becomes almost impossible without a carefully designed migration path.

That is the real value of post-quantum planning: not replacing RSA and ECC everywhere overnight, but introducing crypto agility before the product becomes too rigid.

ML-KEM and ML-DSA in plain terms

The two names embedded teams should recognize first are:

  • ML-KEM: a key encapsulation mechanism for establishing shared secrets, especially relevant to TLS and similar protocols.
  • ML-DSA: a digital signature scheme, relevant to secure boot, firmware signing, package signing, certificates and device identity.

For Linux gateways, ML-KEM is often the first practical entry point because TLS stacks can be tested and upgraded more easily than immutable boot chains.

For firmware and boot flows, ML-DSA is very relevant but needs more careful engineering. Signature sizes, verification time, image layout and manifest formats all matter.

Where PQC enters an embedded architecture

Area What changes Why it matters
TLS and networking Hybrid groups, new key establishment, library updates Gateways and edge devices can start testing now
Secure boot Signature verification may need post-quantum readiness Boot chains are hard to change after deployment
OTA Manifests, package signing and rollback policies may need new formats Update reliability and security are part of the same trust chain
PKI Certificates, provisioning and trust anchors need migration planning Device identity is a long-term product dependency
Memory budget Stack, heap, flash and latency must be measured Papers and release notes are not a substitute for target testing

A practical adoption path

Do not turn on PQC everywhere and hope for the best. A healthier path looks like this:

  1. Inventory every cryptographic dependency in the product.
  2. Map TLS, VPN, secure boot, OTA, package signing, certificates and PKI.
  3. Identify code paths that cannot be updated after manufacturing.
  4. Run a Linux gateway pilot with OpenSSL 3.5 or lab tools such as Open Quantum Safe.
  5. Measure ML-KEM and ML-DSA impact on real hardware.
  6. Review image formats, manifests, rollback and recovery paths.
  7. Define a policy for trust anchor rotation and crypto agility.
  8. Move only the justified parts into production.

Example checklist

pqc_embedded_audit:
  lifecycle:
    expected_field_life_checked: true
    non_updatable_signature_verifier_identified: true

  protocols:
    tls_or_vpn_usage_mapped: true
    certificates_and_pki_inventory_done: true

  firmware_chain:
    secure_boot_flow_reviewed: true
    ota_manifest_and_signature_format_reviewed: true
    rollback_and_recovery_paths_verified: true

  implementation:
    hybrid_transition_need_evaluated: true
    stack_heap_flash_measured_on_real_target: true
    latency_variance_measured: true

  operations:
    trust_anchor_rotation_plan_available: true
    crypto_agility_requirements_defined: true
    release_and_support_workflow_documented: true

When PQC makes sense

PQC planning is most useful when the product is:

  • connected
  • updateable
  • deployed for a long time
  • dependent on secure boot, OTA, certificates or secure networking
  • expensive to access physically
  • subject to compliance or long support windows

That makes Linux gateways, edge appliances, industrial IoT devices and remotely maintained firmware platforms natural candidates for early evaluation.

Where to be careful

PQC is not automatically the right move for every MCU or every firmware build.

Very constrained devices may have strict limits around stack, heap, flash, latency or power. Hybrid approaches can help with migration, but they also add complexity and testing cost. The goal is not to put post-quantum algorithms everywhere. The goal is to know where they reduce real product risk.

Final takeaway

Post-quantum cryptography is becoming part of embedded product architecture. The smartest move today is not panic migration; it is inventory, measurement and crypto agility.

Teams that understand their boot chain, OTA process, PKI and field lifecycle now will have a much easier transition later.

Canonical source: Post-quantum cryptography for embedded and IoT: secure boot, TLS and OTA

Silicon LogiX helps teams review embedded Linux, secure boot, firmware signing, OTA and security architecture for connected products.

Understanding Optimistic Preloading in Modern Applications

In modern software development, performance and user experience play a major role in application design. Users expect applications to respond instantly, and even a small delay can impact engagement. One technique used to improve responsiveness is Optimistic Preloading.

What is Optimistic Preloading?

Optimistic preloading is a technique where an application loads data or resources before the user explicitly requests them. The system predicts what the user is likely to do next and prepares the required content in advance.

The term optimistic comes from the assumption that the prediction will most likely be correct.

Simple Example

Consider an e-commerce website:

  • A user hovers over a product link
  • The application silently starts loading the product page in the background
  • When the user clicks the link, the page opens almost instantly

Since the data was already loaded, the user experiences a much faster response time.

Where is it used?

Optimistic preloading is commonly used in:

  • Web applications
  • Mobile applications
  • Video streaming platforms
  • Gaming systems
  • APIs and database queries

Frameworks like React, Next.js, and many modern browsers use similar strategies to improve performance.

Advantages

  • Faster perceived
  • performance
  • Better user experience
  • Reduced waiting time
  • Smoother navigation between pages

Challenges

While optimistic preloading improves speed, it also has some trade-offs:

  • Increased bandwidth usage
  • Additional memory consumption
  • Wasted resources if predictions are incorrect

Because of this, applications must carefully decide what should be preloaded.

Conclusion

Optimistic preloading is a smart optimization technique that helps applications feel faster and more responsive. By prediction user behavior and loading resources in advance, developers can significantly improve the overall user experience.

As applications continue to focus on speed and seamless interactions, techniques like optimistic preloading are becoming increasingly important in modern software development.

Nobody Wants to Read Your Code (And You Don’t Want to Read Theirs)

There is a thing that happens when you join a new codebase. You open a file, read maybe fifteen lines, and then you close it. Not because you understood it. Because you stopped wanting to understand it.

I think about this a lot. We talk about clean code, readable code, well-documented code, as if the problem is always on the writing side. But the reading side has its own psychology and almost nobody talks about it honestly.

Reading someone else’s code is uncomfortable in a way that is hard to name. It is not just that the logic is unfamiliar. It is that you are stepping inside someone else’s head. Their assumptions are baked into every variable name. Their shortcuts make sense only if you know what they were rushing toward. Their weird choice of a for loop where a while loop would feel more natural is probably the result of a bug they fixed at 11pm six months ago and never bothered to refactor. You are not reading code. You are reading a person.

And most of us are not trained for that. We are trained to write, to produce, to ship. Reading feels passive. Reading someone else’s bad code feels like losing. Reading someone else’s good code feels even worse because then you have to sit with the fact that you would not have done it that way and you are not sure if your way is actually better.

There is also the time problem. When you write code, you have context. You know what the function is for, what came before it, what will come after. When you read, you have to build that context from scratch and the codebase usually does not help you. Comments are either missing or lying. Variable names like data and result and temp are everywhere. The folder structure made sense to the person who created it and to nobody else.

So you do what most people do. You read just enough to do your task. You make your change in the one file you actually understand. You submit your PR and you move on.

The problem is that this pattern compounds. The person after you does the same thing. And the person after them. Over time the codebase becomes a city where everybody knows their own neighborhood and nobody knows the roads in between. When something breaks in the space between neighborhoods, it takes three people and a long afternoon to figure out why.

I do not think the solution is to force people to read more code through code reviews or documentation requirements. Those things help but they do not fix the underlying discomfort. The discomfort is real and it deserves to be taken seriously.

What has actually helped me is reading code the way I read a book I am not enjoying. Not to finish it. Not to extract every piece of information. Just to follow one thread. Pick one function. Understand what it calls. Understand what calls it. Stop there. Do that a few times over a few days and the codebase starts to feel less like a foreign country.

The other thing that helps is accepting that confusion is not a sign of failure. The confusion you feel when you open an unfamiliar file is the same confusion the person who wrote it felt when they started. They just had more time. Time is the only real difference between a file that makes sense and one that does not.

We should probably talk more openly about how hard reading code actually is. Not as a complaint but as an acknowledgment. It is a skill that takes practice and patience in a field that rewards speed. That tension is not going anywhere. Might as well be honest about it.