Quark’s Outlines: Python Traceback Objects

Quark’s Outlines: Python Traceback Objects

Overview, Historical Timeline, Problems & Solutions

An Overview of Python Traceback Objects

What is a Python traceback object?

When you run a Python program and an error happens, Python shows you a stack trace. A stack trace shows where the error came from. It tells you what function failed and which line caused it. A Python traceback object holds that information.

Each traceback object shows one step in the chain of function calls that led to the error. Python builds this chain as it unwinds the stack. The traceback includes the function’s frame, the line number, and the bytecode instruction that failed.

Python lets you examine what went wrong using traceback objects.

import traceback

try:
    1 / 0
except ZeroDivisionError as e:
    tb = e.__traceback__
    print("Line:", tb.tb_lineno)

This traceback shows the line where the error happened. You can follow it to see how Python reached that point.

What does a Python traceback object contain?

A traceback object stores the frame that was active at the time of the error. It also stores the line number and the last instruction run in that frame. If there were more calls before the error, the traceback links to the next earlier traceback using tb_next.

You can think of a traceback as a trail of breadcrumbs that shows how the program moved from one function to the next before it failed.

Python traceback objects form a chain of frames leading to the error.

def a():
    b()

def b():
    1 / 0

try:
    a()
except ZeroDivisionError as e:
    tb = e.__traceback__
    print("Error in:", tb.tb_frame.f_code.co_name)

This prints the name of the function where the error happened. You can also walk backward using tb_next.

A Historical Timeline of Python Traceback Objects

Where do Python’s traceback objects come from?

Python traceback objects follow the idea of stack traces from earlier programming tools. They allow you to see what went wrong and where. This timeline shows how traceback support in Python grew over time.

People invented ways to trace error locations

1960 — Stack trace messages first appeared in debugging tools for compiled languages.

1970s — Structured error reporting became common in tools for ALGOL and Pascal.

People designed traceback support in Python

1991 — Python added exceptions and built-in stack traces for all uncaught errors.

1994 — Traceback module added to let users walk through exceptions by hand.

2000 — __traceback__ attribute added to exceptions to hold traceback objects.

2010 — Chained exceptions allowed Python to preserve traceback links across raise from.

2020 — Traceback access improved in tools like traceback.TracebackException for structured error analysis.

Problems & Solutions with Python Traceback Objects

How do you use Python traceback objects the right way?

Python traceback objects help you see where an error started, where it happened, and what Python was doing. When an error happens, Python builds a traceback. This traceback helps you trace the flow of execution and fix the problem. Each of these problems shows how to use traceback objects in real code.

Problem: How do you get the line where an error occurred in Python?

You are running some code that raises an error. You want to find the exact line number where the problem happened. You want to get that number from Python, not by reading the stack trace on screen.

Problem: You need to get the line number of the error programmatically.

Solution: Python traceback objects give the line number using tb_lineno.

Python lets you read the error line number from a traceback object.

try:
    int("nope")
except ValueError as e:
    tb = e.__traceback__
    print("Line number:", tb.tb_lineno)
# prints:
# Line number: 2

The tb_lineno attribute gives you the exact line where Python stopped with an error.

Problem: How do you find the function where the error happened in Python?

You are debugging a complex program. You want to know which function caused the error without reading the full traceback printout.

Problem: You want the name of the function where the error occurred.

Solution: Python traceback objects include the frame, which has the code object and its name.

Python lets you get the function name from the traceback’s frame.

def crash():
    return 1 / 0

try:
    crash()
except ZeroDivisionError as e:
    tb = e.__traceback__
    print("Function:", tb.tb_frame.f_code.co_name)
# prints:
# Function: crash

The frame tells you which function was running when the error happened.

Problem: How do you follow all the steps that led to an error in Python?

You are debugging a failure that goes through several functions. You want to walk back through all of them and see which path Python took.

Problem: You need to trace the full call stack leading to an error.

Solution: Python traceback objects form a chain using tb_next.

Python lets you walk the full traceback using tb_next.

def a():
    b()

def b():
    c()

def c():
    1 / 0

try:
    a()
except ZeroDivisionError as e:
    tb = e.__traceback__
    while tb:
        print("Function:", tb.tb_frame.f_code.co_name)
        tb = tb.tb_next
# prints:
# Function: c
# Function: b
# Function: a

You can walk the call chain backwards from the point of error using the tb_next link.

Problem: How do you print a traceback yourself in Python?

You are writing a tool that logs errors to a file. You want to include the full stack trace, not just the error message.

Problem: You want to format and print the traceback manually.

Solution: Python has a traceback module that can format tracebacks from objects.

Python lets you print full tracebacks using the traceback module.

import traceback

try:
    open("/this/does/not/exist.txt")
except Exception as e:
    traceback.print_tb(e.__traceback__)
# prints:
#   File "example.py", line 3, in <module>
#     open("/this/does/not/exist.txt")

This gives you a clean traceback without exiting the program.

Problem: How do you access traceback information from outside an except block in Python?

You are running code in a notebook or tool. You want to access the last traceback after the program stops. You did not save the error at the time.

Problem: You want to read the last exception traceback after the program ends.

Solution: Python keeps the last traceback in sys.last_traceback when run interactively.

Python lets you access the last traceback using the sys module.

import sys

# Only works in interactive mode:
# sys.last_traceback

This lets you recover traceback details even if the program already stopped. It only works if Python is running in interactive mode and the error was uncaught.

Like, Comment, Share, and Subscribe

Did you find this helpful? Let me know by clicking the like button below. I’d love to hear your thoughts in the comments, too! If you want to see more content like this, don’t forget to subscribe. Thanks for reading!

Mike Vincent is an American software engineer and app developer from Los Angeles, California. More about Mike Vincent

Ghost in the Stack (Part 1): Why uninitialized variables remember old data

Have you ever written a C program, run it, and watched it print values you never assigned?
At first glance, it feels almost as if old data is haunting your program from beyond a function call, but what is happening under the hood is far more interesting:

  • stack frame reuse

  • compiler behaviour

  • memory persistence

  • and the performance tradeoffs built into modern systems

In this series, we’ll go from high-level C code into stack frames, assembly instructions, and eventually real-world security implications.
Today, in Part 1, we investigate one of the most common low-level surprises in C: uninitialized local variables appearing to “remember” old values.
Consider the following program:

#include <stdio.h>
void Subtraction()
{
    int a = 100;
    int b = 35;
    int c = a - b;
}
void PrintValues()
{
    int i, j, k;
    printf("First value is %dnSecond value is %dnThird value is %dnThese are the values for PrintValues functionn", i, j, k);
}
int main()
{
    Subtraction();
    PrintValues();
    return 0;
}

If we compile without optimization: gcc -O0 main.c, we may observe output similar to this:

First value is 100
Second value is 35
Third value is 65
These are the values for PrintValues function

At first glance, this looks impossible. PrintValues never initializes its variables. So why does it print the exact same values previously used by Subtraction()? Important Warning: This is undefined behaviour
Before going deeper, we need to clarify something important.
Reading uninitialized local variables in C is undefined behaviour.
That means:

  • the C standard does not guarantee what happens

  • different compilers might behave differently

  • optimization levels may change the result

  • future executions may produce different outputs
    The behaviour shown above is simply one possible outcome observed under a particular compiler configuration.

The Dirty Whiteboard Analogy

To understand what’s happening, forget the code for a moment. Imagine RAM as a whiteboard in a shared classroom. First teacher (Subtraction()). A math teacher walks into the room and writes: 100, 35, 65 on the whiteboard. After class ends, she leaves without erasing anything, because erasing takes time. For a brief moment, the room is empty. The writing is still visible. Nothing has overwritten it yet. Second teacher (PrintValues()). A history teacher enters the room immediately afterward. Instead of writing anything new, he simply reads whatever is already on the board. At a high level, this resembles what happens with stack memory. When a function returns, typical compiled code does not automatically erase the stack bytes previously used for local variables. Instead:

  • the stack space becomes available for reuse

  • old data often remains there temporarily

  • another function may reuse the same stack offsets
    If the new function reads memory before writing new values, it may accidentally observe leftover bytes from an earlier stack frame.

INSPECT THE ASSEMBLY FOR SUBTRACTION()

Let’s inspect the assembly generated for Subtraction(). Below is the disassembly produced by GDB on x86-64:

push %rbp
mov %rsp,%rbp
sub $0x30,%rsp
movl $0x64,-0x4(%rbp)
movl $0x23,-0x8(%rbp)
mov -0x4(%rbp),%eax
sub -0x8(%rb),%eax
mov %eax,-0xc(%rbp)
mov -0xc(%rbp),%ecx
mov -0x8(%rbp),%edx
mov -0x4(%rbp),%eax
add $0x30,%rsp
pop %rbp
ret

push %rbp – Save the base pointer onto the stack
mov %rsp,%rbp – Set the stack pointer as the base pointer.
sub $0x30,%rsp – Allocate 48 bytes of space on the stack
movl $0x64,-0x4(%rbp) – Store 100 into the first 4 bytes on the stack
movl $0x23,-0x8(%rbp) – Store 35 into the second slot
mov -0x4(%rbp),%eax – Load 100 into the eax register
sub -0x8(%rbp),%eax – Subtract 35 from eax, the result remains in eax
mov %eax,-0xc(%rbp) – Move the result from the register to memory
mov -0xc(%rbp),%ecx – Move to register
mov -0x8(%rbp),%edx – Move to register
mov -0x4(%rbp),%eax – Move to register
add $0x30,%rsp – Clean up allocated stack space
pop %rbp – Restore the previous stack frame
ret – Return control to the caller
After the function returns, the stack frame is released. The stack pointer simply moves back, making that region available for reuse. The previous values often remain there temporarily until another operation overwrites them. Typically compiled code does not automatically clear old stack contents because doing so would introduce additional instructions and reduce performance.

ENTER PrintValues()

Now let us examine the beginning assembly code generated for PrintValues()

push %rbp
mov %rsp,%rbp
sub $0x30,%rsp
mov -0xc(%rbp),%eax
mov -0x4(%rbp),%edx
mov -0x8(%rbp),%ecx

Notice something very important. PrintValues() allocates a very similar stack layout. So this instruction:
mov -0x4(%rbp),%eax means read whatever bytes that exists here. If those bytes still contain leftover data from Subtraction(), then PrintValues() may appear to “remember” the earlier values.
This teaches something deeper than uninitialized variables are dangerous. It reveals an important systems principle: memory is reused, not automatically cleaned.

Building a High-Performance Local Chess Assistant Extension with WebAssembly Stockfish and Manifest V3

Hey everyone! 👋

I wanted to share a project I’ve been working on recently: Knight – Chess Helper. It’s an advanced browser extension designed to assist and analyze chess games on Chess.com entirely locally and in real-time.

Building a tool like this within the constraints of modern browser security policies (Manifest V3) was a massive technical challenge, and I’d love to walk you through how I solved it.

👉 Check out the full repository here: https://github.com/physicalaff/Knight-Chess-Helper

🛠️ The Technical Challenge: Bypassing CSP & Sandboxing

Modern platforms like Chess.com use very strict Content Security Policies (CSP). You cannot simply inject an external engine script or make third-party server calls to evaluate a board position without triggering security blocks.
To solve this, Knight runs entirely offline and locally using a multi-layered Manifest V3 messaging system:

The Core Logic: Powered by an optimized local Stockfish WebAssembly (WASM) engine.
The Bridge: Since Manifest V3 background service workers don’t support heavy WASM environments directly in some configurations, the extension utilizes Chrome’s Offscreen Document API (and native background workers in Firefox) to run the engine inside an isolated, secure offline process.
The UI Layer: A premium, custom glassmorphic dashboard panel injected directly into the active tab that updates hints instantly on click with zero cooldown.

🧠 Emulating Human-Like Behavior

One of the most interesting parts of this project was moving away from “robotic” engine play. To make the assistant truly feel like a human companion, I implemented mathematical models to simulate organic human flaws and constraints:
Mouse Movement 2.0: Generates smooth Bezier curves with simulated physical hand micro-tremors.
Emulated Fatigue: Thinking times automatically scale and slow down by 2.5% per turn as the game progresses past move 15, mimicking natural mental exhaustion.
Calculated Misclicks: A built-in small percentage chance to click a neighboring square first, pause in hesitation, cancel, and then correct the move.
Opening Book Integration: Automatically fetches and executes the first 14 half-moves smoothly using the Lichess Masters Database.
🎨 Advanced Presets & ELO Scaling

The extension features a mathematically calibrated preset matrix. Users can manually scale the assistant from 1000 to 1500 ELO, which dynamically adjusts engine depth, mistake chances, blunder rates, and average thinking variance in real-time.
There is even a hidden ZXC / Shadow Fiend Mode that overhauls the entire UI into a dark-matte neon-red design, complete with an active animated avatar and audio synchronization.

📂 Source Code & Feedback
The project is completely open-source and licensed under the MIT License. If you are interested in Chrome Extension development, WebAssembly integration, or advanced content script messaging, feel free to check out the codebase!
⭐ Repository: https://github.com/physicalaff/Knight-Chess-Helper
I would highly appreciate your feedback, code reviews, or a ⭐ on GitHub if you find the architecture interesting! What do you think about running heavy WASM engines directly inside browser extensions? Let’s discuss in the comments!

Breaking the Trade-off Between Self-Custody and Intelligent Automation on the Stellar Network

choose between two fundamentally flawed options. On one hand, centralized, custodial platforms offer convenient automation tools, trading bots, and 24/7 market monitoring—but they require users to surrender their private keys, exposing them to catastrophic counterparty risk. On the other hand, non-custodial solutions provide true financial sovereignty, but they demand constant manual oversight, leaving capital idle and vulnerable to emotional, heat-of-the-moment decision-making.

To eliminate this friction and optimize capital efficiency specifically within the Stellar (XLM) ecosystem, we created Krisfi: a secure, non-custodial wallet tightly integrated with a server-side automated execution engine built for data analysis and capital protection.

The Core Problem: Idle Capital and Emotional Friction

Most decentralized finance (DeFi) users face the same recurring pain points every day:

Capital Inefficiency: Assets sit dormant in wallets without any active yield or optimization strategy.

Emotional Trading: Buying and selling driven by short-term market noise, fear of missing out (FOMO), or panic selling (FUD).

Time Constraints: The physical impossibility of monitoring spreads, liquidity pools, order books, and price action 24/7.

The Custody Trap: Forcing users to trust third-party multi-sig or custodial bots just to execute basic automated strategies.

The Krisfi Approach: Total User Sovereignty, 24/7 Server-Side Execution

Krisfi bridges the gap by ensuring users never have to compromise on security for efficiency. The architecture decouples key ownership from trade execution. While the user retains absolute control of their cryptographic keys, the automated engine runs on a dedicated cloud infrastructure (VPS) 24/7—executing strategy parameters even when the user’s device or browser is completely offline.

  1. True Non-Custodial Architecture

Sovereignty is mathematically guaranteed. Krisfi wallets are generated or recovered using a standard 12-word seed phrase. The system leverages enterprise-grade encryption within the server vault to securely sign authorized transactions, but the seed phrase never belongs to Krisfi. Users can import their 12 words into any other Stellar-compatible interface at any second to access their funds independently.

  1. Data-Driven Execution Engine

Moving away from speculative “black-box” trading algorithms or fake guaranteed returns, Krisfi operates on strict statistical advantages. Before executing any network operation, the engine analyzes live Stellar network metrics:

Recent price corrections combined with historical recovery velocity.

Real-time volume and order book depth to mitigate low-liquidity traps.

Bid-ask spreads across selected assets.

Micro-transaction costs (the bot simulates Stellar network fees and slippage, triggering an execution only when net expected profit outweighs the friction overhead).

  1. Dynamic Liquidity Management

Capital preservation is the ultimate goal. When market conditions lack a clear statistical edge, capital remains unexposed or is routed to stable, compatible yield strategies. The engine dynamically calculates pool risks, entry/exit fees, and the threat of impermanent loss, ensuring liquid capital is always ready to deploy when market corrections present optimal entry points.

Security Engineering and Risk Transparency

What sets Krisfi apart is its commitment to radical transparency. In an industry flooded with deceptive marketing, Krisfi explicitly states its boundaries: there are no promises of guaranteed profits. The crypto market is volatile; therefore, the software focuses on algorithmic discipline, fractional purchasing, strict asset limits, and the automatic pruning of underperforming tokens.

From a technical perspective, the platform implements a strict Defense in Depth security model:

Absolute separation between the user interface (frontend) and the execution logic (backend).

Hardened server vaults for encrypted session management.

Rigorous Stellar address, Memo, and smart contract validation layers.

Infrastructure fortified with advanced security headers, strict CORS controls, rate limiting, and comprehensive technical logging.

The Development Roadmap

Krisfi is being deployed in clear, methodical phases, prioritizing infrastructure maturity and security audits before scaling:

Phase 1 (Foundation): Core Stellar wallet infrastructure, featuring secure seed-phrase generation/recovery, live balance tracking, and native withdrawals.

Phase 2 (Automation): Deployment of the 24/7 VPS execution engine, transaction ledger history, and a mobile-optimized management dashboard.

Phase 3 (Optimization): Internal per-asset performance reports, automated asset pruning, and dynamic weight allocation strategies.

Phase 4 (Scale): Multi-wallet infrastructure support and distributed cloud architecture for maximum uptime.

Phase 5 (Hardening): Comprehensive external security audits, full systems hardening, and public ecosystem expansion.

Conclusion

Krisfi was engineered to serve as a clean, reliable, and transparent infrastructure layer for the next generation of DeFi users. By combining the unyielding security of self-custody with the relentless discipline of automated code, Krisfi gives Stellar network investors the ultimate tool: peace of mind over their keys, and machine efficiency over their capital.

Review the complete technical specification and read the full whitepaper at: whitepaper.krisfi.com

I Open-Sourced a Practical Fullstack Interview Preparation Repository (React + Node + System Design)

I’ve taken and conducted software engineering interviews over the years, and one thing became obvious:

Most interview prep resources don’t reflect real-world engineering.

You’ll find textbook definitions, toy examples, and outdated patterns—but very little around production debugging, architecture tradeoffs, scalability, and practical interview thinking.

So I started building an open-source Fullstack Interview Prep repository:

https://github.com/akshayit/fullstack-interview-prep

The goal:
Create something useful for interns, freshers, mid-level engineers, and senior developers.

Topics include:

JavaScript / TypeScript
React / Next.js
Node.js
SQL / MongoDB
DevOps basics
System Design
DSA
Production engineering concepts

This is a living project, and I’d love community feedback.

🚀 How I Started Coding as a Student (Beginner-Friendly Guide)

Starting coding as a student can feel confusing at first. I also felt the same when I began, but step by step, everything became easy. In this blog, I will share my simple journey and how you can also start coding from zero.

👨‍💻 Step 1: I Started with Basics

At the beginning, I didn’t know anything about programming. So I started with:

HTML (for web structure)
CSS (for design)
Basic JavaScript (for logic)

These three languages helped me understand how websites work.

📚 Step 2: I Learned from Free Resources

I didn’t buy any expensive course. I used:

YouTube tutorials
Free websites
Practice websites

I practiced daily instead of just watching videos.

🧠 Step 3: I Focused on Practice

Watching is not enough. I started building small projects like:

Simple calculator
To-do list
Personal portfolio website

This helped me improve very fast.

My Advice for Beginners

If you are a student and want to start coding:

Don’t rush
Practice daily
Build small projects
Be consistent

Coding is not hard, it just needs patience.

WordPress vs. Ghost: Why Automated Bot Attacks Are Making us think much

Characterisctics of ghost

If you run a self-hosted website, your server logs probably look like a digital battleground. Every single day, thousands of automated bots crawl the internet looking for one specific target: WordPress.

If you check your server logs, you will often see lines exactly like these:

162.158.87.119:0 – “GET /wp-admin/install.php?step=1 HTTP/1.0” 404
2026-05-23 11:46:22,634 INFO [elliotsec.http] request_id=f76d4be342ef method=GET path=/wp-admin/install.php status=404 client=162.158.87.119 duration_ms=1.47

Even if you don’t use WordPress, bots will relentlessly probe your server for folders like /wp-admin/ or /wp-login.php.

For a personal website or blog, this constant barrage raises a massive question: Is WordPress still worth the security headache, or is it time to switch to a modern, secure alternative like Ghost?

1. The Reality of WordPress Vulnerabilities

WordPress powers over 40% of all websites on the internet. Because it is so ubiquitous, it is the number one target for hackers. It isn’t necessarily that the core WordPress code is inherently broken, but rather its ecosystem:

The Plugin Trap: Most WordPress sites rely on dozens of third-party plugins and themes. If just one developer forgets to patch a loophole, your entire site is compromised.

Legacy Code: WordPress has been around for over two decades. It carries a massive amount of old code to ensure backward compatibility, which inherently leaves a larger surface area for bugs and exploits.

2. How Automated Bot Scans Can Hack You Instantly

The logs you see above aren’t human hackers sitting at a desk typing commands into your site. They are automated attack scripts (or “scanning bots”) running 24/7.

[Attacker Botnet]
│
├─► Scans IP range for common paths (e.g., /wp-admin/install.php)
│
├─► Checks if page exists (Status 200) or is missing (Status 404)
│
└─► If found: Automatically injects known exploit code to take over the site

  1. Targeting: The bot crawls millions of IP addresses looking for standard WordPress paths (like /wp-admin/install.php or vulnerable plugin folders).

  2. Fingerprinting: If the server returns a 200 OK instead of a 404 Not Found, the bot knows it has found a WordPress site. It will then instantly check the site’s source code to see what version it is running.

3.Automatic Execution: If your site is running an outdated version of WordPress or a plugin with a known vulnerability, the bot executes a pre-written script. Within seconds, it can inject malicious code, install a backdoor, steal data, or turn your server into a spam bot.

3. Why Ghost is Better for Personal Websites

If you just want a fast, clean, and highly secure personal website or blog, Ghost is fundamentally better designed for the modern web.

Here is why switching to Ghost eliminates most of the anxiety shown in your server logs:

A Near-Impenetrable Attack Surface

Unlike WordPress, Ghost does not use a massive network of unvetted, third-party PHP plugins to get basic functionality. Features like SEO optimization, newsletter distribution, membership management, and social sharing are built directly into the Ghost core by professional engineers. Fewer moving parts means fewer doors left open for hackers.

Characterisctics of ghost

Modern, Secure Technology Stack

WordPress runs on PHP, a language notoriously difficult to secure perfectly at scale. Ghost is built on Node.js and handles routing much more cleanly. Because automated scripts are overwhelmingly programmed to look for PHP vulnerabilities, Ghost sites completely bypass the vast majority of blind bot storms.

Lightweight and Fast

In your logs, you might notice your memory hovering around critical limits:

mem avail: 300 of 961 MiB (31.22%)

WordPress is incredibly resource-heavy. Database queries, heavy plugins, and bulky themes eat up RAM quickly, leaving your server sluggish or prone to crashing when bots hit it hard. Ghost is incredibly lightweight. It handles traffic spikes efficiently and uses a fraction of the system memory that a standard WordPress setup requires.
10$ VPS all what you need. I use kamatera.com

Summary: Making the Right Choice

WordPress is great if you are building a complex e-commerce store or a massive corporate directory that requires highly specific integrations.

But if your goal is to share your thoughts, build a portfolio, or publish articles securely without checking your server logs in fear every morning, Ghost wins by a landslide. It removes the background noise of internet bot attacks and lets you focus on what actually matters: writing.

For more insights on web development, security, and hosting tech, check out Gwing Articles.

I tested 4 AI agent-governance tools against an open spec – here’s the matrix

The scenario

Your AI agent just deleted a customer record. Three months later, an auditor asks you to prove:

  • What tool actually ran (not “the agent made a deletion call” — the precise tool, version, and capability)
  • With what arguments (the exact customer ID, scoped fields, options — byte-for-byte)
  • Who approved it (which human, or which automated policy rule)
  • Against which version of which policy (the literal policy bundle the runtime evaluated, not “the policy at the time, probably”)
  • Whether it actually succeeded (not “we said allow”, but “the downstream system confirmed the row is gone”)

You open your audit log.

It says: delete_customer approved, run_id=xyz, decision=allow. The arguments are in a different table. The policy version isn’t recorded anywhere — you’d have to git log your settings file. The execution outcome lives in your application logs, which roll over after 30 days. And the auditor has no way to verify any of this without an engineer walking them through every join.

This gap shows up the moment an agent does something consequential and a non-engineer needs to understand what happened. It’s the same gap regardless of which framework you used. Approval is not proof.

What’s actually missing

The pattern across every agent-governance tool I looked at is the same: they’re built around the decision (allow / deny / require-approval) and treat the action itself as an implementation detail. So the audit log records “the policy fired” but not a single record carrying everything a third party needs to reconstruct what actually happened.

A useful audit artifact has to survive the following:

  1. It can be verified without trusting the runtime that produced it. If your auditor has to call your engineers to interpret the log, the log is testimony, not evidence.
  2. The arguments and the decision are cryptographically bound. If args mutate between approval and execution, the audit must show it.
  3. The policy version is in the record. Not “the policy at the time” — the literal bundle identifier.
  4. The execution outcome is in the record. Approval ≠ execution. Both belong in the same artifact.
  5. The chain of receipts is tamper-evident. Deleting a row from history must break something a verifier can detect.

A receipt that does all five becomes a single evidence record you can hand to an auditor, regulator, insurer, or a compliance team six months later — without them needing access to your database, your cloud creds, or your engineering team.

What I built

AgentBoundary is an open spec for that kind of receipt. v0.1 is stable; v0.2-alpha (draft) adds the optional provenance block and singly-linked chain shown in the example below. Same JSON document, deterministic schema, hash-bound to its arguments.

Here’s one a Discord agent I run in production emitted on 2026-05-21 — it files GitHub issues on behalf of users:

{
  "version":      "agentboundary/v0.2-alpha",
  "receipt_id":   "f04df972-f9fc-4624-83cb-0ed3682297cf",
  "issued_at":    "2026-05-21T06:54:39.251Z",

  "actor": {
    "type":         "agent",
    "id":           "agent:jambot:discord:user:aa74fa40751b528f"
  },

  "tool":   { "name": "github-rest", "version": "2022-11-28", "capability": "github.issues.create" },
  "target": { "system": "github.com/jamjet-labs/jamjet-discord-bot", "environment": "prod" },

  "arguments_hash":  "2d257d4e72f62afa112766154b9b5ac0dd98ae79ee7c2758563a4363a0fb4bdf",
  "policy":          { "name": "jambot.file-issue.v1", "version": "1", "decision": "allow" },
  "execution":       { "status": "success", "completed_at": "2026-05-21T06:54:40.103Z", "result_ref": "github://issues/1" },

  "prior_receipt":      { "receipt_id": "cab5eff7-…", "receipt_hash": "3e7f5a93…" },
  "completeness_score": 0.913,
  "receipt_hash":       "..."
}

A verifier with only this JSON — no database, no Fly.io credentials, no GitHub token, no Discord session — can run six independent checks:

  1. Tamper-evidence. Re-canonicalise the body without receipt_hash, take SHA-256, confirm it matches the stored hash.
  2. Argument binding. Re-canonicalise the arguments separately, take SHA-256, confirm it matches arguments_hash. If anything mutated between approval and execution, this fails.
  3. Spec compliance. Fetch the public JSON Schema, validate the receipt structurally.
  4. Chain integrity. Fetch the receipt at prior_receipt.receipt_id and confirm its hash matches the link.
  5. Emitter honesty. Recompute completeness_score from the provenance block using the deterministic formula in the spec. Catches an emitter that lies about how confident it was in each field.
  6. Execution proof. Follow execution.result_ref to a real downstream artifact (in this case, a public GitHub issue) and read it.

How existing tools do against the bar

I built one adapter per vendor — translating their normative artifact (or, where they don’t have one, the developer-recommended capture shape) into an AgentBoundary v0.2-alpha receipt. Then I ran all 40 conformance scenarios against the adapter-produced receipts.

Vendor PASS PARTIAL DOCS-ONLY NOT COVERED N/A
JamJet reference 40 0 0 0 0
Anthropic permission_policy 12 9 3 14 2
Cloudflare HITL Agents 5 7 1 25 2
LangSmith Gateway 15 14 1 8 2
Microsoft AGT 17 5 1 15 2

Reference implementation first; vendors alphabetical. Not ranked. The PASS counts collapse meaningful categorical differences. Each vendor is solving for a different layer of the stack:

  • Anthropic’s permission_policy is the richest runtime evaluation pipeline of the four — layered hooks, scoped tool patterns, permission modes, the canUseTool callback. But the audit log from Anthropic’s Managed Agents Console isn’t a published schema, so there’s no portable artifact a third party can verify. That’s why 3 DOCS-ONLY (highest of any vendor) and 14 NOT COVERED.
  • Cloudflare HITL is a workflow primitive — durable approval gates with multi-day windows and external notifications. It’s deliberately not an emitted-artifact format. The 25 NOT COVERED reflects that their recommended audit table is 6 columns and doesn’t model the things conformance is asking about.
  • LangSmith is an observability platform. The Run object captures the data, but where in the Run varies by team convention — one team puts the decision in tags, another in feedback_stats. A cross-team auditor can’t reliably extract it. That’s why 14 PARTIAL.
  • Microsoft AGT is the closest peer — also an artifact format, also designed for verifiable evidence, with a Merkle-chained audit log that’s structurally stronger than AgentBoundary’s current singly-linked design. The 15 NOT COVERED rows are deliberate scoping decisions, not bugs.

Per-vendor breakdowns with structural reasoning live in adapters/<vendor>/results.md in the public repo.

Where AgentBoundary itself currently falls short

The reference implementation scoring 40/40 against its own spec is the implementation grading itself. That’s meaningful but not sufficient.

  1. JamBot’s emitter mutates receipts on approval-finalize. When a maintainer approves a held action, the existing row’s execution.status is updated in place and receipt_hash is recomputed — which breaks chain links from any later receipt whose prior_receipt.receipt_hash was captured before the mutation. Fix queued for v0.2.
  2. The chain is singly-linked, not Merkle. AGT’s design (every entry commits to every preceding one) catches arbitrary-entry-reordering attacks that v0.2-alpha would miss. v0.3 candidate.
  3. provenance is a 3-value enum where AGT has a float [0.0, 1.0]. Simpler to reason about, coarser in practice. v0.3 candidate if practitioner feedback warrants it.
  4. No second non-reference implementation yet. Only one production deployment (JamBot). A second emitter in Rust, Go, or Java would validate the spec is implementation-portable.

These are also in the report’s §8.

Run the suite yourself

npx agentboundary run scenarios/
# or
uvx agentboundary run scenarios/

60 seconds on a clean machine. No signup, no Docker, no account. Scenarios are at jamjet-labs/agentboundary/scenarios. If your results disagree, open an issue with the exact command and your environment — the suite is reproducible; if it isn’t on your machine, that’s a bug.

What I want from this post

  • If you maintain an agent-governance product and any of the per-scenario mappings are wrong: open a PR against adapters/<your-product>/. Right-to-respond issues are filed against all four vendors; windows close 2026-05-28 to 2026-05-30 and corrections are folded in inline.
  • If you’re integrating agents into a regulated stack (finance, healthcare, infrastructure ops): try the suite against your own runtime. Emitting an AgentBoundary receipt from your existing audit log is usually a few hundred lines.
  • If you already have an audit format: map one of your real audit rows to the conformance scenarios and open an issue where the suite misrepresents your model. Concrete corrections are far more useful than general feedback. AGT and AgentBoundary’s design centres are complementary; the two specs could reasonably converge.

Full report with the per-vendor deep-dives at jamjet.dev/blog/agent-action-control-40-tests. Canonical archive on the spec microsite at agentboundary.jamjet.dev/reports/2026-05-comparative.

Spec is Apache 2.0. Implementations welcome.

zkML Inference Proof: What the Receipt Proves, and What the Model Still Does Not

zkML proof receipt chain

AI x Crypto Systems disclosure: this article was prepared with AI assistance as an editorial helper. The ideas, facts, code, sources, and conclusions were reviewed by a human.

AI x Crypto Systems disclosure: this article is a technical explanation, not investment advice. AI x Crypto Systems does not recommend buying, selling, or holding any cryptoasset.

zkML Inference Proof

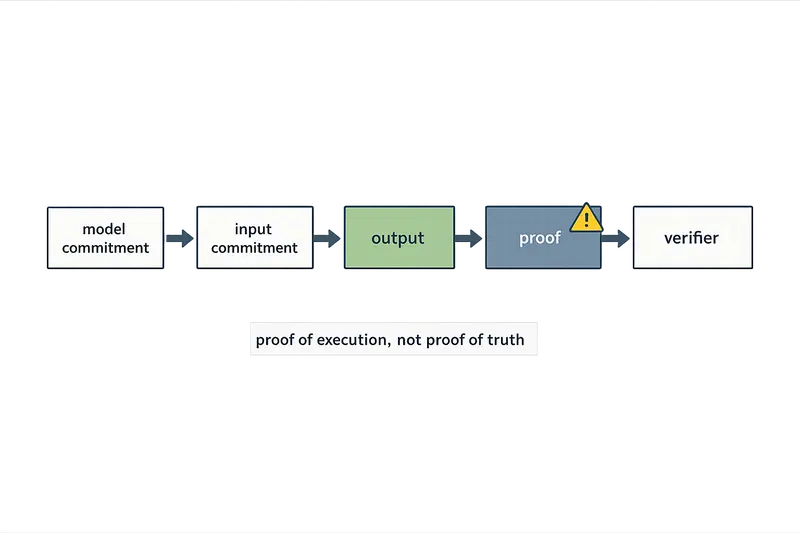
A zkML Inference Proof is easy to oversell. A zkML Inference Proof can show that a committed model computation produced a claimed output from a specific input or input commitment. A zkML Inference Proof cannot show that the model was worth using, that the training data was clean, or that the answer is true. A zkML Inference Proof should be read as a receipt for execution, not as a certificate of intelligence.

The short version

  • A zkML Inference Proof can verify a formal computation claim.
  • A zkML Inference Proof cannot verify real-world truth by itself.
  • A zkML Inference Proof needs inspectable artifacts: model commitment, input commitment, output, proof, and verifier.
  • A zkML Inference Proof is strongest when the claim is narrow enough to test.

Proof Boundary

zkML Inference Proof proves execution, not truth. zkML Inference Proof matters because AI systems usually ask developers to trust a private server, while crypto infrastructure prefers a checkable statement. zkML Inference Proof ties a model commitment, an input or input commitment, an output, and a verifier to one formal claim. zkML Inference Proof becomes useful only when the boundary of that formal claim is visible.

zkML proof receipt chain

AI x Crypto Systems uses the receipt-chain diagram to show artifact order, not to imply that a standalone proof file is enough. A verifier still checks the proof against the selected verifier key, the model commitment, the input commitment or public input, and the claimed output.

Proof receipt

Artifact What a developer should ask Why the artifact matters
Model commitment Which model or circuit was committed? Model names are not proof identities.
Input commitment What input is public, private, or committed? A valid proof can still use bad input.
Output Which output is bound to the proof? The proof should fail if the output changes.
Verifier Which verifier checks the proof? The verifier defines the accepted statement.
Proof Which proof artifact was generated? The proof is the receipt, not a trust slogan.

Model Commitment

zkML Inference Proof depends on the exact model artifact being committed. zkML Inference Proof loses practical meaning if the model name stays the same while the weights, architecture, preprocessing, quantization, or circuit changes. In practice, the inspectable thing is a commitment, hash, circuit, proving key, or verifier key linked to a specific computation. zkML Inference Proof should make model identity inspectable before asking a developer to trust the result.

Source check: EZKL documents the practical proving flow around compiled model artifacts, witness generation, proof generation, and verification. See EZKL proving flow and EZKL docs.

Input Commitment

zkML Inference Proof is only as honest as the input story behind the proof. zkML Inference Proof can verify a computation over an input or an input commitment, but zkML Inference Proof does not prove that the input was complete, unbiased, fresh, or collected from the right source. A bad input can still produce a valid proof if the committed computation was executed correctly. zkML Inference Proof needs provenance around the input, not only a proof around the inference.

zkML input provenance boundary

AI x Crypto Systems uses the input-provenance visual to separate data-source truth from proof validity. zkML Inference Proof can bind an input commitment to a computation, but zkML Inference Proof still needs signatures, logs, attestations, or domain evidence when the source itself matters.

What a zkML proof can and cannot say

Claim Inside the proof? Still needs separate evidence
The committed computation produced this output Yes The exact proof statement and verifier
The input came from the right source No, unless separately committed or signed Data provenance
The model is fair or useful No Evaluation, audits, benchmarks
The answer is true in the real world No External facts and domain validation

Output Meaning

zkML Inference Proof can verify where an output came from, but zkML Inference Proof cannot make the output semantically correct. zkML Inference Proof could prove that a weak classifier produced a label, a biased model produced a score, or a useless model produced a number. The cryptographic statement can be valid while the model answer remains wrong in the real world. zkML Inference Proof reduces one trust problem and leaves the judgment problem alive.

zkML proof versus truth boundary

The trap is in the verb “prove”. zkML Inference Proof proves the formal statement that the verifier is built to check. zkML Inference Proof does not prove everything a marketing page might imply.

Quantization Gap

zkML Inference Proof often proves a transformed computation, not the floating-point notebook a developer remembers. zkML Inference Proof systems usually need machine-learning operations to become proof-friendly arithmetic, and that path can involve ONNX export, quantization, circuit compilation, settings files, and witness generation. That transformation can be legitimate, but the transformation changes what a developer should inspect. zkML Inference Proof should name the model version, circuit version, and quantization assumptions before claiming verification.

zkML quantization gap

AI x Crypto Systems uses the quantization-gap diagram as a common developer path, not as a universal zkML law. Some systems use ONNX, some systems use another intermediate representation, and some systems phrase the transformation differently; the important point is that the proved computation may be a transformed version of the original notebook computation.

Developer check

  1. Ask whether the original model, ONNX export, quantized model, and circuit are all identified.
  2. Ask whether the verifier is tied to the circuit version.
  3. Ask whether the output comes from the same transformed computation that the proof verifies.
  4. Ask whether the article, demo, or product distinguishes float model output from circuit output.

Verifier Key

zkML Inference Proof is checked by a verifier, not by rerunning the model in a reader’s head. zkML Inference Proof uses a verifier artifact or verifier contract to check that the proof satisfies the selected circuit and public statement. That verifier is part of the claim because the verifier decides what proof is valid. zkML Inference Proof without a visible verifier is closer to a slogan than a developer artifact.

zkML verifier key boundary

AI x Crypto Systems uses the verifier-key visual to show that zkML Inference Proof accepts a formal statement, not a marketing claim. zkML Inference Proof becomes inspectable when the verifier key or verifier contract is named beside the proof artifact.

Source check: the ERC-7992 draft describes an interface with modelId, inputCommitment, output, and proof for verifying ML inference proofs. AI x Crypto Systems treats ERC-7992 as a draft, not as a finalized standard.

Receipt View

zkML Inference Proof becomes easier to reason about as a receipt. zkML Inference Proof should expose the model commitment, input policy, output, proof artifact, verifier, and verified statement. The receipt does not need hype to be useful. The receipt needs to answer one boring question: what can a developer verify without trusting the model provider?

{
  "model_commitment": "hash-of-model-or-circuit",
  "input_commitment": "hash-or-private-input-policy",
  "output": "claimed-output",
  "proof": "proof-artifact",
  "verifier": "verifier-artifact-or-contract",
  "statement": "this committed computation produced this output"
}

zkML proof receipt artifact

AI x Crypto Systems uses the proof-receipt visual as the practical artifact a developer should ask to inspect. zkML Inference Proof becomes less vague when the article shows the receipt fields instead of repeating the word “verifiable.”

Break Test

zkML Inference Proof should fail when a bound artifact changes. zkML Inference Proof becomes easier to trust when a developer can change the output, model commitment, public input, or verifier expectation and watch verification fail. That small break test teaches more than a paragraph saying “trustless AI.” zkML Inference Proof earns credibility when the failure mode is visible.

zkML break test

AI x Crypto Systems uses the break-test diagram to show binding, not to assume every output is public. If the system hides the output, the same test should apply to the public commitment or statement that the verifier checks.

A useful tiny experiment

  • Generate or inspect one proof artifact.
  • Change the claimed output by one value.
  • Run verification again.
  • Expect verification to fail.
  • If verification still passes, the proof is not binding what the article claims the proof binds.

Research Trail

zkML Inference Proof is not only a blog idea. zkML Inference Proof has a research trail across CNN proofs, realistic ML inference systems, and verifiable machine-learning surveys. The useful reading pattern is not “read everything”; the useful reading pattern is “separate execution proof from every other trust claim.” AI x Crypto Systems uses the sources below to keep that boundary tight.

zkML research claim boundary

AI x Crypto Systems uses the research-trail visual to connect sources around one boundary question. zkML Inference Proof should be researched by asking what each paper or guide proves, what each paper or guide assumes, and what each paper or guide leaves outside the proof.

Source Use it for Do not overclaim
zkCNN Early proof framing for neural-network predictions Do not generalize one CNN setting to all zkML.
ZKML EuroSys 2024 Practical constraints and optimization for ML inference proofs Do not imply every large model is easy to prove.
Trustless DNN Inference Private inputs/weights and DNN inference framing Do not claim privacy is automatic in every design.
Survey of ZKP-Based Verifiable ML Field map and categories Do not replace primary sources with a survey.
Mina zkML guide Developer workflow and on-chain verification framing Do not treat a product guide as neutral benchmark data.

What zkML Does Not Prove

zkML Inference Proof does not prove model quality. zkML Inference Proof does not prove clean training data, fair labels, safe deployment, current input data, good product design, or honest business claims. zkML Inference Proof proves a narrower computational statement under a chosen proof system. zkML Inference Proof is strongest when the article, product, or documentation says that narrow statement out loud.

zkML red-flag wording

AI x Crypto Systems uses the red-flag visual as a wording filter. zkML Inference Proof should replace broad claims like “proves truth” with narrower claims like “proves execution” before a developer treats the proof as useful evidence.

Red-flag phrases

  • “zkML makes AI trustworthy.”
  • “zkML proves the answer is correct.”
  • “zkML solves AI privacy.”
  • “zkML makes LLMs cheap on-chain.”
  • “zkML removes the need for audits.”

Verification Choice

zkML Inference Proof is one verification pattern, not the only pattern for AI infrastructure. zkML Inference Proof offers a cryptographic proof when the computation can fit the proof system, while trusted execution environments and optimistic machine-learning designs make different tradeoffs around hardware trust, scale, cost, and finality. The right comparison is not “which label sounds more decentralized”; the right comparison is “which constraint is the system actually solving?” zkML Inference Proof should be chosen when the formal proof boundary is worth the proving cost.

zkML TEE opML comparison

AI x Crypto Systems uses the comparison visual to prevent a false winner-takes-all frame. zkML Inference Proof is strongest for narrow cryptographic claims, TEE designs are strongest when hardware trust is acceptable for larger models, and opML designs are strongest when challenge windows are acceptable for cheaper scale.

Developer Checklist

zkML Inference Proof should be reviewed through artifacts, not adjectives. zkML Inference Proof deserves the same blunt questions every time: where is the model commitment, what input is public or private, what output is bound, which verifier is used, which circuit version was proved, what changed during quantization, and what claim remains outside the proof? zkML Inference Proof becomes practical when the answer is a set of inspectable artifacts, not the phrase “verifiable AI.”

zkML developer checklist

AI x Crypto Systems uses the checklist visual as the final review surface for zkML Inference Proof. zkML Inference Proof should leave a developer with named artifacts to inspect, not with a feeling that cryptography automatically made the AI system correct.

Before trusting a zkML inference proof

  • Identify the exact model or circuit commitment.
  • Identify the input commitment and what remains private.
  • Identify the output bound to the proof.
  • Identify the verifier key, verifier contract, or verifier artifact.
  • Identify the proving system and circuit version.
  • Identify whether quantization or preprocessing changed the computation.
  • Identify what the proof does not claim.

zkML final proof boundary

AI x Crypto Systems ends with the boundary card because zkML Inference Proof has one durable lesson. zkML Inference Proof verifies execution first, and the developer still validates reality, provenance, model quality, and product risk separately.

Sources

I Scored 1000/1000 on AWS Certified AI Practitioner (AIF-C01) Here’s Every Resource I Used

TL;DR I passed the AWS Certified AI Practitioner (AIF-C01) exam with a perfect score of 1000/1000 using a deliberate four-layer system: video lectures, reading materials, hands-on labs, and practice exams. Everything I used is listed below free and paid.

Why I Decided to Pursue AIF-C01

AI is no longer a specialty skill reserved for data scientists and ML engineers. In 2025 and beyond, it is becoming a baseline expectation for anyone working in cloud, DevOps, architecture, or engineering.

When AWS launched the AI Practitioner certification (AIF-C01) in October 2024, I saw it as the right opportunity to validate what I had been learning and signal to employers that I genuinely understood the AWS AI ecosystem — not just at a surface level, but deeply enough to make real architectural decisions.

Passing AIF-C01 demonstrates that you understand:

  • ✅ Generative AI — concepts, use cases, and limitations
  • ✅ Foundation Models — how they work and how to select them
  • ✅ Amazon Bedrock — the core GenAI service on AWS
  • ✅ Amazon SageMaker — for ML model training and deployment
  • ✅ Prompt Engineering — techniques for effective model interaction
  • ✅ Responsible AI — bias, fairness, explainability, governance
  • ✅ AI Security on AWS — securing AI workloads end to end

The Honest Truth About This Exam

Most people approach this exam in one of two wrong ways:

Over-preparing with the wrong materials — spending weeks on deep ML theory that simply is not tested at this level.

Under-preparing because it sounds “foundational” — treating it like a vocabulary quiz and getting blindsided by scenario-heavy questions.

Neither approach works. What works is a deliberate, four-layer study system aligned to how AWS actually writes its questions.

Here is exactly what that looks like.

My Four-Layer Study System

Layer 1 — 🎥 Video Lectures: Build Your Mental Model First

Before you touch any documentation or practice question, you need a solid mental picture of how AWS AI services connect and why they exist. These courses gave me that foundation.

🆓 FREE

Andrew Brown — freeCodeCamp (15-Hour Full Course)

This is the most comprehensive free resource available for AIF-C01. Andrew covers every exam domain in depth, and publishing it on freeCodeCamp’s YouTube channel means it is always free. I watched this first before touching anything else.

🔗 Watch on YouTube

AWS Skill Builder — Official Exam Prep Learning Plan

Built directly by AWS, this learning plan tells you exactly what AWS expects you to know. If you want to study from the source, this is it. The free tier gives you access to digital courses and exam prep content.

🔗 Access AWS Skill Builder

💰 PAID

Stéphane Maarek — Udemy (Ultimate AIF-C01 Course)

Over 2.5 million students trust Stéphane for AWS certification prep. His AIF-C01 course is hands-on, laser-focused on exam objectives, and includes a built-in practice exam. Worth every penny.

🔗 Udemy Course

Tutorials Dojo — Video Course 2026

Structured by exam domain and kept fully updated as AWS updates the exam blueprint. Excellent for visual learners who want a clean, no-filler walkthrough without the detours.

🔗 Tutorials Dojo Video Course

Layer 2 — 📖 Reading Materials: Lock In the Details

Video gets you approximately 70% of the way there. Reading is what closes the remaining gap. Edge cases, service limits, key definitions, and the subtle differences between AWS AI tools all live in written form.

💰 PAID

Tutorials Dojo — Study Guide eBook

Over 300 pages of structured notes, cheat sheets, and domain-by-domain breakdowns. This became my go-to reference during final revision. The cheat sheets alone are worth the price.

🔗 Study Guide eBook

🆓 FREE

Tutorials Dojo — AIF-C01 Exam Guide and Study Path

A free, community-trusted resource that maps every exam domain to the right study materials. This is your study roadmap. Bookmark it on day one and return to it regularly.

🔗 Tutorials Dojo Exam Guide

AWS Official Exam Guide PDF

Always read from the source. This document tells you precisely which services, concepts, and task statements are in scope. Every serious candidate should read it once at the start and once again before exam day.

🔗 AWS Official Exam Guide PDF

Jayendra Patil — AIF-C01 Learning Path

Jayendra achieved a perfect score on this exam. His notes are precise, well-organized, and cover technical nuances that most courses gloss over. This is the most underrated free resource on this list.

🔗 Jayendra Patil Learning Path

Layer 3 — 🛠️ Hands-On Labs: Experience What You Cannot Memorize

The AIF-C01 exam is packed with scenario-based questions. Reading about Amazon Bedrock or SageMaker is simply not the same as actually using them. These resources gave me real exposure without requiring a massive AWS bill.

🆓 FREE

AWS PartyRock

Build GenAI applications directly in your browser with zero infrastructure setup or cost. Ideal for understanding how Foundation Models behave, how prompting works in practice, and how to compose AI workflows.

🔗 partyrock.aws

AWS Workshops

Guided, self-paced labs covering Bedrock, SageMaker, Responsible AI, and more. These workshops are built by AWS engineers and reflect real-world architecture patterns you will encounter in exam scenarios.

🔗 workshops.aws

AWS Skill Builder — Standard (Free) Plan

The free tier of Skill Builder includes digital courses, guided lab previews, and exam prep content directly from AWS. There is genuinely no excuse to skip this one.

🔗 skillbuilder.aws

💰 PAID

Whizlabs — AIF-C01 Labs and Practice Tests

Hands-on lab environments combined with practice questions in one platform. A solid all-in-one option if you prefer to keep your study tools consolidated.

🔗 Whizlabs AIF-C01

Layer 4 — 📝 Practice Exams: Train Your Brain Under Pressure

Knowing the material and performing under exam conditions are two completely different things. Practice tests taught me time management, exposed every weak spot I had, and eliminated the surprises on exam day.

My rule: Do not sit the real exam until you are consistently scoring 85%+ across multiple practice test sets under timed conditions.

🆓 FREE

Open Exam Prep — 100+ Free AIF-C01 Questions

Over 100 free practice questions with AI-powered explanations. No account required. A fast, zero-friction way to check your readiness across all exam domains.

🔗 open-exam-prep.com/practice/aws-ai-practitioner

Community Study Notes — GitHub

Personal notes and practice questions from a candidate who passed AIF-C01. Questions are close to actual exam difficulty. An excellent free supplementary resource for the final week of prep.

🔗 github.com/vicsz/aif-c01-study-notes

💰 PAID

Jon Bonso / Tutorials Dojo — Practice Exams

The gold standard for AWS practice tests. Detailed explanations for every answer, domain-based filtering, built-in cheat sheets, and unlimited access for one year. These practice exams alone raised my readiness score by roughly 20 percentage points.

🔗 Tutorials Dojo Practice Exams

Stéphane Maarek & Abhishek Singh — Udemy Practice Exams

Human-crafted, exam blueprint-aligned questions with diagram-rich explanations. Built by instructors who collectively hold over 20 AWS certifications. Highly recommended for your final week of preparation.

🔗 Udemy Practice Exams

My Study Timeline

Here is a rough breakdown of how I structured my preparation:

Week Focus
Week 1 Andrew Brown’s full course (video) + AWS Official Exam Guide PDF
Week 2 AWS Skill Builder learning plan + Stéphane Maarek’s Udemy course
Week 3 Jayendra Patil notes + Tutorials Dojo exam guide + PartyRock hands-on
Week 4 AWS Workshops labs + Tutorials Dojo Study Guide eBook
Week 5–6 Full practice exam sets — Tutorials Dojo + Udemy (timed, reviewed every wrong answer)
Final 48hrs Light review of cheat sheets only — no new material

Key Lessons Learned

1. Scenario questions are everything.
The exam does not test definitions in isolation. It tests whether you can select the right AWS AI service or architecture pattern given a specific business scenario. Always study the why behind each service, not just the what.

2. Amazon Bedrock is central.
Bedrock appears throughout the exam in multiple domains. Make sure you understand model selection, knowledge bases, agents, guardrails, and how it integrates with other AWS services.

3. Responsible AI is not an afterthought.
AWS takes Responsible AI seriously in this exam. Bias, fairness, transparency, explainability, and governance are tested in dedicated questions and embedded in scenario questions too.

4. Do not skip hands-on practice.
Even one hour on PartyRock or an AWS Workshop gives you an intuitive understanding that reading cannot replicate. Scenario questions become significantly easier when you have seen the service behave in practice.

5. Practice test reviews matter more than practice test scores.
Every wrong answer is a study opportunity. Do not just note your score and move on — read every explanation, especially for questions you got right by guessing.

Quick Reference: All Resources in One Place

🆓 Free Resources

Category Resource Link
Video Andrew Brown — freeCodeCamp 15hr Link
Video AWS Skill Builder Official Plan Link
Reading Tutorials Dojo Exam Guide Link
Reading AWS Official Exam Guide PDF Link
Reading Jayendra Patil Learning Path Link
Labs AWS PartyRock Link
Labs AWS Workshops Link
Practice Open Exam Prep — 100+ Questions Link
Practice Community GitHub Notes Link

💰 Paid Resources

Category Resource Link
Video Stéphane Maarek — Udemy Link
Video Tutorials Dojo Video Course 2026 Link
Reading Tutorials Dojo Study Guide eBook Link
Labs Whizlabs AIF-C01 Link
Practice Tutorials Dojo — Jon Bonso Link
Practice Maarek & Abhishek — Udemy Link

Final Thoughts

The AWS AI Practitioner certification is not just a badge — it is a signal that you have taken the time to understand where cloud and AI intersect. That intersection is exactly where most of the interesting, high-value work is happening right now.

Layer your preparation intentionally:

  • Videos for building the big picture
  • Reading for locking in the fine print
  • Labs for developing real instincts
  • Practice tests for building confidence under pressure

That combination is what turned my preparation into a perfect 1000/1000 result — and it will work for you too.

If you are currently preparing for AIF-C01, drop a question in the comments below. I read everything and answer every serious question.

If this article helped you, please share it with your team or anyone in your network who is working toward their AWS AI certification. The more people who pass, the stronger our collective cloud community becomes.

Good luck — you have got this. ☁️

#aws #awscertification #aipractitioner #aifc01 #generativeai #amazonbedrock #machinelearning #cloudcomputing #devops #certification