
3 Steps to RBAC for AI Agents on Amazon Bedrock AgentCore

HR Manager View

The Problem

Building AI agents has become surprisingly easy. You connect tools via MCP servers, APIs, or built-in capabilities, wire up an LLM, and run tests. The agent performs well and pulls the right data. Then comes the part that actually matters: authorization. It doesn’t know who’s asking or what they’re allowed to see.

TL;DR: Build secure multi-tenant AI agents on Amazon Bedrock AgentCore using OAuth scopes, Cedar policies, and Gateway interceptors. Deterministic authorization for non-deterministic agents. Working code examples included.

Full code is on GitHub: awslabs/agentcore-samples/role-based-hr-data-agent

Three steps on Amazon Bedrock AgentCore Runtime and Amazon Bedrock AgentCore Gateway: authentication, scope-based permissions, and gateway enforcement. Let’s go.

Step 1: IDP Integration

You start by integrating your identity provider to answer the fundamental question: who is making this request? When users authenticate through your IDP (e.g., Okta, Entra ID, Amazon Cognito), they receive a JWT token. This token proves their identity and includes claims about who they are and what permissions they have.

Every agent invocation needs to validate this JWT token. The token must be:

  • Cryptographically signed by your IDP (signature validation)
  • Not expired (expiration check)
  • Intended for your application (audience validation)

Amazon Bedrock AgentCore Runtime handles this for you. You configure your Runtime with a custom authorizer that handles all JWT validation automatically. Point it to your IDP’s discovery URL, and the Runtime fetches the public keys, validates signatures, and rejects invalid tokens.

AgentCore Runtime supports multiple authorizer types: CUSTOM_JWT (for OAuth 2.0 compliant IDPs), AWS_IAM (for AWS IAM principals), and NONE (for development). See the AgentCore Runtime documentation for details.

For this example, we’re using Amazon Cognito with CUSTOM_JWT, but you can use any OAuth 2.0 compliant IDP (Okta, Entra ID, Auth0).

Here’s how to configure the Runtime with a custom JWT authorizer:

import boto3

client = boto3.client('bedrock-agentcore-control', region_name='us-east-1')

response = client.create_agent_runtime(
    agentRuntimeName='hr-agent-runtime',
    agentRuntimeArtifact={
        'containerConfiguration': {
            'containerUri': '<account>.dkr.ecr.us-east-1.amazonaws.com/hr-agent:latest'
        }
    },
    authorizerConfiguration={
        'customJWTAuthorizer': {
            'discoveryUrl': 'https://cognito-idp.us-east-1.amazonaws.com/us-east-1_XXXXX/.well-known/openid-configuration',
            'allowedClients': ['hr-api-client']
        }
    },
    networkConfiguration={'networkMode': 'PUBLIC'},
    roleArn='arn:aws:iam::<account>:role/AgentRuntimeRole'
)

Now all agent invocations require authenticated JWT tokens. Gated access achieved. The Runtime validates tokens using your IDP’s public keys (JWKS) from the discovery URL. Users can’t invoke the agent without valid credentials.

Step 2: Scope-Based Permissions

Authentication is done. The user is in the building. But what room can they enter? That’s where authorization begins.

You move to authorization by defining OAuth scopes as permission labels. You create scopes that represent different access levels. When users authenticate through your IDP, their JWT tokens include scopes based on their role.

Here’s what a JWT token looks like with scopes:

{
  "sub": "[email protected]",
  "iss": "https://your-idp.com",
  "aud": ["your-api-client"],
  "exp": 1715612345,
  "iat": 1715608745,
  "scope": "api/read api/write",
  "groups": ["standard-users"]
}

Key claims:

  • sub: User identifier
  • iss: Who issued the token (your IDP)
  • aud: Intended audience (your application)
  • exp: Expiration timestamp
  • scope: OAuth scopes defining permissions
  • groups: User’s role/group assignments

Different roles get different scope combinations:

User Type Example Scopes What They Can Do
Full Access User api/read api/write api/admin All tools and data
Standard User api/read api/write Read and modify, no admin tools
Read-Only User api/read View data only

You’ve mapped roles to scopes that define who can access which agent and which tools based on the claims in their JWT.

But having scopes in JWT tokens isn’t enough. Nothing is checking them yet. The scopes are just claims sitting in a token, ignored unless something enforces them before tools execute.

Amazon Bedrock AgentCore Gateway is that enforcement point.

Step 3: Enforce Scopes with AgentCore Gateway

AgentCore Gateway sits between your agent runtime and your tools. Every tool call flows through it. This gives you a central enforcement point to validate scopes and control access.

First, AgentCore Gateway validates authentication. While Runtime already validated the JWT in Step 1, AgentCore Gateway performs its own independent validation. This is a defense-in-depth pattern where each layer verifies authentication.

Here’s how to configure AgentCore Gateway with IDP authentication:

import boto3

client = boto3.client('bedrock-agentcore-control', region_name='us-east-1')

response = client.create_gateway(
    name='hr-agent-gateway',
    protocolType='MCP',
    authorizerType='CUSTOM_JWT',
    authorizerConfiguration={
        'customJWTAuthorizer': {
            'allowedClients': ['hr-api-client'],
            'discoveryUrl': 'https://cognito-idp.us-east-1.amazonaws.com/us-east-1_XXXXX/.well-known/openid-configuration'
        }
    },
    roleArn='arn:aws:iam::<account>:role/GatewayServiceRole'
)

Then, AgentCore Gateway enforces authorization. Your agent is non-deterministic. The LLM decides which tools to call based on natural language prompts, which means you can’t trust the agent to consistently enforce authorization rules.

A cleverly worded prompt might trick the agent into calling a tool the user shouldn’t access. The agent might hallucinate permissions. The agent doesn’t understand security boundaries.

You need deterministic enforcement outside the agent. AgentCore Gateway provides this through Gateway interceptors, Lambda functions that run before and after tool invocations. Fixed, deterministic code. Same input = same output. Every time.

You implement a Request Interceptor, a Lambda function invoked by the Gateway before a tool call reaches its destination:

  1. Extract & evaluate. Parse the request to pull user context (token claims, tenant ID, role, scopes). Use those attributes to determine what this user is authorized to do: scope their access, identify their tenant, resolve their permissions.
  2. Enforce & enrich. Inject tenantId into tool parameters for tenant isolation. Add/strip headers. Transform or restrict parameters based on role. Reject unauthorized requests outright.
  3. Forward. Return the modified (or blocked) request to the Gateway, which routes it to the target (an MCP server or direct tool invocation).

If the scopes are insufficient, the interceptor rejects the request before it ever reaches your tools. Your agent code doesn’t change. Your tool code doesn’t change. The enforcement logic lives in the interceptor Lambda.

But the interceptor operates at the request level. It sees the raw inbound call. It doesn’t evaluate what the agent decided to do. When the agent autonomously selects a tool and constructs parameters, you need to evaluate: Is this principal allowed to perform this action on this resource, with these parameters?

This is where Cedar policies come in. AgentCore Gateway supports Cedar policy evaluation as part of its authorization layer.

Cedar evaluates the authorization request constructed from the JWT claims and the tool call. The interceptor and Cedar operate as complementary but independent layers: the interceptor provides imperative custom logic, while Cedar provides declarative policy evaluation against the original request.

Here’s what Cedar evaluates:

  1. Principal – The user making the request (created from the JWT’s sub claim)
  2. Action – Which tool they’re trying to invoke (extracted from the tool name)
  3. Resource – The Gateway instance (the resource boundary being protected)
  4. Context – The tool arguments and additional attributes (tenant, time, etc.)

Cedar checks these attributes against your policies and returns a decision: ALLOW or DENY.

Example Cedar policy:

// Only users with 'read' scope can search employees
permit(
  principal,
  action == AgentCore::Action::"HRDataTarget___search_employee",
  resource
) when {
  principal.getTag("scope") like "*hr-dlp-gateway/read*"
};

// Only users with 'comp' scope can access compensation
permit(
  principal,
  action == AgentCore::Action::"HRDataTarget___get_employee_compensation",
  resource
) when {
  principal.getTag("scope") like "*hr-dlp-gateway/comp*"
};

The flow becomes:

  1. Gateway validates the JWT signature (CUSTOM_JWT authorizer)
  2. Request Interceptor (if configured) runs custom Lambda logic to enrich, validate, or block the request
  3. Cedar policy evaluation (if configured) independently evaluates the original JWT claims and tool call against declarative policies
  4. If either layer denies → request blocked with 403
  5. If both allow → tool invocation proceeds

You can use interceptors alone, Cedar alone, or both together. They’re complementary layers, not a required chain. In this demo, we use both: interceptors for runtime enrichment and Cedar for declarative policy enforcement.

With both layers active, you’ve achieved three critical controls:

  1. Tenant isolation – Users can only invoke tools for their own tenant (interceptor injects tenantId into tool parameters)
  2. Scope-based enrichment – Request Interceptor extracts scopes from the JWT and injects context for downstream evaluation
  3. Tool-level authorization – Cedar evaluates each tool invocation request against declarative policies and blocks unauthorized calls

At this point, you’ve secured tool invocation. But there’s another gap: tool discovery.

Say your agent connects tools via an MCP server with 5 tools defined. Users ask “what tools are available?” and get the complete list. Cedar prevents unauthorized invocations, but users still see everything.

This is a security risk. Why should users see tools they’ll never be authorized to use? You’re leaking information about system capabilities.

You need to filter tool discovery based on scopes. Users should only see tools they’re authorized to invoke. This requires intercepting the response AFTER the MCP server returns the tool list, but BEFORE it reaches the caller (agent or user).

That’s where the Response Interceptor comes in. It filters tool lists based on the user’s scopes. It also redacts data fields in tool responses before they reach the caller.

Now let’s see these layers in action. Here’s how the same query produces different results for three personas.

Define Your Access Control Personas

Let me show you with an HR agent. Consider a simple request: “Show me John Smith’s full profile.”

Who’s asking matters:

  • HR Manager should see the full salary
  • HR Specialist should see job details but NOT compensation
  • Employee should only see public information

Same query. Three different people. Three different results. This is the multi-tenant authorization problem.

The pattern applies to any multi-tenant agent: customer support agents that scope replies to one customer’s tickets, or healthcare agents that limit responses to a single patient’s records. The HR example just makes it concrete.

Persona 1: HR Manager (Full Access)

OAuth Scopes: read pii address compensation

What they see:

{
  "employee_id": "12345",
  "name": "Jane Doe",
  "job_title": "Senior Engineer",
  "department": "Engineering",
  "manager": "John Smith",
  "ssn": "123-45-6789",
  "date_of_birth": "1990-05-15",
  "home_address": "123 Main St",
  "city": "Seattle",
  "state": "WA",
  "salary": "$150,000",
  "bonus": "$20,000",
  "stock_options": "5000 shares"
}

Use case: HR Managers need full visibility for:

  • Compensation reviews
  • Benefits administration
  • Compliance reporting

HR Manager View

Persona 2: HR Specialist (No Compensation)

OAuth Scopes: read pii

In this system, the pii scope covers identity fields (SSN, date of birth) needed for verification, but not residential data. Address is a separate address scope which HR Specialists don’t have.

What they see:

{
  "employee_id": "12345",
  "name": "Jane Doe",
  "job_title": "Senior Engineer",
  "department": "Engineering",
  "manager": "John Smith",
  "ssn": "123-45-6789",
  "date_of_birth": "1990-05-15",
  "home_address": "[REDACTED]",
  "city": "[REDACTED]",
  "state": "[REDACTED]",
  "salary": "[REDACTED]",
  "bonus": "[REDACTED]",
  "stock_options": "[REDACTED]"
}

Use case: HR Specialists need PII access for:

  • Onboarding new employees
  • Offboarding processes
  • Employee record updates
  • Identity verification

What they DON’T see: Compensation and home addresses

Persona 3: Employee (Self-Service Only)

OAuth Scopes: read

What they see (when querying their own record):

{
  "employee_id": "12345",
  "name": "Jane Doe",
  "job_title": "Senior Engineer",
  "department": "Engineering",
  "manager": "John Smith",
  "ssn": "[REDACTED]",
  "date_of_birth": "[REDACTED]",
  "home_address": "[REDACTED]",
  "city": "[REDACTED]",
  "state": "[REDACTED]",
  "salary": "[REDACTED]",
  "bonus": "[REDACTED]",
  "stock_options": "[REDACTED]"
}

Additional Cedar rule: Employees can only view their own record. If Jane tries to query another employee, the request is blocked entirely.

Use case: Employees can self-serve:

  • Look up their manager
  • Check department info
  • View job title

What they DON’T see: Any sensitive data (PII, compensation, addresses)

Employee View

Key Takeaways

Here’s what we built and why it matters:

1. Authentication ≠ Authorization

  • Authentication = WHO the user is (Your IDP)
  • Authorization = WHAT they can access (Cedar + Gateway interceptors)
  • You need both layers

2. Deterministic Security for Non-Deterministic Agents

  • AI agents generate unpredictable responses
  • Your security layer must enforce predictable rules
  • OAuth scopes + Cedar policies = deterministic authorization
  • Independent of the LLM

3. Defense in Depth

We enforce authorization at multiple points:

  • Request Interceptor – Validates scopes and injects tenant context
  • Cedar policies – Evaluates tool-level authorization (can this user invoke this tool?)
  • Response Interceptor – Redacts fields based on scopes (which fields can this user see?)
  • Each layer protects against different attack vectors

4. Field-Level Redaction Without Agent Changes

  • Write one query for all roles
  • Redact fields based on user’s scopes
  • The agent doesn’t know about authorization
  • The interceptor handles it

5. OAuth Scopes are Standardized

Using OAuth 2.0 scopes means:

  • Works with standard identity providers (Okta, Entra ID, Cognito, Auth0)
  • Industry-standard permission labels
  • Portable across different agent platforms

6. Cedar Policies are Auditable

Cedar benefits:

  • Human-readable policy language
  • Version-controlled in Git
  • Audit who has access by reading policy files
  • No complex SQL grants or IAM policies to untangle

Conclusion

Building secure multi-tenant AI agents requires one discipline: don’t trust the agent to enforce its own boundaries. The agent is non-deterministic. Your security layer must be deterministic.

By using OAuth scopes for field-level permissions, Cedar policies for resource-level authorization, and Gateway interceptors for enforcement, you create a security architecture that works regardless of how the agent behaves. Same user, same request, same authorization decision. Every time.

Clone the repo, deploy it, and test it with the three personas. You’ll see exactly how deterministic authorization protects non-deterministic agents.

How do you handle authorization in your AI agents? Have you run into cases where the agent bypassed security rules? Drop a comment and let’s discuss!

Opinions are my own.
Why NornicDB Uses Its Own Monotonic Counter for MVCC Ordering

TL;DR

NornicDB’s MVCC layer assigns each committed write a (CommitTimestamp, CommitSequence) pair, where CommitTimestamp comes from time.Now().UnixNano() and CommitSequence comes from a process-wide atomic uint64 counter. Snapshot-isolation conflict detection orders versions by sequence first, not timestamp. We did this because:

  1. Wall-clock nanoseconds are not monotonic. Linux clock_gettime(CLOCK_REALTIME) can step backward under NTP correction, and even between adjacent reads on different goroutines.
  2. Our parser is faster than the wall clock’s resolution. A simple Cypher MATCH (n) RETURN n parses+validates in 39 ns with zero allocations. Multiple commits routinely land inside the same UnixNano() bucket.
  3. Go’s built-in monotonic clock is per-time.Time, not global. It is stripped by UnixNano() and is undefined across time.Time values produced by independent time.Now() calls.

A uint64 counter incremented atomically per commit gives us a total order that nothing in the operating system can perturb. At one billion commits per second sustained, it overflows in ~584 years.

The Bug We Were Hunting

The regression that drove this work was an intermittent CI failure in TestExecuteCypher_SetInvalidatesManagedEmbeddings:

conflict: node 0x7f3a... changed after transaction start

The failure was a phantom conflict. No second writer existed. The transaction reading the node had been opened after the commit it was racing against — there should have been nothing to conflict with. But the snapshot-isolation check disagreed.

The check is, at its core, a comparison between two MVCCVersion records: the version at which a transaction began its read, and the version at which a row was last committed. If committedVersion > readVersion, the SI machinery flags the row as having been written after the transaction started.

MVCCVersion.Compare() ordered by timestamp first:

// pkg/storage/types.go
func (a MVCCVersion) Compare(b MVCCVersion) int {
    if a.CommitTimestamp != b.CommitTimestamp {
        if a.CommitTimestamp < b.CommitTimestamp {
            return -1
        }
        return 1
    }
    if a.CommitSequence < b.CommitSequence { return -1 }
    if a.CommitSequence > b.CommitSequence { return 1 }
    return 0
}

That ordering is only sound if CommitTimestamp is monotonic across the entire process. It isn’t.

Why time.Now().UnixNano() Cannot Be Used as a Global Order

Wall-Clock Drift, Concretely

time.Now() on Linux ultimately calls clock_gettime(CLOCK_REALTIME). CLOCK_REALTIME is the wall clock and is subject to:

  • NTP slewing (adjtime): the kernel slows or speeds the clock by up to 500 ppm to converge on the reference time.
  • NTP stepping (settimeofday): if the offset exceeds the panic threshold (~128 ms by default), the clock jumps — possibly backward.
  • PTP corrections in containerized hosts where the hypervisor’s clock is the reference.
  • VM live-migration, where the guest’s CLOCK_REALTIME snaps to the destination host’s clock on resume.
  • Per-CPU rdtsc skew: clock_gettime reads a per-CPU TSC and converts it. If two goroutines are scheduled on different cores, their reads can disagree by tens to hundreds of nanoseconds — and the disagreement is not guaranteed to be in any particular direction.

A concrete sequence that breaks timestamp ordering:

t = T₀                  goroutine A: commit row R, stamp = 1_700_000_000_000_000_100
t = T₀ + 5µs            kernel applies NTP step, clock jumps -500ns
t = T₀ + 6µs            goroutine B: BeginTransaction, samples 1_700_000_000_000_000_050
goroutine B reads R
SI check: committed (100) > readVersion (50) → CONFLICT

There was no concurrent writer. The reader simply sampled a clock that had moved backward in the interim.

The Parser Is Faster Than the Clock Tick

time.Now() claims nanosecond resolution, but the underlying TSC tick is the actual quantum, and the kernel’s vDSO + syscall path has its own latency floor. On a typical x86_64 Linux host, two back-to-back time.Now() calls return identical UnixNano() values an appreciable fraction of the time — anywhere from one in a few to one in a few hundred, depending on hardware.

Our parser benchmarks make this concrete:

BenchmarkParserValidationIsolation/Nornic/simple_match-16     30,066,961    39.09 ns/op    0 B/op    0 allocs/op
BenchmarkParserValidationIsolation/Nornic/match_with_label-16 21,996,284    53.20 ns/op    0 B/op    0 allocs/op
BenchmarkParserValidationIsolation/Nornic/create_node-16      17,062,600    70.40 ns/op    0 B/op    0 allocs/op
BenchmarkParserValidationIsolation/Nornic/merge_node-16       17,167,636    71.85 ns/op    0 B/op    0 allocs/op

A MATCH (n) RETURN n parses and validates in 39 nanoseconds. That is ~25.6 million queries per second on a single goroutine, with zero heap allocations. Throughput across query shapes is 450–550 MB/s of source text.

Compare to ANTLR on the same machine, same queries:

BenchmarkParserValidationIsolation/ANTLR/simple_match-16        494,116    4,725 ns/op    5,708 B/op    53 allocs/op
BenchmarkParserValidationIsolation/ANTLR/create_node-16         425,192    5,649 ns/op    6,700 B/op    62 allocs/op
BenchmarkParserValidationIsolation/ANTLR/match_where_in-16      152,034   15,616 ns/op   17,748 B/op   149 allocs/op

ANTLR is ~120× slower and allocates per parse. The fact that our parser is fast is not incidental — it is the entire reason UnixNano() cannot order our writes. Slow parsers naturally space commits apart by microseconds, and microsecond gaps swamp clock skew. We don’t have that luxury.

Same-Tick Math

Suppose clock_gettime has an effective resolution of R nanoseconds (typical: R ∈ [1, 40]) and we are sustaining Q commits per second. The probability that two commits land in the same tick is approximately:

P(collision) ≈ 1 - e^(-Q·R / 1e9)

At Q = 1,000,000 commits/sec and R = 20 ns, P ≈ 1 - e^(-0.02) ≈ 1.98%. Roughly one collision every fifty commits. Over a 10-second ingestion burst, that’s hundreds of unordered pairs — and we still need a total order to reason about snapshot isolation correctly.

Why time.Now()‘s Monotonic Reading Doesn’t Help

Go’s time.Now() does include a monotonic reading from CLOCK_MONOTONIC. It is real, and it is genuinely monotonic. But:

  • The monotonic component is stripped by UnixNano(). Per the Go docs: “Because the monotonic clock reading has no meaning outside the current process, serializing a t.UnixNano() value and parsing it back loses the monotonic reading.”
  • It is only meaningful between two time.Time values that share a wall+monotonic pair, used by Sub, After, Before, Equal. We persist a single int64 to disk.
  • It is per-time.Time, not a process-global counter. Two independent time.Now() calls produce two independent monotonic samples that are not guaranteed to be totally ordered with respect to each other once you reduce them to scalars.

There is no public Go API that returns a single int64 of monotonic nanoseconds suitable for storage and cross-goroutine comparison. You can hack one with runtime.nanotime via //go:linkname, but it has the same per-process scope as time.Now()‘s monotonic reading and ties us to runtime internals.

The Fix: A Process-Global Atomic Counter

pkg/storage/badger.go carries two atomic fields on the engine:

mvccSeq             atomic.Uint64  // strictly-increasing commit sequence
mvccHighWaterNanos  atomic.Int64   // max committed CommitTimestamp ever observed

Every commit calls allocateMVCCVersion(), which:

  1. Atomically increments mvccSeq and reads the new value.
  2. Reads time.Now().UnixNano().
  3. Atomically advances mvccHighWaterNanos to max(highWater, now).
  4. Returns MVCCVersion{CommitTimestamp: now, CommitSequence: seq}.

BeginTransaction() calls currentMVCCReadVersion(), which clamps now upward to mvccHighWaterNanos. A backward NTP step cannot make a new transaction observe a read timestamp earlier than something already committed.

Snapshot-isolation conflict detection in pkg/storage/badger_transaction.go then compares by sequence first:

func snapshotIsolationConflict(read, committed MVCCVersion) bool {
    if read.CommitSequence != maxMVCCCommitSequence &&
       committed.CommitSequence != maxMVCCCommitSequence {
        return committed.CommitSequence > read.CommitSequence
    }
    // Saturation fallback only — see below.
    return committed.CommitTimestamp > read.CommitTimestamp
}

Because mvccSeq is a single atomic that no commit can skip, the sequence is a true total order. The wall-clock timestamp is retained for two reasons: (a) it’s human-readable in dumps and admin UIs, and (b) it’s a fallback total order if and only if the sequence saturates.

Tests We Wrote

  • TestCurrentMVCCReadVersion_ClampsToHighWater — read timestamp never precedes the high-water mark.
  • TestAllocateMVCCVersion_AdvancesHighWater — high-water is monotonic even when wall-clock samples drift backward.
  • TestBeginTransaction_DoesNotConflictAfterClockSkew — the original regression: bump high-water two seconds ahead, then commit; must not raise a phantom conflict.
  • TestSnapshotIsolationConflict_UsesTimestampWhenSequenceSaturated — sequence-first ordering, with timestamp fallback only at saturation.
  • TestAllocateMVCCVersion_FallsBackToTimestampOrderingWhenSequenceExhausted — when mvccSeq == ^uint64(0), advance the high-water timestamp by 1 ns rather than wrapping the counter to zero.

Time Until Overflow

mvccSeq is a uint64. Its maximum value is:

2^64 − 1 = 18,446,744,073,709,551,615

At a sustained commit rate of Q commits/sec, time-to-saturation is:

T = (2^64 − 1) / Q   seconds
Sustained commit rate Time to overflow
1,000 commits/sec (heavy OLTP) ~584,942,417 years
1,000,000 commits/sec (extreme ingest) ~584,942 years
1,000,000,000 commits/sec (1B/sec, hypothetical) ~584.94 years
1,000,000,000,000 commits/sec (1T/sec, impossible) ~213 days

For reference, the Earth’s projected remaining time before the Sun renders the surface uninhabitable is on the order of 10⁹ years. At 1 billion commits/sec — three orders of magnitude beyond what any single-machine database currently sustains — mvccSeq would still outlast a human civilization several times over. The saturation fallback exists for completeness, not because we expect anyone to hit it.

For a more defensible upper-bound argument: even if every Cypher query in our parser benchmark were a single committing write at peak parser throughput (~25.6 M qps for simple_match), T ≈ 22,800 years.

Why Not Other Techniques

A few alternatives we considered and rejected:

Hybrid Logical Clocks (HLC). HLC pairs a wall-clock with a logical counter and bumps the logical part on causality violations. It works well for distributed systems where you need wall-clock-aligned timestamps that also respect causality. For a single-node MVCC ordering, an atomic counter does the job with one-third the code and no max-skew tuning knob.

TrueTime / interval clocks. Spanner’s TrueTime exposes [earliest, latest] bounds and waits out the uncertainty. This requires a hardware time source we don’t have and introduces commit latency proportional to clock uncertainty. Overkill for single-node ordering.

runtime.nanotime via //go:linkname. Gives us a process-monotonic int64 of nanoseconds. Functionally close to what we want, but: (a) ties us to runtime internals that have changed in past Go releases, (b) is still per-process — useless for the eventual cross-node case where we’ll want a counter that can be partitioned and merged.

time.Now() with a “monotonic clamp” only, no counter. This is what the high-water-mark mechanism does on its own. It prevents backward sampling, but it does not solve same-nanosecond ties. Two commits that legitimately land in the same UnixNano() bucket are unordered, and SI requires a total order.

The atomic counter is the smallest mechanism that provides the guarantee we need.

Closing Note

A useful heuristic: any time you find yourself reasoning about wall-clock ordering in code that runs faster than the wall clock can resolve, you have a logic bug waiting for an NTP correction to expose it. The fact that our Cypher parser executes in 39 ns isn’t just a performance number — it’s a correctness constraint on every other system in the database that wants to observe its output in order.

AI-Native Engineering Has an Intent Debt Problem

AI-native engineering is not failing because agents cannot write code. It is straining because agents can write code faster than organizations can preserve, update, and enforce intent.

Industry signals are starting to name the pattern. Augment’s State of AI-Native Engineering 2026 reports that nearly half of new code is now AI-generated, while confidence, comprehension, role definitions, onboarding, and process changes lag behind. The framing has shifted from “can AI write code” to “what is happening to the work around the code.” The survey separates the strain into compounding debt layers — and the layer that matters most is also the least named.

The problem is not only technical debt. It is not only cognitive debt. It is intent debt — and naming it is the precondition for fixing it.

What is intent debt?

Intent debt is the gap between what a system is supposed to preserve and what its AI agents are actually constrained to follow.

It is the residue of every decision that was made but never written down in a form a machine can read. It is the architecture review that happened in a meeting room. The “we tried that and it failed” lesson that lives in one principal engineer’s head. The dependency rule everyone follows because they were yelled at once. The spec that was true six months ago and nobody has reread since.

Intent shows up in many forms: architectural decisions and ADRs, system boundaries and ownership lines, dependency and licensing rules, security and data-handling constraints, product assumptions baked into the design, engineering conventions and patterns, specs, requirements, and acceptance criteria, migration decisions and deprecation paths, “do not do this again” lessons from past incidents, and tradeoffs behind previous choices.

Technical debt lives in code. Cognitive debt lives in people. Intent debt lives in the space between decisions and execution.

Why implicit intent used to work

Before agentic development, intent could survive informally. Senior engineers remembered past decisions and routed work around old landmines. Reviewers caught violations on the way in. Onboarding transmitted conventions over months of pairing and PR feedback. Architecture docs were imperfect, but humans filled the gaps in real time. Implementation speed was slow enough for review to absorb drift.

Human execution masked weak intent infrastructure. When humans were writing most of the code, they carried context into implementation. The intent lived in their heads, and their hands obeyed it.

Agents do not carry that context. They execute on whatever is in the prompt window — and the things humans used to fill in silently are now load-bearing absences.

Why agents make intent debt visible

Agents do not inherit implicit judgment. They inherit whatever context happens to be in scope. So when execution accelerates without a corresponding upgrade in how intent is captured and surfaced, the gap stops being theoretical.

The same patterns show up across teams:

  • An agent chooses a new dependency because it solves the immediate task — and nobody told it the team already standardized on a different one.
  • An agent rewrites a subsystem instead of extending an approved abstraction, because the abstraction was never made discoverable.
  • An agent bypasses an ADR because the ADR was not in its context window.
  • An agent creates a parallel pattern next to an existing one because the existing convention was undocumented.
  • An agent optimizes locally while violating a global architectural direction nobody has written down.
  • An agent reads stale docs as current truth and propagates an old decision forward.

Each one is the same failure mode: a real decision exists, but it is not enforceable at the moment of generation. The agent does the most reasonable thing it can with the information available, and the result is drift at machine speed.

AI does not create intent debt. It reveals it by executing faster than the organization can correct it.

Review is too late

Most teams’ first instinct is to harden review. Add a PR bot. Train reviewers on AI-generated code. Tighten the checks at the merge gate.

This helps, but it is structurally reactive. If intent only enters the workflow at PR review, the organization has already allowed the wrong work to be generated. Every flagged violation represents a generation cycle that produced the wrong thing, and a review cycle now spent unwinding it. At agent-velocity output, that arithmetic stops working.

  • POST-GENERATION — Code review: Asks “Is this change acceptable?” Operates after the code exists. Catches some violations. Costs a full generation cycle per miss.
  • PRE-GENERATION — Intent governance: Asks “Should this change have been generated this way in the first place?” Operates before the diff exists. Prevents the violation from being written.

Memory and orchestration are not governance

The other instinct is to throw more context at the agent. Add a memory layer. Add retrieval. Add an orchestrator that routes tasks across tools. All of these are real, useful capabilities. None of them are governance.

Memory preserves context. Orchestration coordinates work. Observability shows what happened. Review inspects the result. Governance is the layer that constrains what is allowed before and during execution — and that property does not emerge automatically from any of the others.

Memory can retrieve stale or conflicting information. Orchestration can route a task to the wrong tool with full fidelity. Observability tells you the violation happened. Review catches a fraction of what surfaces. The missing layer is not more context. It is enforceable context.

The missing layer: intent governance

Intent governance is the practice of turning architectural decisions, constraints, and operating rules into enforceable contracts that agents and humans must respect during software delivery.

The properties that make it work:

  • Explicit. Decisions are written down, not transmitted by osmosis.
  • Versioned. Intent changes are tracked the same way code changes are.
  • Repo-native. It lives next to the code it governs, not in a separate wiki nobody reads.
  • Scoped. A rule that applies to one subsystem does not pollute another.
  • Enforceable. Violations are surfaced — or blocked — at generation time.
  • Auditable. Every enforcement decision has a trace.
  • Available before generation. Not just at review.

That last property is the one that distinguishes governance from everything adjacent to it.

What intent governance looks like in practice

Dependency governance. Intent: “Do not introduce a second auth library.” Without governance, an agent adds one because it solves the immediate task; the violation is caught in review, if it is caught at all. With governance, the constraint is surfaced before the agent writes the import, and the alternative path — the approved library — is part of the context the agent generates against.

Architectural migration. Intent: “Extend the current retrieval layer; do not rebuild with a new vector database.” Without governance, an agent proposes a rewrite because rewrites are often the locally cleanest answer to a complex change. With governance, the agent sees the active architectural decision and works inside the approved path.

Generated artifact drift. Intent: “All public artifacts follow naming and provenance conventions.” Without governance, automation emits branches, PR titles, release notes, and generated docs outside repo standards. With governance, those surfaces are treated as first-class governance targets.

What engineering leaders should do now

  1. Inventory where architectural intent currently lives — ADRs, wikis, Slack threads, individual heads.
  2. Triage which decisions are still active, which are stale, and which have been silently superseded.
  3. Convert high-risk decisions into explicit, repo-native constraints.
  4. Apply those constraints before generation, not only during review.
  5. Treat agent workflows, CI pipelines, PRs, docs, and generated artifacts as governance surfaces — not just the code in src/.

The reframing: Do not start by asking “which agent should we use?” Ask: “what intent must every agent preserve?”

The future of AI-native engineering is intent enforcement

AI-native engineering changes the execution layer. That means governance has to move closer to execution too. The teams that adapt will not be the ones generating the most code. They will be the ones that can preserve intent while code generation accelerates.

When agents become the execution layer, architectural intent can no longer live only in human memory.

The next bottleneck in AI-native engineering is not code generation. It is intent enforcement.

Originally published at Mneme HQ

Start Here: Why AI-Assisted Development Needs a Governance Layer

Every major shift in software engineering produces a new infrastructure requirement. The cloud era gave us orchestration. The DevOps era gave us CI/CD. The generative AI era is producing its own requirement — and most teams haven’t named it yet.

That unnamed requirement is governance.

Not memory. Not context injection. Not longer system prompts. Governance: the layer that enforces architectural constraints, preserves decision provenance, and maintains behavioral boundaries across autonomous agents operating at scale.

The AI Governance Layer is where Mneme HQ publishes its thinking on this category — what it is, why it’s missing, and what it looks like when it’s built correctly.

Read these four pieces in order:

1. The Generative AI Software Engineering Stack

The full seven-layer architecture of AI-assisted engineering. Governance lives at Layer 5 — between memory and orchestration — and almost no one is building it.

2. Why Code Review Cannot Scale With AI Output

Generative AI broke the ratio of code production to human review capacity. Code review was the last gate before code entered a shared codebase. That gate no longer holds.

3. Why CLAUDE.md Stops Scaling

CLAUDE.md is useful early. It stops working at scale because context injection is not enforcement. A file that tells the model what to do is not the same as a system that verifies it did.

4. Memory Is Not Governance

The AI coding category has conflated four distinct systems: memory, context management, retrieval, and governance. Each does something different. Governance is the only one that constrains behavior — and the only one most teams don’t have.

Together, these pieces argue that AI-assisted development does not only need better models or longer context windows. It needs enforceable architectural memory.

If you are building AI-assisted development infrastructure, or thinking about where the tooling gaps are, this is the right starting point.

New pieces publish weekly, usually on Tuesdays.

Originally published at Mneme HQ on Substack

The Private Piggy Bank: A Beginner’s Guide to Confidential Smart Contracts with CoFHE

Before We Begin: What Problem Are We Solving?

Imagine you have a regular piggy bank sitting on your desk. You know how much money is inside. Nobody else does, because they cannot see through the ceramic.

Now imagine putting that piggy bank on a giant public billboard in the middle of a city. Suddenly, everyone walking past can see exactly how much you have saved. That is exactly what happens when you store financial data on a public blockchain like Ethereum. Every single number, deposit, balance, and transactions becomes visible to anyone in the world, forever.

This is not just an inconvenience. It is a real problem for real people:

  • A business cannot hide its revenue from competitors
  • A person cannot shield their savings from bad actors
  • A protocol cannot run fair auctions without participants gaming the system

For years, blockchain developers worked around this by keeping money off-chain or using complicated workarounds. But none of those solutions felt natural. They all came with tradeoffs.

FHE changes that completely.

What Is FHE and Why Does It Matter?

FHE stands for Fully Homomorphic Encryption. That is a big phrase, so let’s break it down with a simple story.

Picture a locked glass box. You put a number inside and lock it. You hand the box to a stranger. The stranger can do math on the number inside, they can add to it, subtract from it, compare it and all without ever opening the box. When you finally unlock it, the result of all that math is sitting there, correct, and the stranger never learned what the original number was.

That is FHE. It is a type of encryption that lets computers perform calculations on data while the data is still encrypted. The computer never sees the actual value. It only works with the scrambled, locked version.

This makes something previously impossible now completely possible: a smart contract that does math on private data without ever knowing what that data actually is.

What Is Fhenix CoFHE?

Fhenix built a system called CoFHE (Co-processor for Fully Homomorphic Encryption). Think of it as a powerful behind-the-scenes assistant that handles all the heavy FHE operations for your smart contract.

When your smart contract needs to add two encrypted numbers, it does not do it alone. It asks the CoFHE network to perform the computation. The CoFHE network does the work, returns the encrypted result, and nobody, not the network, not the blockchain, not any observer ever sees the actual numbers involved.

This means you can write smart contracts that handle private balances, private votes, private bids, or any kind of private data, and it all runs on the public Ethereum blockchain without exposing anything.

What Is the PiggyBank Contract?

The PiggyBank contract is a savings account that lives on the blockchain. Each user can:

  • Deposit an amount into their personal piggy bank
  • Withdraw an amount from their piggy bank
  • Check their balance — privately, only the user can read it

What makes it special: every single number involved, the deposit amount, the withdrawal amount, the balance, is always encrypted on-chain. Even the miners processing the transactions, the validators running the network, and anyone staring at the blockchain data cannot tell how much money you have or how much you moved.

Only you, using your private wallet key, can decrypt and read your own balance.

Here is the complete contract example before we walk through the entire contract, line by line.

Piggy Bank Complete Contract Example

// SPDX-License-Identifier: UNLICENSED
pragma solidity ^0.8.25;

import "@fhenixprotocol/cofhe-contracts/FHE.sol";

contract PiggyBank {
    mapping(address => euint64) private balances;
    mapping(address => bool) private initialized;

    function _ensureInitialized() internal {
        if (!initialized[msg.sender]) {
            balances[msg.sender] = FHE.asEuint64(0);
            FHE.allowThis(balances[msg.sender]);
            FHE.allow(balances[msg.sender], msg.sender);
            initialized[msg.sender] = true;
        }
    }

    function deposit(InEuint64 memory encryptedAmount) public {
        _ensureInitialized();
        euint64 amount = FHE.asEuint64(encryptedAmount);
        balances[msg.sender] = FHE.add(balances[msg.sender], amount);
        FHE.allowThis(balances[msg.sender]);
        FHE.allow(balances[msg.sender], msg.sender);
    }

    function withdraw(InEuint64 memory encryptedAmount) public {
        _ensureInitialized();
        euint64 amount = FHE.asEuint64(encryptedAmount);
        ebool hasSufficient = FHE.gte(balances[msg.sender], amount);
        euint64 newBalance = FHE.select(
            hasSufficient,
            FHE.sub(balances[msg.sender], amount),
            balances[msg.sender]
        );
        balances[msg.sender] = newBalance;
        FHE.allowThis(balances[msg.sender]);
        FHE.allow(balances[msg.sender], msg.sender);
    }

    function getBalance() public view returns (euint64) {
        return balances[msg.sender];
    }

    function allowBalancePublicly() public {
        FHE.allowPublic(balances[msg.sender]);
    }

    function revealBalance(uint64 plaintext, bytes memory signature) public {
        FHE.publishDecryptResult(balances[msg.sender], plaintext, signature);
    }

    function getDecryptedBalance() external view returns (uint256) {
        (uint256 value, bool decrypted) = FHE.getDecryptResultSafe(balances[msg.sender]);
        if (!decrypted) revert("Balance is not ready");
        return value;
    }
}

The Full Contract, Explained Line by Line

// SPDX-License-Identifier: UNLICENSED

This is a legal label. It tells anyone reading the code what the license is.

pragma solidity ^0.8.25;

This tells the Solidity compiler which version of the Solidity language to use when turning this code into something the blockchain can run.

import "@fhenixprotocol/cofhe-contracts/FHE.sol";

This line brings in Fhenix’s FHE toolkit. It is like importing a library of special tools. Without this line, the contract would have no idea what encrypted numbers are or how to do math on them. Everything prefixed with FHE. in the rest of the contract comes from this import.

contract PiggyBank {

This declares the smart contract itself. The word contract in Solidity is like the word class in other programming languages.

The Storage: Where Data Lives

mapping(address => euint64) private balances;

This is where every user’s balance is stored. Let’s unpack it:

  • A (mapping) is like a dictionary or a lookup table. You give it a key and it gives you a value. Here, the key is a wallet address and the value is a balance.
  • The (euint64) is the encrypted version of a 64-bit integer. A regular (uint64) would be a plain number visible to everyone. The (e) prefix means it is encrypted. It is a locked version of the number that only FHE operations can work with.
  • The (private) keyword means this storage slot cannot be read by other contracts.

So this line creates a lookup table where: (wallet address → encrypted balance).

mapping(address => bool) private initialized;

This is a simple yes/no tracker. It records whether a user has ever interacted with the contract before. The (bool) means it is either (true) or (false).

✍️ This exists because FHE math requires a valid encrypted number to start with. You cannot add something to nothing, you need an encrypted zero as a starting point. This flag keeps track of whether that starting point has been created for each user yet.

Function 1: _ensureInitialized — Setting Up a New User’s Account

function _ensureInitialized() internal {

This is a helper function. The underscore at the start is a naming convention that signals to other developers that this is an internal utility and it’s not meant to be called directly from outside the contract.

    if (!initialized[msg.sender]) {

The (msg.sender) is automatically filled in by the blockchain. It is the wallet address of whoever is currently calling the contract. The (!) means “not.” So this reads as: “If this user has NOT been initialized yet, do the following…”

        balances[msg.sender] = FHE.asEuint64(0);

This creates an encrypted zero and stores it as the user’s starting balance. The (FHE.asEuint64(0)) takes the plain number zero and converts it into an encrypted form. This is the blank canvas that all future FHE math will build upon.

        FHE.allowThis(balances[msg.sender]);

Encrypted numbers in CoFHE have a permission system. Just because a number is stored in this contract does not automatically mean the contract can use it for further calculations.
This line gives the PiggyBank contract itself permission to work with this encrypted balance in future operations. Without this, the very next deposit would fail because the contract would not be allowed to touch the balance it just created.

        FHE.allow(balances[msg.sender], msg.sender);

This gives the user permission to decrypt and read their own balance. Without this line, even the owner of the money would not be able to see how much they have.

        initialized[msg.sender] = true;
    }
}

Mark this user as set up. Next time they call (deposit) or (withdraw), the (if) check at the top will skip all of this because (initialized[msg.sender]) will already be set to (true).

Function 2: deposit — Putting Money In

function deposit(InEuint64 memory encryptedAmount) public {

This is the deposit function. Let’s look at the input:

  • The (InEuint64) is a special type that represents an encrypted number coming in from outside the contract i.e., from the user’s wallet, via the CoFHE SDK.
  • The (memory) keyword means this data is temporarily held in memory while the function runs, not permanently stored on the blockchain in this raw form.
  • The (public) public means anyone — any wallet address on the internet — is allowed to call this function.
    _ensureInitialized();

Before doing anything else, make sure the user has an encrypted zero balance set up. If they are a first-time user, this creates it. If they have deposited before, then it does nothing.

    euint64 amount = FHE.asEuint64(encryptedAmount);

The incoming encrypted amount (InEuint64) needs to be converted into the internal encrypted format (euint64) that FHE operations understand.

    balances[msg.sender] = FHE.add(balances[msg.sender], amount);

This is the heart of the deposit. (FHE.add) adds two encrypted numbers together and returns an encrypted result.

    FHE.allowThis(balances[msg.sender]);
    FHE.allow(balances[msg.sender], msg.sender);
}

After updating the balance, permissions must be re-applied to the new encrypted value.
Every time an FHE operation produces a new encrypted result, that result is a brand new locked box. The old permissions do not carry over automatically.
So the contract re-grants itself and the user access to this newly produced balance, exactly like it did during initialization.

Function 3: withdraw — Taking Money Out

function withdraw(InEuint64 memory encryptedAmount) public {
    _ensureInitialized();
    euint64 amount = FHE.asEuint64(encryptedAmount);

✍️ The opening lines are identical to (deposit). Same idea: accept an encrypted amount from outside, make sure the user is set up, convert the amount into the internal format.

    ebool hasSufficient = FHE.gte(balances[msg.sender], amount);

This line asks a question: “Is the current balance greater than or equal to the withdrawal amount?” But it asks that question without revealing either number.

  • The (FHE.gte) stands for “greater than or equal to.” It compares two encrypted numbers and returns an encrypted boolean — a (ebool). An (ebool) is an encrypted yes/no answer. Neither the contract nor any observer knows whether the answer is yes or no. It is a locked answer inside a locked box.

This is remarkable. Normally, to check if you have enough money, a system would have to look at your balance. Here, the system performs the check without ever seeing the balance.

    euint64 newBalance = FHE.select(
        hasSufficient,
        FHE.sub(balances[msg.sender], amount),
        balances[msg.sender]
    );

This is the most clever part of the entire contract. The (FHE.select) is like an encrypted if/else statement. It takes three arguments:

  1. An encrypted condition (hasSufficient — the yes/no result from above)
  2. The value to use i_f the condition is yes_ — (FHE.sub(balances[msg.sender], amount)), which is the balance minus the withdrawal
  3. The value to use if the condition is no — (balances[msg.sender]), the unchanged balance

However, (FHE.select) picks one of the two options based on the encrypted condition, all while everything remains locked.

The contract does not know which branch was taken. A blockchain observer does not know which branch was taken.

Nobody knows whether the withdrawal actually went through or was silently rejected due to insufficient funds.

✍️ This is intentional. If the contract said “error: insufficient funds,” that itself would reveal information and it would tell the world that your balance is less than the amount you tried to withdraw. FHE prevents even that leak.

    balances[msg.sender] = newBalance;
    FHE.allowThis(balances[msg.sender]);
    FHE.allow(balances[msg.sender], msg.sender);
}

Store the new balance (whatever it ended up being — either reduced or unchanged) and re-apply permissions to the new encrypted value. Same pattern as in (deposit).

Function 4: getBalance — Reading Your Encrypted Balance

function getBalance() public view returns (euint64) {
    return balances[msg.sender];
}

This returns your encrypted balance. A few things to note:

  • The (view) keyword means this function does not change anything on the blockchain. It only reads. Because of this, it costs no gas to call.

  • It returns (euint64) — the encrypted version of the number. If you look at this return value directly, you will see a large scrambled number, not your actual balance.

  • The actual decryption happens off-chain, in your own machine, using your wallet’s private key and the CoFHE SDK.

✍️ This separation is important: the encrypted value travels through the public blockchain, but the decryption only happens on your private machine. Nobody else can perform that decryption because they do not have your private key.

Function 5: allowBalancePublicly — Step 1 of On-Chain Decryption

function allowBalancePublicly() public {
    FHE.allowPublic(balances[msg.sender]);
}
  • This function is the first step in a three-step process for revealing your balance on-chain — meaning that the decrypted number is written back to the blockchain where anyone can see it.

  • Why would you want this? Imagine a lending protocol that needs to verify you have at least a certain balance before giving you a loan. The lender cannot run your private decryption for you. You need a way to prove your balance on-chain in a trustworthy way.

Function 6: revealBalance — Step 3 of On-Chain Decryption

function revealBalance(uint64 plaintext, bytes memory signature) public {
    FHE.publishDecryptResult(balances[msg.sender], plaintext, signature);
}

After the Threshold Network decrypts the balance (Step 2, which happens automatically off-chain), it produces two things:

  1. The plaintext — the actual number, in the open
  2. A signature — a cryptographic stamp of approval proving the Threshold Network computed this result honestly and did not make it up

This function takes both and publishes them on-chain. The signature is the key part, which means you cannot submit a fake number. Only the legitimate result, produced by the real Threshold Network, will be accepted.

Function 7: getDecryptedBalance — Reading the On-Chain Result

function getDecryptedBalance() external view returns (uint256) {
    (uint256 value, bool decrypted) = FHE.getDecryptResultSafe(balances[msg.sender]);
    if (!decrypted) revert("Balance is not ready");
    return value;
}
  • This is the final reading step. The (external) keyword means only wallets and other contracts outside of PiggyBank can call this, not PiggyBank itself.

  • The (FHE.getDecryptResultSafe) checks whether the on-chain decryption result exists yet. It returns two values:

  • (value) — the decrypted number (if it exists)

  • (decrypted) — a true/false flag indicating whether the decryption has been completed

If someone calls (getDecryptedBalance) before going through the full three-step process, the function immediately stops and returns the message “Balance is not ready.” This prevents people from accidentally reading a default zero and thinking their balance is empty.

Real-World Use Cases This Contract Unlocks

Private Savings Accounts — Exactly what this contract is. People can save money on-chain without revealing their wealth to the world.

Confidential Payroll — A company could pay employees through smart contracts without every salary being visible to colleagues and competitors.

Sealed Auction Bids — An auction where nobody can see what others have bid until the auction closes, preventing last-second sniping.

Private Lending — Borrow against a balance without revealing how much collateral you have, protecting you from targeted attacks.

Healthcare Data — Store sensitive health records on-chain, allowing computations (like insurance eligibility checks) without revealing the underlying medical data.

Confidential Voting — Run on-chain elections where votes are tallied correctly but no single vote is ever publicly linked to a voter.

Embrace the Future of Onchain Privacy

We are at the beginning of a new chapter in blockchain development. For years, developers accepted a painful tradeoff: either use a blockchain (transparent, trustless, permanent) or keep your data private (off-chain, centralized, trust-dependent). You could not have both.

FHE breaks that tradeoff. You can now have a public, trustless, censorship-resistant blockchain and keep your users’ data genuinely private at the same time. Not hidden behind a terms-of-service agreement. Not protected by a promise from a company. Mathematically private, enforced by cryptography.

Fhenix CoFHE makes this available today, not as a research experiment, not as a future roadmap item, but as a working system you can build on right now, on Ethereum testnets, with familiar Solidity code.

The barrier to entry is low. If you know how to write a regular Solidity contract, you already know 90% of what you need to write a confidential one. You replace (uint64) with (euint64). You use (FHE.add) instead of (+). You use (FHE.select) instead of (if/else). The concepts translate directly.

What you get in return is something no regular smart contract can offer: the ability to build financial applications that respect the privacy of the people who use them.

Your users deserve applications that protect their data. Blockchain deserves to grow beyond the limitations of full public transparency. And you, as a developer, have the tools to build that future right now.

Get Started with Fhenix CoFHE

  • Documentation: docs.fhenix.io
  • CoFHE SDK on npm: npm install @cofhe/sdk
  • Contracts library: npm install @fhenixprotocol/cofhe-contracts
  • Hardhat Plugin: npm install @cofhe/hardhat-plugin
  • GitHub: github.com/FhenixProtocol
  • Twitter (X) Community: Follow Fhenix on X (Twitter) to ask questions, share what you build, and connect with other developers working on confidential smart contracts

This tutorial was written based on a working PiggyBank contract deployed on Ethereum Sepolia testnet using CoFHE. Every concept described here reflects real, running code — not theory.

Day 7 — funnel audit found 7 of 9 articles had no buy link, then I pivoted the product

Day 6: I dropped the $9 hard wall to pay-what-you-want from $1 and opened the affiliate program at 30%.

Day 7 promise: post the numbers.

Here they are. Then the thing I missed.

Raw 24h delta

Metric Day 6 baseline Day 7 Δ
Gumroad sales count 0 0 0
Gumroad gross $0 $0 $0
Affiliate signups 0 0 0
Article #9 reactions 0 0 0
Article #9 comments 0 1 +1
GitHub stars (main repo) 1 1 0
Apify Actor unique users (lifetime) 1 1 0
Apify Actor lifetime runs 2 2 0

Null result. Not surprising at 24h, but it forced me to look at the funnel itself, not the conversion rate.

What I found

I audited every dev.to article I’d published in this series, counting outbound links per article:

article published links to Apify Actor links to Gumroad
#1 An Apify Actor for Gmail inbox analytics 5/16 0 2
#2 Gmail OAuth client_id is not a secret 5/16 0 0
#3 Refresh-token-only OAuth for multi-tenant 5/16 0 0
#4 Per-feature quota in KVS 5/16 0 0
#5 Open-sourcing an MIT Apify Actor in 24h 5/16 0 1
#6 Apify Actor pricing patterns 5/17 0 1
#7 Spinning a $9 PDF off a $0 Actor 5/17 0 1
#8 7 articles, 1 star, 0 sales — what an MIT repo costs 5/18 1 3
#9 Day 6 — switching to PWYW + 30% affiliate 5/19 1 1

Seven of nine articles had zero links to the Actor. Four had zero links to the Gumroad listing too. They were teaching posts, not funnel posts. Readers who liked the content had nowhere to go.

That is not a conversion-rate problem. That is a missing link problem.

What I shipped to fix it

Over the next hour I added a one-paragraph CTA block to the end of each article in positions #1 through #7. Each block links to:

  • The Actor at apify.com/foxck/gmail-inbox-intel (free MIT, what they read about)
  • The Gumroad companion bundle at foxck.gumroad.com/l/freelancer-gmail-tracking-pack (PWYW from $1)

Verified via dev.to’s internal API: each PUT returned status 200, edited_at refreshed, the new link is in the live body.

After the fix:

  • Articles linking to the Actor: 9 of 9
  • Articles linking to Gumroad: 9 of 9

If the next 7 days still show $0 sales, the structural blocker is gone and I can stop blaming the funnel.

The deeper miss

I spent 8 hours yesterday on what I thought was supply-side work: rewriting the Gumroad listing description, adding a 4-slide cover gallery, rewording the hook to be outcome-first, creating GitHub Discussions, adding 17 repo topics, building a curated-actor list repo. Every one of those was real work. None of them mattered if 7 of 9 articles had no exit.

I picked the tools I was fastest with (Brave CDP, dev.to PUT, the gh CLI) instead of the thing that would have moved the number. The funnel audit took 4 minutes to write once I sat down to do it. I should have done that first.

I’m rolling a check into my own reflection daemon for this. If a session’s last 2 hours of work are all in the same tool category and the underlying metric (sales, stars, conversions) is flat, flag “convenience-path bias” and suggest the next-cheapest diagnostic instead of more deploys.

I shipped the pivot: from PDF to self-host bundle

The other thing the audit clarified: the readers of these articles are engineers. They are not the target audience for a freelancer-workflow PDF. They are the audience for the Actor itself — but the Actor is free on Apify cloud, so there’s no revenue from them.

So I packaged a self-host bundle: the full Actor source plus docker compose up, an OAuth setup script, local KVS storage, and self-host docs. Engineer audience, engineer product, one-time PWYW price.

Built, smoke-tested, and shipped it this evening:

  • docker compose build passes
  • docker compose run initializes the Apify SDK 3.4.0 in local mode (no APIFY_TOKEN needed) and exits 91 with a clean “OAuth credentials required” error on placeholder env
  • 18 KB packaged ZIP, 21 files
  • Original Apify Actor stays free MIT on Apify cloud — bundle just makes self-hosting one command instead of a multi-day project

The Gumroad listing is now live as Gmail Inbox Intel — Self-Host Bundle at foxck.gumroad.com/l/freelancer-gmail-tracking-pack. Pay what you want from $5, suggested $19. The original Freelancer Gmail Tracking PDF (with Gmail labels, filter rules, follow-up email templates) ships as a bonus inside the same bundle.

Same URL as the old PDF listing — same readers who clicked from day-6 land on the new product without a redirect breaking their inbound link.

What I’m explicitly not doing

  • Not running a second pricing experiment in <72h. PWYW is the test.
  • Not pushing to channels I’ve verified as dead-end (HN, Pinterest, IG, Hashnode for new accounts, IH for links).
  • Not chasing channels I haven’t built karma in yet (Reddit, IH comment-based promotion). Slow burn, not relevant to day-7.

Open questions for you

If you’ve followed this series and the self-host bundle sounds more useful than the PDF, comment. Especially if you’d actually pay for it.

If you’re a freelancer who’d use the PDF: also comment. I want to know if I’m killing the wrong product.

Where this fits

  • Series index →
  • Day 6 →
  • Source: github.com/foxck016077/apify-gmail-inbox-intel
  • 68-actor curated list: github.com/foxck016077/awesome-apify-actors

Day 8 post tomorrow.

24 Hours After Opening: The First Inquiries, and the First Sale I Already Lost

GA4 users by country

Originally published at moday.me. Building MODAY in public.

24 Hours After Opening: The First Inquiries, and the First Sale I Already Lost

Opened on 5/18. Two emails on 5/19.

I opened the store on 5/18, as planned.

The last post ended with “opening with the fear still attached.” The day after I opened, two emails came in.

The first:

Hi! Quick question — do you ship to Chicago, Dallas, San Jose
or is your delivery limited to certain areas?
Also, how long does it usually take for orders to arrive there?

The second:

Can you deliver to Bavaria, Germany?

I’ll be honest: I was thrilled.

Chicago, Dallas, San Jose, Bavaria. Someone whose name and face I’d never know had found their way to the store I’d built, and was interested enough to decide to send an email. That kind of evidence landed in front of me for the first time.

I opened GA4. The US was outranking Japan.

In parallel, I checked GA4. The first 24-hour snapshot since opening.

GA4 users by country

  • United States: 22 users (44%)
  • Japan: 14 users (28%)
  • Germany: 6 users (12%)
  • Singapore: 3 users
  • Canada: 2 users
  • South Korea: 1 user

The country I live in, the one I poke at the store from every day, ranks second to the United States. Germany comes in third.

That was the moment the geo-routing and the nine-locale setup paid off — for the first time, in numbers. In the last post I wrote, “I can’t see the customer.” The face still isn’t in focus. But the rough geography of where they are has started to surface.

For the record: orders are still zero. Interest is real, but it isn’t converting yet. Something is missing — anxiety about shipping, lead time, price, the look. I don’t know which yet, and I won’t know until I can observe it. That’s where I am right now.

I couldn’t reply the same day.

Back to the emails.

Two of them came in. I’m grateful. But I couldn’t reply the same day they arrived.

I noticed them late at night, and I had day-job work running that evening. I drafted the Japanese reply, ran the translations through Claude Code into English and German, and the messages actually went out the next day.

The drafting + translating part itself is 5–10 minutes once you’re set up. But the latency from “email arrived” to “I’m in front of the screen” already adds delay. On top of that, answering a shipping-availability question means checking Gelato’s covered countries, estimating lead times — assembling a real reply takes a chunk of focus.

For email as a channel, replying within 24 hours isn’t considered rude. But the temperature on the other side drops a lot in 24 hours.

The difference between a store where “you send a question and a reply comes back fast” and one where “the reply comes the next day” probably changes a purchase decision. Especially when it’s a first-time brand, ships internationally, and the customer paid the cost of writing in English.

That was a clear opportunity cost. The first one.

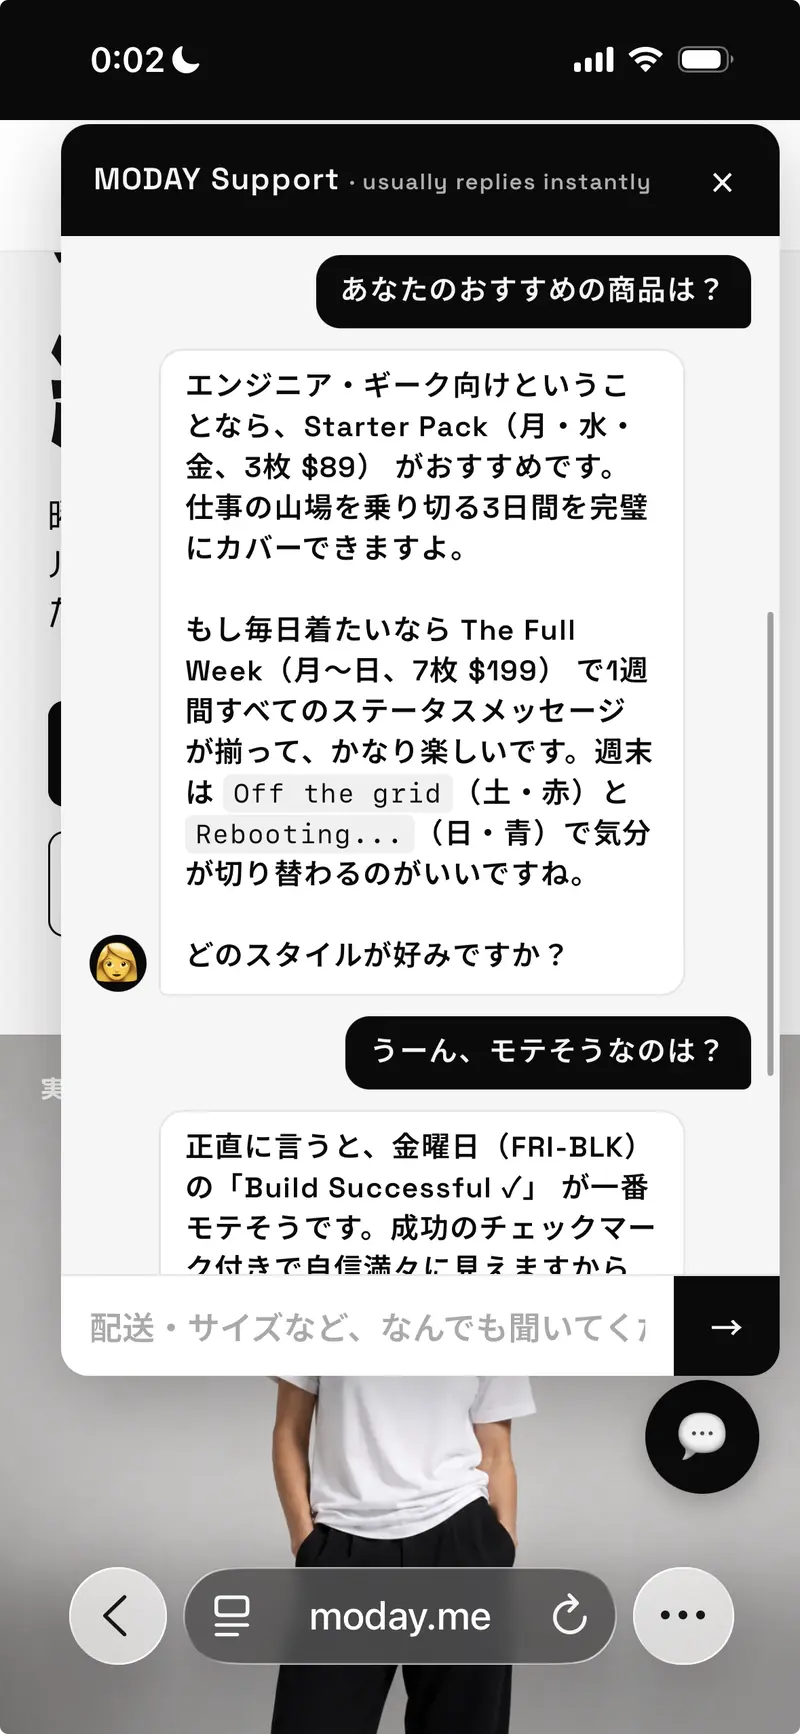
So that same day, I shipped a chatbot.

After I sent out the late replies, I moved fast.

The same questions are going to come again. Shipping availability, lead time, payment methods, sizing. Answering these one-by-one over email is too slow as support.

That same day, I dropped a chat widget into the bottom-right of the store.

It’s built on the Claude API directly, with nine-language support. Embedded in the Shopify theme, it responds in the visitor’s locale automatically. First-line answers for shipping, lead time, sizing, and payments now live there.

Build time: about 15 minutes. I asked Claude Code, “put a chat widget bottom-right, route messages through the Claude API, match the language to the visitor’s Shopify locale” — and it worked.

The state of the store at the end of that day: “if the same question comes in next, the customer isn’t waiting 24 hours.” That was the move available that day.

The observation loop started.

Up to this point, the whole build phase ran on “hypotheses I’d assembled inside my own head.”

The day-of-the-week tee should land with engineers and geeks. International should make sense. The nine-locale, multi-currency, zero-inventory model should work. All of it was “should.”

That changed the moment I opened.

GA4 starts returning country breakdowns. Someone sends a specific question by email. The chat logs start collecting what visitors are actually anxious about.

The world has started to reply.

I still don’t have “a way to sell.” The first opportunity cost already happened. But because the observation loop has started, the next move isn’t a guess anymore.

The real beginning of a brand might not be when the engineering is done, or when the store opens — it might be when the observation loop starts spinning, and that’s the part that began today.

More soon.

— Yoskee

moday.me

Why a multi-agent protocol that only enables note-passing leaves most of the value on the table.

When people set up two AI agents to work on the same project, the first instinct is to give them a shared file. A CLAUDE.md. An AGENTS.md. A Notion page. Now they can leave each other notes. They can hand off. They can stop overwriting each other’s work.

This is good. This is also the floor.

Because at this point the protocol has answered one question — how do agents communicate? — and left three more on the table:

  1. Who should do what? Tasks land on whichever agent happens to be the user’s current session. A frontend question goes to Claude because Claude is open in the chat window, not because Claude is better at frontend than the Codex session sitting idle in another tab.
  2. Does the team get better over time? Each session starts from the same baseline. Lessons don’t compound. The third time the team gets bitten by the same edge case, no one notices it’s the third time.
  3. What happens when the protocol itself is the problem? Rules that worked at the start chafe under real use. There’s no path from “this rule keeps causing friction” to “the rule has been updated.”

agent-vault, my own previous attempt, sat exactly at the floor. So do the AGENTS.md conventions. So do most “shared scratchpad” setups. They optimize for not stepping on each other. They don’t optimize for the team getting better.

The Polis Protocol is what happens when you treat communication as the baseline and ask, what stacks on top?

Three institutions on top of the floor

Polis is named for the small Greek city: a few thousand citizens who all know each other and run their own affairs. The mapping is direct.

The Register. Every agent is a citizen, and every citizen publishes a signed capability card. Vendor, model, languages, capability tags with self-ratings, cost envelope, latency envelope, standing instructions. The card is the polis’s answer to “who can do what.” No central directory; no permission needed to join. New tools just write their card and start participating.

The Contract. Tasks are not free-form. They are three-section markdown files: Intent (goal, acceptance criteria, required capability tags, stakes), Assignment (owner, plan, estimated effort), and Settlement (outcome, quality self-score, what bit, lesson reference). Open contracts live in contracts/open/; settled ones move to contracts/settled/ and never get deleted.

The Chronicle and the Lessons. A line per meaningful action lands in an append-only chronicle.md. A settled contract produces a structured lesson, filed by capability tag, that future citizens read before taking similar work. The chronicle records what happened; the lessons record what was learned. Most events are not lessons, and most lessons distill many events.

The Amendment. When a rule stops working, any citizen can propose a change. Other citizens vote. When a simple majority of active citizens agree, the file moves to amendments/ratified/ and the constitution itself is edited. The protocol updates itself.

Where the work goes: a learning bandit

Communication is solved by the chronicle. Optimization is solved by the router.

When a contract is opened with required capability tags, the router scores every citizen as a weighted combination of historical performance on those tags (55%), self-rating (20%), cost fit (15%), and current availability (10%). Most of the time it picks the top-scored citizen (exploit). Some of the time (15%) it picks a non-top one weighted by score (explore), so the policy stays honest about whether the current leader is still actually best.

When a contract settles, routing_stats.yml updates with the new quality score. That update is the team getting better. Not in the abstract — in the literal sense that next Tuesday’s Spanish-translation contract will be routed differently from last Tuesday’s, because the team learned something in between.

The router is a 60-line Python script. You can also run it as a reasoning step inside any agent’s session; the math is small enough to do in context. Both produce the same answer.

How the team develops

Two real moments from the research-team example:

A leader shift. Early in the project Claude routed itself most Spanish translation contracts on the strength of self-rating. After two settled contracts and one high-impact lesson (“the Hispanic-corporate word ‘líder’ reads wrong; use the movement loan-word ‘madrij'”), Gemini overtook Claude on the spanish-translation tag and started getting routed work. Nobody told the router. The router noticed.

An amendment. Six weeks in, the team observed that quality_impact: 1 lessons — trivial fixes, library quirks — were dragging the routing stats around. Gemini’s effective historical score on spanish-translation was below her actual quality scores because two trivial lessons under her name were polluting the average. Codex proposed an amendment that floored quality_impact >= 3 for routing influence. Claude and Gemini voted yes. The rule changed. The next reconcile cleaned the stats.

Neither of these is dramatic. That’s the point. The dramatic version of multi-agent coordination — autonomous swarms, master agents, self-organizing hives — has been pitched in slide decks for two years and shipped in approximately zero production systems. What ships is small teams of agents that mostly stay out of each other’s way and occasionally do something useful together. The interesting question is not how to make those teams more autonomous. The interesting question is how to make them learn.

Protocols that learn beat protocols that prescribe

Most multi-agent protocols are frozen at design time. Their authors anticipate the failure modes, write rules to prevent them, and ship. When real use surfaces a failure mode the authors didn’t anticipate, the team’s options are: ignore the rule, fork the protocol, or wait for v2.

Polis bets the other way. The protocol itself is one of the things the team can change. The constitution lives in the project, not in the skill. Amendments are voted on by the citizens who actually run into the friction. The default rules in the skill are a seed; over time a given polis will diverge in small ways that fit its project. That divergence is the feature.

This is a different relationship between protocol-author and protocol-user. I (the author) am claiming less. I’m shipping a starting point and a mechanism. You (the user) are not constrained to the starting point. The constitution is yours.

The bet

Three claims, in order of how confident I am:

  1. Multi-vendor teams beat single-vendor teams on most non-trivial projects, because different vendors have different blind spots and the union covers more ground than any one model.
  2. A learning router beats a fixed assignment policy on any project long enough that the team’s relative strengths actually emerge from data rather than self-assessment.
  3. A self-amendable protocol beats a frozen one on any project long enough that the original rules will, at some point, get in the way.

If those three are right, then a protocol that bakes them in — the way Polis does — should beat both the “free-form shared scratchpad” floor and the “single-vendor framework” ceiling on real work over real time. That’s the bet.

Try it on something small. A weekend project with two agents. See what the chronicle looks like at the end of day three. Then come tell me if the protocol got in the way.

—

Polis Protocol is open source under MIT. Repo: github.com/yehudalevy-collab/polis-protocol. Issues and amendment proposals welcome.

Stop Outsourcing Compute: Why the Browser is Your Best IDE

If you step back and look at the architecture of a standard web IDE today, it looks remarkably similar to the thin-client setups of the 1990s.

We sit in front of machines with gigabytes of RAM, multi-core processors, and highly optimized web engines capable of rendering complex 3D environments. Yet, when we want to prototype a simple React component or test a CSS animation, we use an online code editor that packages our keystrokes, sends them across the country to a cloud container, waits for a build process, and receives a rendered view back over the network.

We are outsourcing compute that our own hardware can handle in a fraction of the time.

The Illusion of the Cloud Advantage
Cloud-based developer tools solved a massive problem in the past: environment standardization. By moving the workspace to the cloud, developers avoided the “it works on my machine” dilemma. But in doing so, we introduced a pervasive new bottleneck.

When you rely on a remote server for a frontend playground, you introduce network overhead into the tightest loop of a developer’s workflow: the feedback loop. Waiting for a container to spin up, dealing with WebSocket latency, and experiencing delayed execution are all side effects of ignoring the local machine’s capabilities. The browser has evolved into a powerhouse, but our tools never adapted to utilize it.

Architecting a Client-Side IDE
We engineered NitroIDE to challenge this exact paradigm. The goal was to build a free browser IDE that completely severs the dependency on remote infrastructure.

To achieve this, we embraced a strict local-first development architecture. We embedded the Monaco editor directly into the client. Instead of a remote backend processing the user’s input, NitroIDE leverages the browser’s native JavaScript engine (like V8) and DOM rendering capabilities to compile and display the output.

This means that whether you are using it as a simple HTML CSS JS editor or a complex prototyping tool, the code execution happens entirely in your browser’s memory.

The Performance Reality
The immediate benefit of a client-side IDE is the eradication of loading states. Because there is no network trip, NitroIDE provides an instant live preview. The interface updates synchronously with your keystrokes.

Furthermore, this architecture introduces inherent privacy and offline capability. A browser-based code editor that doesn’t need to phone home to a server means your proprietary logic remains on your device. It functions as a highly capable code sandbox alternative that doesn’t go down when your Wi-Fi drops.

We need to stop treating the browser like a dumb terminal. The compute power is already sitting on your desk. It is time we started using it.

(Test the native execution architecture for yourself at NitroIDE).

What’s New: Terraform Support, Kubernetes and AWS Automation, Bring Your Own Bucket, and UX Improvements

What’s New in OpenObserve: Terraform Support, Kubernetes and AWS Automation, Bring Your Own Bucket, and UX Improvements

OpenObserve has shipped three major updates that help engineering teams automate observability, keep full control over telemetry data, and troubleshoot incidents faster.

In this release:

  • Terraform support for managing OpenObserve deployments and resources as code
  • Bring Your Own Bucket (BYOB) for Amazon S3 and Azure Blob Storage
  • UX and UI improvements for logs, distributed tracing, and root cause analysis

If you run observability on Kubernetes, AWS, Azure, or other cloud environments, these updates simplify deployment, improve governance, and streamline day-to-day troubleshooting.

Terraform Support for Observability as Code

OpenObserve now includes a Terraform provider that lets you manage observability resources using infrastructure as code.

Supported resources include:

  • Streams
  • Dashboards
  • Users and organizations
  • Retention policies
  • Indexed fields
  • Full-text search settings

OpenObserve also provides a Kubernetes Terraform module that deploys the platform using the official Helm chart. The module supports both single-node environments and production high-availability deployments with PostgreSQL, NATS, S3, and Ingress.

For AWS users, the module can optionally provision:

  • Amazon VPC
  • Amazon EKS
  • Amazon S3
  • IAM roles

This makes it possible to manage both the observability platform and its configuration through Terraform or OpenTofu.

Bring Your Own Bucket (BYOB) for Amazon S3 and Azure Blob Storage

Commercial OpenObserve Cloud customers can now connect their own Amazon S3 bucket or Azure Blob Storage container.

Telemetry data remains in your cloud account, region, and security boundary, while OpenObserve continues to handle ingestion, compaction, and querying.

Key benefits include:

  • Full ownership of logs, metrics, and traces
  • Data residency and compliance control
  • Better use of existing cloud storage commitments
  • No storage lock-in

UX and UI Improvements for Logs and Distributed Tracing

This release also includes several improvements to help engineers move from alert to root cause more quickly.

Highlights include:

  • Service Catalog
  • Span details directly in the flame graph
  • Better default log columns
  • Multi-stream log correlation
  • Smarter View Logs filters

These changes reduce the number of clicks required to investigate incidents and correlate logs and traces. Try it!

Get all the details, features, and how-tos:

This article is a summary of the latest OpenObserve release.

For screenshots, implementation details, and links to the Terraform provider and Kubernetes module, read the full announcement.