Android XML vs Jetpack Compose — Which One Should You Use in 2026?

Every Android Developer Faces This

You open a new Android project and get stuck at one question:

Should I use XML or Jetpack Compose?

If you’ve been working with Android for a while, XML feels familiar. It’s stable, predictable, and widely used.

But then you see Jetpack Compose — modern, Kotlin-first, less boilerplate, and backed heavily by Google.

Now the confusion starts:

  • Is XML outdated?
  • Is Compose production-ready?
  • Which one is better for performance?
  • What should I use in real apps?

Let’s break it down deeply, but simply.

🧠 Understanding the Core Difference

🏗️ XML (View System)

Think of XML like designing a house blueprint separately from construction.

  • UI is written in XML files
  • Logic is written in Kotlin/Java
  • You connect them using findViewById or ViewBinding

👉 Two separate worlds:

XML → UI
Kotlin → Logic

⚡ Jetpack Compose

Compose is like building the house directly in code, live, and reactive.

  • UI is written in Kotlin
  • No XML at all
  • UI automatically updates when data changes

👉 Single source of truth:

  • Kotlin handles everything

🔍 Deep Dive (Based on Official Android Architecture)

  • XML (View System Internals)
  • Uses View hierarchy (ViewGroup → View)
  • UI rendering happens via:
  • Measure → Layout → Draw
  • Heavy nesting = performance cost

Problem:

Updating UI manually:

textView.text = "Hello"
button.visibility = View.GONE

👉 You control everything manually.

Jetpack Compose Internals

Compose works on Declarative UI + State-driven rendering

Core Concepts:

  • Composable Functions
  • State
  • Recomposition

How it works:

  • You describe UI as a function
  • When state changes → Compose redraws only affected parts

👉 Think like this:

@Composable
fun Greeting(name: String) {
    Text(text = "Hello $name")
}

If name changes → UI updates automatically.

🛠️ Implementation (Production-Ready Examples)

🧱 XML Example (Classic UI)

Gradle

android {
    buildFeatures {
        viewBinding true
    }
}

layout/activity_main.xml

<?xml version="1.0" encoding="utf-8"?>
<LinearLayout
    xmlns:android="http://schemas.android.com/apk/res/android"
    android:layout_width="match_parent"
    android:layout_height="match_parent"
    android:gravity="center"
    android:orientation="vertical">

    <TextView
        android:id="@+id/tvTitle"
        android:layout_width="wrap_content"
        android:layout_height="wrap_content"
        android:text="Hello XML"
        android:textSize="20sp"/>

    <Button
        android:id="@+id/btnClick"
        android:layout_width="wrap_content"
        android:layout_height="wrap_content"
        android:text="Click Me"/>
</LinearLayout>

MainActivity.kt

class MainActivity : AppCompatActivity() {

    private lateinit var binding: ActivityMainBinding // Avoid findViewById

    override fun onCreate(savedInstanceState: Bundle?) {
        super.onCreate(savedInstanceState)

        binding = ActivityMainBinding.inflate(layoutInflater)
        setContentView(binding.root)

        binding.btnClick.setOnClickListener {
            binding.tvTitle.text = "Clicked!"
        }
    }
}

⚠️ Issues in XML Approach

  • Boilerplate code
  • Manual UI updates
  • Risk of memory leaks (if binding mishandled)
  • Hard to maintain large UI

⚡ Jetpack Compose Example

Dependencies

implementation "androidx.compose.ui:ui:1.6.0"
implementation "androidx.compose.material3:material3:1.2.0"
implementation "androidx.activity:activity-compose:1.8.2"

MainActivity.kt

class MainActivity : ComponentActivity() {

    override fun onCreate(savedInstanceState: Bundle?) {
        super.onCreate(savedInstanceState)
        setContent {
            MyApp()
        }
    }
}

UI Code

@Composable
fun MyApp() {
    var text by remember { mutableStateOf("Hello Compose") }

    Column(
        modifier = Modifier.fillMaxSize(),
        verticalArrangement = Arrangement.Center,
        horizontalAlignment = Alignment.CenterHorizontally
    ) {

        Text(
            text = text,
            fontSize = 20.sp
        )

        Button(
            onClick = {
                text = "Clicked!"
            }
        ) {
            Text("Click Me")
        }
    }
}

🔥 Why This Is Better

  • No XML
  • No binding
  • No manual UI updates

State-driven UI
👉 UI reacts automatically

⚠️ Edge Cases & Real-World Considerations

1. Performance

XML:

  • Faster initial load
  • Heavy layouts = slow rendering

Compose:

  • Slight startup overhead
  • Faster updates due to recomposition

👉 Best Practice:

Avoid unnecessary recompositions

Use remember, derivedStateOf

2. Memory Management

XML:

  • Risk of leaks with binding
  • Fragment lifecycle issues

Compose:

  • Lifecycle-aware by default
  • Safer memory handling

👉 Compose reduces leak chances significantly.

3. Large Projects

XML:

  • Hard to scale
  • Multiple files → difficult navigation

Compose:

  • Modular UI
  • Reusable components

4. Interoperability (IMPORTANT)

You don’t need to fully switch.

👉 You can mix both:

setContent {
    AndroidView(
        factory = { context ->
            LayoutInflater.from(context).inflate(R.layout.old_layout, null)
        }
    )
}

🧠 When Should You Use What?

Use XML if:

  1. Maintaining legacy apps
  2. Team not trained in Compose
  3. Simple static UI

Use Compose if:

  • Starting a new project
  • Building scalable UI
  • Want modern architecture
  • Using Kotlin fully

🏁 Final Verdict

👉 XML is stable and proven

👉 Compose is the future

Google is clearly pushing Compose:

New libraries → Compose-first
Material 3 → Compose-first
Updates → Compose-focused

🎯 Challenge for You

👉 Have you tried migrating an XML screen to Compose?

  • What problems did you face?
  • Did performance improve or not?

💬 Drop your experience in comments — let’s learn from real-world cases.

Feel free to reach out to me with any questions or opportunities at ([email protected])
LinkedIn (https://www.linkedin.com/in/ahsan-ahmed-39544b246/)
Facebook (https://www.facebook.com/profile.php?id=100083917520174).
YouTube (https://www.youtube.com/@mobileappdevelopment4343)
Instagram (https://www.instagram.com/ahsanahmed_03/)

Trying MCP for the First Time — What Stood Out

demo

Introduction

I spent some time exploring the Model Context Protocol (MCP). Not a deep dive—just a hands-on attempt to understand how it actually works.

So I built a minimal client + server setup:
👉 https://github.com/an1meshk/claude-chat-cli

In a real-world project, we will build client and server separately; however, as this was just a demo project, everything was built in the same project

A few things stood out more than I expected.

Demo

demo

🧠 Context

The goal wasn’t to learn everything about MCP. It was to answer a simpler question:
How hard is it to actually build something with it?

Before moving further, here is a quick MCP client and server architecture diagram:
mcp architecture

⚙️ What I Tried

  • Went through the MCP intro course – link
  • Built a minimal client and server in Python using the course’s startup kit
  • Connected it to a simple CLI chat client that already came with the startup kit

Nothing complex—but enough to see how things fit together.

💡 What Stood Out

1. Setup Is Simpler Than Expected

I was expecting some heavy setup. But, instead:

  • Basic server setup was straightforward
  • The Python MCP library abstracts most of the complexity

👉 It felt closer to:
“Define a few handlers, and you’re up.”

than:

“learn a new framework.”

2. The Real Concept Is Context Flow

The interesting part wasn’t the server setup. It was understanding:

  • How context flows
  • How tools are exposed
  • How the model interacts with them

That’s where the mental shift is.

🧠 What Helped Me Understand It

This simple mental model made things click:

mcp sequence diagram

image credit Anthropic academy course

Client → MCP Server → Tool → Response → Client

  • Client sends a request
  • MCP server routes it
  • The tool executes logic
  • Exposing resources
  • Response flows back

Once this clicked, everything else made more sense

⚡ If You Want to Try It

The setup is intentionally minimal:

  • Basic MCP server using Python
  • A simple tool
  • CLI client to trigger it

That’s enough to understand the core idea

Repo:
https://github.com/an1meshk/claude-chat-cli

You will need an Anthropic API key, as this project uses Claude

⚙️ One More Thing That Helped

Project uses uv for dependency management. That helps in a few ways:

  • Fast installs
  • Clean environment setup
  • Minimal friction

It removes a lot of the usual setup overhead

⚠️ What I Haven’t Explored Yet

This was just a first pass. Still curious about:

  • Structuring tools cleanly
  • Scaling MCP servers
  • Real production use cases

🧠 Initial Take

My early impression:

  • MCP isn’t hard to start with
  • But the real value is in how you design interactions

The setup is easy.
The thinking is where the work is.

🏁 Final Thought

Sometimes the best way to understand a new concept is:
Build the simplest possible version of it

This was one of those cases.

If you have reached here, then I have made a satisfactory effort to keep you reading. Please be kind enough to leave any comments or share any corrections.

My Other Blogs:

IP adresses and Subnets

IP ADDRESS

In real life, let’s say you want to find a place or you want to reach a place you need to know the location or precisely the address of that place. Similarly in computers IP address is used to know or denote a particular computer that is connected under the same network. Basically, every node(device) connected under the same network has a unique address known as IP address.

Example of an IP address: 10.1.32.12
Each part has 8 bits and can store 0-255 values.

SUBNETS

In a large network, communication between different devices take too much time or is unnecessary. Here, Subnets helps separate or breakdown the network into different parts so that communication is easier and not unnecessary. Imagine in a college it has one Public IP(large network) here we use subnets for each block or department so that communication in the department is fast and effective.

How Subnets and IP address work

Every IP belongs to a subnet. Subnets tell you the number of ip’s or the the range of IP addresses that are available or fall under that subnet.
For example lets take an IP address: 192.168.1.10
There are always two parts in an IP address
-Network
-Host
Here 192.168.1 is network and 10 denotes host.
To know how many IP’s are stored for networks and host we use a method called CIDR(Classless Inter Domain Routing).
CIDR helps us to know how many devices one can connect under a subnet in an IP. The notation for CIDR is a.b.c.d/n

Example:10.1.32.12/24
Here, /24 means 256 devices can be connected and is stored for networks.

Your Pipeline Is 25.4h Behind: Catching Real Estate Sentiment Leads with Pulsebit

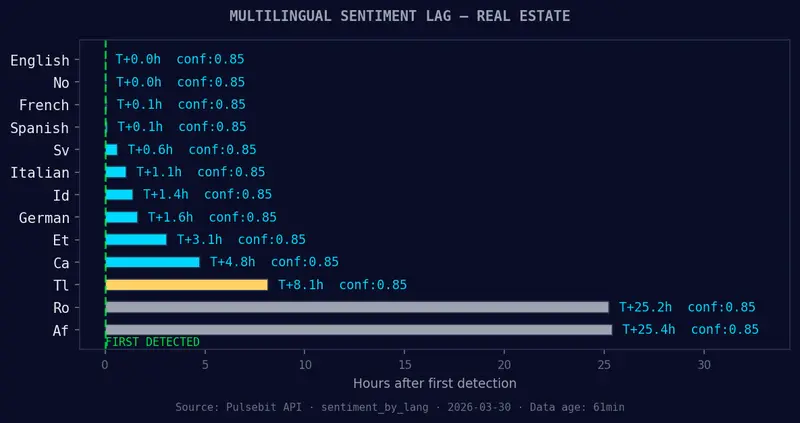
English coverage led by 25.4 hours. Af at T+25.4h. Confidenc

Your Pipeline Is 25.4h Behind: Catching Real Estate Sentiment Leads with Pulsebit

We recently discovered a compelling anomaly: a 24h momentum spike of +0.709 in the real estate sector. This spike isn’t just a number; it represents a significant shift in sentiment that could influence your decisions. The leading language fueling this spike is English, with a notable press cluster revolving around a report from ULI NWA on emerging trends in local real estate. With just one article triggering this movement, it’s clear that the narrative is forming and could shape broader market discussions.

The Problem

This spike reveals a structural gap in pipelines that don’t account for multilingual origins or entity dominance. If your model isn’t designed to handle these nuances, you missed this real estate sentiment shift by 25.4 hours. The dominant entity, NWA, released crucial insights into emerging trends, which could have informed your strategy. Your model’s blind spot to this specific English-language sentiment can lead to missed opportunities in a rapidly changing landscape.

English coverage led by 25.4 hours. Af at T+25.4h. Confidenc
English coverage led by 25.4 hours. Af at T+25.4h. Confidence scores: English 0.85, No 0.85, French 0.85 Source: Pulsebit /sentiment_by_lang.

The Code

To catch this momentum spike, we can leverage our API effectively. The first step is to filter for English-language content that is specifically relevant to the real estate topic. Here’s how to do that:

import requests

# Define the query parameters
params = {
    "topic": "real estate",
    "score": -0.066,
    "confidence": 0.85,
    "momentum": +0.709,
    "lang": "en"
}

# Make the API call
response = requests.get("https://api.pulsebit.com/v1/sentiment", params=params)
data = response.json()

![Left: Python GET /news_semantic call for 'real estate'. Righ](https://pub-c3309ec893c24fb9ae292f229e1688a6.r2.dev/figures/g3_code_output_split_1774896022349.png)
*Left: Python GET /news_semantic call for 'real estate'. Right: returned JSON response structure (clusters: 3). Source: Pulsebit /news_semantic.*


print(data)

Next, we need to score the narrative framing itself around the cluster reason string. This is crucial as it allows us to analyze how the themes interact with one another. The cluster reason string we’re working with is: “Clustered by shared themes: nwa, releases, ‘emerging, trends’, report.”. Here’s how to execute that:

# Define the narrative for sentiment scoring
narrative = "Clustered by shared themes: nwa, releases, ‘emerging, trends’, report."

# Make the POST request to score the narrative
response = requests.post("https://api.pulsebit.com/v1/sentiment", json={"text": narrative})
narrative_score = response.json()

print(narrative_score)

Three Builds Tonight

With this pattern in mind, here are three specific builds you can implement:

  1. Geo Filtered Alert System: Set up an alert that triggers whenever the momentum in real estate topics surpasses a specific threshold, say +0.5, with a geographic filter for English-speaking regions. Use the API to monitor sentiment shifts and notify your team for timely action.

Geographic detection output for real estate. India leads wit
Geographic detection output for real estate. India leads with 7 articles and sentiment -0.24. Source: Pulsebit /news_recent geographic fields.

   params = {
       "topic": "real estate",
       "momentum": "+0.5",
       "lang": "en"
   }
  1. Meta-Sentiment Analysis Dashboard: Create a dashboard that visualizes the meta-sentiment scores of clustered reports. This gives you insights not only into sentiment but also into the framing of narratives over time, enabling you to see how emerging trends are discussed.
   narrative = "Clustered by shared themes: nwa, releases, ‘emerging, trends’, report."
  1. Trend Prediction Model: Build a predictive model that utilizes the momentum spikes in real estate topics, combined with sentiment scores from related narratives. For instance, if the score exceeds +0.5 and forms around themes like “real estate” and “emerging,” alert your analysts.
   if momentum > +0.5 and "real estate" in narrative:
       trigger_alert()

Get Started

Ready to dive deeper? Check out our full documentation at pulsebit.lojenterprise.com/docs. You can copy-paste these examples and run them in under 10 minutes. Let’s harness the power of sentiment data to stay ahead of the curve!